warning light MITSUBISHI L200 2014 (in English) User Guide
[x] Cancel search | Manufacturer: MITSUBISHI, Model Year: 2014, Model line: L200, Model: MITSUBISHI L200 2014Pages: 362, PDF Size: 20.97 MB
Page 118 of 362
lIt is possible to activate the following func-
tions. For further information, we recom-
mend you to consult a MITSUBISHI
MOTORS Authorized Service Point. •Flashing of the turn-signal lamps and the
indication lamp in the instrument cluster
when the lever is operated with the igni-
tion switch in the “ACC” position
• Flashing of the turn-signal lamps and the
indication lamp in the instrument cluster
three times when you move the lever to
(2) slightly then release it
• The time required to operate the lever for
the 3-flash function can be adjusted.Hazard warning flasher switch E00506600903
Use the hazard warning flasher switch when the ve-
hicle has to be parked on the road for any emergency.
The hazard warning flashers can always be operat-
ed, regardless of the position of the ignition key.
Push the switch to turn on the hazard warning flash-
ers; push the switch again to turn them off.
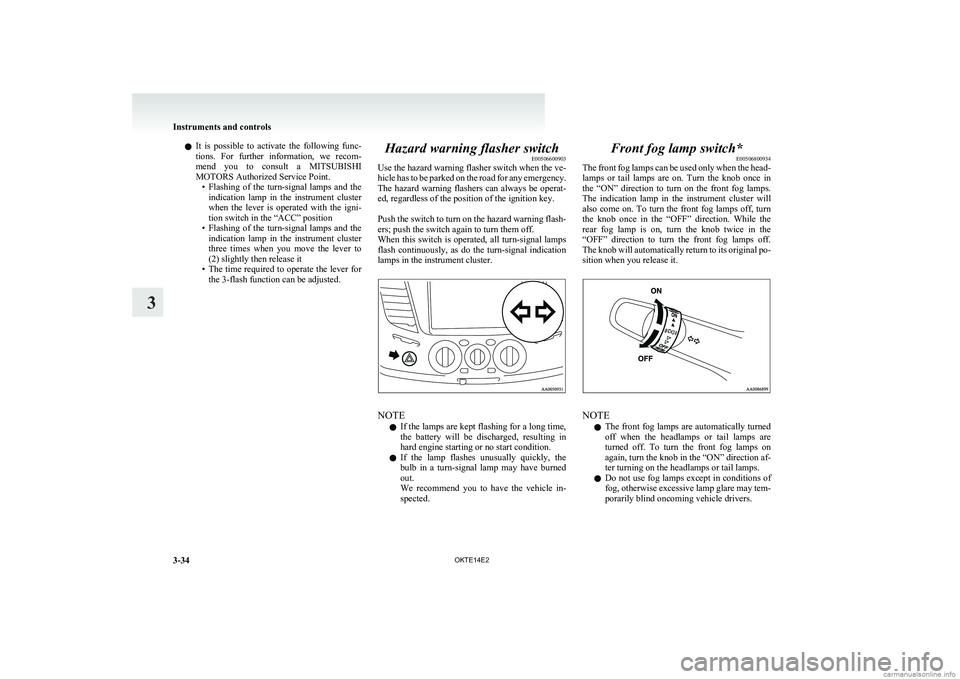
When this switch is operated, all turn-signal lamps
flash continuously, as do the turn-signal indication
lamps in the instrument cluster.
NOTE
l If the lamps are kept flashing for a long time,
the battery will be discharged, resulting in
hard engine starting or no start condition.
l If the lamp flashes unusually quickly, the
bulb in a turn-signal lamp may have burned
out.
We recommend you to have the vehicle in-
spected.
Front fog lamp switch* E00506800934
The front fog lamps can be used only when the head-
lamps or tail lamps are on. Turn the knob once in
the “ON” direction to turn on the front fog lamps.
The indication lamp in the instrument cluster will
also come on. To turn the front fog lamps off, turn
the knob once in the “OFF” direction. While the
rear fog lamp is on, turn the knob twice in the
“OFF” direction to turn the front fog lamps off.
The knob will automatically return to its original po-
sition when you release it.
NOTE
l The front fog lamps are automatically turned
off when the headlamps or tail lamps are
turned off. To turn the front fog lamps on
again, turn the knob in the “ON” direction af-
ter turning on the headlamps or tail lamps.
l Do not use fog lamps except in conditions of
fog, otherwise excessive lamp glare may tem-
porarily blind oncoming vehicle drivers.
Instruments and controls
3-34 OKTE14E2
3
Page 126 of 362
Economical drivingE00600100620
For economical driving, there are some technical re-
quirements that have to be met. The prerequisite
for low fuel consumption is a properly adjusted en-
gine. In order to achieve longer life of the vehicle
and the most economical operation, we recommend
you to have the vehicle checked at regular intervals
in accordance with the service standards.
Fuel economy and generation of exhaust gas and
noise are highly influenced by personal driving hab-
its as well as the particular operating conditions.
The following points should be observed in order
to minimize wear of brakes, tyres and engine as
well as to reduce environmental pollution.
Starting
Avoid rapid acceleration and sudden starts; such op-
eration will result in higher fuel consumption.
Shifting
Shift only at an appropriate speed and engine
speed. Always use the highest gear possible.
The transfer shift lever should be set to “2H” when
driving 4WD vehicles on normal roads and express
ways to obtain best possible fuel economy.
City traffic
Frequent starting and stopping increases the aver-
age fuel consumption. Use roads with smooth traf-
fic flow whenever possible. When driving on con-
gested roads, avoid use of a low gear at high en-
gine speeds.
Idling
The vehicle consumes fuel even during idling.
Avoid extended idling whenever possible.Speed
The higher the vehicle speed, the more fuel con-
sumed. Avoid driving at full speed. Even a slight re-
lease of the accelerator pedal will save a significant
amount of fuel.
Tyre inflation pressure
Check the tyre inflation pressures at regular inter-
vals. Low tyre inflation pressure increases road re-
sistance and fuel consumption. In addition, low
tyre pressures adversely affect tyre wear and driv-
ing stability.
Load
Do not drive with unnecessary articles in the cargo
area. Especially during city driving where frequent
starting and stopping is necessary, the increased
weight of the vehicle will greatly affect fuel con-
sumption.
Cold engine starting
Starting of a cold engine consumes more fuel.
Unnecessary fuel consumption is also caused by
keeping a hot engine running. After the engine is
started, commence driving as soon as possible.
Air conditioning*
The use of the air conditioning will increase the
fuel consumption.Driving, alcohol and drugs E00600200012
Driving after drinking alcohol is one of the most fre-
quent causes of accidents.
Your driving ability can be seriously impaired even
with blood alcohol levels far below the legal mini-
mum. If you have been drinking, don’t drive. Ride
with a designated non-drinking driver, call a cab or
a friend, or use public transportation.
Drinking coffee or taking a cold shower will not
make you sober.
Similarly, prescription and nonprescription drugs af-
fect your alertness, perception and reaction time.
Consult with your doctor or pharmacist before driv-
ing while under the influence of any of these medi-
cations.WARNINGl NEVER DRINK AND DRIVE.
Your perceptions are less accurate, your
reflexes are slower and your judgment is
impaired.
Starting and driving
4-02 OKTE14E2
4
Page 130 of 362
Parking brakeE00600501562
To park the vehicle, first bring it to a complete
stop, fully engage the parking brake, and then
move the gearshift lever to 1 st
(on an uphill) or Re-
verse (on a downhill) position for vehicles with man-
ual transmission or set the selector lever to “P”
(PARK) position on automatic transmission vehi-
cles.CAUTIONl Before driving, be sure that the parking
brake is fully released and brake warning
lamp is off.
If a vehicle is driven without releasing the
parking brake, the brake will be overhea-
ted, resulting in ineffective braking and
possible brake failure.
l When you intend to apply the parking
brake, firmly press the brake pedal to
bring the vehicle to a complete stop be-
fore pulling the parking brake lever. Pull-
ing the parking brake lever with the vehi-
cle moving could make the rear wheels
lock up, thereby making the vehicle unsta-
ble. It could also make the parking brake
malfunction.
l If the brake warning lamp does not extin-
guish when the parking brake is fully re-
leased, the brake system may be abnormal.
Have your vehicle checked immediately.
For details, refer to “Brake warning
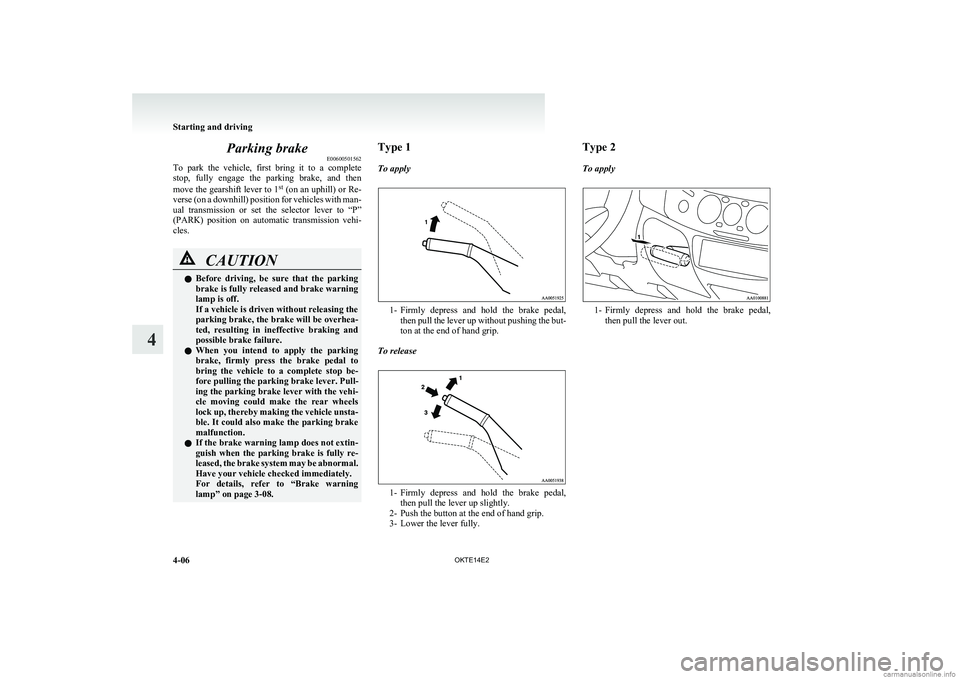
lamp” on page 3-08.Type 1
To apply
1- Firmly depress and hold the brake pedal,
then pull the lever up without pushing the but-
ton at the end of hand grip.
To release
1- Firmly depress and hold the brake pedal,
then pull the lever up slightly.
2- Push the button at the end of hand grip.
3- Lower the lever fully.
Type 2
To apply
1- Firmly depress and hold the brake pedal,
then pull the lever out.
Starting and driving
4-06 OKTE14E2
4
Page 131 of 362
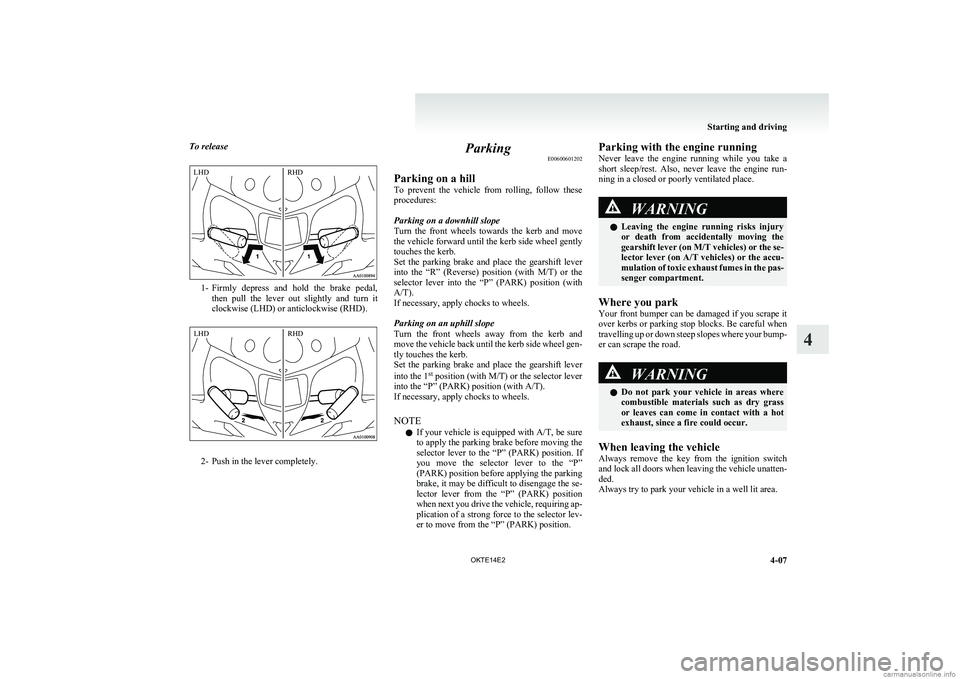
To release
1-Firmly depress and hold the brake pedal,
then pull the lever out slightly and turn it
clockwise (LHD) or anticlockwise (RHD).
2- Push in the lever completely.
Parking E00600601202
Parking on a hill
To prevent the vehicle from rolling, follow these
procedures:
Parking on a downhill slope
Turn the front wheels towards the kerb and move
the vehicle forward until the kerb side wheel gently
touches the kerb.
Set the parking brake and place the gearshift lever
into the “R” (Reverse) position (with M/T) or the
selector lever into the “P” (PARK) position (with
A/T).
If necessary, apply chocks to wheels.
Parking on an uphill slope
Turn the front wheels away from the kerb and
move the vehicle back until the kerb side wheel gen-
tly touches the kerb.
Set the parking brake and place the gearshift lever
into the 1 st
position (with M/T) or the selector lever
into the “P” (PARK) position (with A/T).
If necessary, apply chocks to wheels.
NOTE l If your vehicle is equipped with
A/T, be sure
to apply the parking brake before moving the
selector lever to the “P” (PARK) position. If
you move the selector lever to the “P”
(PARK) position before applying the parking
brake, it may be difficult to disengage the se-
lector lever from the “P” (PARK) position
when next you drive the vehicle, requiring ap-
plication of a strong force to the selector lev-
er to move from the “P” (PARK) position.Parking with the engine running
Never leave the engine running while you take a
short sleep/rest. Also, never leave the engine run-
ning in a closed or poorly ventilated place.WARNINGl Leaving the engine running risks injury
or death from accidentally moving the
gearshift lever (on M/T vehicles) or the se-
lector lever (on A/T vehicles) or the accu-
mulation of toxic exhaust fumes in the pas-
senger compartment.
Where you park
Your front bumper can be damaged if you scrape it
over kerbs or parking stop blocks. Be careful when
travelling up or down steep slopes where your bump-
er can scrape the road.
WARNINGl Do not park your vehicle in areas where
combustible materials such as dry grass
or leaves can come in contact with a hot
exhaust, since a fire could occur.
When leaving the vehicle
Always remove the key from the ignition switch
and lock all doors when leaving the vehicle unatten-
ded.
Always try to park your vehicle in a well lit area.
Starting and driving
4-07
OKTE14E2
4LHD RHD LHD RHD
Page 133 of 362
Outside rear-view mirrorsE00600900149To adjust the mirror position E00601000482WARNINGlDo not attempt to adjust the rear-view
mirrors while driving. This can be danger-
ous.
Always adjust the mirrors before driving.
l Your vehicle is equipped with convex
type mirrors.
Please take into consideration, that ob-
jects you see in the mirror will look small-
er and farther away compared to a nor-
mal flat mirror.
Do not use this mirror to estimate dis-
tance of following vehicles when changing
lanes.
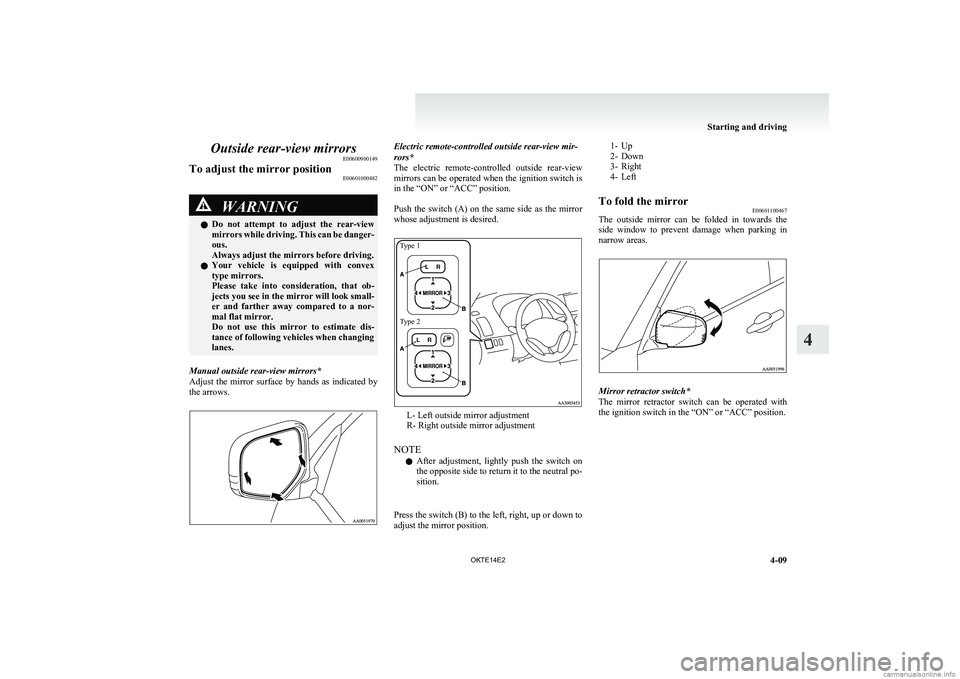
Manual outside rear-view mirrors*
Adjust the mirror surface by hands as indicated by
the arrows.
Electric remote-controlled outside rear-view mir-
rors*
The electric remote-controlled outside rear-view
mirrors can be operated when the ignition switch is
in the “ON” or “ACC” position.
Push the switch (A) on the same side as the mirror
whose adjustment is desired.Type 1Type 2
L- Left outside mirror adjustment
R- Right outside mirror adjustment
NOTE l After adjustment, lightly push the switch on
the opposite side to return it to the neutral po-
sition.
Press the switch (B) to the left, right, up or down to
adjust the mirror position.
1- Up
2- Down
3- Right
4- LeftTo fold the mirror E00601100467
The outside mirror can be folded in towards the
side window to prevent damage when parking in
narrow areas.
Mirror retractor switch*
The mirror retractor switch can be operated with
the ignition switch in the “ON” or “ACC” position.
Starting and driving
4-09
OKTE14E2
4
Page 136 of 362
Steering wheel lockE00601500227
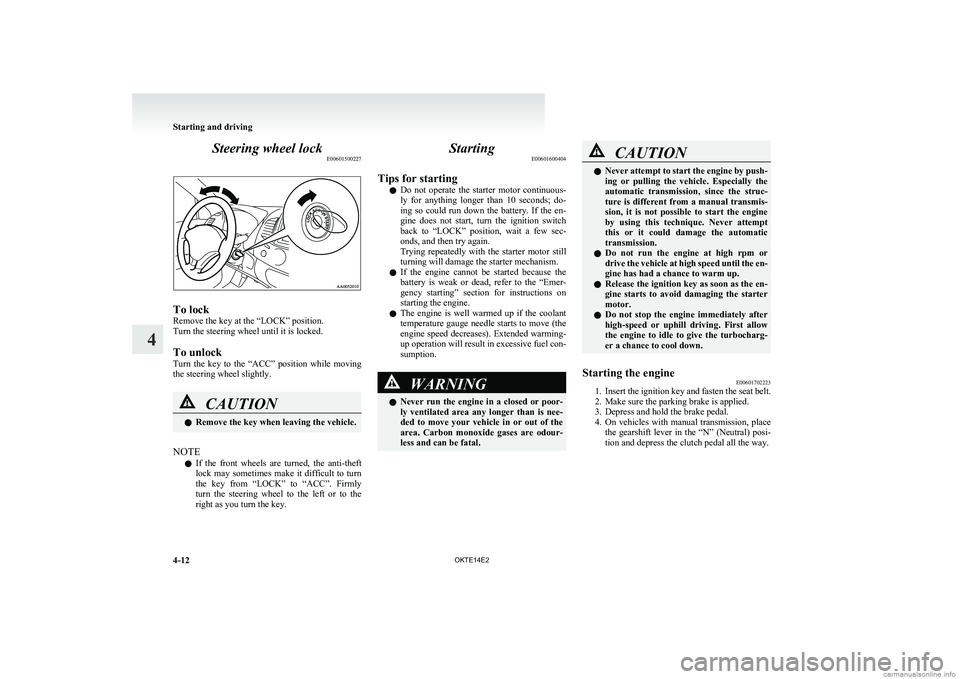
To lock
Remove the key at the “LOCK” position.
Turn the steering wheel until it is locked.
To unlock
Turn the key to the “ACC” position while moving
the steering wheel slightly.
CAUTIONl Remove the key when leaving the vehicle.
NOTE
l If the front wheels are turned, the anti-theft
lock may sometimes make it difficult to turn
the key from “LOCK” to “ACC”. Firmly
turn the steering wheel to the left or to the
right as you turn the key.
Starting E00601600404
Tips for starting l Do not operate the starter motor continuous-
ly for anything longer than 10 seconds; do-
ing so could run down the battery. If the en-
gine does not start, turn the ignition switch
back to “LOCK” position, wait a few sec-
onds, and then try again.
Trying repeatedly with the starter motor still
turning will damage the starter mechanism.
l If the engine cannot be started because the
battery is weak or dead, refer to the “Emer-
gency starting” section for instructions on
starting the engine.
l The engine is well warmed up if the coolant
temperature gauge needle starts to move (the
engine speed decreases). Extended warming-
up operation will result in excessive fuel con-
sumption.WARNINGl Never run the engine in a closed or poor-
ly ventilated area any longer than is nee-
ded to move your vehicle in or out of the
area. Carbon monoxide gases are odour-
less and can be fatal.CAUTIONl Never attempt to start the engine by push-
ing or pulling the vehicle. Especially the
automatic transmission, since the struc-
ture is different from a manual transmis-
sion, it is not possible to start the engine
by using this technique. Never attempt
this or it could damage the automatic
transmission.
l Do not run the engine at high rpm or
drive the vehicle at high speed until the en-
gine has had a chance to warm up.
l Release the ignition key as soon as the en-
gine starts to avoid damaging the starter
motor.
l Do not stop the engine immediately after
high-speed or uphill driving. First allow
the engine to idle to give the turbocharg-
er a chance to cool down.Starting the engine E00601702223
1.Insert the ignition key and fasten the seat belt.
2. Make sure the parking brake is applied.
3. Depress and hold the brake pedal.
4. On vehicles with manual transmission, place
the gearshift lever in the “N” (Neutral) posi-
tion and depress the clutch pedal all the way.
Starting and driving
4-12 OKTE14E2
4
Page 137 of 362
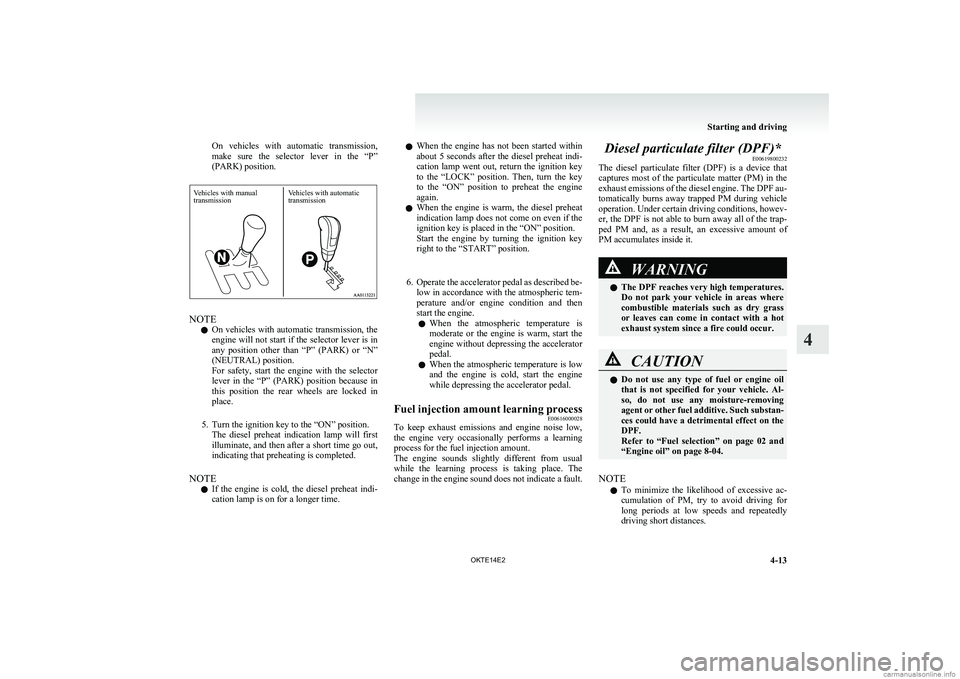
On vehicles with automatic transmission,
make sure the selector lever in the “P”
(PARK) position.
NOTE
l On vehicles with automatic transmission, the
engine will not start if the selector lever is in
any position other than “P” (PARK) or “N”
(NEUTRAL) position.
For safety, start the engine with the selector
lever in the “P” (PARK) position because in
this position the rear wheels are locked in
place.
5. Turn the ignition key to the “ON” position. The diesel preheat indication lamp will first
illuminate, and then after a short time go out,
indicating that preheating is completed.
NOTE l If the engine is cold, the diesel preheat indi-
cation lamp is on for a longer time.
l When the engine has not been started within
about 5 seconds after the diesel preheat indi-
cation lamp went out, return the ignition key
to the “LOCK” position. Then, turn the key
to the “ON” position to preheat the engine
again.
l When the engine is warm, the diesel preheat
indication lamp does not come on even if the
ignition key is placed in the “ON” position.
Start the engine by turning the ignition key
right to the “START” position.
6. Operate the accelerator pedal as described be-
low in accordance with the atmospheric tem-
perature and/or engine condition and then
start the engine.
l When the atmospheric temperature is
moderate or the engine is warm, start the
engine without depressing the accelerator
pedal.
l When the atmospheric temperature is low
and the engine is cold, start the engine
while depressing the accelerator pedal.Fuel injection amount learning process E00616000028
To keep exhaust emissions and engine noise low,
the engine very occasionally performs a learning
process for the fuel injection amount.
The engine sounds slightly different from usual
while the learning process is taking place. The
change in the engine sound does not indicate a fault.
Diesel particulate filter (DPF)* E00619800232
The diesel particulate filter (DPF) is a device that
captures most of the particulate matter (PM) in the
exhaust emissions of the diesel engine. The DPF au-
tomatically burns away trapped PM during vehicle
operation. Under certain driving conditions, howev-
er, the DPF is not able to burn away all of the trap-
ped PM and, as a result, an excessive amount of
PM accumulates inside it.WARNINGl The DPF reaches very high temperatures.
Do not park your vehicle in areas where
combustible materials such as dry grass
or leaves can come in contact with a hot
exhaust system since a fire could occur.CAUTIONl Do not use any type of fuel or engine oil
that is not specified for your vehicle. Al-
so, do not use any moisture-removing
agent or other fuel additive. Such substan-
ces could have a detrimental effect on the
DPF.
Refer to “Fuel selection” on page 02 and
“Engine oil” on page 8-04.
NOTE
l To minimize the likelihood of excessive ac-
cumulation of PM, try to avoid driving for
long periods at low speeds and repeatedly
driving short distances.
Starting and driving
4-13
OKTE14E2
4Vehicles with manual transmissionVehicles with automatictransmission
Page 159 of 362
WARNINGlWhen attempting to rock your vehicle out
of a stuck position, be sure that the area
around the vehicle is clear of people and
physical objects. The rocking motion may
cause the vehicle to suddenly launch for-
ward or backward, causing injury or dam-
age to nearby people or objects.
NOTE
l Avoid sudden braking, acceleration, and turn-
ing; such operations could result in the vehi-
cle becoming stuck.
l If the vehicle becomes stuck in sandy or mud-
dy roads, it can often be moved a rocking mo-
tion. Move the selector lever rhythmically be-
tween the “D” (DRIVE) and “R” (RE-
VERSE) position (with M/T, between 1 st
and
Reverse), while applying slight pressure to
the accelerator pedal.
l It is recommended to start the vehicle with
parking brake partially, but not completely,
applied by slightly pulling the parking brake
lever.
After the vehicle has become free, do not for-
get to release the parking brake.
l If it is necessary to drive in extremely muddy
conditions, the use of tyre chains is recom-
mended. Because the extent of muddy condi-
tions is difficult to judge and the vehicle
could become bogged down very deeply, op-
eration should be at a low speed. If possible,
get out of the vehicle and check the condi-
tions ahead before proceeding.
l Driving over roads in coastal areas or roads
on which anti-skid preparations have been
spread can cause rust on the vehicle; wash
the vehicle thoroughly as soon as possible af-
ter such use.
Climbing sharp grades
Set the transfer shift lever to “4L” position (easy se-
lect 4WD), “4LLc” position (super select 4WD) to
maximize the engine torque.WARNINGl Go straight up. Do not try to traverse
across a steep slope.
l If you begin to lose traction, ease off the
accelerator pedal and gently turn the
steering wheel alternatively left and right
to regain adequate traction again.
NOTE
l Choose as smooth a slope as possible with
few stones or other obstacles.
l Before attempting to drive up the slope, walk
up it to confirm that the vehicle can handle
the grade.
Descending sharp grades
Set the transfer shift lever to “4L” position (easy se-
lect 4WD), “4LLc” position (super select 4WD),
use the engine brake (downshifting) and descend
slowly.
WARNINGl Avoid snaking down a sharp grade. De-
scend the grade as straight as possible.
NOTE
l When descending a sharp grade, if the brakes
are applied suddenly because of an obstacle
encountered, control of the vehicle could be
lost. Before descending the slope, walk down
it and confirm the path.
l Before descending a grade, it is necessary to
choose the appropriate gear. Avoid changing
gears or depressing the clutch while descend-
ing the grade.
l MITSUBISHI
MOTORS is not responsible
to the operator for any damage or injury
caused or liability incurred by improper and
negligent operation of a vehicle. All techni-
ques of vehicle operation described herein de-
pend on the skill and experience of the opera-
tor and other participating parties and any de-
viation from the recommended operation in-
structions above is at their own risk.
Turning sharp corners
When turning a sharp corner in “4H” or “4L” posi-
tion (easy select 4WD), “4HLc” or “4LLc” posi-
tion (super select 4WD) at low speed, a slight dif-
ference in steering may be experienced similar to
as if the brakes were applied. This is called tight cor-
ner braking and results from each of the 4 tyres be-
ing at a different distance from the corner.
The phenomenon is peculiar to 4-wheel drive vehi-
cles. If this occurs, either straighten the steering
wheel, or change to rear-wheel drive.
Starting and driving
4-35
OKTE14E2
4
Page 161 of 362
CAUTIONlAlways use tyres of the same size, same
type, and same brand, and which have no
wear differences. Using tyres of different
size, type, brands or degree of wear, will
increase the differential oil temperature,
resulting in possible damage to the driv-
ing system. Further, the drive train will
be subjected to excessive loading, possibly
leading to oil leakage, component seizure,
or other serious faults.
Towing
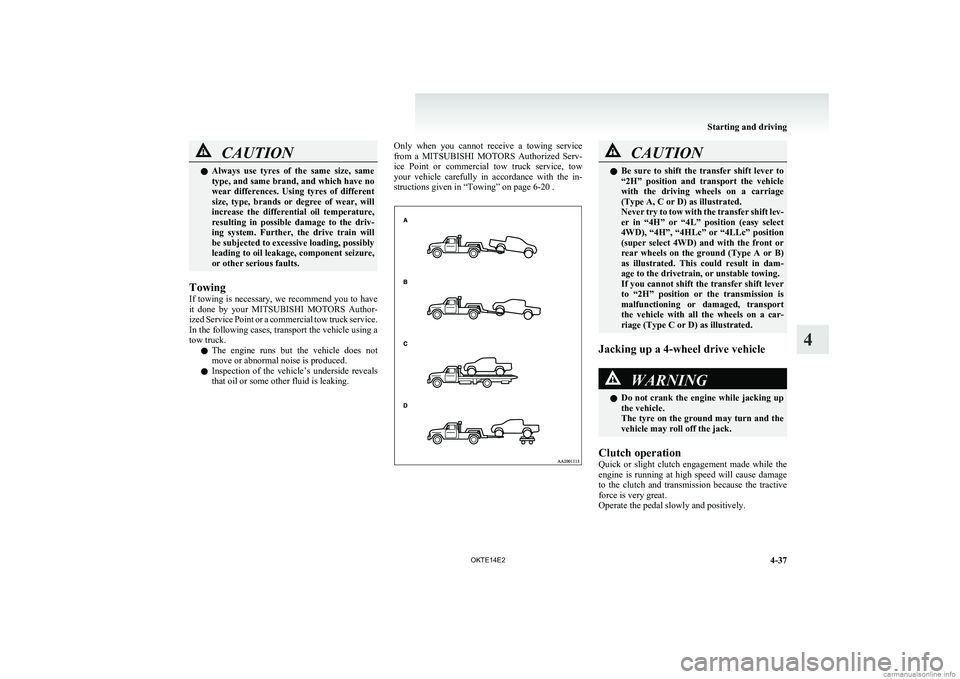
If towing is necessary, we recommend you to have
it done by your MITSUBISHI MOTORS Author-
ized Service Point or a commercial tow truck service.
In the following cases, transport the vehicle using a
tow truck.
l The engine runs but the vehicle does not
move or abnormal noise is produced.
l Inspection of the vehicle’s underside reveals
that oil or some other fluid is leaking.
Only when you cannot receive a towing service
from a MITSUBISHI MOTORS Authorized Serv-
ice Point or commercial tow truck service, tow
your vehicle carefully in accordance with the in-
structions given in “Towing” on page 6-20 .CAUTIONl Be sure to shift the transfer shift lever to
“2H” position and transport the vehicle
with the driving wheels on a carriage
(Type A, C or D) as illustrated.
Never try to tow with the transfer shift lev-
er in “4H” or “4L” position (easy select
4WD), “4H”, “4HLc” or “4LLc” position
(super select 4WD) and with the front or
rear wheels on the ground (Type A or B)
as illustrated. This could result in dam-
age to the drivetrain, or unstable towing.
If you cannot shift the transfer shift lever
to “2H” position or the transmission is
malfunctioning or damaged, transport
the vehicle with all the wheels on a car-
riage (Type C or D) as illustrated.
Jacking up a 4-wheel drive vehicle
WARNINGl Do not crank the engine while jacking up
the vehicle.
The tyre on the ground may turn and the
vehicle may roll off the jack.
Clutch operation
Quick or slight clutch engagement made while the
engine is running at high speed will cause damage
to the clutch and transmission because the tractive
force is very great.
Operate the pedal slowly and positively.
Starting and driving
4-37
OKTE14E2
4
Page 162 of 362
Limited-slip differential*E00606900037
A limited-slip differential is applied for the rear
wheel differential only. The features of this limited-
slip differential are described below:
Just as with a conventional differential, the wheel
on one side is allowed to turn at a different speed
from the wheel on the other side when the vehicle
is cornering. The difference between the limited-
slip differential and a conventional differential is
that if the wheel on one side of the vehicle loses trac-
tion, a greater amount of torque is applied to the
wheel on the other side to improve traction.
NOTE l Even if there is a difference in the amount of
traction the wheels can get, if both of them
are spinning, the limited-slip differential will
not be effective.CAUTIONl Never start the engine while one of the
rear wheels is jacked up and the other in
contact with the ground; doing so may
cause the vehicle to jump forward.
l When attempting to extract the vehicle
from snow, mud, etc., and the engine is
run continuously at high speed, the limi-
ted-slip differential will be adversely af-
fected.Braking E00607001928
All the parts of the brake system are critical to safe-
ty. We recommend you to have the vehicle
checked at regular intervals according to the serv-
ice booklet.CAUTIONl Avoid driving habits that cause heavy
braking and never “ride” the brakes by
resting your foot on the brake pedal
while driving.
It causes brake overheating and fade.
Brake system
The service brake is divided into two brake cir-
cuits. And your vehicle is equipped with power
brakes. If one brake circuit fails, the other is availa-
ble to stop the vehicle. If you should lose the pow-
er assist for some reason, the brakes will still work.
In these situations, even if the brake pedal moves
down to the very end of its possible stroke or re-
sists being depressed, keep depressing the brake ped-
al down harder and further than usual; stop driving
as soon as possible and have the brake system re-
paired.
WARNINGl Do not turn off the engine while your ve-
hicle is in motion. If you turn off the en-
gine while driving, the power assistance
for the braking system will stop working
and your brakes will not work effectively.WARNINGl If the power assist is lost or if either
brake hydraulic system stops working
properly, have your vehicle checked im-
mediately.
Warning lamp
The brake warning lamp illuminates to indicate a
fault in the braking system. Refer to “Brake warn-
ing lamp” on page 3-08.
When brakes are wet
Check the brake system while driving at a low
speed immediately after starting, especially when
the brakes are wet, to confirm they work normally.
A film of water can be formed on the brake discs
or brake drums and prevent normal braking after
driving in heavy rain or through large puddles, or
after the vehicle is washed. If this occurs, dry the
brakes out by driving slowly while lightly depress-
ing the brake pedal.
When driving downhill
It is important to take advantage of the engine brak-
ing by shifting to a lower shift position while driv-
ing on steep downhill roads in order to prevent the
brakes from overheating.
Starting and driving
4-38 OKTE14E2
4