buttons MITSUBISHI L200 2015 Owner's Manual (in English)
[x] Cancel search | Manufacturer: MITSUBISHI, Model Year: 2015, Model line: L200, Model: MITSUBISHI L200 2015Pages: 418, PDF Size: 25.8 MB
Page 99 of 418
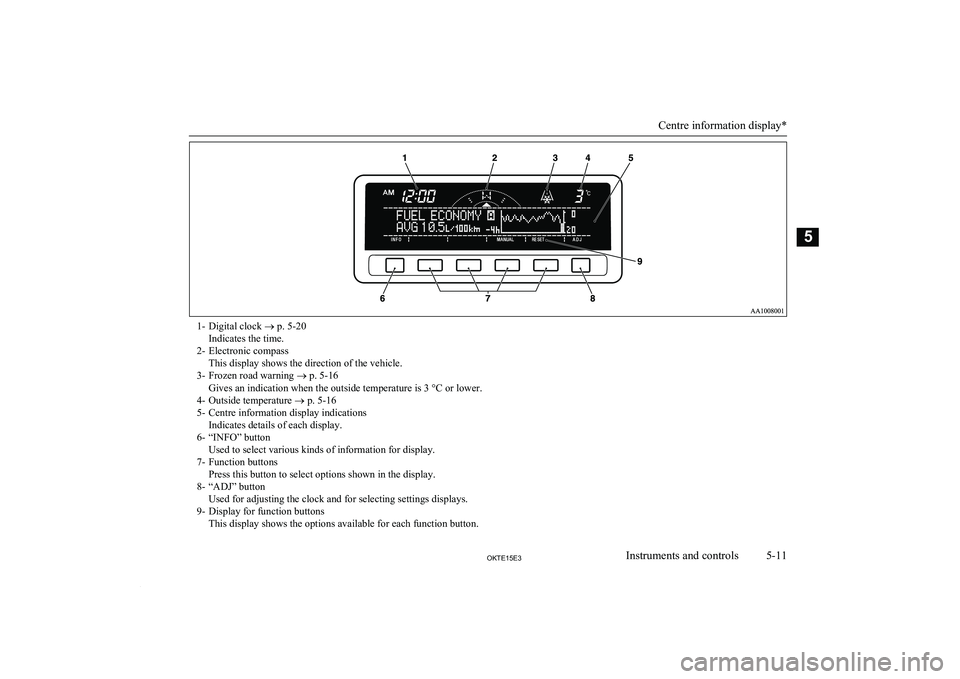
1- Digital clock ® p. 5-20
Indicates the time.
2- Electronic compass This display shows the direction of the vehicle.
3- Frozen road warning ® p. 5-16
Gives an indication when the outside temperature is 3 °C or lower.
4- Outside temperature ® p. 5-16
5- Centre information display indications Indicates details of each display.
6- “INFO” button Used to select various kinds of information for display.
7- Function buttons Press this button to select options shown in the display.
8- “ADJ” button Used for adjusting the clock and for selecting settings displays.
9- Display for function buttons This display shows the options available for each function button.
Centre information display*
5-11OKTE15E3Instruments and controls5
Page 107 of 418
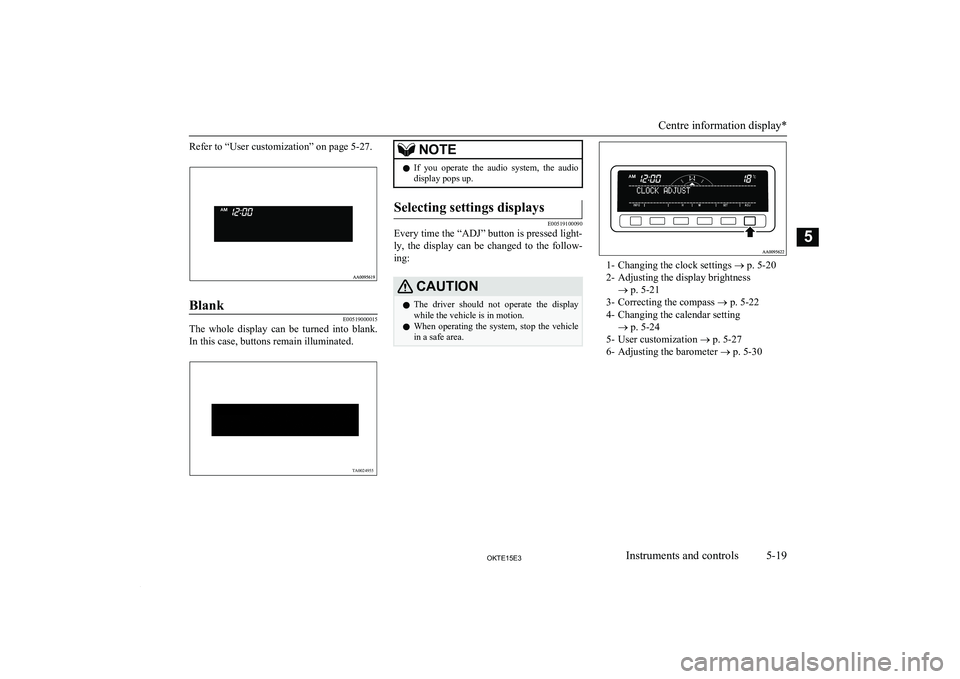
Refer to “User customization” on page 5-27.Blank
E00519000015
The whole display can be turned into blank.
In this case, buttons remain illuminated.
NOTEl If you operate the audio system, the audio
display pops up.Selecting settings displays
E00519100090
Every time the “ADJ” button is pressed light-
ly, the display can be changed to the follow-ing:
CAUTIONl The driver should not operate the display
while the vehicle is in motion.
l When operating the system, stop the vehicle
in a safe area.
1- Changing the clock settings ® p. 5-20
2- Adjusting the display brightness ® p. 5-21
3- Correcting the compass ® p. 5-22
4- Changing the calendar setting ® p. 5-24
5- User customization ® p. 5-27
6- Adjusting the barometer ® p. 5-30
Centre information display*
5-19OKTE15E3Instruments and controls5 TA0024955
Page 108 of 418
Changing the clock settings
E00519200121
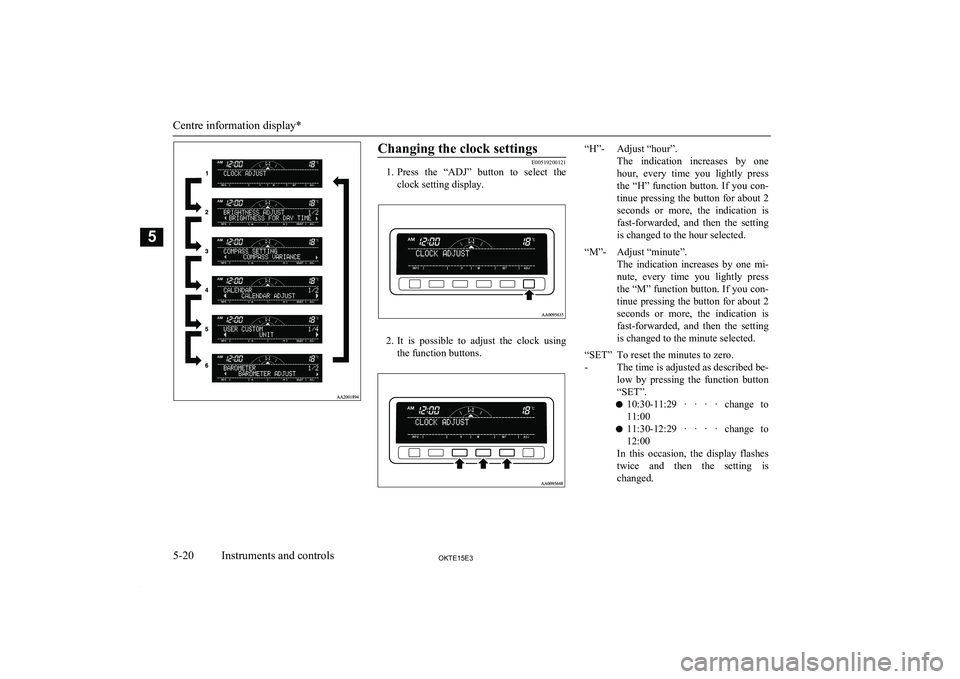
1. Press the “ADJ” button to select the
clock setting display.
2. It is possible to adjust the clock using
the function buttons.
“H”-Adjust “hour”.
The indication increases by one
hour, every time you lightly press the “H” function button. If you con-tinue pressing the button for about 2 seconds or more, the indication is fast-forwarded, and then the settingis changed to the hour selected.“M”-Adjust “minute”.
The indication increases by one mi-
nute, every time you lightly press
the “M” function button. If you con- tinue pressing the button for about 2 seconds or more, the indication is fast-forwarded, and then the settingis changed to the minute selected.“SET”
-To reset the minutes to zero.
The time is adjusted as described be-
low by pressing the function button
“SET”.
l 10:30-11:29 · · · · change to
11:00
l 11:30-12:29 · · · · change to
12:00
In this occasion, the display flashes twice and then the setting is changed.
Centre information display*
5-20OKTE15E3Instruments and controls5
Page 109 of 418
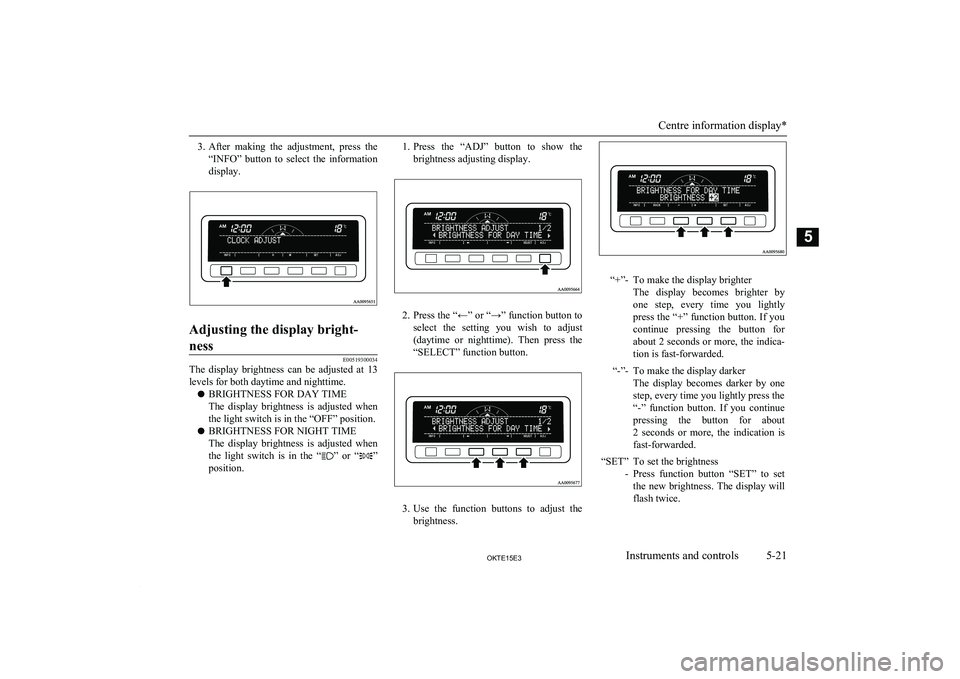
3.After making the adjustment, press the
“INFO” button to select the information display.Adjusting the display bright-
ness
E00519300034
The display brightness can be adjusted at 13
levels for both daytime and nighttime.
l BRIGHTNESS FOR DAY TIME
The display brightness is adjusted when the light switch is in the “OFF” position.
l BRIGHTNESS FOR NIGHT TIME
The display brightness is adjusted when the light switch is in the “
” or “”
position.
1. Press the “ADJ” button to show the
brightness adjusting display.
2. Press the “←” or “→” function button to
select the setting you wish to adjust (daytime or nighttime). Then press the
“SELECT” function button.
3. Use the function buttons to adjust the
brightness.
“+”-To make the display brighter
The display becomes brighter by one step, every time you lightly
press the “+” function button. If you
continue pressing the button for
about 2 seconds or more, the indica- tion is fast-forwarded.“-”-To make the display darker
The display becomes darker by one step, every time you lightly press the
“-” function button. If you continue pressing the button for about
2 seconds or more, the indication is fast-forwarded.“SET” -To set the brightness
Press function button “SET” to set
the new brightness. The display will flash twice.
Centre information display*
5-21OKTE15E3Instruments and controls5
Page 113 of 418
Date setting
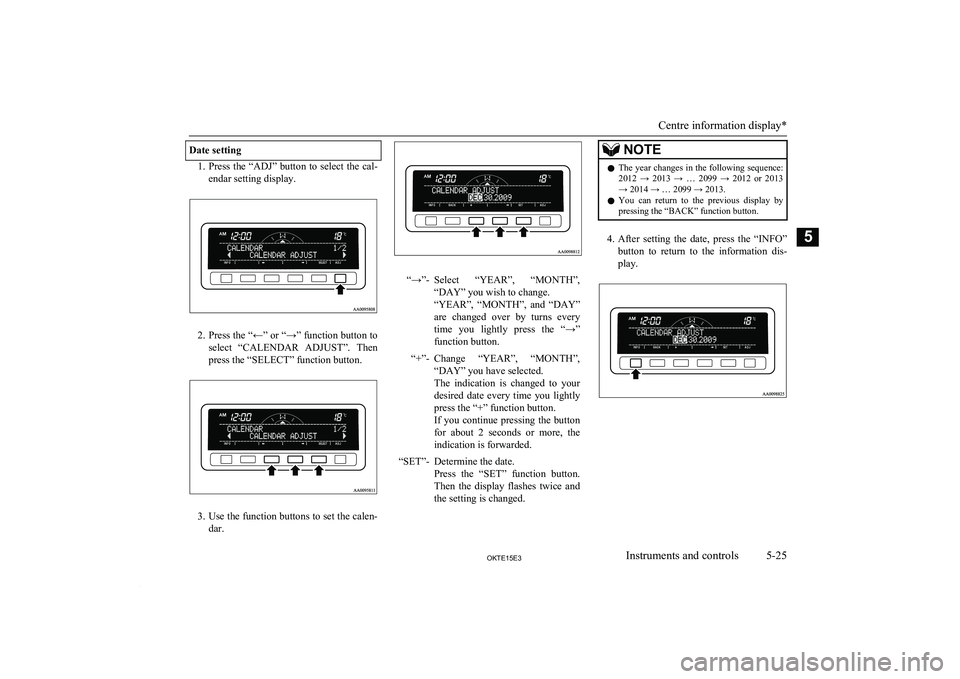
1.Press the “ADJ” button to select the cal-
endar setting display.
2. Press the “←” or “→” function button to
select “CALENDAR ADJUST”. Then press the “SELECT” function button.
3. Use the function buttons to set the calen-
dar.
“→”-Select “YEAR”, “MONTH”,
“DAY” you wish to change.
“YEAR”, “MONTH”, and “DAY”
are changed over by turns every time you lightly press the “→”
function button.“+”-Change “YEAR”, “MONTH”, “DAY” you have selected.
The indication is changed to your
desired date every time you lightly
press the “+” function button.
If you continue pressing the button
for about 2 seconds or more, the indication is forwarded.“SET”-Determine the date.
Press the “SET” function button.
Then the display flashes twice and the setting is changed.NOTEl The year changes in the following sequence:
2012 → 2013 → … 2099 → 2012 or 2013
→ 2014 → … 2099 → 2013.
l You can return to the previous display by
pressing the “BACK” function button.
4. After setting the date, press the “INFO”
button to return to the information dis- play.
Centre information display*
5-25OKTE15E3Instruments and controls5
Page 119 of 418
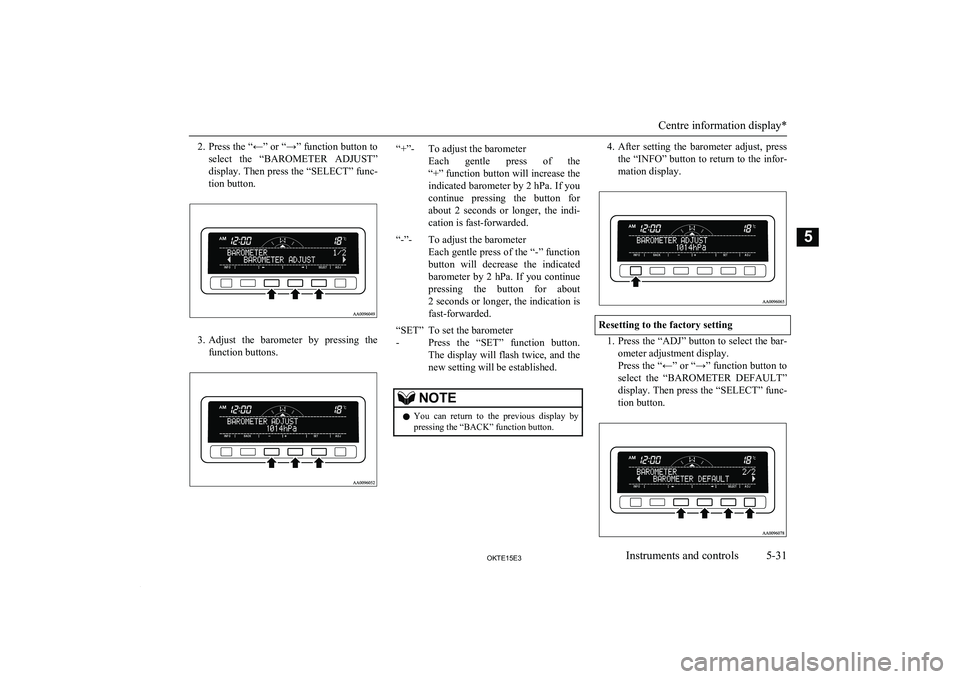
2.Press the “←” or “→” function button to
select the “BAROMETER ADJUST” display. Then press the “SELECT” func-
tion button.
3. Adjust the barometer by pressing the
function buttons.
“+”-To adjust the barometer
Each gentle press of the
“+” function button will increase the
indicated barometer by 2 hPa. If you
continue pressing the button for
about 2 seconds or longer, the indi-
cation is fast-forwarded.“-”-To adjust the barometer
Each gentle press of the “-” function
button will decrease the indicated
barometer by 2 hPa. If you continue pressing the button for about 2 seconds or longer, the indication is
fast-forwarded.“SET”
-To set the barometer
Press the “SET” function button.
The display will flash twice, and the
new setting will be established.NOTEl You can return to the previous display by
pressing the “BACK” function button.4. After setting the barometer adjust, press
the “INFO” button to return to the infor-
mation display.
Resetting to the factory setting
1. Press the “ADJ” button to select the bar-
ometer adjustment display.
Press the “←” or “→” function button to select the “BAROMETER DEFAULT”display. Then press the “SELECT” func-
tion button.
Centre information display*
5-31OKTE15E3Instruments and controls5
Page 209 of 418
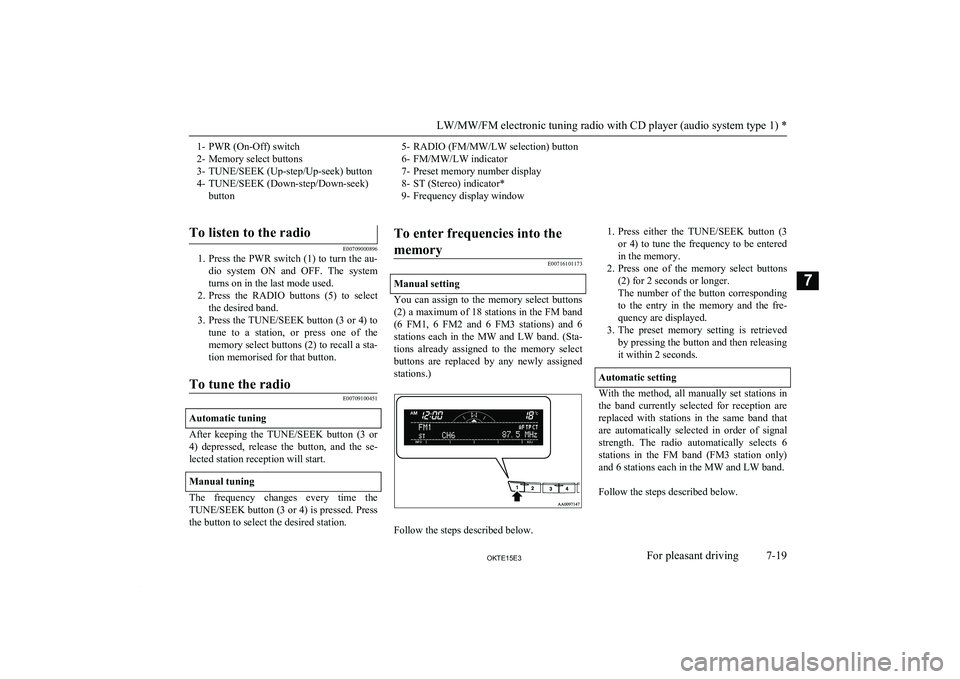
1- PWR (On-Off) switch
2- Memory select buttons
3- TUNE/SEEK (Up-step/Up-seek) button
4- TUNE/SEEK (Down-step/Down-seek) button5- RADIO (FM/MW/LW selection) button
6- FM/MW/LW indicator
7- Preset memory number display
8- ST (Stereo) indicator*
9- Frequency display window
To listen to the radio
E00709000896
1. Press the PWR switch (1) to turn the au-
dio system ON and OFF. The system turns on in the last mode used.
2. Press the RADIO buttons (5) to select
the desired band.
3. Press the TUNE/SEEK button (3 or 4) to
tune to a station, or press one of the memory select buttons (2) to recall a sta-
tion memorised for that button.
To tune the radio
E00709100451
Automatic tuning
After keeping the TUNE/SEEK button (3 or 4) depressed, release the button, and the se-
lected station reception will start.
Manual tuning
The frequency changes every time the TUNE/SEEK button (3 or 4) is pressed. Press
the button to select the desired station.
To enter frequencies into the
memory
E00716101173
Manual setting
You can assign to the memory select buttons (2) a maximum of 18 stations in the FM band
(6 FM1, 6 FM2 and 6 FM3 stations) and 6 stations each in the MW and LW band. (Sta-
tions already assigned to the memory select buttons are replaced by any newly assigned stations.)
Follow the steps described below.
1. Press either the TUNE/SEEK button (3
or 4) to tune the frequency to be entered in the memory.
2. Press one of the memory select buttons
(2) for 2 seconds or longer.
The number of the button corresponding to the entry in the memory and the fre-
quency are displayed.
3. The preset memory setting is retrieved
by pressing the button and then releasing
it within 2 seconds.
Automatic setting
With the method, all manually set stations in
the band currently selected for reception are
replaced with stations in the same band that are automatically selected in order of signalstrength. The radio automatically selects 6
stations in the FM band (FM3 station only)
and 6 stations each in the MW and LW band.
Follow the steps described below.
LW/MW/FM electronic tuning radio with CD player (audio system type 1) *
7-19OKTE15E3For pleasant driving7
Page 210 of 418
1. With the radio mode selected, hold downthe RADIO button (5) for 2 seconds orlonger. The 6 stations with the best sig-
nal strength will automatically be as- signed to the memory select buttons (2),
with the lowest-frequency station being
assigned to the lowest-number button.2. When you subsequently press a memory
select button to select a channel number,
the radio will begin receiving the station
assigned to that number.NOTEl If you press the RADIO button (5) for 2 sec-
onds or longer while tuning in the FM1 or
FM2 band, the radio will automatically switch to the FM3 band, where the automat-
ic seeking/storing will be activated.Radio data system (RDS)
E00709200452
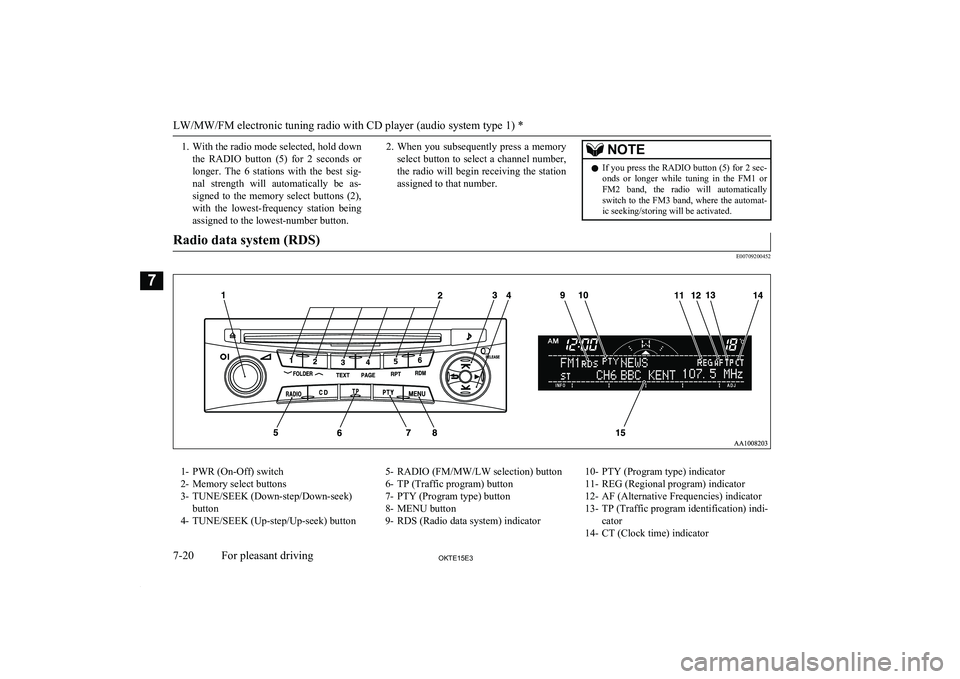
1- PWR (On-Off) switch
2- Memory select buttons
3- TUNE/SEEK (Down-step/Down-seek) button
4- TUNE/SEEK (Up-step/Up-seek) button5- RADIO (FM/MW/LW selection) button 6- TP (Traffic program) button
7- PTY (Program type) button
8- MENU button
9- RDS (Radio data system) indicator10- PTY (Program type) indicator
11- REG (Regional program) indicator 12- AF (Alternative Frequencies) indicator
13- TP (Traffic program identification) indi- cator
14- CT (Clock time) indicator
LW/MW/FM electronic tuning radio with CD player (audio system type 1) *
7-20OKTE15E3For pleasant driving7
Page 213 of 418
1.Press either the TUNE/SEEK button (3
or 4) to tune the PTY to be entered in the
memory.
2. Press one of the memory select buttons
(2) for 2 seconds or longer. The number of the button corresponding to the entry
into the memory and the PTY are dis-
played.
3. The preset memory setting is retrieved
by pressing the button and then releasing
it within about 2 seconds.Traffic information
E00721600254
The radio will automatically tune in to traffic information broadcasts while receiving FM
broadcasts or playing compact discs etc.
To select this function, follow the instruc-
tions below. 1. Press the TP button (6). The display will
show “TP” (13). If the RDS data can be
read, the display will show “RDS” (9). If
not, the display will show “NO RDS” for about 5 seconds.
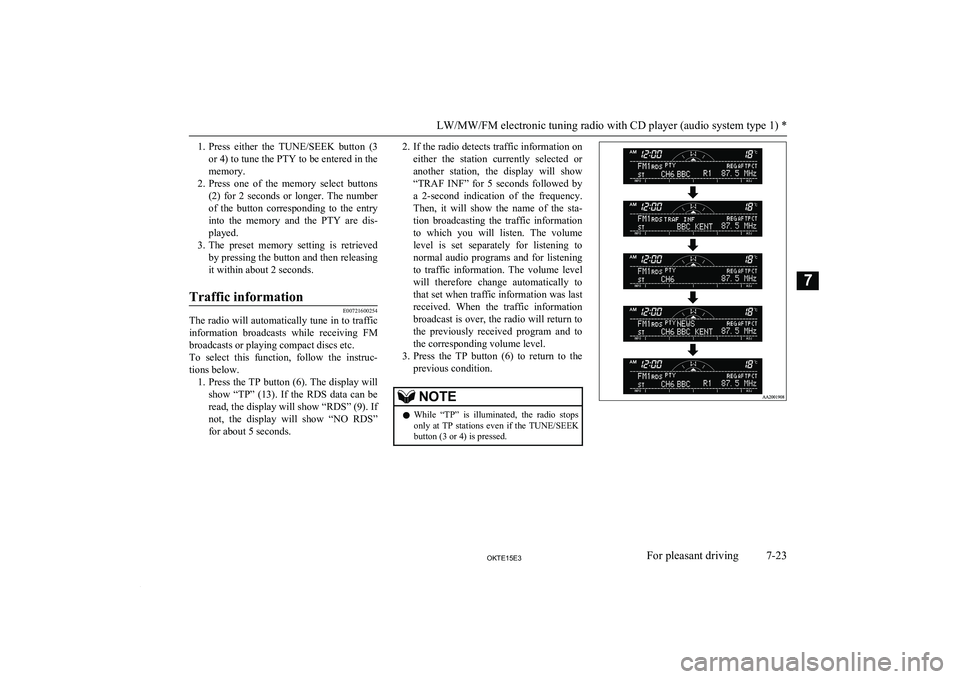
2. If the radio detects traffic information on
either the station currently selected or
another station, the display will show “TRAF INF” for 5 seconds followed bya 2-second indication of the frequency.
Then, it will show the name of the sta-
tion broadcasting the traffic information
to which you will listen. The volume
level is set separately for listening to normal audio programs and for listening
to traffic information. The volume level
will therefore change automatically to that set when traffic information was last
received. When the traffic information
broadcast is over, the radio will return to
the previously received program and to
the corresponding volume level.
3. Press the TP button (6) to return to the
previous condition.NOTEl While “TP” is illuminated, the radio stops
only at TP stations even if the TUNE/SEEK
button (3 or 4) is pressed.
LW/MW/FM electronic tuning radio with CD player (audio system type 1) *
7-23OKTE15E3For pleasant driving7
Page 219 of 418
To find a file (MP3 CDs only)
Press the following buttons to select desiredfile.
The selected folder or file is shown in the dis-
play.
button (14): To start this mode
or cancel the selec-
tion. button (9) or
button (10)
: To show the folder or file. button (15): To select the folderor file.NOTEl If no operation is performed for 10 seconds
or more or another button is operated after
the
button or button has been pressed,
searching of the desired file is cancelled.
l If no operation is performed for
5 seconds or
more after the file is displayed, playback starts.
To repeat a track
Press the RPT button (7) briefly while the
track is playing. “RPT” will appear on thedisplay.
To exit the repeat mode, press the RPT but-
ton.
To repeat a folder (MP3 CDs
only)
Press the RPT button (7) for 1 second or lon-
ger (until you hear a beep). “F-RPT” will ap- pear on the display. You can listen to all the
files in the currently selected folder repeated-
ly.
NOTEl With a disc that contains both
CD-DA and
MP3 files, the repeat mode causes only files
of the same format ( CD-DA only or MP3
files only) to be repeated.
To play tracks in random order
Random playback for a disc (music CDs
only)
Press the RDM button (8) briefly. “RDM” will appear on the display. Tracks on the cur-
rently selected disc will be played in a ran- dom sequence.
To exit the random mode, press the RDM button again.
Random playback for a folder (MP3 CDs
only)
Press the RDM button (8) briefly. “F-RDM”
will appear on the display. Files on the cur-
rently selected folder will be played in a ran- dom sequence.
To exit the random mode, press the RDM
button again.
Random playback for all folders on a disc
(MP3 CDs only)
Press the RDM button (8) for 1 second or
longer (until you hear a beep). “RDM” will appear on the display. Files from all the fold-ers on the currently selected disc will be
played in a random sequence.
To exit the random mode, briefly press the RDM button again.
NOTEl With a disc that contains both
CD-DA and
MP3 files, the random mode causes only files of the same format ( CD-DA only or
MP3 files only) to be played in a random se-
quence.
To eject a disc
When the CD eject button (1) is pressed, the
disc automatically stops and is ejected.
NOTEl If you do not remove the disc before
15 seconds have elapsed, the CD player will
automatically reload the disc and stop.
LW/MW/FM electronic tuning radio with CD player (audio system type 1) *
7-29OKTE15E3For pleasant driving7