sunroof MITSUBISHI L200 2015 Owner's Manual (in English)
[x] Cancel search | Manufacturer: MITSUBISHI, Model Year: 2015, Model line: L200, Model: MITSUBISHI L200 2015Pages: 418, PDF Size: 25.8 MB
Page 14 of 418
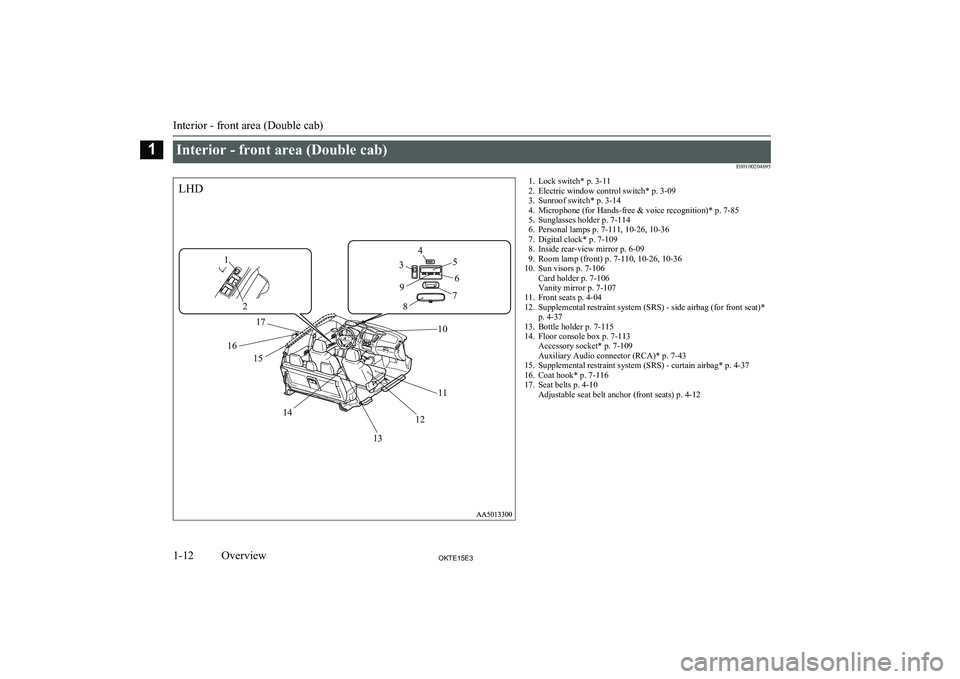
Interior - front area (Double cab)E00100204695
1293456871011121314151617LHD1. Lock switch* p. 3-11
2. Electric window control switch* p. 3-09
3. Sunroof switch* p. 3-14
4. Microphone (for Hands-free & voice recognition)* p. 7-85
5. Sunglasses holder p. 7-114
6. Personal lamps p. 7-111, 10-26, 10-36
7. Digital clock* p. 7-109
8. Inside rear-view mirror p. 6-09
9. Room lamp (front) p. 7-110, 10-26, 10-36
10. Sun visors p. 7-106 Card holder p. 7-106
Vanity mirror p. 7-107
11. Front seats p. 4-04
12. Supplemental restraint system (SRS) - side airbag (for front seat)* p. 4-37
13. Bottle holder p. 7-115
14. Floor console box p. 7-113 Accessory socket* p. 7-109
Auxiliary Audio connector (RCA)* p. 7-43
15. Supplemental restraint system (SRS) - curtain airbag* p. 4-37
16. Coat hook* p. 7-116
17. Seat belts p. 4-10 Adjustable seat belt anchor (front seats) p. 4-12
Interior - front area (Double cab)
1-12OKTE15E3Overview1
Page 15 of 418
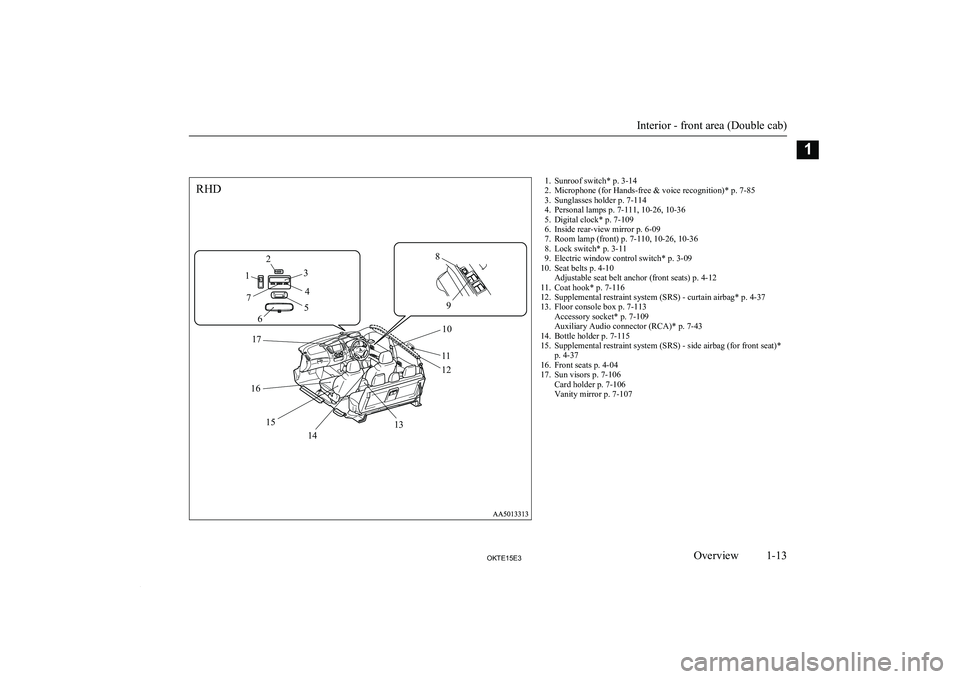
RHD12348910111213141516175671. Sunroof switch* p. 3-14
2. Microphone (for Hands-free & voice recognition)* p. 7-85
3. Sunglasses holder p. 7-114
4. Personal lamps p. 7-111, 10-26, 10-36
5. Digital clock* p. 7-109
6. Inside rear-view mirror p. 6-09
7. Room lamp (front) p. 7-110, 10-26, 10-36
8. Lock switch* p. 3-11
9. Electric window control switch* p. 3-09
10. Seat belts p. 4-10 Adjustable seat belt anchor (front seats) p. 4-12
11. Coat hook* p. 7-116
12. Supplemental restraint system (SRS) - curtain airbag* p. 4-37
13. Floor console box p. 7-113 Accessory socket* p. 7-109
Auxiliary Audio connector (RCA)* p. 7-43
14. Bottle holder p. 7-115
15. Supplemental restraint system (SRS) - side airbag (for front seat)* p. 4-37
16. Front seats p. 4-04
17. Sun visors p. 7-106 Card holder p. 7-106
Vanity mirror p. 7-107
Interior - front area (Double cab)
1-13OKTE15E3Overview1
Page 22 of 418
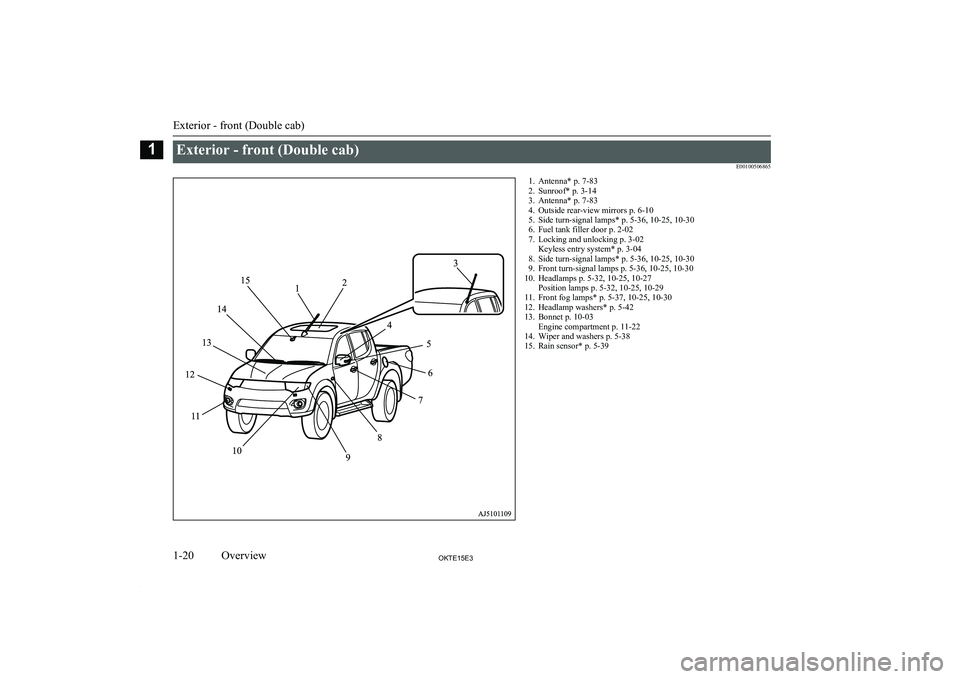
Exterior - front (Double cab)E001005068651. Antenna* p. 7-832. Sunroof* p. 3-14
3. Antenna* p. 7-83
4. Outside rear-view mirrors p. 6-10
5. Side turn-signal lamps* p. 5-36, 10-25, 10-30
6. Fuel tank filler door p. 2-02
7. Locking and unlocking p. 3-02 Keyless entry system* p. 3-04
8. Side turn-signal lamps* p. 5-36, 10-25, 10-30
9. Front turn-signal lamps p. 5-36, 10-25, 10-30
10. Headlamps p. 5-32, 10-25, 10-27 Position lamps p. 5-32, 10-25, 10-29
11. Front fog lamps* p. 5-37, 10-25, 10-30
12. Headlamp washers* p. 5-42
13. Bonnet p. 10-03 Engine compartment p. 11-22
14. Wiper and washers p. 5-38
15. Rain sensor* p. 5-39
Exterior - front (Double cab)
1-20OKTE15E3Overview1
Page 31 of 418
Keys.................................................................................................... 3-02Electronic immobilizer (Anti-theft starting system)........................... 3-02
Keyless entry system*.........................................................................3-04
Doors................................................................................................... 3-06
Central door locks*............................................................................. 3-07
“Child-protection” rear doors (Double cab)........................................3-08
Manual window control*.................................................................... 3-08
Electric window control*.................................................................... 3-08
Quarter window (Club cab).................................................................3-13
Rear gate............................................................................................. 3-14
Sunroof*.............................................................................................. 3-14Locking and unlocking
OKTE15E33
Page 44 of 418
Rear gateE00303000050
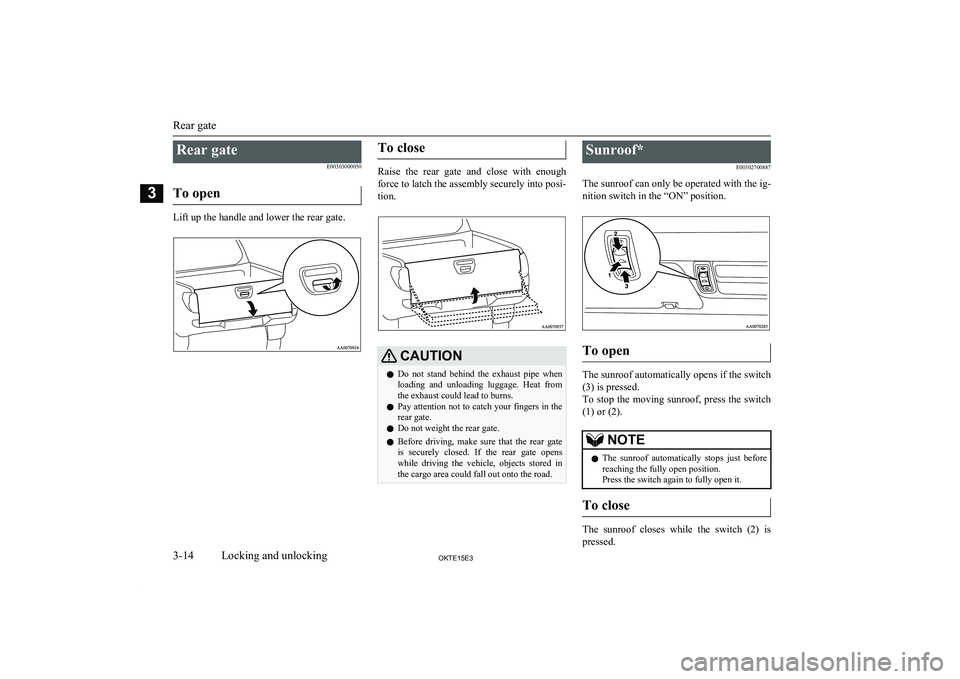
To open
Lift up the handle and lower the rear gate.
To close
Raise the rear gate and close with enough
force to latch the assembly securely into posi- tion.
CAUTIONl Do not stand behind the exhaust pipe when
loading and unloading luggage. Heat fromthe exhaust could lead to burns.
l Pay attention not to catch your fingers in the
rear gate.
l Do not weight the rear gate.
l Before driving, make sure that the rear gate
is securely closed. If the rear gate opens
while driving the vehicle, objects stored in
the cargo area could fall out onto the road.Sunroof*
E00302700887
The sunroof can only be operated with the ig- nition switch in the “ON” position.
To open
The sunroof automatically opens if the switch(3) is pressed.
To stop the moving sunroof, press the switch
(1) or (2).
NOTEl The sunroof automatically stops just before
reaching the fully open position.
Press the switch again to fully open it.
To close
The sunroof closes while the switch (2) is
pressed.
Rear gate
3-14OKTE15E3Locking and unlocking3
Page 45 of 418
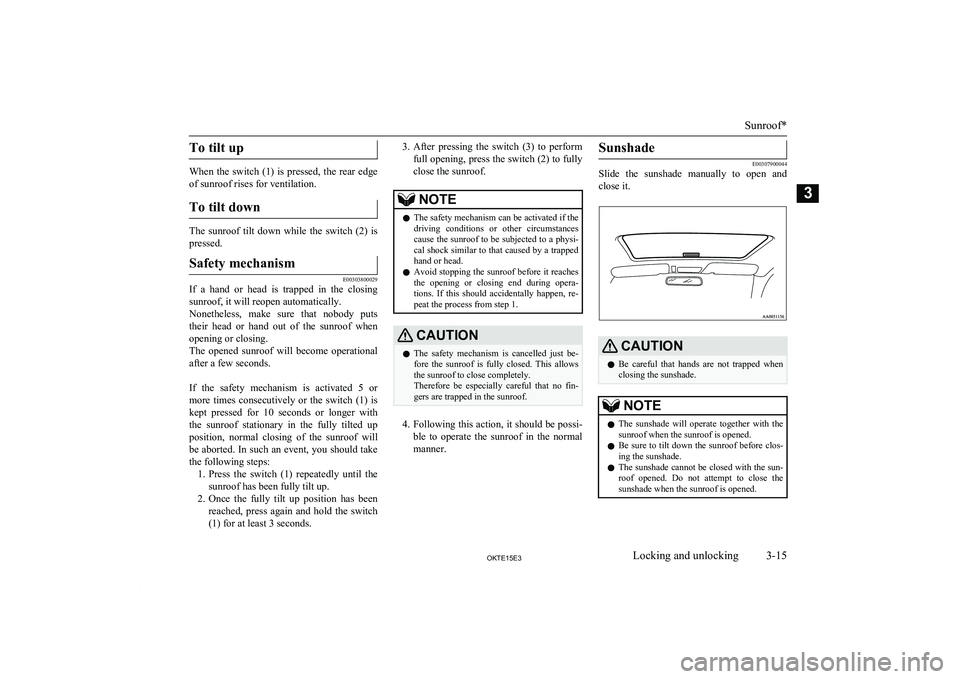
To tilt up
When the switch (1) is pressed, the rear edgeof sunroof rises for ventilation.
To tilt down
The sunroof tilt down while the switch (2) is
pressed.
Safety mechanism
E00303800029
If a hand or head is trapped in the closing sunroof, it will reopen automatically.Nonetheless, make sure that nobody puts
their head or hand out of the sunroof when
opening or closing.
The opened sunroof will become operational after a few seconds.
If the safety mechanism is activated 5 or
more times consecutively or the switch (1) is kept pressed for 10 seconds or longer with
the sunroof stationary in the fully tilted up position, normal closing of the sunroof will be aborted. In such an event, you should take
the following steps: 1. Press the switch (1) repeatedly until the
sunroof has been fully tilt up.
2. Once the fully tilt up position has been
reached, press again and hold the switch
(1) for at least 3 seconds.
3. After pressing the switch (3) to perform
full opening, press the switch (2) to fully close the sunroof.NOTEl The safety mechanism can be activated if the
driving conditions or other circumstancescause the sunroof to be subjected to a physi-
cal shock similar to that caused by a trapped hand or head.
l Avoid stopping the sunroof before it reaches
the opening or closing end during opera-
tions. If this should accidentally happen, re- peat the process from step 1.CAUTIONl The safety mechanism is cancelled just be-
fore the sunroof is fully closed. This allows the sunroof to close completely.
Therefore be especially careful that no fin-
gers are trapped in the sunroof.
4. Following this action, it should be possi-
ble to operate the sunroof in the normal manner.
Sunshade
E00307900044
Slide the sunshade manually to open and
close it.
CAUTIONl Be careful that hands are not trapped when
closing the sunshade.NOTEl The sunshade will operate together with the
sunroof when the sunroof is opened.
l Be sure to tilt down the sunroof before clos-
ing the sunshade.
l The sunshade cannot be closed with the sun-
roof opened. Do not attempt to close the sunshade when the sunroof is opened.
Sunroof*
3-15OKTE15E3Locking and unlocking3
Page 46 of 418
WARNINGlDo not put head, hands or anything else
out of the sunroof opening while driving
the vehicle.
l Never leave a child (or other person who
might not be capable of safe operation of
the sunroof switch) in the vehicle alone.
l Before operating the sunroof, make sure
that nothing is capable of being trapped
(head, hand, finger, etc.).NOTEl The sunroof stops just before reaching the
fully open position.
If the vehicle is driven with the sunroof in
this position, wind throb is lower than with the sunroof fully open.
l When leaving the vehicle unattended, make
sure you close the sunroof and remove the ignition key.
l Do not try to operate the sunroof if it is fro-
zen closed (after snow fall or during extreme cold).
l Do not sit or place heavy luggage on the
sunroof or roof opening edge.
l Release the switch as soon as the sunroof
reaches the fully open or fully closed posi-
tion.NOTEl If the sunroof does not operate when the
sunroof switch is operated, release the switch and check whether something is trap-
ped by the sunroof. If nothing is trapped, we recommend you to have the sunroof
checked.
l Depending on the model of ski carriers or
roof carriers, the sunroof may make contactwith the carrier when the sunroof is tilted up.Be careful when tilting up the sunroof if
such a ski carrier or a roof carrier is instal-
led.
l Be sure to close the sunroof completely
when washing the vehicle or when leaving
the vehicle.
l Be careful, not to put any wax on the weath-
erstrip (black rubber) around the sunroof opening. If stained with wax, the weather-
strip cannot maintain a weatherproof seal with the sunroof.
l After washing the vehicle or after it has
rained, wipe off any water that is on the sun-
roof before operating it.
l Operating the sunroof repeatedly with the
engine stationary will run down the battery. Operate the sunroof while the engine is run-
ning.
Sunroof*
3-16OKTE15E3Locking and unlocking3
Page 111 of 418
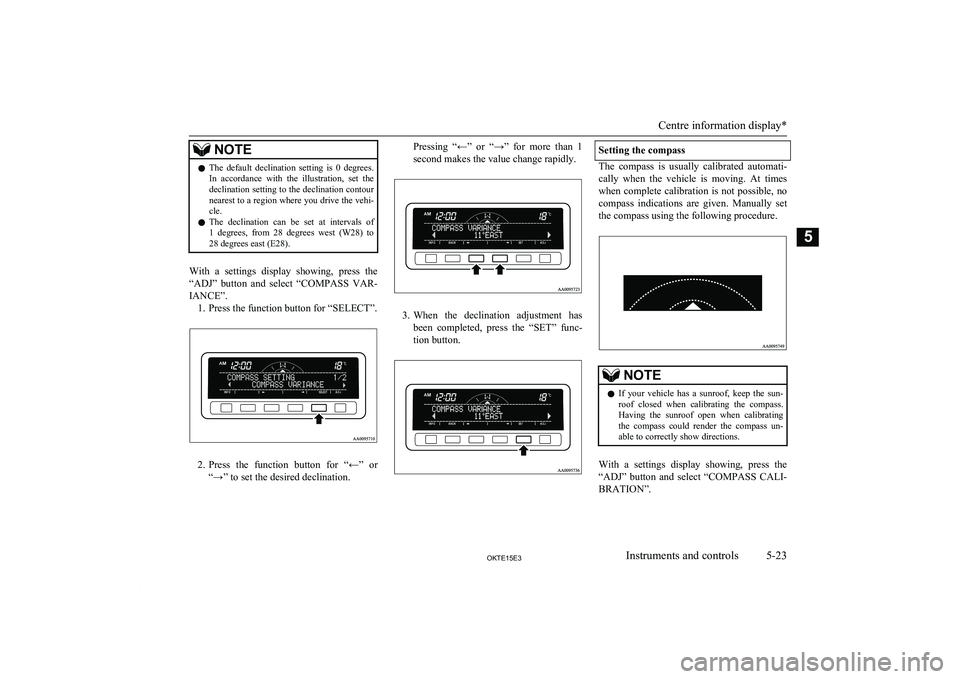
NOTElThe default declination setting is 0 degrees
.
In accordance with the illustration, set the
declination setting to the declination contour
nearest to a region where you drive the vehi- cle.
l The declination can be set at intervals of
1 degrees, from 28 degrees west (W28) to 28 degrees east (E28).
With a settings display showing, press the
“ADJ” button and select “COMPASS VAR-
IANCE”. 1. Press the function button for “SELECT”.
2. Press the function button for “←” or
“→” to set the desired declination.
Pressing “←” or “→” for more than 1
second makes the value change rapidly.
3. When the declination adjustment has
been completed, press the “SET” func-
tion button.
Setting the compass
The compass is usually calibrated automati-
cally when the vehicle is moving. At times when complete calibration is not possible, nocompass indications are given. Manually set
the compass using the following procedure.
NOTEl If your vehicle has a sunroof, keep the sun-
roof closed when calibrating the compass.
Having the sunroof open when calibrating the compass could render the compass un-
able to correctly show directions.
With a settings display showing, press the
“ADJ” button and select “COMPASS CALI-
BRATION”.
Centre information display*
5-23OKTE15E3Instruments and controls5
Page 340 of 418
CAUTIONlSome types of hot water washing equipment
apply high pressure and heat to the vehicle.
They may cause heat distortion and damage to the vehicle resin parts and may result in
flooding of the vehicle interior. Therefore;
observe the following.
• Maintain a distance of approx. 50 cm or
more between the vehicle body and the washing nozzle.
• When washing around the door glass,
hold the nozzle at a distance of more than
50 cm and at right angles to the glass sur-
face.
l After washing the vehicle, drive the vehicle
slowly while lightly depressing the brake
pedal several times in order to dry out the brakes.
Leaving the brakes wet could result in re-
duced braking performance. Also, there is a possibility that they could freeze up or be-
come inoperative due to rust, rendering the vehicle unable to move.
l When using an automatic car wash, pay at-
tention to the following items, referring to the operation manual or consulting a car
wash operator. If the following procedure is not followed, it could result in damage to
your vehicle.
• The outside mirrors are retracted.
• If your vehicle is equipped with the pillar
antenna, it can be retracted.
• If your vehicle is equipped with the roof
antenna, it can be removed.During cold weather
Salt and other chemicals spread on the roads
in some areas in winter can have a harmful effect on the vehicle body. You should there-
fore wash the vehicle as often as possible in accordance with our care-instructions. It is
recommended to have a preservative applied
and the underfloor protection checked before and after the cold weather season.
After washing your vehicle, wipe off all wa- terdrops from the rubber parts around the
doors to prevent the doors from freezing.
NOTEl To prevent freezing of the weatherstripping
on the doors, bonnet, etc., they should be treated with silicone spray.Waxing
E00901000687
Waxing the vehicle will help prevent the ad-
herence of dust and road chemicals to the paintwork. Apply a wax solution after wash- ing the vehicle, or at least once every three
months to assist displacing of water.
Do not wax your vehicle in direct sunlight.
You should wax after the surfaces have
cooled.
CAUTIONl Waxes containing high abrasive compounds
should not be used. Such waxes remove rust and stains effectively from the paintwork but
they are harmful to the lustre on the painted
surface and the plated surface.
Further, they are harmful to glossy surfaces such as grille, garnish, mouldings, etc.
l Do not use petrol or paint thinners to remove
road tar or other contamination to the vehi-
cle surface.
l Do not apply wax on the areas having black
mat coating as it can cause uneven discolou-
ration, patches, blurs, etc. If stained with wax, immediately wipe off with a piece of
soft cloth and warm water.
l On vehicles with a sunroof, be careful when
waxing the area around the sunroof opening, not to put any wax on the weatherstrip
(black rubber). If stained with wax, the weatherstrip cannot maintain a weatherproof
seal with the sunroof.Polishing
E00901100011
The vehicle should only be polished if the
paintwork has become stained or lost its lus- tre. Matt-finish parts and plastic bumpers
must not be polished, polishing these parts will stain them or damage their finish.
Cleaning the exterior of your vehicle
9-04OKTE15E3Vehicle care9
Page 342 of 418
NOTElTo clean the inside of the rear window, al-
ways use a soft cloth and wipe the window
glass along the demister heater element so as not to cause damage.Wiper blades
E00901700017
Use a soft cloth and glass cleaner to remove
grease, dead insects, etc., from the wiper blades. Replace the wiper blades when they
no longer wipe properly. (Refer to page “Wiper blades” on page 10-17.)
Cleaning the sunroof*
E00901800180
Clean the inside of the sunroof with a soft cloth. Hard deposits should be wiped away
with a cloth dipped in warm, neutral deter- gent solution. Wipe away the solution with a
sponge dipped in fresh water.
NOTEl The surface treatment on the inside of the
glass may be removed if hard cloth or organ-
ic solvent (benzine, kerosene, thinner, etc.) is used.Engine compartment
E00902100265
Clean the engine compartment at the begin-
ning and end of winter. Pay particular atten- tion to flanges, crevices and peripheral parts where dust containing road chemicals and
other corrosive materials might collect.
If salt and other chemicals are used on the roads in your area, clean the engine compart- ment at least every three months.
Never spray or splash water on the electrical
components in the engine compartment, as
this may cause damage.
Do not bring the nearby parts, the plastic parts and so on into contact with sulphuric
acid (battery electrolyte) which may crack,
stain or discolour them.
If they are in contact, wipe off with soft cloth, chamois or the like and an aqueous sol-
ution of neutral detergent then immediately rinse the affected parts with plenty of water.
Cleaning the exterior of your vehicle
9-06OKTE15E3Vehicle care9