bluetooth MITSUBISHI L200 2017 Owner's Manual (in English)
[x] Cancel search | Manufacturer: MITSUBISHI, Model Year: 2017, Model line: L200, Model: MITSUBISHI L200 2017Pages: 426, PDF Size: 14.12 MB
Page 5 of 426
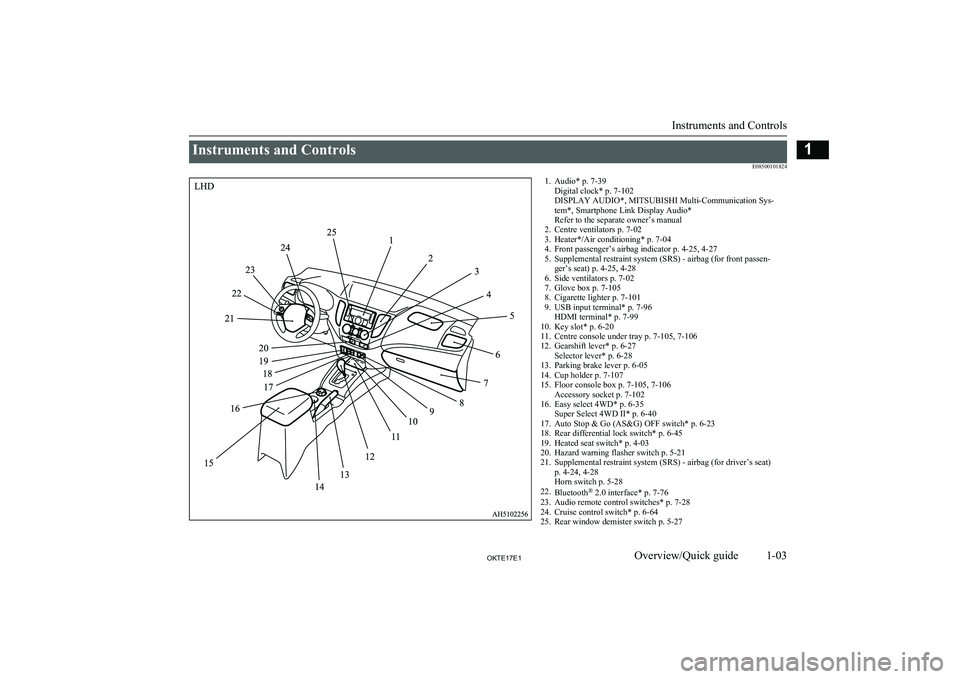
Instruments and ControlsE085001018241. Audio* p. 7-39Digital clock* p. 7-102
DISPLAY AUDIO*, MITSUBISHI Multi-Communication Sys-
tem*, Smartphone Link Display Audio*
Refer to the separate owner’s manual
2. Centre ventilators p. 7-02
3. Heater*/Air conditioning* p. 7-04
4. Front passenger’s airbag indicator p. 4-25, 4-27
5. Supplemental restraint system (SRS) - airbag (for front passen- ger’s seat) p. 4-25, 4-28
6. Side ventilators p. 7-02
7. Glove box p. 7-105
8. Cigarette lighter p. 7-101
9. USB input terminal* p. 7-96 HDMI terminal* p. 7-99
10. Key slot* p. 6-20
11. Centre console under tray p. 7-105, 7-106
12. Gearshift lever* p. 6-27 Selector lever* p. 6-28
13. Parking brake lever p. 6-05
14. Cup holder p. 7-107
15. Floor console box p. 7-105, 7-106 Accessory socket p. 7-102
16. Easy select 4WD* p. 6-35 Super Select 4WD II* p. 6-40
17. Auto Stop & Go (AS&G) OFF switch* p. 6-23
18. Rear differential lock switch* p. 6-45
19. Heated seat switch* p. 4-03
20. Hazard warning flasher switch p. 5-21
21. Supplemental restraint system (SRS) - airbag (for driver’s seat) p. 4-24, 4-28
Horn switch p. 5-28
22. Bluetooth ®
2.0 interface* p. 7-76
23. Audio remote control switches* p. 7-28
24. Cruise control switch* p. 6-64
25. Rear window demister switch p. 5-27
Instruments and Controls
1-03OKTE17E1Overview/Quick guide1
Page 6 of 426
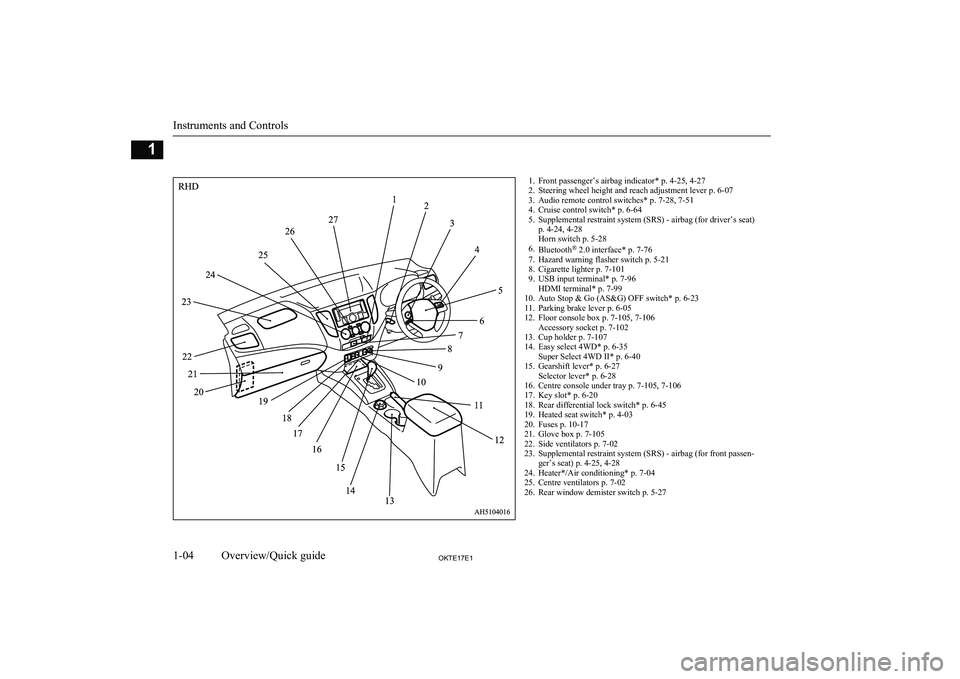
1. Front passenger’s airbag indicator* p. 4-25, 4-27
2. Steering wheel height and reach adjustment lever p. 6-07
3. Audio remote control switches* p. 7-28, 7-51
4. Cruise control switch* p. 6-64
5. Supplemental restraint system (SRS) - airbag (for driver’s seat) p. 4-24, 4-28
Horn switch p. 5-28
6. Bluetooth ®
2.0 interface* p. 7-76
7. Hazard warning flasher switch p. 5-21
8. Cigarette lighter p. 7-101
9. USB input terminal* p. 7-96 HDMI terminal* p. 7-99
10. Auto Stop & Go (AS&G) OFF switch* p. 6-23
11. Parking brake lever p. 6-05
12. Floor console box p. 7-105, 7-106 Accessory socket p. 7-102
13. Cup holder p. 7-107
14. Easy select 4WD* p. 6-35 Super Select 4WD II* p. 6-40
15. Gearshift lever* p. 6-27 Selector lever* p. 6-28
16. Centre console under tray p. 7-105, 7-106
17. Key slot* p. 6-20
18. Rear differential lock switch* p. 6-45
19. Heated seat switch* p. 4-03
20. Fuses p. 10-17
21. Glove box p. 7-105
22. Side ventilators p. 7-02
23. Supplemental restraint system (SRS) - airbag (for front passen- ger’s seat) p. 4-25, 4-28
24. Heater*/Air conditioning* p. 7-04
25. Centre ventilators p. 7-02
26. Rear window demister switch p. 5-27
Instruments and Controls
1-04OKTE17E1Overview/Quick guide1
Page 8 of 426
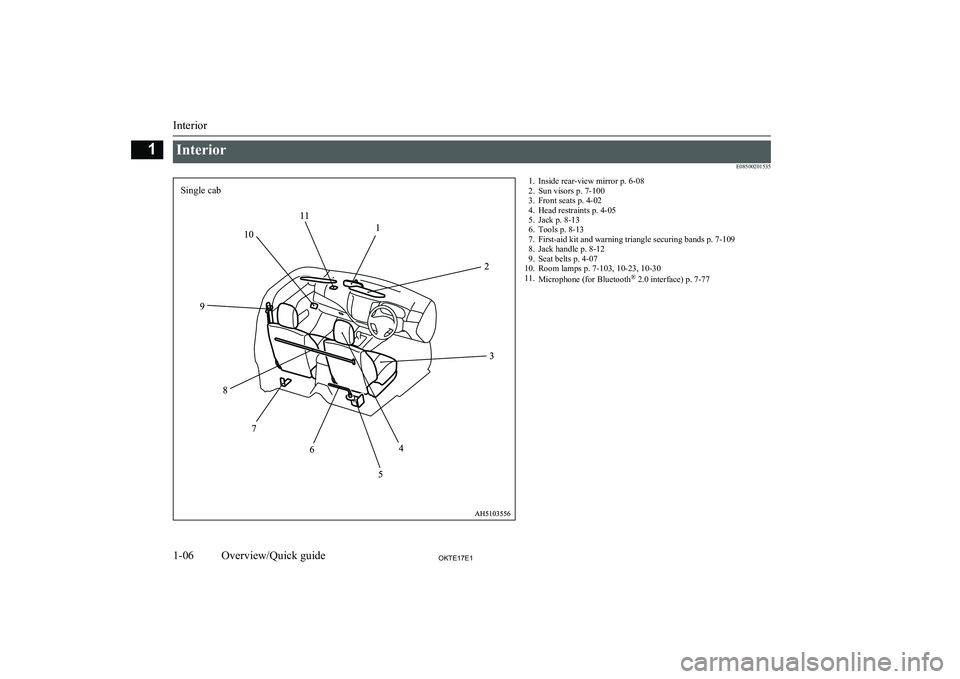
Interior E085002015351. Inside rear-view mirror p. 6-082. Sun visors p. 7-100
3. Front seats p. 4-02
4. Head restraints p. 4-05
5. Jack p. 8-13
6. Tools p. 8-13
7. First-aid kit and warning triangle securing bands p. 7-109
8. Jack handle p. 8-12
9. Seat belts p. 4-07
10. Room lamps p. 7-103, 10-23, 10-30
11. Microphone (for Bluetooth ®
2.0 interface) p. 7-77
Interior
1-06OKTE17E1Overview/Quick guide1Single cab
Page 9 of 426
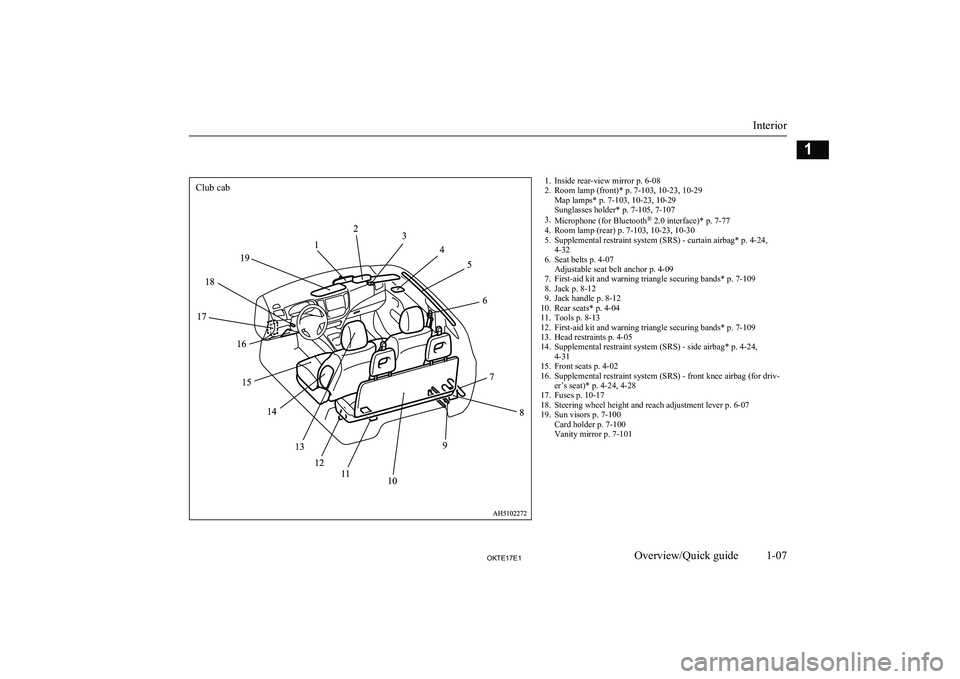
1. Inside rear-view mirror p. 6-08
2. Room lamp (front)* p. 7-103, 10-23, 10-29 Map lamps* p. 7-103, 10-23, 10-29
Sunglasses holder* p. 7-105, 7-107
3. Microphone (for Bluetooth ®
2.0 interface)* p. 7-77
4. Room lamp (rear) p. 7-103, 10-23, 10-30
5. Supplemental restraint system (SRS) - curtain airbag* p. 4-24, 4-32
6. Seat belts p. 4-07 Adjustable seat belt anchor p. 4-09
7. First-aid kit and warning triangle securing bands* p. 7-109
8. Jack p. 8-12
9. Jack handle p. 8-12
10. Rear seats* p. 4-04
11. Tools p. 8-13
12. First-aid kit and warning triangle securing bands* p. 7-109
13. Head restraints p. 4-05
14. Supplemental restraint system (SRS) - side airbag* p. 4-24, 4-31
15. Front seats p. 4-02
16. Supplemental restraint system (SRS) - front knee airbag (for driv- er’s seat)* p. 4-24, 4-28
17. Fuses p. 10-17
18. Steering wheel height and reach adjustment lever p. 6-07
19. Sun visors p. 7-100 Card holder p. 7-100
Vanity mirror p. 7-101
Interior
1-07OKTE17E1Overview/Quick guide1Club cab
Page 10 of 426
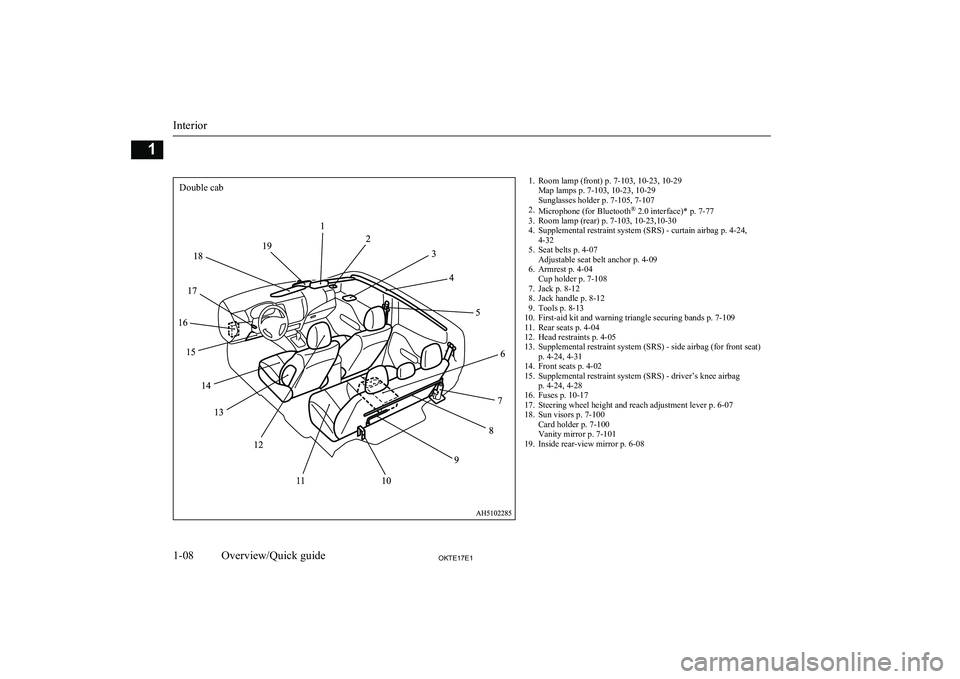
1. Room lamp (front) p. 7-103, 10-23, 10-29Map lamps p. 7-103, 10-23, 10-29
Sunglasses holder p. 7-105, 7-107
2. Microphone (for Bluetooth ®
2.0 interface)* p. 7-77
3. Room lamp (rear) p. 7-103, 10-23,10-30
4. Supplemental restraint system (SRS) - curtain airbag p. 4-24, 4-32
5. Seat belts p. 4-07 Adjustable seat belt anchor p. 4-09
6. Armrest p. 4-04 Cup holder p. 7-108
7. Jack p. 8-12
8. Jack handle p. 8-12
9. Tools p. 8-13
10. First-aid kit and warning triangle securing bands p. 7-109
11. Rear seats p. 4-04
12. Head restraints p. 4-05
13. Supplemental restraint system (SRS) - side airbag (for front seat) p. 4-24, 4-31
14. Front seats p. 4-02
15. Supplemental restraint system (SRS) - driver’s knee airbag p. 4-24, 4-28
16. Fuses p. 10-17
17. Steering wheel height and reach adjustment lever p. 6-07
18. Sun visors p. 7-100 Card holder p. 7-100
Vanity mirror p. 7-101
19. Inside rear-view mirror p. 6-08
Interior
1-08OKTE17E1Overview/Quick guide1Double cab
Page 203 of 426
Ventilators........................................................................................... 7-02
Heater/Manual air conditioning*........................................................ 7-04 Automatic climate control air conditioner*........................................ 7-09
Important operation tips for the air conditioning................................ 7-17 Air purifier*........................................................................................ 7-17AM/FM radio/CD player with AUX*.................................................7-18
Handling of Discs................................................................................7-19
Audio Files (MP3/WMA/AAC)..........................................................7-20
Important Points on Safety for the Customer......................................7-24
Operation Keys................................................................................... 7-25 Listen to Radio.................................................................................... 7-28Listen to CDs...................................................................................... 7-29
Listen to MP3s/WMAs/AACs............................................................ 7-30
Listen to an iPod*............................................................................... 7-31 Listen to Audio Files on a USB Device*............................................ 7-33Use AUX*........................................................................................... 7-35
Display Indicator................................................................................. 7-35 Audio Quality and Volume Balance Adjustment............................... 7-36
Time Setting........................................................................................ 7-37
Troubleshooting.................................................................................. 7-38 LW/MW/FM radio/CD player*.......................................................... 7-39
Handling of Discs................................................................................7-42
Audio Files (MP3/WMA/AAC)..........................................................7-43
Important Points on Safety for the Customer......................................7-47
Operation Keys................................................................................... 7-48
Listen to Radio.................................................................................... 7-52
Listen to DAB*................................................................................... 7-53
Listen to Traffic Messages.................................................................. 7-54
Listen to CDs...................................................................................... 7-55Listen to MP3s.................................................................................... 7-55
Listen to an iPod................................................................................. 7-57 Listen to Audio Files on a USB Device.............................................. 7-58To play iPod/USB memory device tracks via voice opera-
tion (vehicles with Bluetooth ®
2.0 interface)................................. 7-61
Listen to Bluetooth Audio*................................................................. 7-64 Display Indicator................................................................................. 7-66
Audio Quality and Volume Balance Adjustment............................... 7-67
System Settings................................................................................... 7-68
Troubleshooting.................................................................................. 7-72
Antenna............................................................................................... 7-75
Link System*...................................................................................... 7-76
Bluetooth ®
2.0 interface*....................................................................7-76
USB input terminal*........................................................................... 7-96
HDMI terminal*..................................................................................7-99
Sun visors.......................................................................................... 7-100
Vanity mirror*...................................................................................7-101
Ashtray.............................................................................................. 7-101
Cigarette lighter.................................................................................7-101
Accessory socket............................................................................... 7-102
Digital clock*.................................................................................... 7-102
Interior lamps.................................................................................... 7-103
Storage spaces................................................................................... 7-105
Cup holder......................................................................................... 7-107
Bottle holder......................................................................................7-108
Convenient hook*............................................................................. 7-108
Assist grip......................................................................................... 7-109
Coat hook*........................................................................................ 7-109
First-aid kit and warning triangle securing bands*........................... 7-109For pleasant driving
OKTE17E17
Page 252 of 426
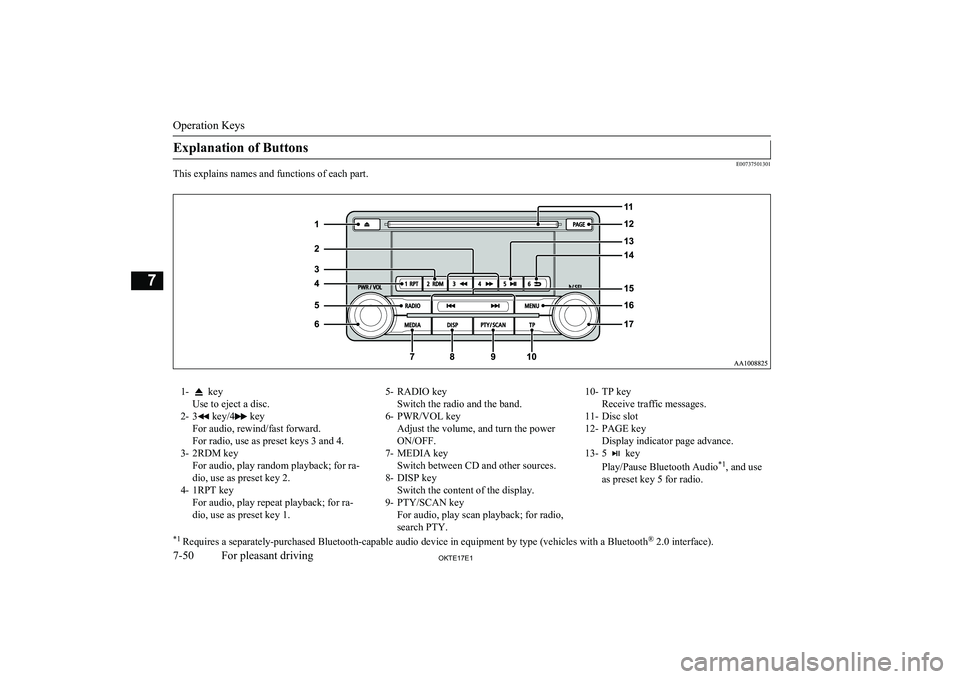
Explanation of Buttons
E00737501301
This explains names and functions of each part.
1- key
Use to eject a disc.
2- 3
key/4 key
For audio, rewind/fast forward.
For radio, use as preset keys 3 and 4.
3- 2RDM key For audio, play random playback; for ra-
dio, use as preset key 2.
4- 1RPT key For audio, play repeat playback; for ra-dio, use as preset key 1.
5- RADIO key Switch the radio and the band.
6- PWR/VOL key Adjust the volume, and turn the power
ON/OFF.
7- MEDIA key Switch between CD and other sources.
8- DISP key Switch the content of the display.
9- PTY/SCAN key For audio, play scan playback; for radio,
search PTY.10- TP key Receive traffic messages.
11- Disc slot
12- PAGE key Display indicator page advance.
13- 5
key
Play/Pause Bluetooth Audio *1
, and use
as preset key 5 for radio.
*1 Requires a separately-purchased Bluetooth-capable audio device in equipment by type (vehicles with a Bluetooth ®
2.0 interface).
Operation Keys
7-50OKTE17E1For pleasant driving7
Page 253 of 426
14- 6 key
Return during audio track search, and
stop Bluetooth Audio *1
.
For radio, use as preset key 6.15- key/ key
For audio, select audio track/file; for ra-
dio, perform automatic station selection
or ensemble/service station selection.16- MENU key Switch to Menu mode.
17-
/SEL key
Adjust audio quality and select items.
For radio, manually select stations.
*1 Requires a separately-purchased Bluetooth-capable audio device in equipment by type (vehicles with a Bluetooth ®
2.0 interface).Steering wheel audio remote
control switches*
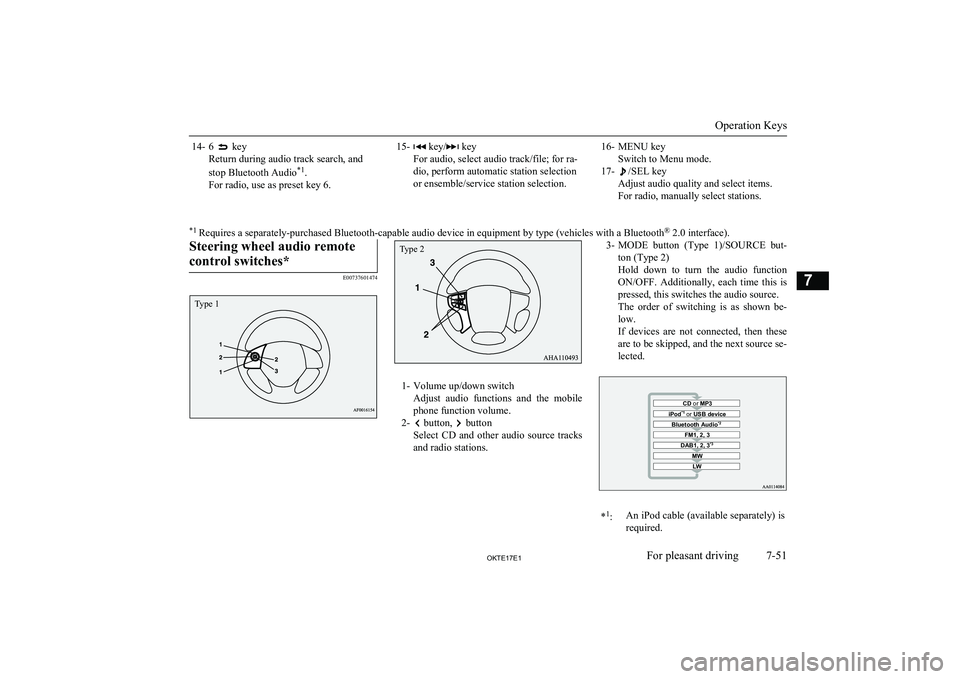
E00737601474
1- Volume up/down switch Adjust audio functions and the mobile
phone function volume.
2-
button, button
Select CD and other audio source tracks
and radio stations.
3- MODE button (Type 1)/SOURCE but-
ton (Type 2)
Hold down to turn the audio function ON/OFF. Additionally, each time this is
pressed, this switches the audio source.
The order of switching is as shown be- low.
If devices are not connected, then these
are to be skipped, and the next source se- lected.CD or MP3MWLWDAB1, 2, 3 *3FM1, 2, 3Bluetooth Audio *2iPod*1
or USB device*1
:An iPod cable (available separately) is
required.
Operation Keys
7-51OKTE17E1For pleasant driving7 Type 1 Type 2
Page 254 of 426
*2
:Requires a separately-purchased Blue-
tooth-capable audio device (vehicles
with a Bluetooth ®
2.0 interface).*3
:Requires DAB tuner connection.Listen to Radio
E00737701130
This explains how to listen to FM, MW, and
LW radio broadcasts.
To Listen to the Radio
Press the RADIO key to switch the band.
Switch between FM1, FM2, FM3, MW, and LW bands.
The selected band is indicated on the display.
NOTEl This switches in the order FM1, FM2, FM3,
DAB1*, DAB2*, DAB3*, MW, and LW. *:When a DAB tuner is connected.
Manual/Seek Station Selection
Turn the /SEL key to the frequency to lis-
ten to.
/SEL key
(counter-
clockwise)Reduces the frequency being
received./SEL key
(clockwise)Increases the frequency be-
ing received. key
(hold down)Release the button to start
seek station selection, and
when a station is received,
scanning stops. key
(hold down)
Preset Memory
Register the broadcast station in advance, and select this at a later time.
1. Tune in to the frequency to register.
2. Hold down any of the keys from the
1RPT key to the 6
key.
A “Beep” sounds, and the preset key is registered.
NOTEl The preset memory can register a maximum
of 6 stations for each band (FM1, FM2,
FM3).
l If a preset key that already has a station reg-
istered is selected, then this is overwritten with the new preset.NOTEl Pressing the preset key will select the previ-
ously registered frequency.
Auto Memory (Auto Store)
The top 6 stations with a strong signal can be
automatically registered in order with preset keys.
Hold down the RADIO key.
After completion of auto store operations, the product will receive the station registered in
the preset key [1].
CAUTIONl Please be aware that the formerly-registered
frequency in the memory will be overwrit- ten.NOTEl Using auto store for FM1 and FM2 switches
to FM3.
PTY Search
Select PTY (program content), and automati-
cally scan for stations.
Listen to Radio
7-52OKTE17E1For pleasant driving7
Page 259 of 426
NOTElSelect the folder, and hold down the /SEL
key to start playback from the first track in
that folder.
l While the file is selected, press the 6
key
to return to the previous operation.
l While the file is selected, hold down the 6
key to cancel track search mode.
l If there is no operation for five seconds after
selecting the file, that file is played back.
l Disc operations such as selecting a track will
cancel track search mode.
Listen to an iPod
E00738001433
By connecting commercially-available iPod/iPhone devices to this product, you can play
back tracks on these through the product.
CAUTIONl Do not leave the iPod/iPhone unattended in
the vehicle.
l Never hold these devices in your hand to op-
erate while driving, as this is dangerous.
l No indemnification for data loss resulting
when the iPod/iPhone is connected to the
product will be possible.
l Depending on how the devices are handled,
audio files being damaged or lost, therefore
it is recommended that data be backed up.NOTEl Depending on the generation, model, or soft-
ware version of the iPod/iPhone, playback
on this product may not be possible. (→P. 7-18 ) Additionally, playback as explained in
this document may not be possible.
l In some countries, for vehicles with a Blue-
tooth ®
2.0 interface, the types of devices that
can be connected may vary.
For details, access the MITSUBISHI
MOTORS website.
Please read and agree to the “Warning about
Links to the Web Sites of Other Compa- nies”. The websites mentioned above mayconnect you to websites other than the
MITSUBISHI MOTORS website.
http://www.mitsubishi-motors.com/en/prod-
ucts/ index.html
l Usage of iPod/iPhone hardware with the lat-
est software version is recommended.
l Regarding how to connect the iPod/iPhone,
refer to “How to connect an iPod” on page
7-98.
l When connecting the iPod/iPhone, use a
commercially-available iPod connection ca-
ble.
l Set up the device in order that no unsafe ac-
tions, such as plugging in the connection ca-ble are taken while driving.
l When inserting and removing the iPod/
iPhone, for safety’s sake first stop the vehi- cle.
l Depending on the status of the iPod/iPhone,
it may take some time until the device is rec-
ognized, or playback starts.NOTEl Buttons on the product will not operate
while iPod/iPhone is connected.
l iPod/iPhone specifications and settings may
mean that connection is not possible, or re- sult in differences in operation or display.
l Depending on audio data in the iPod/iPhone,
track information may not be displayed cor- rectly.
l Depending on the status of the vehicle and
device, the iPod/iPhone may not play back
after starting the engine.
l Data containing copyright information may
not play back.
l It is recommended that the iPod/iPhone
equaliser settings be set to flat.
l Operate the iPod/iPhone while connected to
this product.
l If the iPod/iPhone is connected via Blue-
tooth as a Bluetooth-capable audio device,
then do not connect the iPod/iPhone using
an iPod connection cable. Connection using both methods will result in erroneous opera-
tion.
l If an iPod/iPhone does not operate correctly,
then remove the iPod/iPhone from the prod-
uct, reset, then reconnect.
Play iPod
Press the MEDIA key to set the iPod as the
source.
The selected source is indicated on the dis-
play.
Listen to an iPod
7-57OKTE17E1For pleasant driving7