headlamp MITSUBISHI L200 2017 Owner's Manual (in English)
[x] Cancel search | Manufacturer: MITSUBISHI, Model Year: 2017, Model line: L200, Model: MITSUBISHI L200 2017Pages: 426, PDF Size: 14.12 MB
Page 4 of 426
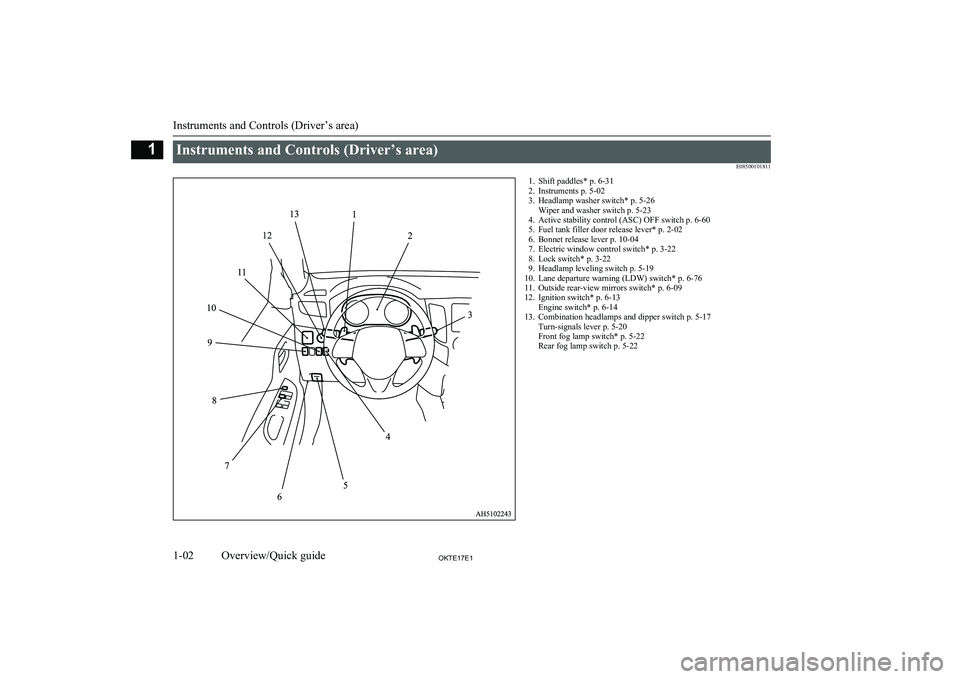
Instruments and Controls (Driver’s area)E085001018111. Shift paddles* p. 6-312. Instruments p. 5-02
3. Headlamp washer switch* p. 5-26 Wiper and washer switch p. 5-23
4. Active stability control (ASC) OFF switch p. 6-60
5. Fuel tank filler door release lever* p. 2-02
6. Bonnet release lever p. 10-04
7. Electric window control switch* p. 3-22
8. Lock switch* p. 3-22
9. Headlamp leveling switch p. 5-19
10. Lane departure warning (LDW) switch* p. 6-76
11. Outside rear-view mirrors switch* p. 6-09
12. Ignition switch* p. 6-13 Engine switch* p. 6-14
13. Combination headlamps and dipper switch p. 5-17 Turn-signals lever p. 5-20
Front fog lamp switch* p. 5-22
Rear fog lamp switch p. 5-22
Instruments and Controls (Driver’s area)
1-02OKTE17E1Overview/Quick guide1
Page 11 of 426
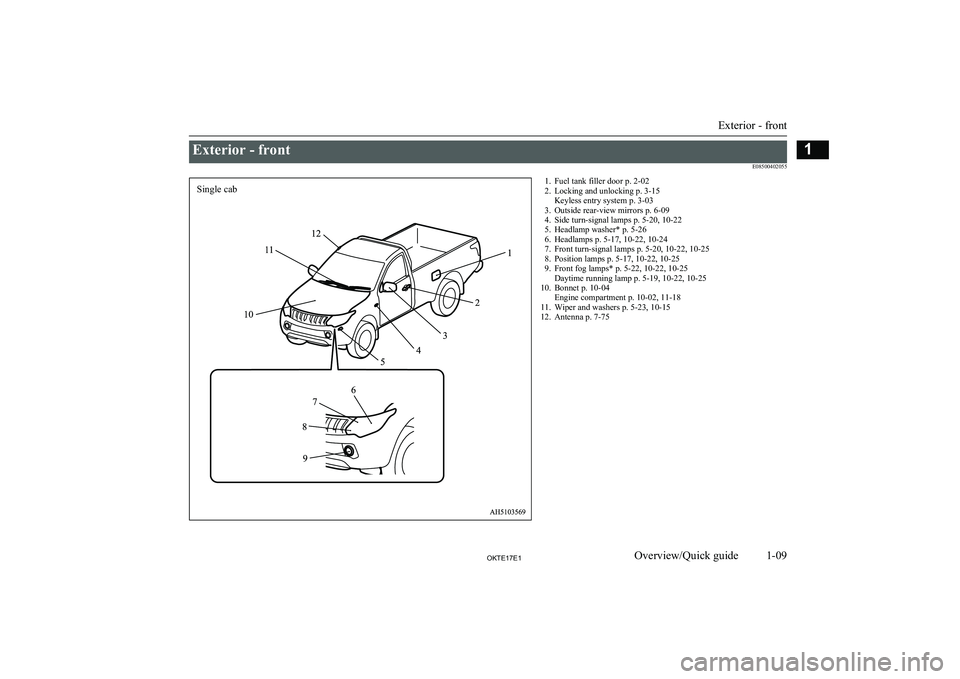
Exterior - front E085004020551. Fuel tank filler door p. 2-022. Locking and unlocking p. 3-15 Keyless entry system p. 3-03
3. Outside rear-view mirrors p. 6-09
4. Side turn-signal lamps p. 5-20, 10-22
5. Headlamp washer* p. 5-26
6. Headlamps p. 5-17, 10-22, 10-24
7. Front turn-signal lamps p. 5-20, 10-22, 10-25
8. Position lamps p. 5-17, 10-22, 10-25
9. Front fog lamps* p. 5-22, 10-22, 10-25 Daytime running lamp p. 5-19, 10-22, 10-25
10. Bonnet p. 10-04 Engine compartment p. 10-02, 11-18
11. Wiper and washers p. 5-23, 10-15
12. Antenna p. 7-75
Exterior - front
1-09OKTE17E1Overview/Quick guide1Single cab
Page 12 of 426
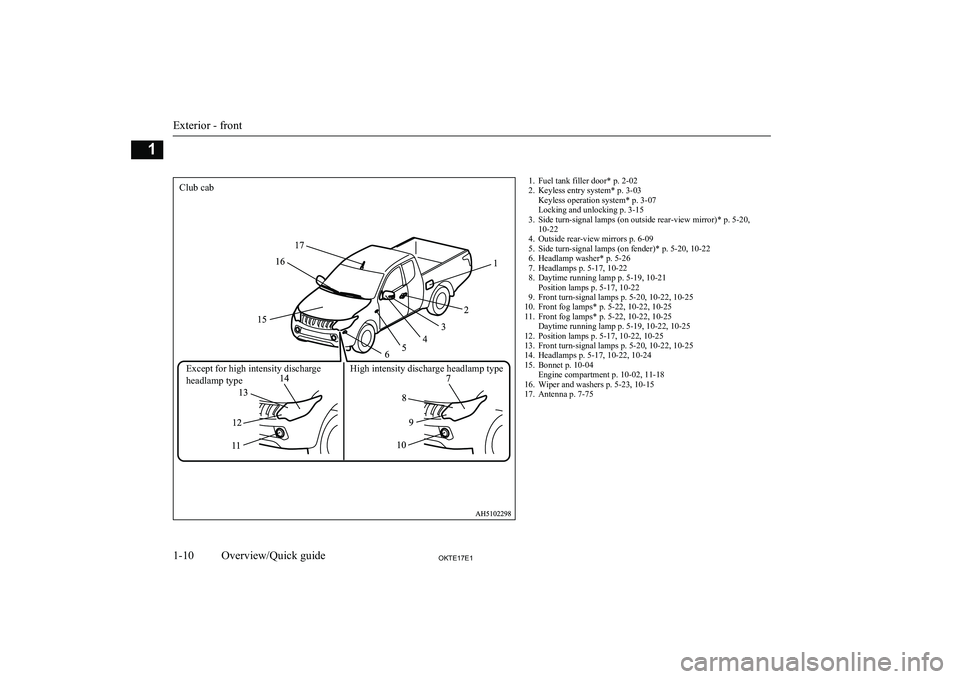
1. Fuel tank filler door* p. 2-02
2. Keyless entry system* p. 3-03 Keyless operation system* p. 3-07
Locking and unlocking p. 3-15
3. Side turn-signal lamps (on outside rear-view mirror)* p. 5-20, 10-22
4. Outside rear-view mirrors p. 6-09
5. Side turn-signal lamps (on fender)* p. 5-20, 10-22
6. Headlamp washer* p. 5-26
7. Headlamps p. 5-17, 10-22
8. Daytime running lamp p. 5-19, 10-21 Position lamps p. 5-17, 10-22
9. Front turn-signal lamps p. 5-20, 10-22, 10-25
10. Front fog lamps* p. 5-22, 10-22, 10-25
11. Front fog lamps* p. 5-22, 10-22, 10-25 Daytime running lamp p. 5-19, 10-22, 10-25
12. Position lamps p. 5-17, 10-22, 10-25
13. Front turn-signal lamps p. 5-20, 10-22, 10-25
14. Headlamps p. 5-17, 10-22, 10-24
15. Bonnet p. 10-04 Engine compartment p. 10-02, 11-18
16. Wiper and washers p. 5-23, 10-15
17. Antenna p. 7-75
Exterior - front
1-10OKTE17E1Overview/Quick guide1Club cabExcept for high intensity discharge
headlamp type High intensity discharge headlamp type
Page 13 of 426
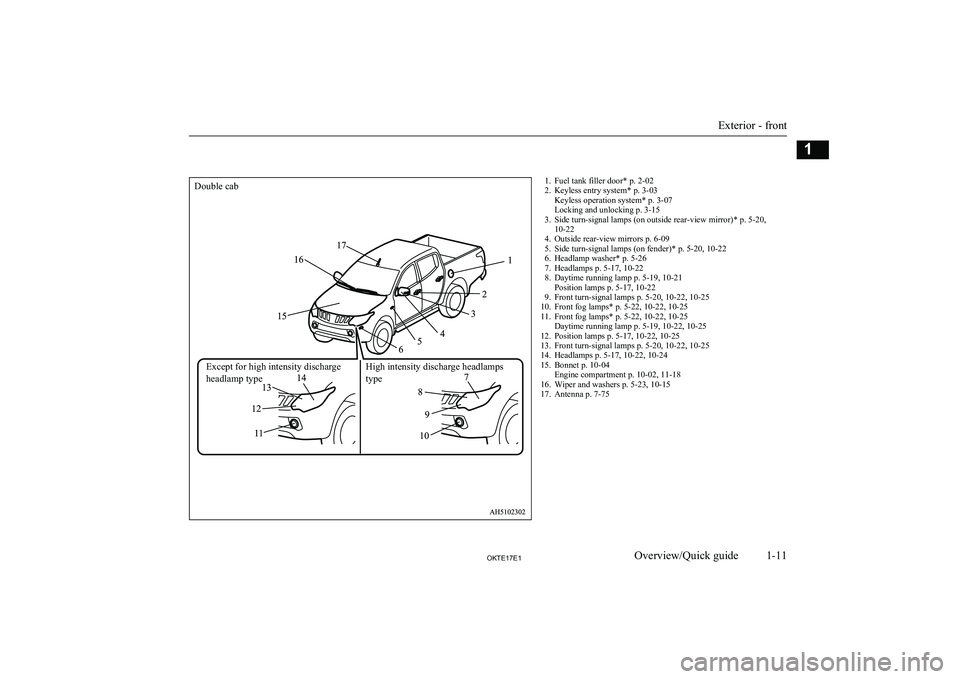
1. Fuel tank filler door* p. 2-02
2. Keyless entry system* p. 3-03 Keyless operation system* p. 3-07
Locking and unlocking p. 3-15
3. Side turn-signal lamps (on outside rear-view mirror)* p. 5-20, 10-22
4. Outside rear-view mirrors p. 6-09
5. Side turn-signal lamps (on fender)* p. 5-20, 10-22
6. Headlamp washer* p. 5-26
7. Headlamps p. 5-17, 10-22
8. Daytime running lamp p. 5-19, 10-21 Position lamps p. 5-17, 10-22
9. Front turn-signal lamps p. 5-20, 10-22, 10-25
10. Front fog lamps* p. 5-22, 10-22, 10-25
11. Front fog lamps* p. 5-22, 10-22, 10-25 Daytime running lamp p. 5-19, 10-22, 10-25
12. Position lamps p. 5-17, 10-22, 10-25
13. Front turn-signal lamps p. 5-20, 10-22, 10-25
14. Headlamps p. 5-17, 10-22, 10-24
15. Bonnet p. 10-04 Engine compartment p. 10-02, 11-18
16. Wiper and washers p. 5-23, 10-15
17. Antenna p. 7-75
Exterior - front
1-11OKTE17E1Overview/Quick guide1Double cabExcept for high intensity discharge
headlamp type High intensity discharge headlamps
type
Page 18 of 426
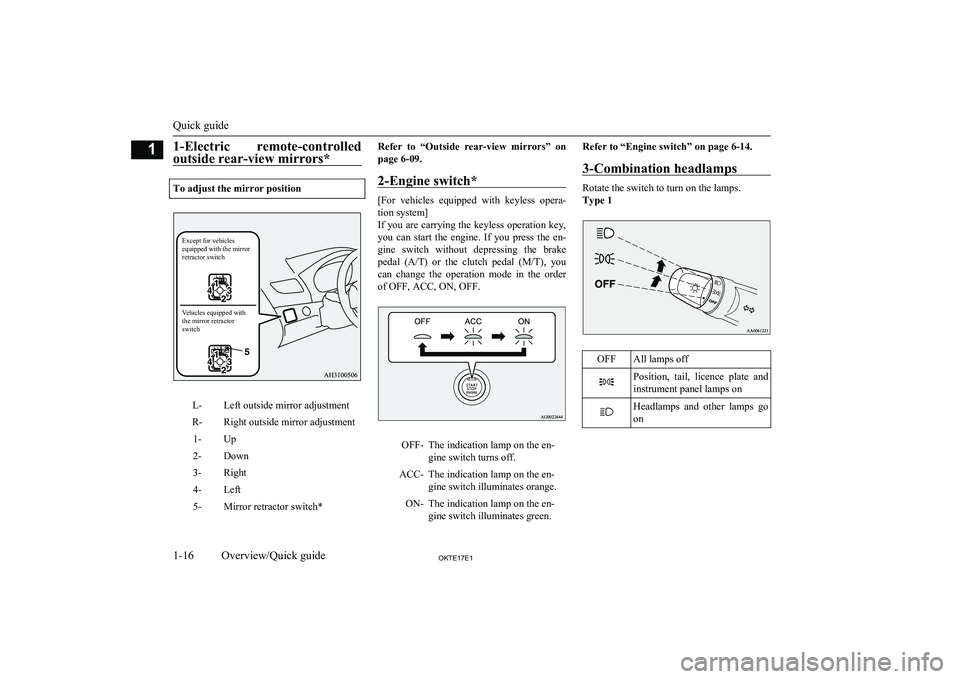
1-Electric remote-controlled
outside rear-view mirrors* To adjust the mirror position
L- Left outside mirror adjustment
R- Right outside mirror adjustment 1- Up
2- Down
3- Right
4- Left
5- Mirror retractor switch* Refer to “Outside rear-view mirrors” on
page 6-09.
2-Engine switch* [For vehicles equipped with keyless opera-
tion system]
If
you are carrying the keyless operation key,
you can start the engine. If you press the en- gine switch without depressing the brakepedal (A/T) or the clutch pedal (M/T), you
can change the operation mode in the order
of OFF, ACC, ON, OFF. OFF- The indication lamp on the en-
gine switch turns off.
ACC- The indication lamp on the en- gine switch illuminates orange.
ON- The indication lamp on the en- gine switch illuminates green. Refer to “Engine switch” on page 6-14.
3-Combination headlamps Rotate the switch to turn on the lamps.
Type 1
OFF All lamps off
Position, tail, licence plate and
instrument panel lamps on Headlamps and other lamps go
on Quick guide
1-16
OKTE17E1
Overview/Quick guide 1Except for vehicles
e
quipped with the mirror
retractor switch
V
the mirror retractor
switch
Page 19 of 426
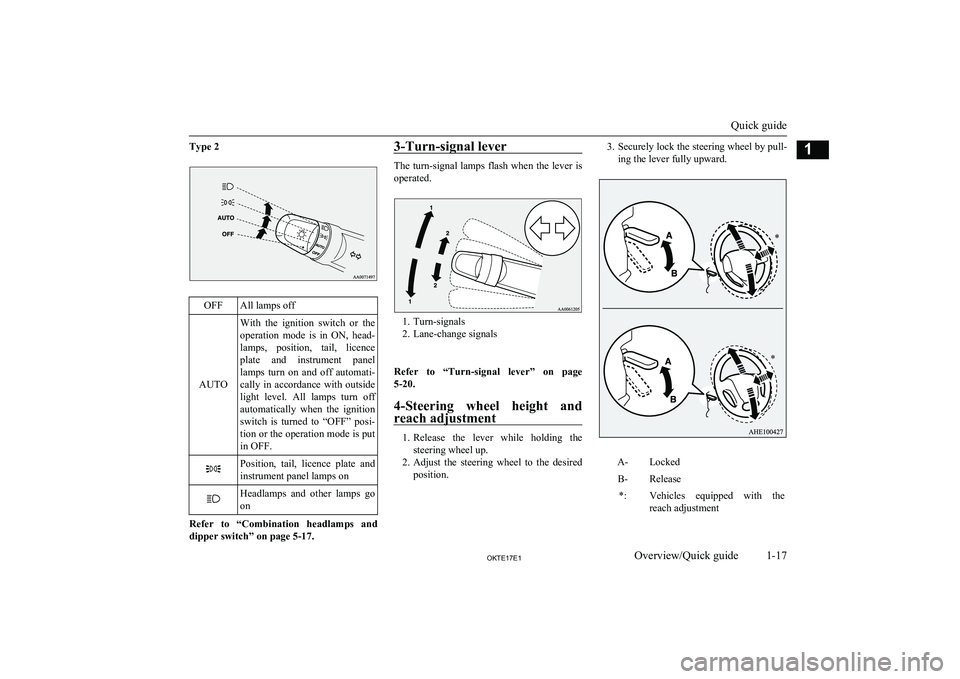
Type 2
OFF All lamps off
AUTO With the ignition switch or the
operation mode is in
ON, head-
lamps, position, tail, licence plate and instrument panellamps turn on and off automati-
cally in accordance with outside
light level. All lamps turn off automatically when the ignition
switch is turned to “OFF” posi-
tion or the operation mode is put in OFF. Position, tail, licence plate and
instrument panel lamps on Headlamps and other lamps go
on Refer to “Combination headlamps and
dipper switch” on page 5-17. 3-Turn-signal lever The turn-signal lamps flash when the lever is
operated. 1. Turn-signals
2.
Lane-change signals
Refer to
“Turn-signal
lever” on page
5-20.
4-Steering wheel height and
reach adjustment 1. Release the lever while holding the
steering wheel up.
2. Adjust the
steering wheel to the desired
position. 3. Securely lock the steering wheel by pull-
ing the lever fully upward. A- Locked
B- Release *: Vehicles equipped with the reach adjustment Quick guide
1-17
OKTE17E1 Overview/Quick guide 1
* *
Page 89 of 426
Instruments.......................................................................................... 5-02
Multi-information display................................................................... 5-02 Indication and warning lamps (multi information display)................ 5-12Indication lamps.................................................................................. 5-13
Warning lamps.................................................................................... 5-15
Combination headlamps and dipper switch........................................ 5-17
Headlamp levelling switch.................................................................. 5-19
Turn-signal lever................................................................................. 5-20
Hazard warning flasher switch............................................................5-21 Fog lamp switch*................................................................................ 5-22Wiper and washer switch.................................................................... 5-23
Rear window demister switch............................................................. 5-27
Horn switch......................................................................................... 5-28Instruments and controls
OKTE17E15
Page 105 of 426
refer to “Refill capacities” on page 11-18.Combination headlampsand dipper switch E00506004080
Headlamps
NOTElDo not leave the lamps on for a long time
while the engine is stationary (not running).A run-down battery could result.
l When it rains, or when the vehicle has been
washed, the inside of the lens sometimes be-
comes foggy, but this does not indicate a
functional problem.
When the lamp is switched on, the heat will remove the fog. However, if water gathers
inside the lamp, we recommend you to have it checked.Type 1
Rotate the switch to turn on the lamps.
OFFAll lamps offPosition, tail, licence plate and instru-
ment panel lamps onHeadlamps and other lamps go onType 2
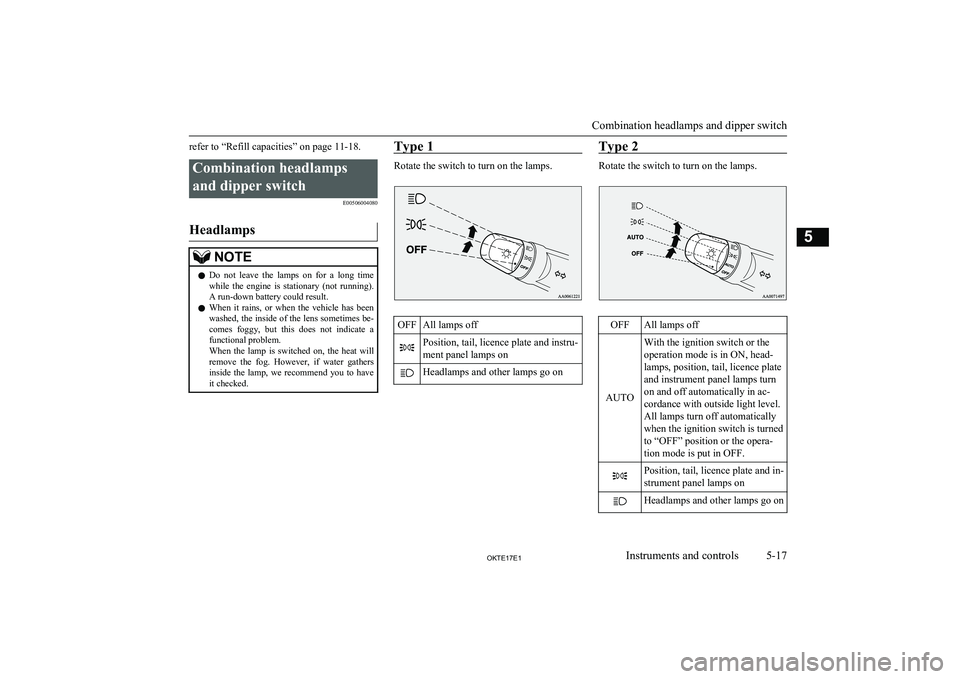
Rotate the switch to turn on the lamps.
OFFAll lamps off
AUTO
With the ignition switch or the
operation mode is in ON, head-
lamps, position, tail, licence plate
and instrument panel lamps turn
on and off automatically in ac-
cordance with outside light level.
All lamps turn off automatically
when the ignition switch is turned
to “OFF” position or the opera-
tion mode is put in OFF.Position, tail, licence plate and in-
strument panel lamps onHeadlamps and other lamps go on
Combination headlamps and dipper switch
5-17OKTE17E1Instruments and controls5
Page 106 of 426
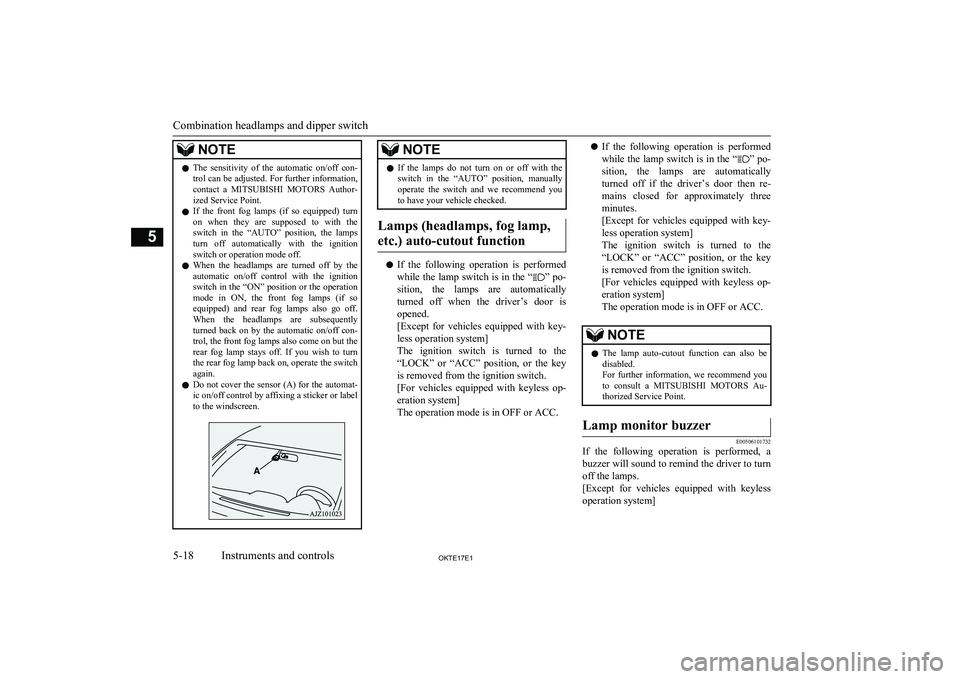
NOTElThe sensitivity of the automatic on/off con-
trol can be adjusted. For further information,contact a MITSUBISHI MOTORS Author-
ized Service Point.
l If the front fog lamps (if so equipped) turn
on when they are supposed to with theswitch in the “AUTO” position, the lamps
turn off automatically with the ignition
switch or operation mode off.
l When the headlamps are turned off by the
automatic on/off control with the ignition
switch in the “ON” position or the operation
mode in ON, the front fog lamps (if so
equipped) and rear fog lamps also go off.
When the headlamps are subsequently turned back on by the automatic on/off con-
trol, the front fog lamps also come on but the rear fog lamp stays off. If you wish to turn
the rear fog lamp back on, operate the switch again.
l Do not cover the sensor (A) for the automat-
ic on/off control by affixing a sticker or label
to the windscreen.NOTEl If the lamps do not turn on or off with the
switch in the “AUTO” position, manually
operate the switch and we recommend you
to have your vehicle checked.
Lamps (headlamps, fog lamp,
etc.) auto-cutout function
l If the following operation is performed
while the lamp switch is in the “” po-
sition, the lamps are automatically
turned off when the driver’s door is
opened.
[Except for vehicles equipped with key-
less operation system]
The ignition switch is turned to the
“LOCK” or “ACC” position, or the key is removed from the ignition switch.
[For vehicles equipped with keyless op- eration system]
The operation mode is in OFF or ACC.
l If the following operation is performed
while the lamp switch is in the “” po-
sition, the lamps are automatically
turned off if the driver’s door then re- mains closed for approximately three
minutes.
[Except for vehicles equipped with key-
less operation system]
The ignition switch is turned to the “LOCK” or “ACC” position, or the key
is removed from the ignition switch.
[For vehicles equipped with keyless op- eration system]
The operation mode is in OFF or ACC.NOTEl The lamp auto-cutout function can also be
disabled.
For further information, we recommend you
to consult a MITSUBISHI MOTORS Au-
thorized Service Point.Lamp monitor buzzer
E00506101732
If the following operation is performed, a
buzzer will sound to remind the driver to turn
off the lamps.
[Except for vehicles equipped with keyless
operation system]
Combination headlamps and dipper switch
5-18OKTE17E1Instruments and controls5
Page 107 of 426
If the driver’s door is opened when the key is
in the “LOCK” or “ACC” position or re-
moved from the ignition switch while the
lamps are on.
[For vehicles equipped with keyless opera- tion system]
If the driver’s door is opened when the opera- tion mode is in ACC or OFF while the lamps
are on.
In both cases, the buzzer will automatically
stop if the auto-cutoff function is activated, the lamp switch is turned off, or the door is
closed.Daytime running lamp
E00530601343
The daytime running lamps comes on when the engine is running and the lamp switch is
in the “OFF” or “AUTO” position and the
tail lamps are off.
Dipper (High/Low beam
change)
E00506201717
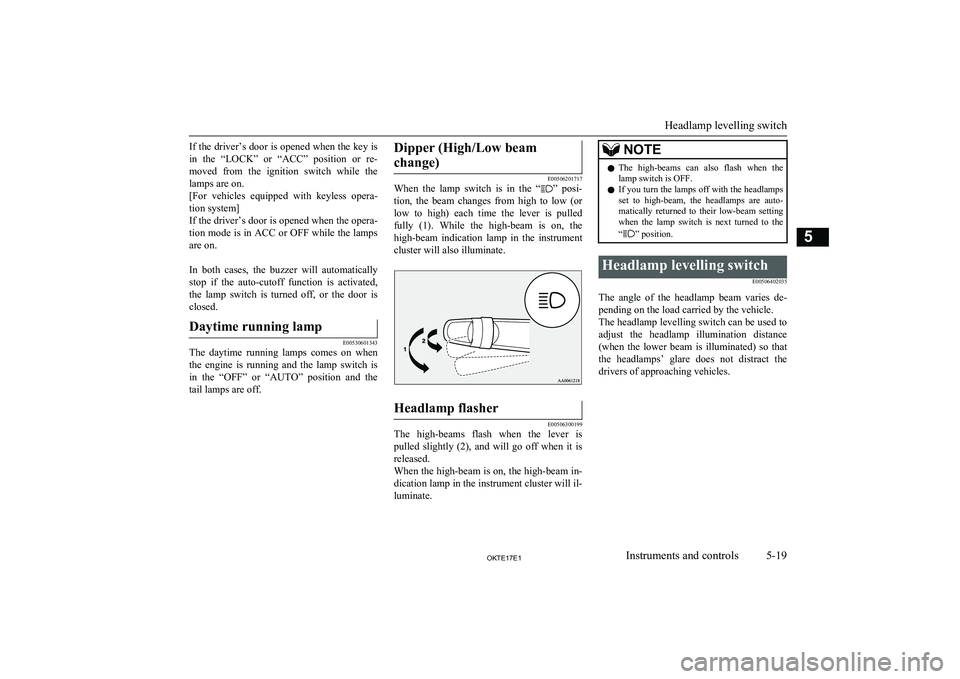
When the lamp switch is in the “” posi-
tion, the beam changes from high to low (or
low to high) each time the lever is pulled fully (1). While the high-beam is on, the
high-beam indication lamp in the instrument
cluster will also illuminate.
Headlamp flasher
E00506300199
The high-beams flash when the lever is pulled slightly (2), and will go off when it is
released.
When the high-beam is on, the high-beam in- dication lamp in the instrument cluster will il-
luminate.
NOTEl The high-beams can also flash when the
lamp switch is OFF.
l If you turn the lamps off with the headlamps
set to high-beam, the headlamps are auto- matically returned to their low-beam setting
when the lamp switch is next turned to the
“
” position.
Headlamp levelling switch
E00506402035
The angle of the headlamp beam varies de-pending on the load carried by the vehicle.The headlamp levelling switch can be used to
adjust the headlamp illumination distance (when the lower beam is illuminated) so that the headlamps’ glare does not distract thedrivers of approaching vehicles.
Headlamp levelling switch
5-19OKTE17E1Instruments and controls5