power steering MITSUBISHI L200 2018 (in English) User Guide
[x] Cancel search | Manufacturer: MITSUBISHI, Model Year: 2018, Model line: L200, Model: MITSUBISHI L200 2018Pages: 466, PDF Size: 28.42 MB
Page 187 of 466
Under either of the following conditions,however, using the switch does not allow you
to resume the previously set speed. In these
situations, repeat the speed setting procedure:
l The CRUISE CONTROL ON/OFF
switch is pressed.
l The ignition switch is turned OFF or the
operation mode is put in OFF.
l Indication lamp go off.Speed Limiter
E00633201110
The Speed Limiter is a driver assist functionto prevent from exceeding the speed set by
driver while engine power control.
CAUTIONl Because the system does not use service
brake (hydraulic brake), the vehicle speed may exceed the set speed on the downhill.
If a driver wants to keep the vehicle speed in such a situation, he/she must put on a servicebrake or downshift.NOTEl If the clutch pedal
(M/T) is depressed, the
Speed Limiter does not activate.If the vehicle speed exceeds the set speed,
control state “LIMIT” and the Speed Limit-
er’s symbol will blink in the combination me-
ter.
If the vehicle speed exceeds the set speed af- ter indicated control state “LIMIT” and the
Speed Limiter’s symbol, beep alert will sound a certain period of time.
While running without blinked control state “LIMIT” and the Speed Limiter’s symbol, if
you decrease the set speed and vehicle speed is more than set speed, control state “LIMIT” and the Speed Limiter’s symbol blinking
starts but beep alert is delayed.
In this case, when vehicle speed keeps ex- ceeding set speed for about 30 seconds after
control state “LIMIT” and the Speed Limit- er’s symbol are blinked, beep alert will sound
a certain period of time.
If the vehicle speeds decreases less than set
speeds, control state “LIMIT” and the Speed Limiter’s symbol stop blinking. When beep
alert is sounding, the beep alert also goes off.NOTEl However, this gives priority to audio and
visual signal of safety reasons or driver’s de-mand.
l If the set speed is too lower based on current
shift position, the Speed Limiter may not
limit the vehicle speed to prevent engine stall.Speed Limiter control switches
E00633301094
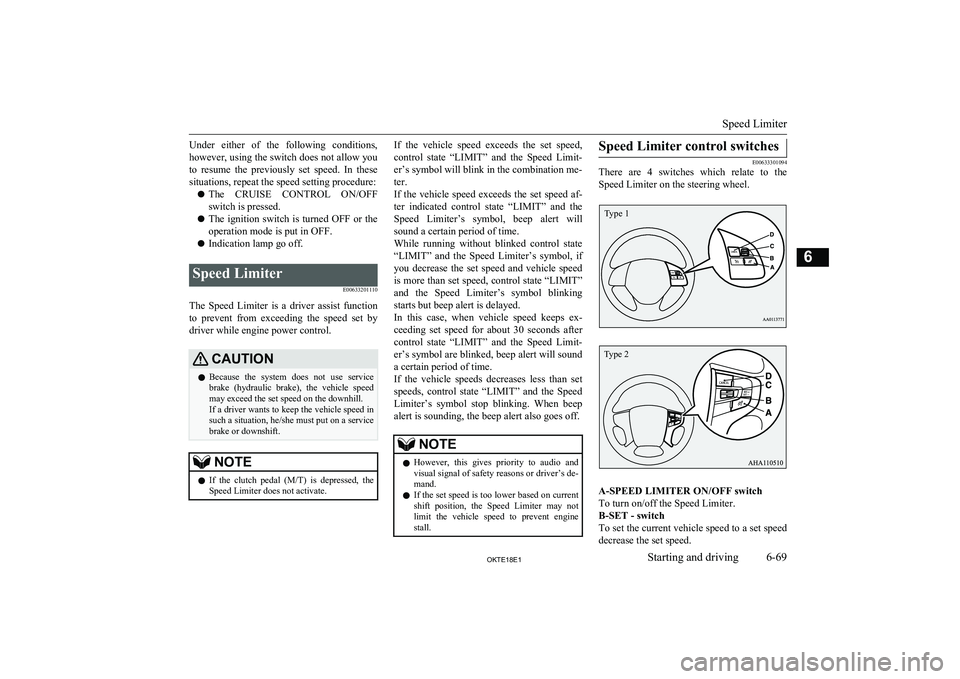
There are 4 switches which relate to the
Speed Limiter on the steering wheel.
A-SPEED LIMITER ON/OFF switch
To turn on/off the Speed Limiter.
B-SET - switch
To set the current vehicle speed to a set speed decrease the set speed.
Speed Limiter
6-69OKTE18E1Starting and driving6 Type 1 Type 2
Page 229 of 466
CAUTIONlDo not turn the volume up to the extent that
you cannot hear sounds from outside the ve-
hicle while driving.
Driving without being able to hear sounds from outside the vehicle may result in an ac-
cident.
l Do not insert your hand or fingers into the
disc slot.
This may result in injury.Operation Keys
E00737101134
Turn the Power ON/ OFF
E00737201193
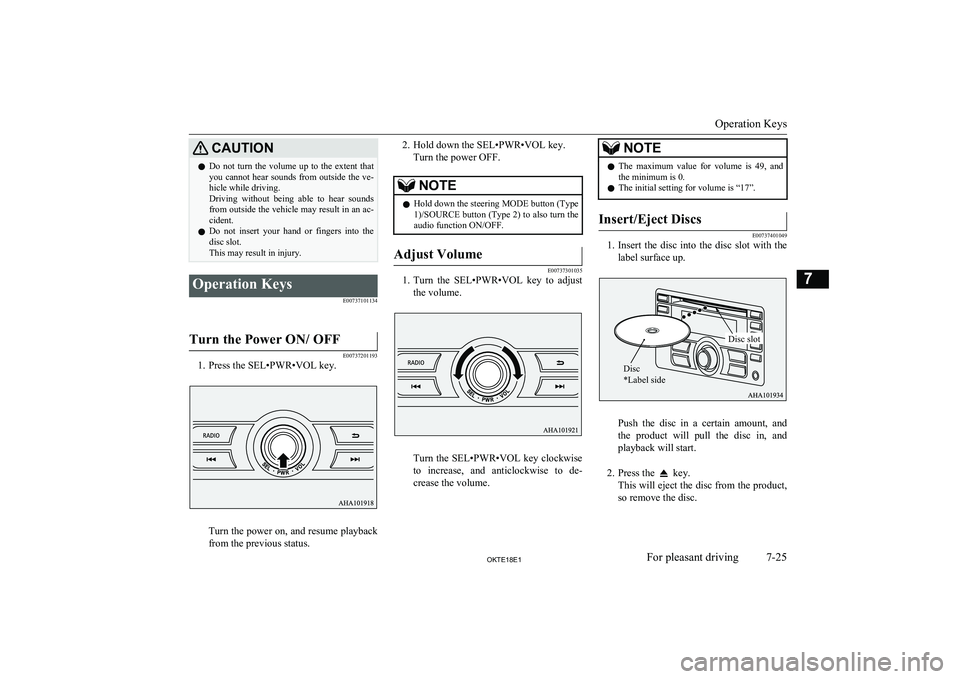
1. Press the SEL•PWR•VOL key.
Turn the power on, and resume playback
from the previous status.
2. Hold down the SEL•PWR•VOL key.
Turn the power OFF.NOTEl Hold down the steering MODE button (Type
1)/SOURCE button (Type 2) to also turn the
audio function ON/OFF.Adjust Volume
E00737301035
1. Turn the SEL•PWR•VOL key to adjust
the volume.
Turn the SEL•PWR•VOL key clockwise
to increase, and anticlockwise to de- crease the volume.
NOTEl The maximum value for volume is 49, and
the minimum is 0.
l The initial setting for volume is “17”.Insert/Eject Discs
E00737401049
1.
Insert the disc into the disc slot with the
label surface up.
Push the disc in a certain amount, and
the product will pull the disc in, and playback will start.
2. Press the
key.
This will eject the disc from the product,
so remove the disc.
Operation Keys
7-25OKTE18E1For pleasant driving7 Disc
*Label sideDisc slot
Page 252 of 466
CAUTIONlDo not turn the volume up to the extent that
you cannot hear sounds from outside the ve-
hicle while driving.
Driving without being able to hear sounds from outside the vehicle may result in an ac-
cident.
l Do not insert your hand or fingers into the
disc slot.
This may result in injury.Operation Keys
E00737101147Turn the Power ON/ OFF
E00737201207
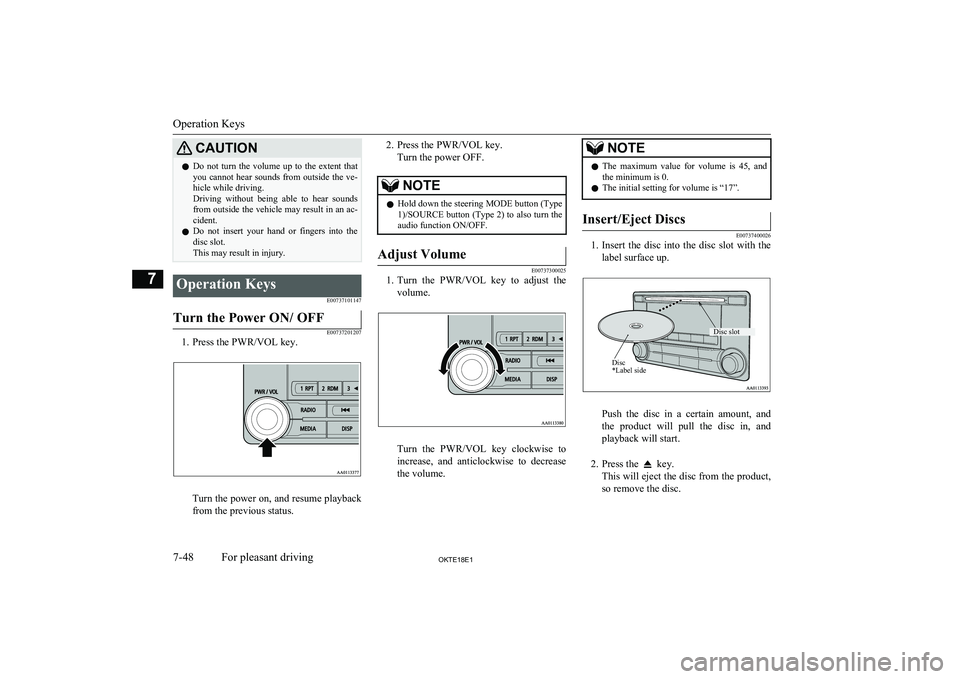
1. Press the PWR/VOL key.
Turn the power on, and resume playback
from the previous status.
2. Press the PWR/VOL key.
Turn the power OFF.NOTEl Hold down the steering MODE button (Type
1)/SOURCE button (Type 2) to also turn the
audio function ON/OFF.Adjust Volume
E00737300025
1. Turn the PWR/VOL key to adjust the
volume.
Turn the PWR/VOL key clockwise toincrease, and anticlockwise to decrease
the volume.
NOTEl The maximum value for volume is 45, and
the minimum is 0.
l The initial setting for volume is “17”.Insert/Eject Discs
E00737400026
1.
Insert the disc into the disc slot with the
label surface up.
Push the disc in a certain amount, and
the product will pull the disc in, and
playback will start.
2. Press the
key.
This will eject the disc from the product,
so remove the disc.
Operation Keys
7-48OKTE18E1For pleasant driving7 Disc *Label sideDisc slot
Page 281 of 466
NOTElFor vehicles equipped with the Keyless op-
eration system, if the operation mode is left
in ACC, the accessory power will automati- cally turn off after a certain period of time
and you will no longer be able to use the au- dio system. The accessory power comes on again if the engine switch is operated with it
in the “ACC” position. Refer to “ACC pow- er auto-cutout function” on page 6-15.
l The Bluetooth ®
2.0 interface cannot be used
if the Bluetooth ®
device has a flat battery or
the device power is turned off.
l Hands-free calls will not be possible if your
phone does not have service available.
l Some Bluetooth ®
devices are not compatible
with the Bluetooth ®
2.0 interface.
l You can confirm the Link System software
version by pressing the HANG-UP button 3
times (press and hold 2 times and then press briefly) within 10 seconds.
l In some countries, for details of the
Bluetooth ®
2.0 interface, you can see them
by accessing via the MITSUBISHI
MOTORS web site.
Please read and agree on the “Warning about
Links to the Web Sites of Other Companies”
because it connects to other than MITSUBISHI MOTORS website.
http://www.mitsubishi-motors.com/en/prod-
ucts/ index.html
l Software updates by cellular phone/digital
audio device manufacturers may change/
alter device connectivity.NOTEl For vehicles equipped with the ERA-GLO-
NASS, the Bluetooth ®
2.0 interface cannot
be used while an emergency call is activated.
Steering control switch and microphone
® p. 7-77
Voice recognition function ® p. 7-78
Useful voice commands ® p. 7-79
Speaker enrollment function ® p. 7-81
Connecting the Bluetooth® 2.0 interface and Bluetooth® device ® p. 7-82
Operating a music player connected via Blue-
tooth® ® p. 7-86
How to make or receive hands-free calls ® p. 7-86
Phone book function ® p. 7-89
Steering control switch and mi-
crophone
E00727201578
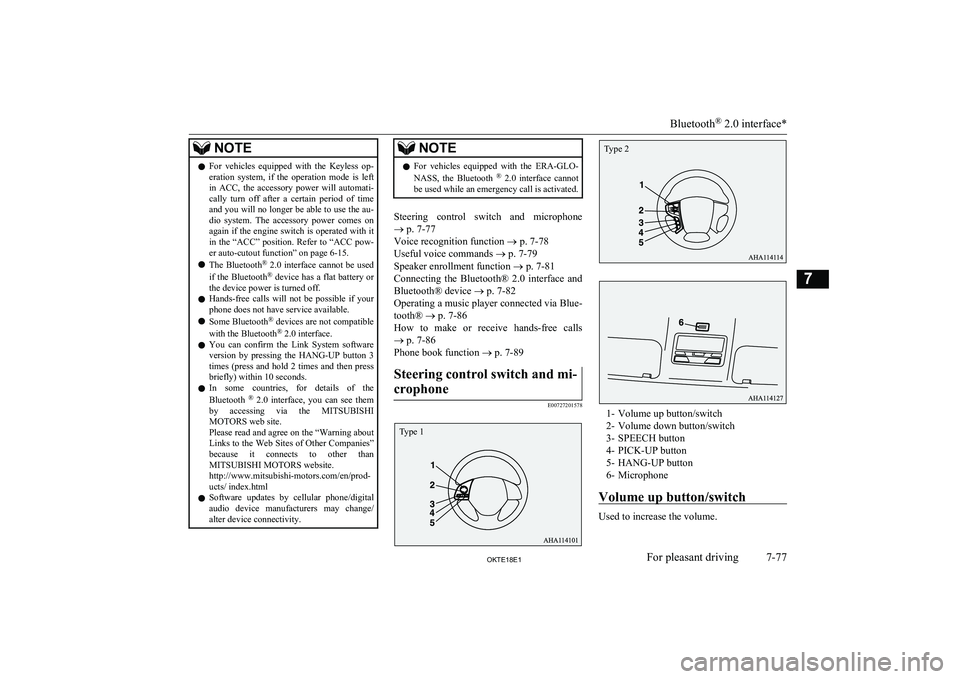
1- Volume up button/switch
2- Volume down button/switch
3- SPEECH button
4- PICK-UP button
5- HANG-UP button
6- Microphone
Volume up button/switch
Used to increase the volume.
Bluetooth ®
2.0 interface*
7-77OKTE18E1For pleasant driving7 Type 1 Type 2
Page 321 of 466
WARNINGlIf any of the check results are not normal,
the red lamp illuminates (for approxi- mately 5 seconds) and the buzzer sounds 3times. In this case, there is a possible fail-
ure in the system. Have the system inspec- ted by a MITSUBISHI MOTORS Au-
thorized Service Point immediately.
6. When the green lamp extinguishes, the
test mode is completed.
If the vehicle breaks down
E00800101137
If the vehicle breaks down on the road, moveit to the shoulder and use the hazard warning
flashers and/or the warning triangle etc.
Refer to “Hazard warning flasher switch” on page 5-21.
If the engine stops/fails
Vehicle operation and control are affected if
the engine stops. Before moving the vehicle to a safe area, be aware of the following:
l The brake booster becomes inoperative
and the pedal effort will increase. Press
down the brake pedal harder than usual.
l Since the power steering system is no
longer operative, the steering wheel feels heavy when turning it.
If the operation mode
cannot be changed to OFF (vehicles equipped with the
keyless operation system) E00804900077
If the operation mode cannot be changed to OFF, perform the following procedure. 1. Move the selector lever to the “P”
(PARK) position, and then change the operation mode to OFF. (For vehicles with A/T)
2. One of the other causes could be low
battery voltage. If this occurs, the key-
less entry system, keyless operation
function and steering lock will also not operate. Contact a MITSUBISHI
MOTORS Authorized Service Point.Emergency starting
E00800504132
If the engine cannot be started because thebattery is weak or dead, the battery from an-other vehicle can be used with jumper cables to start the engine.
WARNINGl To start the engine using jumper cables
connected from another vehicle, perform
the correct procedures according to the instruction below. Incorrect procedures could result in a fire or explosion or dam-
age to the vehicles.
l Keep sparks, cigarettes and flames away
from the battery because the battery may produce an explosion.CAUTIONl Do not attempt to start the engine by pulling
or pushing the vehicle.
It could damage your vehicle.
l Check the other vehicle. It must have a 12-
volt battery.
If the other system isn’t 12-volt, shorting can
damage both vehicles.
l Use the proper cables suitable for the battery
size to prevent overheating of the cables.
l Check the jumper cables for damage and
corrosion before use.
l Always wear protective eye goggles when
working near the battery.
l Keep the battery out of the reach of children.
1.
Get the vehicles close enough so the
jumper cables can reach, but be sure the vehicles aren’t touching each other.
2. Turn off all lamps, heater and other elec-
trical loads.
If the vehicle breaks down
8-07OKTE18E1For emergencies8
Page 340 of 466
NOTElSecure the tow rope to the same side towing
hook, to keep the tow rope as straight as pos-
sible.
2. Keep the engine running.
If the engine is not running, perform the
following operation to unlock the steer- ing wheel.
[Except for vehicles equipped with key-
less operation system]
On vehicles with manual transmission, turn the ignition switch to the “ACC” or
“ON” position.
On vehicles with automatic transmis- sion, turn the ignition switch to the
“ON” position.
[For vehicles with the keyless operation
system]
On vehicles with manual transmission, put the operation mode in ACC or ON.
On vehicles with automatic transmis- sion, put the operation mode in ON.
NOTEl For vehicles equipped with the Auto Stop &
Go (AS&G) system, press the “Auto Stop &Go (AS&G) OFF” switch to deactivate theAuto Stop & Go (AS&G) system before stopping the vehicle.
Refer to “To deactivate” on page 6-26.WARNINGl When the engine is not running, the brake
booster and power steering pump do notoperate. This means higher brake depres-sion force and higher steering effort arerequired. Therefore, vehicle operation is
very difficult.CAUTIONl Do not leave the ignition switch in the
“LOCK” position or the operation mode in
OFF. The steering wheel will lock, causing loss of control.
3. Place the gearshift lever in the “N”
(Neutral) position (manual transmission) or the selector lever in the “N” (NEU-
TRAL) position (automatic transmis-
sion).
4. On 4WD vehicles, set the drive mode se-
lector to the “2H” position.
5. Turn on the hazard warning lamps if re-
quired by law. (Follow the local driving
laws and regulations.)
6. During towing make sure that close con-
tact is maintained between the drivers of
both vehicles, and that the vehicles trav- el at low speed.
WARNINGl Avoid sudden braking, acceleration and
steering wheel movements; such drivingoperation could cause damage to the tow-
ing hook or tow rope.
People in the vicinity could be injured as a
result.
l When going down a long slope, the brakes
may overheat, reducing effectiveness.
Have your vehicle transported by a tow truck.CAUTIONl The person in the vehicle being towed must
pay attention to the brake lamps of the tow- ing vehicle and make sure the rope never be-
comes slack.
l When a vehicle with an automatic transmis-
sion is to be towed by another vehicle with
all the wheels on the ground, make sure that the towing speed and distance given below
are never exceeded, avoiding damage to the
transmission.
Towing speed: 30 km/h (19 mph)
Towing distance: 80 km (50 miles)
For the towing speed and the towing dis- tance, follow the local driving laws and reg-
ulations.
Towing
8-26OKTE18E1For emergencies8
Page 349 of 466
Service precautions........................................................................... 10-02
Catalytic converter............................................................................ 10-03
Bonnet............................................................................................... 10-04
Engine oil.......................................................................................... 10-05 Engine coolant...................................................................................10-06
Washer fluid...................................................................................... 10-08
Brake fluid.........................................................................................10-08
Clutch fluid*..................................................................................... 10-09 Power steering fluid.......................................................................... 10-09
Battery............................................................................................... 10-10 Tyres..................................................................................................10-12Wiper blade rubber replacement....................................................... 10-15
General maintenance......................................................................... 10-16
Fusible links...................................................................................... 10-17
Fuses..................................................................................................10-17
Replacement of lamp bulbs............................................................... 10-22
Masking the headlamps.....................................................................10-31Maintenance
OKTE18E110
Page 351 of 466
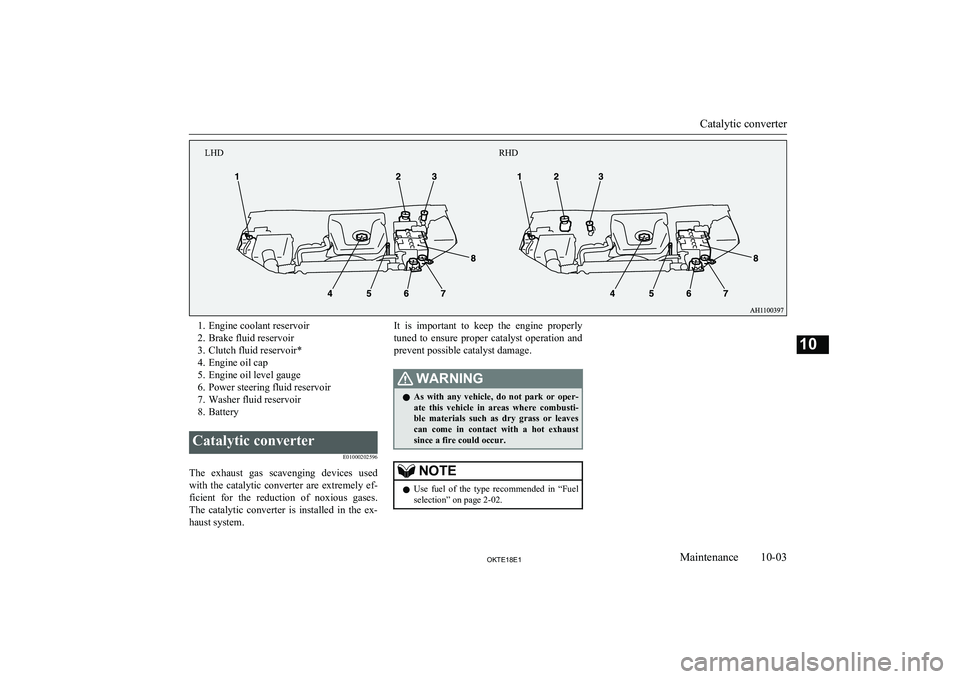
1. Engine coolant reservoir
2. Brake fluid reservoir
3. Clutch fluid reservoir*
4. Engine oil cap
5. Engine oil level gauge
6. Power steering fluid reservoir
7. Washer fluid reservoir
8. BatteryCatalytic converter
E01000202596
The exhaust gas scavenging devices usedwith the catalytic converter are extremely ef- ficient for the reduction of noxious gases.
The catalytic converter is installed in the ex- haust system.
It is important to keep the engine properly
tuned to ensure proper catalyst operation and prevent possible catalyst damage.WARNINGl As with any vehicle, do not park or oper-
ate this vehicle in areas where combusti- ble materials such as dry grass or leaves
can come in contact with a hot exhaust
since a fire could occur.NOTEl Use fuel of the type recommended in
“Fuel
selection” on page 2-02.
Catalytic converter
10-03OKTE18E1Maintenance10RHD
LHD
Page 357 of 466
CAUTIONlUse only the specified brake fluid.
Do not mix or add different brands of brake fluid to prevent chemical reactions.
Do not let any petroleum-based fluid touch, mix with, or get into the brake fluid.
This will damage the seals.
l Keep the reservoir tank cap closed to pre-
vent the brake fluid from deteriorating ex- cept maintenance.
l Clean the filler cap before removing and
close the cap securely after maintenance.Clutch fluid*
E01001001581
To check the fluid level
The clutch fluid in the master cylinder should
be checked when performing other under- hood service. In addition, the system shouldbe checked for leakage at the same time.
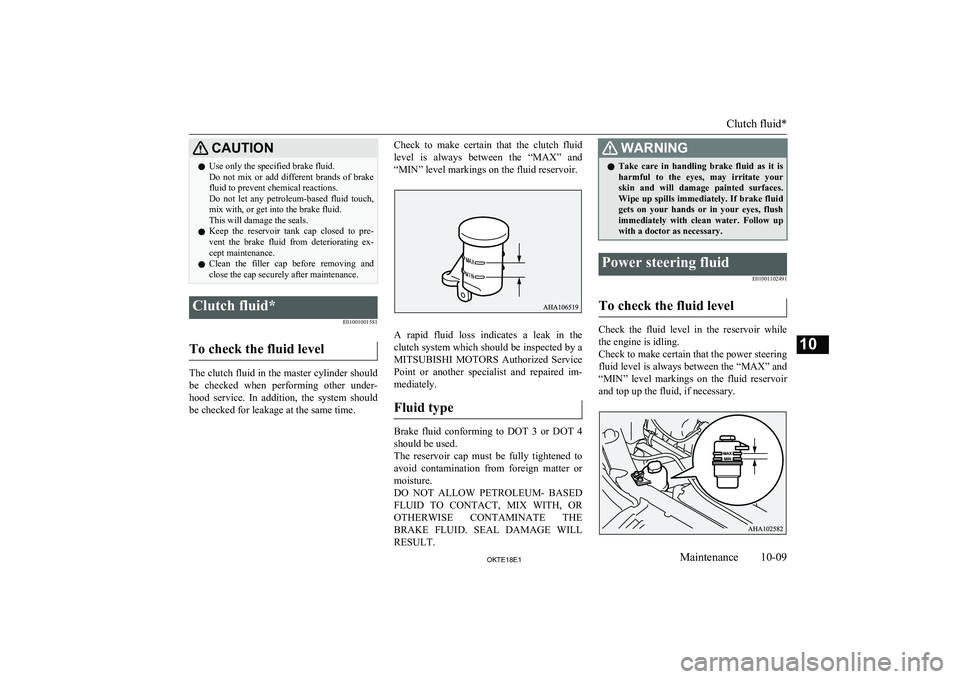
Check to make certain that the clutch fluid
level is always between the “MAX” and
“MIN” level markings on the fluid reservoir.
A rapid fluid loss indicates a leak in the
clutch system which should be inspected by a
MITSUBISHI MOTORS Authorized Service
Point or another specialist and repaired im- mediately.
Fluid type
Brake fluid conforming to DOT 3 or DOT 4 should be used.
The reservoir cap must be fully tightened to avoid contamination from foreign matter or
moisture.
DO NOT ALLOW PETROLEUM- BASED FLUID TO CONTACT, MIX WITH, OR
OTHERWISE CONTAMINATE THE BRAKE FLUID. SEAL DAMAGE WILLRESULT.
WARNINGl Take care in handling brake fluid as it is
harmful to the eyes, may irritate your
skin and will damage painted surfaces. Wipe up spills immediately. If brake fluid
gets on your hands or in your eyes, flush immediately with clean water. Follow up
with a doctor as necessary.Power steering fluid
E01001102491
To check the fluid level
Check the fluid level in the reservoir whilethe engine is idling.
Check to make certain that the power steering
fluid level is always between the “MAX” and
“MIN” level markings on the fluid reservoir
and top up the fluid, if necessary.
Clutch fluid*
10-09OKTE18E1Maintenance10
Page 358 of 466
Fluid type
Use “MITSUBISHI MOTORS GENUINE
PSF (Power Steering Fluid)”.
Battery
E01001203662
The condition of the battery is very important
for quick starting of the engine and proper functioning of the vehicle’s electrical system.
Regular inspection and care are especially
important in cold weather.
Checking battery electrolytelevel
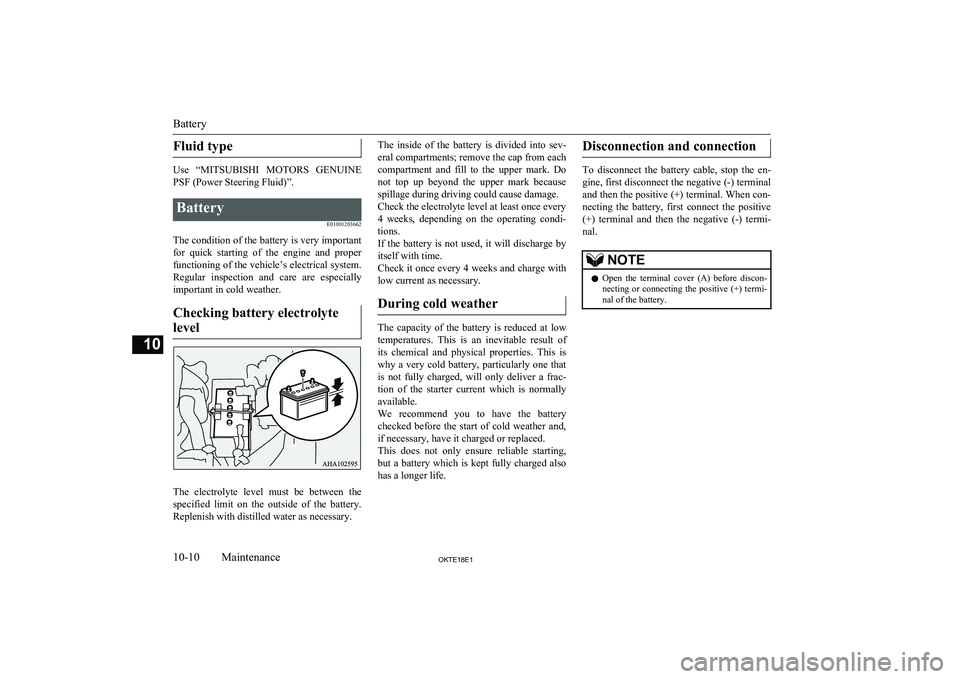
The electrolyte level must be between the specified limit on the outside of the battery.
Replenish with distilled water as necessary.
The inside of the battery is divided into sev-
eral compartments; remove the cap from each
compartment and fill to the upper mark. Do
not top up beyond the upper mark because spillage during driving could cause damage.
Check the electrolyte level at least once every
4 weeks, depending on the operating condi- tions.
If the battery is not used, it will discharge by
itself with time.
Check it once every 4 weeks and charge with
low current as necessary.
During cold weather
The capacity of the battery is reduced at low temperatures. This is an inevitable result of
its chemical and physical properties. This is why a very cold battery, particularly one that
is not fully charged, will only deliver a frac- tion of the starter current which is normallyavailable.
We recommend you to have the battery checked before the start of cold weather and,if necessary, have it charged or replaced.
This does not only ensure reliable starting,
but a battery which is kept fully charged also has a longer life.
Disconnection and connection
To disconnect the battery cable, stop the en-
gine, first disconnect the negative (-) terminal and then the positive (+) terminal. When con-
necting the battery, first connect the positive
(+) terminal and then the negative (-) termi-
nal.
NOTEl Open the terminal cover (A) before discon-
necting or connecting the positive (+) termi-
nal of the battery.
Battery
10-10OKTE18E1Maintenance10