MITSUBISHI L200 2018 Owner's Manual (in English)
Manufacturer: MITSUBISHI, Model Year: 2018, Model line: L200, Model: MITSUBISHI L200 2018Pages: 466, PDF Size: 28.42 MB
Page 371 of 466
Outside
E01003305254
Front
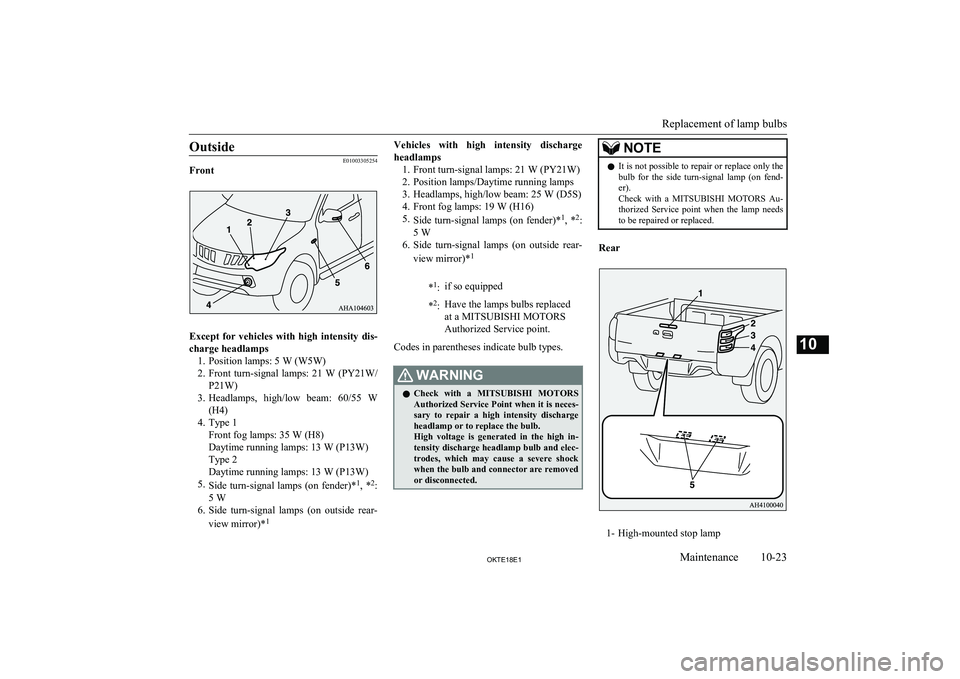
Except for vehicles with high intensity dis-
charge headlamps 1. Position lamps: 5 W (W5W)
2. Front turn-signal lamps: 21 W (PY21W/
P21W)
3. Headlamps, high/low beam: 60/55 W
(H4)
4. Type 1 Front fog lamps: 35 W (H8)
Daytime running lamps: 13 W (P13W)
Type 2
Daytime running lamps: 13 W (P13W)
5. Side turn-signal lamps (on fender)* 1
, * 2
:
5 W
6. Side turn-signal lamps (on outside rear-
view mirror)* 1
Vehicles with high intensity discharge
headlamps 1. Front turn-signal lamps: 21 W (PY21W)
2. Position lamps/Daytime running lamps
3. Headlamps, high/low beam: 25 W (D5S) 4. Front fog lamps: 19 W (H16)
5. Side turn-signal lamps (on fender)* 1
, * 2
:
5 W
6. Side turn-signal lamps (on outside rear-
view mirror)* 1*1
:if so equipped* 2
:Have the lamps bulbs replaced
at a MITSUBISHI MOTORS
Authorized Service point.
Codes in parentheses indicate bulb types.
WARNINGl Check with a
MITSUBISHI MOTORS
Authorized Service Point when it is neces- sary to repair a high intensity discharge
headlamp or to replace the bulb.
High voltage is generated in the high in-
tensity discharge headlamp bulb and elec- trodes, which may cause a severe shock
when the bulb and connector are removed or disconnected.NOTEl It is not possible to repair or replace only the
bulb for the side turn-signal lamp (on fend-
er).
Check with a MITSUBISHI MOTORS Au-
thorized Service point when the lamp needs to be repaired or replaced.
Rear
1- High-mounted stop lamp
Replacement of lamp bulbs
10-23OKTE18E1Maintenance10
Page 372 of 466
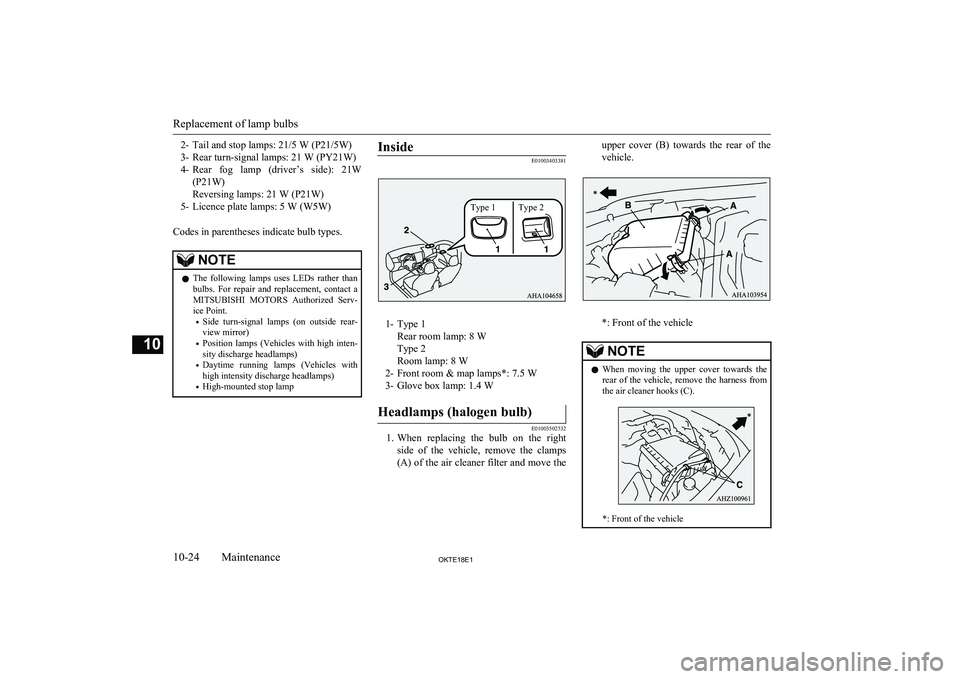
2- Tail and stop lamps: 21/5 W (P21/5W)
3- Rear turn-signal lamps: 21 W (PY21W) 4- Rear fog lamp (driver’s side): 21W
(P21W)
Reversing lamps: 21 W (P21W)
5- Licence plate lamps: 5 W (W5W)
Codes in parentheses indicate bulb types.NOTEl The following lamps uses LEDs rather than
bulbs. For repair and replacement, contact a
MITSUBISHI MOTORS Authorized Serv-
ice Point.
• Side turn-signal lamps (on outside rear-
view mirror)
• Position lamps (Vehicles with high inten-
sity discharge headlamps)
• Daytime running lamps (Vehicles with
high intensity discharge headlamps)
• High-mounted stop lampInside
E01003403381
1- Type 1
Rear room lamp: 8 W
Type 2
Room lamp: 8 W
2- Front room & map lamps*: 7.5 W
3- Glove box lamp: 1.4 W
Headlamps (halogen bulb)
E01003502532
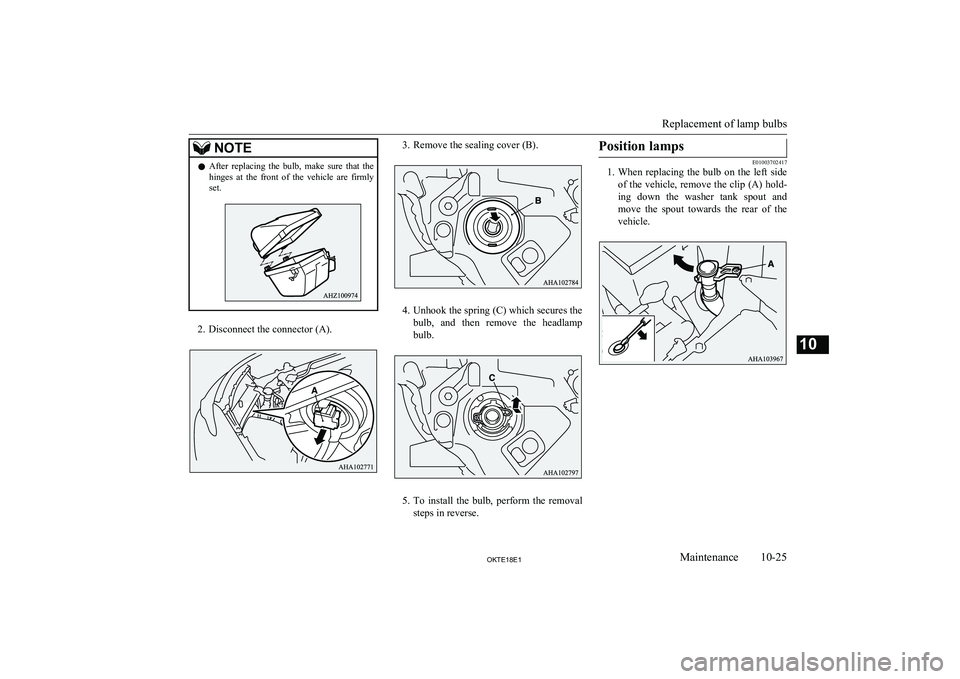
1. When replacing the bulb on the right
side of the vehicle, remove the clamps
(A) of the air cleaner filter and move the
upper cover (B) towards the rear of the
vehicle.
*: Front of the vehicle
NOTEl When moving the upper cover towards the
rear of the vehicle, remove the harness fromthe air cleaner hooks (C).
*: Front of the vehicle
Replacement of lamp bulbs
10-24OKTE18E1Maintenance10 Type 1 Type 2
Page 373 of 466
NOTElAfter replacing the bulb, make sure that the
hinges at the front of the vehicle are firmly
set.
2. Disconnect the connector (A).
3. Remove the sealing cover (B).
4. Unhook the spring (C) which secures the
bulb, and then remove the headlamp bulb.
5. To install the bulb, perform the removal
steps in reverse.
Position lamps
E01003702417
1. When replacing the bulb on the left side
of the vehicle, remove the clip (A) hold-
ing down the washer tank spout and
move the spout towards the rear of the vehicle.
Replacement of lamp bulbs
10-25OKTE18E1Maintenance10
Page 374 of 466
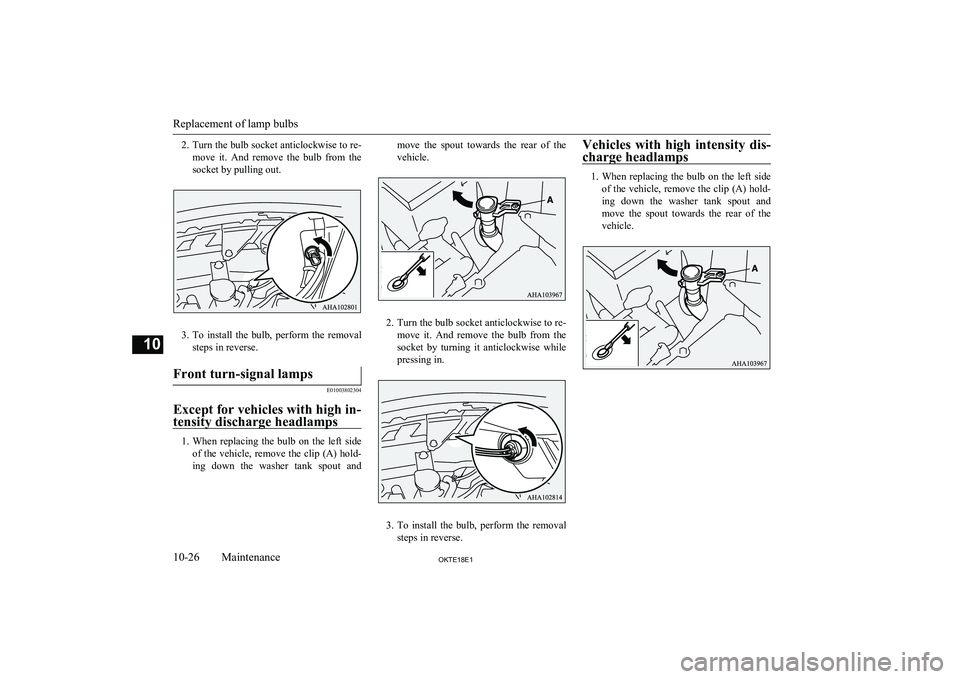
2.Turn the bulb socket anticlockwise to re-
move it. And remove the bulb from the
socket by pulling out.
3. To install the bulb, perform the removal
steps in reverse.
Front turn-signal lamps
E01003802304
Except for vehicles with high in- tensity discharge headlamps
1. When replacing the bulb on the left side
of the vehicle, remove the clip (A) hold- ing down the washer tank spout and
move the spout towards the rear of the
vehicle.
2. Turn the bulb socket anticlockwise to re-
move it. And remove the bulb from the
socket by turning it anticlockwise while pressing in.
3. To install the bulb, perform the removal
steps in reverse.
Vehicles with high intensity dis-
charge headlamps
1. When replacing the bulb on the left side
of the vehicle, remove the clip (A) hold- ing down the washer tank spout and
move the spout towards the rear of the vehicle.Replacement of lamp bulbs
10-26OKTE18E1Maintenance10
Page 375 of 466
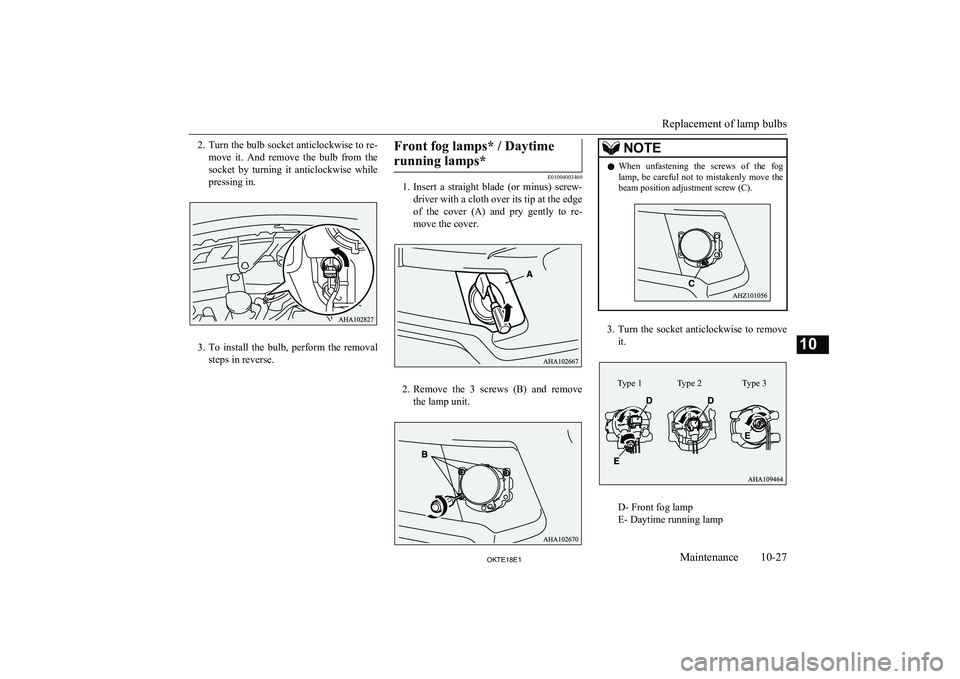
2.Turn the bulb socket anticlockwise to re-
move it. And remove the bulb from the
socket by turning it anticlockwise while pressing in.
3. To install the bulb, perform the removal
steps in reverse.
Front fog lamps* / Daytime
running lamps*
E01004003469
1. Insert a straight blade (or minus) screw-
driver with a cloth over its tip at the edge
of the cover (A) and pry gently to re- move the cover.
2. Remove the 3 screws (B) and remove
the lamp unit.
NOTEl When unfastening the screws of the fog
lamp, be careful not to mistakenly move thebeam position adjustment screw (C).
3. Turn the socket anticlockwise to remove
it.
D- Front fog lamp
E- Daytime running lamp
Replacement of lamp bulbs
10-27OKTE18E1Maintenance10 Type 1 Type 2 Type 3
Page 376 of 466
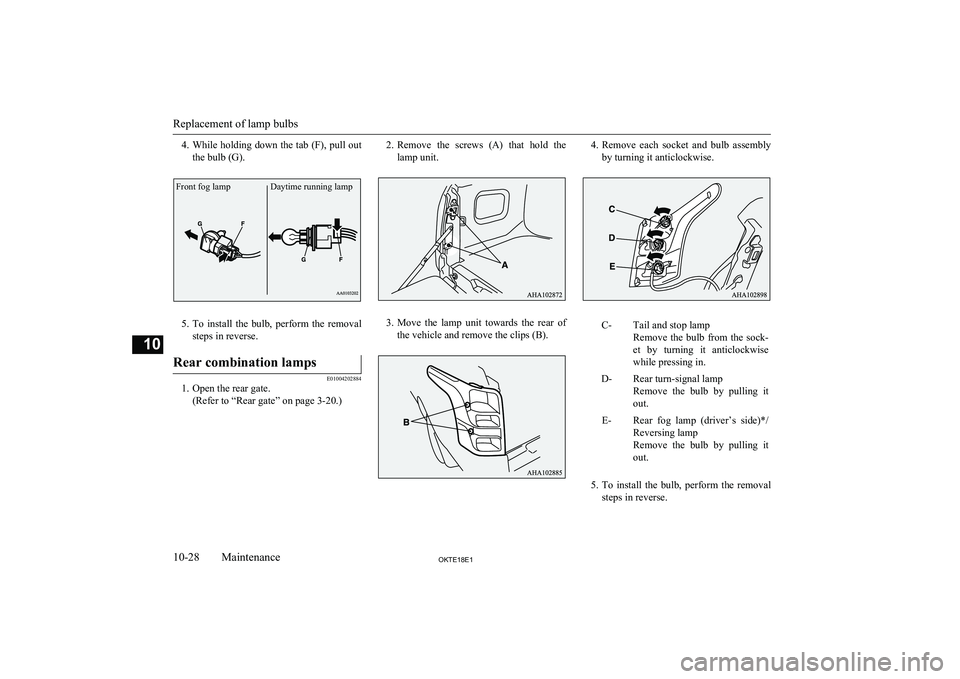
4.While holding down the tab (F), pull out
the bulb (G).
5. To install the bulb, perform the removal
steps in reverse.
Rear combination lamps
E01004202884
1. Open the rear gate. (Refer to “Rear gate” on page 3-20.)
2.Remove the screws (A) that hold the
lamp unit.
3. Move the lamp unit towards the rear of
the vehicle and remove the clips (B).
4. Remove each socket and bulb assembly
by turning it anticlockwise.C-Tail and stop lamp
Remove the bulb from the sock- et by turning it anticlockwise
while pressing in.D-Rear turn-signal lamp
Remove the bulb by pulling it
out.E-Rear fog lamp (driver’s side)*/ Reversing lamp
Remove the bulb by pulling it out.
5. To install the bulb, perform the removal
steps in reverse.
Replacement of lamp bulbs
10-28OKTE18E1Maintenance10Front fog lamp Daytime running lamp
Page 377 of 466
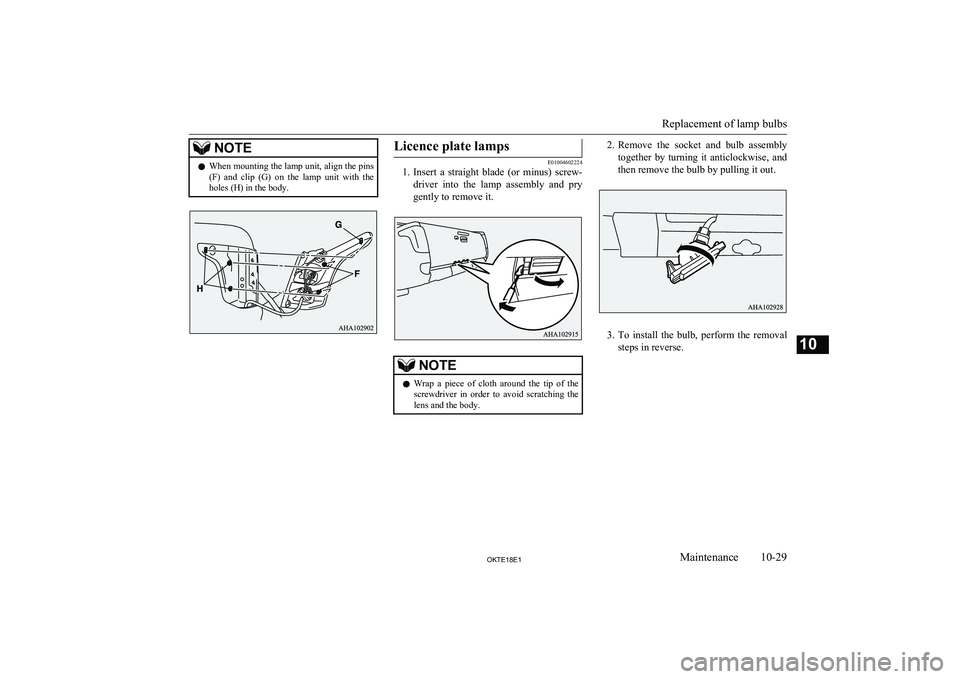
NOTElWhen mounting the lamp unit, align the pins
(F) and clip (G) on the lamp unit with the
holes (H) in the body.Licence plate lamps
E01004602224
1. Insert a straight blade (or minus) screw-
driver into the lamp assembly and pry
gently to remove it.
NOTEl Wrap a piece of cloth around the tip of the
screwdriver in order to avoid scratching the
lens and the body.2. Remove the socket and bulb assembly
together by turning it anticlockwise, and then remove the bulb by pulling it out.
3. To install the bulb, perform the removal
steps in reverse.
Replacement of lamp bulbs
10-29OKTE18E1Maintenance10
Page 378 of 466
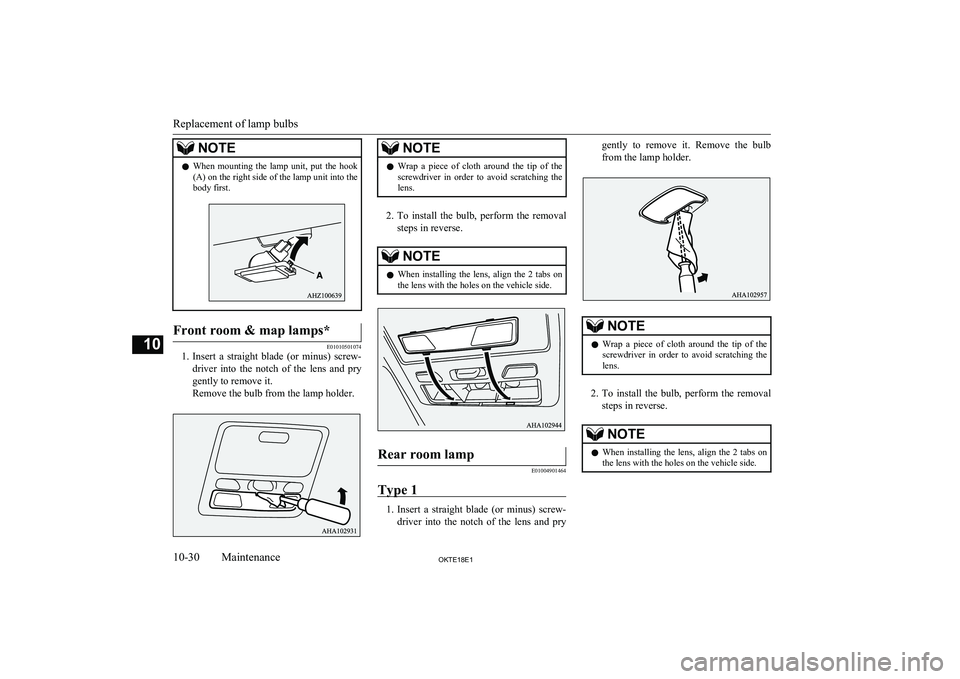
NOTElWhen mounting the lamp unit, put the hook
(A) on the right side of the lamp unit into thebody first.Front room & map lamps*
E01010501074
1. Insert a straight blade (or minus) screw-
driver into the notch of the lens and pry
gently to remove it.
Remove the bulb from the lamp holder.
NOTEl Wrap a piece of cloth around the tip of the
screwdriver in order to avoid scratching the
lens.
2. To install the bulb, perform the removal
steps in reverse.
NOTEl When installing the lens, align the 2 tabs on
the lens with the holes on the vehicle side.Rear room lamp
E01004901464
Type 1
1. Insert a straight blade (or minus) screw-
driver into the notch of the lens and pry
gently to remove it. Remove the bulb
from the lamp holder.NOTEl Wrap a piece of cloth around the tip of the
screwdriver in order to avoid scratching the
lens.
2. To install the bulb, perform the removal
steps in reverse.
NOTEl When installing the lens, align the 2 tabs on
the lens with the holes on the vehicle side.
Replacement of lamp bulbs
10-30OKTE18E1Maintenance10
Page 379 of 466
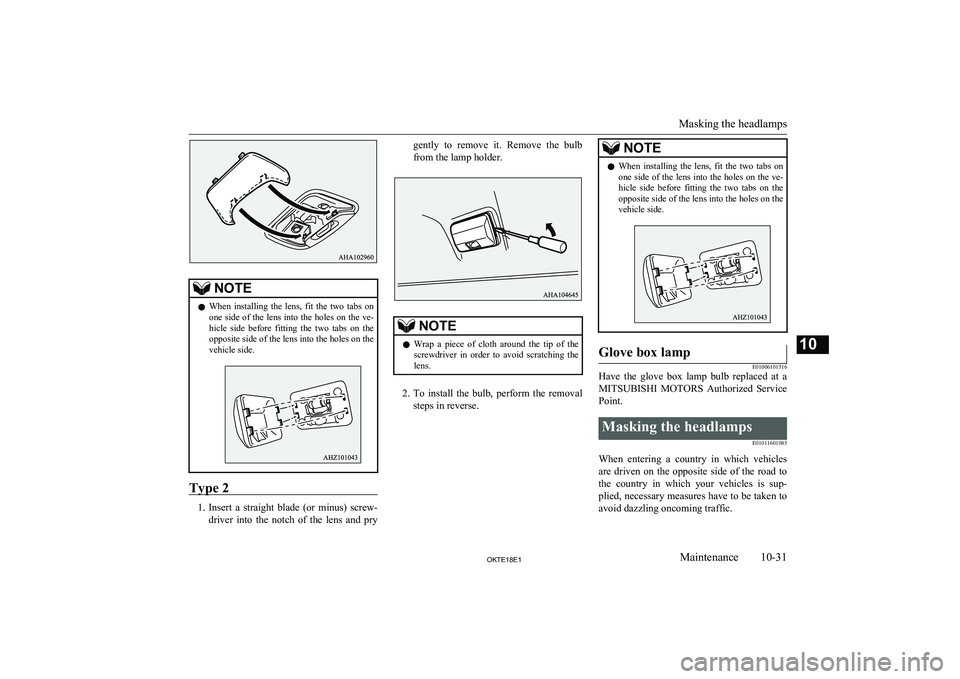
NOTElWhen installing the lens, fit the two tabs on
one side of the lens into the holes on the ve-hicle side before fitting the two tabs on the opposite side of the lens into the holes on the
vehicle side.
Type 2
1. Insert a straight blade (or minus) screw-
driver into the notch of the lens and pry
gently to remove it. Remove the bulb
from the lamp holder.NOTEl Wrap a piece of cloth around the tip of the
screwdriver in order to avoid scratching the
lens.
2. To install the bulb, perform the removal
steps in reverse.
NOTEl When installing the lens, fit the two tabs on
one side of the lens into the holes on the ve-hicle side before fitting the two tabs on the opposite side of the lens into the holes on the
vehicle side.Glove box lamp
E01006101516
Have the glove box lamp bulb replaced at a
MITSUBISHI MOTORS Authorized Service
Point.
Masking the headlamps
E01011601085
When entering a country in which vehiclesare driven on the opposite side of the road to the country in which your vehicles is sup-plied, necessary measures have to be taken to
avoid dazzling oncoming traffic.
Masking the headlamps
10-31OKTE18E1Maintenance10
Page 380 of 466
High intensity discharge head-lamp type
Do not need any adjustment.
Halogen headlamp type
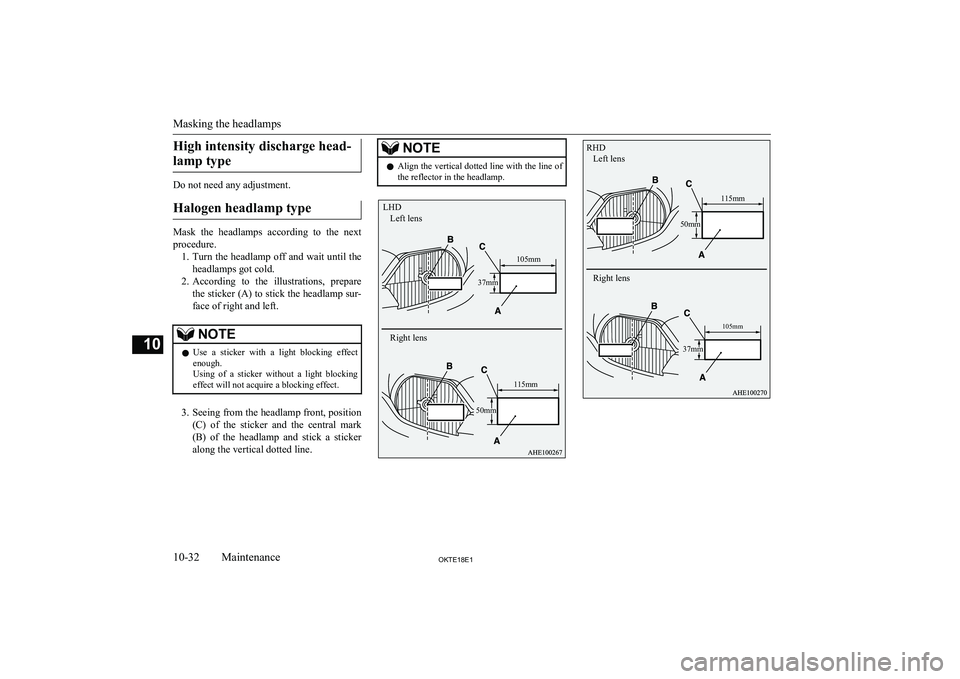
Mask the headlamps according to the next
procedure. 1. Turn the headlamp off and wait until the
headlamps got cold.
2. According to the illustrations, prepare
the sticker (A) to stick the headlamp sur-
face of right and left.
NOTEl Use a sticker with a light blocking effect
enough.
Using of a sticker without a light blocking
effect will not acquire a blocking effect.
3. Seeing from the headlamp front, position
(C) of the sticker and the central mark
(B) of the headlamp and stick a sticker along the vertical dotted line.
NOTEl Align the vertical dotted line with the line of
the reflector in the headlamp.
Masking the headlamps
10-32OKTE18E1Maintenance10 LHDLeft lens
Right lens
115mm105mm
37mm
50mm RHDLeft lens
Right lens
105mm
37mm
50mm
115mm