front MITSUBISHI LANCER 2006 Owners Manual
[x] Cancel search | Manufacturer: MITSUBISHI, Model Year: 2006, Model line: LANCER, Model: MITSUBISHI LANCER 2006Pages: 800, PDF Size: 45.03 MB
Page 344 of 800
AC504986 AC400117
AC400128
Section A – A
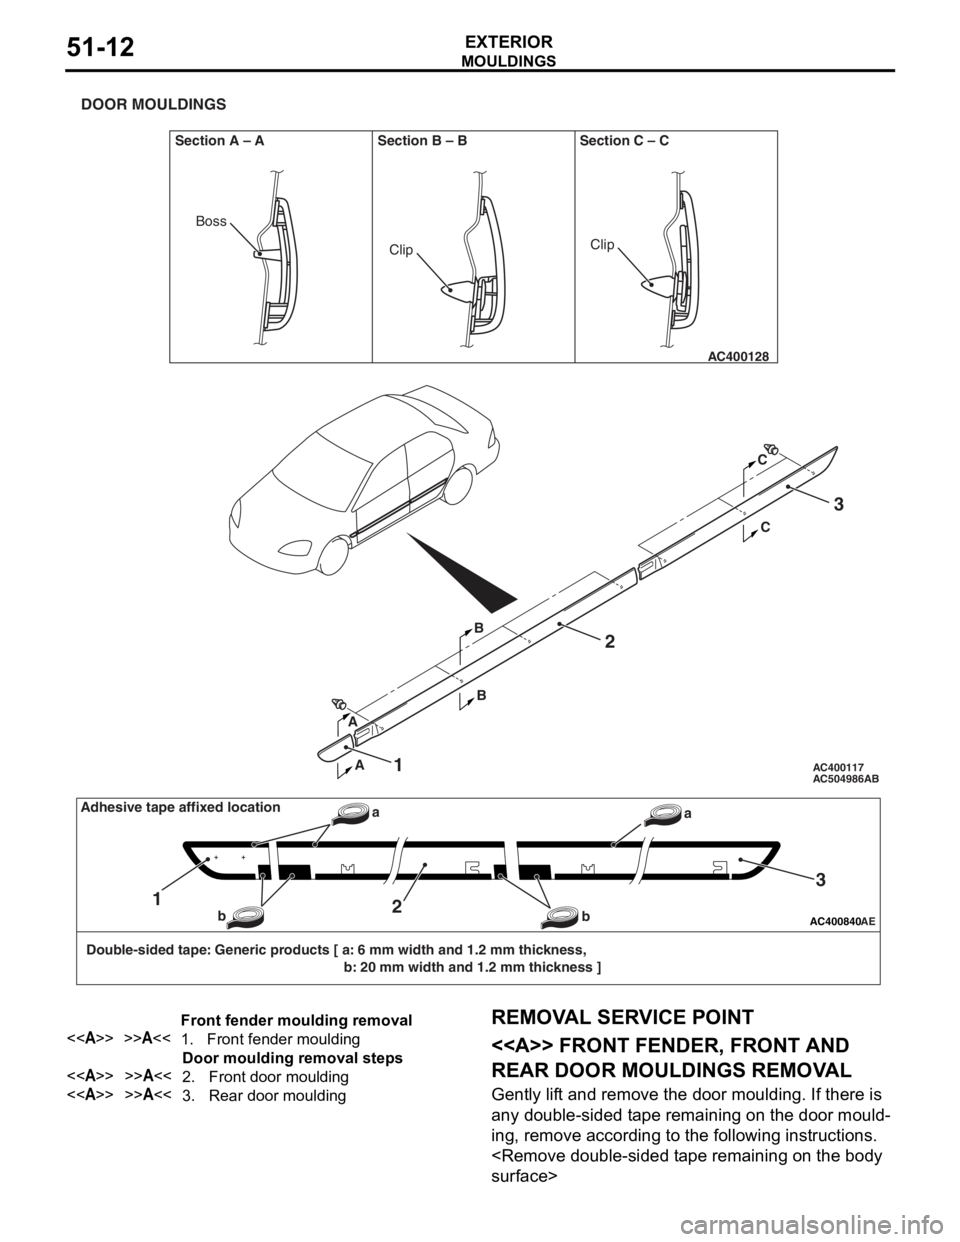
DOOR MOULDINGS
Section B – B Section C – C
AB
AA C
C
BB2
1
3
ClipClip
Boss
AC400840AE
Double-sided tape: Generic products [ a: 6 mm width and 1.2 mm thickness, b: 20 mm width and 1.2 mm thickness ]
12
3
a
b
baAdhesive tape affixed location
Front fender moulding removal
<>>>A<<1.Front fender moulding
Door moulding removal steps
<>>>A<<2.Front door moulding
<>>>A<<3.Rear door moulding
MO
UL DI N G S
EXTERIOR51-12
REMOVA L SER VICE POINT
<> FRONT FENDER, FRONT AND
REAR DOOR MOULDINGS REMOV
A L
Gently lif t and remo ve th e door moulding . If the r e is
any d
ouble-sided t ape remainin g on th e door mould
-
ing, remove accord ing to the fo llowing in struction s .
Page 345 of 800
AC000420Double-sided tapeProtection tapeAB
MO
UL DI N G S
EXTERIOR51-13
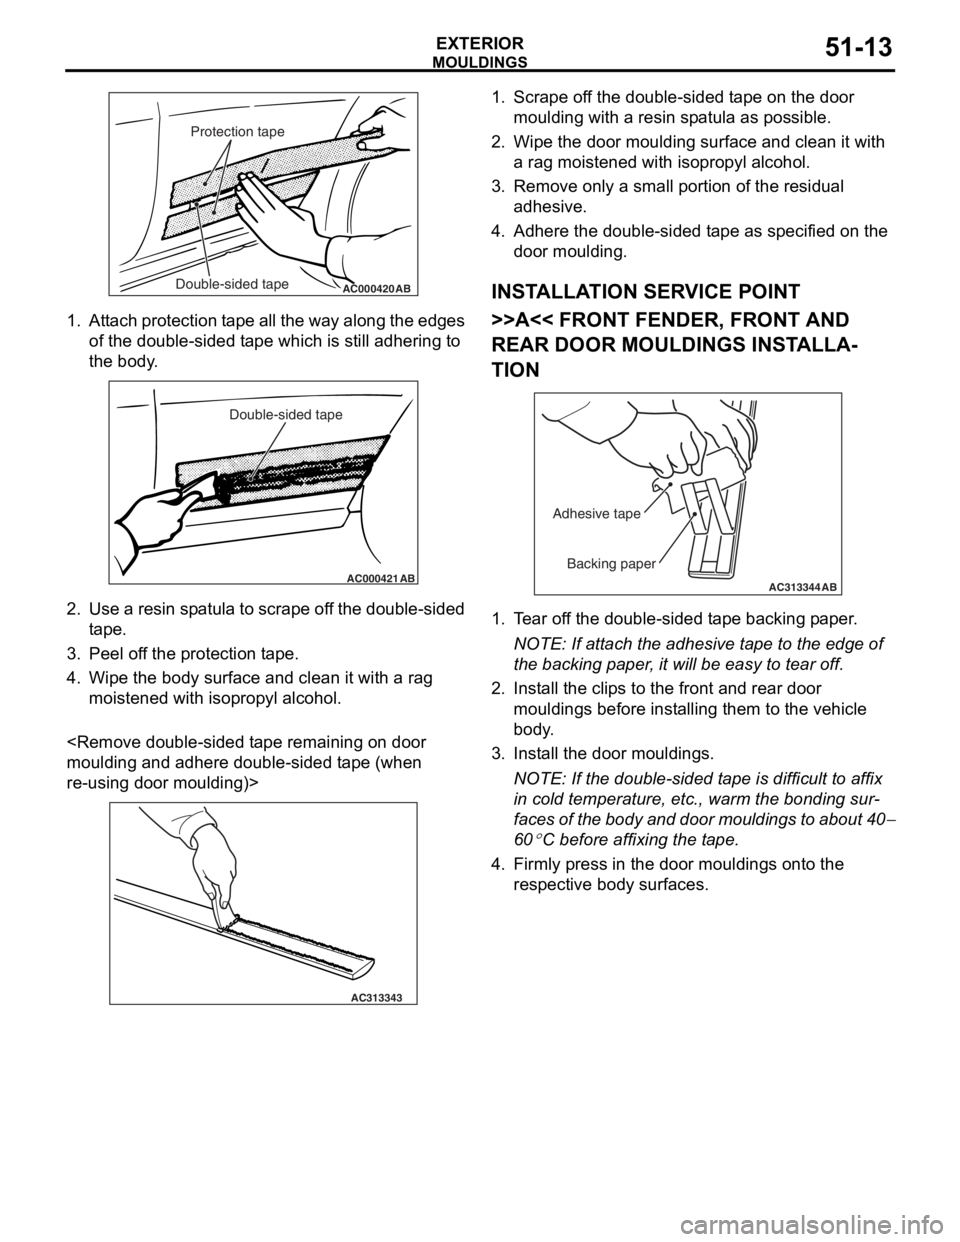
1.At t a ch pro t ection t a pe all th e wa y alon g the e dge s
of the do uble - sid ed t ape which is still adh ering to
th e body .
AC000421
Double-sided tape
AB
2.Use a resin sp atula to scrape of f t he dou ble-sided
t ape .
3.Pee l of f the pr otect i on t ape .
4.Wipe th e body su rface and clean it with a rag
moistened with isopro p yl alcohol.
and a dhere d ouble-sided t ape (wh en
re-using do
or mo ulding)>
AC313343
1.Scrape o f f the double-sided t ape on th e door
moulding with a re sin sp atula as possible.
2.Wipe th e door moulding surfa c e a nd clean it with
a rag moistened with isoprop yl a l co hol.
3.Remove only a small po rtion o f the re sid ual
a dhesive .
4.Adh e re the double-sided t ape as specified on t he
d oor mo ulding.
INSTALLA T ION SER VICE POINT
>>A<< FRONT FENDER, FRONT AND
REAR DOOR MOULDINGS INST
ALLA
-
TION
AC313344
Backing paper
Adhesive tape
AB
1.
T ear of f the double-sided t ape backing p aper .
NOTE: If atta ch the adhesive t a pe to the edg e of
th
e backing p aper , it will be easy to te ar off.
2.In st all the clip s to the front a nd rear door
mouldings befo r e inst alling th em to the vehicle
b ody .
3.In st all the do or mo uldings.
NOTE: If the double-sided t ape is difficult to af fix
in co
ld te mpera t ure, et c., warm the b ondin g su r
-
faces of the bod y and doo r mo uldin g s to ab out 40−
60
°C bef ore affixing the t a p e .
4.Firmly pre ss in the door moulding s ont o the
re spective bod y surface s .
Page 349 of 800
DOOR SASH TAPE
EXTERIOR51-17
DOOR SASH TAPE
SPECIAL TOOLM1511000601664
ToolNumberNameUse
MB990528
MB990528Stripe tape spatulaInstallation of door sash tape
DOOR SASH TA PE
REMOVA L AND INST ALLA TION
Pre-removal and Post-installation Operation
•Door Trim Assembly Removal and Installation (Refer to
GROUP 52A
P.52A-17).
•Door Beltline Weatherstrip Inner Removal and Installation
(Refer to GROUP 42
P.42-39).
•Door Opening Weatherstrip Outer Removal and Installa-
tion (Refer to GROUP 42 P.42-39).
•Door Window Glass Runchannel Removal and Installation
(Refer to GROUP 42
P.42-39).
•Door Beltline Moulding Removal and Installation (Refer to
GROUP 42
P.42-39).
AC404973
124
3
N
NN
N
AC
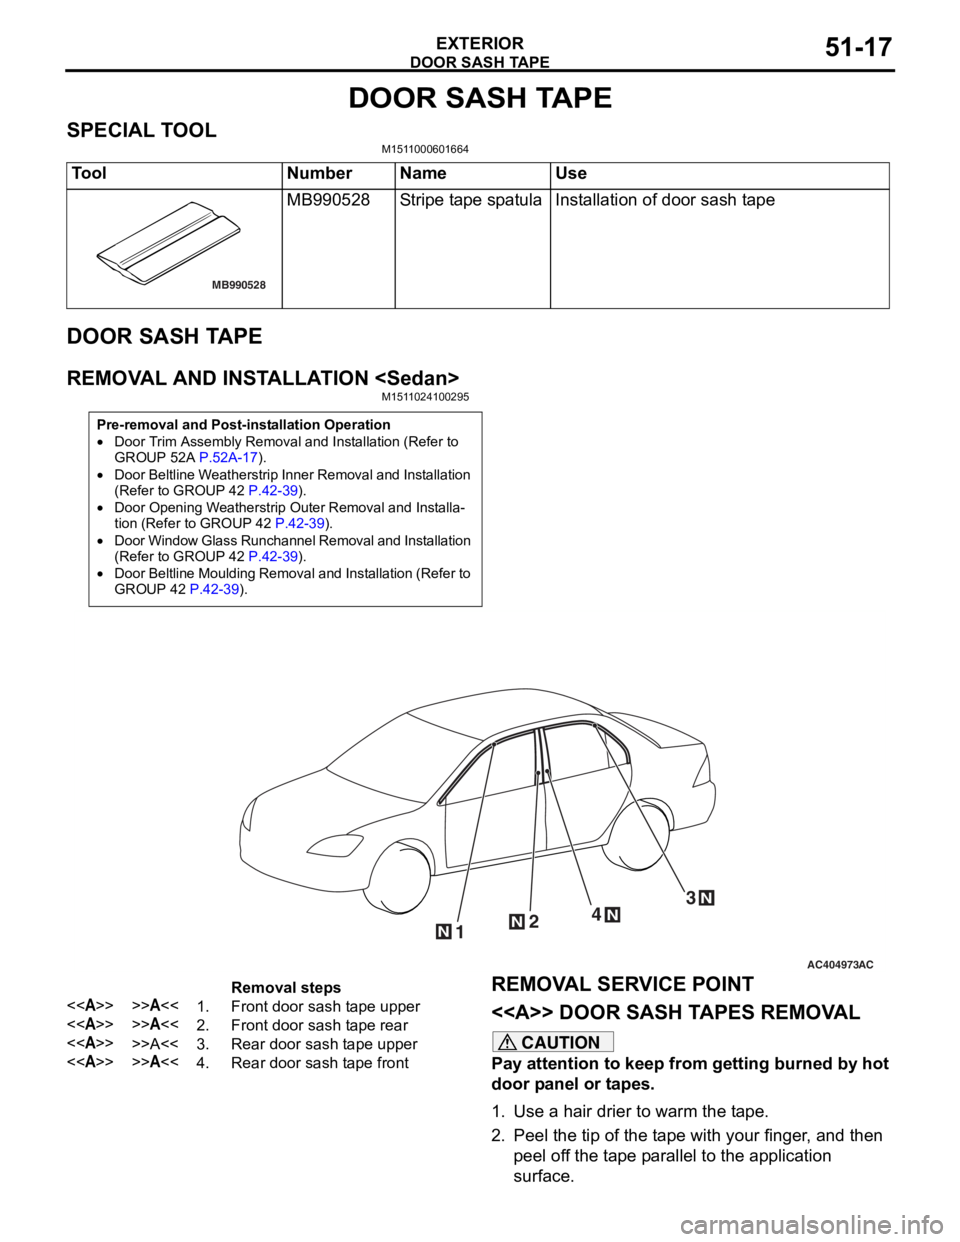
Removal steps
<>>>A<<1.Front door sash tape upper
<>>>A<<2.Front door sash tape rear
<>>>A<<3.Rear door sash tape upper
<>>>A<<4.Rear door sash tape front
REMOVA L SER VICE POINT
<> DOOR SASH T A PES REMOV A L
CAUTION
Pay attention to keep from getting burned by hot
door panel or tapes.
1. Use a hair drier to warm the tape.
2. Peel the tip of the tape with your finger, and then
peel off the tape parallel to the application
surface.
Page 351 of 800
AC403580AD
3.5 mm
3.5 mm 5.0
mm 7.0
mm3.5 mm
3.5 mm
3.5 mm
Tape overlap:
3.0 mm
Tape overlap:
3.0 mm
3.5 mm
RH only
RH onlyRH only
Backing paper
cut-lineTape perforate-
lineTape perforate-
line
Backing paper
cut-line
Backing paper
cut-line
: Tape locating points: T-stud for door opening weatherstrip attaching locations (5 pieces in all). Tape perforate-
line
Front door sash
tape upperRear door sash
tape front
Rear door sash
tape upperFront door sash
tape rear
DOOR S
A SH T A PE
EXTERIOR51-19
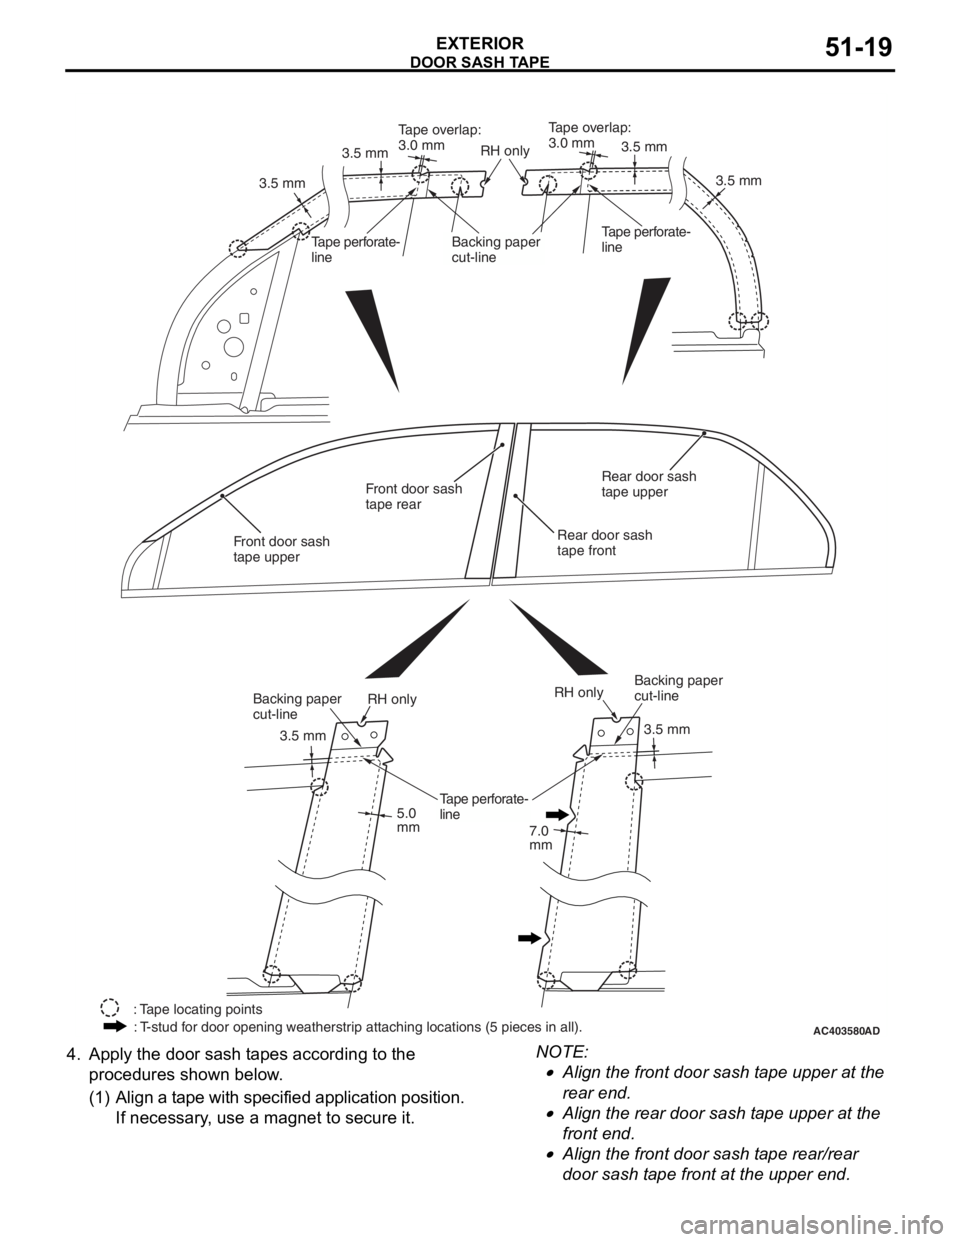
4.App l y t he doo r sash t apes according to t he
pro c ed ures shown b e low .
(1) A lign a t ape with specified a pplication p o sition.
If necessary , u s e a magn et to secu re it.
NOTE: .
•Align the fro n t door sash t ape up per at the
rear en
d.
•Align the rea r door sash t a pe upp er at th e
front en
d.
•Align the fro n t door sash t ape rea r /rear
door sash
t a pe front at the upper e nd.
Page 352 of 800

DOOR SASH TAPE
EXTERIOR51-20
(2) As for the front/rear door sash tape upper, peel off the backing paper under the tape by the
backing paper cut-line and apply the tape
temporarily.
AC303110AB
Backing paper
Door sash tape
(3) P eel o f f th e backin g p aper a nd cu t it a s
necessary .
AC402197AD
MB990528
Backing paper
Door sash
tape
(4
) W hi le pe el in g o f f th e re mai n in g ba ck in g p a pe r ,
press the t a pe by a special to ol (MB99052 8).
NOTE: .
•Apply the fro n t doo r sash t ape u pper fro m
rear to f
r ont.
•Apply the rea r door sash t ape up per from
front to
rear .
•Apply the fro n t doo r sash t ape re ar/rear
door sash
t a p e front from top to b o ttom.
(5) A s fo r the fro n t door sash t ape rea r /rear do or
sash t a pe front, pee l of f the ap plication t a pe in
the d i rection of 180
° from bottom to top.
(6) R emove un nece ssa ry p a rt o f the t ape at t ape
perfo rate-line.
AC303415 AB
MB990528 120˚60˚
Hemming part
(7) P ress the f o lded area o f the t ape at 3 step s
securely(60
°, 12 0° and holding ), rolling in
toward t
he ve
hicle inside direction.
AC303443 AE
A section
Tape pasting onto corner
(viewed from inside)
(8) A s fo r the fro n t door sash t ape rea r /rear do or
sa sh t a pe fro n t, ro ll in t h e A section of th e t a pe
uppe r corn er toward t he ve hicle inside with
you r p a lm sec u rely .
Page 353 of 800
DOOR SASH TAPE
EXTERIOR51-21
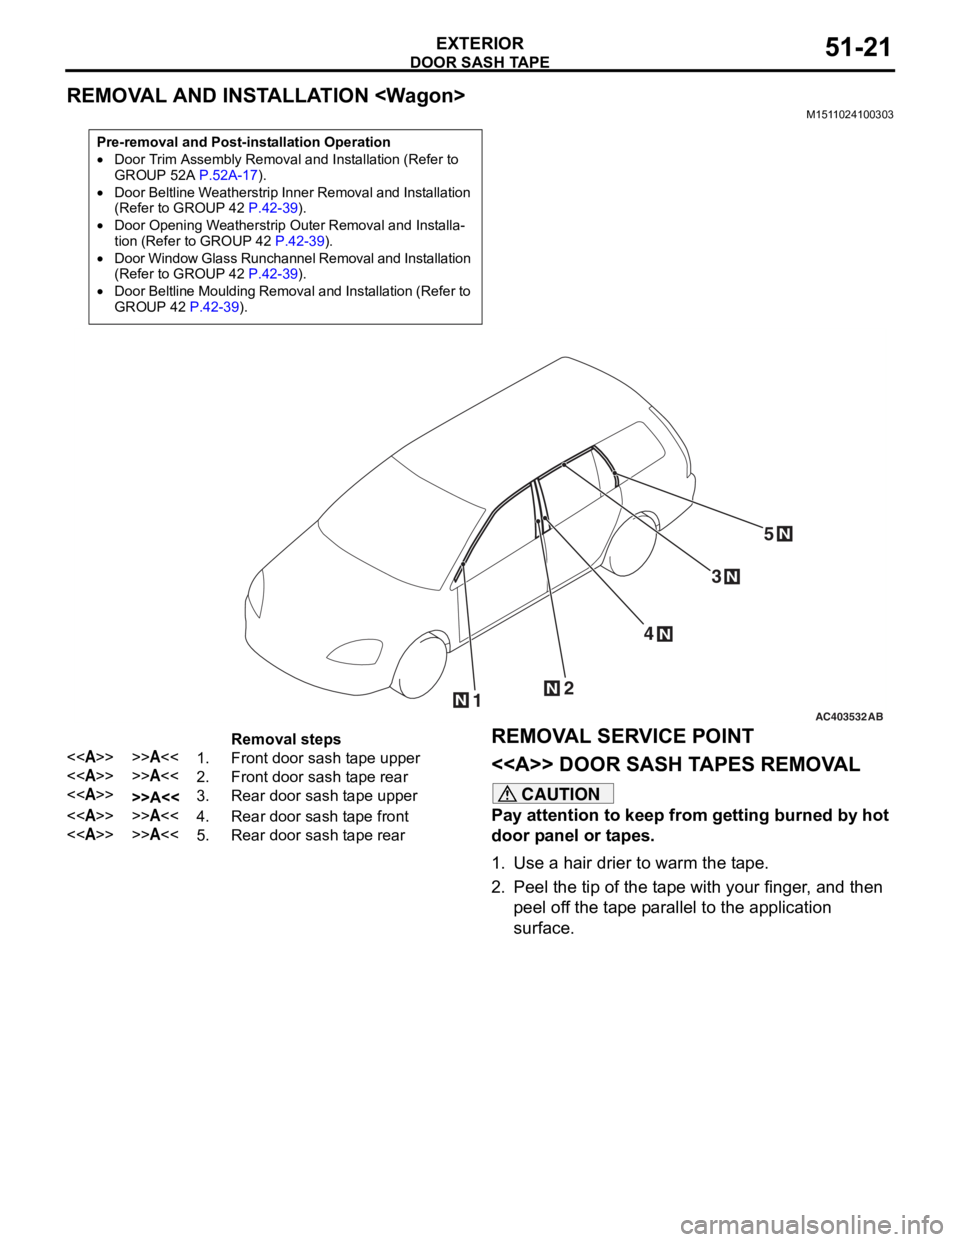
REMOVAL AND INSTALLATION
M1511024100303
Pre-removal and Post-installation Operation
•Door Trim Assembly Removal and Installation (Refer to
GROUP 52A P.52A-17).
•Door Beltline Weatherstrip Inner Removal and Installation
(Refer to GROUP 42 P.42-39).
•Door Opening Weatherstrip Outer Removal and Installa-tion (Refer to GROUP 42 P.42-39).
•Door Window Glass Runchannel Removal and Installation
(Refer to GROUP 42 P.42-39).
•Door Beltline Moulding Removal and Installation (Refer to
GROUP 42 P.42-39).
AC40353212
4
3
N
N
N
N
5N
AB
Removal steps
<>>>A<<1.Front door sash tape upper
<>>>A<<2.Front door sash tape rear
<>>>A<<3.Rear door sash tape upper
<>>>A<<4.Rear door sash tape front
<>>>A<<5.Rear door sash tape rear
REMOVA L SER VICE POINT
<> DOOR SASH T A PES REMOV A L
CAUTION
Pay attention to keep from getting burned by hot
door panel or tapes.
1. Use a hair drier to warm the tape.
2. Peel the tip of the tape with your finger, and then
peel off the tape parallel to the application
surface.
Page 355 of 800
AC403579AC
3.5 mm
3.5 mm 3.5 mm
5.0
mm 7.0
mm 3.5 mm
3.5 mm
3.5 mm
3.5 mm
Tape overlap:
3.0 mm
Tape overlap:
3.0 mm
3.5 mm
RH only
RH onlyRH only
Backing paper
cut-lineTape perforate-
lineTape perforate-
line
Backing paper
cut-lineBacking paper
cut-line
: Tape locating points
: T-stud for door opening weatherstrip attaching locations (5 pieces in all). Tape perforate-
line
Front door sash
tape upperRear door sash
tape front
Rear door sash
tape upper
Rear door sash
tape rearFront door sash
tape rear
DOOR S
A SH T A PE
EXTERIOR51-23
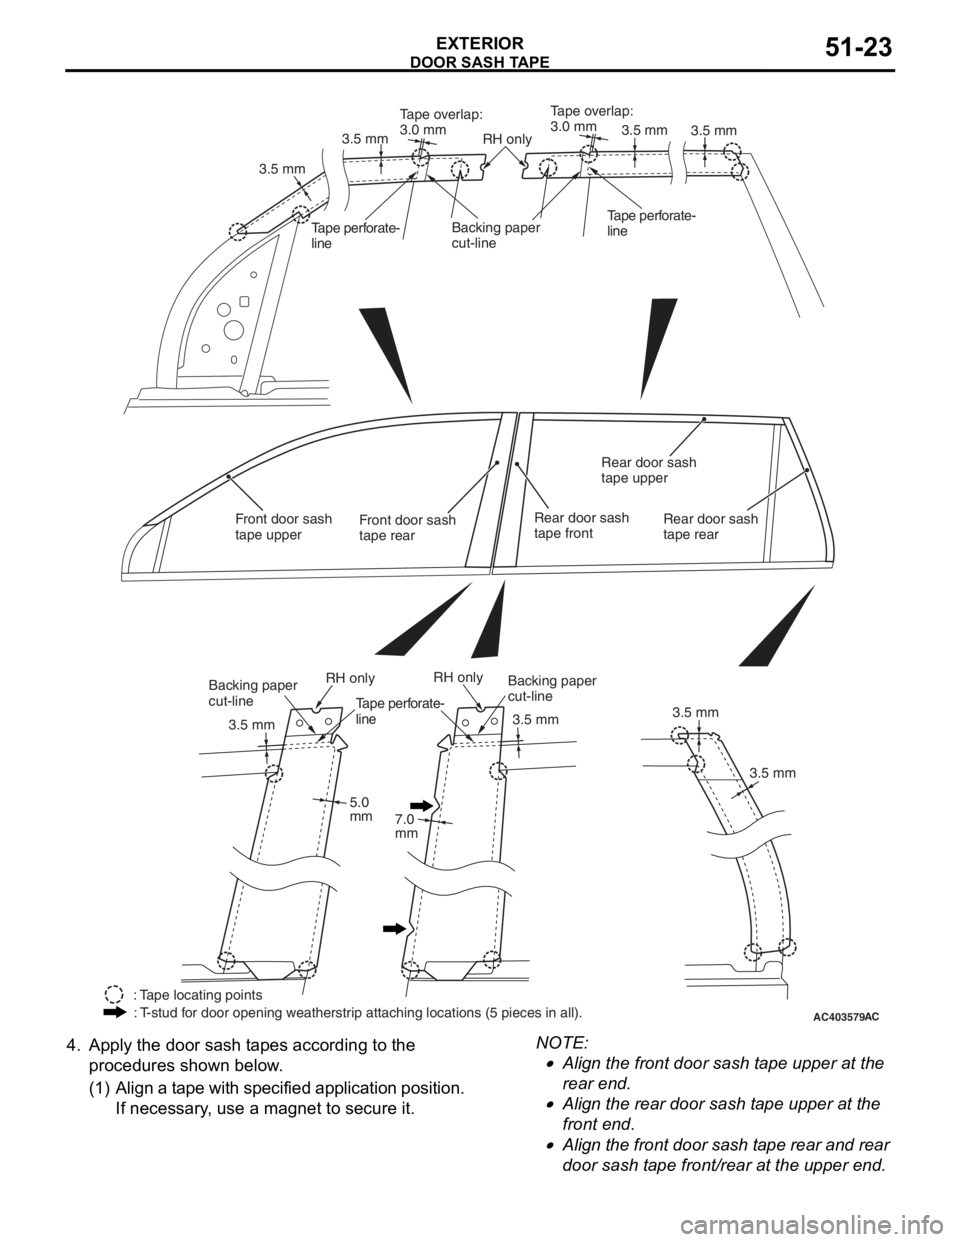
4.App l y t he doo r sash t apes according to t he
pro c ed ures shown b e low .
(1) A lign a t ape with specified a pplication p o sition.
If necessary , u s e a magn et to secu re it.
NOTE: .
•Align the fro n t door sash t ape up per at the
rear en
d.
•Align the rea r door sash t a pe upp er at th e
front en
d.
•Align the front door sash t a p e rea r and rear
door sash
t a pe front /rear at the up per end .
Page 356 of 800
DOOR SASH TAPE
EXTERIOR51-24
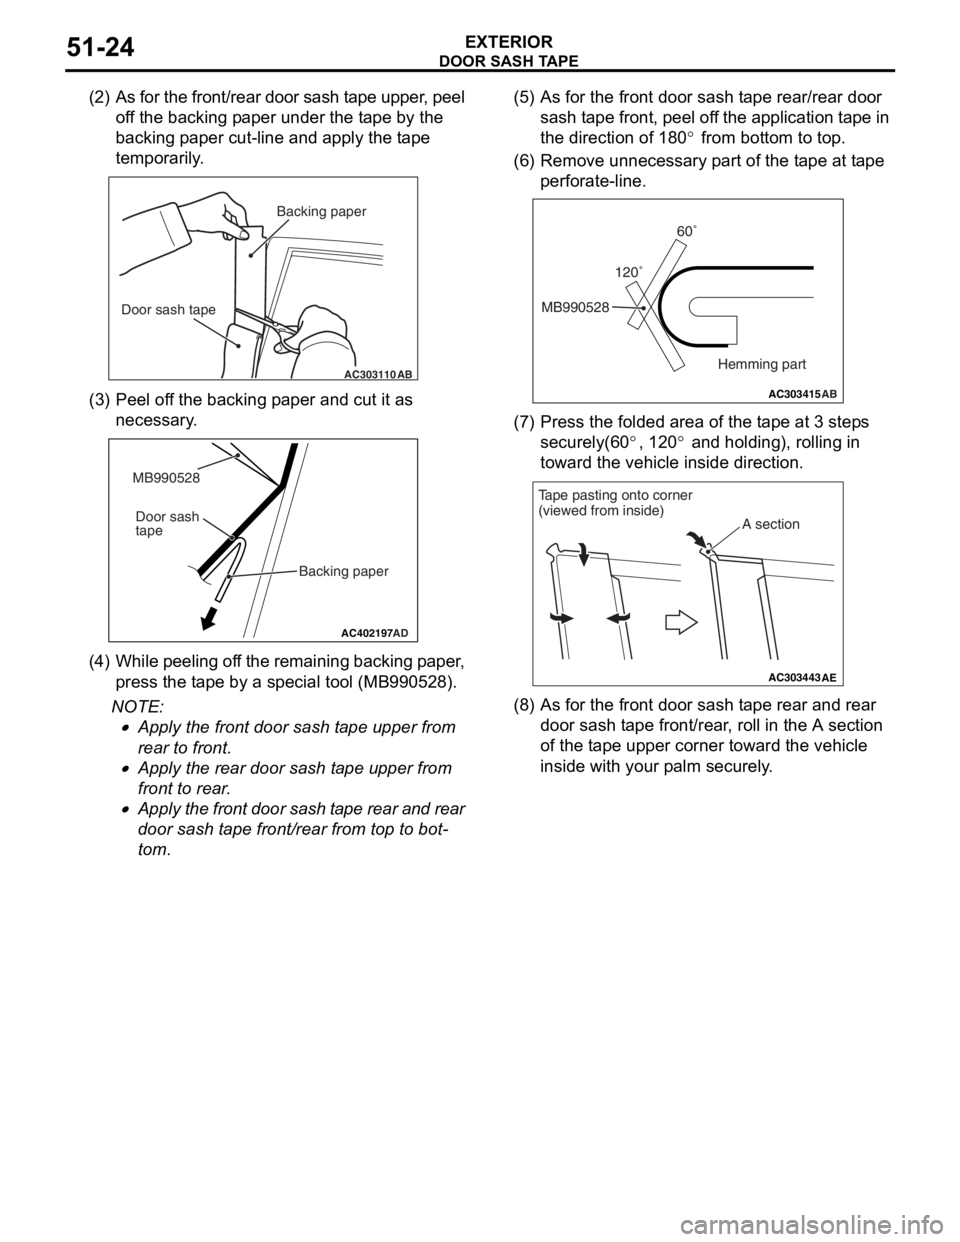
(2) As for the front/rear door sash tape upper, peel off the backing paper under the tape by the
backing paper cut-line and apply the tape
temporarily.
AC303110AB
Backing paper
Door sash tape
(3) P eel o f f th e backin g p aper a nd cu t it a s
necessary .
AC402197AD
MB990528
Backing paper
Door sash
tape
(4
) W hi le pe el in g o f f th e re mai n in g ba ck in g p a pe r ,
press the t a pe by a special to ol (MB99052 8).
NOTE: .
•Apply the fro n t doo r sash t ape u pper fro m
rear to f
r ont.
•Apply the rea r door sash t ape up per from
front to
rear .
•Apply the front door sash t ape rear and rear
door sash
t a p e front /rear from top to bot
-
tom.
(5) A s fo r the fro n t door sash t ape rea r /rear do or
sash t a pe front, pee l of f the ap plication t a pe in
the d i rection of 180
° from bottom to top.
(6) R emove un nece ssa ry p a rt o f the t ape at t ape
perfo rate-line.
AC303415 AB
MB990528 120˚60˚
Hemming part
(7) P ress the f o lded area o f the t ape at 3 step s
securely(60
°, 12 0° and holding ), rolling in
toward t
he ve
hicle inside direction.
AC303443 AE
A section
Tape pasting onto corner
(viewed from inside)
(8) A s fo r the fro n t door sash t ape rea r and re ar
door sash t ape fro n t/rear , roll in th e A section
of th e t a pe upp er co rner toward the vehicle
inside with your p a lm se curely .
Page 359 of 800
ROOF RAIL
EXTERIOR51-27
ROOF RAIL
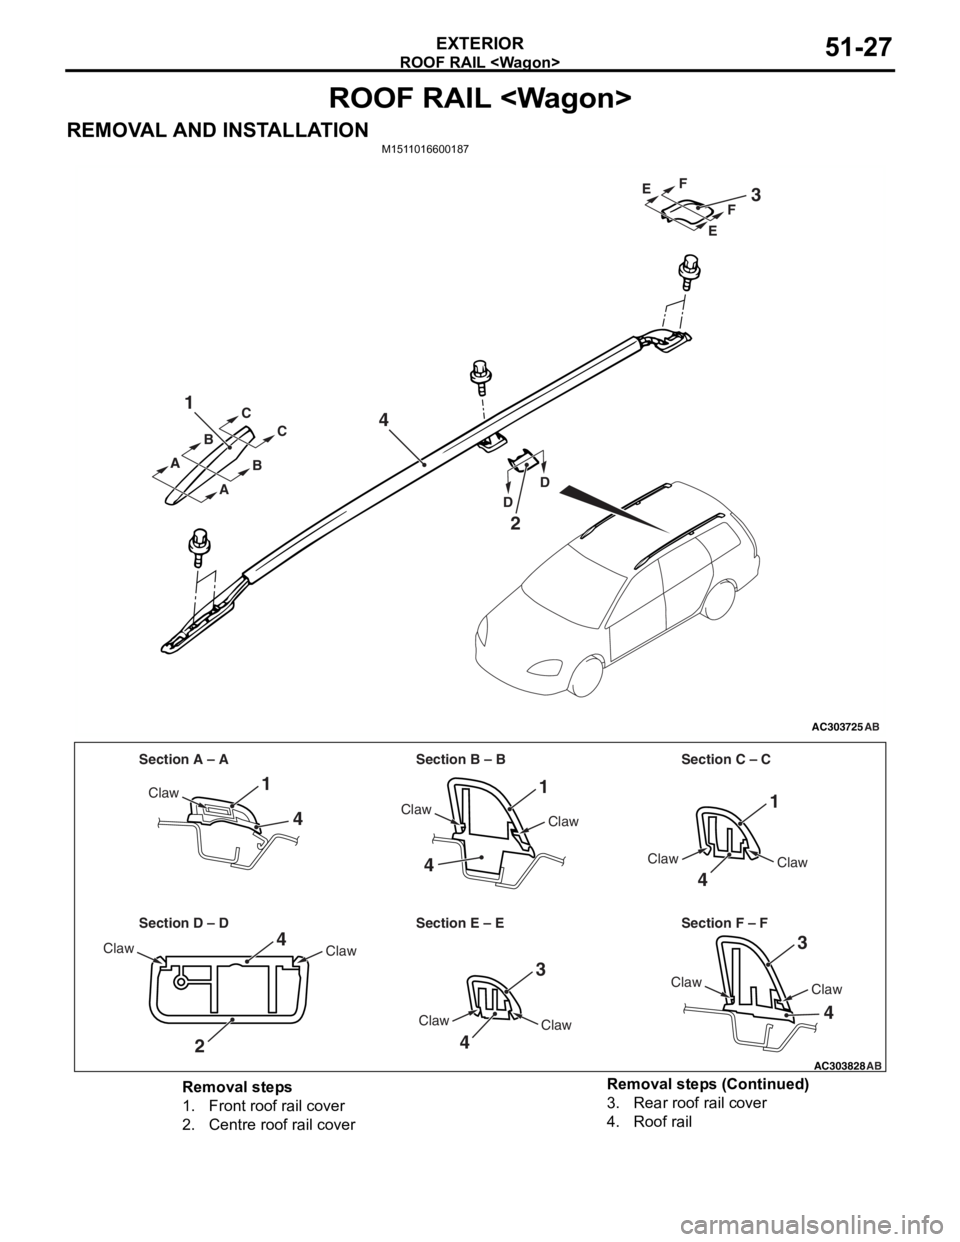
REMOVAL AND INSTALLATIONM1511016600187
AC303725
1
4
2
3
AB
AAA
B
C
C
B
DD E
F
E
F
AC303828
Section A – A Section B – B Section C – C
Section D – D Section E – E Section F – F
1
4
4
11
4
3
3
4
4
2
4
Claw
Claw
Claw
Claw
Claw
Claw
ClawClaw
Claw
Claw Claw
AB
Removal steps
1.Front roof rail cover
2.Centre roof rail cover
3.Rear roof rail cover
4.Roof rail
Removal steps (Continued)
Page 360 of 800

WINDSHIELD WIPER AND WASHER
EXTERIOR51-28
WINDSHIELD WIPER AND WASHER
GENERAL INFORMATIONM1511000100514
WINDSHIELD WIPER AND WASHER
OPERATION
Windshield Low-speed (and High-speed)
Wiper Operation
•If the windshield low-speed wiper switch is turned
to the ON position with the ignition switch at the
"ACC" or "ON" position, the column switch sends
a low-speed wiper ON and high-speed wiper OFF
signals to the front-ECU. This turns the wiper sig
-
nal on and the wiper speed control relay off
(low-speed), causing the wipers to operate at
low-speed.
•If the windshield high-speed wiper switch is
turned to the ON position, the column switch
sends a low-speed wiper OFF and high-speed
wiper ON signals to the front-ECU. This turns
both the wiper signal and the wiper speed control
relay on (high-speed), causing the wipers to
operate at high-speed.
NOTE: The windshield wiper speed is switchable
with the built-in wiper speed control relay.
High-speed operations take place when the wiper
speed control relay is set to "ON" and low-speed
operations take place when the wiper speed control
relay is set to "OFF".
Windshield Intermittent Wiper Operation
The ETACS-ECU calculates the wiper operation
interval according to the voltage signal sent from the
column switch. Then the ETACS-ECU sends a signal
to the front-ECU. The front-ECU determines the
wiper operation interval and turns on the wiper relay
signal relay. This causes the wiper auto stop relay to
turn on. Then the wiper auto stop relay will turn off
after the wipers reach the park position. This causes
the wiper signal relay and then the wipers to turn off.
If the wiper signal relay remains off for the wiper
operation interval, the relay turns on again, causing
the wipers to operate in intermittent mode.
Windshield Mist Wiper Operation
•If the windshield mist wipe r switch is turned to the
ON position with the ignition switch at the "ACC"
or "ON" position, the mist wiper high-speed oper
-
ation signal is sent to the front-ECU. This signal
turns on the wiper speed control relay, causing
the wipers to work at high-speed while the mist
switch is on.
•While the windshield mist wiper switch remains
turned on when the intermittent mode is still work
-
ing, the wipers work as the mist wiper. However,
the wipers return to the intermittent mode again
when the switch is changed back to "INT" posi
-
tion.
•To prevent the windshield mist wiper from operat-
ing when the windshield wiper switch is turned
OFF, the windshield mist wiper does not work for
0.5 second after the windshi eld intermittent wiper
switch, the windshield low-speed wiper switch
and the windshield high-speed wiper switch are
turned OFF.
Windshield Washer Operation
•If the windshield washer switch is turned to ON
position with the ignition sw itch at "ACC" or "ON"
position, the windshield wa sher ON signal is sent
to the front-ECU. After 0.3 second, the windshield
wiper signal turns on. After the windshield washer
switch signal turns off, the windshield wiper signal
turns off in three seconds.
•If the windshield washer switch is turned on while
the windshield wiper is at intermittent mode,
when the windshield washer switch is turned OFF
within 0.2 second, the wiper works only once to
perform mist operation by the windshield washer
switch. When the ON condi tion of the windshield
washer switch continues more than 0.2 second,
the wiper performs the same movement as nor
-
mal condition from the time when 0.2 second has
elapsed and then returns to the intermittent
motion.
SERVICE SPECIFICATION
M1511000300325
ItemStandard value
Windshield wiper blade park position mm34 ± 5