Oil MITSUBISHI LANCER 2006 Owner's Guide
[x] Cancel search | Manufacturer: MITSUBISHI, Model Year: 2006, Model line: LANCER, Model: MITSUBISHI LANCER 2006Pages: 800, PDF Size: 45.03 MB
Page 97 of 800
IGNITION SYSTEM
ENGINE ELECTRICAL16-35
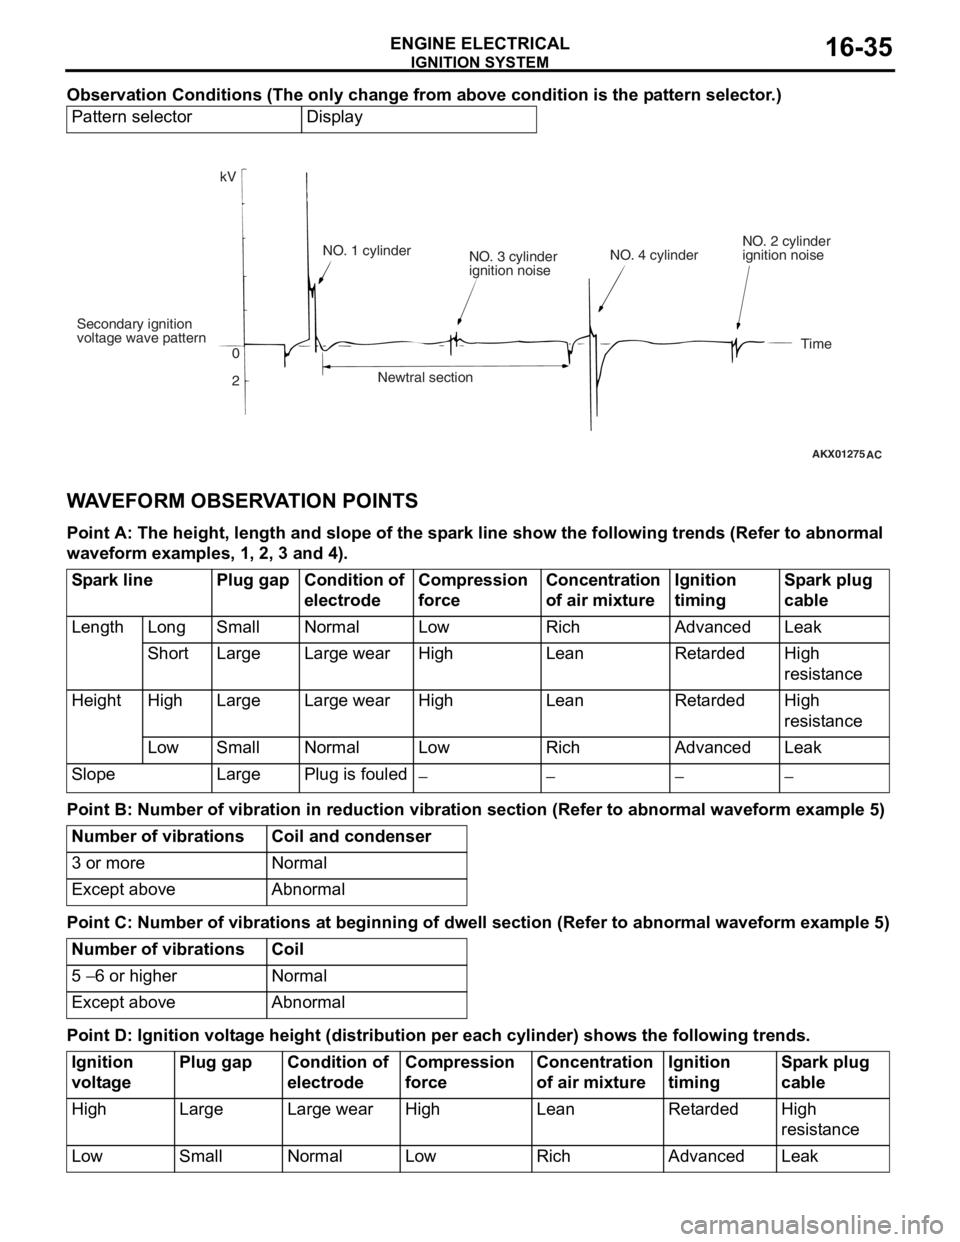
Observation Conditions (The only change from above condition is the pattern selector.)
Pattern selectorDisplay
AKX01275
kV
Secondary ignition
voltage wave pattern 0
2NO. 1 cylinder
NO. 3 cylinder
ignition noise
Newtral section NO. 4 cylinder
NO. 2 cylinder
ignition noise
Time
AC
WA VEFORM OBSER V A T ION POINTS
Point A: The he ight, len g th and s l ope of th e sp a r k line sho w the following trends (Re f er to abnorma l
wave
form exam ples, 1 , 2, 3 a nd 4).
Spark linePlug gapCondition of
electrodeCompression
force Concentration
of air mixtureIgnition
timingSpark plug
cable
LengthLongSmallNormalLowRichAdvancedLeak
ShortLargeLarge wearHigh LeanRetardedHigh
resistance
HeightHighLargeLarge wearHighLeanRetardedHigh
resistance
LowSmallNormalLow RichAdvancedLeak
SlopeLargePlug is fouled−−−−
Point B: Number of v i bra t ion in red uction vi bra t ion sec tion (Refer to a bnormal wavefo r m examp l e 5)
Number of vibrationsCoil and condenser
3 or moreNormal
Except aboveAbnormal
Point C: Number of v i bra t ions a t beginnin g of dwell se ction (Refer to a bnormal wave form exam ple 5)
Number of vibrationsCoil
5 − 6 or higherNormal
Except aboveAbnormal
Point D: Ignition volt a g e height (distribution per each cylinder) s hows the follo wing tren ds.
Ignition
voltagePlug gapCondition of
electrodeCompression
forceConcentration
of air mixtureIgnition
timingSpark plug
cable
HighLargeLarge wearHighLeanRetardedHigh
resistance
LowSmallNormalLowRichAdvancedLeak
Page 98 of 800
IGNITION SYSTEM
ENGINE ELECTRICAL16-36
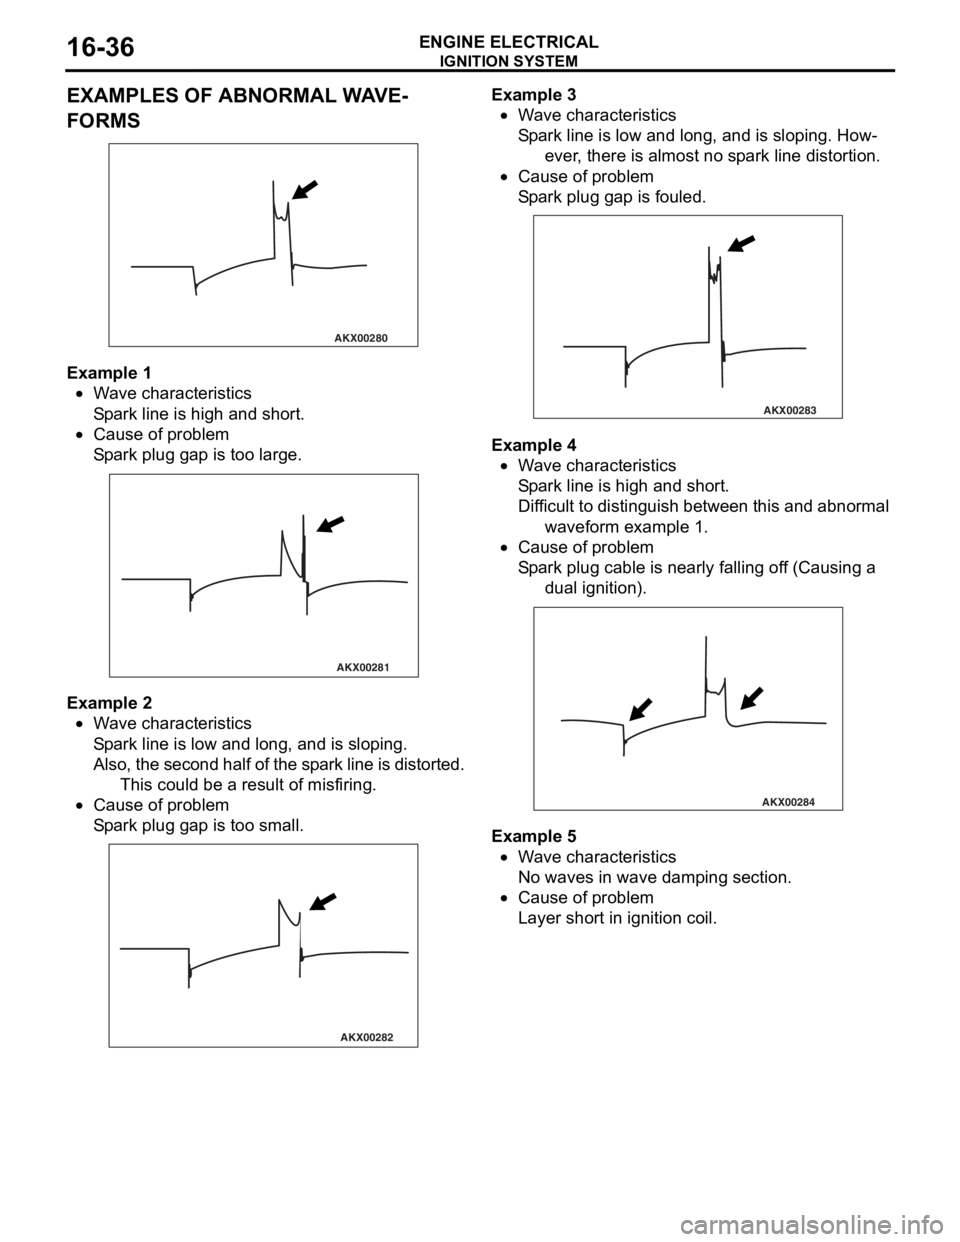
EXAMPLES OF ABNORMAL WAVE-
FORMS
AKX00280
Example 1
•Wa ve ch aracte rist ics
Sp a r k line is high an d sh ort.
•Cause of pr oblem
Sp a r k plug ga p is too large.
AKX00281
Example 2
•Wa ve ch aracte rist ics
Sp a r k line is low and long, a nd is sloping.
Also, the secon d half of the sp ark line is distorted.
This cou l d be a result o f misfiring.
•Cause of pr oblem
Sp a r k plug ga p is too small.
AKX00282
Example 3
•Wa ve ch aracte rist ics
Sp a r k line is low and long, a nd is sloping. How-
ever, there is a l mo st no sp ark lin e distortion.
•Cause of pr oblem
Sp a r k plug ga p is fouled.
AKX00283
Example 4
•Wa ve ch aracte rist ics
Sp a r k line is high an d sh ort.
Diff icu l t to distingu ish be twe en this an d a bnormal
wa vefor m examp l e 1.
•Cause of pr oblem
Sp a r k plug cable is nearly fallin g of f (Ca u sing a
dual ignition ).
AKX00284
Example 5
•Wa ve ch aracte rist ics
No waves in wave damp i ng section.
•Cause of pr oblem
Layer short in ign i tio n coil.
Page 99 of 800
IGNITION SYSTEM
ENGINE ELECTRICAL16-37
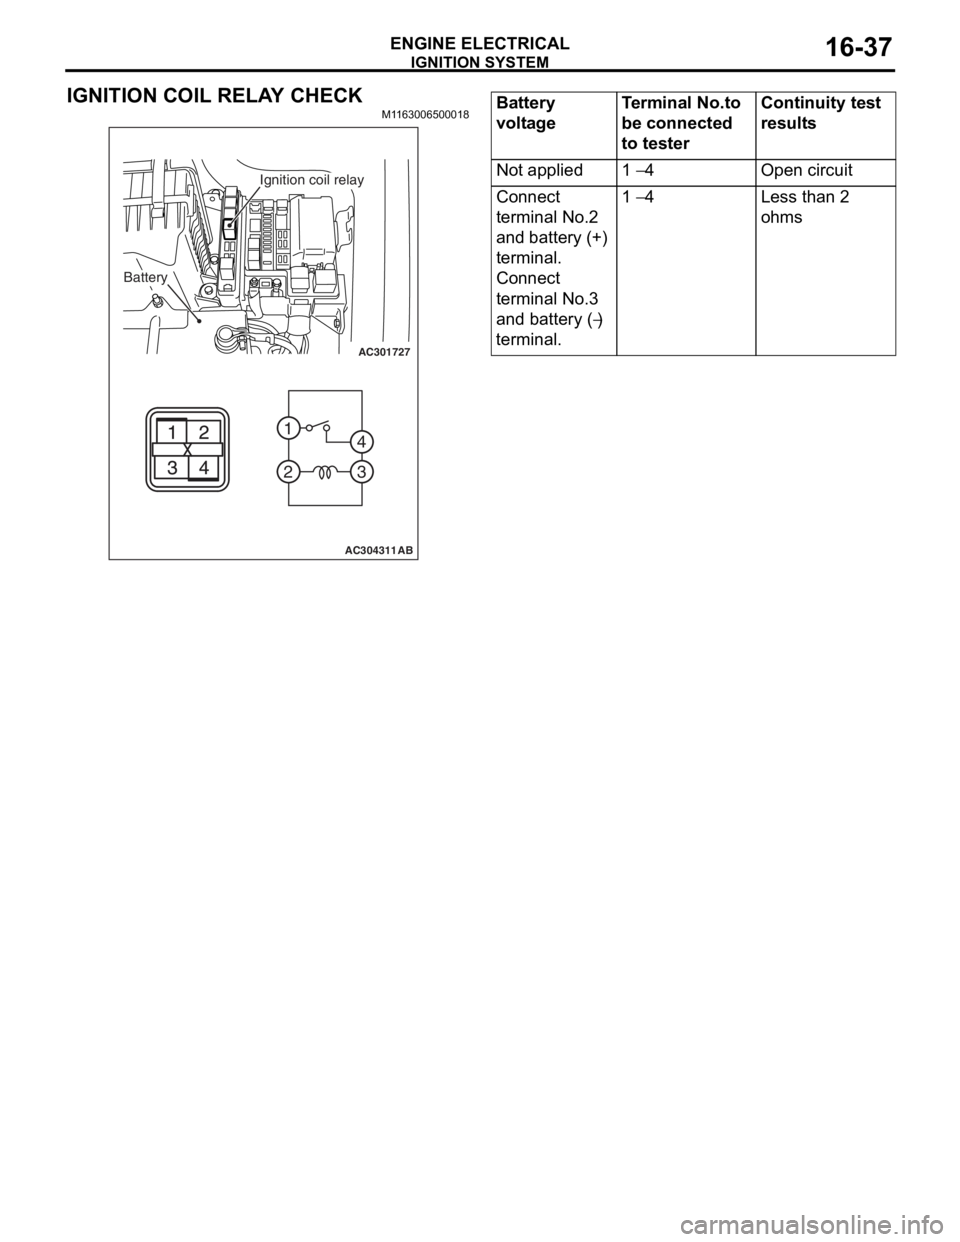
IGNITION COIL RELAY CHECK
M1163006500018
AC301727
2 1
3
4
AC304311AB
Battery
Ignition coil relay
Battery
voltageTerminal No.to
be connected
to testerContinuity test
results
Not applied1 − 4Open circuit
Connect
terminal No.2
and battery (+)
terminal.
Connect
terminal No.3
and battery (
−)
terminal.
1 − 4Less than 2
ohms
Page 100 of 800
IGNITION SYSTEM
ENGINE ELECTRICAL16-38
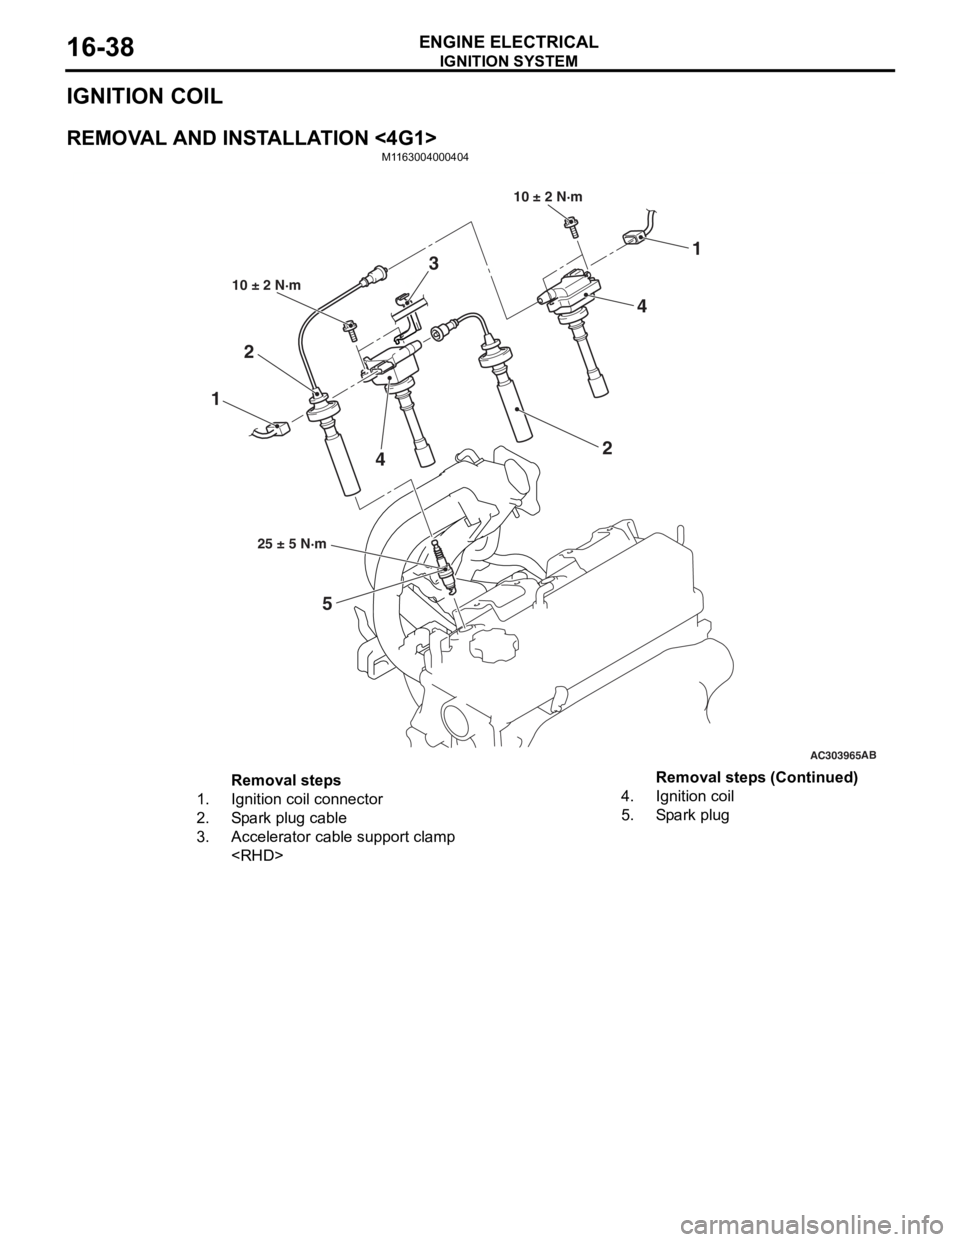
IGNITION COIL
REMOVAL AND INSTALLATION <4G1>
M1163004000404
AC303965AB
11
5
2
2
10 ± 2 N·m
10 ± 2 N·m
25 ± 5 N·m
3
4
4
Removal steps
1.Ignition coil connector
2.Spark plug cable
3.Accelerator cable support clamp
4.Ignition coil
5.Spark plug
Removal steps (Continued)
Page 101 of 800
IGNITION SYSTEM
ENGINE ELECTRICAL16-39
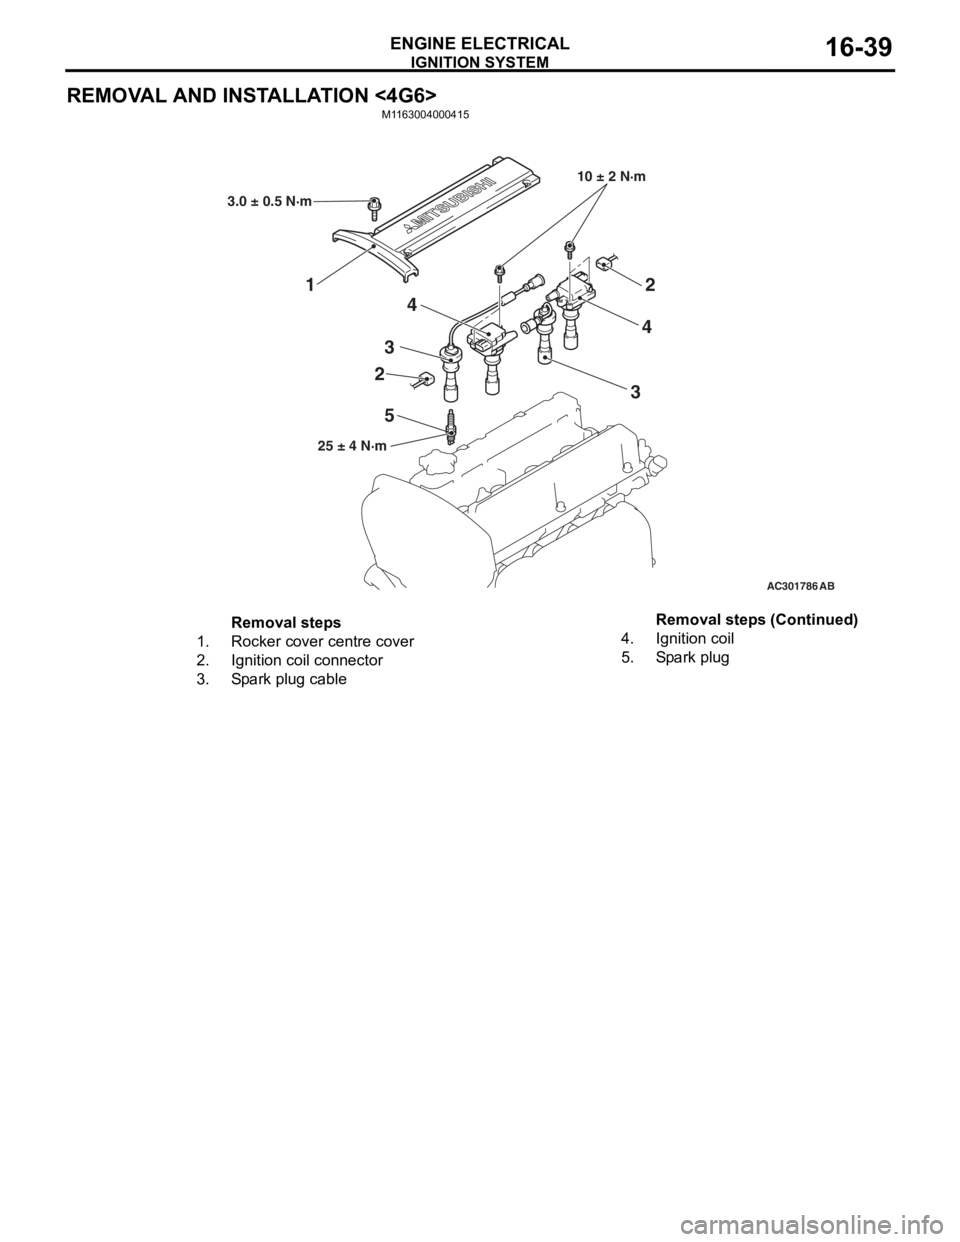
REMOVAL AND INSTALLATION <4G6>
M1163004000415
AC301786
10 ± 2 N·m
25 ± 4 N·m
5 4
2 2
3
3
4
AB
1
3.0 ± 0.5 N·m
Removal steps
1.Rocker cover centre cover
2.Ignition coil connector
3.Spark plug cable
4.Ignition coil
5.Spark plug
Removal steps (Continued)
Page 104 of 800
IGNITION SYSTEM
ENGINE ELECTRICAL16-42
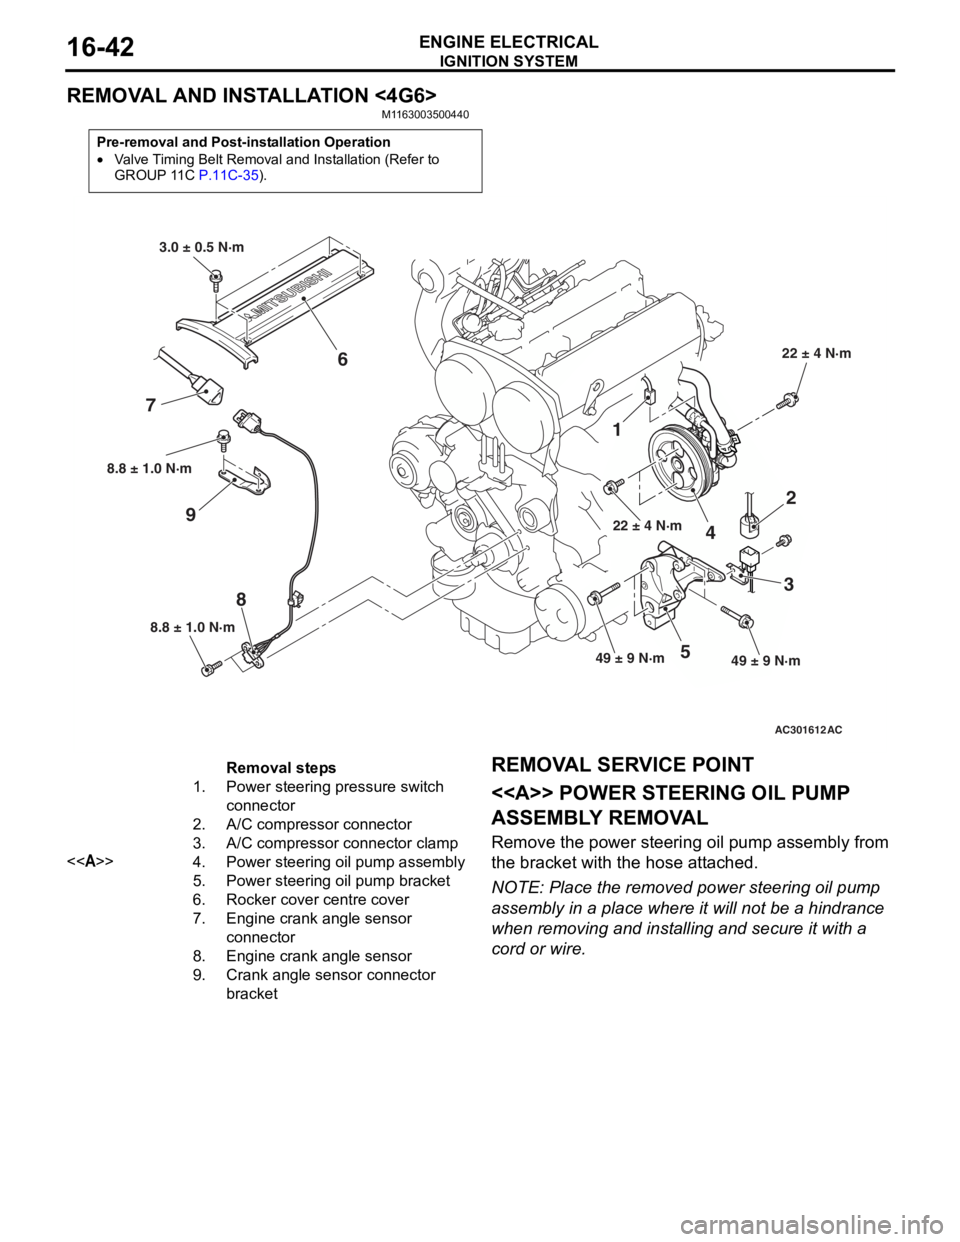
REMOVAL AND INSTALLATION <4G6>
M1163003500440
Pre-removal and Post-installation Operation
•Valve Timing Belt Removal and Installation (Refer to
GROUP 11C P.11C-35).
AC301612
8.8 ± 1.0 N·m
8
8.8 ± 1.0 N·m
9
1
22 ± 4 N·m
4
2
3
49 ± 9 N·m49 ± 9 N·m5
22 ± 4 N·m
3.0 ± 0.5 N·m
6
7
AC
Removal steps
1.Power steering pressure switch
connector
2.A/C compressor connector
3.A/C compressor connector clamp
<>4.Power steering oil pump assembly
5.Power steering oil pump bracket
6.Rocker cover centre cover
7.Engine crank angle sensor
connector
8.Engine crank angle sensor
9.Crank angle sensor connector
bracket
REMOV A L SER VICE POINT
<> POWE R STEERING OIL PUMP
ASSEMBL
Y REMOV A L
Remove the p o wer st eering oil pump assembly from
the bra
cke t with th e hose att a ched.
NOTE: Place the remo ved power st eering oil pump
assembly in a place where it will not be a hindrance
wh
en removing an d inst a lling an d secure it with a
cord or wire.
Page 111 of 800
EMISSION CONTROL
ENGINE AND EMISSION CONTROL17-5
SERVICE SPECIFICATION(S)
M1173000300288
ItemsStandard value
Purge control solenoid valve coil resistance (at 20°C) Ω30 − 34
EGR control solenoid valve coil resistance (at 20°C) Ω29 − 35
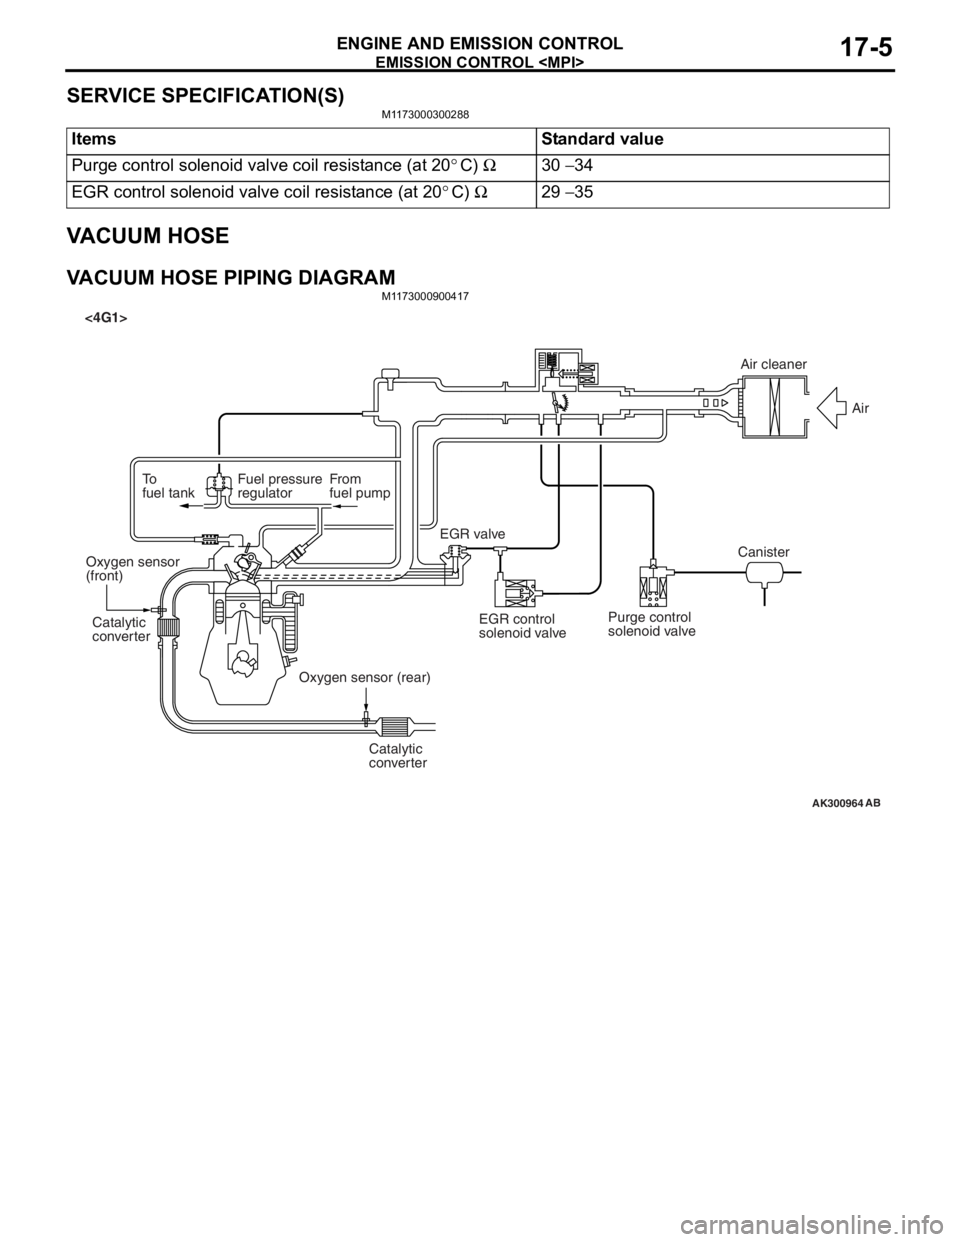
VACUUM HOSE
VACUUM HOSE PIPING DIAGRAMM1173000900417
AK300964
To
fuel tankFuel pressure
regulatorFrom
fuel pump
Catalytic
converter Catalytic
converter
Oxygen sensor
(front)
Oxygen sensor (rear)EGR valve
<4G1>
EGR control
solenoid valvePurge control
solenoid valve CanisterAir
AB
Air cleaner
Page 134 of 800
GENERAL INFORMATION
FRONT AXLE26-2
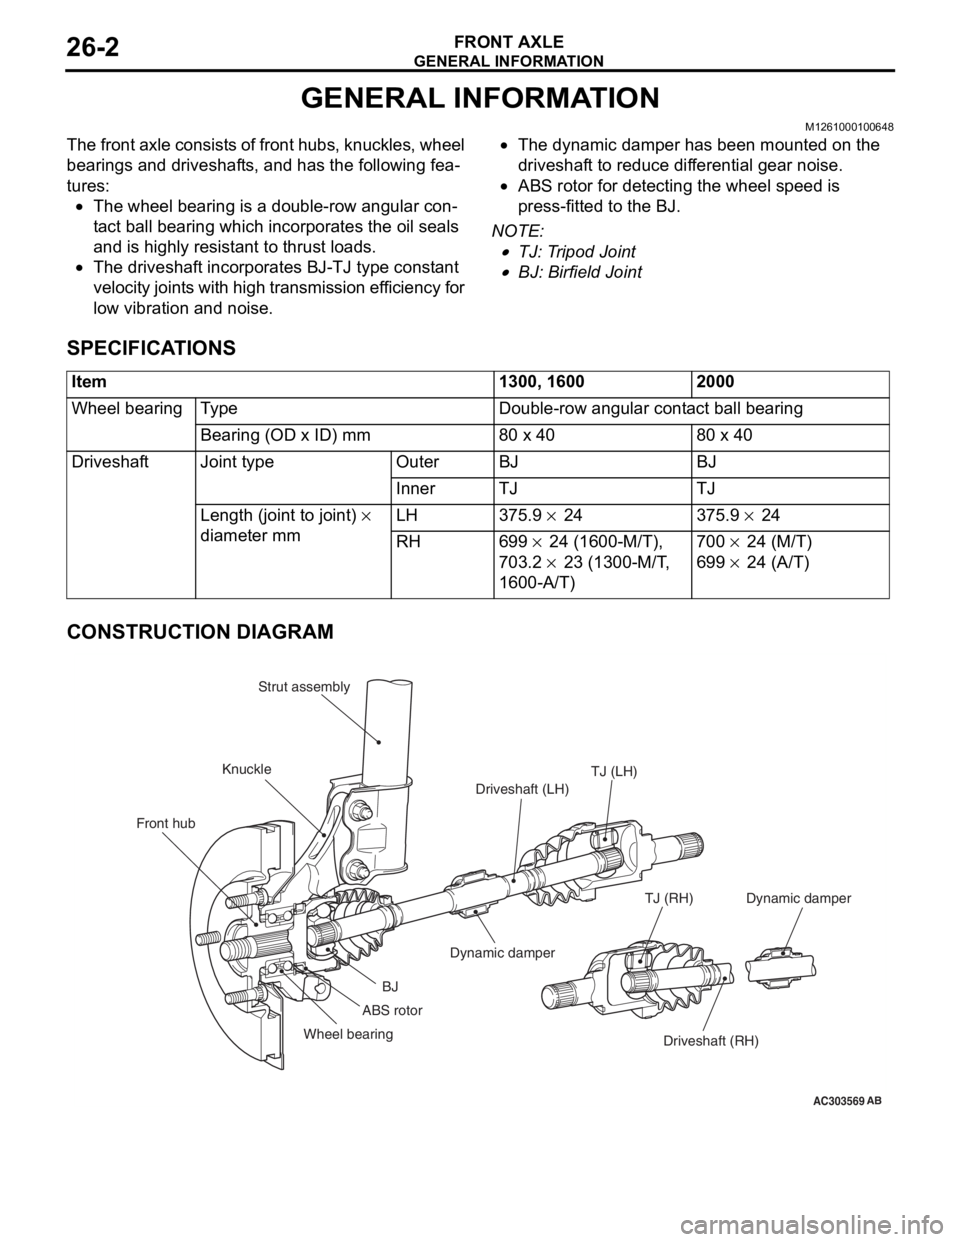
GENERAL INFORMATION
M1261000100648
The front axle consists of front hubs, knuckles, wheel
bearings and driveshafts, and has the following fea
-
tures:
•The wheel bearing is a double-row angular con-
tact ball bearing which incorporates the oil seals
and is highly resistant to thrust loads.
•The driveshaft incorporates BJ-TJ type constant
velocity joints with high transmission efficiency for
low vibration and noise.
•The dynamic damper has been mounted on the
driveshaft to reduce differential gear noise.
•ABS rotor for detecting the wheel speed is
press-fitted to the BJ.
NOTE: .
•TJ: Tripod Joint
•BJ: Birfield Joint
SPECIFICATIONS
Item1300, 16002000
Wheel bearingTy p eDouble-row angular contact ball bearing
Bearing (OD x ID) mm80 x 4080 x 40
DriveshaftJoint typeOuterBJBJ
InnerTJTJ
Length (joint to joint) ×
diameter mm LH 375.9 × 24 375.9 × 24
RH699 × 24 (1600-M/T),
703.2
× 23 (1300-M/T,
1600-A/T)
700 × 24 (M/T)
699 × 24 (A/T)
CONSTRUCTION DIAGRAM
AC303569
Front hub KnuckleStrut assembly
TJ (LH)
Driveshaft (LH)
Dynamic damper
BJ
Wheel bearing Driveshaft (RH)
TJ (RH)
AB
ABS rotor
Dynamic damper
Page 144 of 800
FRONT AXLE HUB ASSEMBLY
FRONT AXLE26-12
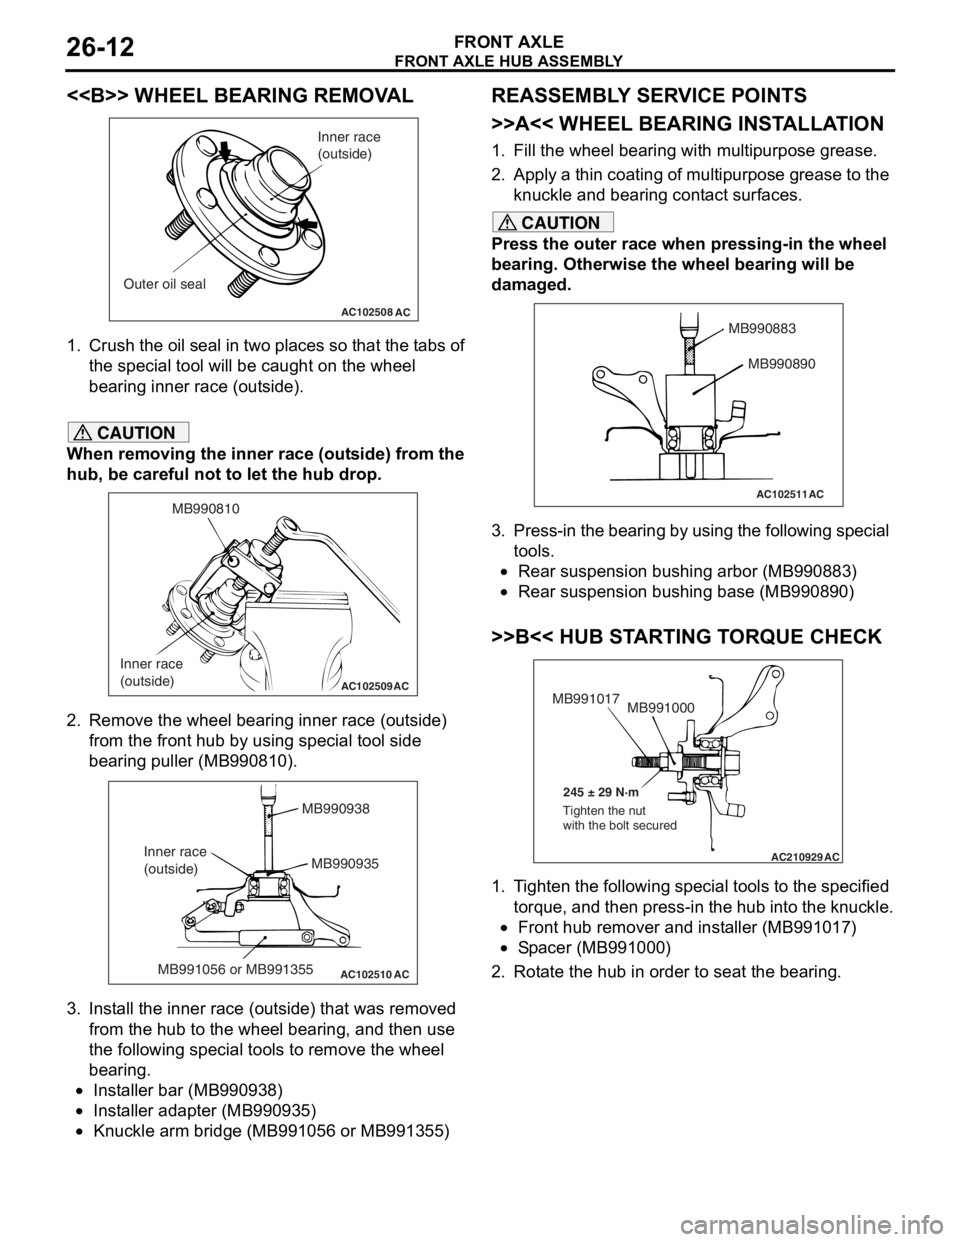
<> WHEEL BEARING REMOVAL
AC102508AC
Inner race
(outside)
Outer oil seal
1. Crush th e oil seal in two pl ace s so t hat t he t abs of
th e spe c ia l too l will be caugh t on th e wheel
be aring inne r race (out side).
CAUTION
When removing the inner race (outside) from the
hub, be careful not to let the hub drop.
AC102509
MB990810
Inner race
(outside)
AC
2. Remove the wheel bearing inner race (outside) from the front hub by using special tool side
bearing puller (MB990810).
AC102510 AC
MB990938
MB990935
MB991056 or MB991355
Inner race
(outside)
3. Install the inner race (outside) that was removed
from the hub to the wheel bearing, and then use
the following special tools to remove the wheel
bearing.
•Installer bar (MB990938)
•Installer adapter (MB990935)
•Knuckle arm bridge (MB991056 or MB991355)
REASSEMBLY SERVICE POINTS
>>A<< WHEEL BEARING INSTALLATION
1. Fill the wheel bearing with multipurpose grease.
2. Apply a thin coating of multipurpose grease to the knuckle and bearing contact surfaces.
CAUTION
Press the outer race when pressing-in the wheel
bearing. Otherwise the wheel bearing will be
damaged.
AC102511
MB990883
MB990890
AC
3. Press-in the bearing by using the following special tools.
•Rear suspension bushing arbor (MB990883)
•Rear suspension bushing base (MB990890)
>>B<< HUB STARTING TORQUE CHECK
AC210929AC
MB991000
MB991017
245 ± 29 N·m
Tighten the nut
with the bolt secured
1. Tighten the following special tools to the specified torque, and then press-in the hub into the knuckle.
•Front hub remover and installer (MB991017)
•Spacer (MB991000)
2. Rotate the hub in order to seat the bearing.
Page 146 of 800
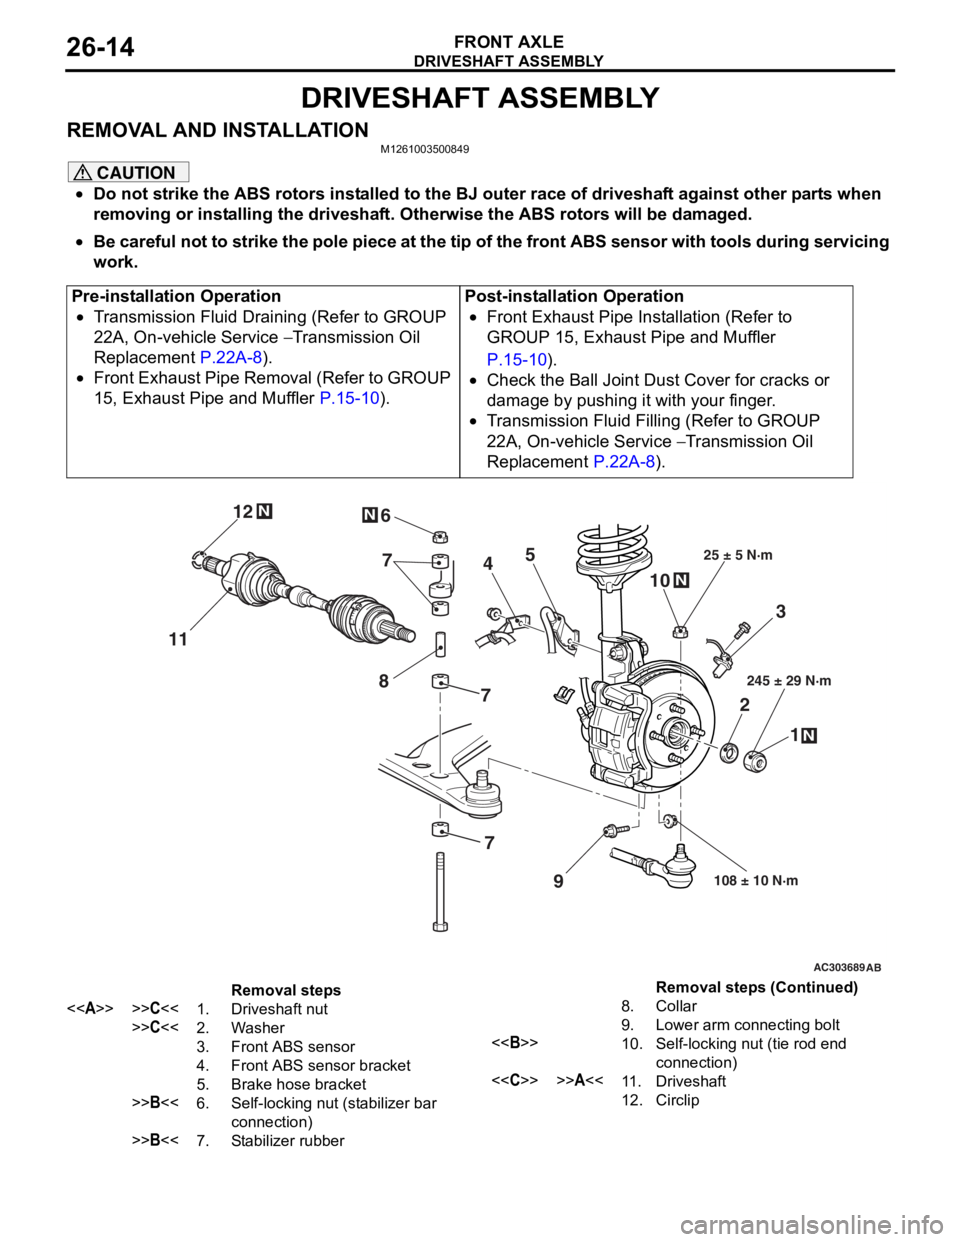
DRIVESHAFT ASSEMBLY
FRONT AXLE26-14
DRIVESHAFT ASSEMBLY
REMOVAL AND INSTALLATIONM1261003500849
CAUTION
•Do not strike the ABS rotors installed to the BJ outer race of driveshaft against other parts when
removing or installing the driveshaft. Otherwise the ABS rotors will be damaged.
•
Pre-installation Operation
•Transmission Fluid Draining (Refer to GROUP
22A, On-vehicle Service
− Transmission Oil
Replacement
P.22A-8).
•Front Exhaust Pipe Removal (Refer to GROUP
15, Exhaust Pipe and Muffler
P.15-10).
Post-installation Operation
•Front Exhaust Pipe Installation (Refer to
GROUP 15, Exhaust Pipe and Muffler
P.15-10).
•Check the Ball Joint Dust Cover for cracks or
damage by pushing it with your finger.
•Transmission Fluid Filling (Refer to GROUP
22A, On-vehicle Service
− Transmission Oil
Replacement
P.22A-8).
AC303689AB
9
N
N
NN
10
7
4
3
2 1
25 ± 5 N·m
245 ± 29 N·m
108 ± 10 N·m
8
5
6
11 12
77
Removal steps
<>>>C<<1.Driveshaft nut
>>C<<2.Washer
3.Front ABS sensor
4.Front ABS sensor bracket
5.Brake hose bracket
>>B<<6.Self-locking nut (stabilizer bar
connection)
>>B<<7.Stabilizer rubber
8.Collar
9.Lower arm connecting bolt
<>10.Self-locking nut (tie rod end
connection)
<
12.Circlip
Be careful not to strike the pole piece at the tip of the front ABS sensor with tools during servicing
work.
Removal steps (Continued)