ignition MITSUBISHI LANCER 2014 8.G Owners Manual
[x] Cancel search | Manufacturer: MITSUBISHI, Model Year: 2014, Model line: LANCER, Model: MITSUBISHI LANCER 2014 8.GPages: 434, PDF Size: 57.5 MB
Page 256 of 434
Interior lights
Features and controls 5-189
5
N00553800067
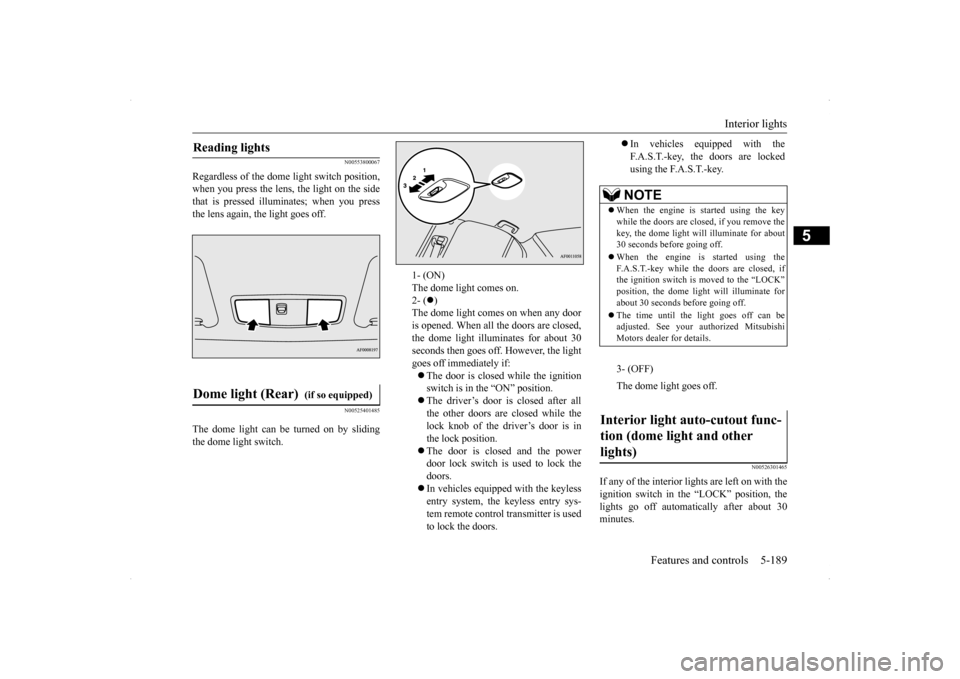
Regardless of the dome light switch position, when you press the lens, the light on the sidethat is pressed illuminates; when you press the lens again, the light goes off.
N00525401485
The dome light can be turned on by sliding the dome light switch.
N00526301465
If any of the interior lights are left on with theignition switch in the “LOCK” position, the lights go off automatically after about 30 minutes.
Reading lights
Dome light (Rear)
(if so equipped)
1- (ON) The dome light comes on. 2- (
)
The dome light comes on when any dooris opened. When all the doors are closed, the dome light illuminates for about 30 seconds then goes off. However, the lightgoes off immediately if: The door is closed while the ignition switch is in the “ON” position. The driver’s door is closed after all the other doors are closed while the lock knob of the driver’s door is in the lock position. The door is closed and the power door lock switch is used to lock the doors. In vehicles equipped with the keyless entry system, the keyless entry sys- tem remote control transmitter is usedto lock the doors.
In vehicles equipped with the F.A.S.T.-key, the doors are lockedusing the F.A.S.T.-key.NOTE
When the engine is started using the key while the doors are closed, if you remove the key, the dome light will illuminate for about30 seconds before going off. When the engine is started using the F.A.S.T.-key while the doors are closed, if the ignition switch is moved to the “LOCK” position, the dome light will illuminate forabout 30 seconds before going off. The time until the light goes off can be adjusted. See your authorized Mitsubishi Motors dealer for details.3- (OFF) The dome light goes off.
Interior light auto-cutout func- tion (dome light and other lights)
Page 257 of 434
Storage spaces 5-190 Features and controls
5
The lights come on again if the ignition switch is turned to the “ON” or “ACC” posi- tion, any door or the trunk lid is opened and closed, or the keyless entry system orF.A.S.T.-key is operated.
N00526400485
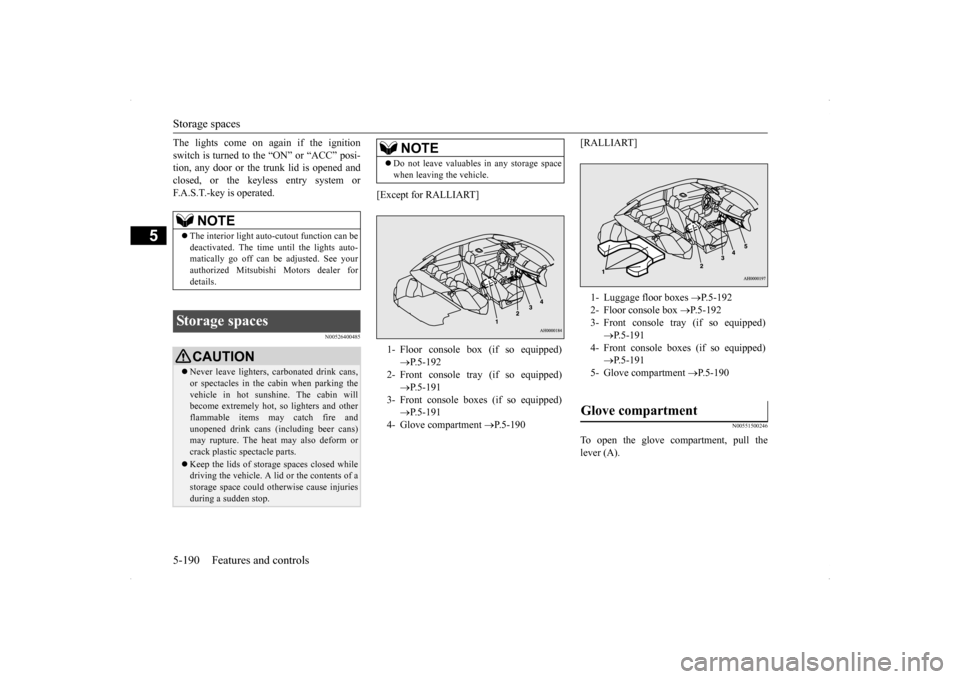
[Except for RALLIART]
[RALLIART]
N00551500246
To open the glove compartment, pull the lever (A).
NOTE
The interior light auto-cutout function can be deactivated. The time until the lights auto- matically go off can be adjusted. See yourauthorized Mitsubishi Motors dealer for details.
Storage spaces
CAUTION Never leave lighters, carbonated drink cans, or spectacles in the cabin when parking the vehicle in hot sunshine. The cabin will become extremely hot, so lighters and otherflammable items may catch fire and unopened drink cans (including beer cans) may rupture. The heat may also deform or crack plastic spectacle parts. Keep the lids of storage spaces closed while driving the vehicle. A lid or the contents of a storage space could otherwise cause injuriesduring a sudden stop.
NOTE
Do not leave valuables in any storage space when leaving the vehicle.1- Floor console box (if so equipped)
P.5-192
2- Front console tray (if so equipped)
P.5-191
3- Front console boxes (if so equipped)
P.5-191
4- Glove compartment
P.5-190
1- Luggage floor boxes
P.5-192
2- Floor console box
P.5-192
3- Front console tray (if so equipped)
P.5-191
4- Front console boxes (if so equipped)
P.5-191
5- Glove compartment
P.5-190
Glove compartment
Page 279 of 434
Heater without air conditioni
ng function (if so equipped)
7-4 Comfort controls
7
Air flows mainly to the windshield and the door windows.
N00737700031
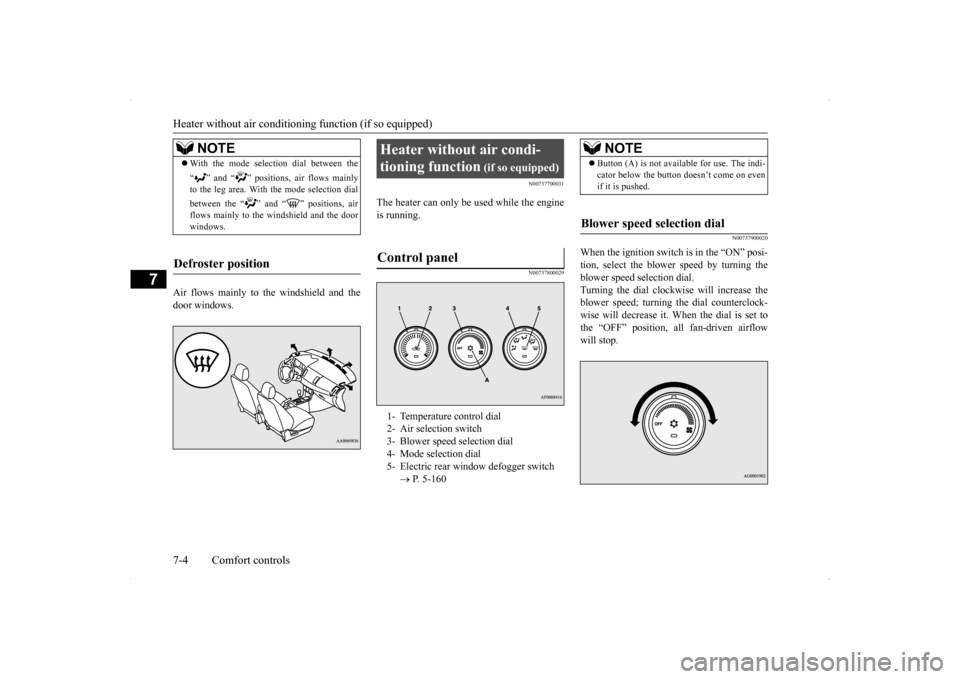
The heater can only be used while the engineis running.
N00737800029
N00737900020
When the ignition switch is in the “ON” posi- tion, select the blower speed by turning theblower speed selection dial. Turning the dial clockwise will increase the blower speed; turning the dial counterclock-wise will decrease it. When the dial is set to the “OFF” position, all fan-driven airflow will stop.
NOTE
With the mode selection dial between the “ ” and “ ” positions, air flows mainly to the leg area. With the mode selection dial between the “ ” and “ ” positions, air flows mainly to the windshield and the doorwindows.
Defroster position
Heater without air condi- tioning function
(if so equipped)
Control panel
1- Temperature control dial 2- Air selection switch 3- Blower speed selection dial 4- Mode selection dial5- Electric rear window defogger switch
P. 5-160
NOTE
Button (A) is not available for use. The indi- cator below the button doesn’t come on even if it is pushed.
Blower speed selection dial
Page 282 of 434
Manual air conditioning with
MAX A/C mode (if so equipped)
Comfort controls 7-7
7
1. Set the mode selection dial to the “ ” position. 2. Select your desired blower speed by turn- ing the blower speed selection dial.3. Select your desired temperature by turn- ing the temperature control dial.
For quick defrosting 1. Set the mode selection dial to the “ ” position.
2. Set your blower to the maximum speed. 3. Set the temperature to the highest posi- tion.
N00730300256
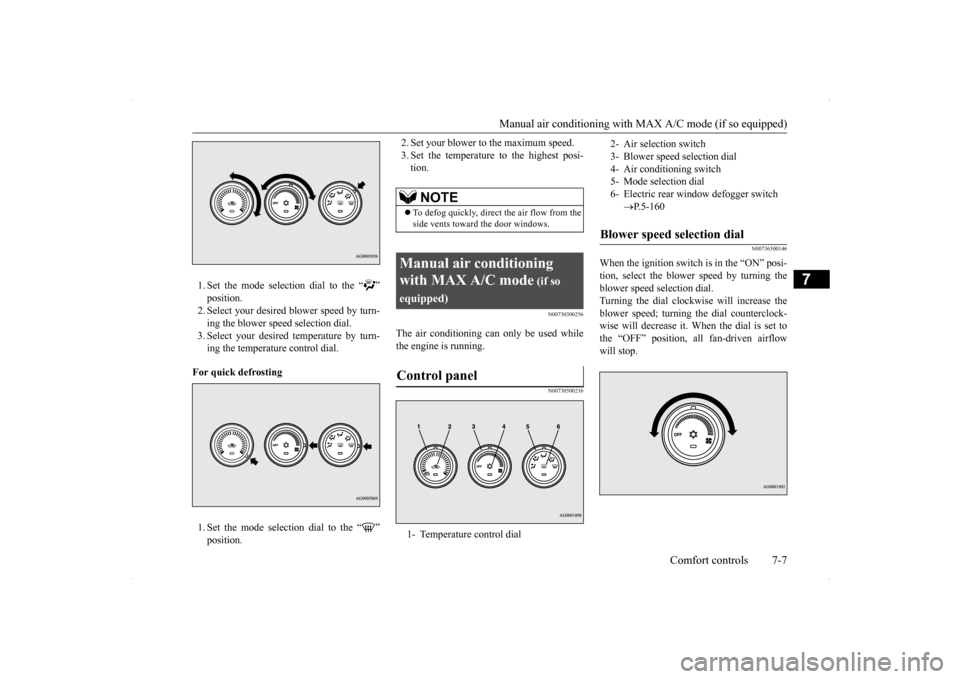
The air conditioning can only be used while the engine is running.
N00730500216
N00736500146
When the ignition switch is in the “ON” posi- tion, select the blower speed by turning the blower speed selection dial. Turning the dial clockwise will increase theblower speed; turning the dial counterclock- wise will decrease it. When the dial is set to the “OFF” position, all fan-driven airflowwill stop.
NOTE
To defog quickly, direct
the air flow from the
side vents toward the door windows.
Manual air conditioning with MAX A/C mode
(if so
equipped)Control panel
1- Temperature control dial
2- Air selection switch 3- Blower speed selection dial4- Air conditioning switch 5- Mode selection dial 6- Electric rear window defogger switch
P.5-160
Blower speed selection dial
Page 288 of 434
Manual air conditioning withou
t MAX A/C mode (if so equipped)
Comfort controls 7-13
7
N00730500229 N00736500133
When the ignition switch is in the “ON” posi- tion, select the blower speed by turning the blower speed selection dial.Turning the dial clockwise will increase the blower speed; turning the dial counterclock- wise will decrease it. When the dial is set tothe “OFF” position, all fan-driven airflow will stop.
N00736600176
Turn the temperature control dial clockwise to make the air warmer. Turn it counterclock-wise to make the air cooler.
N00736700177
To change the amount of air flowing from thevents, turn the mode selection dial. Refer to “Changing the mode selection” on page 7-2.
N00736800279
Normally, use the outside air position to keepthe windshield and side windows clear and to
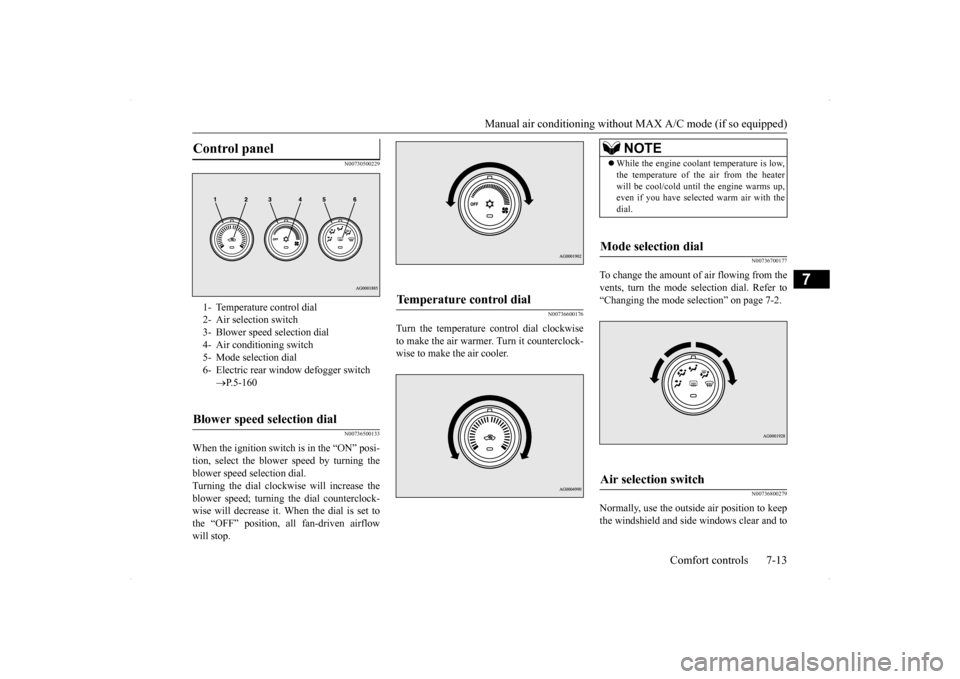
Control panel
1- Temperature control dial2- Air selection switch 3- Blower speed selection dial4- Air conditioning switch 5- Mode selection dial 6- Electric rear window defogger switch
P.5-160
Blower speed selection dial
Temperature control dial
NOTE
While the engine coolant temperature is low, the temperature of the air from the heater will be cool/cold until the engine warms up, even if you have selected warm air with the dial.
Mode selection dial
Air selection switch
Page 293 of 434
Automatic air conditioning with
Fahrenheit scale (if so equipped)
7-18 Comfort controls
7
N00736900094
When the ignition switch is in the “ON” posi- tion, select the blower speed by turning the blower speed selection dial. Turning the dial clockwise will increase theblower speed; turning the dial counterclock- wise will decrease it. When the dial is set to the “OFF” position, all fan-driven airflowwill stop.
N00737000265
Use this dial to adjust the temperature in thepassenger compartment. Turn the temperaturecontrol dial clockwise to make the air warmer. Turn it counterclockwise to make the air cooler.
The above indicates the factory settings. You can personalize the air selection switch and air conditioning switch to match your per-sonal preferences. Contact your Mitsubishi Motors dealer or a repair facility of your choice for assistance.Refer to “Personalizing the air conditioning switch (Changing the function setting)” on page 7-20.Refer to “Personalizing the air selection (Changing the function setting)” on page
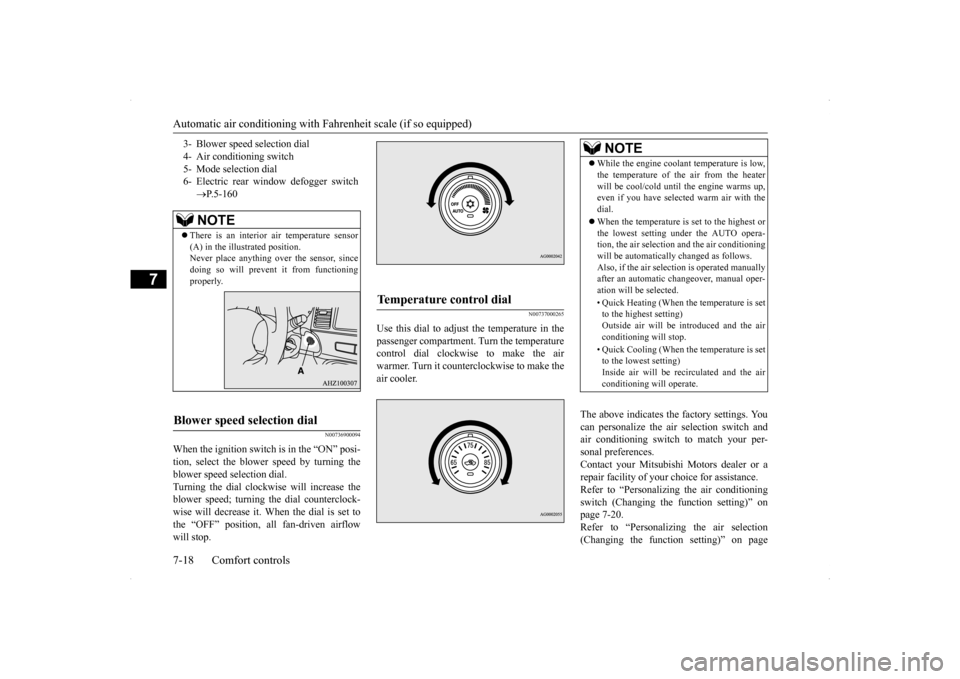
3- Blower speed selection dial 4- Air conditioning switch5- Mode selection dial 6- Electric rear window defogger switch
P.5-160NOTE
There is an interior air temperature sensor (A) in the illustrated position.Never place anything over the sensor, since doing so will prevent it from functioning properly.
Blower speed selection dial
Temperature control dial
NOTE
While the engine coolant temperature is low, the temperature of the air from the heater will be cool/cold until the engine warms up, even if you have selected warm air with the dial. When the temperature is set to the highest or the lowest setting under the AUTO opera-tion, the air selection and the air conditioning will be automatically changed as follows. Also, if the air selection is operated manuallyafter an automatic changeover, manual oper- ation will be selected. • Quick Heating (When the temperature is set to the highest setting) Outside air will be introduced and the airconditioning will stop. • Quick Cooling (When the temperature is set to the lowest setting) Inside air will be recirculated and the air conditioning will operate.
Page 298 of 434
Automatic air conditioning with
Celsius scale (if so equipped)
Comfort controls 7-23
7
N00731500239
The air conditioning can only be used while the engine is running.
N00711801594
N00736900111
When the ignition switch is in the “ON” posi- tion, select the blower speed by turning the blower speed selection dial.Turning the dial clockwise will increase the blower speed; turning the dial counterclock- wise will decrease it. When the dial is set tothe “OFF” position, all fan-driven airflow will stop.
N00737000281
Use this dial to adjust the temperature in the passenger compartment. Turn the temperaturecontrol dial clockwise to make the air warmer. Turn it counterclockwise to make the air cooler.
When defrosting, do not set the temperature control dial to the maximum cool position. This will blow cool air on the window glass and fog it up.
Automatic air conditioning with Celsius scale
(if so
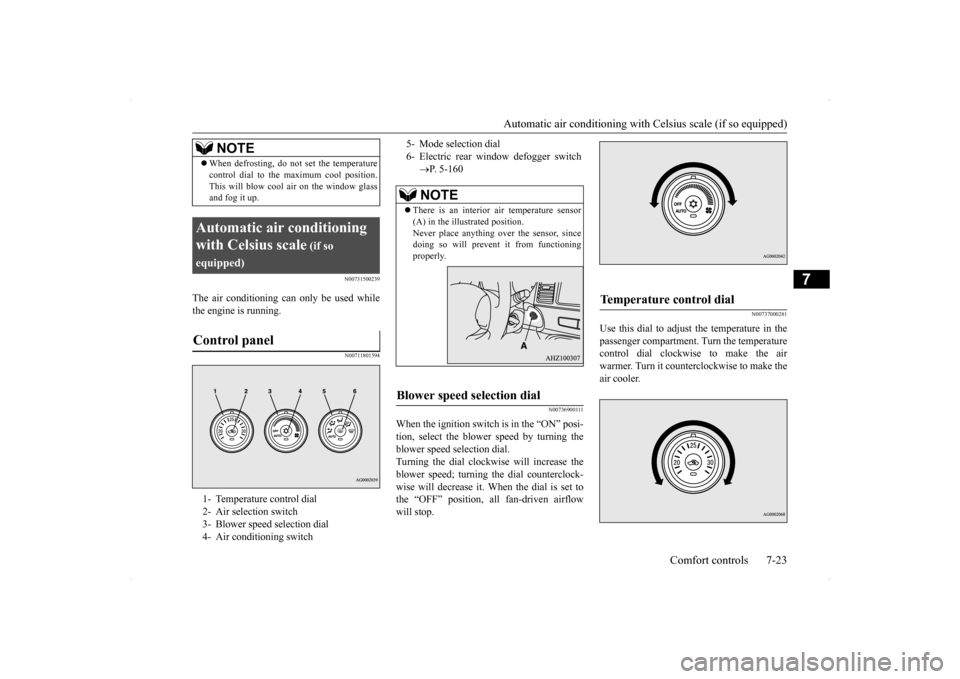
equipped)Control panel
1- Temperature control dial 2- Air selection switch 3- Blower speed selection dial 4- Air conditioning switch
NOTE
5- Mode selection dial6- Electric rear window defogger switch
P. 5-160NOTE
There is an interior
air temperature sensor
(A) in the illustrated position. Never place anything over the sensor, sincedoing so will prevent it from functioning properly.
Blower speed selection dial
Temperature control dial
Page 304 of 434
AM/FM radio/CD player (if so equipped)
Comfort controls 7-29
7
The air filter’s ability to collect pollen and dirt is reduced as it becomes dirty, so replace it periodically. For the maintenance interval, refer to the “WARRANTY AND MAINTE-NANCE MANUAL”.
N00734302098
The audio system can only be used when the ignition switch is in the “ON” or “ACC” position.
N00715000021
This product supports audio playback from iPod/iPhone devices, however dif- fering versions mean that playback cannot be guaranteed. Please be aware that depending on the iPod/iPhone model or version, operation may differ.
N00715200023
If the product becomes dirty, wipe with a soft cloth. If very dirty, use a soft cloth dipped in neutral detergent diluted in water, and then wrung out. Do not use benzene, thin-ners, or other chemical wipes. This may harm the surface.
NOTE
Operation in certain conditions such as driv- ing on a dusty road and frequent use of the air conditioning can lead to reduction of ser-vice life of the filter.
When you feel that the
air flow is lower than
normal or when the
windshield or windows start to fog up easily,replace the air filter. Contact your Mitsubishi Motors dealer or a repair facility of your choice for assistance.
AM/FM radio/CD player
(if
so equipped)
NOTE
To listen to the audio system while the engine is not running, turn the ignition switch to the “ACC” position. If the ignition switch is left in the “ACC” position, the accessory power will automati-cally turn off after a certain period of time and you will no longer be able to use the audio system. The accessory power comeson again if the ignition switch is turned from the “ACC” position. Refer to “ACC power auto-cutout function” on page 5-55. If a cellular phone is used inside the vehicle, it may create noise in the audio equipment.This does not mean that anything is wrong with your audio equipment. In such a case, use the cellular phone at a place as far awayas possible from the audio equipment. If foreign objects or water get into the audio equipment, or if smoke or a strange odor comes from it, immediately turn off the audio system and have it checked at anauthorized Mitsubishi Motors dealer or a repair facility of your choice. Never try to repair it yourself. Avoid using the audio sys-tem until it is inspected by a qualified per- son. If the audio system is damaged by foreign objects, water, or fire, have the system checked by a qualified Mitsubishi Motors technician.
The audio amplifier (if so equipped) is located under the front left seat. Do not subject the amplifier to a strong impact. It could damage the amplifier or malfunc-tioning could result.
Important Points on Usage
iPod/iPhone Playback Function
(if
so equipped)How to Clean
NOTE
Page 324 of 434
Listen to Audio Files on a USB Device
Comfort controls 7-49
7
Press the 2RDM key. Play tracks in the category currently being played in a random order. Hold down the 2RDM key. Play back the album in a random order (tracks in any order on the album). Search categories or track names, and select a track. 1. Turn the /SEL key to select the cate- gory.
2. Press the /SEL key. Categories or tracks within the selected category are displayed. 3. Turn the /SEL key to select the cate- gory or track. 4. Press the /SEL key. Repeat steps 1 to 4, and search for tracks. Select the track, and press the /SEL key to play.
N00717400032
By connecting commercially-available USBdevices such as USB memory to this product,you can play back audio files on these through the product.
Shuffle Playback (RDM)
NOTE
Pressing again will cancel.
Album Shuffle Playback
NOTE
Pressing again will cancel.
Search Tracks
NOTE
While the category (1st level) is selected, press the 6 key to cancel track search mode. If there is no operation for 10 seconds after selecting the category, then track search mode will be cancelled. Select the category, and hold down the
/SEL key to start playback from the first
track in that category. While the track is selected, press the 6 key to return to the previous operation. While the track is selected, hold down the 6 key to cancel track search mode. If there is no operation for five seconds after selecting the track, that file is played back. iPod operations such as selecting a track will cancel track search mode.
Listen to Audio Files on a USB Device
CAUTION Do not leave the USB device unattended in the vehicle. Never hold these devices in your hand to operate while driving, as this is dangerous. Do not use hard discs, card readers, or mem- ory readers, as damage may occur to these or to the data contained therein. If these are erroneously connected, then turn the ignitionswitch to the “LOCK” position, then remove. Because of the risk of data loss, it is recom- mended that files be backed up. No guarantee is made as regards damage to the USB device, nor regarding loss or dam- age to data contained therein. Depending on how the devices are handled, audio files being damaged or lost, therefore it is recommended that data be backed up.
Page 343 of 434
If the vehicle breaks down 8-2 For emergencies
8
N00836300161
If your vehicle breaks down on the road, move to the shoulder and turn on the hazardwarning flashers. If there is no shoulder, or the shoulder is not safe, drive in the right lane slowly, with the hazard lights flashing, untilyou come to a safe stopping place. Keep the flashers flashing. If the engine stops, there will be no power assist to the steering and brakes, making these difficult to use. The brake booster will not work, so the brakes will not grip well. The brake pedalwill be harder to press than usual. Since there is no power steering assist, the steering wheel will be hard to turn.
Get help from your passengers, bystanders, etc. to push the vehicl
e and move it to a safe
zone.
N00836400713
If the engine cannot be started because the battery is weak or dead, you can start it withthe battery from another vehicle using jumper cables. 1. Take off any metal jewelry such as watch bands or bracelets that might make an accidental electrical contact.
2. Position the vehicles close enough together so that the jumper cables can reach, but be sure the vehicles aren’t touching each other. 3. You could be injured if the vehicles move. Set the parking brake firmly on each vehi- cle. Put an automatic transaxle, CVT or Twin Clutch SST in “P” (PARK) or amanual transaxle in “N” (Neutral). Turn the ignition key to the “LOCK” position.
If the vehicle breaks down If the engine stops/fails When the engine fails at the intersection
Jump-starting the engine
WA R N I N G When using jumper cables to start a vehi- cle, follow the procedures and be very cau- tious. CAUTION Do not try to start your vehicle by pushing or towing. Vehicles with continuously variable transmission (CVT) or Twin Clutch SST cannot be started this way. Pushing or towinga vehicle that has a manual transaxle may overheat and damage the catalytic converter. Also, there is more ri
sk of an accident when
a vehicle is being pushed or towed.
CAUTION Check the other vehicle. It must have a 12- volt battery. If the other system isn’t 12-volt, both systems can be damaged.WA R N I N G Turn the ignition key to the “LOCK” posi- tion on both vehicles. Make sure that the cables or your clothes cannot be caught by the fan or drive belt. Personal injurycould result. NOTE
Turn off all lights, heater, and other electrical loads. This will avoid sparks and help save both batteries.