MITSUBISHI LANCER 2017 8.G Owners Manual
Manufacturer: MITSUBISHI, Model Year: 2017, Model line: LANCER, Model: MITSUBISHI LANCER 2017 8.GPages: 385, PDF Size: 14.34 MB
Page 311 of 385
How to change a tire 8-8 For emergencies
8
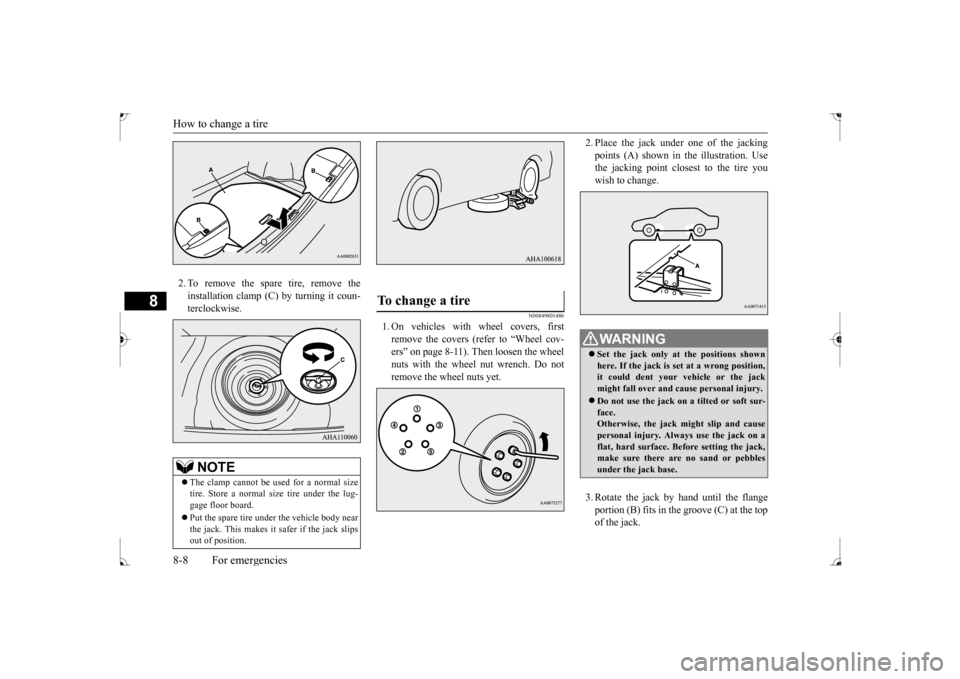
2. To remove the spare tire, remove the installation clamp (C) by turning it coun-terclockwise.
N00849801486
1. On vehicles with wheel covers, firstremove the covers (refer to “Wheel cov-ers” on page 8-11). Then loosen the wheel nuts with the wheel nut wrench. Do not remove the wheel nuts yet.
2. Place the jack under
one of the jacking
points (A) shown in the illustration. Use the jacking point closest to the tire you wish to change. 3. Rotate the jack by hand until the flange portion (B) fits in the groove (C) at the top of the jack.
NOTE
The clamp cannot be used for a normal size tire. Store a normal size tire under the lug-gage floor board. Put the spare tire under the vehicle body near the jack. This makes it safer if the jack slips out of position.
To change a tire
WA R N I N G Set the jack only at the positions shown here. If the jack is set at a wrong position,it could dent your vehicle or the jack might fall over and cause personal injury. Do not use the jack on a tilted or soft sur- face. Otherwise, the jack might slip and causepersonal injury. Always use the jack on a flat, hard surface. Before setting the jack, make sure there are no sand or pebblesunder the jack base.
BK0237700US.bo
ok 8 ページ 2016年4月15日 金曜日 午前11時28分
Page 312 of 385
How to change a tire
For emergencies 8-9
8
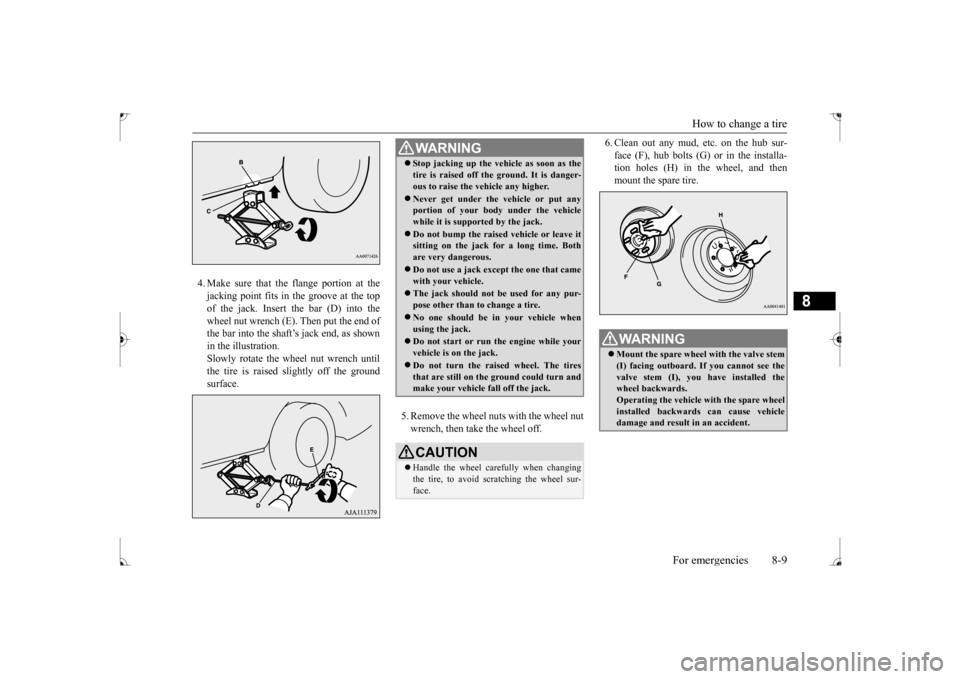
4. Make sure that the flange portion at the jacking point fits in the groove at the topof the jack. Insert the bar (D) into the wheel nut wrench (E). Then put the end of the bar into the shaft’s jack end, as shownin the illustration. Slowly rotate the wheel nut wrench until the tire is raised slightly off the groundsurface.
5. Remove the wheel nuts with the wheel nut wrench, then take the wheel off.
6. Clean out any mud, etc. on the hub sur- face (F), hub bolts (G) or in the installa- tion holes (H) in the wheel, and then mount the spare tire.
WA R N I N G Stop jacking up the vehicle as soon as the tire is raised off the ground. It is danger- ous to raise the vehicle any higher. Never get under the vehicle or put any portion of your body under the vehicle while it is support
ed by the jack.
Do not bump the raised vehicle or leave it sitting on the jack for a long time. Both are very dangerous. Do not use a jack except the one that came with your vehicle. The jack should not be used for any pur- pose other than to change a tire. No one should be in your vehicle when using the jack. Do not start or run the engine while your vehicle is on the jack. Do not turn the raised wheel. The tires that are still on the ground could turn andmake your vehicle fall off the jack. CAUTION Handle the wheel carefully when changing the tire, to avoid scratching the wheel sur- face.
WA R N I N G Mount the spare wheel with the valve stem (I) facing outboard. If you cannot see the valve stem (I), you have installed the wheel backwards.Operating the vehicle with the spare wheel installed backwards can cause vehicle damage and result in an accident.
BK0237700US.bo
ok 9 ページ 2016年4月15日 金曜日 午前11時28分
Page 313 of 385
![MITSUBISHI LANCER 2017 8.G Owners Manual How to change a tire 8-10 For emergencies
8
7. [Vehicle with steel wheels] • Normal wheels and compact spare wheel Install the wheel nuts (tapered nuts) withtheir tapered ends facing inward, then ti MITSUBISHI LANCER 2017 8.G Owners Manual How to change a tire 8-10 For emergencies
8
7. [Vehicle with steel wheels] • Normal wheels and compact spare wheel Install the wheel nuts (tapered nuts) withtheir tapered ends facing inward, then ti](/img/19/7464/w960_7464-312.png)
How to change a tire 8-10 For emergencies
8
7. [Vehicle with steel wheels] • Normal wheels and compact spare wheel Install the wheel nuts (tapered nuts) withtheir tapered ends facing inward, then tighten by hand until the wheel is no lon- ger loose. [Vehicle with aluminum wheels] • Normal wheels
Temporarily tighten the wheel nuts (flange nuts) until their flange section comes in contact with the wheel and it is no longer loose. • Compact spare wheel Install the wheel nuts with their tapered ends facing inward, then tighten by hand until the wheel is no longer loose.
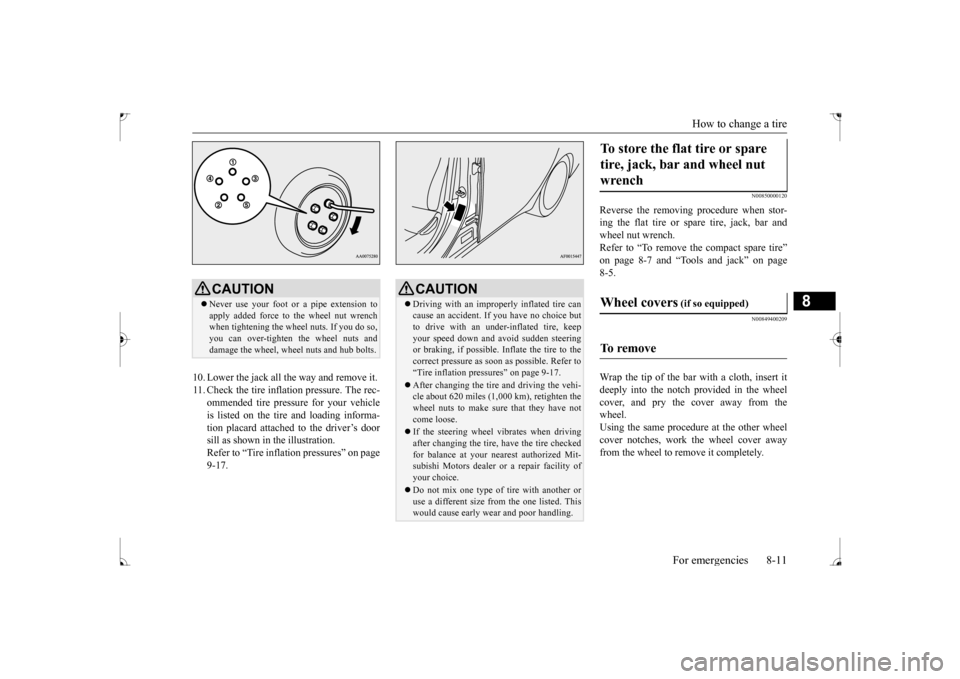
8. Lower the vehicle slowly by rotating the wheel nut wrench counterclockwise until the tire touches the ground. 9. Tighten the nuts in the order shown in the illustration until each nut has been tight-ened to the torque listed here. 65 to 80 ft-lb (88 to 108 N•m)CAUTION Never apply oil to either the wheel bolts or the nuts or they will tighten too much.NOTE
Flange nuts can be temporarily used on the compact spare or steel wheel, but return them to the original wheel and tire as soon aspossible. If all four wheels are changed to steel wheels, use tapered nuts.
BK0237700US.bo
ok 10 ページ 2016年4月15日 金曜日 午前11時28分
Page 314 of 385
How to change a tire
For emergencies 8-11
8
10. Lower the jack all the way and remove it. 11. Check the tire inflation pressure. The rec-
ommended tire pressure for your vehicle is listed on the tire and loading informa-tion placard attached to the driver’s door sill as shown in the illustration. Refer to “Tire inflation pressures” on page9-17.
N00850000120
Reverse the removing procedure when stor- ing the flat tire or spare tire, jack, bar and wheel nut wrench.Refer to “To remove the compact spare tire” on page 8-7 and “Tools and jack” on page 8-5.
N00849400209
Wrap the tip of the bar with a cloth, insert itdeeply into the notch provided in the wheelcover, and pry the cover away from the wheel. Using the same procedure at the other wheelcover notches, work the wheel cover away from the wheel to remove it completely.
CAUTION Never use your foot or a pipe extension to apply added force to the wheel nut wrench when tightening the wheel nuts. If you do so,you can over-tighten the wheel nuts and damage the wheel, wheel nuts and hub bolts.
CAUTION Driving with an improperly inflated tire can cause an accident. If you have no choice but to drive with an under-inflated tire, keep your speed down and avoid sudden steeringor braking, if possible
. Inflate the tire to the
correct pressure as soon as possible. Refer to “Tire inflation pressures” on page 9-17. After changing the tire and driving the vehi- cle about 620 miles (1,000 km), retighten thewheel nuts to make sure that they have not come loose. If the steering wheel vibrates when driving after changing the tire, have the tire checked for balance at your nearest authorized Mit-subishi Motors dealer or a repair facility of your choice. Do not mix one type of tire with another or use a different size from the one listed. This would cause early wear and poor handling.
To store the flat tire or spare tire, jack, bar and wheel nut wrench Wheel covers
(if so equipped)
To remove
BK0237700US.bo
ok 11 ページ 2016年4月15日 金曜日 午前11時28分
Page 315 of 385
Towing 8-12 For emergencies
8
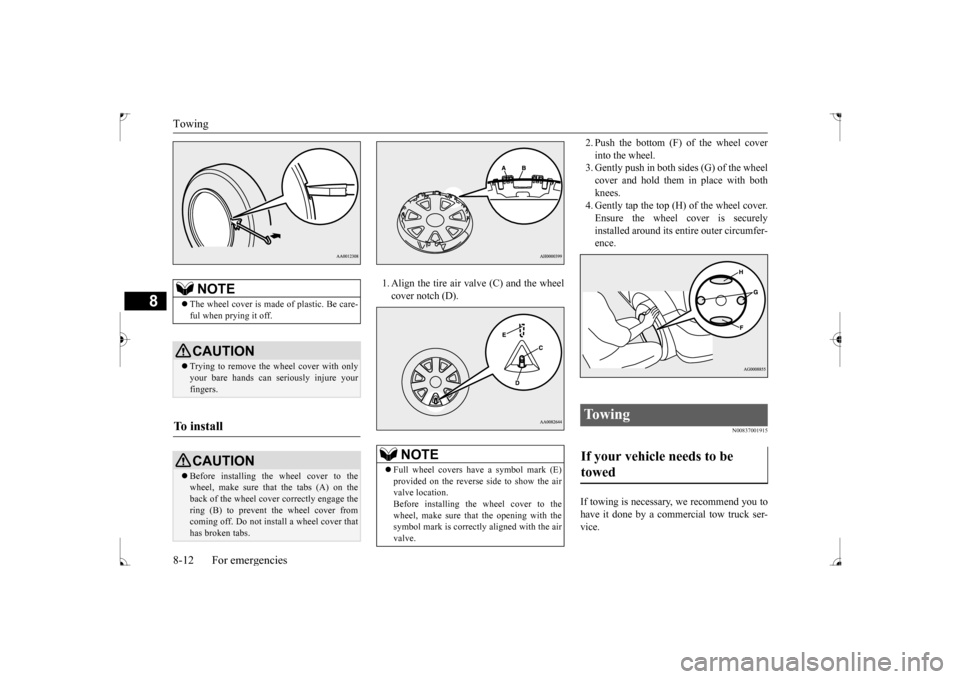
1. Align the tire air valve (C) and the wheel cover notch (D).
2. Push the bottom (F) of the wheel cover into the wheel. 3. Gently push in both sides (G) of the wheel cover and hold them in place with bothknees. 4. Gently tap the top (H) of the wheel cover. Ensure the wheel cover is securelyinstalled around its entire outer circumfer- ence.
N00837001915
If towing is necessary, we recommend you to have it done by a commercial tow truck ser-vice.
NOTE
The wheel cover is made of plastic. Be care- ful when prying it off. CAUTION Trying to remove the wheel cover with only your bare hands can seriously injure your fingers.
To i n s t a l l
CAUTION Before installing the wheel cover to the wheel, make sure that the tabs (A) on the back of the wheel cover correctly engage the ring (B) to prevent the wheel cover fromcoming off. Do not install a wheel cover that has broken tabs.
NOTE
Full wheel covers have a symbol mark (E) provided on the reverse side to show the air valve location.Before installing the wheel cover to the wheel, make sure that the opening with the symbol mark is correctly aligned with the airvalve.
To w i n g If your vehicle needs to be towed
BK0237700US.bo
ok 12 ページ 2016年4月15日 金曜日 午前11時28分
Page 316 of 385
Towing
For emergencies 8-13
8
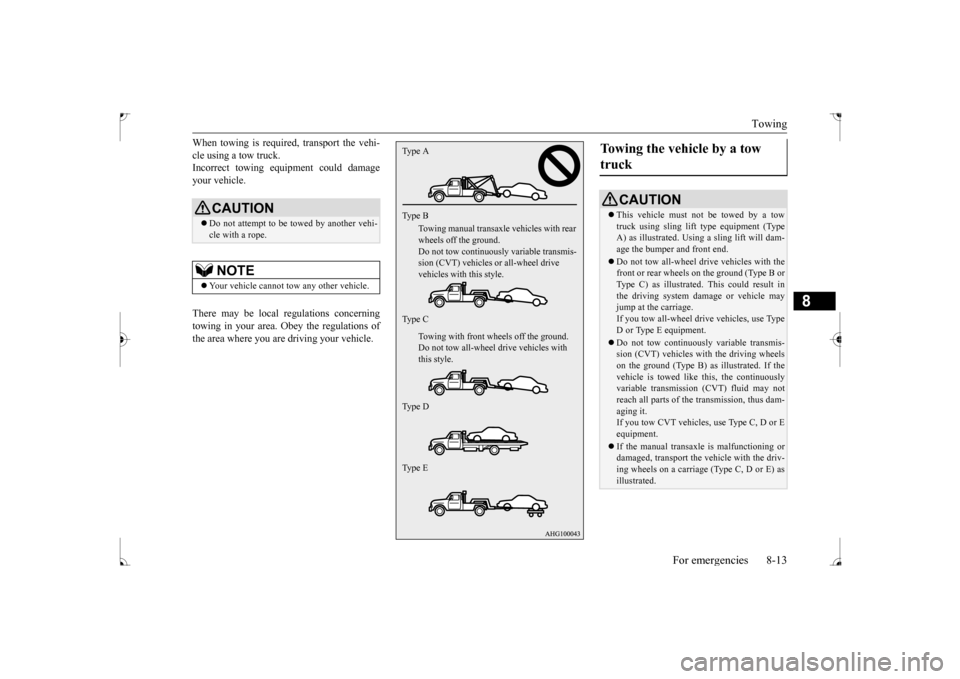
When towing is required, transport the vehi- cle using a tow truck. Incorrect towing equipment could damage your vehicle. There may be local regulations concerning towing in your area. Obey the regulations of the area where you are driving your vehicle.
CAUTION Do not attempt to be towed by another vehi- cle with a rope.NOTE
Your vehicle cannot tow any other vehicle.
Type A Type B
Towing manual transaxle
vehicles with rear
wheels off the ground. Do not tow continuously
variable transmis-
sion (CVT) vehicles or all-wheel drive vehicles with this style.
Type C
Towing with front wheels off the ground. Do not tow all-wheel drive vehicles with this style.
Type D Type E
Towing the vehicle by a tow truck
CAUTION This vehicle must not be towed by a tow truck using sling lift type equipment (TypeA) as illustrated. Using a sling lift will dam- age the bumper and front end. Do not tow all-wheel dr
ive vehicles with the
front or rear wheels on the ground (Type B or Type C) as illustrated. This could result inthe driving system damage or vehicle may jump at the carriage. If you tow all-wheel drive vehicles, use TypeD or Type E equipment. Do not tow continuously variable transmis- sion (CVT) vehicles with the driving wheels on the ground (Type B) as illustrated. If the vehicle is towed like this, the continuouslyvariable transmission (CVT) fluid may not reach all parts of the transmission, thus dam- aging it.If you tow CVT vehicles, use Type C, D or E equipment. If the manual transaxle is malfunctioning or damaged, transport the vehicle with the driv- ing wheels on a carriage (Type C, D or E) as illustrated.
BK0237700US.bo
ok 13 ページ 2016年4月15日 金曜日 午前11時28分
Page 317 of 385
Operation under adverse driving conditions 8-14 For emergencies
8
Place the gearshift lever in the “Neutral” position. Turn the ignition switch to the “ACC” posi-tion and secure the steering wheel in a straight-ahead position with a rope or tie- down strap. Never place the ignition switch inthe “LOCK” position when towing.
Release the parking brake. Place the gearshift lever in the “Neutral” position (manual transaxle) or the selectorlever in the “N” (NEUTRAL) position (CVT).
N00837200662
If your vehicle becomes stuck in snow, sand, or mud, it can often be
moved by a rocking
motion. Rock your vehicle back and forth to free it. Do not rev the engine or spin the wheels.Constant efforts to free a stuck vehicle can cause overheating and transaxle failure. Let
the engine idle for a few minutes to cool the transaxle before trying again. If your vehicle is still stuck after several rock- ing attempts, call for a commercial tow truckservice.
[For front-wheel drive vehicle equipped with the active stability control (ASC)] If the vehicle is towed with the ignition switch in the “ON” position and only the front wheels or only the rear wheels raisedoff the ground, the ASC may operate, result- ing in an accident. When towing the vehicle with only the front wheels or only the rearwheels raised, keep the ignition switch in the “LOCK” or “ACC” position. [For vehicle equipped with the Electronically controlled 4WD system] Even in “2WD” mode, the vehicle cannot betowed with the front or the rear wheels on the ground.
Towing manual transaxle vehicles with rear wheels off the ground (Type B)
CAUTION
Towing with front wheels off the ground (Type C)
WA R N I N G To prevent entry of exhaust gas from the towing vehicle, set the selection switch to the recirculation position.
Operation under adverse driving conditions If your vehicle becomes stuck in sand, mud or snow
WA R N I N G When trying to rock your vehicle out of a stuck position, make sure that there are no people nearby. The rocking motion canmake your vehicle suddenly lurch forward or backward, and injure any bystanders.
On wet roads
CAUTION Avoid flooded roads. Water is often deeper than it looks, and you could be seriously hurt by driving into flood water. When driving in rain, on water-covered roads, or through a car wash, water could get into the brake discs and make them fail tem-porarily. In such cases, lightly press the brake pedal to see if they are working prop- erly. If they are not, press the pedal lightly several times while driving to dry the brake pads or linings, then check them again.
BK0237700US.bo
ok 14 ページ 2016年4月15日 金曜日 午前11時28分
Page 318 of 385
Fuel Pump Shut-off System
For emergencies 8-15
8
When driving on a road covered with snow or ice, use snow tires. Tire chains cannot be used on your vehicle. There may be state or local regulations aboutusing snow tires. Always check the regu- lations in your local area before using them. Refer to the section entitled “Snowtires” on page 9-20 and “Tire chains” on page 9-20. Drive slowly. Do not make sudden starts or stops, sharp turns, or slam on the brakes. Allow extra distance between your vehi- cle and the vehicle in front of you, and avoid sudden braking. If a skid occurs when the accelerator pedal is depressed, take your foot off the pedal. Steer gently in the direction of the skid.
Your vehicle is equipped with an anti-lock braking system (ABS), hold the brake pedal down firmly and keep it depressed. Do not pump the brake pedal which willresult in reduced braking performance. After parking on snowy or icy road, it may be difficult to move your vehicle dueto freeze-up of the brake. Depress the accelerator pedal little by little to move the vehicle after confirming safety of thevehicle. Drive as slow as poss
ible when driving on
bumpy or rutted roads or over potholes etc.
N00860600044
In the event of a collision causing frontal air-bag deployment, the fuel pump shut-off sys- tem will activate to stop fuel supply to the engine.
When driving in rain, a layer of water may form between the tires and the road surface (aquaplaning). This loosens your tires’ grip on the road, making it difficult to steer or brake properly. When driving on a wet road:• Drive your vehicle at a safe speed.• Do not drive on worn tires.• Always keep the tires at the correct infla-tion pressures.
On snowy or icy roads
CAUTION
CAUTION Do not depress the accelerator pedal rapidly. The vehicle could start moving when it breaks free from the ice, possibly resulting inan accident.
On a bumpy or rutted road
CAUTION Driving on bumpy, rutted roads or over pot- holes can damage the tires and wheels.Wheels with low-profiles tires or under- inflated tires are especially at risk for dam- age.
The vehicle’s body, bumper, muffler and other parts may be damaged if the vehicle is:• driven over a step (for example, at the entrance or exit of a parking lot);• parked too closely against a curb or parkingblock, or by the side of a road with curb-stones;• driven on a steep slope;
Fuel Pump Shut-off System
WA R N I N G Before attempting to restart the engine after a collision, always inspect the groundunder the vehicle for leaking fuel. If a fuel leak is found or a fuel odor is detected, do not restart the engine. Mitsubishi Motors recommends that your vehicle be inspected by an authorizedMitsubishi Motors dealer after any colli- sion.CAUTION
BK0237700US.bo
ok 15 ページ 2016年4月15日 金曜日 午前11時28分
Page 319 of 385
BK0237700US.bo
ok 16 ページ 2016年4月15日 金曜日 午前11時28分
Page 320 of 385
9
Vehicle care and maintenanceService precautions .........
.................................................................9-2
Catalytic converter
.................................................
..........................9-2
Engine hood ..............................
.......................................................9-3
View of the engine comp
artment .....................................................9-5
Engine oil and oil filt
er ................................
....................................9-5
Engine coolant ................
.................................................................9-7
Air cleaner filter ....
.................................................
..........................9-8
Manual transaxle oil (if so
equipped) ...............................................9-9
Continuously variable transmission (CVT) fluid (if so equipped) .
.................................................
........................9-10
Transfer oil (All-wheel dr
ive models) ...........................................9-10
Rear axle oil (All-wheel dr
ive models) ........................................9-10
Washer fluid ....................
...............................................................9-10
Brake fluid/Clutch fluid (if
so equipped)........................................ 9-11
Power steering fluid (if so equipped)..............................................9-12 Battery .......................................
.....................................................9-12
Tires ..........................................
.....................................................9-14
Clutch pedal free play (if so equipped)...........................................9-20 Brake pedal free play
.............................................
........................9-21
Parking brake lever stroke .............................................................9-21 Parking brake break-in
...........................................
........................9-21
Wiper blades ...................
...............................................................9-21
Emission-control system maintenance ..........................................9-22General maintenance
.............................................
........................9-23
For cold and snowy weat
her ..........................................................9-24
Fusible links ....................
...............................................................9-24
Fuses .........................................
.....................................................9-25
Replacement of light bu
lbs ............................................................9-29
Vehicle care precautions
.......................................
......................... 9-41
Cleaning the inside of you
r vehicle ............................................... 9-42
Cleaning the outside of your
vehicle ............................................. 9-43
BK0237700US.bo
ok 1 ページ 2016年4月15日 金曜日 午前11時28分