light MITSUBISHI LANCER EVOLUTION 2014 10.G MMCS Manual
[x] Cancel search | Manufacturer: MITSUBISHI, Model Year: 2014, Model line: LANCER EVOLUTION, Model: MITSUBISHI LANCER EVOLUTION 2014 10.GPages: 226, PDF Size: 31.21 MB
Page 9 of 226
Important Points on Safety for the Customer 9
IntroductionBefore Use
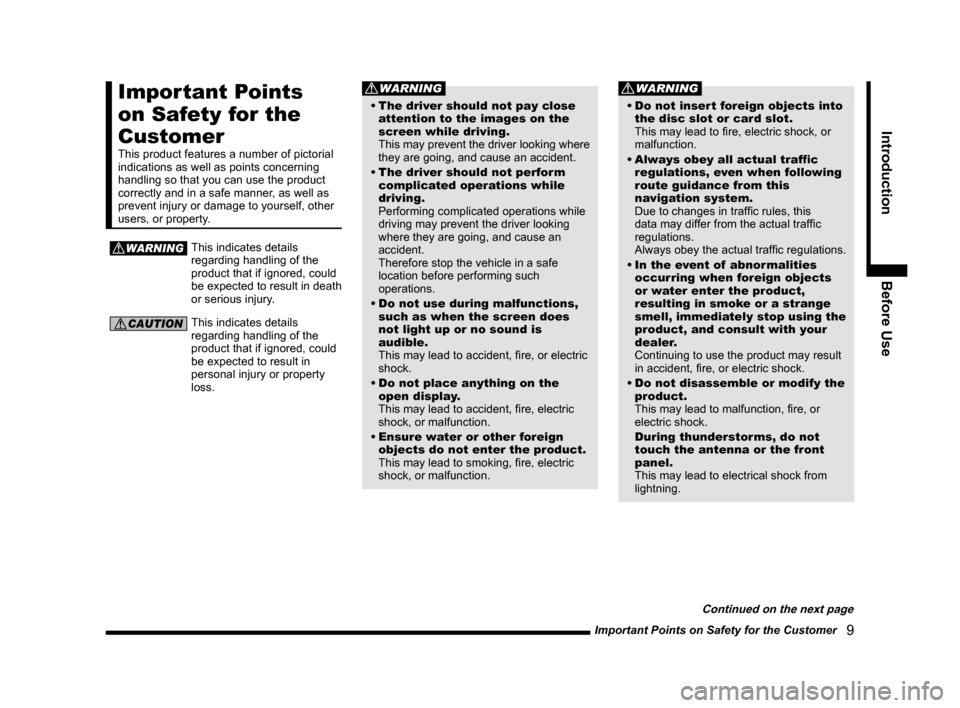
Important Points
on Safety for the
Customer
This product features a number of pictorial
indications as well as points concerning
handling so that you can use the product
correctly and in a safe manner, as well as
prevent injury or damage to yourself, other
users, or property.
WARNINGThis indicates details
regarding handling of the
product that if ignored, could
be expected to result in death
or serious injury.
CAUTIONThis indicates details
regarding handling of the
product that if ignored, could
be expected to result in
personal injury or property
loss.
WARNING
• The driver should not pay close
attention to the images on the
screen while driving.
This may prevent the driver looking where
they are going, and cause an accident.
• The driver should not perform
complicated operations while
driving.
Performing complicated operations while
driving may prevent the driver looking
where they are going, and cause an
accident.
Therefore stop the vehicle in a safe
location before performing such
operations.
• Do not use during malfunctions,
such as when the screen does
not light up or no sound is
audible.
This may lead to accident, fire, or electric
shock.
• Do not place anything on the
open display.
This may lead to accident, fire, electric
shock, or malfunction.
• Ensure water or other foreign
objects do not enter the product.
This may lead to smoking, fire, electric
shock, or malfunction.
WARNING
• Do not insert foreign objects into
the disc slot or card slot.
This may lead to fire, electric shock, or
malfunction.
• Always obey all actual traffic
regulations, even when following
route guidance from this
navigation system.
Due to changes in traffic rules, this
data may differ from the actual traffic
regulations.
Always obey the actual traffic regulations.
• In the event of abnormalities
occurring when foreign objects
or water enter the product,
resulting in smoke or a strange
smell, immediately stop using the
product, and consult with your
dealer.
Continuing to use the product may result
in accident, fire, or electric shock.
• Do not disassemble or modify the
product.
This may lead to malfunction, fire, or
electric shock.
During thunderstorms, do not
touch the antenna or the front
panel.
This may lead to electrical shock from
lightning.
Continued on the next page
Page 12 of 226
12 This Product
Basic Operation
This Product
Main Unit Panel
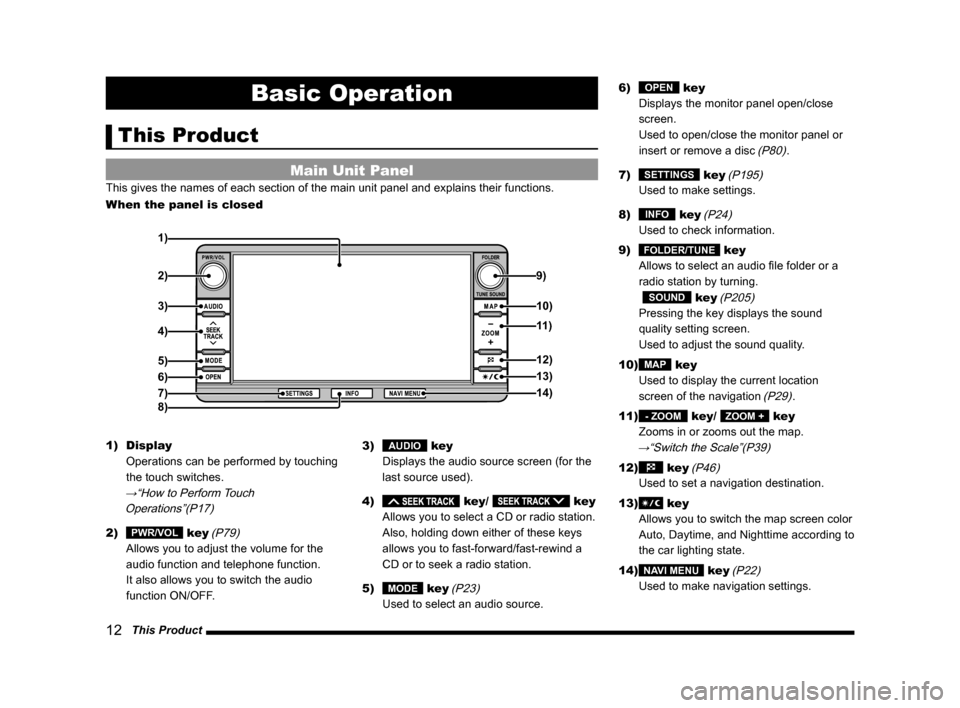
This gives the names of each section of the main unit panel and explains\
their functions.
When the panel is closed
1)
2) 9)
3)
4)
5)
6)
7)
8)
10)
11)
12)
13)
14)
1) Display
Operations can be performed by touching
the touch switches.
→“How to Perform Touch Operations”(P17)
2) PWR/VOL key (P79)
Allows you to adjust the volume for the
audio function and telephone function.
It also allows you to switch the audio
function ON/OFF. 3)
AUDIO key
Displays the audio source screen (for the
last source used).
4)
key/ key
Allows you to select a CD or radio station.
Also, holding down either of these keys
allows you to fast-forward/fast-rewind a
CD or to seek a radio station.
5)
MODE key (P23)
Used to select an audio source. 6)
OPEN key
Displays the monitor panel open/close
screen.
Used to open/close the monitor panel or
insert or remove a disc
(P80).
7)
SETTINGS key (P195)
Used to make settings.
8)
INFO key (P24)
Used to check information.
9)
FOLDER/TUNE key
Allows to select an audio file folder or a
radio station by turning.
SOUND key (P205)
Pressing the key displays the sound
quality setting screen.
Used to adjust the sound quality.
10)
MAP key
Used to display the current location
screen of the navigation
(P29).
11)
- ZOOM key/ ZOOM + key
Zooms in or zooms out the map.
→“Switch the Scale”(P39)
12) key (P46)
Used to set a navigation destination.
13)
key
Allows you to switch the map screen color
Auto, Daytime, and Nighttime according to
the car lighting state.
14)
NAVI MENU key (P22)
Used to make navigation settings.
Page 14 of 226
14 This Product
SD Cards
This product supports two types of SD cards:
map cards used with the navigation function
and audio SD cards used with audio functions.
WARNING
• In order to prevent an accident,
keep the SD card out of the reach
of small children.
If a child does swallow an SD card, seek
immediate medical attention.
CAUTION
• Do not insert the map card anywhere
other than the map slot in this product.
Doing so may lead to malfunction. Data
might be destroyed and the map card
might become unusable.
• When inserting and removing an SD card,
first ensure that your car is stopped in a
safe area in which stopping is permitted.
• Do not remove a SD card or switch OFF
the power while data is being read from
or written to the SD card.
The recorded data might be lost or
damaged.
• Do not insert foreign objects into the
SD card slot. This may lead to injury,
smoking, or fire.
• There are two SD card slots, the map slot
and the user slot. Be sure to insert the
SD card into the correct slot.
NOTE
• Mitsubishi Motors will in no way be held
responsible for any losses resulting from
SD card data loss.
• SD cards formatted using standard
computer functions may not operate
correctly.
• SD cards have a finite service life. After
being written repeatedly, writing, erasing,
etc. may become impossible.
Important Points on Handling
• Fingerprints or other marks on the terminals
of an SD card may result in its content being
more difficult to read. When holding an SD
card, do not touch its terminals.
• Do not affix paper or stickers to an SD card
and do not damage it.
• Do not forcefully insert an SD card if an SD
card is already within the device. Doing so
may lead to malfunction.
• Do not insert anything other than an SD card
into an SD card slot. Inserting anything other
than an SD card may cause damage or get
the object stuck in the slot.
Important Points on Storage
When you take an SD card out of this product,
store it out of direct sunlight.
Page 28 of 226
28 Navigation Functions
Route Search Methods
• The route displayed in the route guidance
is a reference route to the destination. It
is not necessarily the shortest route. This
route guidance also does not take traffic
congestion information into account.
• Not all roads are used in route guidance.
• Routes using ferries are set to be less
recommended than normal roads. Therefore,
even when a ferry provides a quicker route
to the destination, a route not using the ferry
may be displayed.
• When a toll road interchange, parking area,
or service area is set as the destination or
as a waypoint, select from an establishment
search or from a freeway simplified map and
set without scrolling the map.
• Sometimes, the route is not the same as the
one prepared previously even though the
same locations were set as the destination
and waypoints.
• Sometimes routes are displayed that include
pedestrian ways, stairs, etc. that are not
passable by vehicle.
• If there is no road to the destination or only
narrow roads, a route may be displayed
that goes to some place apart from the
destination.
• Because searches are carried out passing
alongside establishments, depending on the
road configuration, roundabout routes may
be displayed.
• Sometimes routes are searched that take
traffic rule information into account.
• Sometimes, some temporary rules are not
taken into account or the time for which
they are applied differs from when they are
actually in effect.
Route Guidance
• When your car is driving on the searched
route, this displays the distance until the
destination or the next waypoint.
• When your car is driving off the searched
route, this displays the distance from the
point where you left the route until the
destination or the next waypoint.
• The display of the estimated time of arrival
at the destination is calculated based on the
remaining time data in the map data and
learning trip information.
• Sometimes even though you need to turn
at a junction, the junction name is not in the
guidance and the junction is not covered in
the audio guidance.
• Sometimes left and right turn guidance
differs from the actual road configuration.
• When you go off the route, for example by
turning one junction too early, sometimes the
audio guidance continues for the route you
had been on.
• Sometimes the distance in the guidance is
slightly too high or too low.
Precautions for operating the
navigation
• During route guidance, always obey the
actual traffic regulations. Failure to do so
may cause a traffic accident.
• The route is searched using the map data on
the map card. Sometimes it may differ from
actual restrictions for construction, one-way
rules, and other traffic rules. Always obey
the actual traffic regulations.
• Traffic rules that depend on the time of
day reflect the time at which the route was
searched. When driving the route, always
obey the actual traffic regulations.
• The distance your car has traveled is
measured with the speed sensor (and this
speed is proportional to the rotation rate of
the tires).When the tires are new, if you have
non-standard tires, or if the tire air pressure
is not correct, error inputs the distance
measurement more easily and the location
of your car may not be displayed correctly.
• The route is a reference route to around the
destination. It is not the shortest route or the
route most free of traffic congestion.
• While you are driving, the amount of road
information displayed is restricted and some
roads may not be displayed.(For example,
narrow streets)
• If the distance to the destination is extremely
short or extremely long, route search may be
impossible.
• Even if you travel off the route, the route is
automatically recalculated.
• The estimated time of arrival varies with the
road conditions and how you drive.
Page 37 of 226
Guidance Display 37
NAVI Basic Operation
Guidance Display
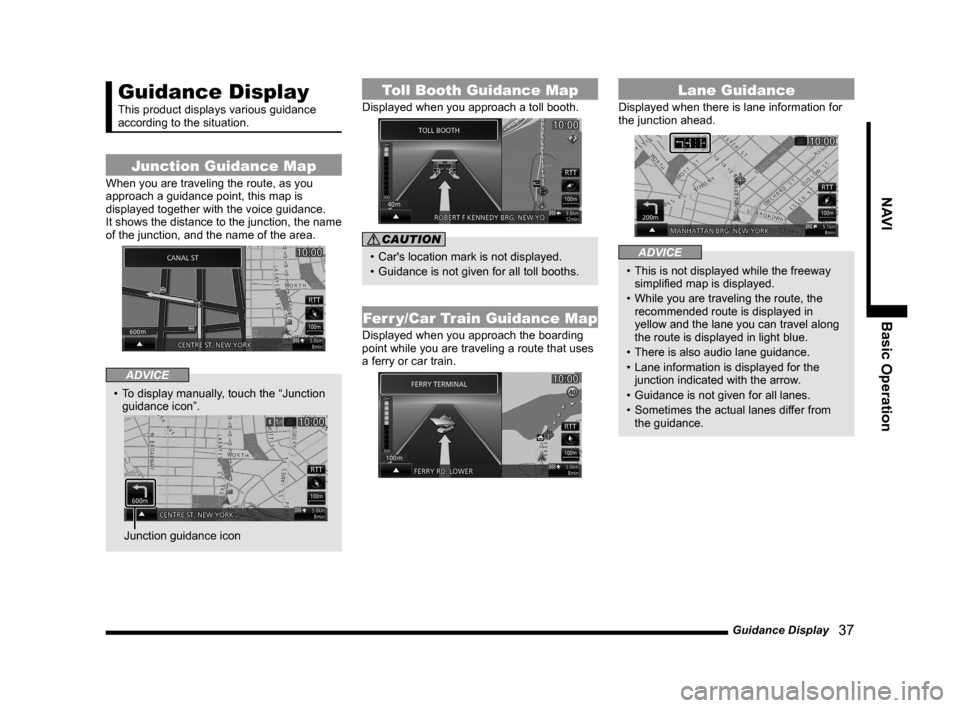
This product displays various guidance
according to the situation.
Junction Guidance Map
When you are traveling the route, as you
approach a guidance point, this map is
displayed together with the voice guidance.
It shows the distance to the junction, the name
of the junction, and the name of the area.
ADVICE
• To display manually, touch the “Junction
guidance icon”.
Junction guidance icon
Toll Booth Guidance Map
Displayed when you approach a toll booth.
CAUTION
• Car's location mark is not displayed.
• Guidance is not given for all toll booths.
Ferr y/Car Train Guidance Map
Displayed when you approach the boarding
point while you are traveling a route that uses
a ferry or car train.
Lane Guidance
Displayed when there is lane information for
the junction ahead.
ADVICE
• This is not displayed while the freeway
simplified map is displayed.
• While you are traveling the route, the
recommended route is displayed in
yellow and the lane you can travel along
the route is displayed in light blue.
• There is also audio lane guidance.
• Lane information is displayed for the
junction indicated with the arrow.
• Guidance is not given for all lanes.
• Sometimes the actual lanes differ from
the guidance.
Page 83 of 226
Handling of Discs 83
AVAudio Functions
Handling of Discs
This explains care that should be taken in
the handling of discs.
Important Points on Handling
• Fingerprints or other marks on the read
surface of the disc may result in its content
being more difficult to read. When holding
the disc, grip both edges, or one edge
and the center hole, in order that the read
surface is not touched.
• Do not affix paper or stickers,
or otherwise damage the disc.
• Do not forcefully insert a disc if a disc is
already within the device. This can result in
damage to discs, or malfunction.
Cleaning
• Periodically clean the read surface of the
disc. When cleaning, do not wipe in a circular
motion. Instead, wipe gently outwards from
the center of the disc to the outer edge.
• New discs may have burring around the
outer edge or in the hole in the center.
Ensure you check for these. If there are
burrs, these may lead to faulty operation,
therefore ensure these are removed.
Important Points on Storage
• When not using discs, ensure these are kept
in cases, and stored out of direct sunlight.
• If discs are not going to be used for a long
period of time, remove these from the
product.
Disc Playback Environment
In cold environments such as in mid-winter
when the interior of the vehicle is cold, turning
the heater on and immediately trying to use
the product may cause condensation (water
droplets) to form on the disc and internal
optical components, and this may prevent the
product from operating correctly.
In these conditions, remove the disc, and wait
a short time before use.
Copyright
Actions such as unauthorized reproduction,
broadcast, public performance, or rental of
discs that comprise other than personal use
are prohibited by law.
Page 130 of 226
130 Calendar
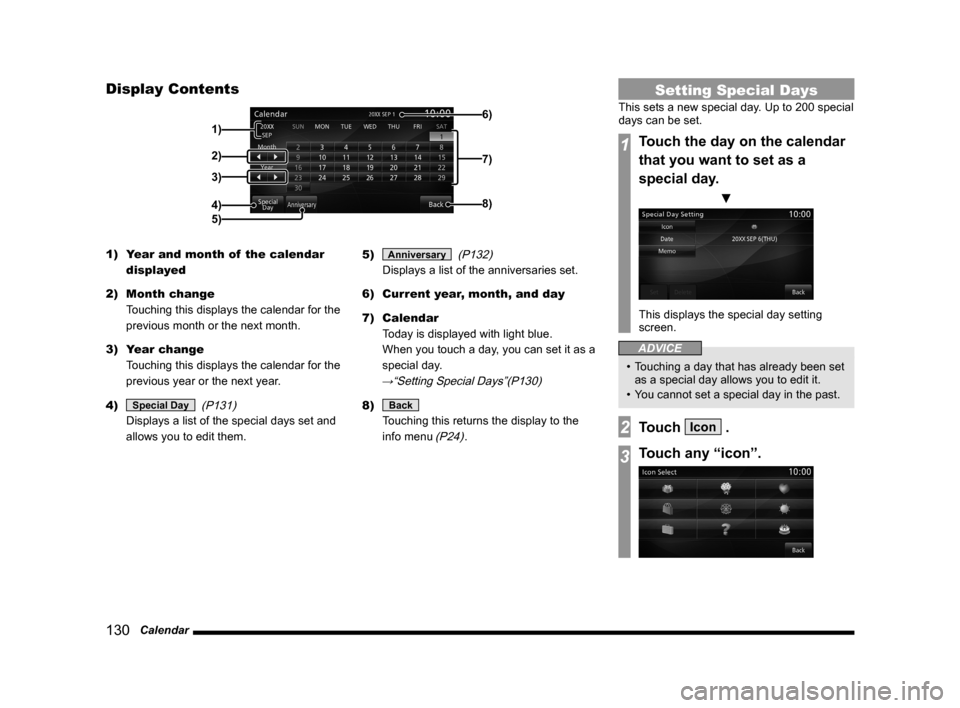
Display Contents
3)
4)
5)
6)
7)
8)
2)
1)
1) Year and month of the calendar
displayed
2) Month change
Touching this displays the calendar for the
previous month or the next month.
3) Year change
Touching this displays the calendar for the
previous year or the next year.
4)
Special Day (P131)
Displays a list of the special days set and
allows you to edit them. 5)
Anniversary
(P132)
Displays a list of the anniversaries set.
6) Current year, month, and day
7) Calendar
Today is displayed with light blue.
When you touch a day, you can set it as a
special day.
→“Setting Special Days”(P130)
8) Back
Touching this returns the display to the
info menu
(P24).
Setting Special Days
This sets a new special day. Up to 200 special
days can be set.
1Touch the day on the calendar
that you want to set as a
special day.
▼
This displays the special day setting
screen.
ADVICE
• Touching a day that has already been set
as a special day allows you to edit it.
• You cannot set a special day in the past.
2Touch Icon .
3Touch any “icon”.
Page 183 of 226
List of Audio Commands 183
INFO/SETTINGSVoice Operation
RTT Icons on MapRTT Icons on Map
RTT icons display setting
Current Station Current Station
Search for RTT stations
Display Progress
Line Display Progress Line
PremiDIA HD PremiDIA HD
Dolby Volume Dolby Volume
Balance/Fader Balance/Fader
Balance & Fader Settings
Balance and fader
Sound Quality
Control Sound Quality Control
Sound Quality Setting
Sound settings
Set sound quality
Sound
Acoustics Setting Acoustics Setting
Set acoustics
Acoustics
Speed
Compensated
Volume Speed Compensated Volume
Speed Compensated Volume
Settings
Speed volume settings
Speed volume
Compensated volume
Set speed volume
Display Off Display Off
Turn off display
Do not show display
Don't show displaySoundSound
Navi Voice
Volume setting
Set Time Display Set Time Display
Switch to set time display
Time display settings
Daylight Saving
Time Daylight Saving Time
Time Zone Time Zone
Format Change Format Change
Set Unit Set Unit
Camera Setting Camera Setting
Keyboard Layout Keyboard Layout
Pairing Pairing
Bluetooth setting
A/C Cut-in A/C Cut-in
A/C cut-in setting
Voice Control
Settings Voice Control Settings
Configuración de interrupción
de A/C
Picture Control Picture Control
Color Contrast
Contrast
Adjust contrast
Clock Screen Clock Screen
Display clock
Vehicle Settings Vehicle Settings
Car settingsCharging TimerCharging Timer
Timer Charge Setting
Timer Charge
Remote Climate
Control Remote Climate Control
Pre-Air Conditioning Settings
Pre-Air Conditioning
Set pre-air conditioning
Reset Trip Reset Trip
Reset Trip information
Reset Trip info
Page 197 of 226
Navi Settings 197
INFO/SETTINGS SETTINGS
Screen
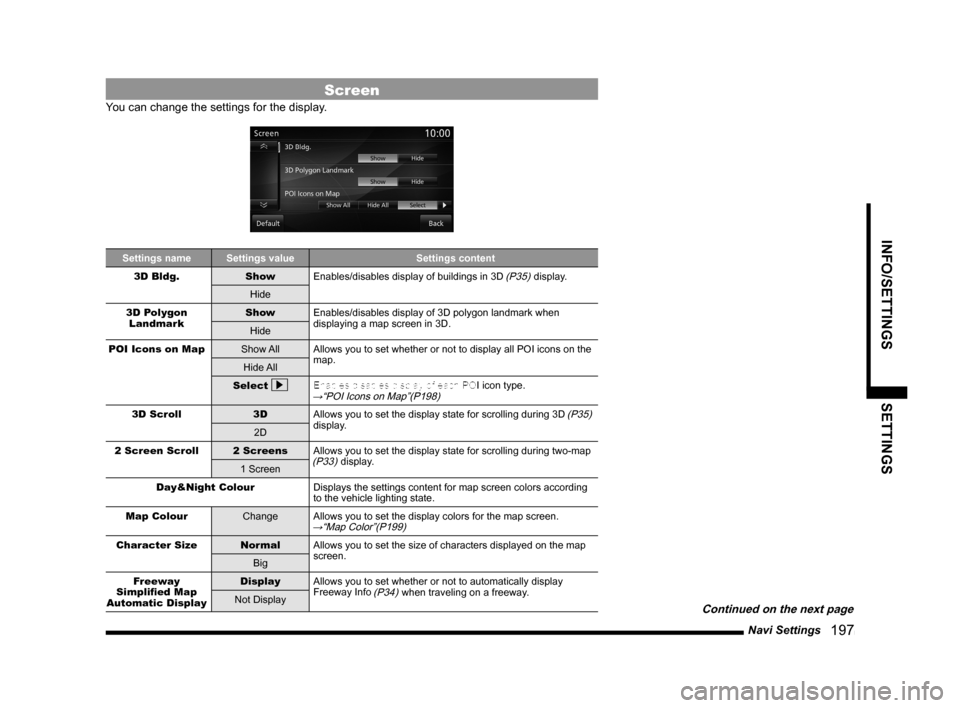
You can change the settings for the display.
Settings nameSettings value Settings content
3D Bldg. ShowEnables/disables display of buildings in 3D
(P35) display.
Hide
3D Polygon Landmark Show
Enables/disables display of 3D polygon landmark when
displaying a map screen in 3D.
Hide
POI Icons on Map Show AllAllows you to set whether or not to display all POI icons on the
map.
Hide All
Select
Enables/disables display of each POI icon type.→“POI Icons on Map”(P198)
3D Scroll
3DAllows you to set the display state for scrolling during 3D (P35)
display.
2D
2 Screen Scroll 2 ScreensAllows you to set the display state for scrolling during two-map
(P33) display.
1 Screen
Day&Night Colour Displays the settings content for map screen colors according
to the vehicle lighting state.
Map Colour ChangeAllows you to set the display colors for the map screen.
→“Map Color”(P199)
Character Size NormalAllows you to set the size of characters displayed on the map
screen.
Big
Freeway
Simplified Map
Automatic Display Display
Allows you to set whether or not to automatically display
Freeway Info
(P34) when traveling on a freeway.
Not Display
Continued on the next page
Page 208 of 226
208 System Settings
System Settings
You can make system related settings, such
as the time, language, units, and Bluetooth
device.
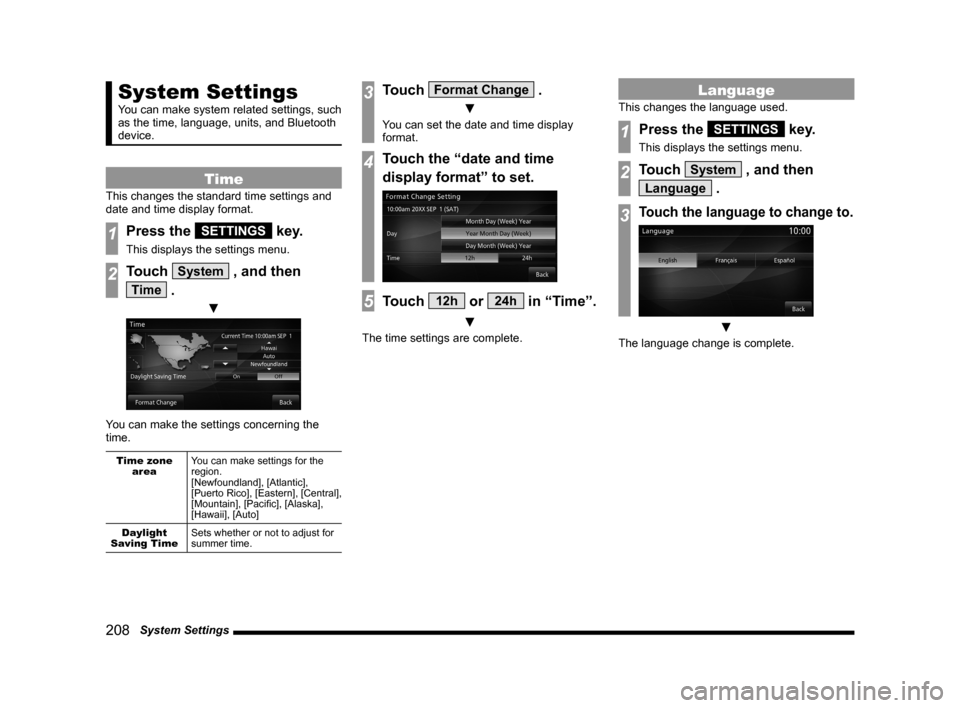
Time
This changes the standard time settings and
date and time display format.
1Press the SETTINGS key.
This displays the settings menu.
2Touch System , and then
Time .
▼
You can make the settings concerning the
time.
Time zone
area You can make settings for the
region.
[Newfoundland], [Atlantic],
[Puerto Rico], [Eastern], [Central],
[Mountain], [Pacific], [Alaska],
[Hawaii], [Auto]
Daylight
Saving Time Sets whether or not to adjust for
summer time.
3Touch Format Change .
▼
You can set the date and time display
format.
4Touch the “date and time
display format” to set.
5Touch 12h or 24h in “Time”.
▼
The time settings are complete.
Language
This changes the language used.
1Press the SETTINGS key.
This displays the settings menu.
2Touch System , and then
Language .
3Touch the language to change to.
▼
The language change is complete.