reset MITSUBISHI MIRAGE 2017 6.G Owners Manual
[x] Cancel search | Manufacturer: MITSUBISHI, Model Year: 2017, Model line: MIRAGE, Model: MITSUBISHI MIRAGE 2017 6.GPages: 305, PDF Size: 8.67 MB
Page 126 of 305
Multi-information display
Features and controls 5-63
5
N00574900016
The odometer indicates the total distance the vehicle has traveled.
N00575000014
The trip odometer indicates the distance trav-eled between two points. To return the display to 0, hold down the multi-information display switch for about 1 second or more. Only the currently displayed value will be reset. Example
If trip odometer is
displayed, only trip
odometer wi
ll be reset.
N00575101025
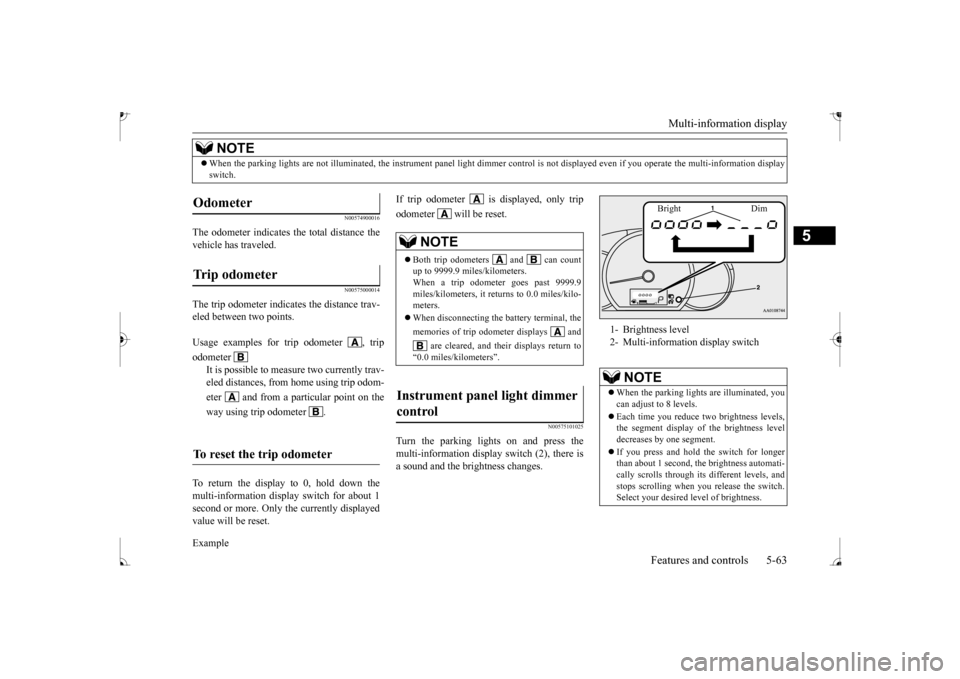
Turn the parking lights on and press the multi-information display switch (2), there is a sound and the brightness changes.
When the parking lights are not il
luminated, the instrument pane
l light dimmer control is not di
splayed even if you operate the
multi-information display
switch.NOTE
Odometer Trip odometer Usage examples for trip odometer , trip odometer
It is possible to measure two currently trav- eled distances, from home using trip odom- eter and from a particular point on theway using trip odometer .
To reset the trip odometer
NOTE
Both trip odometers and can count up to 9999.9 miles/kilometers. When a trip odometer goes past 9999.9miles/kilometers, it returns to 0.0 miles/kilo- meters. When disconnecting the battery terminal, the memories of trip odometer displays and
are cleared, and their displays return to
“0.0 miles/kilometers”.
Instrument panel light dimmer control
1- Brightness level 2- Multi-information display switch
NOTE
When the parking light
s are illuminated, you
can adjust to 8 levels. Each time you reduce tw
o brightness levels,
the segment display of
the brightness level
decreases by one segment. If you press and hold the switch for longer than about 1 second, th
e brightness automati-
cally scrolls through its different levels, and stops scrolling when
you release the switch.
Select your desired
level of brightness.
Bright Dim
BK0235100US.book 63 ページ 2015年11月20日 金曜日 午後3時12分
Page 127 of 305
Multi-information display 5-64 Features and controls
5
N00575201042
This displays the approximate driving range (how many more miles
or kilometers you can
drive). When the driving range falls below approximately 30 miles
(50 km), “---” is dis-
played.
N00575300017
This displays the average fuel consumptionfrom the last reset to the present. The reset mode conditions for the average fuel consumption display can be switchedbetween “Auto reset”
and “Manual reset”.
For information on how to change the aver- age fuel consumption di
splay setting, refer to
“Changing the function settings” on page 5-67.
N00556501134
Shows the temperature outside the vehicle.
The brightness level
of the instruments is
stored when the ignition switch is turned tothe “OFF” position or the operation mode isput in OFF.
Driving range display
NOTE
The driving range is determined based on the fuel consumption data. This may vary depending on the drivi
ng conditions and hab-
its. Treat the distance
displayed as just a
rough guideline. When you refuel, the driving range display is updated. However, if you only add a small amount offuel, the correct value
will not be displayed.
Fill to a full tank whenever possible. When your vehicle is stopped on an extremely steep hill, th
e driving range value
may change. This is due to the movement of fuel in the tank and does not indicate anybreakdown.NOTE
The display setting can be changed to the preferred units (miles or km).Refer to “Changing the
function settings” on
page 5-67.
Average fuel consumption dis- play
NOTE
The average fuel cons
umption display can be
reset separately in both auto reset mode andmanual reset mode. “---” is displayed when the average fuel con- sumption cannot be measured. The initial (default) setting is “Auto reset mode”.NOTE
Average fuel consumption may vary depend on the driving conditi
ons (road conditions,
how you drive, etc.).The actual fuel consum
ption may differ from
the fuel consumption displayed, so treat the fuel consumption displayed as just a roughguideline. Disconnecting the batt
ery cable will erase
from memory the manual reset mode or auto reset mode setting for the average fuel con- sumption display. The display setting ca
n be changed to the
preferred units {mpg, km/L, L/100 km}.Refer to “Changing th
e function settings” on
page 5-67.
Outside temperature display
(if
so equipped)
NOTE
The display setting ca
n be changed to the
preferred units (°F or °C).
e function settings” on
page 5-67. Depending on factors such as the driving conditions, the displa
yed temperature may
vary from the actual outside temperature.NOTE
BK0235100US.book 64 ページ 2015年11月20日 金曜日 午後3時12分
Page 129 of 305
Multi-information display 5-66 Features and controls
5
N00556701309
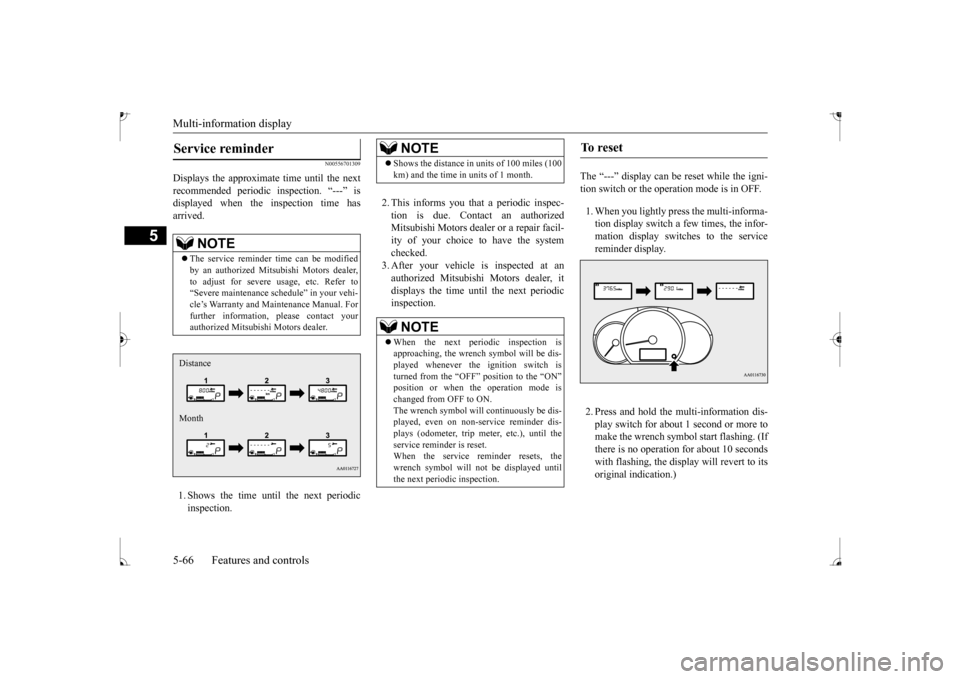
Displays the approximate time until the next recommended periodic
inspection. “---” is
displayed when the inspection time hasarrived. 1. Shows the time until the next periodic inspection.
2. This informs you that a periodic inspec- tion is due. Contact an authorized Mitsubishi Motors dealer
or a repair facil-
ity of your choice to have the system checked. 3. After your vehicle
is inspected at an
authorized Mitsubishi Motors dealer, it displays the time unt
il the next periodic
inspection.
The “---” display can be
reset while the igni-
tion switch or the opera
tion mode is in OFF.
1. When you lightly press the multi-informa- tion display switch a few times, the infor-mation display switches to the service reminder display. 2. Press and hold the multi-information dis- play switch for about 1 second or more tomake the wrench symbol start flashing. (If there is no operation for about 10 seconds with flashing, the displa
y will revert to its
original indication.)
NOTE
The service reminder time can be modified by an authorized Mitsubishi Motors dealer,to adjust for severe usage, etc. Refer to “Severe maintenance sc
hedule” in your vehi-
cle’s Warranty and Ma
intenance Manual. For
further information, please contact your authorized Mitsubishi Motors dealer.Distance Month
NOTE
Shows the distance in
units of 100 miles (100
km) and the time in units of 1 month.NOTE
When the next periodic inspection is approaching, the wrench symbol will be dis-played whenever the ignition switch is turned from the “OFF” position to the “ON”changed from OFF to ON. The wrench symbol will continuously be dis- played, even on non-service reminder dis-plays (odometer, trip meter, etc.), until the service reminder is reset. When the service reminder resets, thewrench symbol will not be displayed untilthe next periodic inspection.
To r e s e t
BK0235100US.book 66 ページ 2015年11月20日 金曜日 午後3時12分
Page 130 of 305
Multi-information display
Features and controls 5-67
5
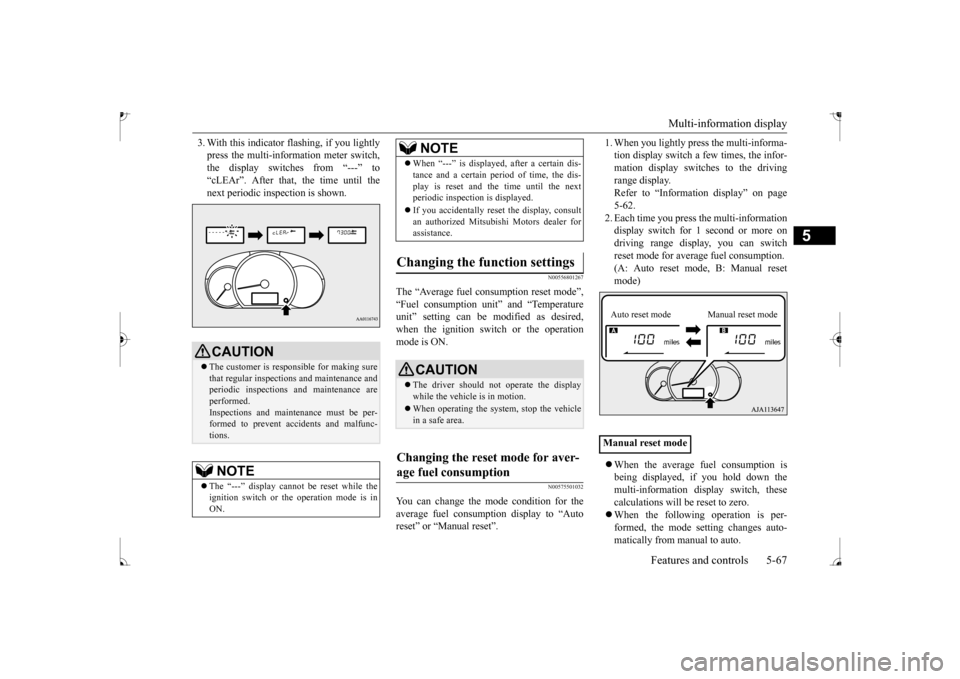
3. With this indicator
flashing, if you lightly
press the multi-information meter switch,the display switches from “---” to “cLEAr”. After that, the time until the next periodic inspection is shown.
N00556801267
The “Average fuel c
onsumption reset mode”,
“Fuel consumption uni
t” and “Temperature
unit” setting can be m
odified as desired,
when the ignition switch or the operation mode is ON.
N00575501032
You can change the mode condition for theaverage fuel consumpt
ion display to “Auto
reset” or “Manual reset”.
1. When you lightly press the multi-informa- tion display switch a few times, the infor-mation display switches to the driving range display. Refer to “Information display” on page5-62. 2. Each time you press th
e multi-information
display switch for 1 second or more ondriving range disp
lay, you can switch
reset mode for average fuel consumption. (A: Auto reset mode, B: Manual reset mode) When the average fuel consumption is being displayed, if you hold down themulti-information display switch, these calculations will be reset to zero. When the following operation is per- formed, the mode setting changes auto- matically from manual to auto.
CAUTION The customer is responsible for making sure that regular inspections and maintenance and periodic inspections
and maintenance are
performed.Inspections and mainte
nance must be per-
formed to prevent accidents and malfunc- tions.NOTE
The “---” display cannot
be reset while the
ignition switch or the operation mode is inON.
When “---” is displayed, after a certain dis- tance and a certain pe
riod of time, the dis-
play is reset and th
e time until the next
periodic inspection is displayed. If you accidentally reset
the display, consult
an authorized Mitsubishi Motors dealer for assistance.
Changing the function settings
CAUTION The driver should not operate the display while the vehicle is in motion. When operating the system, stop the vehicle in a safe area.
Changing the reset mode for aver- age fuel consumption
NOTE
Manual reset modeAuto reset mode Manual reset mode
BK0235100US.book 67 ページ 2015年11月20日 金曜日 午後3時12分
Page 131 of 305
![MITSUBISHI MIRAGE 2017 6.G Owners Manual Multi-information display 5-68 Features and controls
5
[Except for vehicles
equipped with the
F. A . S . T. - k e y ]Turn the ignition switch to the “ON” posi- tion from the “ACC” or “OFF MITSUBISHI MIRAGE 2017 6.G Owners Manual Multi-information display 5-68 Features and controls
5
[Except for vehicles
equipped with the
F. A . S . T. - k e y ]Turn the ignition switch to the “ON” posi- tion from the “ACC” or “OFF](/img/19/7514/w960_7514-130.png)
Multi-information display 5-68 Features and controls
5
[Except for vehicles
equipped with the
F. A . S . T. - k e y ]Turn the ignition switch to the “ON” posi- tion from the “ACC” or “OFF” position. [For vehicles equipped
with the F.A.S.T.-
key]Change the operation mode to ON from ACC or OFF. When the average fuel consumption is being displayed, if you hold down the multi-information display switch, these calculations will
be reset to zero.
When the engine switch or the operation mode is in the following conditions, the average fuel consumption display willautomatically reset. [Except for vehicles
equipped with the
F. A . S . T. - k e y ] The ignition switch has been set to the“ACC” or “OFF” position for about 4 hours or more. [For vehicles equipped
with the F.A.S.T.-
key]The operation mode has been set to ACC or OFF for about 4 hours or more.
N00557100156
The fuel consumption display unit can bechanged. The distance
and amount units are
also switched to match the selected fuel con-sumption unit. 1. When you lightly press the multi-informa- tion display switch a few times, the infor- mation display switches to the averagefuel consumption display. Refer to “Information display” on page 5-62.2. Press and hold the mu
lti-information dis-
play switch for about 5 seconds or more until buzzer sound is heard twice.
3. Press and hold the multi-information dis- play switch to switch in sequence from“km/L”
“L/100 km”
“mpg”
The distance units is al
so changed in the fol-
lowing combinations to match the selected fuel consumption unit.
Auto reset mode
NOTE
The average fuel cons
umption display can be
reset separately for the auto reset mode andfor the manual reset mode. Disconnecting th
e battery cable will erase
from memory the manual reset mode or autoreset mode setting for the average fuel con- sumption display. The initial (default) setting is “Auto reset mode”.
Changing the fuel consumption display unit
NOTE
The display units for the driving range, the average fuel consumption are changed, but the units for the indicating needle (speedom- eter), the odometer, the trip odometer and theservice reminder will
remain unchanged.
If the battery is disconnected, the memory of the unit setting is erased and it returns auto- matically to factory setting.
BK0235100US.book 68 ページ 2015年11月20日 金曜日 午後3時12分
Page 208 of 305
AM/FM electronically tuned radio with CD player (if so equipped)
Comfort controls 7-21
7
N00735000926
1. Press the PWR switch or the RADIO but- ton to turn on the radio. Press and hold the PWR switch for 2 sec- onds or longer to turn off the radio.2. Press the RADIO but
ton to select the
desired band (AM/FM1/FM2). 3. Press the seek button to tune to a station,or press one of the memory select buttons to tune in to a station memorized for that button.Refer to “Automatic
tuning”, “Manual
tuning” or “To enter frequencies into the memory”.
The frequency changes every time the seek button is pressed. Pre
ss the button to select
the desired station.
After keeping the seek button depressed until it beeps, release the button, and the selectedstation reception will start. As many as 6 AM and
12 FM stations can be
entered into the memory. To store a frequency in the memory, follow these steps: 1. Press the seek button to tune to the fre- quency you wish to keep in the memory.2. Press one of the memory select buttons until it beeps. The sound will be momentarily inter-rupted while the frequency is being entered into the memory. The number of the button matching the entry in the mem-ory as well as the frequency is displayed. 3. The preset memory setting is retrieved by pressing the button and then releasing itwithin 1 second.
N00735301766
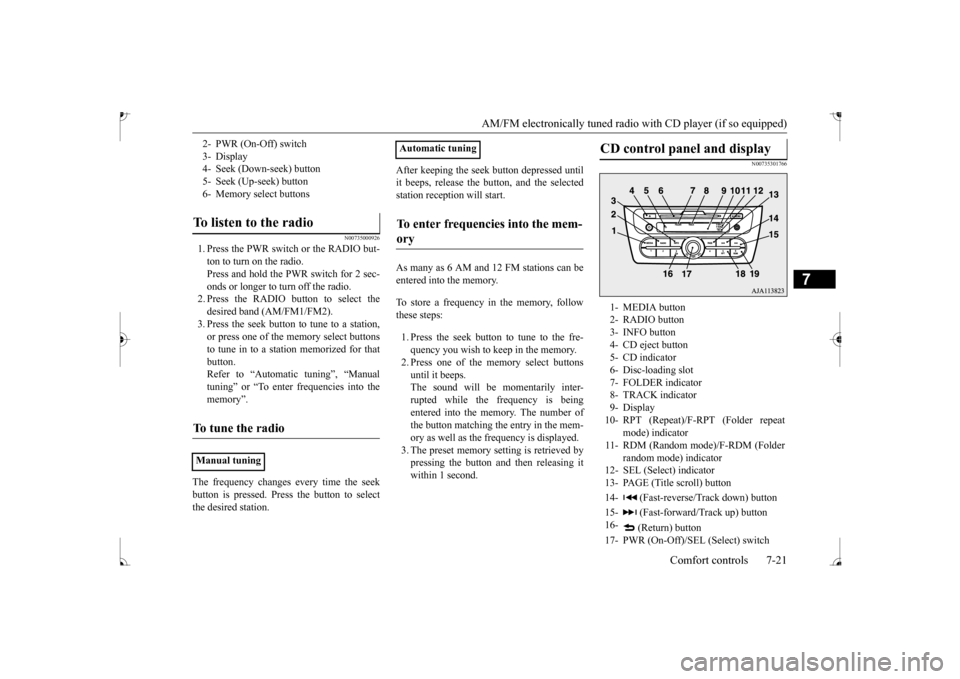
2- PWR (On-Off) switch 3- Display 4- Seek (Down-seek) button5- Seek (Up-seek) button 6- Memory select buttonsTo listen to the radio
To tune the radio
Manual tuning
Automatic tuningTo enter frequencies into the mem- ory
CD control panel and display
1- MEDIA button 2- RADIO button3- INFO button 4- CD eject button 5- CD indicator6- Disc-loading slot 7- FOLDER indicator 8- TRACK indicator9- Display 10- RPT (Repeat)/F-RPT (Folder repeat
mode) indicator
11- RDM (Random mode)/F-RDM (Folder
random mode) indicator
12- SEL (Select)
indicator
13- PAGE (Title scroll) button 14- (Fast-reverse/Track down) button15- (Fast-forward/Track up) button 16-
(Return) button
17- PWR (On-Off)/SEL (Select) switch
BK0235100US.book 21 ページ 2015年11月20日 金曜日 午後3時12分
Page 213 of 305
AM/FM electronically tuned radio with CD player (if so equipped) 7-26 Comfort controls
7
N00702701034
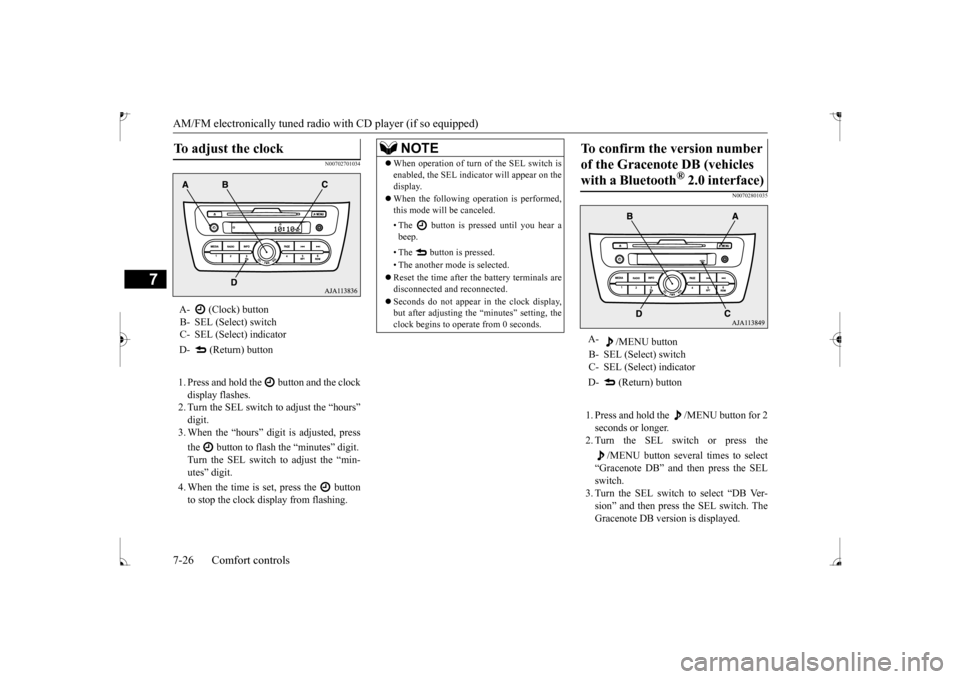
1. Press and hold the button and the clock display flashes. 2. Turn the SEL switch to adjust the “hours”digit. 3. When the “hours” digit is adjusted, press the button to flash
the “minutes” digit.
Turn the SEL switch to adjust the “min- utes” digit. 4. When the time is set, press the button to stop the clock display from flashing.
N00702801035
1. Press and hold the /MENU button for 2 seconds or longer. 2. Turn the SEL switch or press the
/MENU button several times to select
“Gracenote DB” and then press the SEL switch. 3. Turn the SEL switch to select “DB Ver-sion” and then press the SEL switch. The Gracenote DB vers
ion is displayed.
To adjust the clock
A- (Clock) button B- SEL (Select) switch C- SEL (Select) indicator D- (Return) button
NOTE
When operation of turn of the SEL switch is enabled, the SEL indica
tor will appear on the
display. When the following operation is performed, this mode will be canceled. • The button is pressed until you hear a beep. • The button is pressed. • The another mode is selected. Reset the time after the battery terminals are disconnected an
d reconnected.
Seconds do not appear
in the clock display,
but after adjusting the
“minutes” setting, the
clock begins to operate from 0 seconds.
To confirm the version number of the Gracenote DB (vehicles with a Bluetooth
® 2.0 interface)
A-
/MENU button
B- SEL (Select) switch C- SEL (Select) indicator D- (Return) button
BK0235100US.book 26 ページ 2015年11月20日 金曜日 午後3時12分