center console MITSUBISHI MIRAGE 2019 Owner's Manual (in English)
[x] Cancel search | Manufacturer: MITSUBISHI, Model Year: 2019, Model line: MIRAGE, Model: MITSUBISHI MIRAGE 2019Pages: 16, PDF Size: 0.91 MB
Page 1 of 16

1
Thank you for buying a Mitsubishi MIrage. There’s no doubt you’ve already realized how well
your car drives on the open road. What you may not know is all the great\
features that help
your car perform the way it does. In the pages ahead we’re going to run through the basics
and prepare you for the road.
We hope you will visit the Mitsubishi Owner’s site where we store the\
latest Mitsubishi news
and special offers. Here you can also keep track of your car’s warran\
ty and servicing needs,
get Roadside Assistance Information and tap into other owner-centric det\
ails. Just log on to
HTTPS://WWW.MITSUBISHICARS.COM/OWNERS.
Some of the information contained in this booklet may not be correct due\
to product changes which may
have occurred after the time it was published. Mitsubishi Motors North A\
merica, Inc. reserves the right to
make changes at any time, without notice, to prices, color, materials, specification and models.
TABLE OF CONTENTS
Outside Driver's Side .......... Page 4
Steering Wheel Controls ....... Page 5
Steering Column Controls ...... Page 7
Instrument Cluster ...........Page 8
Instrument Panel ............Page 9
Center Console & Panel ....... Page 10
Emergency Roadside
Assistance App ............. Page 14
FAQ’s ..................... Page 15
Page 10 of 16

10CENTER CONSOLE & PANEL
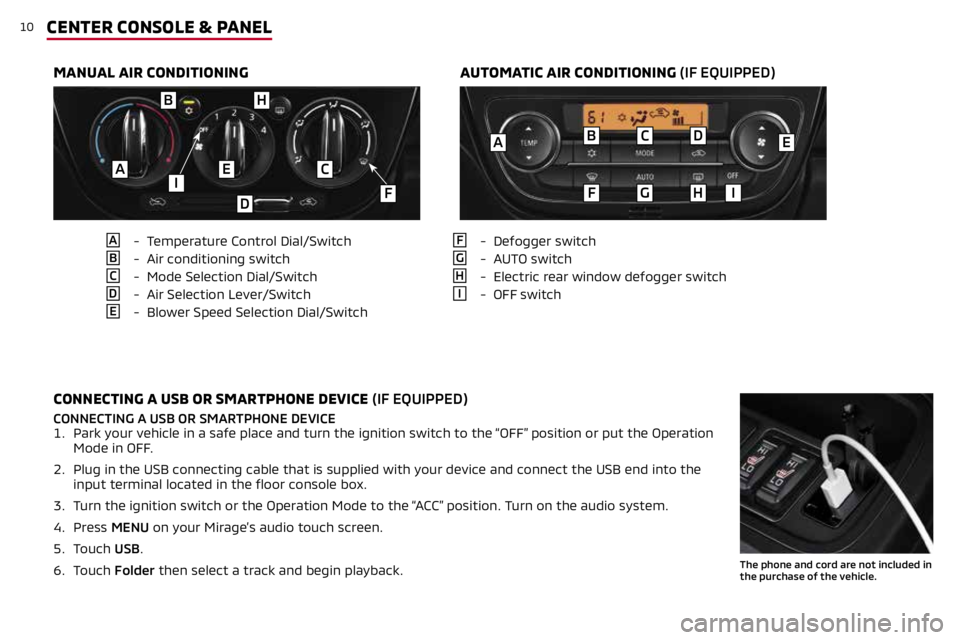
MANUAL AIR CONDITIONINGAUTOMATIC AIR CONDITIONING (IF EQUIPPED)
A - Temperature Control Dial/Switch
B - Air conditioning switch
C - Mode Selection Dial/Switch
D - Air Selection Lever/Switch
E - Blower Speed Selection Dial/Switch
F - Defogger switch
G - AUTO switch
H - Electric rear window defogger switch
I - OFF switch
CONNECTING A USB OR SMARTPHONE DEVICE (IF EQUIPPED)
CONNECTING A USB OR SMARTPHONE DEVICE
1. Park your vehicle in a safe place and turn the ignition switch to the “OFF” position or put the Operation
Mode in OFF.
2. Plug in the USB connecting cable that is supplied with your device and connect the USB end into the
input terminal located in the floor console box.
3. Turn the ignition switch or the Operation Mode to the “ACC” position. Turn on the audio system.
4. Press MENU on your Mirage’s audio touch screen.
5. Touch USB.
6. Touch Folder then select a track and begin playback.
The phone and cord are not included in
the purchase of the vehicle.
B
F
C
G
D
HI
AE
BH
EAC
D
IF
Page 11 of 16

11CENTER CONSOLE & PANEL
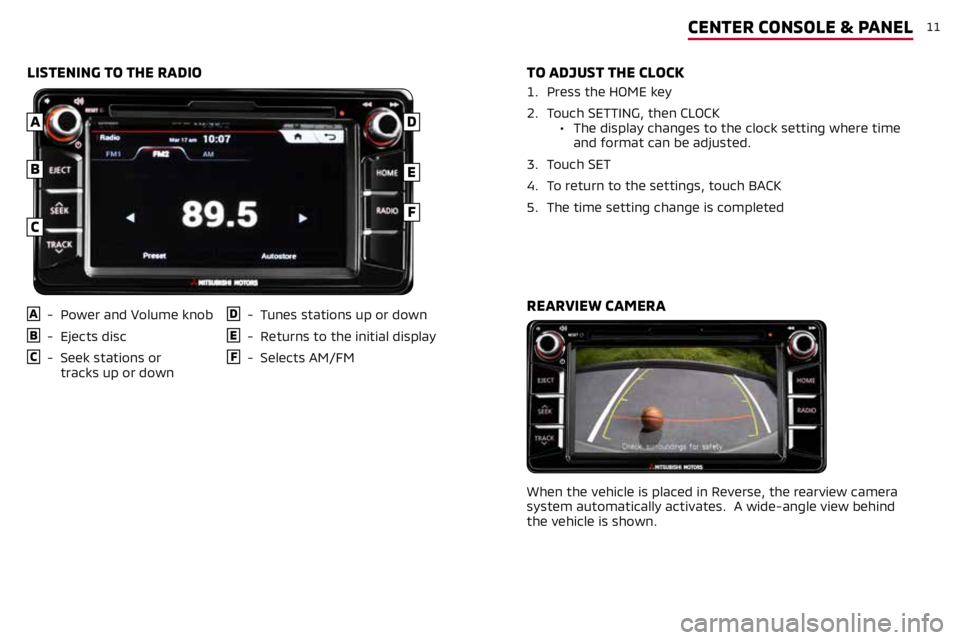
LISTENING TO THE RADIO
A - Power and Volume knob
B - Ejects disc
C - Seek stations or
tracks up or down
D - Tunes stations up or down
E - Returns to the initial display
F - Selects AM/FM
TO ADJUST THE CLOCK
1. Press the HOME key
2. Touch SETTING, then CLOCK
• The display changes to the clock setting where time
and format can be adjusted.
3. Touch SET
4. To return to the settings, touch BACK
5. The time setting change is completed
E
C
B
F
AD
When the vehicle is placed in Reverse, the rearview camera
system automatically activates. A wide-angle view behind
the vehicle is shown.
REARVIEW CAMERA
Page 12 of 16

12CENTER CONSOLE & PANEL
USB INPUT
1. Park your vehicle in a safe place and turn the ignition switch
to the “OFF” position or put the Operation Mode in OFF.
2. Plug in the USB connecting cable that is supplied with your
device and connect the USB end into the USB port located in
the lower instrument panel.
3.
Turn the ignition switch or the Operation Mode to the “ACC”
position. Turn on the audio system.
4. Press MEDIA to switch to the USB mode.
5.
Depending on your USB device, it may take longer for
playback to start.
6. Once the device is selected, playback starts.
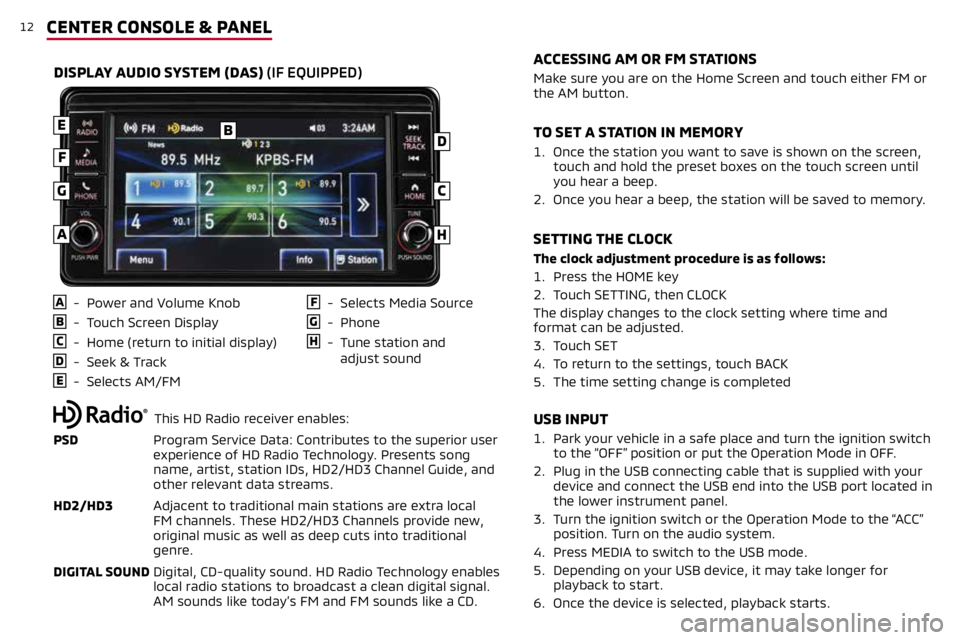
A - Power and Volume Knob
B - Touch Screen Display
C - Home (return to initial display)
D - Seek & Track
E - Selects AM/FM
F - Selects Media Source
G - Phone
H - Tune station and
adjust sound
DISPLAY AUDIO SYSTEM (DAS) (IF EQUIPPED)
B
C
D
E
F
G
H
Make sure you are on the Home Screen and touch either FM or
the AM button.
1.
Once the station you want to save is shown on the screen,
touch and hold the preset boxes on the touch screen until
you hear a beep.
2.
Once you hear a beep, the station will be saved to memory.
The clock adjustment procedure is as follows:
1. Press the HOME key
2. Touch SETTING, then CLOCK
The display changes to the clock setting where time and
format can be adjusted.
3. Touch SET
4. To return to the settings, touch BACK
5. The time setting change is completed
ACCESSING AM OR FM STATIONS
TO SET A STATION IN MEMORY
SETTING THE CLOCK
A
This HD Radio receiver enables:
PSD Program Service Data: Contributes to the superior user
experience of HD Radio Technology. Presents song
name, artist, station IDs, HD2/HD3 Channel Guide, and
other relevant data streams.
HD2/HD3 Adjacent to traditional main stations are extra local
FM channels. These HD2/HD3 Channels provide new,
original music as well as deep cuts into traditional
genre.
DIGITAL SOUND Digital, CD-quality sound. HD Radio Technology enables
local radio stations to broadcast a clean digital signal.
AM sounds like today’s FM and FM sounds like a CD.
Page 13 of 16

13
Apple CarPlay, iPhone, Siri and Lightning are trademarks of Apple Inc., registered in the U.S. and other Countries. Android, Android Auto, Google Play and
other marks are trademarks of Google Inc.
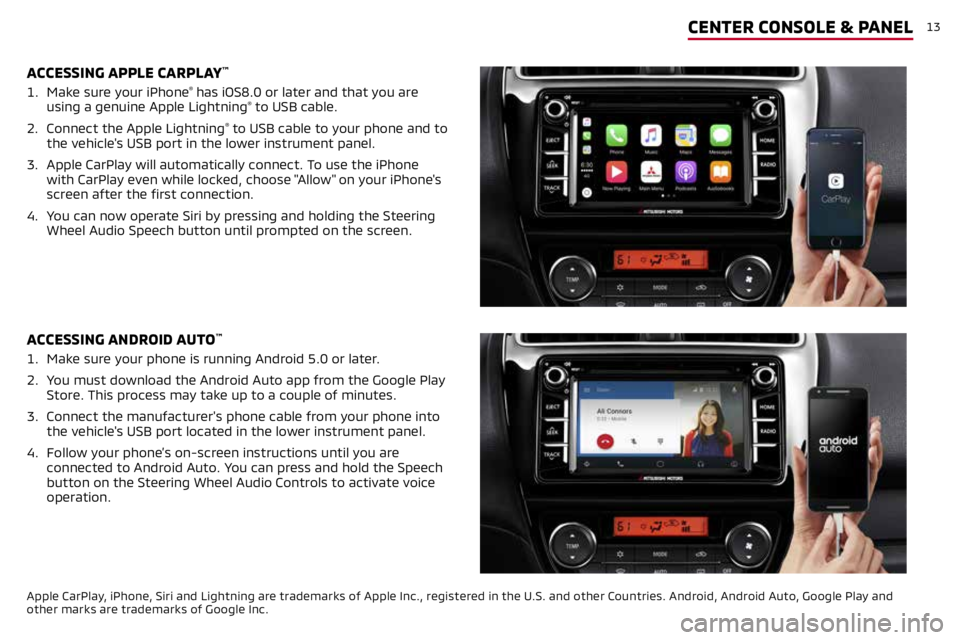
1.
Make sure your iPhone® has iOS8.0 or later and that you are
using a genuine Apple Lightning® to USB cable.
2.
Connect the Apple Lightning
® to USB cable to your phone and to
the vehicle's USB port in the lower instrument panel.
3.
Apple CarPlay will automatically connect. To use the iPhone
with CarPlay even while locked, choose "Allow" on your iPhone's
screen after the first connection.
4. You can now operate Siri by pressing and holding the Steering
Wheel Audio Speech button until prompted on the screen.
ACCESSING APPLE CARPLAY™
1. Make sure your phone is running Android 5.0 or later.
2. You must download the Android Auto app from the Google Play
Store. This process may take up to a couple of minutes.
3.
Connect the manufacturer's phone cable from your phone into
the vehicle's USB port located in the lower instrument panel.
4.
Follow your phone’s on-screen instructions until you are
connected to Android Auto. You can press and hold the Speech
button on the Steering Wheel Audio Controls to activate voice
operation.
ACCESSING ANDROID AUTO™
CENTER CONSOLE & PANEL