window MITSUBISHI MIRAGE G4 2019 (in English) User Guide
[x] Cancel search | Manufacturer: MITSUBISHI, Model Year: 2019, Model line: MIRAGE G4, Model: MITSUBISHI MIRAGE G4 2019Pages: 267, PDF Size: 38.31 MB
Page 96 of 267

Power window control
Features and controls 5-31
5
N00548800098
Each sub-switch can be
used for it’s own pas-
senger door window, unless the driver’s win-dow lock switch is activated.
N00548900132
The power windows can be run up or downwhen the ignition switch or the operationmode is in ON. The door windows can be opened or closed for a 30-second period after the engine is
stopped. However, once the driver’s door or the front passenger’s
door is opened, the
power windows cannot
be operated.
N00549000169
When this switch is in the lock mode, the pas- senger door switches cannot be used to open or close the door windows, and the main switch will open or close only the driver’s door window. To unlock the switch, press it again.
1- Driver’s door window switch 2- Front passenger door window switch3- Left rear door window switch 4- Right rear door window switch 5- Lock switchType 1Type 2
Sub switch 1- Close2- Open
NOTE
The rear door windows
open only half-way.
Power window timer function
Lock switch 1- Lock 2- Unlock
Ty p e 1 Ty p e 2
BK0267800US.book 31 ページ 2018年5月30日 水曜日 午後4時24分
Page 97 of 267

Power window control 5-32 Features and controls
5
N00528801161
If a hand or head is trapped, for safety the door window is automati
cally lowered a little.
After the door window is lowered, clear the obstruction, then pull up the switch again toclose the door window.
N00551400043
Wind buffeting can be de
scribed as the per-
ception of pressure on the ears or a booming or rumbling sound. Your
vehicle may exhibit
wind buffeting when driving with one or bothrear door windows down or partially opened. This is a normal occurrence that can be mini- mized. If the buffeting
occurs with the rear
door windows open, open the front door win- dows as well as the rear door windows to minimize the condition.
WA R N I N G Before driving with a child in the vehicle, be sure to lock the window switch to makeit inoperative. Children tampering withthe switch could easily trap their hands or heads in the window.
Safety mechanism (Driver’s door window of Type 1 only)
WA R N I N G If the battery terminals are disconnected or the fuse for electric window is replaced, the safety mechanism will be cancelled. If a hand or head got
trapped, a serious
injury could result.CAUTION The safety mechanism is deactivated just before the door window closes. This allows the door window to close completely. There- fore be especially careful that fingers are nottrapped in the door window opening.
The safety mechanism is deactivated while the switch is pulled up.
Therefore be espe-
cially careful that fi
ngers are not trapped in
the door window opening. Do not deliberately tr
ap your hands or head
in order to activate the safety mechanism. Your hand or head coul
d be trapped and per-
sonal injury could result.NOTE
The safety mechanism can be activated if the driving conditions or
other circumstances
cause the door window to be subjected to a physical shock similar to that caused by trapped hand or head. If the safety mechanism is activated 5 or more times in a row, the safety mechanismwill be cancelled a
nd the door window will
not close correctly. In such a case, the following procedureshould be implemented to rectify this situa- tion. If the window is open,
repeatedly raise the
driver’s door window sw
itch until that win-
dow has been fully cl
osed. Following this,
release the switch, raise the switch once again and hold it in this condition for atleast1 second, then release it. You should now be able to operate
in the normal fashion.
CAUTION
If the battery terminals are disconnected or the fuse for electric
window is replaced, the
safety mechanism will
be cancelled and the
door window will not automatically open/close completely. If the window is open,
repeatedly raise the
driver’s door window switch until the win- dow has been fully cl
osed. Following this,
release the switch, raise the switch onceagain and hold it in this
condition for at least
1 second, then release it. You should now be able to operate the driver’s door window inthe normal fashion.
What to do if you hear wind buffeting when driving
NOTE
BK0267800US.book 32 ページ 2018年5月30日 水曜日 午後4時24分
Page 99 of 267

Steering wheel height adjustment 5-34 Features and controls
5
N00511500231
To adjust the steering wheel to the desired position, move the lever upward or down-ward while moving the steering wheel to the desired level.
N00511601402
Adjust the inside rearview mirror only aftermaking any seat adjustme
nts so as to have a
clear view to the rear of the vehicle. Adjust the inside mirror to maximize the view through the rear window.
CAUTION Before driving, be sure that the parking brake is fully released and brake warninglight is off.If you drive without the parking brake fully released, the warning lamp will illuminate and a buzzer sounds when the vehicle speedexceeds 5 mph (8 km/h). If a vehicle is driven without releasing the parking brake, the brakes will be overheated,resulting in ineffectiv
e braking and possible
brake failure.
Steering wheel height adjustment
A- Wheel lock B- ReleaseWA R N I N G After adjusting, make sure the lever is secured in the locked (A) position. Do not attempt to adjust the steering wheel while driving. This can be danger-ous. When releasing the leve
r (moving it to the
position (B)), be sure to hold the steering wheel firmly. Otherwise, the steering wheel may slip down too suddenly.
Inside rearview mirror
WA R N I N G Do not attempt to adjust the inside rear- view mirror while driving. This can bedangerous. Be sure to adjust the mirror before driv- ing.Type 1 Type 2
BK0267800US.book 34 ページ 2018年5月30日 水曜日 午後4時24分
Page 102 of 267

Ignition switch
Features and controls 5-37
5
N00549200099
The outside mirror can be manually folded in towards the side window to prevent damagewhen parking in tight locations.
N00549301286
When the rear window defogger switch ispressed with the engine running, the outside rearview mirrors are defogged or defrosted. Current will flow thr
ough the heater element
inside the mirrors, thus clearing away frost or condensation.The indicator light (A) will illuminate while the defogger is on. The heater will be turned off automatically inabout 20 minutes.
N00512401739
[For vehicles equipped with the Free-handAdvanced Security Transmitter (F.A.S.T.-key)] For information on operations for vehicles equipped with the Free-hand Advanced Secu-rity Transmitter (F.A.S.T.-key), refer to “Free-hand Advanced Se
curity Transmitter
(F.A.S.T.-key):Engine switch” on page 5-13.
[Except for vehicles equipped with the Free-hand Advanced Security Transmit-ter (F.A.S.T.-key)] The engine is off. The key can be inserted and removed only when the switch is in this posi-tion. Allows operation of some
electrical accesso-
ries with the engine off.
NOTE
After adjusting, return the lever to the “•” (OFF) position (C).
To fold the mirror Door mirror heater
(if so equipped)
Ignition switch
OFF ACC
BK0267800US.book 37 ページ 2018年5月30日 水曜日 午後4時24分
Page 104 of 267

Starting the engine
Features and controls 5-39
5
This model is equipped with an electronically controlled fuel injection system. This is a sys-tem that automatically controls fuel injection. There is usually no need to depress the accel- erator pedal when starting the engine.The starter should not be run for more than 15 seconds at a time. To prevent battery drai
n, wait a few seconds
between attempts to restart the engine. 1. Make sure all occupants are properly seated with seat belts fastened.
2. Insert the ignition key. 3. Make sure the parking brake is applied.4. Press and hold the brake pedal down firmly with your right foot. 5. Press and hold the clutch pedal all the waydown (manual transaxle). 6. On vehicles equippe
d with manual trans-
axle, place the gearshift lever in the “N” (Neutral) position.On vehicles equipped with continuously variable transmission (CVT), make sure the selector lever is in the “P” (PARK)position.
7. Turn the ignition switch to the “ON” posi- tion and make certain that all warninglights are functioning properly before starting the engine. 8. Turn the ignition switch to the “START”position without pressi
ng the accelerator
pedal. Release the
key when the engine
starts.
After several attempts, you may experience that the engine still does not start. 1. Make sure that all electric devices, such as lights, air conditio
ning blower and rear
window defogger, are turned off. 2. While depressing the brake pedal {contin- uously variable transmission (CVT)} orthe clutch pedal (manual transaxle), press the accelerator peda
l halfway and hold it
there, then crank the engine. Release theaccelerator pedal, immediately after the engine starts.
WA R N I N G Never run the engine in
a closed or poorly
ventilated area any lo
nger than is needed
to move your vehicle out of the area. Car-bon monoxide gas, whic
h is odorless and
extremely poisonous, could build up and cause serious injury or death.CAUTION Do not push-start the vehicle.Do not run the engine at high rpms or drive at high speeds until th
e engine has had a
chance to warm up. Release the ignition sw
itch as soon as the
engine starts. Otherwise, the starter motor will be damaged.
Starting the engine
NOTE
On vehicles equipped
with manual transaxle,
the starter will not ope
rate unless the clutch
pedal is fully depresse
d (Clutch interlock).
NOTE
On vehicles equipped
with CVT, the starter
will not operate unless the selector lever is in the “P” (PARK) or “N” (NEUTRAL) posi-tion.For safety reasons, start the engine in the “P” (PARK) position so that the wheels are locked.
NOTE
Minor noises may be heard on engine start- up. These will disappear as the engine warms up.
When the engine is hard to start
BK0267800US.book 39 ページ 2018年5月30日 水曜日 午後4時24分
Page 126 of 267

Tire pressure monitoring system (if so equipped)
Features and controls 5-61
5
N00532801566
1. If the tire pressure monitoring system warning light illumi
nates, avoid hard
braking, sharp steering maneuvers and high speeds. You should stop and adjust the tires to the proper inflation pressure assoon as possible. Adjust the spare tire at the same time. Refer to “Tires” on page 9-12.
2. If the tire pressure monitoring system warning light remains illuminated afteryou have been driving for approximately 20 minutes after you adjust the tire infla- tion pressure, one or more of the tires mayhave a puncture. Inspect the tire and if it has a puncture, have it repaired by an authorized Mitsubishi Motors dealer assoon as possible.
The tire pressure monitoring system may not work normally in the following circum- stances: A wireless facility or device using the same frequency is near the vehicle. Snow or ice is stuck inside the fenders and/or on the wheels. The tire inflation pres
sure sensor’s battery
is dead. Wheels other than Mitsubishi Motors Genuine wheels are being used. Wheels that are not fitted with tire infla- tion pressure sensors are being used. Wheels whose ID codes are not memo- rized by the vehicle are used. Compact spare tire is fitted on a road wheel. A window tint that affects the radio wave signals is installed.
If the warning light illuminates while driving
NOTE
When inspecting or adjusting the tire pres- sure, do not apply excessive force to the valve stem to avoid breakage. After inspecting or adju
sting the tire pres-
sure, always reinstall the valve cap on thevalve stem. Without the valve cap, dirt or moisture could get into the valve, resulting in damage to thetire inflation pressure sensor. Do not use metal valve caps, which may cause a metal reaction, resulting in corrosion and damage of the tire inflation pressure sen- sors. Once adjustments have
been made, the warn-
ing light will go off after a few minutes ofdriving.
WA R N I N G If the warning light illuminates while you are driving, avoid ha
rd braking, sharp
steering maneuvers and high speeds. Driving with an under-inflated tire adversely affects vehicle performance andcan result in an accident.CAUTION The warning light may
not illuminate imme-
diately in the event of
a tire blowout or rapid
leak.NOTE
To avoid the risk of damage to the tire infla- tion pressure sensors, have any puncturedtire repaired by an authorized Mitsubishi Motors dealer. If the tire repair is not done by an authorized Mitsubishi Motors dealer,damage to the tire infl
ation pressure sensor is
not covered by your warranty.
Do not use an aerosol puncture-repair spray on any tire.Such a spray could damage the tire inflationpressure sensors. Have any puncture repaired by an authorized Mitsubishi Motors dealer.NOTE
BK0267800US.book 61 ページ 2018年5月30日 水曜日 午後4時24分
Page 145 of 267

Combination headlights and dimmer switch 5-80 Features and controls
5
N00532600570
If the following operation is performed with the combination headlights and dim- mer switch in the “ ” or “ ” position, the lights automatically turn off. [Except for vehicles
equipped with the
F. A . S . T. - k e y ]The ignition switch is turned to the “OFF” or “ACC” position or the key is removed from the ignition switch and the driver’sdoor is opened. [For vehicles equipped
with the F.A.S.T.-
key]
The operation mode is changed to OFF or ACC and the driver’s door is opened. If the following operation is performed with the combination headlights and dim- mer switch in the “ ” or “ ” position, the lights automatically turn off after about 3 minutes. [Except for vehicles equipped with the F. A . S . T. - k e y ] The ignition switch is turned to the “OFF”or “ACC” position or
the key is removed
from the ignition switch and the driver’s door is not opened. [For vehicles equipped with the F.A.S.T.- key] The operation mode is changed to OFF or ACC and the driver’s door is not opened.
If the combination headlights and dimmer switch is turned to the “ ” or “ ” posi- tion again after the engine is turned off, the about 3-minute auto-cutout function described above will not
work. The lights (the
parking lights, tail li
ghts and license plate
lights) will stay on and will not turn off auto-matically.
N00549800226
[When using a key to start the engine]If the driver’s door is opened with the key in the “OFF” or “ACC” position or removed from the ignition switch while the lights areon, the tone will sound to remind you to turn off the lights. [When using the F.A.S.T.-key to start the engine]If the driver’s door is opened with the opera- tion mode is put in OFF or ACC, or if the operation mode is changed to OFF while thelights are on, the tone
will sound to remind
you to turn off the lights. In either case, the lights will turn off automat- ically and so will the tone. Or you can turn
NOTE
Do not leave the headli
ghts and other lights
on for a long period of time when the engineis not running. The battery will run down. When it rains, or wh
en the vehicle has been
washed, the inside of the lens sometimesbecomes foggy. This is the same as when window glass mists up on a humid day, and does not indicate a pr
oblem. When the light
is switched on, the heat will dry out the fog. However, if water collects inside the light, have it checked by an authorized MitsubishiMotors dealer or a re
pair facility of your
choice.
Light auto-cutout function (headlights and other lights)
NOTE
The light auto-cutout f
unction can be deacti-
vated. See your authorized Mitsubishi Motorsdealer for details.
When you want to keep the lights on: Headlight reminder buzzer
BK0267800US.book 80 ページ 2018年5月30日 水曜日 午後4時24分
Page 149 of 267

Electric rear window defogger switch 5-84 Features and controls
5
N00523501349
N00523701484
The rear window defogger can be used when the engine is running. The indicator light (A) will come on when you press the electric rear window defoggerswitch. Electric current will flow through the heating wires on the rear window to help clear away moisture or frost.
After about 20 minutes of operation, the sys- tem will shut off automatically. To switch the defogger OFF before 20 min-utes have passed, press the switch again. The indicator light will go
out and the defogger
will turn off. If you need the defogger for more than 20 minutes, press th
e switch again. This will add
20 more minutes.
Precautions to observe when using wipers and washers
CAUTION If the washer is used in cold weather, washer fluid sprayed onto the
glass might freeze,
blocking your view. Heat the glass with thedefroster before using the washer.NOTE
Do not use the wipers when the windshield is dry. This could scratch the glass and wear the wiper blades prematurely. Before using the wipers in cold weather, check to be sure that the wiper blades are notfrozen to the windshield. Using the wipers while the blades are frozen could cause the wiper motor to burn out. If the moving wipers be
come blocked part-
way through a sweep by ic
e or other deposits
on the glass, the wipers may temporarily stop operating to prevent the motor from over- heating. In this case, park the vehicle in asafe place, turn the ignition switch to the“OFF” position or put the operation mode in OFF, and then remove
the ice or other depos-
its.Because the wipers will start operating again after the wiper motor cools down, check that the wipers operate
before using them.
Avoid using the washer for more than 20 sec- onds at a time. Do not operate the washerwhen the washer fluid reservoir is empty orthe pump may fail. During cold weather, add a recommended washer solution that will not freeze in the washer fluid reservoir.
Otherwise the washer
may not work or may be damaged. Replace the wiper blades when they are worn. Use the proper size replacementblades. For further information, please con- tact your authorized
Mitsubishi Motors
dealer.
Electric rear window defog- ger switch
NOTE
Type 1Type 2
BK0267800US.book 84 ページ 2018年5月30日 水曜日 午後4時24分
Page 150 of 267

Horn switch
Features and controls 5-85
5
N00523800185
To honk the horn, press around the “ ” mark on the steering wheel.
N00563701196
The Link System takes co
ntrol of the devices
connected via the USB input terminal or the Bluetooth
®; the system allows the connected
devices to be operated by using the switches in the vehicle or voice commands (if so equipped).For details on how to operate, refer to “USB input terminal” on page 5-85 and the separate owner’s manual. Bluetooth
® is a registered trademark of
BLUETOOTH SIG, INC.
N00566701171
You can connect your USB memory device or iPod
* to play music files stored in the USB
memory device or iPod.This section explains
how to connect and
remove a USB memory device or iPod. Refer to the separate owner’s manual fordetails on the types of
connectable devices
and supported files, a
nd how to play music
files. * : “iPod” is a registered trademark of Apple Inc. in the United States and other countries.
CAUTION The rear window defogge
r is not designed to
melt snow. Remove
any snow manually
before using the rear window defogger. Use the rear window de
fogger only after the
engine has started and
is running. Be sure to
turn the defogger swit
ch off immediately
after the window is cl
ear to save on battery
power. Do not place stickers,
tape, or other items
that are attached with adhesive over the gridwires on the rear window. When cleaning the inside
rear window, use a
soft cloth and wipe lightly over the grid wires.NOTE
If your vehicle is equi
pped with heated mir-
rors, mist can also be removed from the out-side rearview mirrors when the rear window defogger switch is pressed. (Refer to “Door mirror heater” on page 5-37.)
Horn switch
Link System
(if so equipped)
USB input terminal
WA R N I N G Do not perform to connect/disconnect the USB memory device or iPod while driving.This can be dangerous. Be sure to perform before driving.
BK0267800US.book 85 ページ 2018年5月30日 水曜日 午後4時24分
Page 164 of 267
Vehicle preparatio
n before driving
Driving safety 6-3
6
N00629001770
For a safer and more enjoyable trip, always check for the following:
Before starting the ve
hicle, make certain
that you and all passengers are seated and wearing their seat belts properly (with children in the rear seat, in appropriaterestraints), and that all the doors are locked. Move the driver’s seat as far backward as possible, while keeping good visibility, and good control of the steering wheel, brakes, accelerator, and controls. Check the instrument panel indicators and multi- information display for any possible prob-lem. Similarly, the front
passenger seat should
also be moved as fa
r back as possible.
Make sure that infants and small children are properly restrained in accordance with all laws and regulations.
Check these by selectin
g the defroster mode,
and set the blower switch on high. You shouldbe able to feel the air blowing against the windshield. Refer to “Defrosti
ng or defogging (wind-
shield, door windows)” on page 7-6, 7-10, 7-17.
NOTE
The shape of the mat and the number of retaining clips may
vary depending on the
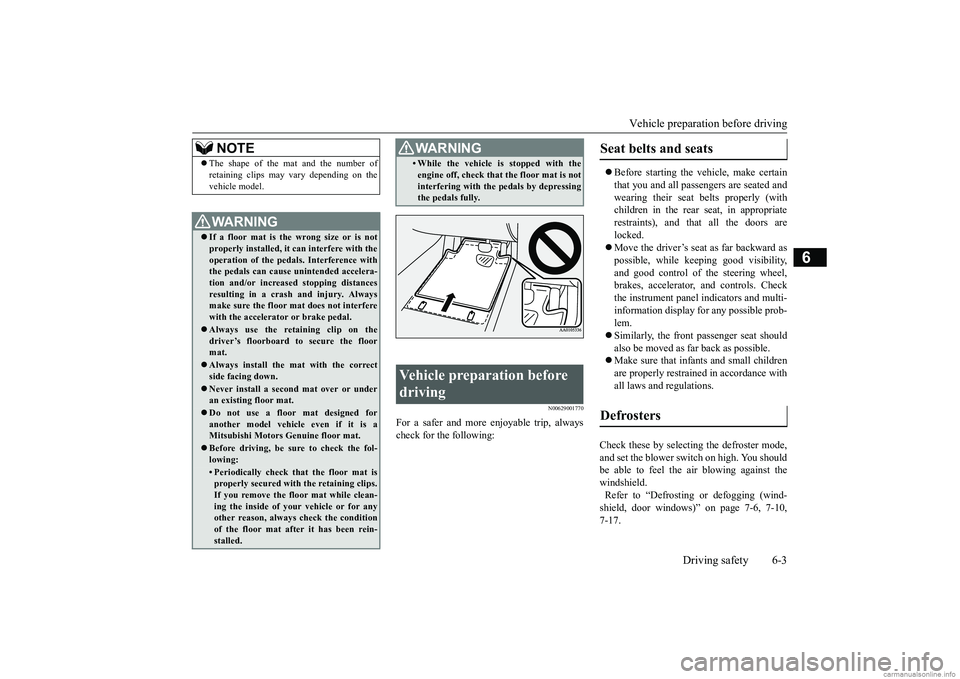
vehicle model.WA R N I N G If a floor mat is the
wrong size or is not
properly installed, it can interfere with the operation of the pedals. Interference with the pedals can cause unintended accelera-tion and/or increase
d stopping distances
resulting in a cras
h and injury. Always
make sure the floor mat does not interferewith the accelerator or brake pedal. Always use the retaining clip on the driver’s floorboard to secure the floor mat. Always install the mat with the correct side facing down. Never install a second mat over or under an existing floor mat. Do not use a floor mat designed for another model vehicle even if it is a Mitsubishi Motors Genuine floor mat. Before driving, be sure to check the fol- lowing:• Periodically check that the floor mat is properly secured with the retaining clips. If you remove the fl
oor mat while clean-
ing the inside of you
r vehicle or for any
other reason, always
check the condition
of the floor mat afte
r it has been rein-
stalled.
• While the vehicle is stopped with theengine off, check that the floor mat is notinterfering with the pedals by depressingthe pedals fully.
Vehicle preparation before driving
WA R N I N G
Seat belts and seats Defrosters
BK0267800US.book 3 ページ 2018年5月30日 水曜日 午後4時24分