wheel MITSUBISHI MIRAGE G4 2019 (in English) Service Manual
[x] Cancel search | Manufacturer: MITSUBISHI, Model Year: 2019, Model line: MIRAGE G4, Model: MITSUBISHI MIRAGE G4 2019Pages: 267, PDF Size: 38.31 MB
Page 203 of 267
How to change a tire 8-8 For emergencies
8
N00849801529
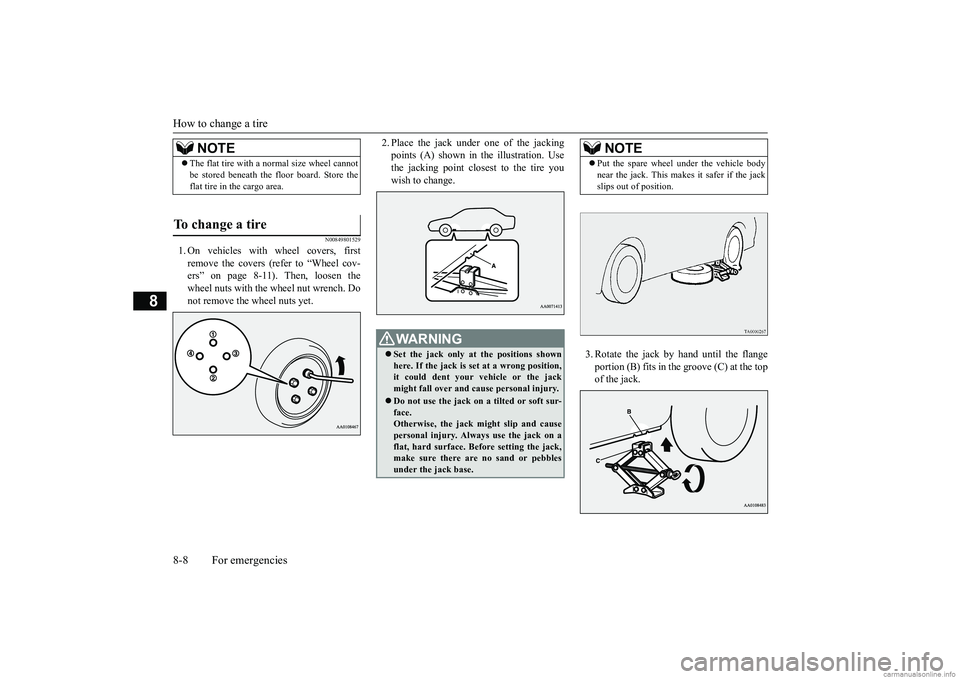
1. On vehicles with
wheel covers, first
remove the covers (refer to “Wheel cov- ers” on page 8-11). Then, loosen thewheel nuts with the wheel nut wrench. Do not remove the wheel nuts yet.
2. Place the jack under one of the jacking points (A) shown in th
e illustration. Use
the jacking point closest to the tire you wish to change.
3. Rotate the jack by hand until the flange portion (B) fits in the groove (C) at the top of the jack.
NOTE
The flat tire with a
normal size wheel cannot
be stored beneath the floor board. Store theflat tire in the cargo area.
To change a tire
WA R N I N G Set the jack only at
the positions shown
here. If the jack is set at a wrong position, it could dent your vehicle or the jackmight fall over and ca
use personal injury.
Do not use the jack on a tilted or soft sur- face. Otherwise, the jack might slip and cause personal injury. Always
use the jack on a
flat, hard surface. Before setting the jack, make sure there are no sand or pebbles under the jack base.
NOTE
Put the spare wheel
under the vehicle body
near the jack. This makes it safer if the jackslips out of position.
BK0267800US.book 8 ページ 2018年5月30日 水曜日 午後4時24分
Page 204 of 267
How to change a tire
For emergencies 8-9
8
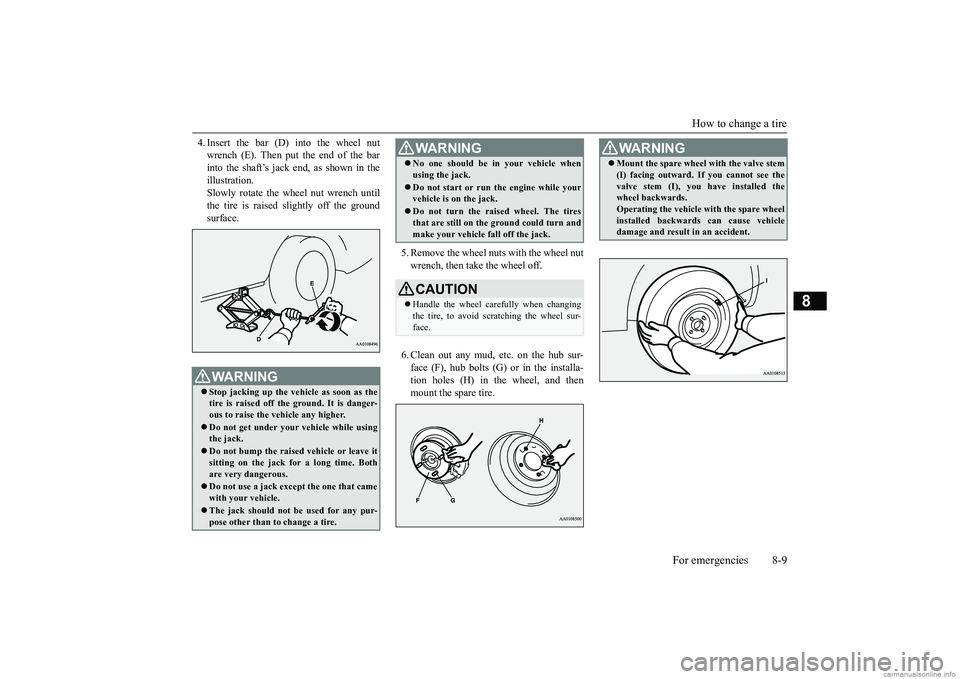
4. Insert the bar (D) into the wheel nut wrench (E). Then put the end of the barinto the shaft’s jack end, as shown in the illustration. Slowly rotate the wheel nut wrench untilthe tire is raised
slightly off the ground
surface.
5. Remove the wheel nuts with the wheel nut wrench, then take the wheel off. 6. Clean out any mud, etc. on the hub sur- face (F), hub bolts (G)
or in the installa-
tion holes (H) in the wheel, and then mount the spare tire.
WA R N I N G Stop jacking up the ve
hicle as soon as the
tire is raised off the ground. It is danger- ous to raise the ve
hicle any higher.
Do not get under your vehicle while using the jack. Do not bump the raised
vehicle or leave it
sitting on the jack for a long time. Bothare very dangerous. Do not use a jack except the one that came with your vehicle. The jack should not be used for any pur- pose other than to change a tire.
No one should be
in your vehicle when
using the jack. Do not start or run the engine while your vehicle is on the jack. Do not turn the raised wheel. The tires that are still on the
ground could turn and
make your vehicle fall off the jack.CAUTION Handle the wheel care
fully when changing
the tire, to avoid scratching the wheel sur-face.WA R N I N G
WA R N I N G Mount the spare wheel
with the valve stem
(I) facing outward. If
you cannot see the
valve stem (I), you
have installed the
wheel backwards. Operating the vehicle with the spare wheel installed backwards can cause vehicledamage and result
in an accident.
BK0267800US.book 9 ページ 2018年5月30日 水曜日 午後4時24分
Page 205 of 267
How to change a tire 8-10 For emergencies
8
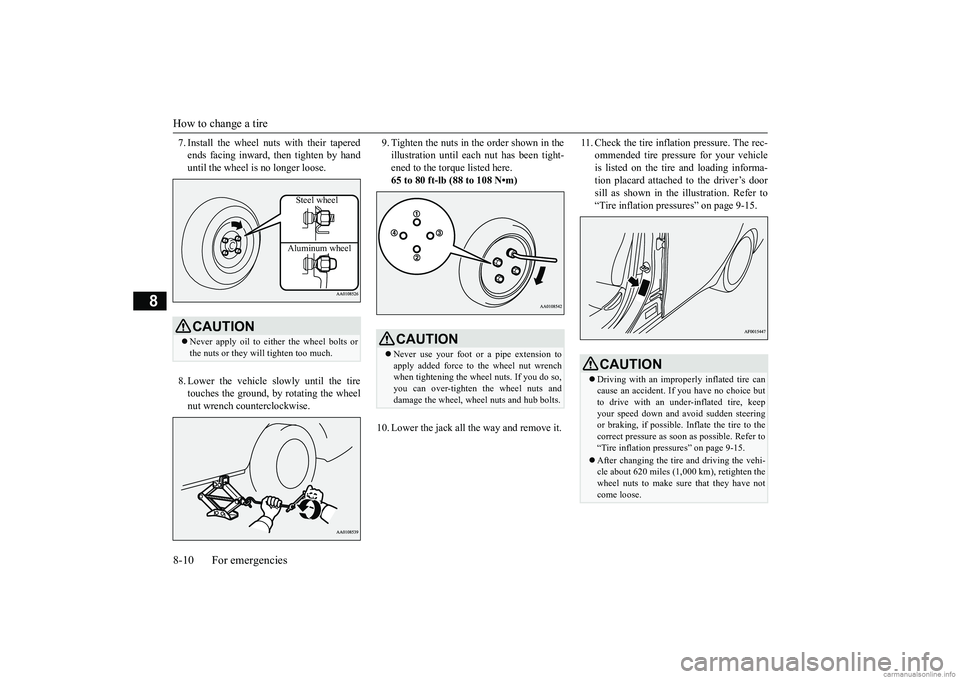
7. Install the wheel nuts with their tapered ends facing inward, then tighten by handuntil the wheel is no longer loose. 8. Lower the vehicle slowly until the tire touches the ground, by rotating the wheel nut wrench counterclockwise.
9. Tighten the nuts in the order shown in the illustration until each
nut has been tight-
ened to the torque listed here. 65 to 80 ft-lb (88 to 108 N•m)
10. Lower the jack all the way and remove it.
11. Check the tire inflation pressure. The rec-
ommended tire pressure for your vehicleis listed on the tire
and loading informa-
tion placard attached to the driver’s door sill as shown in the illustration. Refer to“Tire inflation pressures” on page 9-15.
CAUTION Never apply oil to either the wheel bolts or the nuts or they will tighten too much.
Steel wheel Aluminum wheel
CAUTION Never use your foot or a pipe extension to apply added force to the wheel nut wrench when tightening the wh
eel nuts. If you do so,
you can over-tighten the wheel nuts and damage the wheel, wheel nuts and hub bolts.
CAUTION Driving with an imprope
rly inflated tire can
cause an accident. If
you have no choice but
to drive with an under-inflated tire, keep your speed down and av
oid sudden steering
or braking, if possible. Inflate the tire to thecorrect pressure as soon as possible. Refer to “Tire inflation pressures” on page 9-15. After changing the tire
and driving the vehi-
cle about 620 miles (1,000 km), retighten the wheel nuts to make sure that they have notcome loose.
BK0267800US.book 10 ページ 2018年5月30日 水曜日 午後4時24分
Page 206 of 267
How to change a tire
For emergencies 8-11
8
N00850001198
Store the flat tire in the cargo area. Reverse the removing procedure when stor-ing the spare tire, jack, bar and wheel nut wrench. Refer to “To remove compact spare tire” onpage 8-7 and “Jack and tools” on page 8-5.
N00849401251
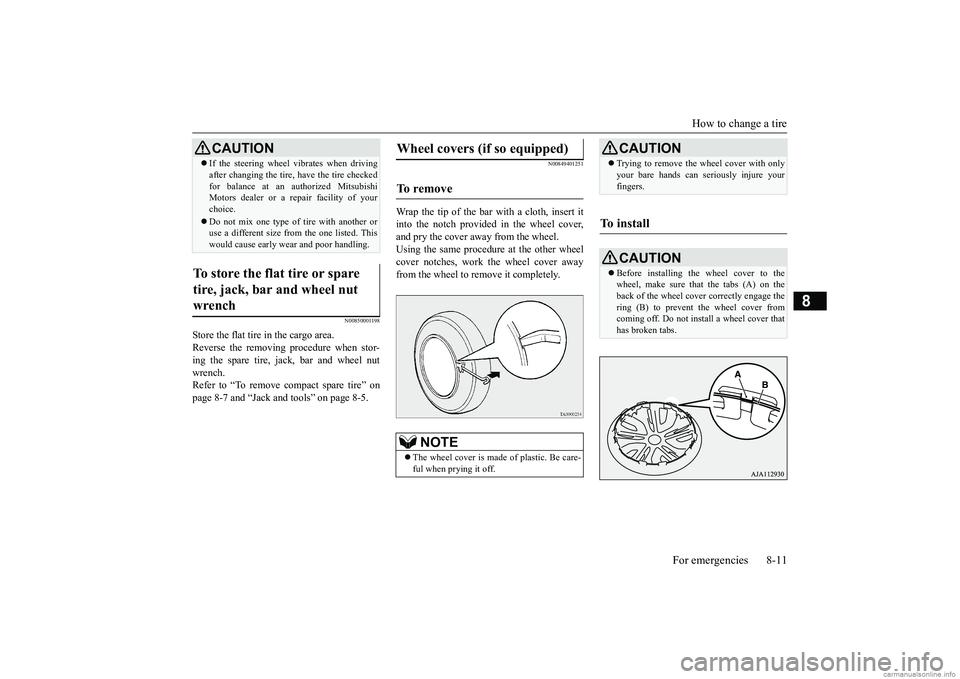
Wrap the tip of the bar with a cloth, insert itinto the notch provided in the wheel cover, and pry the cover away from the wheel. Using the same procedure at the other wheelcover notches, work the wheel cover away from the wheel to remove it completely.
If the steering wheel vibrates when driving after changing the tire, have the tire checkedfor balance at an authorized MitsubishiMotors dealer or a repair facility of your choice. Do not mix one type of tire with another or use a different size from the one listed. This would cause ea
rly wear and poor handling.
To store the flat tire or spare tire, jack, bar and wheel nut wrench
CAUTION
Wheel covers (if so equipped) To r e m o v e
NOTE
The wheel cover is made
of plastic. Be care-
ful when prying it off.
CAUTION Trying to remove the
wheel cover with only
your bare hands can seriously injure yourfingers.
To install
CAUTION Before installing the wheel cover to the wheel, make sure that the tabs (A) on the back of the wheel cove
r correctly engage the
ring (B) to prevent the wheel cover fromcoming off. Do not install a wheel cover that has broken tabs.
BK0267800US.book 11 ページ 2018年5月30日 水曜日 午後4時24分
Page 207 of 267
Towing 8-12 For emergencies
8
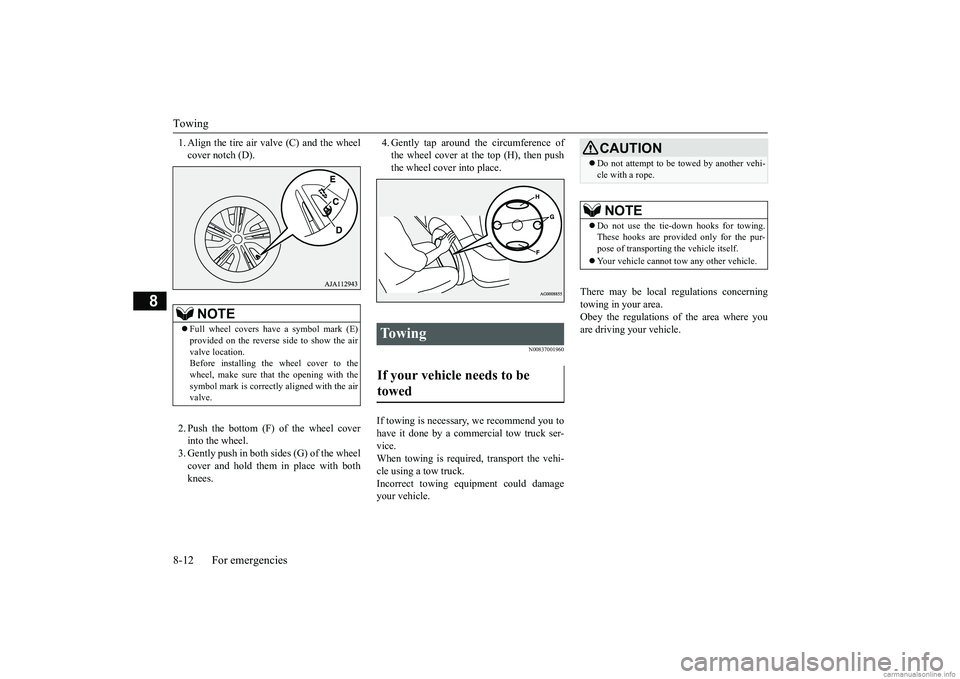
1. Align the tire air valve (C) and the wheel cover notch (D). 2. Push the bottom (F) of the wheel cover into the wheel. 3. Gently push in both sides (G) of the wheel cover and hold them in place with bothknees.
4. Gently tap around the circumference of the wheel cover at the top (H), then pushthe wheel cover into place.
N00837001960
If towing is necessary, we recommend you tohave it done by a commercial tow truck ser- vice. When towing is required, transport the vehi-cle using a tow truck. Incorrect towing equipment could damage your vehicle.
There may be local regulations concerning towing in your area. Obey the regulations of the area where you are driving your vehicle.
NOTE
Full wheel covers have a symbol mark (E) provided on the reverse side to show the air valve location. Before installing the wheel cover to thewheel, make sure that the opening with the symbol mark is correctly aligned with the air valve.
To w i n g If your vehicle needs to be towed
CAUTION Do not attempt to be
towed by another vehi-
cle with a rope.NOTE
Do not use the tie-down hooks for towing. These hooks are provided only for the pur-pose of transporting
the vehicle itself.
Your vehicle cannot
tow any other vehicle.
BK0267800US.book 12 ページ 2018年5月30日 水曜日 午後4時24分
Page 208 of 267
Operation under adverse driving conditions
For emergencies 8-13
8
Set the gearshift lever to the “N” (Neutral) position.Secure the steering wheel in a straight-ahead position with a rope or tie-down strap. Release the parking brake. Place the gearshift lever in the “N” (Neutral) position (manual transa
xle) or the selector
lever in the “N” (NEUTRAL) position (CVT).
N00837201799
If your vehicle becomes stuck in snow, sand, or mud, it can often be moved by a rockingmotion. Rock your vehicle back and forth to free it.
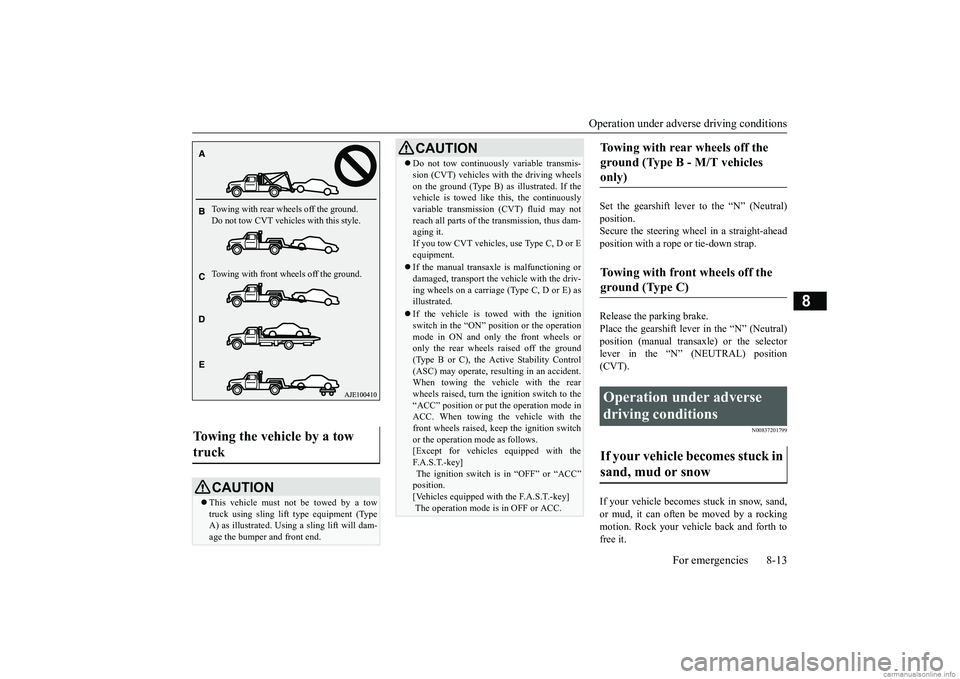
Towing the vehicle by a tow truck
CAUTION This vehicle must not be towed by a tow truck using sling lift
type equipment (Type
A) as illustrated. Using a sling lift will dam- age the bumper and front end.Towing with rear wheels off the ground. Do not tow CVT vehicles with this style. Towing with front wheels off the ground.
Do not tow continuously variable transmis- sion (CVT) vehicles with the driving wheelson the ground (Type B) as illustrated. If thevehicle is towed like
this, the continuously
variable transmission (CVT) fluid may not reach all parts of the transmission, thus dam-aging it. If you tow CVT vehicles, use Type C, D or E equipment. If the manual transaxl
e is malfunctioning or
damaged, transport the
vehicle with the driv-
ing wheels on a carriage (Type C, D or E) as illustrated. If the vehicle is towed with the ignition switch in the “ON” pos
ition or the operation
mode in ON and only the front wheels oronly the rear wheels raised off the ground (Type B or C), the Active Stability Control (ASC) may operate, result
ing in an accident.
When towing the vehicle with the rear wheels raised, turn the ignition switch to the “ACC” position or put
the operation mode in
ACC. When towing the vehicle with the front wheels raised, keep the ignition switch or the operation mode as follows.[Except for vehicles equipped with the F. A . S . T. - k e y ] The ignition switch is
in “OFF” or “ACC”
position. [Vehicles equipped with the F.A.S.T.-key] The operation mode is in OFF or ACC.CAUTION
Towing with rear wheels off the ground (Type B - M/T vehicles only) Towing with front wheels off the ground (Type C) Operation under adverse driving conditions If your vehicle becomes stuck in sand, mud or snow
BK0267800US.book 13 ページ 2018年5月30日 水曜日 午後4時24分
Page 209 of 267
Operation under adverse driving conditions 8-14 For emergencies
8
Do not rev the engine or spin the wheels. Constant efforts to free a stuck vehicle cancause overheating and tr
ansaxle failure. Let
the engine idle for a few minutes to cool the transaxle before trying again.If your vehicle is still
stuck after several rock-
ing attempts, call for a commercial tow truck service.
When driving on a road covered with snow or ice, use snow tires. Tire chainscannot be used on your vehicle. There may be state or local regulations about using snow tires. Always check the regu-lations in your local area before using them. Refer to “Snow tires” on page 9-18 and “Tire chains” on page 9-18. Drive slowly. Do not make sudden starts or stops, sharp turns, or slam on the brakes. Allow extra distance
between your vehi-
cle and the vehicle in front of you, and avoid sudden braking. If a skid occurs when the accelerator pedal is depressed, take your foot off the pedal. Steer gently in the direction of theskid.
Your vehicle is equipped with an anti-lock braking system (ABS). Hold the brakepedal down firmly and keep it depressed. Do not pump the brake pedal which will result in reduced braking performance. After parking on snowy or icy roads, it may be difficult to move your vehicle due to the brake being frozen. Depress theaccelerator pedal little by little to move the vehicle when safe to do so. Drive as slow as possible when driving on bumpy, rutted roads or over potholes etc.
WA R N I N G When trying to rock
your vehicle out of a
stuck position, make sure that there are no people nearby. The
rocking motion can
make your vehicle suddenly lurch forwardor backward, and inju
re any bystanders.
On wet roads
CAUTIONAvoid flooded roads. Water is often deeper than it looks, and you
could be seriously hurt
by driving into flood water. When driving in rain, on water-covered roads, or through a car wash, water could get into the brake discs and make them fail tem-porarily. In such cases, lightly press the brake pedal to see if they are working prop- erly. If they are not, press the pedal lightlyseveral times while driving to dry the brake pads or linings, then check them again.
When driving in rain, a layer of water may form between the tires and the road surface(hydroplaning). This loosens your tires’ gripon the road, making it difficult to steer or brake properly. When driving on a wet road:• Drive your vehicle at a safe speed.• Do not drive on worn tires.• Always keep the tires at the correct infla- tion pressures.
On snowy or icy roads
CAUTION
CAUTION Do not depress the acce
lerator pedal rapidly.
The vehicle could start moving when itbreaks free from the ice, possibly resulting in an accident.
On a bumpy or rutted road
CAUTION Driving on bumpy, rutted roads or over pot- holes can damage the tires and wheels. Wheels with low-profile tires or under-inflated tires are especially at risk for dam- age. The vehicle’s body, bumper, muffler and other parts may be dama
ged if the vehicle is:
BK0267800US.book 14 ページ 2018年5月30日 水曜日 午後4時24分
Page 226 of 267
Tires
Vehicle care and maintenance 9-15
9
The treadwear grade is a comparative rating based on the wear rate of the tire when tested under controlled conditions on a specifiedgovernment test course. For example, a tire graded 150 would wear one and one-half (11/2) times as well on th
e government course
as a tire graded 100. The relative performance of tires depends upon th
e actual conditions of
their use, however, and may depart signifi- cantly from the norm due to variations in driving habits, service
practices and differ-
ences in road characteristics and climate.
The traction grades, from highest to lowest, are AA, A, B and C. Those grades representthe tire’s ability to stop on wet pavement as measured under contro
lled conditions on
specified government te
st surfaces of asphalt
and concrete. A tire
marked C may have poor
traction performance. The temperature grades
are A (the highest), B
and C, representing the tire’s resistance to the generation of heat and
its ability to dissipate
heat when tested under controlled conditionson a specified indoor laboratory test wheel. Sustained high temperature can cause the material of the tire to
degenerate and reduce
tire life, and excessive temperature can lead to sudden tire failure. The grade C corre- sponds to a level of performance which allpassenger car tires must meet under the Fed- eral Motor Vehicle Safety Standard No. 109. Grades B and A represent higher levels ofperformance on the laboratory test wheel than the minimum required by law.
N00939301984
Proper tire inflation pressure is essential forthe safe and satisfactory operation of your
vehicle. The wrong tire pressure will cause problems in three major areas: Safety Too little pressure increases flexing in the tire and can cause tire failure. Too much pressure can cause a tire to lose its abilityto cushion shock. Objects on the road and potholes could then ca
use tire damage that
may result in tire failure. Economy The wrong tire pressu
re can cause uneven
wear patterns in the tire tread. These abnormal wear patter
ns will reduce the
tread life, and the tire will have to bereplaced sooner. Too little pressure also makes it harder for the tire to roll, and this uses up more fuel. Ride comfort and vehicle stability The superior riding experience built into your vehicle partly de
pends on the correct
tire pressure. Too much pressure gives an uncomfortable and jarring ride. Too little pressure feels as if
your vehicle is slow to
respond. Unequal tire pressure
s can make steering
your vehicle uneven
and unpredictable.
The tire pressure for your vehicle under nor- mal driving conditions is listed on the placard attached to the driver’s door sill. (Refer to “Tire and loading information plac-ard” on page 11-3.)
MA
Code representing the tire manu- facturing location. (2 digits)
L9 ABCD
Code representing the tire size. (2 digits) Code used by tire manufacturer. (1 to 4 digits)
15
Number representing the week in which the tire was manufactured. (2 digits)
04
Number representing the year in which the tire was manufactured. (2 digits)
Treadwear, Traction and Temper- ature Grades Treadwear
Tr a c t i o n TemperatureTire inflation pressures
BK0267800US.book 15 ページ 2018年5月30日 水曜日 午後4時24分
Page 227 of 267
Tires 9-16 Vehicle care and maintenance
9
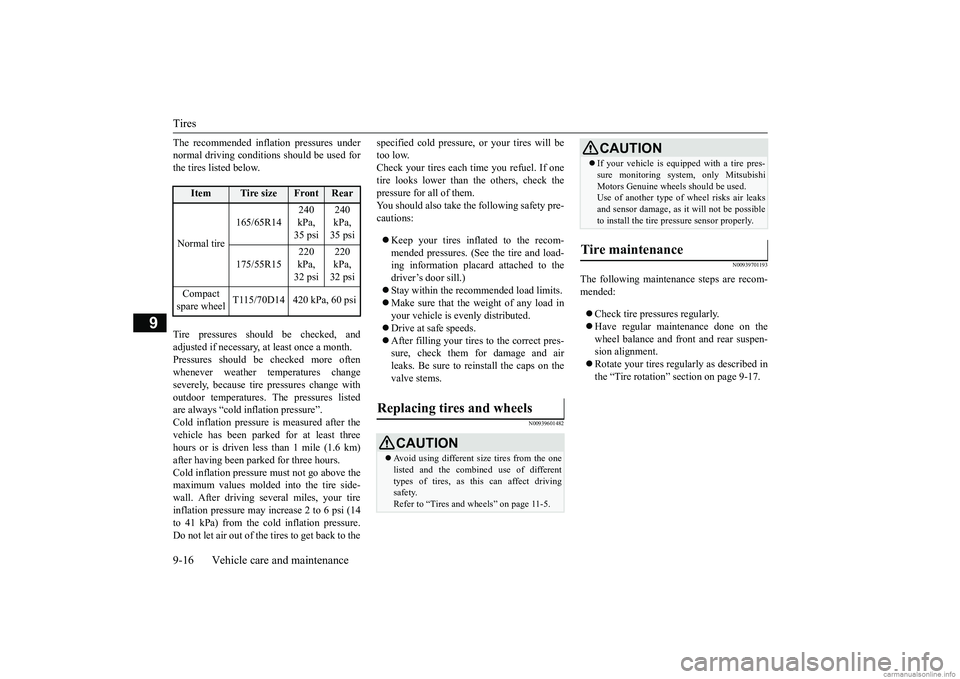
The recommended inflation pressures under normal driving conditions should be used forthe tires listed below. Tire pressures should be checked, and adjusted if necessary, at least once a month. Pressures should be checked more often whenever weather temperatures changeseverely, becaus
e tire pressures change with
outdoor temperatures. The pressures listed are always “cold inflation pressure”.Cold inflation pressure is measured after the vehicle has been parked
for at least three
hours or is driven less than 1 mile (1.6 km)after having been parked for three hours. Cold inflation pressure must not go above the maximum values molded into the tire side-wall. After driving seve
ral miles, your tire
inflation pressure may increase 2 to 6 psi (14 to 41 kPa) from the cold inflation pressure.Do not let air out of the tires to get back to the
specified cold pressure, or your tires will be too low.Check your tires each time you refuel. If one tire looks lower than the others, check the pressure for all of them.You should also take the following safety pre- cautions: Keep your tires inflated to the recom- mended pressures. (See the tire and load-ing information placard attached to the driver’s door sill.) Stay within the recommended load limits. Make sure that the weight of any load in your vehicle is evenly distributed. Drive at safe speeds. After filling your tires to the correct pres- sure, check them for damage and airleaks. Be sure to reinstall the caps on the valve stems.
N00939601482
N00939701193
The following maintenance steps are recom- mended: Check tire pressures regularly. Have regular maintenance done on the wheel balance and front and rear suspen-sion alignment. Rotate your tires regularly as described in the “Tire rotation” section on page 9-17.
Item
Tire size
Front
Rear
Normal tire
165/65R14
240 kPa, 35 psi
240 kPa, 35 psi
175/55R15
220 kPa, 32 psi
220 kPa, 32 psi
Compact spare wheel
T115/70D14 420 kPa, 60 psi
Replacing tires and wheels
CAUTION Avoid using different size tires from the one listed and the combined use of different types of tires, as this can affect driving safety.Refer to “Tires and wheels” on page 11-5.
If your vehicle is equippe
d with a tire pres-
sure monitoring system, only MitsubishiMotors Genuine wheels should be used.Use of another type of
wheel risks air leaks
and sensor damage, as
it will not be possible
to install the tire pressure sensor properly.
Tire maintenance
CAUTION
BK0267800US.book 16 ページ 2018年5月30日 水曜日 午後4時24分
Page 228 of 267
Tires
Vehicle care and maintenance 9-17
9
N00939801240
Tread wear indicators ar
e built into the origi-
nal equipment tires on
your vehicle to help
you know when your tires should be replaced. Many states have la
ws requiring that you
replace your tires at this point.These indicators are molded into the bottom of the tread grooves and will appear when the tire tread is worn down to 1/16 inch (1.6mm). When the bands appear next to one another in two or more places
, replace your tires.
N00939901557
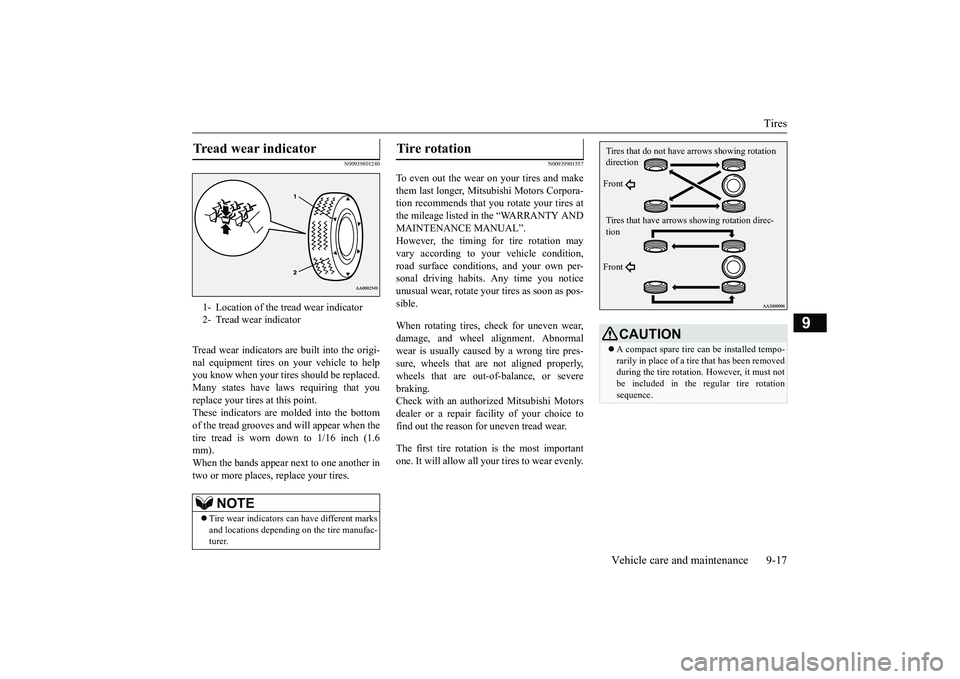
To even out the wear on your tires and make them last longer, Mitsubishi Motors Corpora- tion recommends that y
ou rotate your tires at
the mileage listed in the “WARRANTY AND MAINTENANCE MANUAL”. However, the timing for tire rotation mayvary according to your vehicle condition, road surface conditions, and your own per- sonal driving habits. Any time you notice unusual wear, rotate your
tires as soon as pos-
sible. When rotating tires, check for uneven wear, damage, and wheel al
ignment. Abnormal
wear is usually caused by a wrong tire pres- sure, wheels that ar
e not aligned properly,
wheels that are out-of-balance, or severe braking. Check with an authoriz
ed Mitsubishi Motors
dealer or a repair facility of your choice to find out the reason for uneven tread wear. The first tire rotation is the most important one. It will allow all your tires to wear evenly.
Tread wear indicator 1- Location of the tread wear indicator2- Tread wear indicator
NOTE
Tire wear indicators ca
n have different marks
and locations dependi
ng on the tire manufac-
turer.
Tire rotation
CAUTION A compact spare tire can be installed tempo- rarily in place of a tir
e that has been removed
during the tire rotation. However, it must notbe included in the regular tire rotation sequence.Tires that do not have arrows showing rotation direction Front Tires that have arrows
showing rotation direc-
tion Front
BK0267800US.book 17 ページ 2018年5月30日 水曜日 午後4時24分