MITSUBISHI MIRAGE G4 2020 Owner's Manual (in English)
Manufacturer: MITSUBISHI, Model Year: 2020, Model line: MIRAGE G4, Model: MITSUBISHI MIRAGE G4 2020Pages: 253, PDF Size: 36.39 MB
Page 181 of 253

BK0284300US.book 14 ページ 2019年5月23日 木曜日 午後12時22分
Page 182 of 253
8
For emergenciesIf the vehicle breaks down ...............................................................8-2 If the operation mode ca
nnot be changed to OFF
(vehicles equipped with the F.A.S.T.-key) ...................................8-2Jump-starting the engine ..................................................................8-2 Engine overheating ..........................................................................8-4 Jack and tools ...................................................................................8-5How to change a tire ........................................................................8-6 Towing ...........................................................................................8-12 Operation under adverse driving conditions
...........
.........
.........
.....8-13
Fuel Pump Shut-off System ...........................................................8-15
BK0284300US.book 1 ページ 2019年5月23日 木曜日 午後12時22分
Page 183 of 253
If the vehicle breaks down 8-2 For emergencies
8
N00836300233
If your vehicle breaks down on the road, move to the shoulder and turn on the hazard warning flashers. If there is no shoulder, orthe shoulder is not safe, drive in the right lane slowly with the haza
rd lights flashing until
you come to a safe stopping place. Keep theflashers flashing. If the engine stops, there will be no power assist to the steering and brakes, making these difficult to use. The brake booster will not work, so the brakes will not grip well. The brake pedal will be harder to press than usual. Since there is no power steering assist, the steering wheel will be hard to turn.
Get help from your passengers, bystanders, etc. to push the vehicle
and move it to a safe
area.
N00860700117
If the operation mode
cannot be changed to
OFF, perform the following procedure. 1. Move the selector lever to the “P” (PARK) position, and then change the operation mode to OF
F. (For vehicles
with continuously variable transmission(CVT)) 2. One of the other causes could be low bat- tery voltage. If this occurs, the keylessentry system and the F.A.S.T.-key opera- tion will also not operate. Contact an authorized Mitsubish
i Motors dealer.
N00836401837
If the engine cannot be started because the battery is weak or de
ad, you can start it with
the battery from anothe
r vehicle using jumper
cables.
1. Take off any metal jewelry such as watch bands or bracelets th
at might create an
accidental electrical contact. 2. Position the vehicles close enoughtogether so that the jumper cables can reach, but be sure the vehicles aren’t touching each other.
If the vehicle breaks down If the engine stops/fails When the engine fails at the intersection
If the operation mode can- not be changed to OFF (vehicles equipped with the F.A.S.T.-key) Jump-starting the engine
WA R N I N G To reduce the risk of igniting flammable gas that may be emi
tted from the battery,
carefully read this section before jump-starting the vehicle. Do not try to start you
r vehicle by pushing
or towing. This can cause an accident resulting in serious
injury or death and
can damage the vehicle.NOTE
Do not use jumper cables if they have dam- age or corrosion.CAUTION Check the other vehicle.
It must have a 12-
volt battery. If the other system isn’t 12-volt,both systems can be damaged.
BK0284300US.book 2 ページ 2019年5月23日 木曜日 午後12時22分
Page 184 of 253
Jump-starting the engine For emergencies 8-3
8
3. You could be injured if the vehicles move. Set the parking brake firmly on each vehi-cle. Put an automatic transaxle or CVT in “P” (PARK) or a manual transaxle in “N” (Neutral).4. Turn the ignition switch to the “OFF” position or put the operation mode in OFF. 5. Make sure your batt
ery electrolyte is at
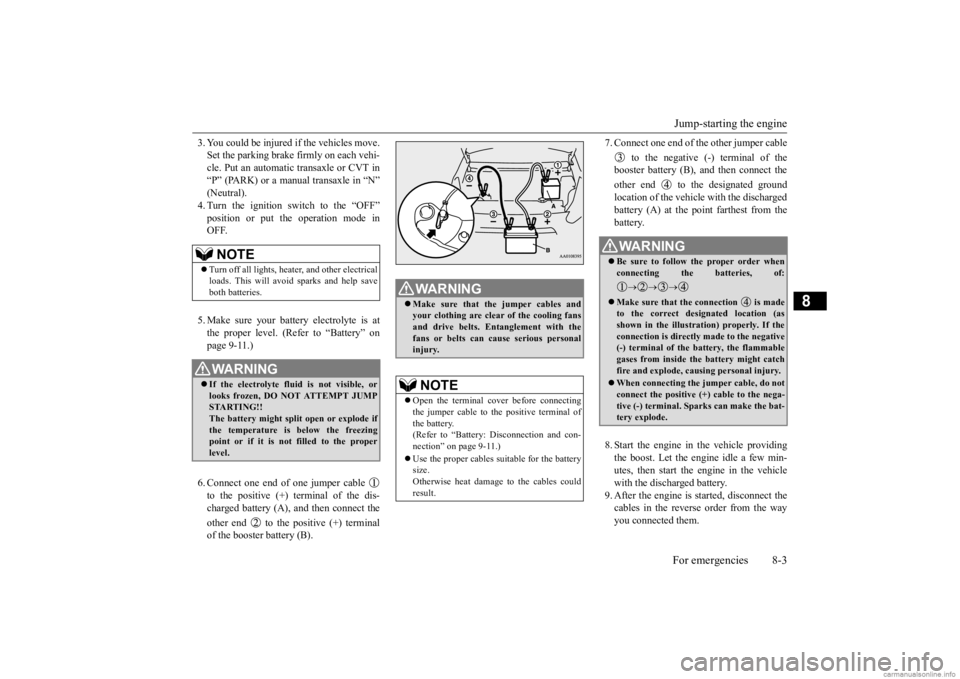
the proper level. (Refer to “Battery” on page 9-11.) 6. Connect one end of one jumper cable to the positive (+) terminal of the dis- charged battery (A),
and then connect the
other end to the positive (+) terminal of the booster battery (B).
7. Connect one end of the other jumper cable
to the negative (-) terminal of the booster battery (B), a
nd then connect the
other end to the designated ground location of the vehicl
e with the discharged
battery (A) at the point farthest from the battery. 8. Start the engine in the vehicle providing the boost. Let the engine idle a few min- utes, then start the engine in the vehiclewith the discharged battery. 9. After the engine is
started, disconnect the
cables in the reverse order from the wayyou connected them.
NOTE
Turn off all lights, heat
er, and other electrical
loads. This will avoid sparks and help save both batteries.WA R N I N G If the electrolyte flui
d is not visible, or
looks frozen, DO NOT ATTEMPT JUMP STARTING!! The battery might split open or explode ifthe temperature is below the freezing point or if it is not filled to the proper level.
WA R N I N G Make sure that the jumper cables and your clothing are clear of the cooling fansand drive belts. Entanglement with the fans or belts can ca
use serious personal
injury.NOTE
Open the terminal cover before connecting the jumper cable to the positive terminal ofthe battery. (Refer to “Battery:
Disconnection and con-
nection” on page 9-11.) Use the proper cables suitable for the battery size.Otherwise heat damage
to the cables could
result.
WA R N I N G Be sure to follow the proper order when connecting the batteries, of:
Make sure that the connection is made to the correct designated location (as shown in the illustration) properly. If theconnection is directly made to the negative (-) terminal of the battery, the flammable gases from inside the battery might catchfire and explode, caus
ing personal injury.
When connecting the jumper cable, do not connect the positive (+) cable to the nega- tive (-) terminal. Sparks can make the bat- tery explode.
BK0284300US.book 3 ページ 2019年5月23日 木曜日 午後12時22分
Page 185 of 253
Engine overheating 8-4 For emergencies
8
If you drive your vehicl
e with a low battery
charge after the engine has been started byusing jumper cables, th
e engine may misfire.
This can cause the anti-lock braking system warning light to blink on
and off. This is only
due to the low battery voltage. It is not a problem with the brake system. If this hap- pens, fully charge the battery and ensure the charging system is operating properly.
N00836501418
If the high coolant temperature warning lightilluminates while the e
ngine is running, the
engine may be overhea
ting. If this happens:
1. Stop the vehicle in a safe place. Turn on the hazard warning flashers. 2. With the engine still running, carefully raise the engine hood to vent the enginecompartment. 3. Check that the cooling fan is running. If the fan is not turning, stop the engineimmediately and contact an authorized Mitsubishi Motors dealer or a repair facil- ity of your choice for assistance.
4. If you see steam or spray coming from under the hood, turn off the engine. 5. If you do not see steam or spray coming from under the hood, leave the engine onuntil the high coolant
temperature warn-
ing light goes off. After the high coolant temperature warning light has gone off,you can start driving again. If the high coolant temperature warning light stays on, turn off the engine. 6. When you do not see any more steam or spray, open the hood. Look for obviousleaks, such as a split radiator hose. Be careful as components will be hot. Any leak source must be repaired.
Charging the battery by using an external battery charger
WA R N I N G Always remove the
battery from your
vehicle when the battery is charged by an external battery charger. Keep sparks, cigarette
s, and flames away
from the battery because the battery couldexplode. Keep your work area well vented when charging or using
the battery in an
enclosed space. Remove all the caps before charging the battery. Electrolyte (battery acid) is made of corro- sive diluted sulfuric acid. If electrolyte comes in contact with your hands, eyes,clothes, or the pain
ted surface of your
vehicle, thoroughly
flush with water. If
electrolyte gets in your eyes, flush themimmediately and thor
oughly with water,
and get prompt medical attention. Always wear protective clothing and gog- gles when working near the battery. Keep the battery out of the reach of chil- dren.
As your vehicle has anti-lock brakes Engine overheating
WA R N I N G To avoid personal injury, keep hands, hair, jewelry and clothes aw
ay from the cooling
fan. The cooling fan ca
n start at any time.
WA R N I N GBefore raising the en
gine hood, check to
see if there is steam or spray coming fromunder the hood. Steam or spray coming from an overheated en
gine could seriously
scald you.Do not open the hood until there is no steam or spray.
BK0284300US.book 4 ページ 2019年5月23日 木曜日 午後12時22分
Page 186 of 253
Jack and tools
For emergencies 8-5
8
7. If there is no obvious leak source, check the coolant level in th
e engine coolant res-
ervoir. If there is none, or if it is too low, slowly add coolant. 8. If the engine coolant reservoir needs cool-ant, you will probably also need to add coolant to the radiator. Do not loosen or remove the radiator cap until the enginehas cooled down. 9. Start the engine, and slowly add coolant, up to the bottom of the filler neck. Useplain water if you have to (and replace it with the right coolant as soon as possible).
10. Replace the radiator
cap and tighten it
fully. Check the coolant temperature warning light. You can start driving again when the high coolant temperature warn-ing light does not come on.
11. Have the system inspected by your autho-
rized Mitsubishi Motors
dealer or a repair
facility of your choice.
N00836601464
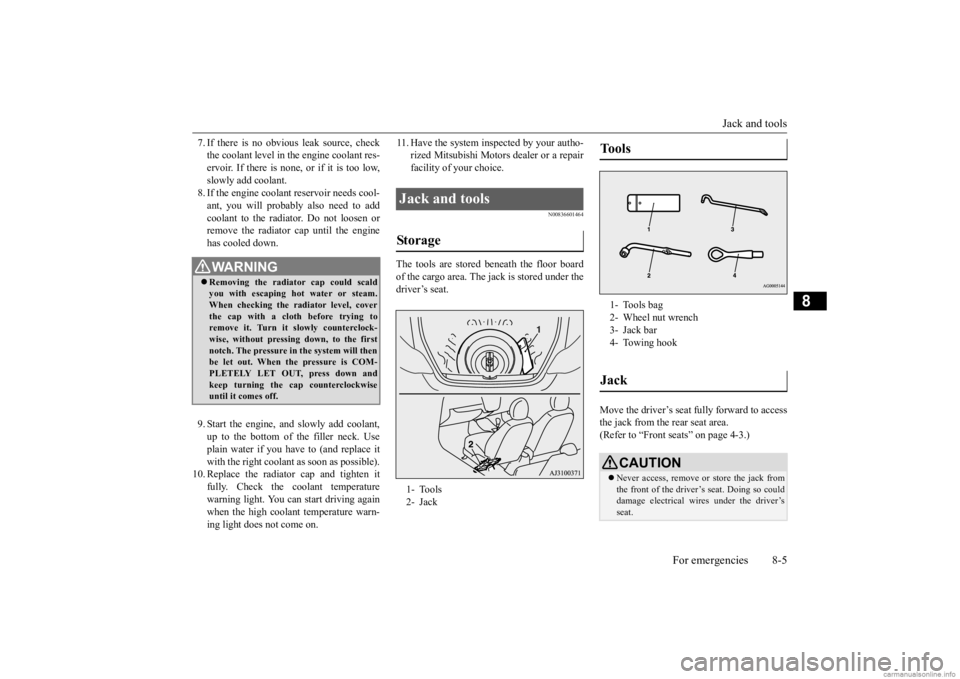
The tools are stored beneath the floor boardof the cargo area. The jack is stored under the driver’s seat.
Move the driver’s seat fully forward to access the jack from the rear seat area.(Refer to “Front seats” on page 4-3.)
WA R N I N G Removing the radiat
or cap could scald
you with escaping hot water or steam. When checking the radiator level, cover the cap with a cloth before trying toremove it. Turn it slowly counterclock- wise, without pressing down, to the first notch. The pressure in the system will thenbe let out. When the pressure is COM- PLETELY LET OUT, press down and keep turning the cap counterclockwiseuntil it comes off.
Jack and tools Storage 1- Tools 2- Jack
Tools 1- Tools bag 2- Wheel nut wrench 3- Jack bar4- Towing hookJack
CAUTION Never access, remove or store the jack from the front of the driver’s seat. Doing so could damage electr
ical wires under the driver’s
seat.
BK0284300US.book 5 ページ 2019年5月23日 木曜日 午後12時22分
Page 187 of 253
How to change a tire 8-6 For emergencies
8
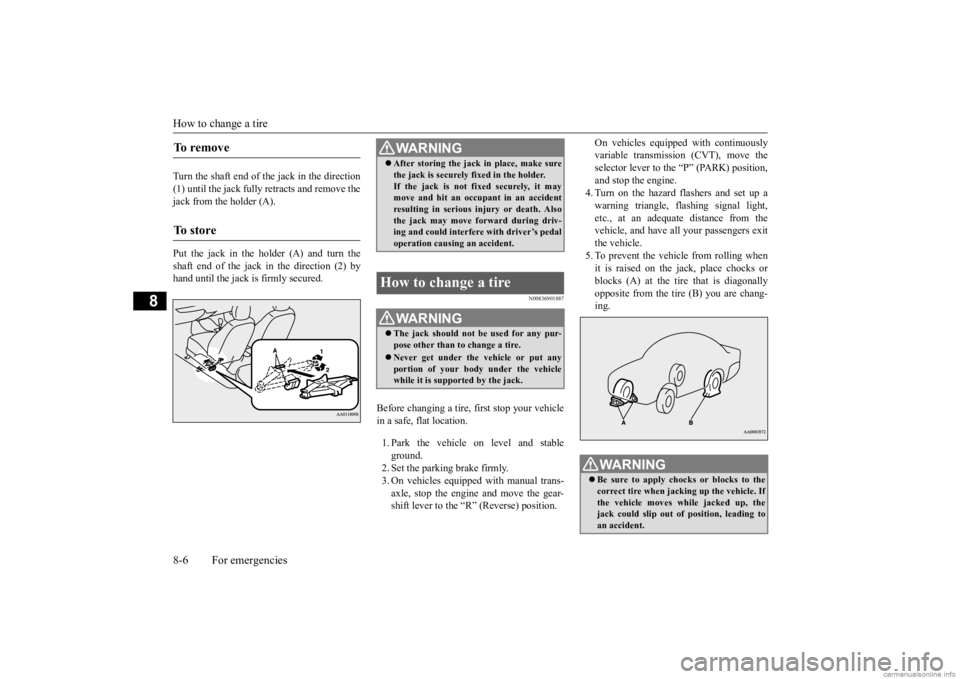
Turn the shaft end of the jack in the direction (1) until the jack fully retracts and remove the jack from the holder (A). Put the jack in the holder (A) and turn the shaft end of the jack in the direction (2) by hand until the jack is firmly secured.
N00836901887
Before changing a tire, first stop your vehiclein a safe, flat location. 1. Park the vehicle on level and stable ground. 2. Set the parking brake firmly.3. On vehicles equipped with manual trans- axle, stop the engine and move the gear- shift lever to the “R” (Reverse) position.
On vehicles equippe
d with continuously
variable transmission (CVT), move theselector lever to the “P” (PARK) position, and stop the engine. 4. Turn on the hazard flashers and set up awarning triangle, flashing signal light, etc., at an adequate distance from the vehicle, and have al
l your passengers exit
the vehicle. 5. To prevent the vehicle from rolling when it is raised on the jack, place chocks or blocks (A) at the ti
re that is diagonally
opposite from the tire (B) you are chang-ing.
To r e m o v e To s t o r e
WA R N I N G After storing the jack in place, make sure the jack is securely fixed in the holder.If the jack is not fixed securely, it maymove and hit an
occupant in an accident
resulting in serious injury or death. Also the jack may move forward during driv-ing and could interfere with driver’s pedal operation causing an accident.
How to change a tire
WA R N I N G The jack should not be used for any pur- pose other than to change a tire. Never get under the
vehicle or put any
portion of your body under the vehiclewhile it is supported by the jack.
WA R N I N G Be sure to apply choc
ks or blocks to the
correct tire when jacking up the vehicle. If the vehicle moves while jacked up, the jack could slip out of
position, leading to
an accident.
BK0284300US.book 6 ページ 2019年5月23日 木曜日 午後12時22分
Page 188 of 253
How to change a tire
For emergencies 8-7
8
6. Get the jack, bar and wheel nut wrench ready. (Refer to “Jack and t
ools” on page 8-5.)
N00849600344
The compact spare tire is stowed beneath the floor board of the cargo area. It is designed to save space in the cargo area. Its lighter weightmakes it easier to use if a flat tire occurs.
N00849701371
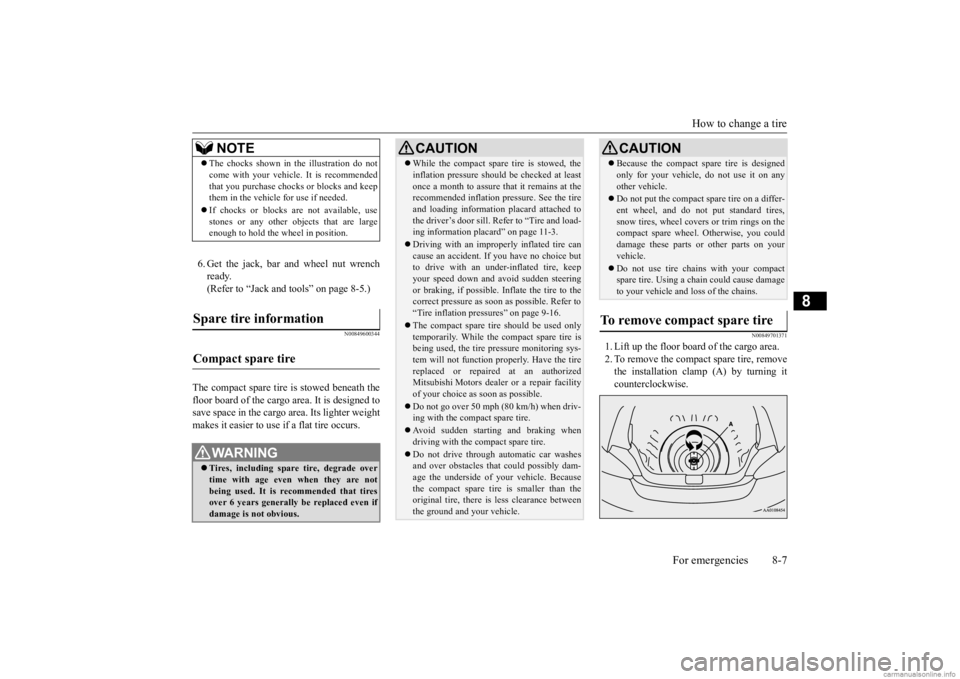
1. Lift up the floor board of the cargo area. 2. To remove the compact spare tire, remove the installation clamp (A) by turning itcounterclockwise.
NOTE
The chocks shown in the illustration do not come with your vehicl
e. It is recommended
that you purchase chocks or blocks and keepthem in the vehicle for use if needed. If chocks or blocks
are not available, use
stones or any other obj
ects that are large
enough to hold the wheel in position.
Spare tire information Compact spare tire
WA R N I N G Tires, including spar
e tire, degrade over
time with age even when they are notbeing used. It is recommended that tires over 6 years generally
be replaced even if
damage is not obvious.
CAUTION While the compact spare tire is stowed, the inflation pressure shoul
d be checked at least
once a month to assure that it remains at therecommended inflation pressure. See the tire and loading informati
on placard attached to
the driver’s door sill. Refer to “Tire and load-ing information placard” on page 11-3. Driving with an imprope
rly inflated tire can
cause an accident. If
you have no choice but
to drive with an under-inflated tire, keep your speed down and av
oid sudden steering
or braking, if possible. Inflate the tire to the correct pressure as soon as possible. Refer to “Tire inflation pressures” on page 9-16. The compact spare tire should be used only temporarily. While th
e compact spare tire is
being used, the tire pr
essure monitoring sys-
tem will not function
properly. Have the tire
replaced or repaired at an authorizedMitsubishi Motors dealer
or a repair facility
of your choice as soon as possible. Do not go over 50 mph (80 km/h) when driv- ing with the compact spare tire. Avoid sudden starting and braking when driving with the compact spare tire. Do not drive through automatic car washes and over obstacles that
could possibly dam-
age the underside of your vehicle. Becausethe compact spare tire is smaller than the original tire, there is less clearance between the ground and your vehicle.
Because the compact spare tire is designed only for your vehicle, do not use it on anyother vehicle. Do not put the compact spare tire on a differ- ent wheel, and do not put standard tires,snow tires, wheel covers
or trim rings on the
compact spare wheel. Otherwise, you could damage these parts or other parts on yourvehicle. Do not use tire chains with your compact spare tire. Using a chain could cause damage to your vehicle and loss of the chains.
To remove compact spare tire
CAUTION
BK0284300US.book 7 ページ 2019年5月23日 木曜日 午後12時22分
Page 189 of 253
How to change a tire 8-8 For emergencies
8
N00849801529
1. On vehicles with
wheel covers, first
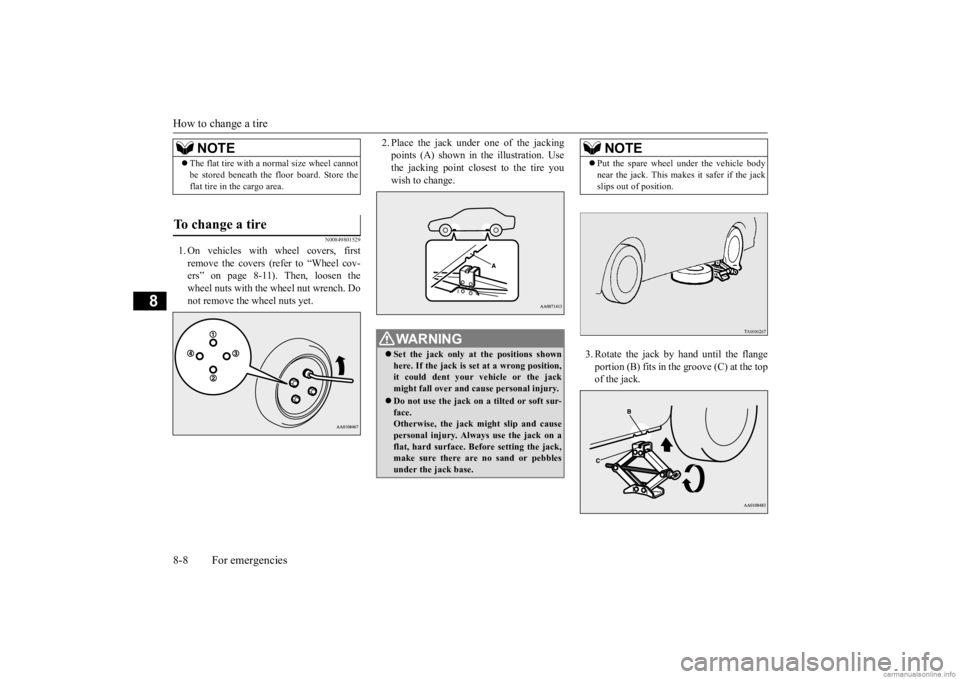
remove the covers (refer to “Wheel cov- ers” on page 8-11). Then, loosen thewheel nuts with the wheel nut wrench. Do not remove the wheel nuts yet.
2. Place the jack under one of the jacking points (A) shown in th
e illustration. Use
the jacking point closest to the tire you wish to change.
3. Rotate the jack by hand until the flange portion (B) fits in the groove (C) at the top of the jack.
NOTE
The flat tire with a
normal size wheel cannot
be stored beneath the floor board. Store theflat tire in the cargo area.
To change a tire
WA R N I N G Set the jack only at
the positions shown
here. If the jack is set at a wrong position, it could dent your vehicle or the jackmight fall over and ca
use personal injury.
Do not use the jack on a tilted or soft sur- face. Otherwise, the jack might slip and cause personal injury. Always
use the jack on a
flat, hard surface. Before setting the jack, make sure there are no sand or pebbles under the jack base.
NOTE
Put the spare wheel
under the vehicle body
near the jack. This makes it safer if the jackslips out of position.
BK0284300US.book 8 ページ 2019年5月23日 木曜日 午後12時22分
Page 190 of 253
How to change a tire
For emergencies 8-9
8
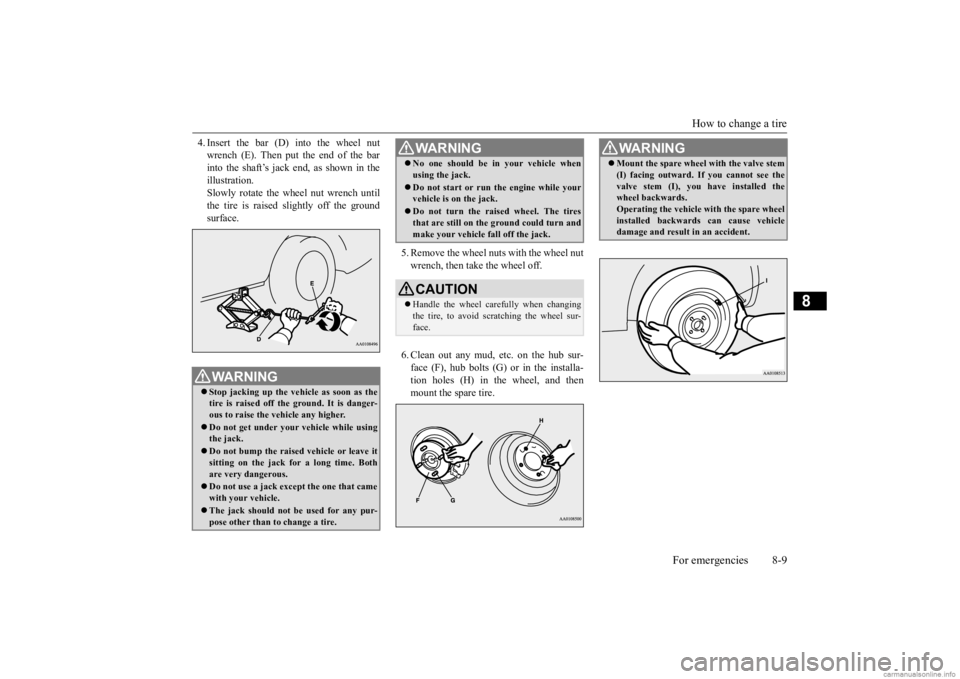
4. Insert the bar (D) into the wheel nut wrench (E). Then put the end of the barinto the shaft’s jack end, as shown in the illustration. Slowly rotate the wheel nut wrench untilthe tire is raised
slightly off the ground
surface.
5. Remove the wheel nuts with the wheel nut wrench, then take the wheel off. 6. Clean out any mud, etc. on the hub sur- face (F), hub bolts (G)
or in the installa-
tion holes (H) in the wheel, and then mount the spare tire.
WA R N I N G Stop jacking up the ve
hicle as soon as the
tire is raised off the ground. It is danger- ous to raise the ve
hicle any higher.
Do not get under your vehicle while using the jack. Do not bump the raised
vehicle or leave it
sitting on the jack for a long time. Bothare very dangerous. Do not use a jack except the one that came with your vehicle. The jack should not be used for any pur- pose other than to change a tire.
No one should be
in your vehicle when
using the jack. Do not start or run the engine while your vehicle is on the jack. Do not turn the raised wheel. The tires that are still on the
ground could turn and
make your vehicle fall off the jack.CAUTION Handle the wheel care
fully when changing
the tire, to avoid scratching the wheel sur-face.WA R N I N G
WA R N I N G Mount the spare wheel
with the valve stem
(I) facing outward. If
you cannot see the
valve stem (I), you
have installed the
wheel backwards. Operating the vehicle with the spare wheel installed backwards can cause vehicledamage and result
in an accident.
BK0284300US.book 9 ページ 2019年5月23日 木曜日 午後12時22分