Drive MITSUBISHI MIRAGE G4 2020 Owner's Manual (in English)
[x] Cancel search | Manufacturer: MITSUBISHI, Model Year: 2020, Model line: MIRAGE G4, Model: MITSUBISHI MIRAGE G4 2020Pages: 253, PDF Size: 36.39 MB
Page 5 of 253
Instruments and controls 1-1
1
Overview
N00100202964
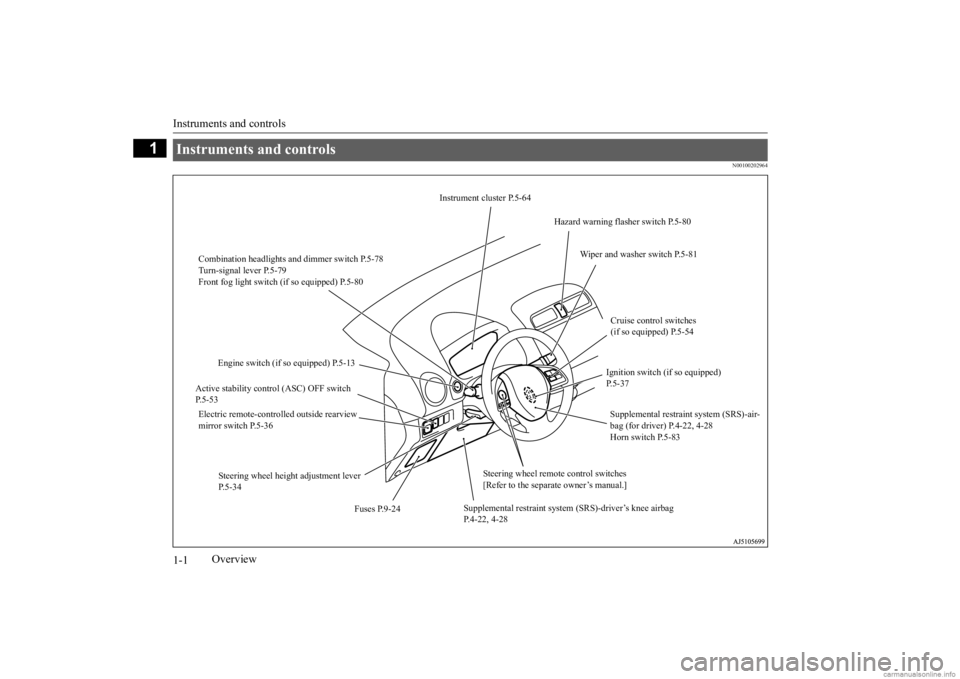
Instruments and controls
Instrument cluster P.5-64
Hazard warning flasher switch P.5-80
Combination headlights and dimmer switch P.5-78 Turn-signal lever P.5-79 Front fog light switch (if so equipped) P.5-80
Wiper and washer switch P.5-81
Cruise control switches (if so equipped) P.5-54
Engine switch (if so equipped) P.5-13
Ignition switch (if so equipped) P.5-37
Active stability control (ASC) OFF switch P.5-53 Electric remote-controlled outside rearview mirror switch P.5-36
Supplemental restraint system (SRS)-air- bag (for driver) P.4-22, 4-28 Horn switch P.5-83
Steering wheel height adjustment lever P.5-34
Steering wheel remote control switches [Refer to the separate owner’s manual.]
Supplemental restraint system (SRS)-driver’s knee airbag P.4-22, 4-28
Fuses P.9-24
BK0284300US.book 1 ページ 2019年5月23日 木曜日 午後12時22分
Page 7 of 253
Interior 1-3 Overview
1
N00100302620
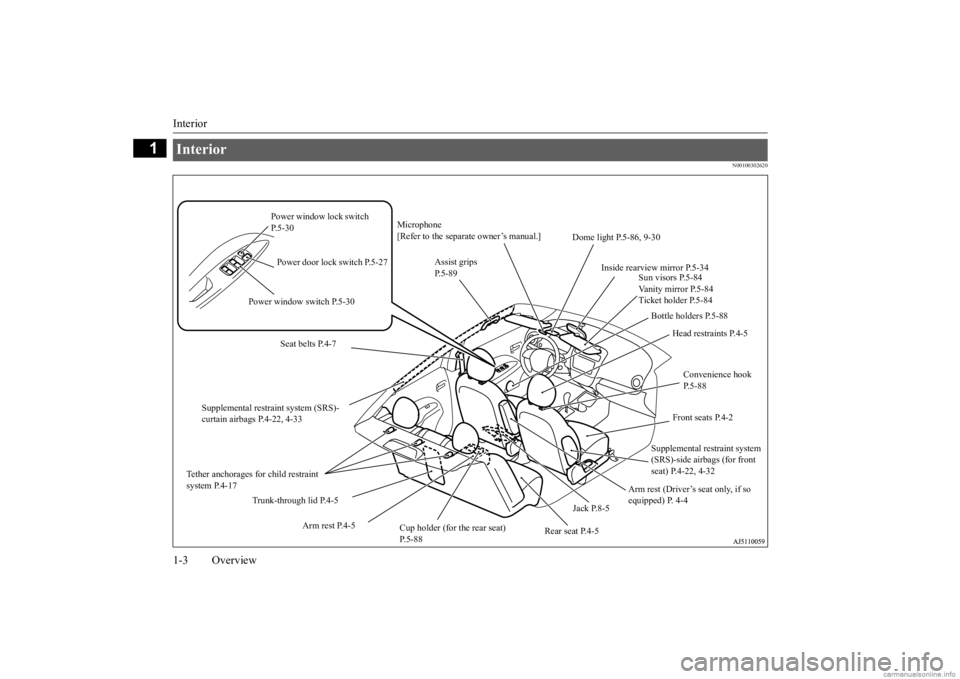
Interior
Bottle holders P.5-88
Power window lock switch P.5-30
Sun visors P.5-84 Vanity mirror P.5-84 Ticket holder P.5-84
Power door lock switch P.5-27
Dome light P.5-86, 9-30
Inside rearview mirror P.5-34
Head restraints P.4-5
Power window switch P.5-30
Seat belts P.4-7
Supplemental restraint system (SRS)- curtain airbags P.4-22, 4-33
Tether anchorages for child restraint system P.4-17
Front seats P.4-2
Supplemental restraint system (SRS)-side airbags (for front seat) P.4-22, 4-32
Arm rest P.4-5
Jack P.8-5
Rear seat P.4-5
Cup holder (for the rear seat) P.5-88
Assist grips P.5-89
Arm rest (Driver’s seat only, if so equipped) P. 4-4
Microphone [Refer to the separate owner’s manual.]
Trunk-through lid P.4-5
Convenience hook P.5-88
BK0284300US.book 3 ページ 2019年5月23日 木曜日 午後12時22分
Page 23 of 253
Filling the fuel tank 3-4 General information
3
9.2 gal (35 L) 1. Before filling with
fuel, stop the engine.
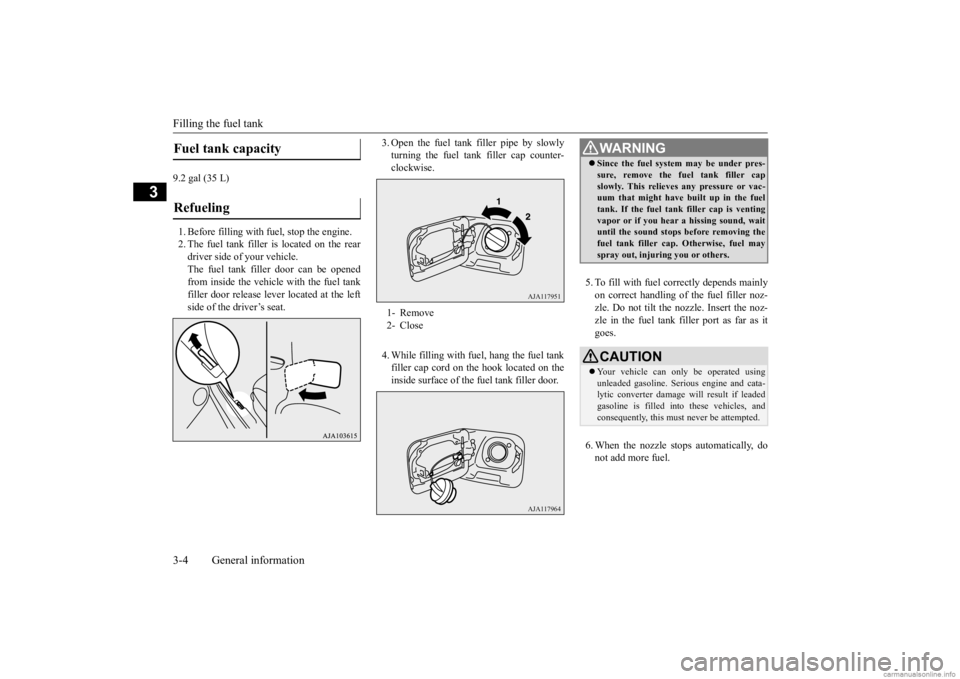
2. The fuel tank filler is located on the reardriver side of your vehicle. The fuel tank filler door can be opened from inside the vehicle with the fuel tank filler door releas
e lever located at the left
side of the driver’s seat.
3. Open the fuel tank filler pipe by slowly turning the fuel tank filler cap counter-clockwise. 4. While filling with fuel, hang the fuel tank filler cap cord on the hook located on theinside surface of the fuel tank filler door.
5. To fill with fuel correctly depends mainly on correct handling of the fuel filler noz- zle. Do not tilt the nozzle. Insert the noz- zle in the fuel tank filler port as far as itgoes. 6. When the nozzle stops automatically, do not add more fuel.
Fuel tank capacity Refueling
1- Remove 2- Close
AJA117951AJA117964
WA R N I N G Since the fuel system may be under pres- sure, remove the fuel tank filler capslowly. This relieves
any pressure or vac-
uum that might have built up in the fuel tank. If the fuel tank filler cap is venting vapor or if you hear
a hissing sound, wait
until the sound stops before removing the fuel tank filler cap. Otherwise, fuel may spray out, injuring you or others.CAUTION Your vehicle can onl
y be operated using
unleaded gasoline. Seri
ous engine and cata-
lytic converter
damage will result if leaded
gasoline is filled into these vehicles, and consequently, this must
never be attempted.
BK0284300US.book 4 ページ 2019年5月23日 木曜日 午後12時22分
Page 24 of 253
Modifications to and racing of your vehicle
General information 3-5
3
7. To close, turn the fuel tank filler cap slowly clockwise un
til you hear clicking
sounds, then gently push the fuel tankfiller door closed.
N00301600194
This vehicle should not be modified withnon-Mitsubishi Motors genuine parts. Mitsubishi Motors designs and manufactures high quality vehicles
with an emphasis on
safety and durability.
Modifications using
non-Mitsubishi Motors genuine parts may affect the performance, safety and/or durabil-ity of your vehicle,
and may violate applica-
ble state and/or fe
deral regulations.
DAMAGE OR PERFORMANCE PROB- LEMS RESULTING FROM MODIFICA-TIONS TO OR RACING OF YOUR
VEHICLE ARE NOT COVERED UNDER WARRANTY. Examples of modifications to your vehicle that can cause damage or performance prob- lems include the following: Failure to use Mits
ubishi Motors genuine
parts Failure to use required fuel and fluids Failure to use proper
size tires and wheels
Modification of the fu
el, intake, exhaust,
emission, suspension,
engine, drive train
or electrical wiring systems Modification of any onboard com- puter/control module, including repro- gramming, or replac
ing/adding chips to
any onboard computer/control module
Review the Warranty
and Maintenance Man-
ual for further details
regarding warranty cov-
erage.
N00301701277
CAUTION To avoid fuel spillage
and overfilling, do not
“top-off” the fuel tank. Spilled fuel coulddiscolor, stain, or cr
ack the vehicle’s paint-
work. If fuel spills on the paintwork, wipe it off with a soft cloth.WA R N I N G Make sure the fuel tank filler cap is securely closed. If the fuel tank filler cap were loose, fuel coul
d leak, resulting in a
fire.CAUTION If you need to replace the fuel tank filler cap, use only the fuel tank filler cap specified for your model vehicle.
NOTE
If the fuel tank filler cap is not tight while driving, the engine
malfunction indicator
(“SERVICE ENGINE SOON” or “Checkengine light”) may come on when the onboard diagnostic (OBD) system performs a self check.Always tighten the fu
el tank filler cap until
you hear at least 3 clicks. The indicator will go of
f after several driving
cycles. If the indicato
r does not go off, con-
tact your authorized
Mitsubishi Motors
dealer or a repair faci
lity of your choice as
soon as possible.
Modifications to and racing of your vehicle
Installation of accessories
CAUTION Before any electrical or electronic accesso- ries are installed,
consult an authorized
Mitsubishi Motors dealer.
BK0284300US.book 5 ページ 2019年5月23日 木曜日 午後12時22分
Page 26 of 253
California Perchlorate Materials Requirements
General information 3-7
3
vehicle has a selecti
on of Mitsubishi Motors
authorized accessories to choose from to tai-lor your new vehicle to your own personal preference. Your Mitsubishi Motors dealer’s Parts Manager has in
formation on various
audio systems,
protection items, as well as
interior and exterior ac
cessories available for
your specific model.
N00300100017
Certain components of this vehicle, such asairbag modules, seat belt pretensioners, and button cell batteries, ma
y contain perchlorate
materials.Special handling may apply. For additional information, see www.d
tsc.ca.gov/hazardous-
waste/perchlorate.
N00302700033
This vehicle is equipped with an event datarecorder (EDR).The main purpose of an EDR is to record, in certain crash or near
crash-like situations,
such as an airbag deployment or hitting aroad obstacle, data that
will assist in under-
standing how a vehicl
e’s systems performed.
The EDR is designed to
record data related to
vehicle dynamics and safety systems for ashort period of time,
typically 30 seconds or
less. The EDR in this vehicle is designed to record such data as: How various systems in your vehicle were operating; Whether or not the driver and front pas- senger safety belts
were buckled/fastened;
How far (if at all) the driver was depress- ing the accelerator and/or brake pedal;and, How fast the vehicle was traveling.
These data can help provide a better under- standing of the circumstances in whichcrashes and injuries occur.
To read data recorded
by an EDR, special
equipment is requi
red, and access to the vehi-
cle or the EDR is needed. In addition to the vehicle manufacturer, ot
her parties, such as
law enforcement, that have the special equip-ment, can read the information if they have access to the vehicle or the EDR.
California Perchlorate Materials Requirements Event Data Recording
NOTE
EDR data are recorded by your vehicle only if a non-trivial crash si
tuation occurs; no data
are recorded by the EDR under normal driv- ing conditions and no personal data (e.g.,name, gender, age, a
nd crash location) are
recorded. However, ot
her parties, such as
law enforcement, could combine the EDRdata with the type of
personally identifying
data routinely acquire
d during a crash inves-
tigation.
BK0284300US.book 7 ページ 2019年5月23日 木曜日 午後12時22分
Page 29 of 253
Seats 4-2 Seat and restraint systems
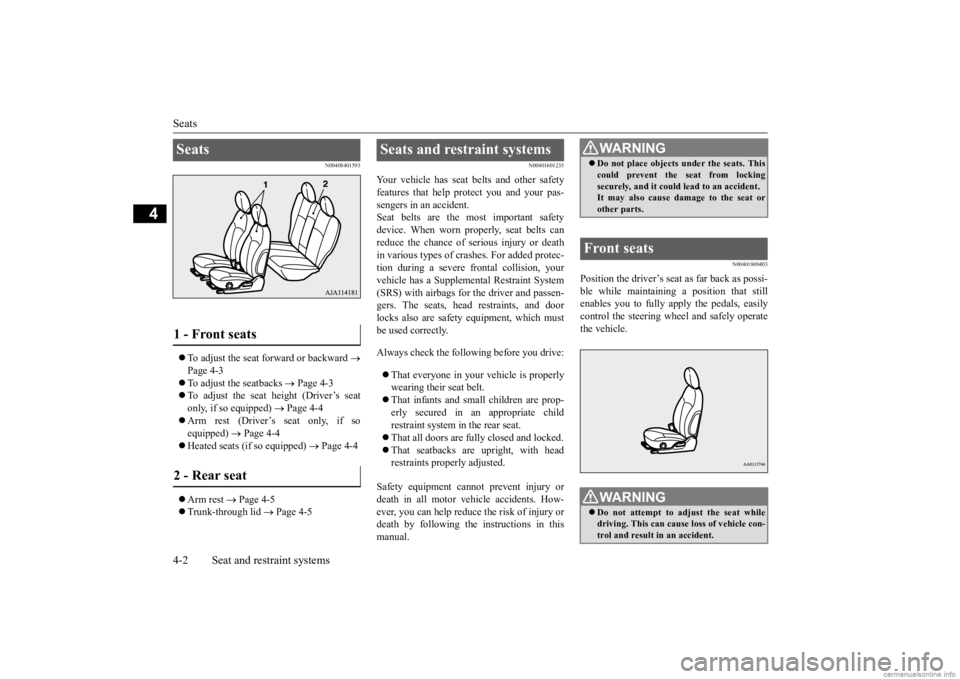
4
N00408401593
To adjust the seat forward or backward
Page 4-3 To adjust the seatbacks
Page 4-3
To adjust the seat height (Driver’s seat only, if so equipped)
Page 4-4
Arm rest (Driver’s seat only, if so equipped)
Page 4-4
Heated seats (if so equipped)
Page 4-4
Arm rest
Page 4-5
Trunk-through lid
Page 4-5
N00401601235
Your vehicle has seat
belts and other safety
features that help
protect you and your pas-
sengers in an accident.Seat belts are the most important safety device. When worn properly, seat belts can reduce the chance of serious injury or deathin various types of cras
hes. For added protec-
tion during a severe fr
ontal collision, your
vehicle has a Supplemen
tal Restraint System
(SRS) with airbags for the driver and passen- gers. The seats, head restraints, and doorlocks also are safety equipment, which must be used correctly. Always check the follow
ing before you drive:
That everyone in your vehicle is properly wearing their seat belt. That infants and small children are prop- erly secured in an appropriate child restraint system in
the rear seat.
That all doors are fully closed and locked. That seatbacks are upright, with head restraints properly adjusted.
Safety equipment cannot prevent injury or death in all motor ve
hicle accidents. How-
ever, you can help reduce the risk of injury or death by following the
instructions in this
manual.
N00401800403
Position the driver’s seat as far back as possi-ble while maintaining a position that stillenables you to fully a
pply the pedals, easily
control the steering wheel and safely operate the vehicle.
Seats 1 - Front seats 2 - Rear seat
Seats and restraint systems
WA R N I N G Do not place objects under the seats. This could prevent the seat from lockingsecurely, and it could lead to an accident.It may also cause damage to the seat or other parts.
Front seats
WA R N I N G Do not attempt to adjust the seat while driving. This can cause loss of vehicle con- trol and result
in an ac
cident.
BK0284300US.book 2 ページ 2019年5月23日 木曜日 午後12時22分
Page 30 of 253
Front seats
Seat and restraint systems 4-3
4
N00401900316
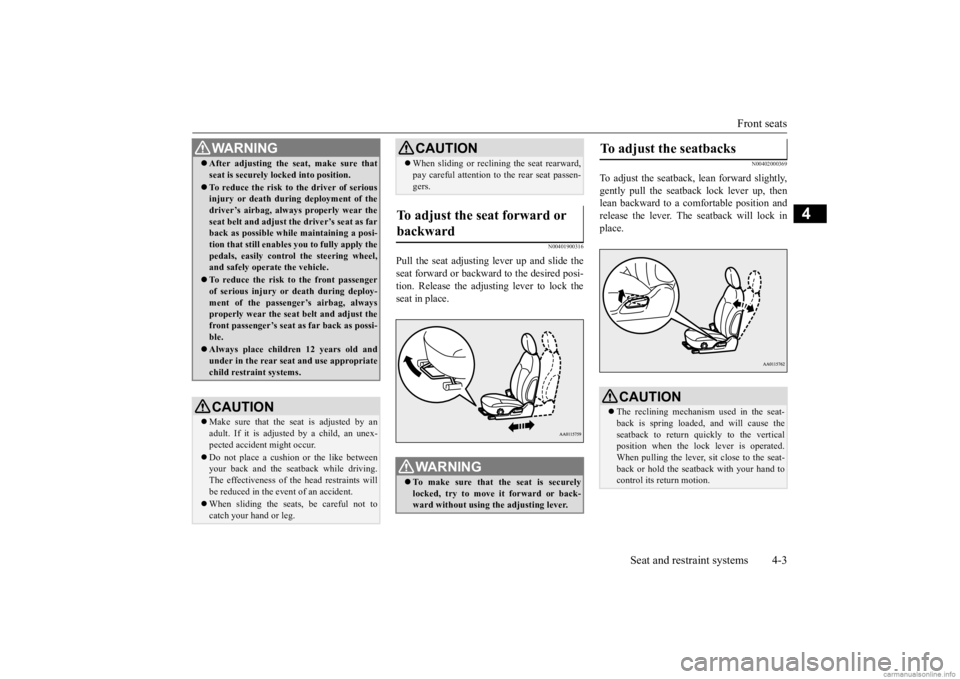
Pull the seat adjusting lever up and slide the seat forward or backward to the desired posi- tion. Release the adjusting lever to lock theseat in place.
N00402000369
To adjust the seatback,
lean forward slightly,
gently pull the seatback lock lever up, then lean backward to a comfortable position andrelease the lever. The seatback will lock in place.
After adjusting the se
at, make sure that
seat is securely locked into position. To reduce the risk to the driver of serious injury or death durin
g deployment of the
driver’s airbag, always
properly wear the
seat belt and adjust th
e driver’s seat as far
back as possible while maintaining a posi- tion that still enables
you to fully apply the
pedals, easily control the steering wheel, and safely operate the vehicle. To reduce the risk to the front passenger of serious injury or
death during deploy-
ment of the passenger’s airbag, alwaysproperly wear the seat
belt and adjust the
front passenger’s seat as far back as possi- ble. Always place childre
n 12 years old and
under in the rear seat
and use appropriate
child restraint systems.CAUTION Make sure that the seat is adjusted by an adult. If it is adjusted by a child, an unex- pected accident
might occur.
Do not place a cushion
or the like between
your back and the seatback while driving. The effectiveness of the head restraints will be reduced in the event of an accident. When sliding the seat
s, be careful not to
catch your hand or leg.WA R N I N G
When sliding or reclining the seat rearward, pay careful attention to
the rear seat passen-
gers.
To adjust the seat forward or backward
WA R N I N G To make sure that the seat is securely locked, try to move
it forward or back-
ward without using
the adjusting lever.
CAUTION
To adjust the seatbacks
CAUTIONThe reclining mechanism used in the seat- back is spring loaded, and will cause theseatback to return quickly to the vertical position when the lock lever is operated. When pulling the lever, sit close to the seat-back or hold the seatback with your hand to control its return motion.
BK0284300US.book 3 ページ 2019年5月23日 木曜日 午後12時22分
Page 31 of 253
Front seats 4-4 Seat and restraint systems
4
N00402100243
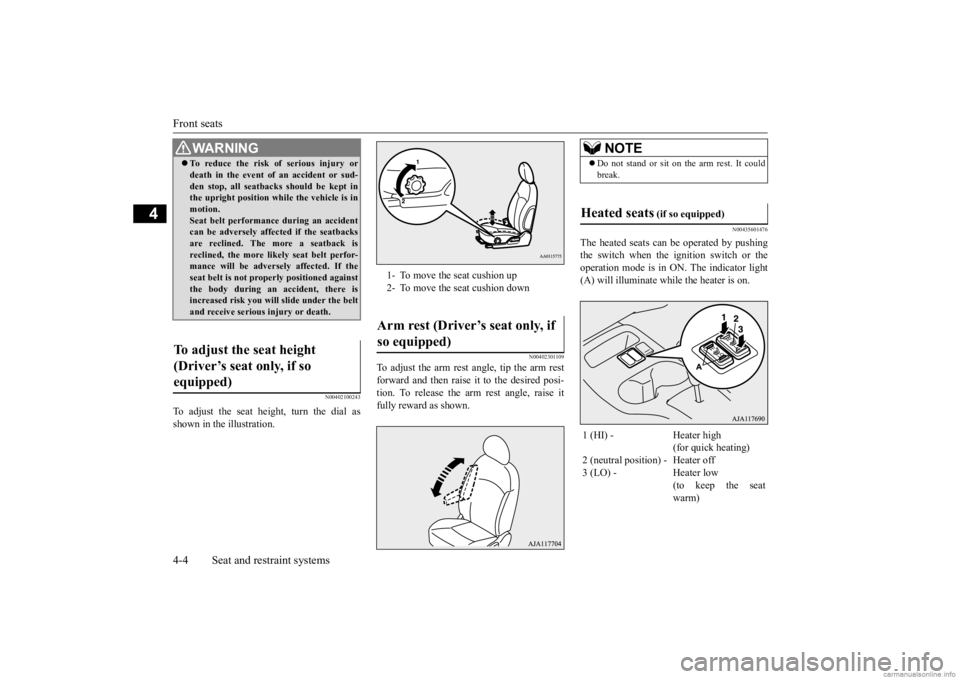
To adjust the seat height, turn the dial as shown in the illustration.
N00402301109
To adjust the arm rest angle, tip the arm rest forward and then raise it to the desired posi- tion. To release the arm rest angle, raise it fully reward as shown.
N00435601476
The heated seats can
be operated by pushing
the switch when the ignition switch or theoperation mode is in ON. The indicator light (A) will illuminate while the heater is on.
WA R N I N G To reduce the risk of serious injury or death in the event of
an accident or sud-
den stop, all seatbacks should be kept inthe upright position while the vehicle is in motion. Seat belt performance during an accidentcan be adversely affect
ed if the seatbacks
are reclined. The more a seatback is reclined, the more likely seat belt perfor-mance will be adversely affected. If the seat belt is not proper
ly positioned against
the body during an accident, there isincreased risk you will slide under the belt and receive serious
injury or death.
To adjust the seat height (Driver’s seat only, if so equipped)
1- To move the seat cushion up 2- To move the seat cushion downArm rest (Driver’s seat only, if so equipped)
NOTE
Do not stand or sit on the arm rest. It could break.
Heated seats
(if so equipped)
1 (HI) - Heater high
(for quick heating)
2 (neutral position) - Heater off 3 (LO) - Heater low
(to keep the seat warm)
BK0284300US.book 4 ページ 2019年5月23日 木曜日 午後12時22分
Page 33 of 253
Head restraints 4-6 Seat and restraint systems
4
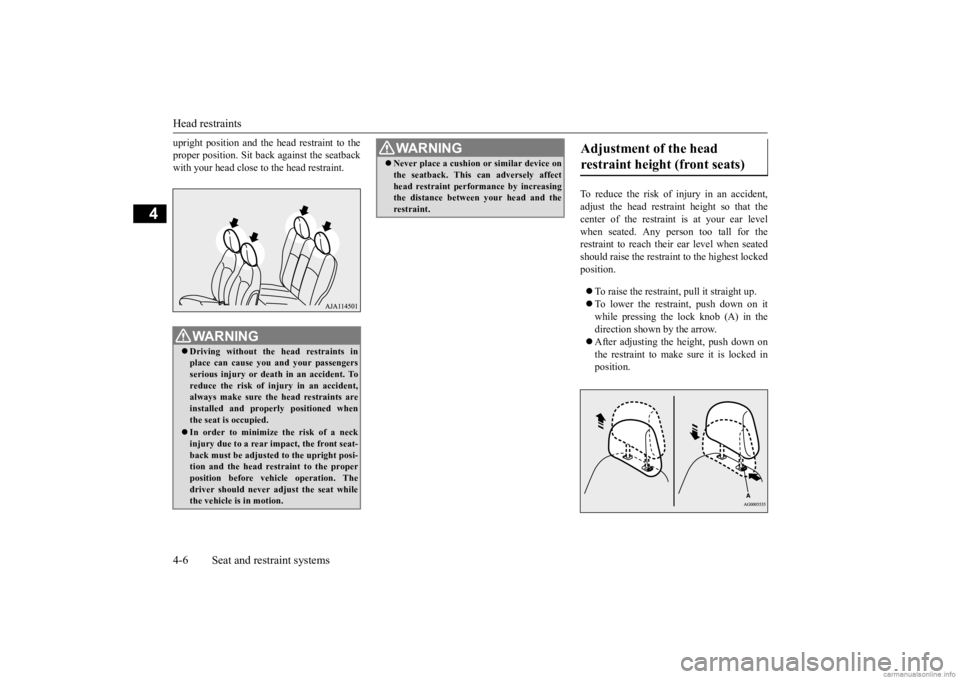
upright position and the head restraint to the proper position. Sit back
against the seatback
with your head close to the head restraint.
To reduce the risk of injury in an accident, adjust the head restraint height so that thecenter of the restrain
t is at your ear level
when seated. Any person too tall for the restraint to reach their ear level when seatedshould raise the restraint to the highest locked position. To raise the restraint, pull it straight up. To lower the restraint, push down on it while pressing the lock knob (A) in the direction shown by the arrow. After adjusting the height, push down on the restraint to make sure it is locked in position.
WA R N I N G Driving without the
head restraints in
place can cause you and your passengers serious injury or deat
h in an accident. To
reduce the risk of injury in an accident,always make sure the head restraints are installed and proper
ly positioned when
the seat is occupied. In order to minimize the risk of a neck injury due to a rear impact, the front seat-back must be adjusted to the upright posi- tion and the head restraint to the proper position before vehi
cle operation. The
driver should never ad
just the seat while
the vehicle is in motion.
Never place a cushion
or similar device on
the seatback. This can adversely affecthead restraint performance by increasingthe distance between your head and the restraint.WA R N I N G
Adjustment of the head restraint height (front seats)
BK0284300US.book 6 ページ 2019年5月23日 木曜日 午後12時22分
Page 34 of 253
Seat belts
Seat and restraint systems 4-7
4
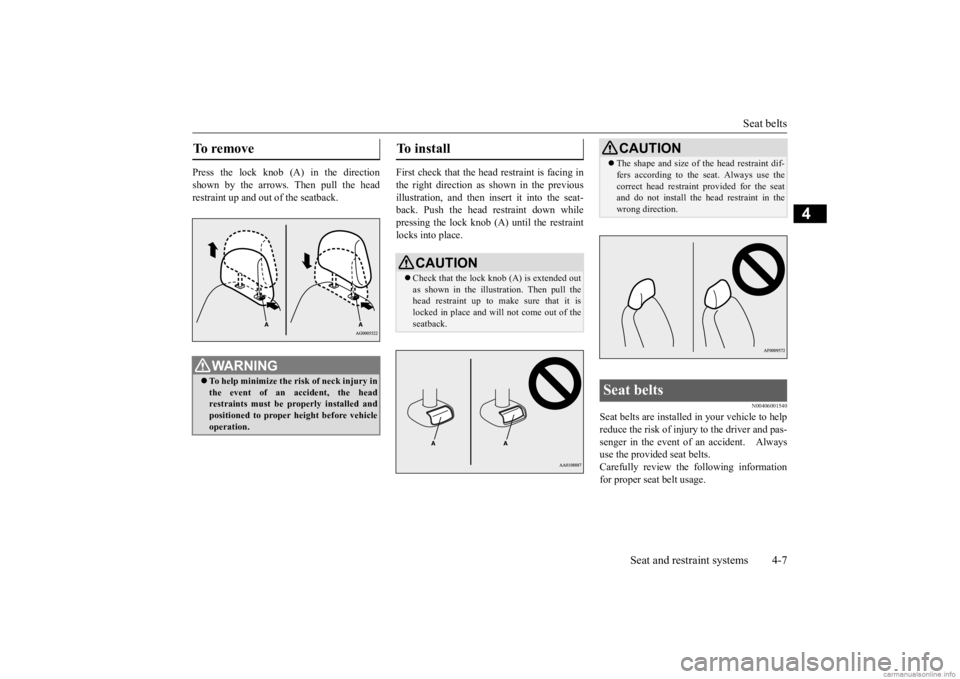
Press the lock knob (A) in the direction shown by the arrows. Then pull the head restraint up and out of the seatback.
First check that the head restraint is facing in the right direction as
shown in the previous
illustration, and then insert it into the seat- back. Push the head restraint down whilepressing the lock knob (A) until the restraint locks into place.
N00406001540
Seat belts are installed in your vehicle to help reduce the risk of injury to the driver and pas- senger in the event of an accident. Always use the provided seat belts.Carefully review the
following information
for proper seat belt usage.
To remove
WA R N I N G To help minimize the risk of neck injury in the event of an accident, the headrestraints must be properly installed and positioned to proper height before vehicle operation.
To install
CAUTION Check that the lock knob (A) is extended out as shown in the illustration. Then pull the head restraint up to make sure that it islocked in place and will
not come out of the
seatback.
CAUTION The shape and size of the head restraint dif- fers according to the seat. Always use thecorrect head restrain
t provided for the seat
and do not install the he
ad restraint in the
wrong direction.
Seat belts
BK0284300US.book 7 ページ 2019年5月23日 木曜日 午後12時22分