light MITSUBISHI MONTERO 1987 1.G Repair Manual
[x] Cancel search | Manufacturer: MITSUBISHI, Model Year: 1987, Model line: MONTERO, Model: MITSUBISHI MONTERO 1987 1.GPages: 284, PDF Size: 14.74 MB
Page 99 of 284
CHARGING SYSTEM - Service Adjustment Procedures 8-79
Result
(1) The ammeter reading must be higher than the limit value. If it
is lower but the alternator output wire is normal, remove the
alternator from the vehicle and check it.
Limit value : 31 A min.
Caution
1. The nominal output current value is shown on the
nameplate affixed to the alternator body.
2. The output current value changes with the electrical
load and the temperature of the alternator itself.
Therefore, the nominal output current may not be ob-
tained if the vehicle electrical load at the time of test is
small. In such a case, keep the headlights on to cause
discharge of the battery or use lights of another vehi-
cle as a load to increase the electrical load. The nom-
inal output current may not be obtained if the temper-
ature of the alternator itself or abmient temperature is
too high. In such a case, reduce the temperature be-
fore testing again.
(2) Upon completion of the output current test, lower the engine
speed to the idle speed and turn off the ignition switch.
(3) Disconnect the battery ground cable.
(4) Remove the test ammeter and voltmeter and the engine ta-
chometer.
(5) connect the alternator output wire to the alternator “B” ter-
minal.
(6) Connect the battery ground cable.
REGULATED VOLTAGE TEST
The purpose of this test is to check that the electronic voltage
regulator controls the voltage correctly.
Preparation
(1) Prior to the test, check the following items and correct if nec-
essary.
(a) Check the battery installed on the vehicle to see that it is
fully charged. For battery checking method, see “BAT-
TERY”.
(b) Check the alternator drive belt tension. For belt tension
check, see “GROUP 7 COOLING - Service Adjustment
Procedures”.
(2) Turn the ignition switch to “OFF”.
(3) Disconnect the battery ground cable.
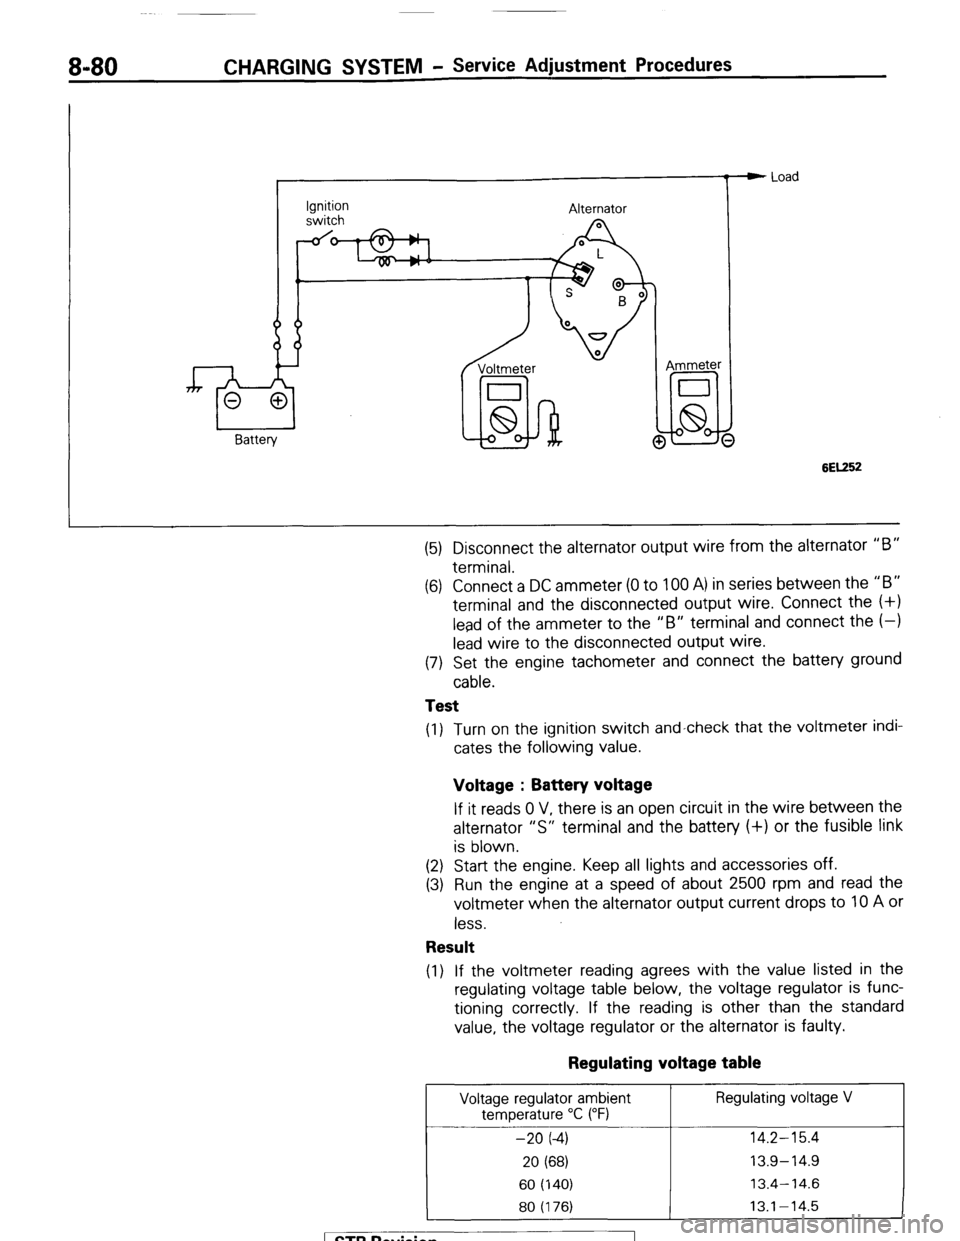
(4) Connect a digital voltmeter between the “S” terminal of the
alternator and ground. Connect the (+) lead of the voltmeter to
the “S” terminal of the alternator, inserting from the wire side
of the 2-way connector and connect the (-1 lead to sound
ground or battery (-) terminal.
1 ST6 Revision
Page 100 of 284
8-80 CHARGING SYSTEM - Service Adjustment Procedures
Ignition
switch Alternator
Voltmeter
I
lid-hi! @ Ammeter e Load
6EK52
(5) Disconnect the alternator output wire from the alternator “B”
terminal.
(6) Connect a DC ammeter (0 to 100 A) in series between the “B”
terminal and the disconnected output wire. Connect the (+I
lead of the ammeter to the “B” terminal and connect the (-1
lead wire to the disconnected output wire.
(7) Set the engine tachometer and connect the battery ground
cable.
Test
(1) Turn on the ignition switch and-check that the voltmeter indi-
cates the following value.
Voltage : Battery voltage
If it reads 0 V, there is an open circuit in the wire between the
alternator “S” terminal and the battery (+) or the fusible link
is blown.
(2) Start the engine. Keep all lights and accessories off.
(3) Run the engine at a speed of about 2500 rpm and read the
voltmeter when the alternator output current drops to 10 A or
less.
Result
(1) If the voltmeter reading agrees with the value listed in the
regulating voltage table below, the voltage regulator is func-
tioning correctly. If the reading is other than the standard
value, the voltage regulator or the alternator is faulty.
Regulating voltage table
Voltage regulator ambient Regulating voltage V
temperature “C (“F)
-20 (-4) 14.2-15.4
20 (68) 13.9-14.9
60 (140) 13.4-14.6
80 (176) 13.1-14.5
1 STB Revision
Page 111 of 284
STARTING SYSTEM-General Information 8-91
STARTING SYSTEM
GENERAL INFORMATION
NOBFAAJ
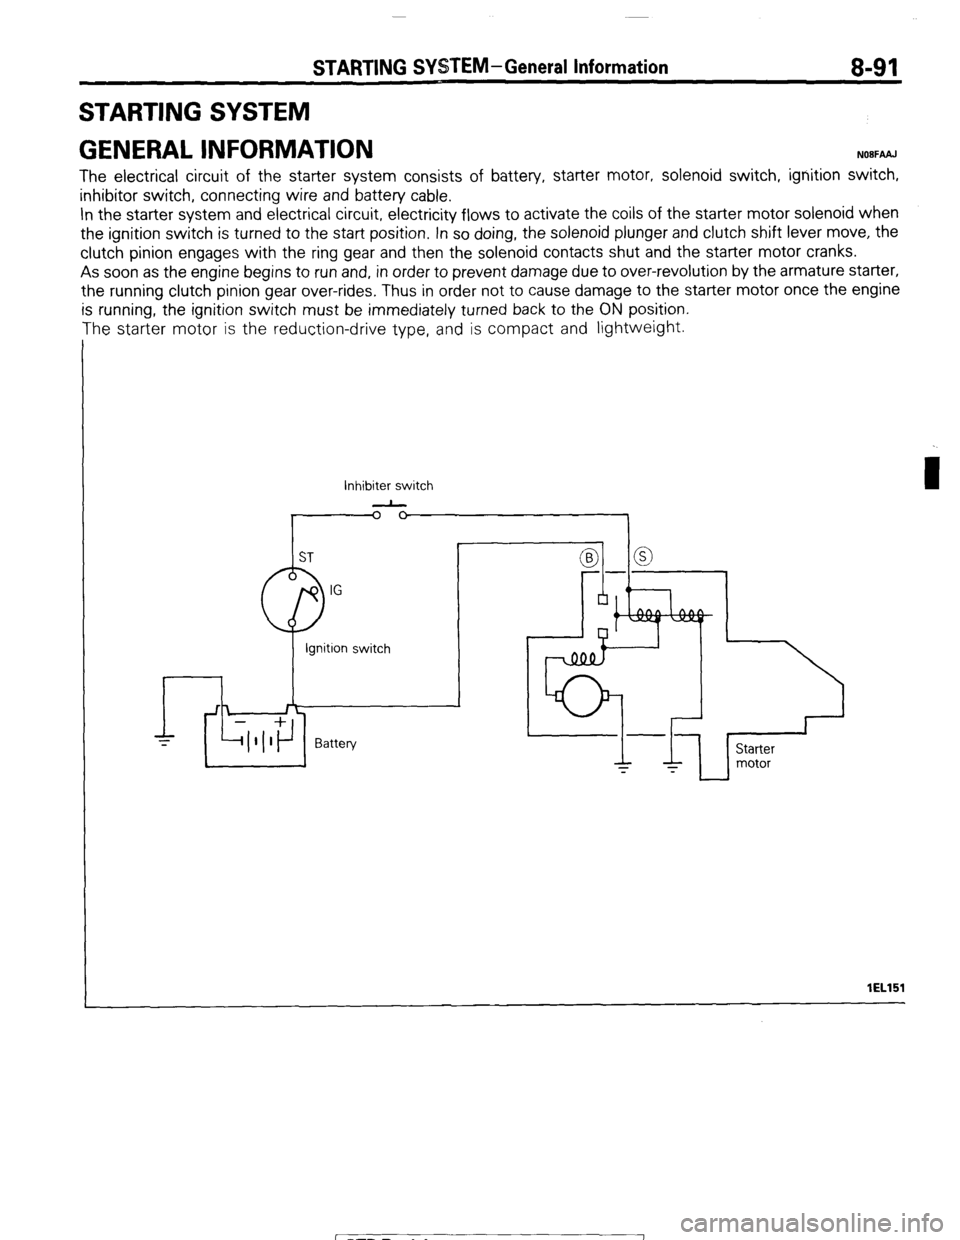
The electrical circuit of the starter system consists of battery, starter motor, solenoid switch, ignition switch,
inhibitor switch, connecting wire and battery cable.
In the starter system and electrical circuit, electricity flows to activate the coils of the starter motor solenoid when
the ignition switch is turned to the start position. In so doing, the solenoid plunger and clutch shift lever move, the
clutch pinion engages with the ring gear and then the solenoid contacts shut and the starter motor cranks.
As soon as the engine begins to run and, in order to prevent damage due to over-revolution by the armature starter,
the running clutch pinion gear over-rides, Thus in order not to cause damage to the starter motor once the engine
is running, the ignition switch must be immediately turned back to the ON position.
The starter motor is the reduction-drive type, and is compact and lightweight.
Inhibiter switch
-
I lEL151
1 STB Revision
Page 116 of 284
8-96 STARTING SYSTEM - Circuit Diagram
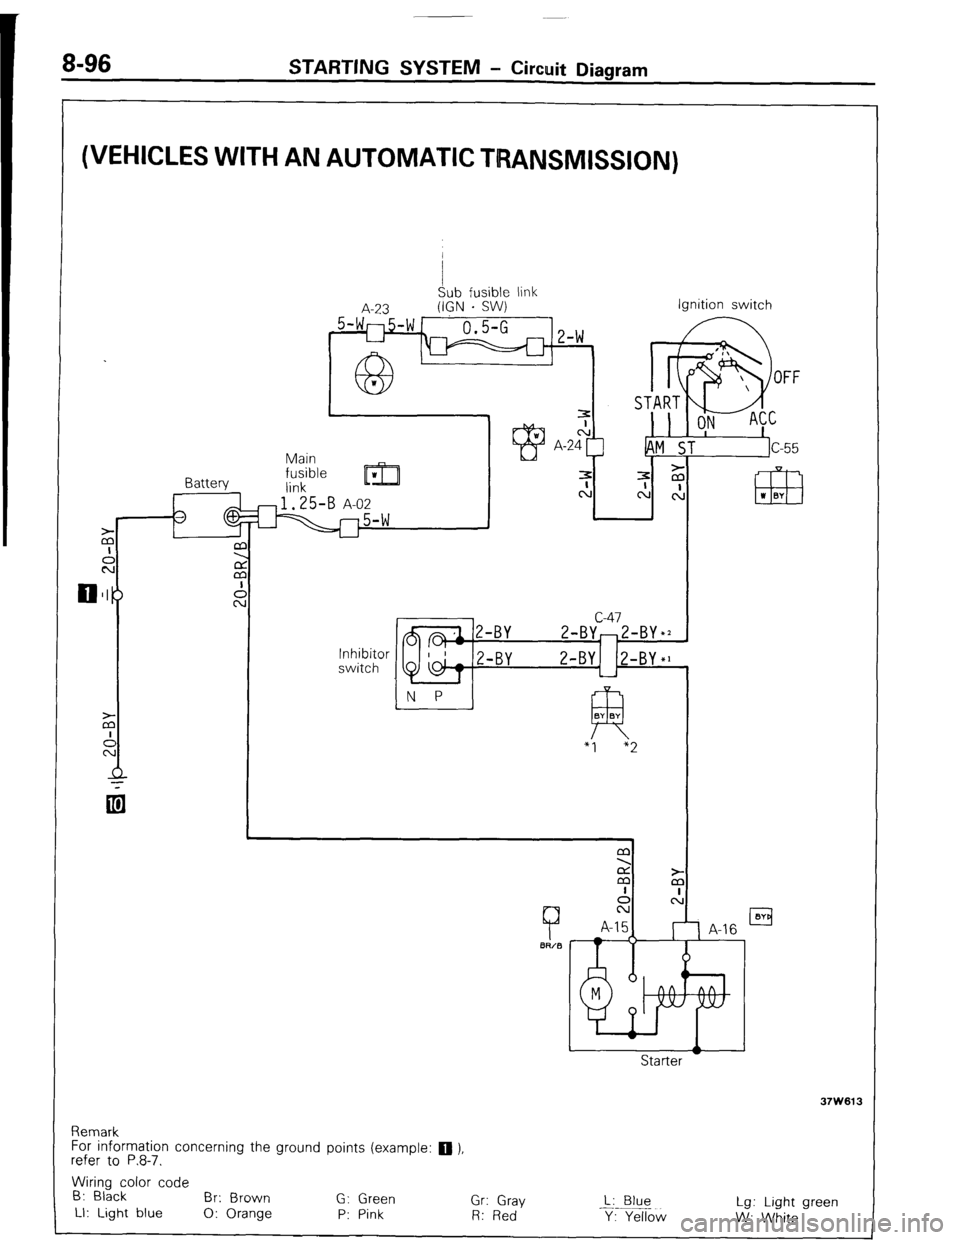
(VEHICLES WITH AN AUTOMATIC TRANSMISSION)
I
Sub fusible link
A-23 (IGN . SW)
_ 5-WI-754 1
0.5-G 1, 1,
L-l m 1 L-W
Battery Ignition switch
c-47
2-BY-Z-BY*2
N P
!-BY Z-BY1 (Z-BY*]
L-l
R BY BY
“I “2
Remark
For information concerning the ground points (example:
q ),
refer to P.8-7.
Wiring color code
B: Black
Br: Brown
G: Green
Gr: Gray L: Blue
LI: Light blue
0: Orange P: Pink Lg: Light green
R: Red
Y: Yellow
W: White
STB Revision
Page 130 of 284
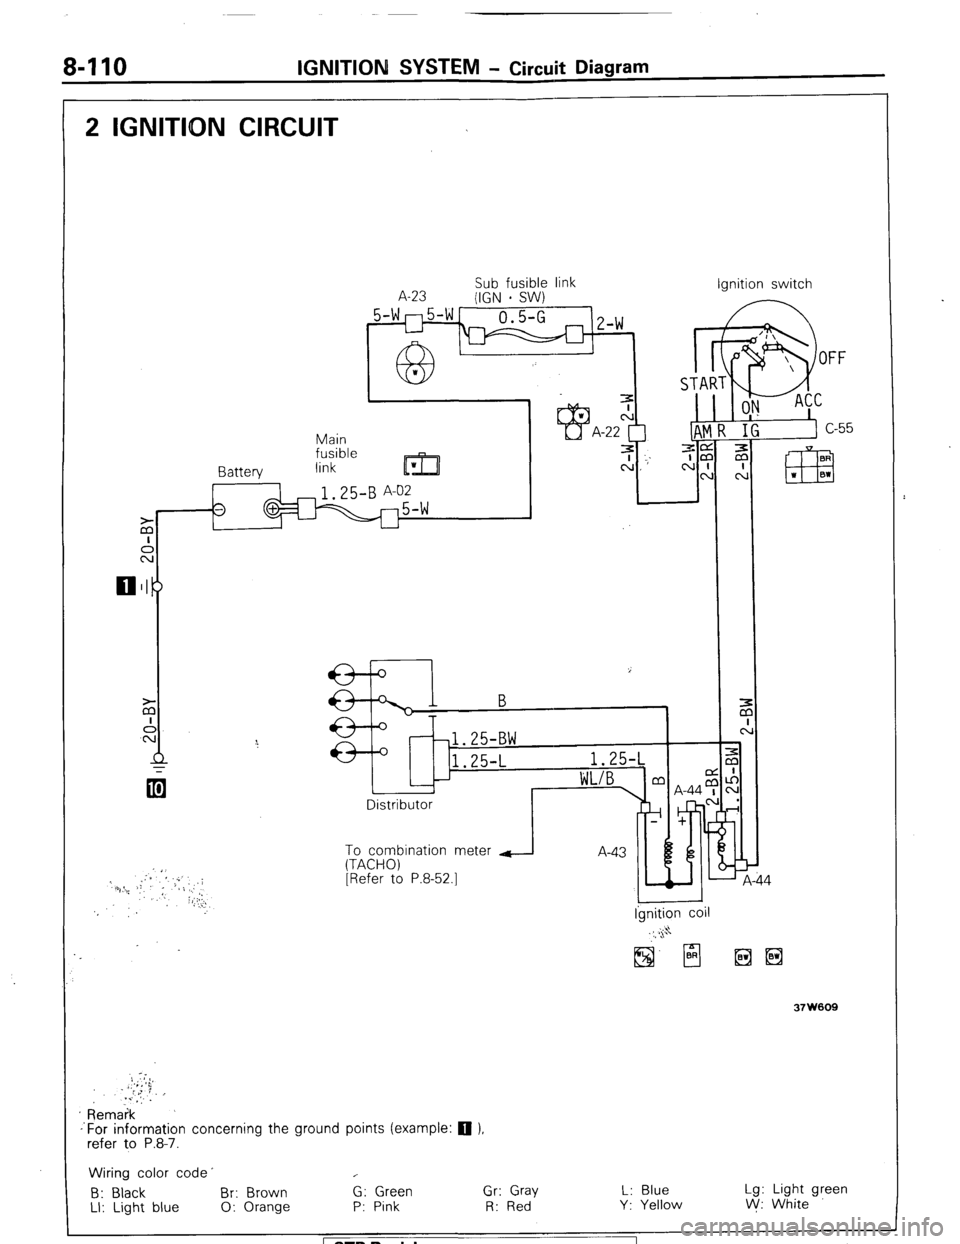
8-110 IGNITION SYSTEM - Circuit Diagram
2 IGNITDN CIRCUIT
Sub fusible link
A-23
(IGN - SW) Ignition switch
5-wn5-w-
0.5-G 1
u
63- Z-W
I
IAT
Main 1
fusible
Rnttprv link
m
ze 3 cj _-’ A:“p m
N CL
I 64-b I I I m
I
Ei
I
L Disi
To combination meter d A-an b
(TACHO)
[Refer to P.8-52.1
I I Ignition coil
37 w009
Remaik
-‘For information concerning the ground points (example: q ),
refer to P.8-7.
Wiring color code’ c
B: Black Br: Brown G: Green Gr: Gray L: Blue Lg: Light green
LI: Light blue 0: Orange P: Pink R: Red Y: Yellow V/: White
1 STB Revision 1
Page 131 of 284
IGNITION SYSTEM - Service Adjustment Procedures 8-111
SERVICE ADJUSTMENT PROCEDURES
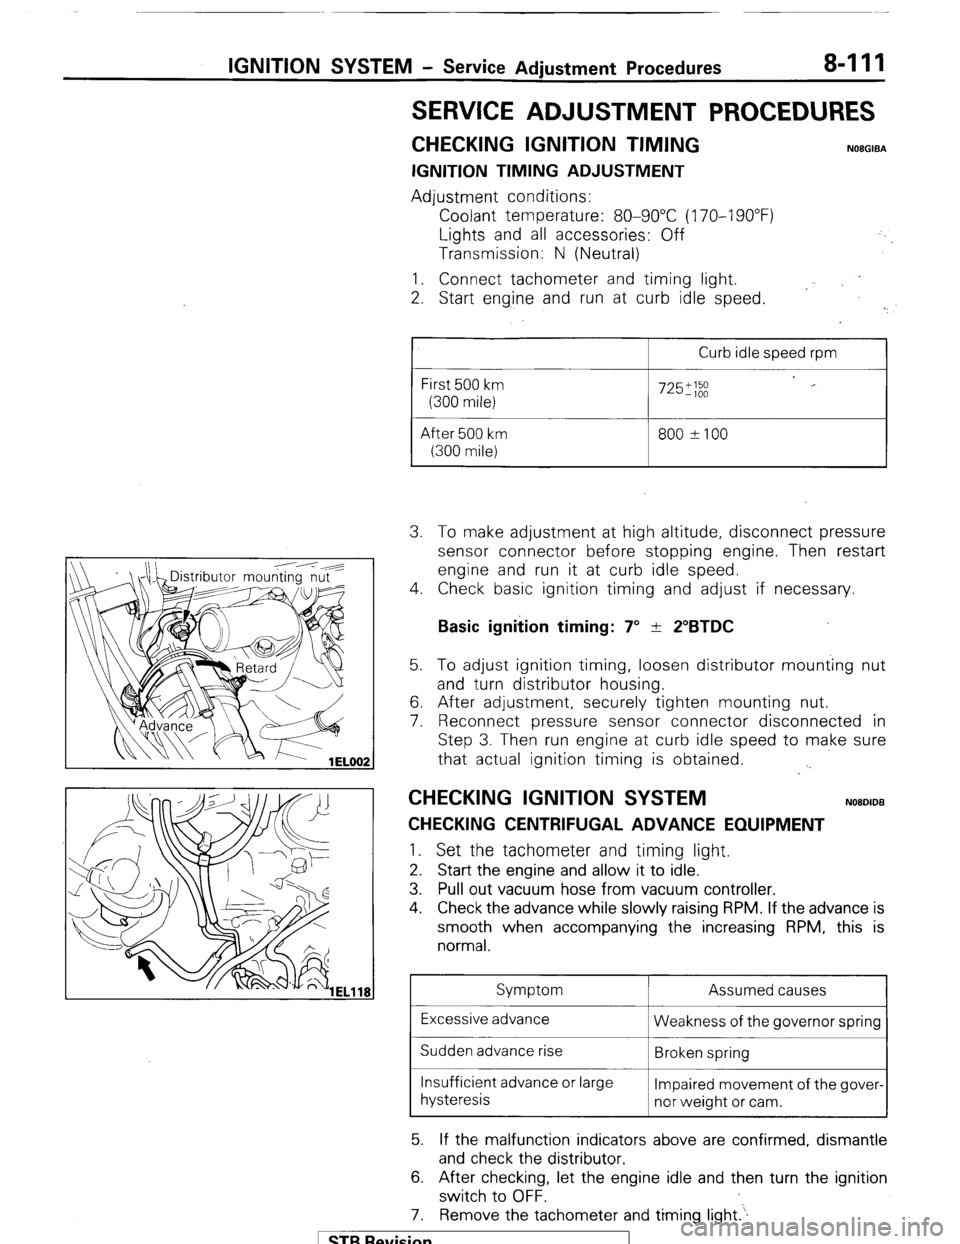
CHECKING IGNITION TIMING NOEGIBA
IGNITION TIMING ADJUSTMENT
Adjustment conditions:
Coolant temperature: 80-90°C (170-I 90°F)
Lights and all accessories: Off
Transmission: N (Neutral)
1. Connect tachometer and timing light.
2. Start eng.ine and run at curb idle speed.
I
Curb idle speed rpm
First 500 km
(300 mile)
After 500 km
(300 mile)
725';;;
800 ?I00 3. To make adjustment at high altitude, disconnect pressure
sensor connector before stopping engine. Then restart
engine and run it at curb idle speed.
4. Check basic ignition timing and adjust if necessary.
Basic ignition timing: 7” + 2”BTDC 5. To adjust ignition timing, loosen distributor mounting nut
and turn distributor housing.
6. After adjustment, securely tighten mounting nut.
7. Reconnect pressure sensor connector disconnected in
Step 3. Then run engine at curb idle speed to make sure
that actual ignition timing is obtained.
. .
CHECKING IGNITION SYSTEM NOBDIDB
CHECKING CENTRIFUGAL ADVANCE EQUIPMENT 1.
Set the tachometer and timing light.
2. Start the engine and allow it to idle.
3. Pull out vacuum hose from vacuum controller.
4. Check the advance while slowly raising RPM. If the advance is
smooth when accompanying the increasing RPM, this is
normal.
Symptom Assumed causes
Excessive advance
Weakness of the governor spring
Sudden advance rise
Broken spring
Insufficient advance or large
Impaired movement of the gover-
hysteresis
nor weight or cam.
5. If the malfunction indicators above are confirmed, dismantle
and check the distributor.
6. After checking, let the engine idle and then turn the ignition
switch to OFF.
7. Remove the tachometer and timing light.‘.
1 STB Revision
Page 132 of 284
8-112 IGNITION SYSTEM - Service Adjustment Procedures
CHECKING NEGATIVE PRESSURE ADVANCE EQUIPMENT
1. Set the timing light.
2. Start the engine and allow it to idle.
3. Pull out the vacuum hose from vacuum controller and attach
vacuum pump to nipple.
4. Check the advance while slowly applying negative pressure to
the vacuum pump. If the advance is smooth when accompa-
nying the increase in negative pressure, this is normal.
Secondary cable
~~
Primaw 6-8 mm
Cylinder
block
cable ’ (.24-.31 in.) 5ELO45 1
Spark plug
5ELO46
Iefective insula
5ELO47
/
Symptom
Excessive advances
Sudden advance rise
Insufficient advance or large
hysteresis
No advance Assumed causes
Weakness of vacuum controller
spring
Broken spring
Impaired movement of breaker
base
Broken diaphragm
5. If the malfunction indicators above are confirmed, dismantle
and check the distributor.
6. Allow the engine to idle and then turn the ignition switch to
OFF.
7. Remove the vacuum pump and attach the vacuum hose to the
vacuum controller nipple.
8. Remove the timing light.
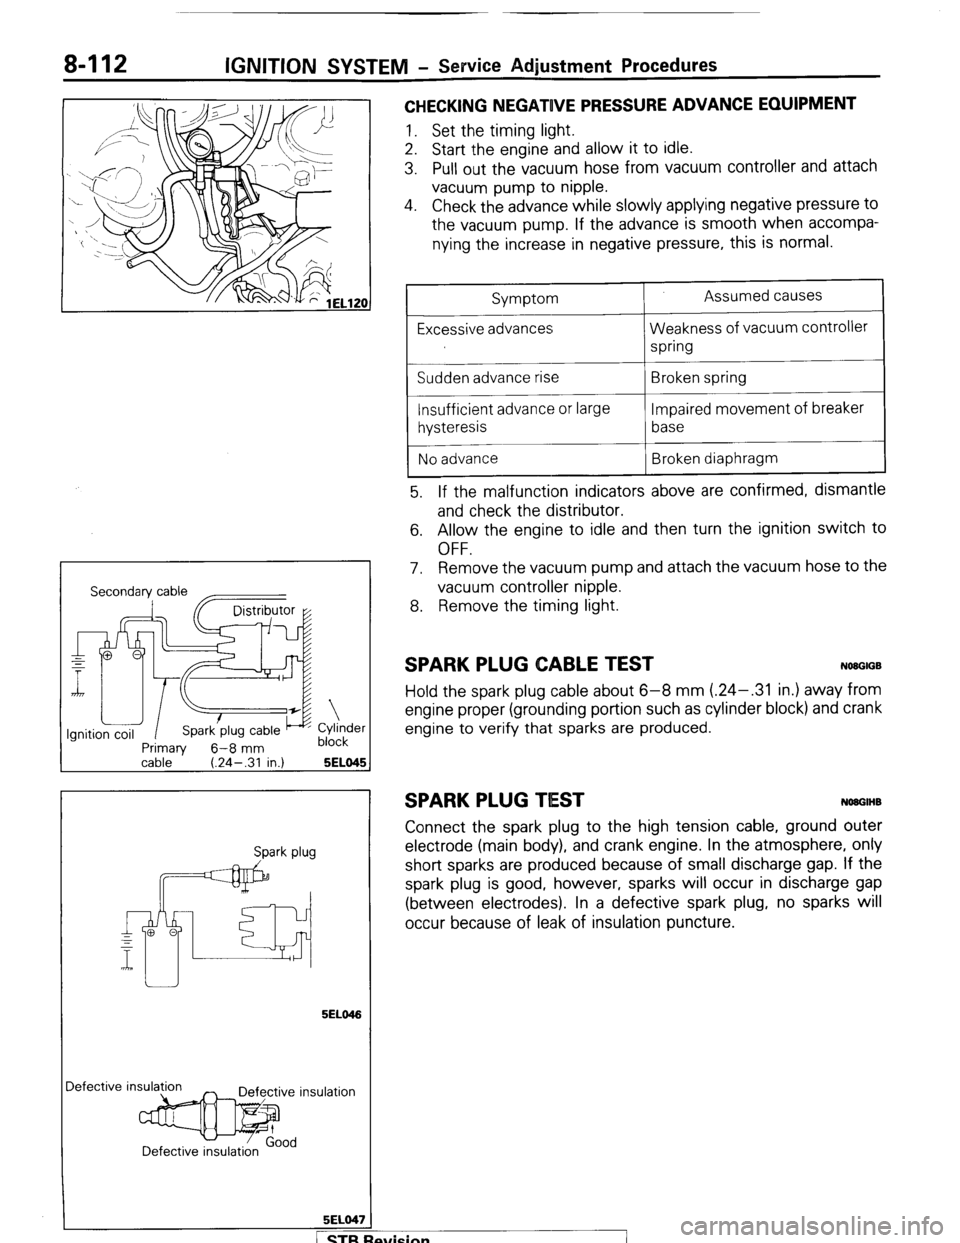
SPARK PLUG CABLE TEST NWGIGB
Hold the spark plug cable about 6-8 mm (.24-.31 in.) away from
engine proper (grounding portion such as cylinder block) and crank
engine to verify that sparks are produced.
SPARK PLUG TIEST NOUGIHB
Connect the spark plug to the high tension cable, ground outer
electrode (main body), and crank engine. In the atmosphere, only
short sparks are produced because of small discharge gap. If the
spark plug is good, however, sparks will occur in discharge gap
(between electrodes). In a defective spark plug, no sparks will
occur because of leak of insulation puncture.
fvision
I
Page 140 of 284
8-120 IGNITION SYSTEM - Distributor
6ELO6i
ti Pin punch
II
1ELlOi
SERVICE POINTS OF DISASSEMBLY
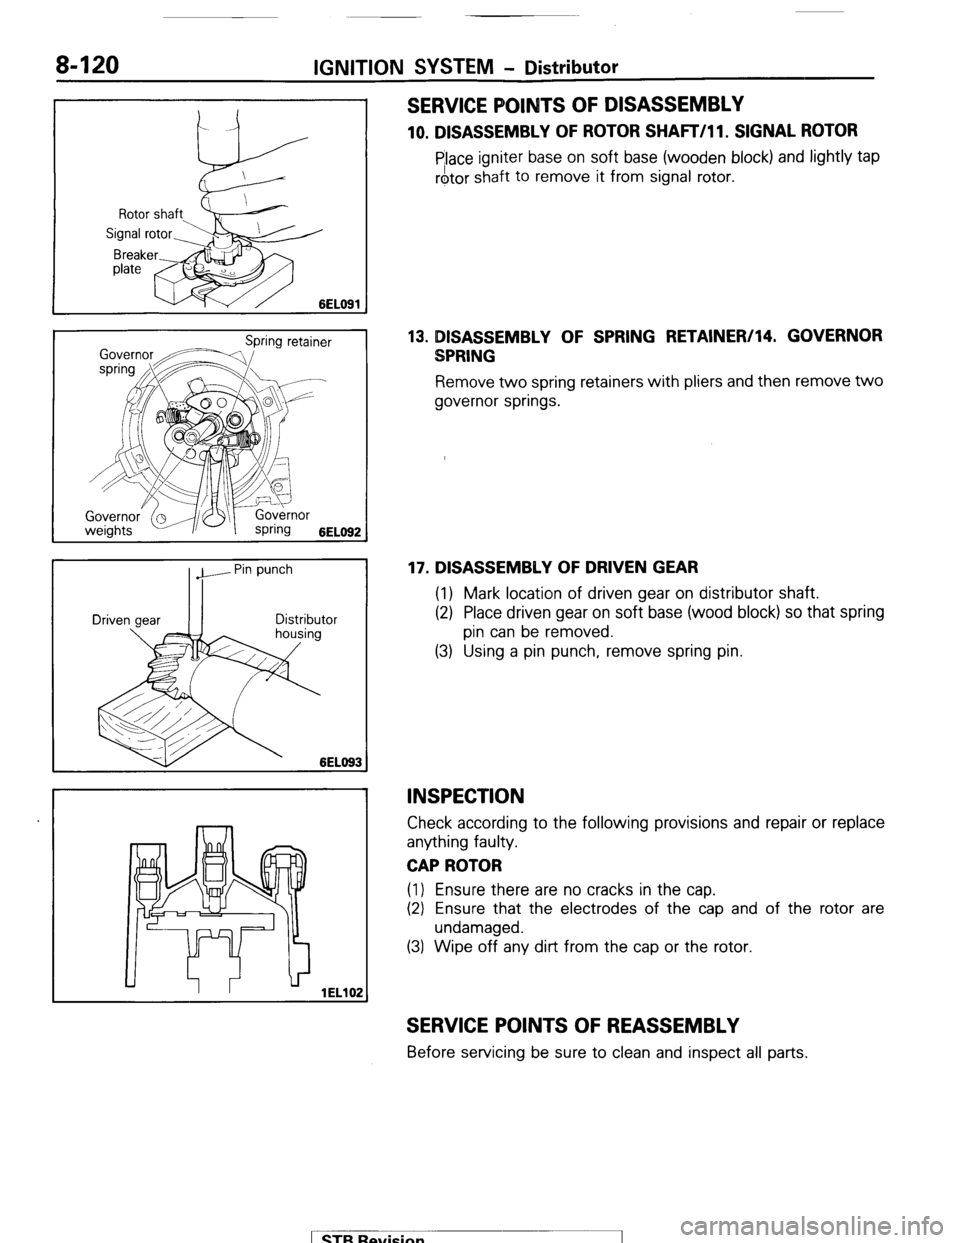
10. DISASSEMBLY OF ROTOR SHAFT/l 1. SIGNAL ROTOR
Place igniter base on soft base (wooden block) and lightly tap
rotor shaft to remove it from signal rotor.
13. DISASSEMBLY OF SPRING RETAINERI14. GOVERNOR
SPRING
Remove two spring retainers with pliers and then remove two
governor springs.
17. DISASSEMBLY OF DRIVEN GEAR
(1) Mark location of driven gear on distributor shaft.
(2) Place driven gear on soft base (wood block) so that spring
pin can be removed.
(3) Using a pin punch, remove spring pin.
INSPECTION
Check according to the following provisions and repair or replace
anything faulty.
CAP ROTOR
(1) Ensure there are no cracks in the cap.
(2) Ensure that the electrodes of the cap and of the rotor are
undamaged.
(3) Wipe off any dirt from the cap or the rotor.
SERVICE POINTS OF REASSEMBLY
Before servicing be sure to clean and inspect all parts.
1 STB Revision
Page 143 of 284
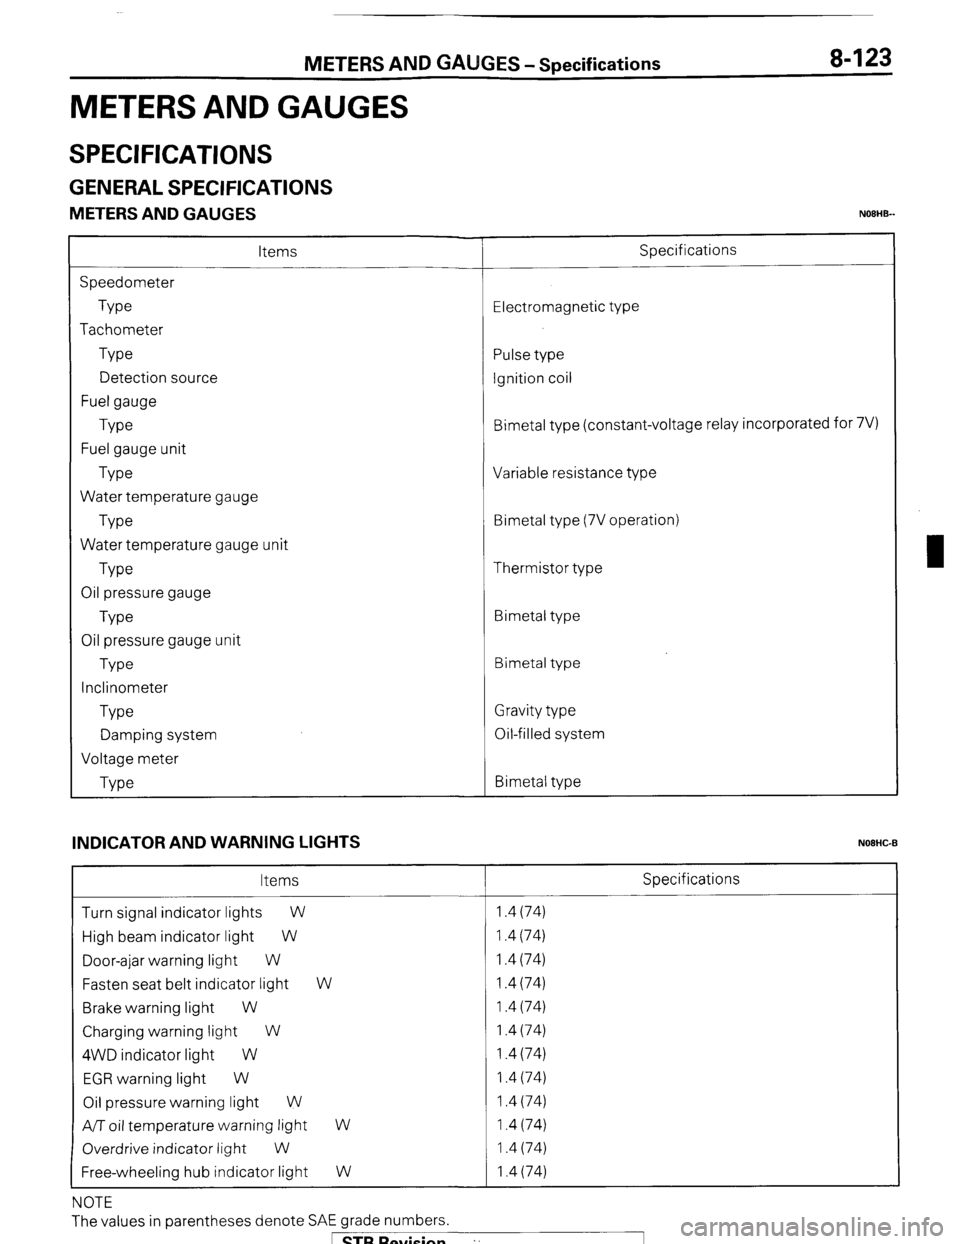
METERS AND GAUGES-Specifications
METERS AND GAUGES
8-123
SPECIFICATIONS
GENERAL SPECIFICATIONS
METERS AND GAUGES NOEHB-
Items
Speedometer
Type
Tachometer
Type
Detection source
Fuel gauge
Type
Fuel gauge unit
Type
Water temperature gauge
Type
Water temperature gauge unit
Type
Oil pressure gauge
Type
Oil pressure gauge unit
Type
Inclinometer
Type
Damping system
Voltage meter
Type Specifications
Electromagnetic type
Pulse type
Ignition coil
Bimetal type (constant-voltage relay incorporated for 7V)
Variable resistance type
Bimetal type (7V operation)
Thermistor type
Bimetal type
Bimetal type
Gravity type
Oil-filled system
Bimetal type
INDICATOR AND WARNING LIGHTS
NOEHC-B
Items Specifications
Turn signal indicator lights
W 1.4 (74)
High beam indicator light W 1.4 (74)
Door-ajar warning light W 1.4 (74)
Fasten seat belt indicator light W 1.4 (74)
Brake warning light W 1.4 (74)
Charging warning light W 1.4 (74)
4WD indicator light W 1.4 (74)
EGR warning light W 1.4 (74)
Oil pressure warning light W 1.4 (74)
A/T oil temperature warning light
W 1.4 (74)
Overdrive indicator light
W 1.4 (74)
Free-wheeling hub indicator light W 1.4 (74)
NOTE
The values in parentheses denote SAE grade numbers.
1 STB Revision ”
Page 147 of 284
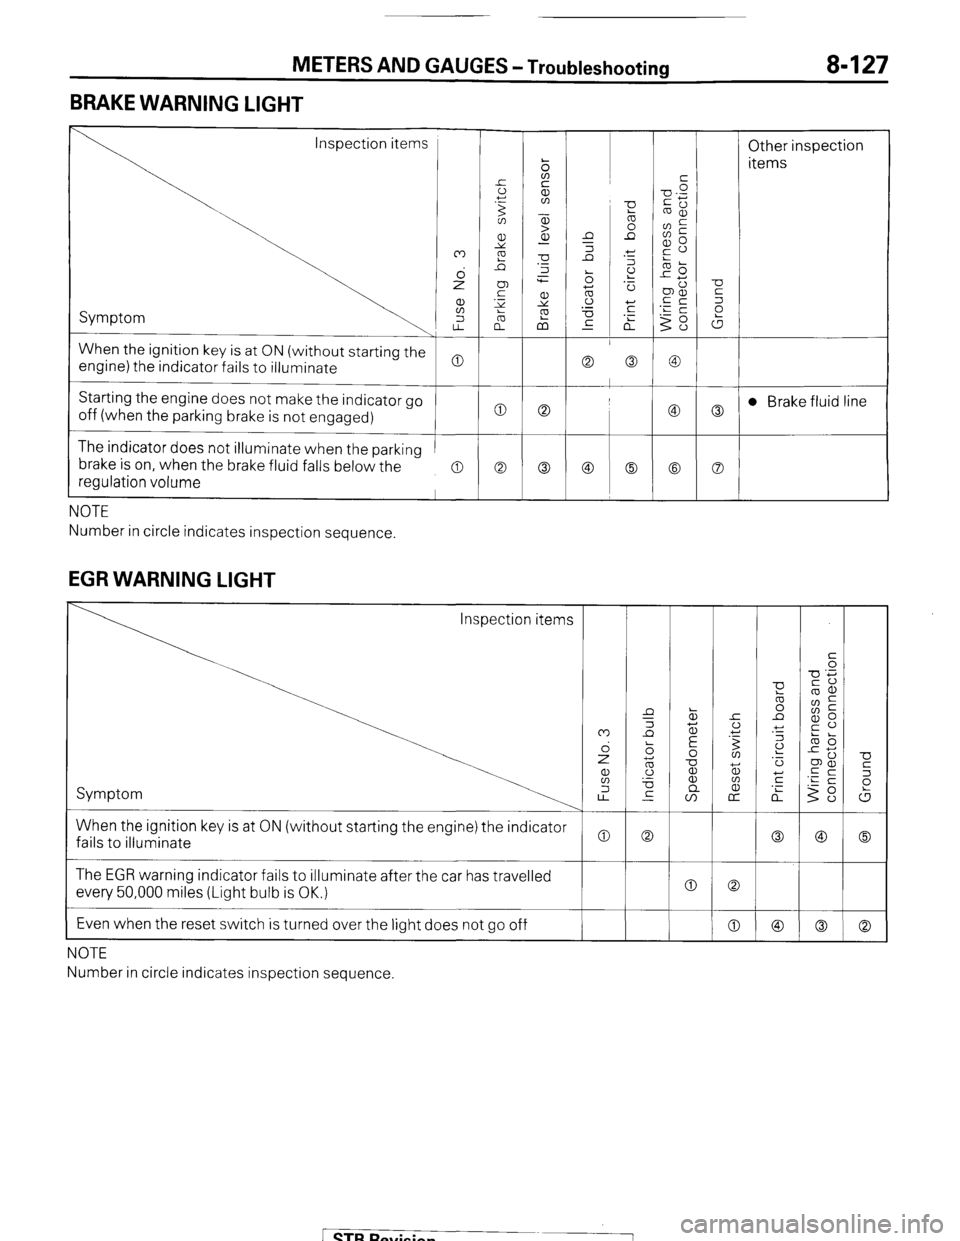
METERS AND GAUGES -Troubleshooting 8-127
BRAKE WARNING LIGHT
Inspection items
Other inspection
items
Symptom
When the ignition key is at ON (without starting the
engine) the indicator fails to illuminate
Starting the engine does not make the indicator go
off (when the parking brake is not engaged) t 0 0
c
The indicator does not illuminate when the parking
brake is on, when the brake fluid falls below the
regulation volume
a a Co
NOTE
Number in circle indicates inspection sequence.
EGR WARNING LIGHT
U
5
P
W
0
Co When the ignition key is at ON (without starting the engine) the indicator
fails to illuminate
0 The EGR warning indicator fails to illuminate after the car has travelled
every 50,000 miles (Light bulb is OK.)
Even when the reset switch is turned over the light does not go off 0 0
0
I
NOTE
Number in circle indicates inspection sequence.
[ STB Revision