MITSUBISHI MONTERO 1998 Service Manual
MONTERO 1998
MITSUBISHI
MITSUBISHI
https://www.carmanualsonline.info/img/19/57333/w960_57333-0.png
MITSUBISHI MONTERO 1998 Service Manual
Trending: fuse diagram, tire pressure, battery location, snow chains, alternator article, maintenance schedule, boot
Page 1141 of 1501

column switch. To install, reverse removal procedure.
Removal & Installation (Eclipse)
Remove air bag module. See AIR BAG RESTRAINT SYSTEMS article.
Remove horn pad and steering wheel. Remove hood lock release handle.
Remove column pad and upper and lower column covers. See Fig. 6.
Remove A/C-heater system lap cooler duct and foot shower duct. Remove
steering column switch. To install, reverse removal procedure.
Removal & Installation (Galant)
Remove air bag module. See AIR BAG RESTRAINT SYSTEMS article.
Remove steering wheel. Remove column pad. Remove foot duct. Remove
upper and lower steering column covers. See Fig. 11. Remove steering
column switch. To install, reverse removal procedure.
Removal & Installation (Mirage)
Remove air bag module. See AIR BAG RESTRAINT SYSTEMS article.
Remove steering wheel. Remove hood release handle. Remove knee
protector. Remove upper and lower steering column covers. See Fig. 15.
Remove steering column switch. To install, reverse removal procedure.
Removal & Installation (Montero)
Remove air bag module. See AIR BAG RESTRAINT SYSTEMS article.
Remove steering wheel. Remove foot duct. Remove lower instrument panel
cover. Remove upper and lower steering column covers. See Fig. 19.
Remove steering column switch. To install, reverse removal procedure.
Removal & Installation (Montero Sport)
Remove air bag module. See AIR BAG RESTRAINT SYSTEMS article.
Remove steering wheel. Remove instrument panel lower cover. Remove
upper and lower steering column covers. See Fig. 25. Remove steering
column switch. To install, reverse removal procedure.
Removal & Installation (3000GT)
Remove air bag module. See AIR BAG RESTRAINT SYSTEMS article.
Remove steering wheel. Remove knee protector. Remove upper and lower
steering column covers. Remove A/C-heater system lap cooler duct and
foot duct. Remove left or right steering column switch. See Fig. 31.
To install, reverse removal procedure.
TORQUE SPECIFICATIONS
TORQUE SPECIFICATIONS TABLE������������������\
������������������\
������������������\
������������������\
������������������\
������������������\
�����������
Application Ft. Lbs. (N.m)
Steering Wheel Nut
Diamante, Montero, Montero Sport
& 3000GT ...................................... 29 (39)
Eclipse, Galant & Mirage ....................... 30 (41)
INCH Lbs. (N.m)
Air Bag Module Bolts/Nuts
Diamante, Eclipse & Mirage .................... 53 (6.0)
Galant & Montero .............................. 80 (9.0)
Montero Sport ................................. 78 (8.8)
3000GT ....................................... 39 (4.4)
������������������\
������������������\
������������������\
������������������\
������������������\
������������������\
�����������
WIRING DIAGRAMS
Page 1142 of 1501
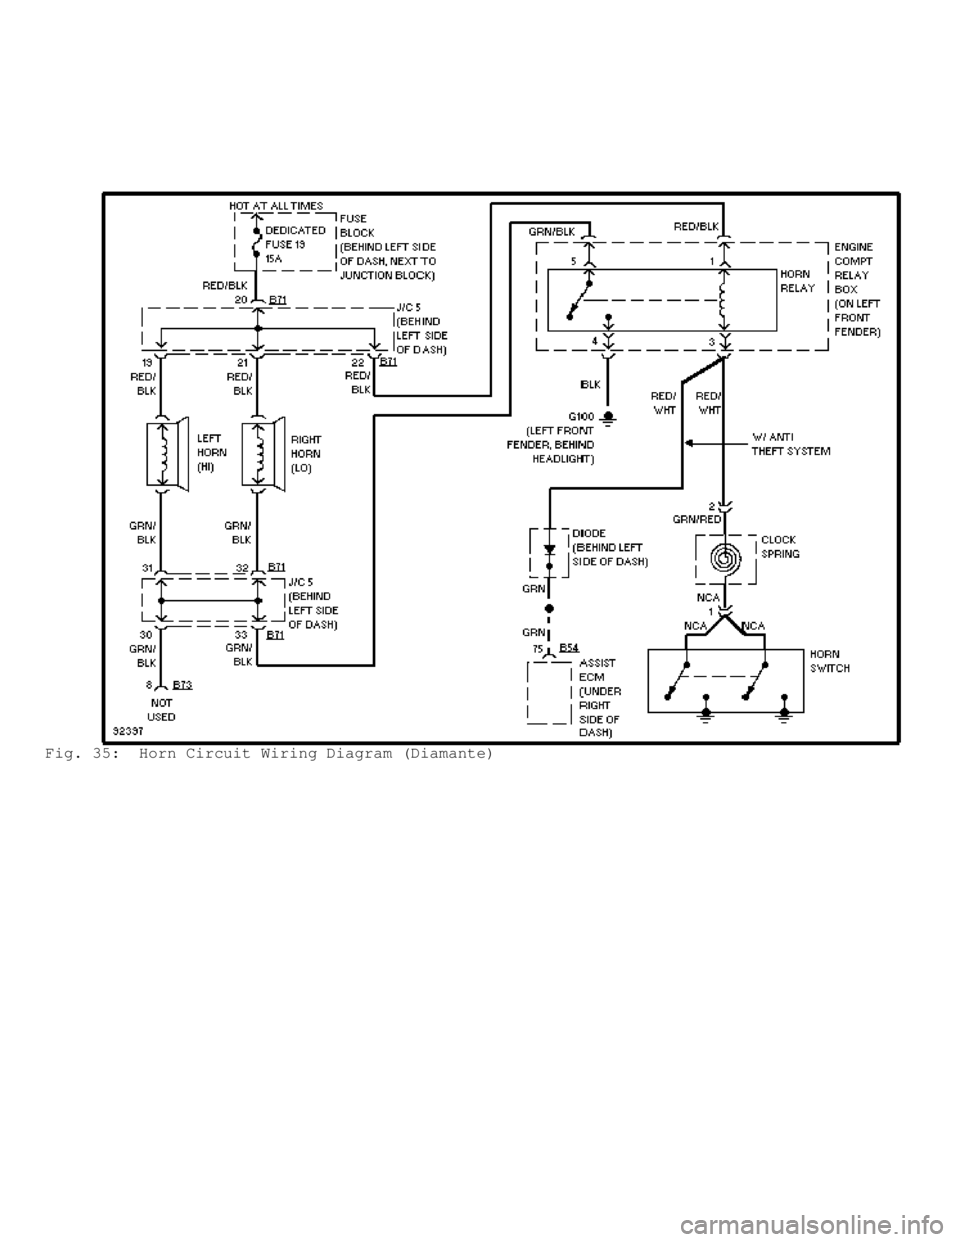
Fig. 35: Horn Circuit Wiring Diagram (Diamante)
Page 1143 of 1501
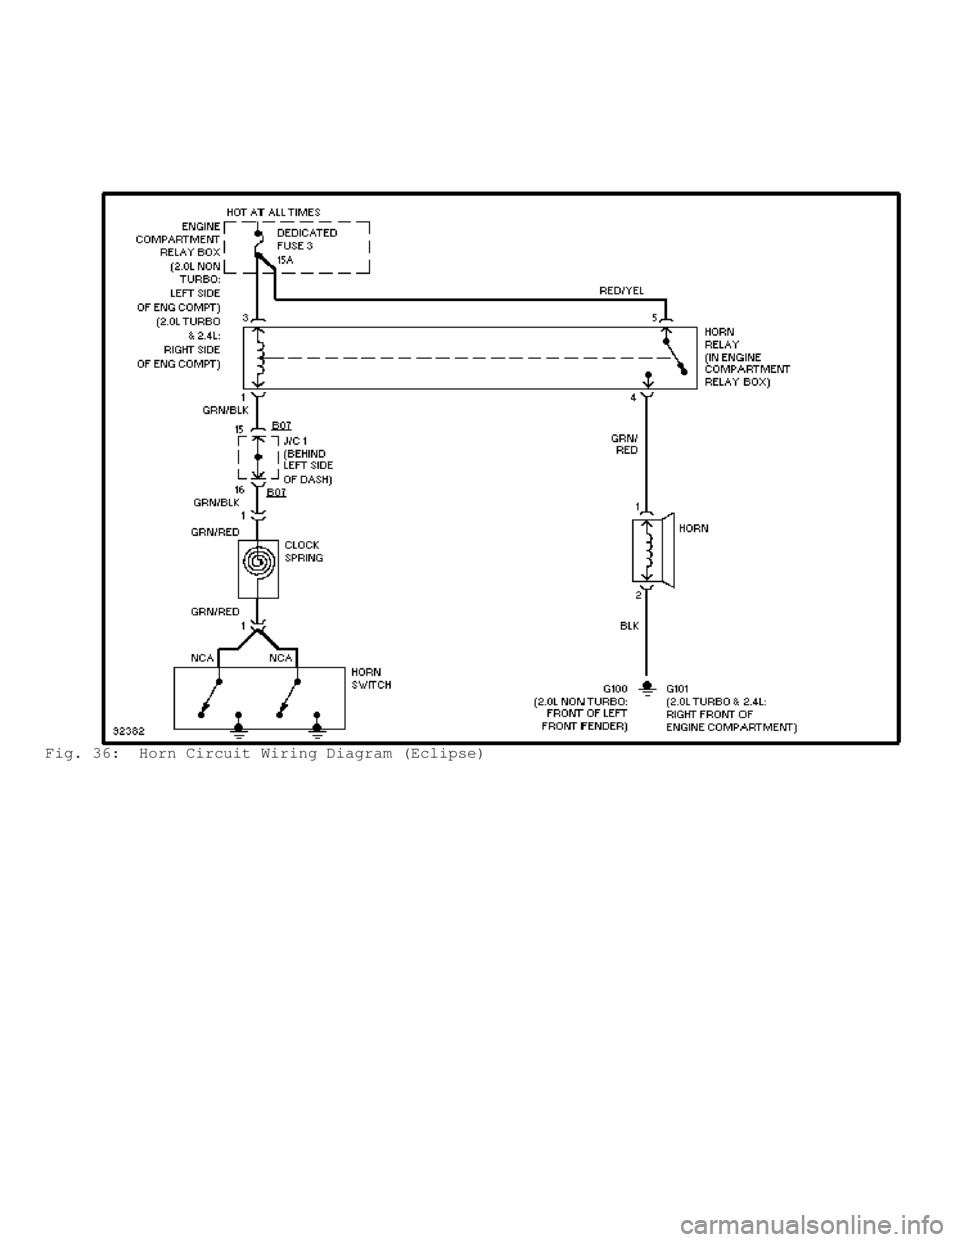
Fig. 36: Horn Circuit Wiring Diagram (Eclipse)
Page 1144 of 1501
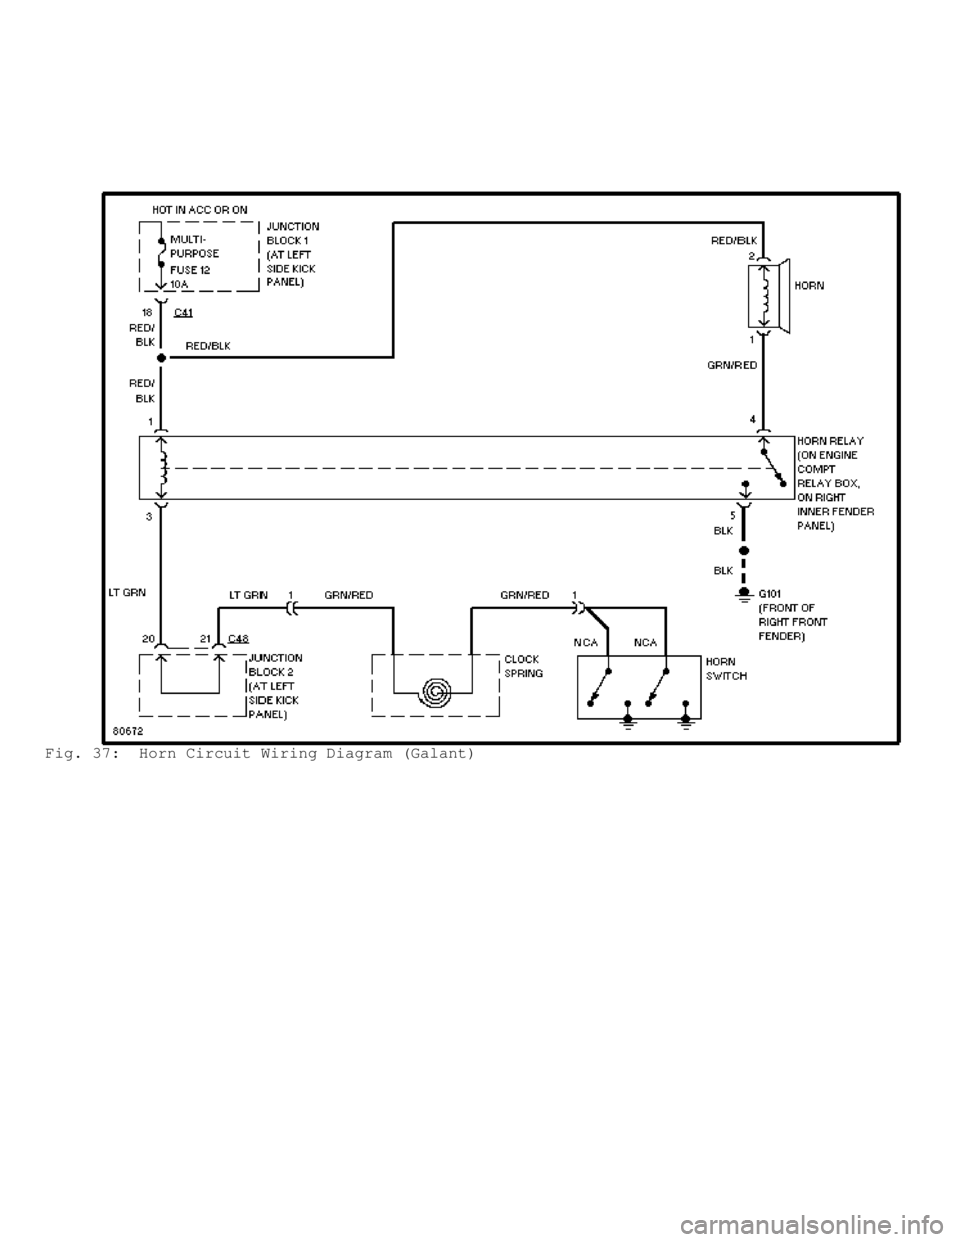
Fig. 37: Horn Circuit Wiring Diagram (Galant)
Page 1145 of 1501
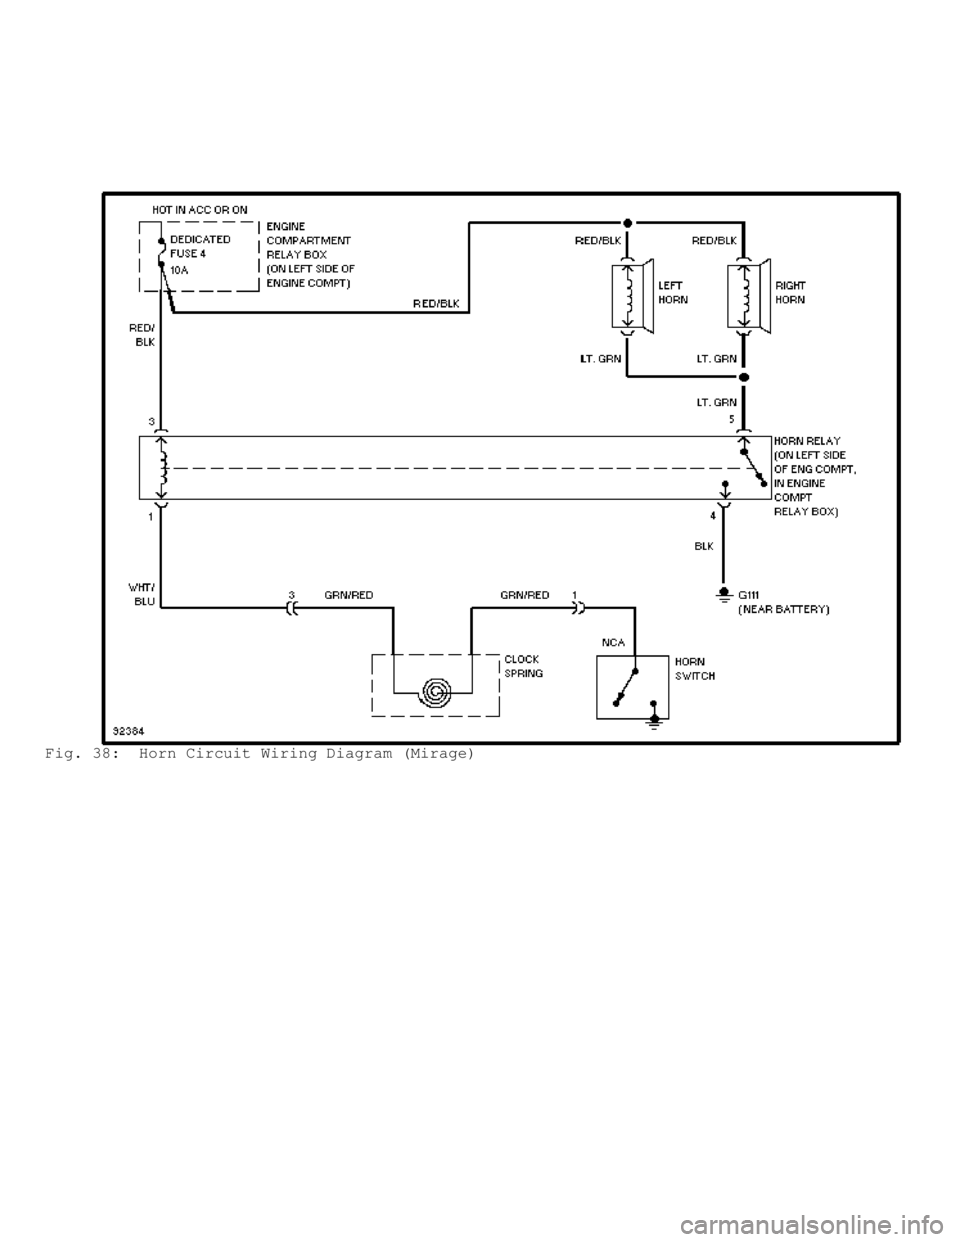
Fig. 38: Horn Circuit Wiring Diagram (Mirage)
Page 1146 of 1501
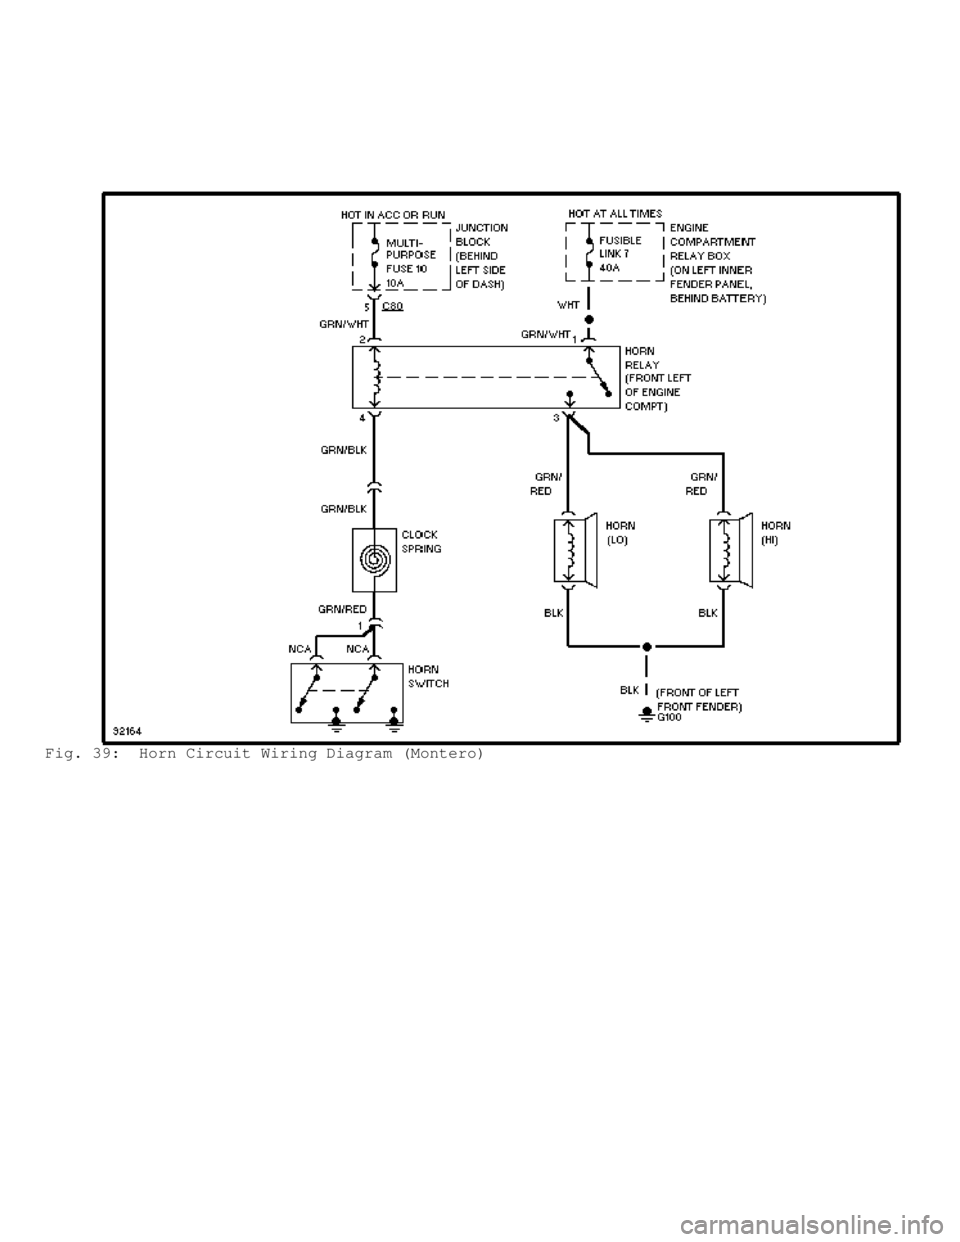
Fig. 39: Horn Circuit Wiring Diagram (Montero)
Page 1147 of 1501
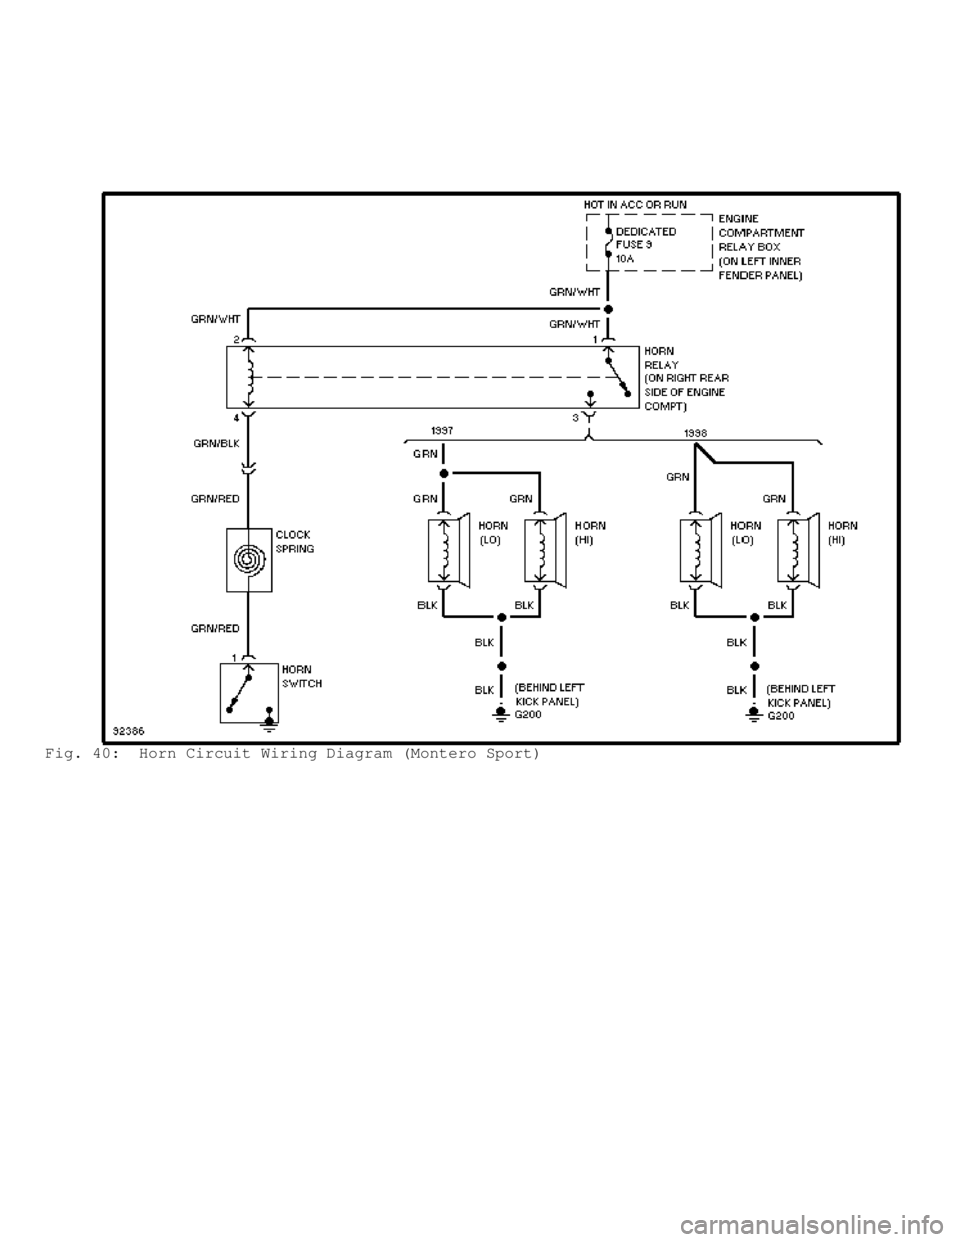
Fig. 40: Horn Circuit Wiring Diagram (Montero Sport)
Page 1148 of 1501
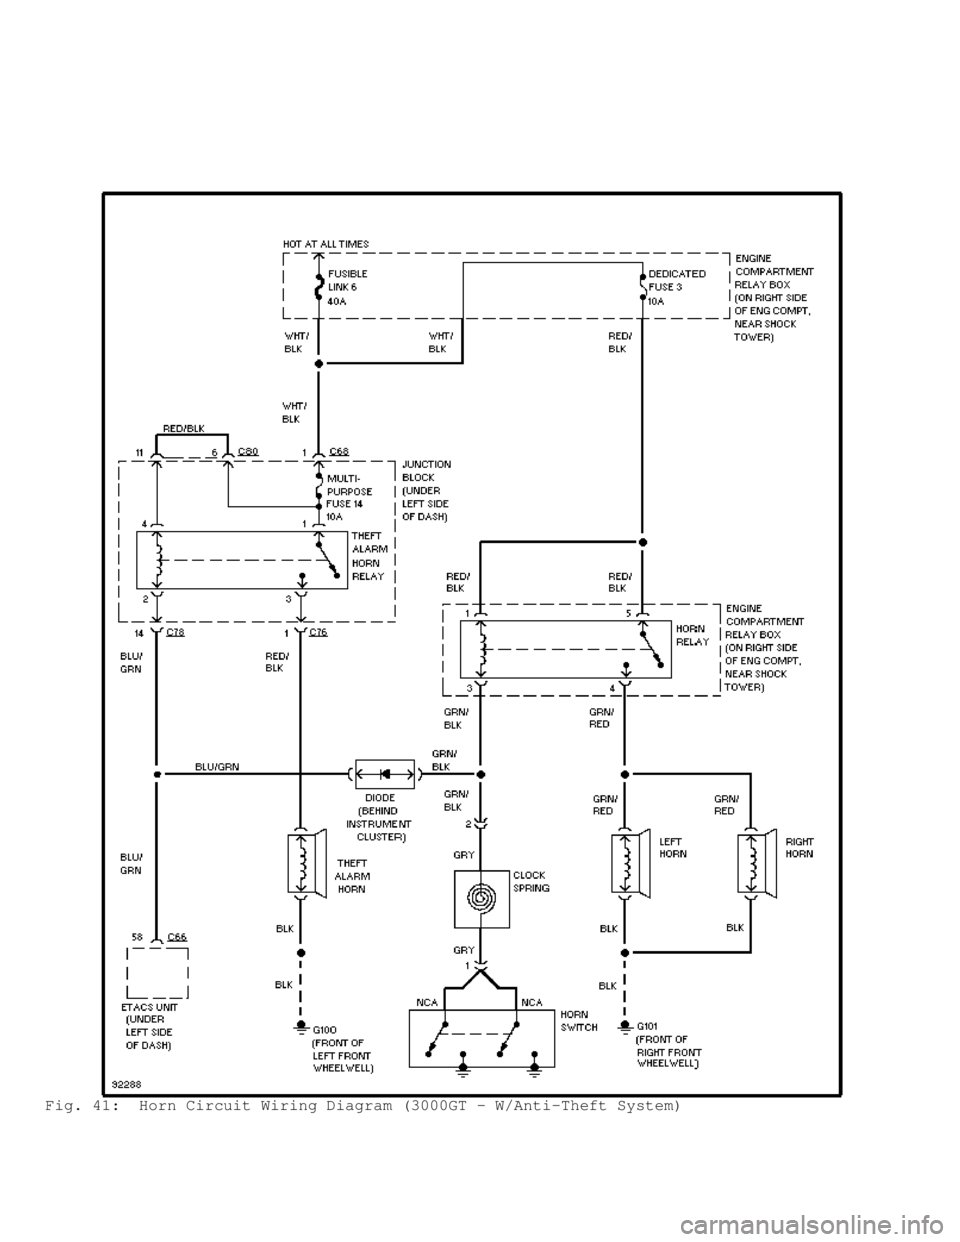
Fig. 41: Horn Circuit Wiring Diagram (3000GT - W/Anti-Theft System)
Page 1149 of 1501
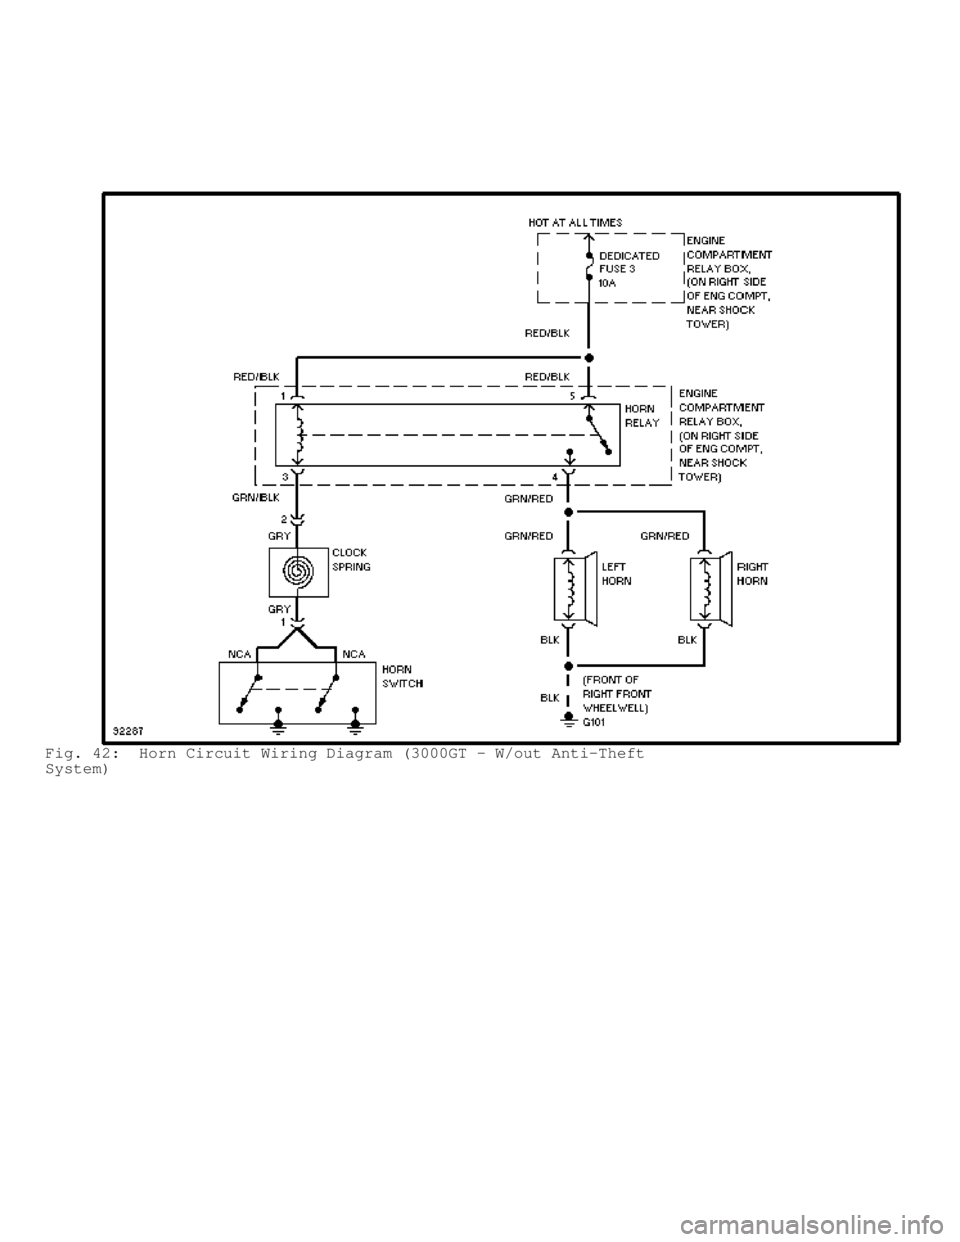
Fig. 42: Horn Circuit Wiring Diagram (3000GT - W/out Anti-Theft
System)
Page 1150 of 1501

STEERING COLUMN
1998 Mitsubishi Montero
1997-98 STEERING
Mitsubishi - Steering Columns - RWD & 4WD
Mitsubishi: Montero, Montero Sport
DESCRIPTION & OPERATION
WARNING: Vehicle is equipped with a Supplemental Restraint System
(SRS) that includes an air bag located in steering wheel.
Use caution when working around steering column. Ensure
battery is disconnected before attempting any repair. DO NOT
apply electrical power to any component on steering column
without disconnecting air bag module (air bag could deploy).
Steering column consists of a collapsible steering shaft with
lower joint assembly. Vehicle is equipped with a Supplemental
Restraint System (SRS) that includes an air bag and clockspring
located in steering column wheel.
NOTE: For information not covered in this article, air bag
DIAGNOSIS & TESTING or DISPOSAL PROCEDURES, see AIR BAG
RESTRAINT SYSTEM article.
DISABLING & ACTIVATING AIR BAG SYSTEM
WARNING: Wait at least 60 seconds after disconnecting negative
battery cable before servicing SRS. System reserve capacitor
maintains SRS voltage for about 60 seconds after battery is
disconnected. Servicing SRS before 60-second period may
cause accidental air bag deployment and possible personal
injury.
To disable system, turn ignition switch to OFF position.
Disconnect and isolate negative battery cable end. Wait at least 60
seconds. To activate system, reconnect negative battery cable.
AIR BAG SERVICE PRECAUTIONS
The following precautions should be observed when working
with SRS:
* Disable SRS before servicing any SRS or steering column
component. Failure to do this may result in accidental air
bag deployment and possible personal injury. See DISABLING &
ACTIVATING AIR BAG SYSTEM.
* Wait at least 60 SECONDS after disabling air bag system. SRS
system retains enough voltage, for a short time after system
is disabled, to deploy air bag.
* After repairs, always turn ignition on to ensure SRS warning
light is working properly and no system faults are indicated.
* Always wear safety glasses when servicing or handling an air
bag.
* DO NOT expose air bag module and clockspring to temperatures
more than 200
�F (93�C).
* When placing a live air bag on a bench or other surface,
always face air bag and trim cover up, away from surface.
This will reduce motion of module if air bag accidentally
Trending: radio, fuel filter location, odometer, starter mounting bolt, service interval, roof rack, fuel tank capacity

