radio MITSUBISHI OUTLANDER 2014 3.G Display Audio Manual
[x] Cancel search | Manufacturer: MITSUBISHI, Model Year: 2014, Model line: OUTLANDER, Model: MITSUBISHI OUTLANDER 2014 3.GPages: 88, PDF Size: 11.63 MB
Page 39 of 88
Listen to Satellite Radio 39
AVRadio
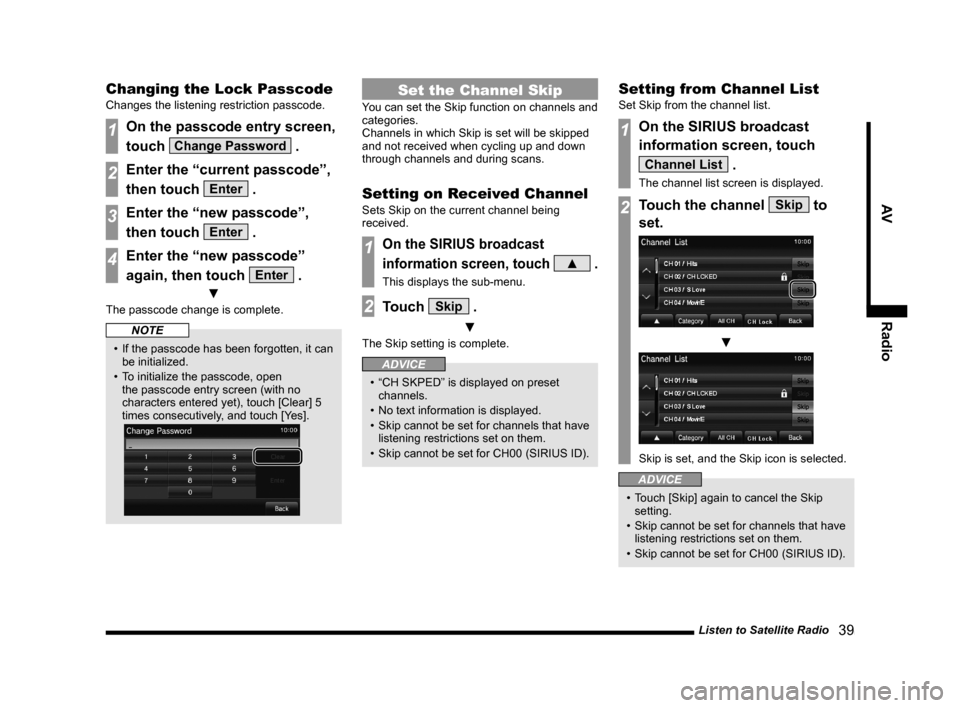
Changing the Lock Passcode
Changes the listening restriction passcode.
1On the passcode entry screen,
touch
Change Password .
2Enter the “current passcode”,
then touch
Enter .
3Enter the “new passcode”,
then touch
Enter .
4Enter the “new passcode”
again, then touch
Enter .
▼
The passcode change is complete.
NOTE
• If the passcode has been forgotten, it can
be initialized.
• To initialize the passcode, open the passcode entry screen (with no
characters entered yet), touch [Clear] 5
times consecutively, and touch [Yes].
Set the Channel Skip
You can set the Skip function on channels and
categories.
Channels in which Skip is set will be skipped
and not received when cycling up and down
through channels and during scans.
Setting on Received Channel
Sets Skip on the current channel being
received.
1On the SIRIUS broadcast
information screen, touch
▲ .
This displays the sub-menu.
2Touch Skip .
▼
The Skip setting is complete.
ADVICE
• “CH SKPED” is displayed on preset channels.
• No text information is displayed.
• Skip cannot be set for channels that have listening restrictions set on them.
• Skip cannot be set for CH00 (SIRIUS ID).
Setting from Channel List
Set Skip from the channel list.
1On the SIRIUS broadcast
information screen, touch
Channel List .
The channel list screen is displayed.
2Touch the channel Skip to
set.
▼
Skip is set, and the Skip icon is selected.
ADVICE
• Touch [Skip] again to cancel the Skip setting.
• Skip cannot be set for channels that have listening restrictions set on them.
• Skip cannot be set for CH00 (SIRIUS ID).
13MY_AVC(NAS).indb 392013/02/14 10:57:40
Page 40 of 88
40 Listen to Satellite Radio
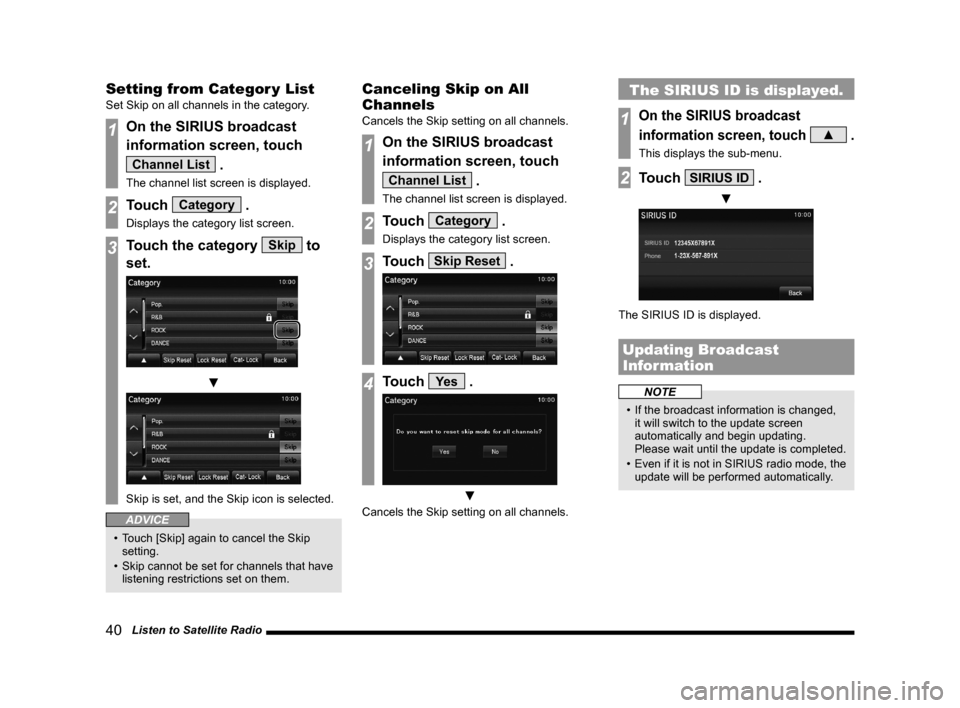
Setting from Categor y List
Set Skip on all channels in the category.
1On the SIRIUS broadcast
information screen, touch
Channel List .
The channel list screen is displayed.
2Touch Category .
Displays the category list screen.
3Touch the category Skip to
set.
▼
Skip is set, and the Skip icon is selected.
ADVICE
• Touch [Skip] again to cancel the Skip setting.
• Skip cannot be set for channels that have listening restrictions set on them.
Canceling Skip on All
Channels
Cancels the Skip setting on all channels.
1On the SIRIUS broadcast
information screen, touch
Channel List .
The channel list screen is displayed.
2Touch Category .
Displays the category list screen.
3Touch Skip Reset .
4Touch Ye s .
▼
Cancels the Skip setting on all channels.
The SIRIUS ID is displayed.
1On the SIRIUS broadcast
information screen, touch
▲ .
This displays the sub-menu.
2Touch SIRIUS ID .
▼
The SIRIUS ID is displayed.
Updating Broadcast
Information
NOTE
• If the broadcast information is changed, it will switch to the update screen
automatically and begin updating.
Please wait until the update is completed.
• Even if it is not in SIRIUS radio mode, the
update will be performed automatically.
13MY_AVC(NAS).indb 402013/02/14 10:57:41
Page 74 of 88
74 Adjust the Sound Quality
Settings nameSettings value Settings content
SURROUND*1SURROUND TYPE DTS Neural*3*4Allows you to select the surround type.
PREMIDIA WIDE Off
SOUND FIELD NORMAL
Allows you to select the sound field type.
STAGE LIVE
Premidia HD
*1*2*3*4Off Allows you to adjust the amount of
compensation for reproducing the feeling of
solidity and depth of the original sound by
forecasting and supplementing for the high-
pass audio information lost during audio
data compression.
Low
High
Dolby Volume
*1*4Off Allows you to select the level for the
automatic real-time adjustment function,
which provides the same output levels for
the different volumes of different sources
and songs.
Low
Mid
High
*1) This is a setting item only for vehicles with premium audio system.
*2) This is also effective for non-compressed sound sources.
*3) “DTS Neural” and “PremiDIA HD” cannot be selected at the same time.
*4) This is disabled when the audio source is analog radio.
ADVICE
• If you feel that the Dolby volume effect does not match the impression of the audio being
played back, switch it OFF.
13MY_AVC(NAS).indb 742013/02/14 10:58:04
Page 80 of 88
80 Other Settings
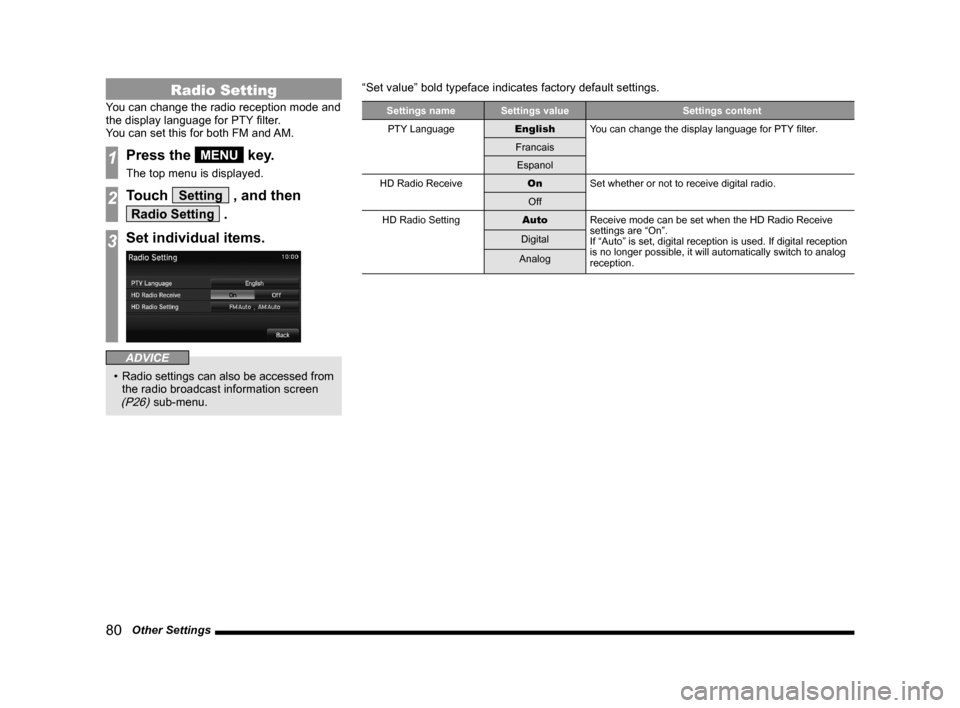
Radio Setting
You can change the radio reception mode and
the display language for PTY filter.
You can set this for both FM and AM.
1Press the MENU key.
The top menu is displayed.
2Touch Setting , and then
Radio Setting .
3Set individual items.
ADVICE
• Radio settings can also be accessed from
the radio broadcast information screen
(P26) sub-menu. “Set value” bold typeface indicates factory default settings.
Settings name
Settings value Settings content
PTY Language EnglishYou can change the display language for PTY filter.
Francais Espanol
HD Radio Receive OnSet whether or not to receive digital radio.
Off
HD Radio Setting AutoReceive mode can be set when the HD Radio Receive
settings are “On”.
If “Auto” is set, digital reception is used. If digital reception \
is no longer possible, it will automatically switch to analog
reception.
Digital
Analog
13MY_AVC(NAS).indb 802013/02/14 10:58:06
Page 81 of 88
Other Settings 81
INFO/SETTINGSSETTINGS
Equipment by type
(Vehicles with a Bluetooth® 2.0 interface).
Bluetooth Setting
You can use the Bluetooth function to connect
any commercially-available Bluetooth device
to this product.
What Bluetooth is
Bluetooth is a wireless communications
standard specialized for connecting devices
over short distances (a few meters or less).
Since it uses radio waves, it is not directional.
Thanks to its characteristic, communications
are possible even if there is an obstruction.
This makes it possible to communicate, even
with the mobile phone still in your shirt pocket
or briefcase or shoulder bag.
NOTE
• This product supports Ver. 2.0 + EDR.
Supported profiles
Bluetooth AUDIO A2DP(v1.0)
AVRCP(v1.3)
Hands-free HFP(v1.5)
Phonebook transfer OPP(v1.1)
PBAP(v1.0)
NOTE
• Cancel functions such as the mobile
phone “dial lock”, and connect while on
the standby screen.
• While connected, operations on the Bluetooth device (receiving calls, etc.)
may not function correctly.
• For details on how to enter the passkey for your Bluetooth device, refer to its user
manual.
• The connection fails sometimes. Register again.
• Depending on the distance between this product and your Bluetooth device, the
conditions within the vehicle, and types
of screening, connection may not be
possible. In this case, put your Bluetooth
as close as possible to this product.
• Even though a device is Bluetooth- capable, its characteristics and
specifications may mean that correct
operation is not possible.
• Some Bluetooth devices cannot be connected.
• Depending on the Bluetooth device, connecting may take some time.
• Up to 7 Bluetooth devices can be registered.
If 7 devices are already registered, you
must delete one before you can register
a new Bluetooth device.
Registering a Bluetooth
Device
Register a Bluetooth device with this product.
1Press the MENU key.
The top menu is displayed.
2Touch Setting , and then
Bluetooth Setting .
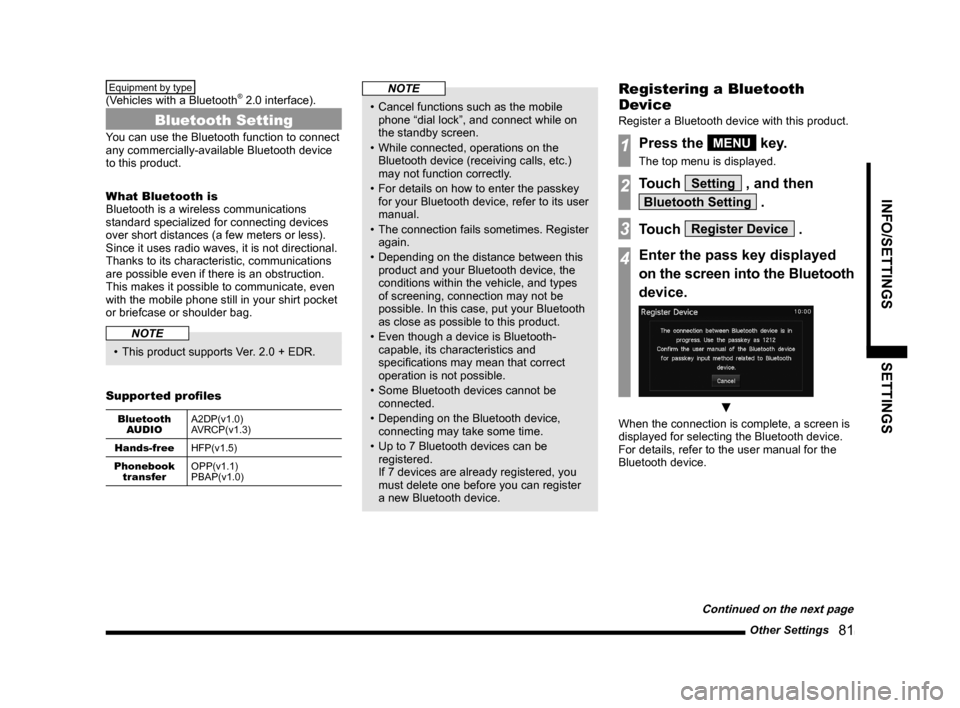
3Touch Register Device .
4Enter the pass key displayed
on the screen into the Bluetooth
device.
▼
When the connection is complete, a screen is
displayed for selecting the Bluetooth device.
For details, refer to the user manual for the
Bluetooth device.
Continued on the next page
13MY_AVC(NAS).indb 812013/02/14 10:58:07