stop start MITSUBISHI OUTLANDER 2014 3.G Display Audio Manual
[x] Cancel search | Manufacturer: MITSUBISHI, Model Year: 2014, Model line: OUTLANDER, Model: MITSUBISHI OUTLANDER 2014 3.GPages: 88, PDF Size: 11.63 MB
Page 4 of 88
4
Introduction
The followings are what you need to know before using this product.
Before Use
Disclaimers
• Mitsubishi Motors will in no way be held
responsible for losses resulting from fire,
earthquake, tsunami, flood, or other natural
disasters; from actions of third parties; from
other accidents; or from inappropriate or
abnormal usage conditions utilized by the
customer, be said conditions deliberate or
unintentional.
• There will be no indemnification for alteration
or loss of any information stored upon this
product by the customer or a third party
resulting from improper use of this product,
the influence of static electricity or electric
noise, or at the time of malfunction or repair
or similar circumstances. We recommend
that you create backups of important
information as a precautionary measure.
• Some personal information (telephone numbers etc.) entered into this product may
remain in memory even if this product is
removed. The customer is responsible for
proper handling and management (including
deleting) of personal information to protect
privacy when handing this product over to
anyone else or disposing of it. Mitsubishi
Motors will in no way be held responsible. • Mitsubishi Motors will in no way be held
responsible for any collateral losses (loss
of business profits, alteration or loss of
recorded data) resulting from the usage or
inability to use this product.
• For the purpose of product improvement, specifications and external appearance may
be subject to change without advance notice.
Accordingly, while the contents of the User
Manual may differ, please be aware that
returns, refunds, exchange, or conversion
are not possible.
• This User Manual explains details for multiple models together. Depending on the
model, there may be functions that may be
described but not available, or requirements
for separately purchased-products. Thank
you for your understanding.
• Images and illustrations used in the User Manual are either those used in
development, or used for explanations.
Please be aware that these may differ from
the actual images and illustrations used in
the product.
• Please be aware that Mitsubishi Motors, including after-sales service departments,
will in no way be held responsible for any
losses or detriment resulting from alteration
or loss of information stored in this product.
Important Points on Usage
Common
• During operation, ensure that the vehicle is not stationary in a garage or other confined
area with bad ventilation while the engine
is running. Doing so may result in carbon
monoxide poisoning.
• For safety, the driver is not to operate this product while the vehicle is moving. The
driver should also minimize as much as
possible the time spent viewing the screen.
Being distracted by the screen can result in
an accident.
• Do not turn the volume up to the extent that you cannot hear sounds from outside the
vehicle while driving. Driving without being
able to hear sounds from outside the vehicle
can result in an accident.
• Do not disassemble or modify the product. This may lead to malfunction, smoking, or
fire.
• When operating, ensure that the vehicle is stopped in a safe area in which stopping is
permitted.
• Continued usage of this product without the engine running may deplete the vehicle
battery, meaning that the engine may not be
able to start.
Ensure this product is used while the engine
is running.
13MY_AVC(NAS).indb 42013/02/14 10:57:16
Page 15 of 88
Basic Operation 15
AVAudio Functions
Insert/Eject Discs
The following explains how to insert a disc into
this product.
CAUTION
• When replacing discs, first ensure that the vehicle is stopped in an area in which
stopping is permitted.
• Do not insert your hand, fingers, or foreign objects into the disc slot. This
may lead to injury, smoking, or fire.
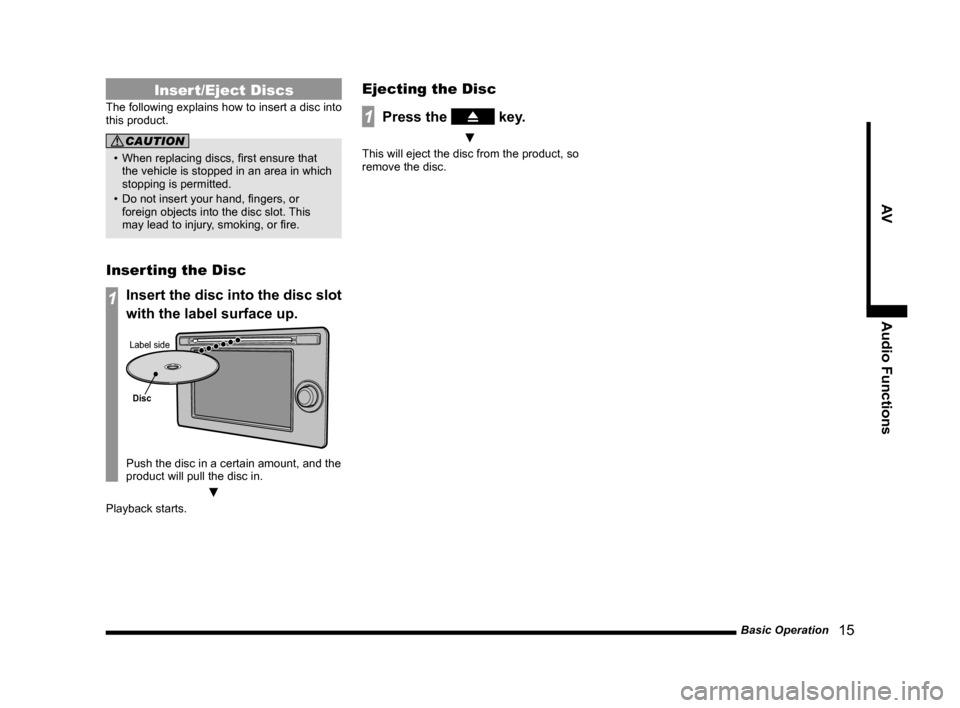
Inserting the Disc
1Insert the disc into the disc slot
with the label surface up.
Disc
Label side
Push the disc in a certain amount, and the
product will pull the disc in.
▼
Playback starts.
Ejecting the Disc
1Press the key.
▼
This will eject the disc from the product, so
remove the disc.
13MY_AVC(NAS).indb 152013/02/14 10:57:26
Page 29 of 88
Listen to Radio 29
AVRadio
Register Your Favorite
Broadcast Stations
You can register your favorite 6 stations for
each band, FM1, FM2, and AM.
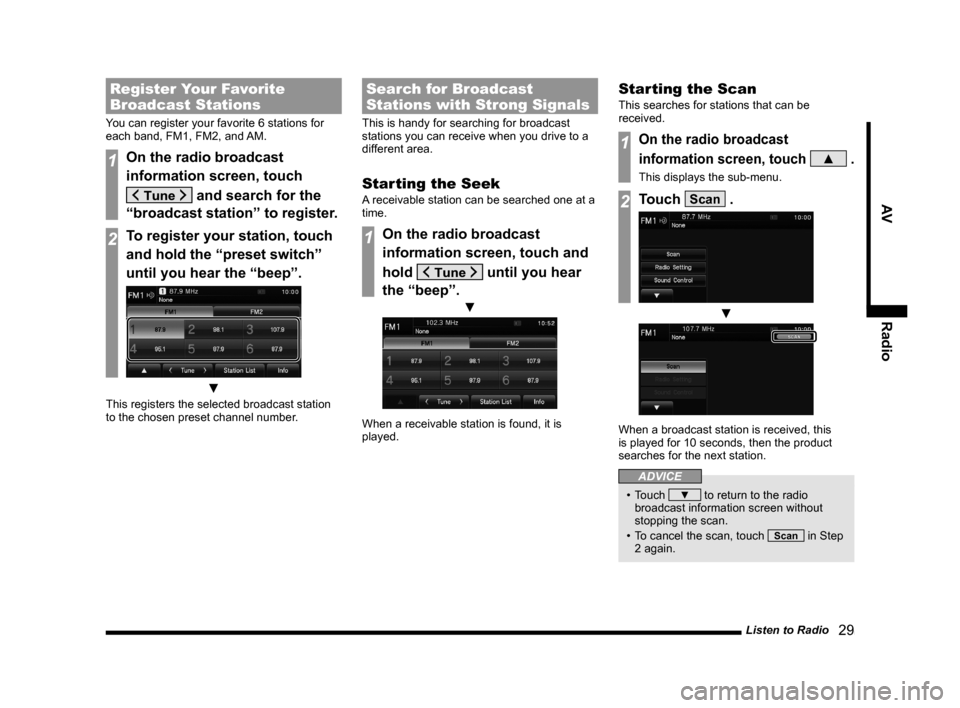
1On the radio broadcast
information screen, touch
and search for the
“broadcast station” to register.
2To register your station, touch
and hold the “preset switch”
until you hear the “beep”.
▼
This registers the selected broadcast station
to the chosen preset channel number.
Search for Broadcast
Stations with Strong Signals
This is handy for searching for broadcast
stations you can receive when you drive to a
different area.
Starting the Seek
A receivable station can be searched one at a
time.
1On the radio broadcast
information screen, touch and
hold
until you hear
the “beep”.
▼
When a receivable station is found, it is
played.
Starting the Scan
This searches for stations that can be
received.
1On the radio broadcast
information screen, touch
▲ .
This displays the sub-menu.
2Touch Scan .
▼
When a broadcast station is received, this
is played for 10 seconds, then the product
searches for the next station.
ADVICE
• Touch ▼ to return to the radio
broadcast information screen without
stopping the scan.
• To cancel the scan, touch
Scan in Step
2 again.
13MY_AVC(NAS).indb 292013/02/14 10:57:33
Page 30 of 88
30 Listen to Radio
Search for Broadcast
Stations from the Station List
You can select a station from the list of
receivable broadcast stations.
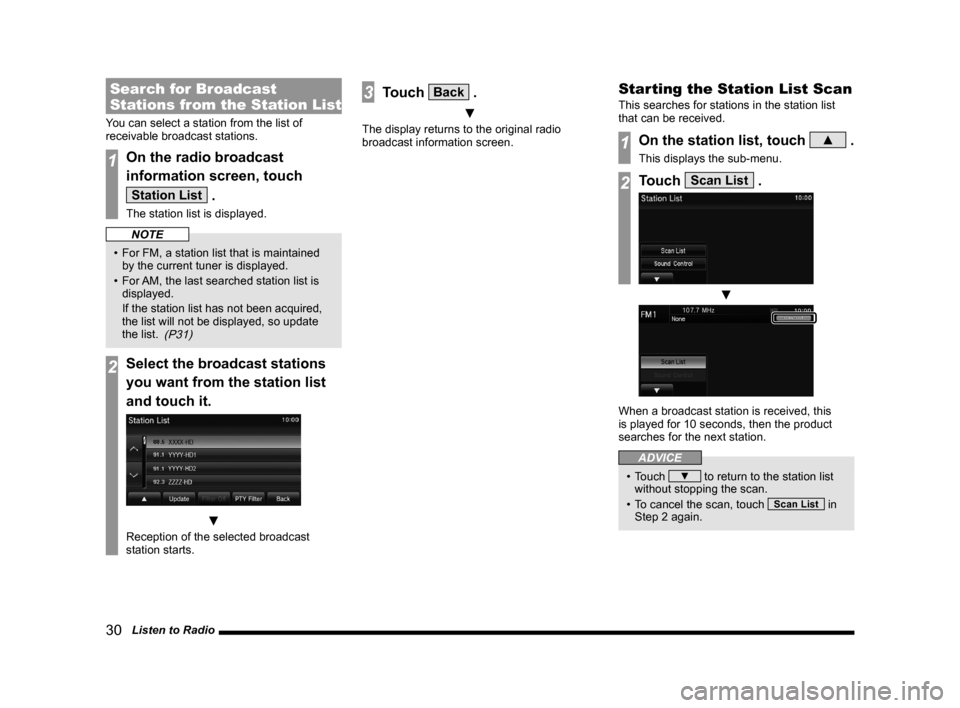
1On the radio broadcast
information screen, touch
Station List .
The station list is displayed.
NOTE
• For FM, a station list that is maintained by the current tuner is displayed.
• For AM, the last searched station list is
displayed.
If the station list has not been acquired,
the list will not be displayed, so update
the list.
(P31)
2Select the broadcast stations
you want from the station list
and touch it.
▼
Reception of the selected broadcast
station starts.
3Touch Back .
▼
The display returns to the original radio
broadcast information screen.
Starting the Station List Scan
This searches for stations in the station list
that can be received.
1On the station list, touch ▲ .
This displays the sub-menu.
2Touch Scan List .
▼
When a broadcast station is received, this
is played for 10 seconds, then the product
searches for the next station.
ADVICE
• Touch ▼ to return to the station list
without stopping the scan.
• To cancel the scan, touch
Scan List in
Step 2 again.
13MY_AVC(NAS).indb 302013/02/14 10:57:34
Page 51 of 88
Use an iPod 51
AViPod/USB
iPod/USB
Use an iPod
By connecting commercially-available iPod/
iPhone devices to this product, you can play
back tracks on these through the product.
CAUTION
• Never hold an iPod/iPhone in your hand
and operate it while driving, as this is
dangerous.
• Do not leave the iPod/iPhone unattended in the vehicle.
• No indemnification for data loss resulting when the iPod/iPhone is connected to the
product will be possible.
• Depending on how devices are handled, audio files can be damaged or lost,
therefore it is recommended that data be
backed up.
NOTE
• Depending on the generation, model, or software version of the iPod/iPhone,
playback on this product may not be
possible.
(→P7) Additionally, playback as explained in this document may not be possible.
• Please refer to your vehicle's user manual regarding details such as types
of iPod/iPhone that can be connected to
Equipment by type (vehicles with a Bluetooth ®
2.0 interface), and types of files that can
be played back.
NOTE
• Updating your software sometimes changes the functions that can be used
while connected with this product.
• Operate the iPod/iPhone while connected
to this product.
• Please refer to your vehicle's user manual regarding how to connect the
iPod/iPhone.
• When connecting the iPod/iPhone, use any commercially-available iPod cable.
• If the iPod/iPhone is connected via Bluetooth as a Bluetooth-capable audio
device, do not connect the iPod/iPhone
using an iPod cable. Connection using
both methods will result in erroneous
operation.
• If an iPod/iPhone does not operate correctly, then remove the iPod/iPhone
from the product, reset, then reconnect.
• Viewing videos is not possible even if the iPod/iPhone supports video playback
functions.
• Set up the device in order that no unsafe actions, such as plugging in the
connection cable are taken while driving.
• When inserting and removing the iPod/ iPhone, for safety's sake first stop the
vehicle.
NOTE
• Depending on the status of the iPod/iPhone, it may take some time until the
device is recognized, or playback starts.
• Buttons on the product will not operate while iPod/iPhone is connected.
• iPod/iPhone specifications and settings may mean that connection is not
possible, or result in differences in
operation or display.
• Depending on the audio data in the iPod/ iPhone, track information may not be
displayed correctly.
• Depending on the status of the vehicle and device, the iPod/iPhone may not play
back after starting the engine.
• Data containing copyright information may not play back.
• It is recommended that the iPod/iPhone equalizer settings be set to flat.
13MY_AVC(NAS).indb 512013/02/14 10:57:49
Page 57 of 88
Listen to Audio Files on a USB Device 57
AViPod/USB
Listen to Audio Files
on a USB Device
By connecting commercially-available
USB devices such as USB memory to this
product, you can play back audio files on
these through the product.
CAUTION
• Never hold an USB device in your hand
and operate it while driving, as this is
dangerous.
• Do not leave the USB device unattended in the vehicle.
• Do not use hard discs, card readers, or memory readers, as damage may occur
to these or to the data contained therein.
If these are erroneously connected,
then turn the engine ignition “OFF”, then
remove.
• No guarantee is made as regards damage to the USB device, nor regarding
loss or damage to data contained therein.
• Depending on how devices are handled, audio files can be damaged or lost,
therefore it is recommended that data be
backed up.
NOTE
• Please refer to your vehicle's user manual regarding details such as types of
USB devices that can be connected and
USB input ports.
NOTE
• Please refer to your vehicle's user manual regarding details of types of files
that can be played back in
Equipment by type
(vehicles with a Bluetooth ® 2.0 interface).
• Please refer to your vehicle's user manual regarding how to connect USB
devices.
• Depending on the type of USB device, usage may not be possible, or functions
that can be used may be restricted.
• The recommended file system for USB memory is FAT32.
• The maximum supported capacity for USB memory is 32GB.
• Operate the USB device containing recorded audio files while connected to
this product.
• When connecting a USB device, use any commercially-available connection cable.
Failure to use a connection cable when
connecting may place undue load on, or
damage the USB connector.
• Set up the device in order that no unsafe actions, such as plugging in the
connection cable are taken while driving.
• When inserting and removing the USB device, for safety's sake first stop the
vehicle.
• Do not insert non-audio devices into the USB port. Damage to the device or
equipment may result.
• Depending on the status of the USB device, it may take some time until the
device is recognized, or playback starts.
NOTE
• Depending on USB devices, buttons on the product will not operate while the
USB device is connected.
• Data containing copyright information may not play back.
• USB device specifications and settings may mean that connection is not
possible, or result in differences in
operation or display.
• Depending on audio data in the USB device, track information may not be
displayed correctly.
• Depending on the status of the vehicle and device, the iPod/iPhone may not play
back after starting the engine.
1Press the MENU key.
The top menu is displayed.
2Touch USB .
The playback information screen is
displayed.
3Touch
and select a folder.
4Touch and select a
track.
▼
The selected track is played back.
ADVICE
• You can fast forward or rewind the track being played by touching and holding
.
13MY_AVC(NAS).indb 572013/02/14 10:57:53
Page 65 of 88
Use AUX 65
AVExternal Input Devices
Equipment by type
Use AUX
By connecting external input cables and
AUX devices to this product, you can play
back tracks on these devices through the
product.
CAUTION
• Connect an audio device with external
sound input mode cancelled, or with the
sound turned down.
• Even when no device is connected, the product will switch to AUX, therefore take
care with volume levels when no device
is connected.
• Video from AUX devices cannot be
viewed.
• If this is used with the engine stopped, it may run down the battery and make it
impossible to start the engine.
NOTE
• Depending on the audio device to be connected, background noise may be
emitted.
• For power, use the battery power source included in the audio device. Using the
connected audio device while charging
through the cigarette lighter socket in the
vehicle may lead to background noise
being emitted through the speakers.
• If no audio devices are connected, then do not select the external sound input
mode. If external sound input mode is
selected while no audio devices are
connected, then sound may be emitted
through the speakers.
• Please refer to your vehicle's user manual regarding how to connect AUX
devices.
Displaying
1Press the MENU key.
The top menu is displayed.
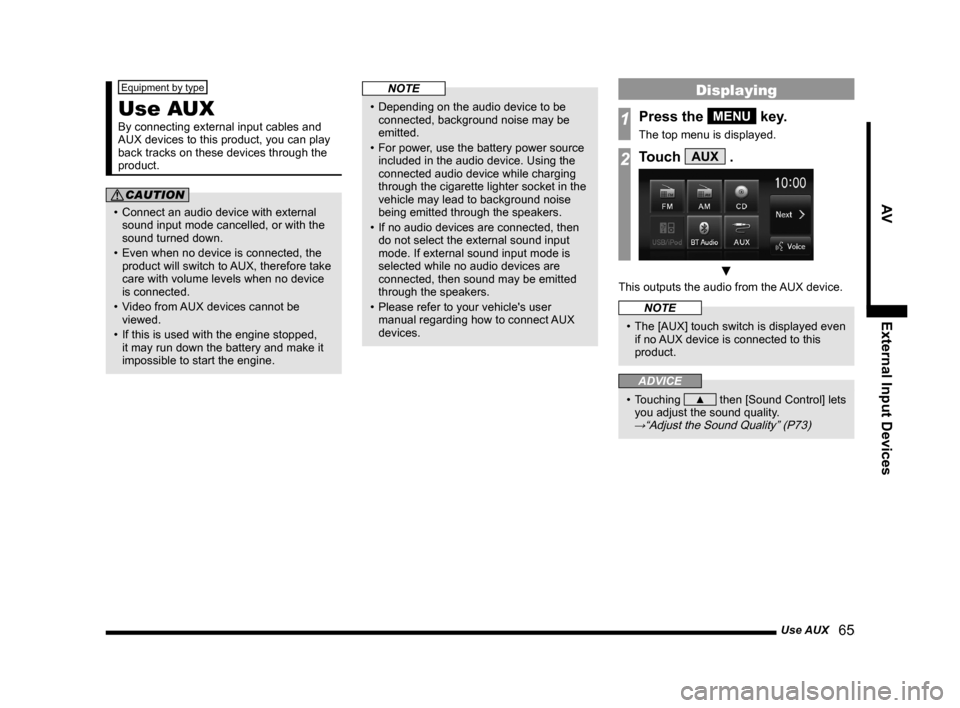
2Touch AUX .
▼
This outputs the audio from the AUX device.
NOTE
• The [AUX] touch switch is displayed even if no AUX device is connected to this
product.
ADVICE
• Touching ▲ then [Sound Control] lets
you adjust the sound quality.
→“Adjust the Sound Quality” (P73)
13MY_AVC(NAS).indb 652013/02/14 10:57:59
Page 67 of 88
Mobile Phone 67
INFO/SETTINGSINFO
Display the Phonebook
There is the vehicle phonebook registered in
this product and the mobile phonebook that
can receive the data in your mobile phone.
1Press the MENU key or touch
Phone .
The mobile phone screen is displayed.
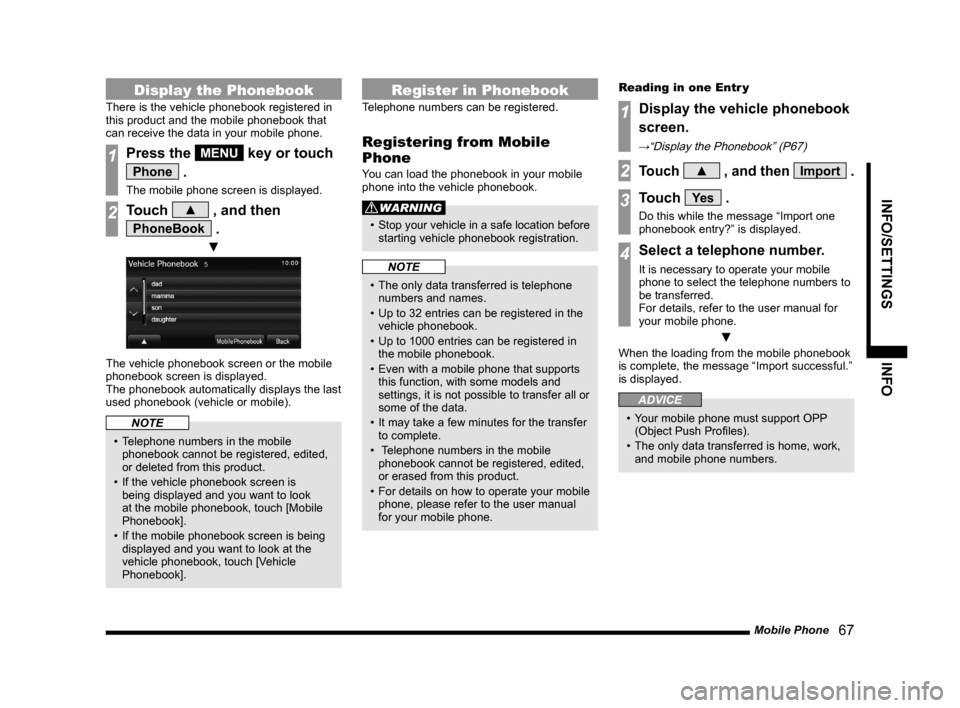
2Touch ▲ , and then
PhoneBook .
▼
The vehicle phonebook screen or the mobile
phonebook screen is displayed.
The phonebook automatically displays the last
used phonebook (vehicle or mobile).
NOTE
• Telephone numbers in the mobile
phonebook cannot be registered, edited,
or deleted from this product.
• If the vehicle phonebook screen is being displayed and you want to look
at the mobile phonebook, touch [Mobile
Phonebook].
• If the mobile phonebook screen is being displayed and you want to look at the
vehicle phonebook, touch [Vehicle
Phonebook].
Register in Phonebook
Telephone numbers can be registered.
Registering from Mobile
Phone
You can load the phonebook in your mobile
phone into the vehicle phonebook.
WARNING
• Stop your vehicle in a safe location before
starting vehicle phonebook registration.
NOTE
• The only data transferred is telephone numbers and names.
• Up to 32 entries can be registered in the vehicle phonebook.
• Up to 1000 entries can be registered in the mobile phonebook.
• Even with a mobile phone that supports this function, with some models and
settings, it is not possible to transfer all or
some of the data.
• It may take a few minutes for the transfer to complete.
• Telephone numbers in the mobile
phonebook cannot be registered, edited,
or erased from this product.
• For details on how to operate your mobile
phone, please refer to the user manual
for your mobile phone. Reading in one Entr y
1Display the vehicle phonebook
screen.
→“Display the Phonebook” (P67)
2Touch ▲ , and then Import .
3Touch Ye s .
Do this while the message “Import one
phonebook entry?” is displayed.
4Select a telephone number.
It is necessary to operate your mobile
phone to select the telephone numbers to
be transferred.
For details, refer to the user manual for
your mobile phone.
▼
When the loading from the mobile phonebook
is complete, the message “Import successful.”
is displayed.
ADVICE
• Your mobile phone must support OPP
(Object Push Profiles).
• The only data transferred is home, work, and mobile phone numbers.
13MY_AVC(NAS).indb 672013/02/14 10:58:00
Page 69 of 88
Mobile Phone 69
INFO/SETTINGSINFO
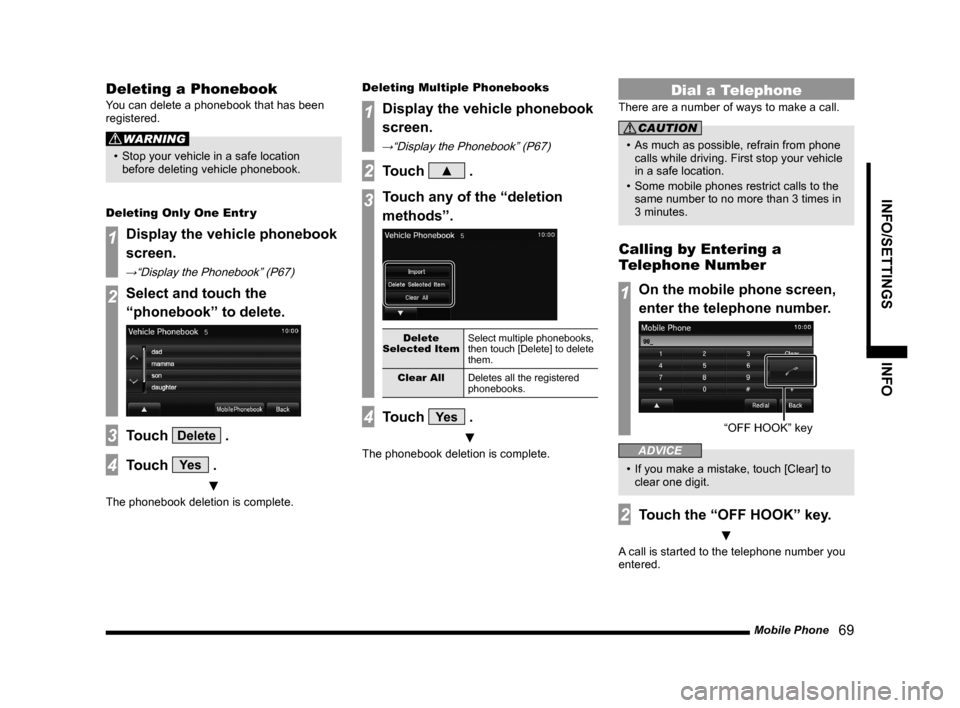
Deleting a Phonebook
You can delete a phonebook that has been
registered.
WARNING
• Stop your vehicle in a safe location
before deleting vehicle phonebook.
Deleting Only One Entr y
1Display the vehicle phonebook
screen.
→“Display the Phonebook” (P67)
2Select and touch the
“phonebook” to delete.
3Touch Delete .
4Touch Ye s .
▼
The phonebook deletion is complete. Deleting Multiple Phonebooks
1Display the vehicle phonebook
screen.
→“Display the Phonebook” (P67)
2Touch ▲ .
3Touch any of the “deletion
methods”.
Delete
Selected Item Select multiple phonebooks,
then touch [Delete] to delete
them.
Clear All Deletes all the registered
phonebooks.
4Touch Ye s .
▼
The phonebook deletion is complete.
Dial a Telephone
There are a number of ways to make a call.
CAUTION
• As much as possible, refrain from phone
calls while driving. First stop your vehicle
in a safe location.
• Some mobile phones restrict calls to the same number to no more than 3 times in
3 minutes.
Calling by Entering a
Telephone Number
1On the mobile phone screen,
enter the telephone number.
“OFF HOOK” ke y
ADVICE
• If you make a mistake, touch [Clear] to
clear one digit.
2Touch the “OFF HOOK” key.
▼
A call is started to the telephone number you
entered.
13MY_AVC(NAS).indb 692013/02/14 10:58:01