MITSUBISHI OUTLANDER 2014 3.G Service Manual
Manufacturer: MITSUBISHI, Model Year: 2014, Model line: OUTLANDER, Model: MITSUBISHI OUTLANDER 2014 3.GPages: 451, PDF Size: 49.08 MB
Page 41 of 451
Making a cargo area 4-14 Seat and restraint systems
4
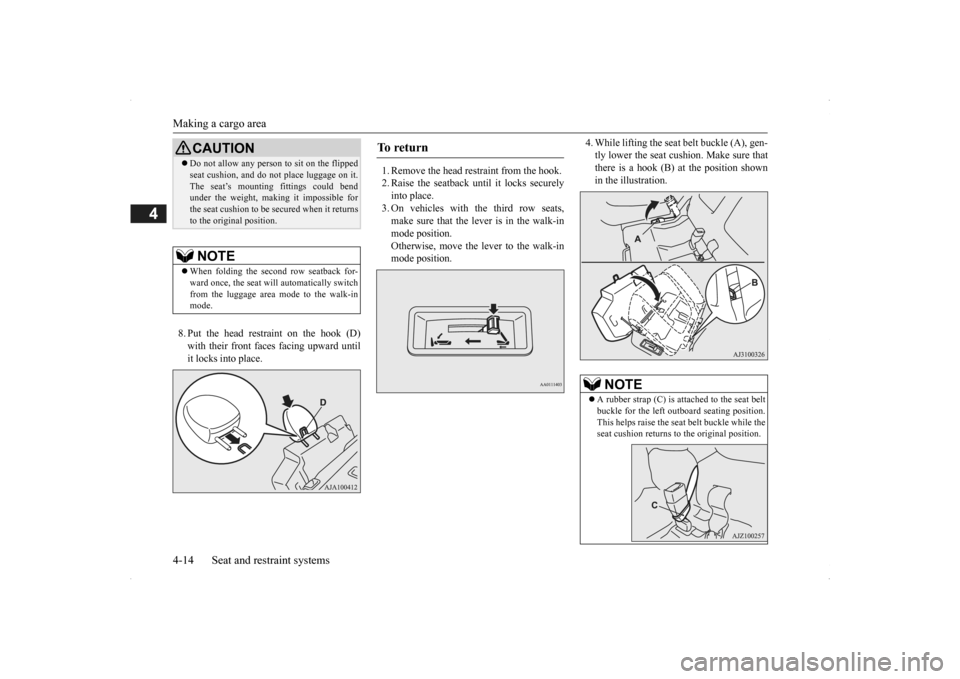
8. Put the head restraint on the hook (D) with their front fa
ces facing upward until
it locks into place.
1. Remove the head restraint from the hook. 2. Raise the seatback until it locks securely into place. 3. On vehicles with the third row seats,make sure that the lever is in the walk-in mode position. Otherwise, move the lever to the walk-inmode position.
4. While lifting the seat
belt buckle (A), gen-
tly lower the seat cushion. Make sure thatthere is a hook (B) at the position shown in the illustration.
CAUTION Do not allow any person to sit on the flipped seat cushion, and do
not place luggage on it.
The seat’s mounting
fittings could bend
under the weight, making it impossible for the seat cushion to be secured when it returns to the original position.NOTE
When folding the second row seatback for- ward once, the seat will automatically switch from the luggage area
mode to the walk-in
mode.
To r e t u r n
NOTE
A rubber strap (C) is atta
ched to the seat belt
buckle for the left out
board seating position.
This helps raise the seat
belt buckle while the
seat cushion returns to the original position.
BK0200500US.book 14 ページ 2013年2月12日 火曜日 午前9時46分
Page 42 of 451
Making a cargo area
Seat and restraint systems 4-15
4
5. Push down the seat cushion until it locks into place. 6. Make sure that all
seat belt buckles are
properly positioned on the seat cushion. Install the head restraints and make surethat they are securely locked. 7. If the center seat
belt is stored;
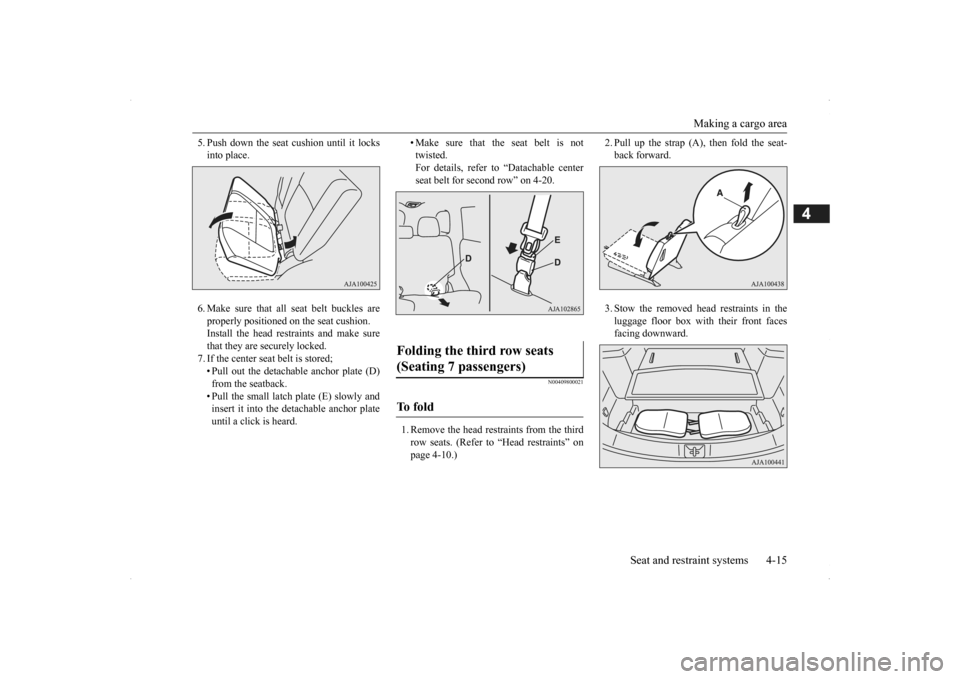
• Pull out the detachable anchor plate (D)from the seatback. • Pull the small latch plate (E) slowly and insert it into the detachable anchor plateuntil a click is heard.
• Make sure that the seat belt is not twisted.For details, refer to “Datachable center seat belt for second row” on 4-20.
N00409800021
1. Remove the head restraints from the thirdrow seats. (Refer to
“Head restraints” on
page 4-10.)
2. Pull up the strap (A), then fold the seat- back forward. 3. Stow the removed head restraints in the luggage floor box with their front faces facing downward.
Folding the third row seats (Seating 7 passengers) To f o l d
BK0200500US.book 15 ページ 2013年2月12日 火曜日 午前9時46分
Page 43 of 451
Making a flat seat 4-16 Seat and restraint systems
4
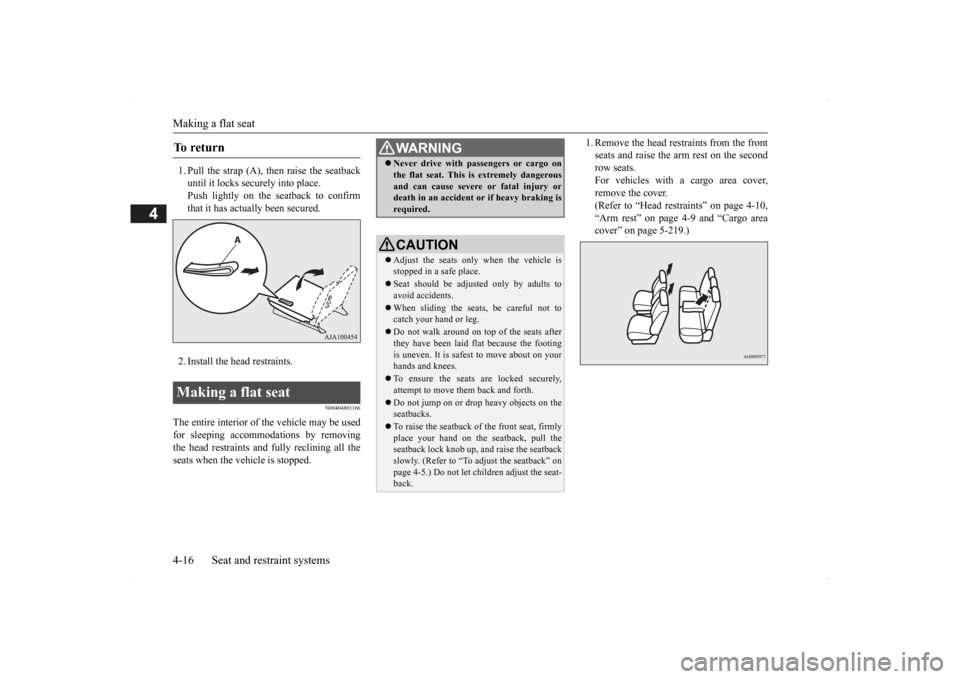
1. Pull the strap (A), then raise the seatback until it locks securely into place. Push lightly on the seatback to confirm that it has actually been secured. 2. Install the head restraints.
N00404801166
The entire interior of the vehicle may be used for sleeping accomm
odations by removing
the head restraints and fully reclining all the seats when the vehicle is stopped.
1. Remove the head re
straints from the front
seats and raise the arm rest on the secondrow seats. For vehicles with a cargo area cover, remove the cover.(Refer to “Head restraints” on page 4-10, “Arm rest” on page 4-9 and “Cargo area cover” on page 5-219.)
To r e t u r n Making a flat seat
WA R N I N G Never drive with passengers or cargo on the flat seat. This is extremely dangerousand can cause severe or fatal injury ordeath in an accident
or if heavy braking is
required.CAUTION Adjust the seats only
when the vehicle is
stopped in a safe place. Seat should be adjusted only by adults to avoid accidents. When sliding the seat
s, be careful not to
catch your hand or leg. Do not walk around on t
op of the seats after
they have been laid fl
at because the footing
is uneven. It is safe
st to move about on your
hands and knees. To ensure the seats are locked securely, attempt to move them back and forth. Do not jump on or drop heavy objects on the seatbacks. To raise the seatback of the front seat, firmly place your hand on the
seatback, pull the
seatback lock knob up,
and raise the seatback
slowly. (Refer to “To adjust the seatback” onpage 4-5.) Do not let children adjust the seat- back.
BK0200500US.book 16 ページ 2013年2月12日 火曜日 午前9時46分
Page 44 of 451
Seat belts
Seat and restraint systems 4-17
4
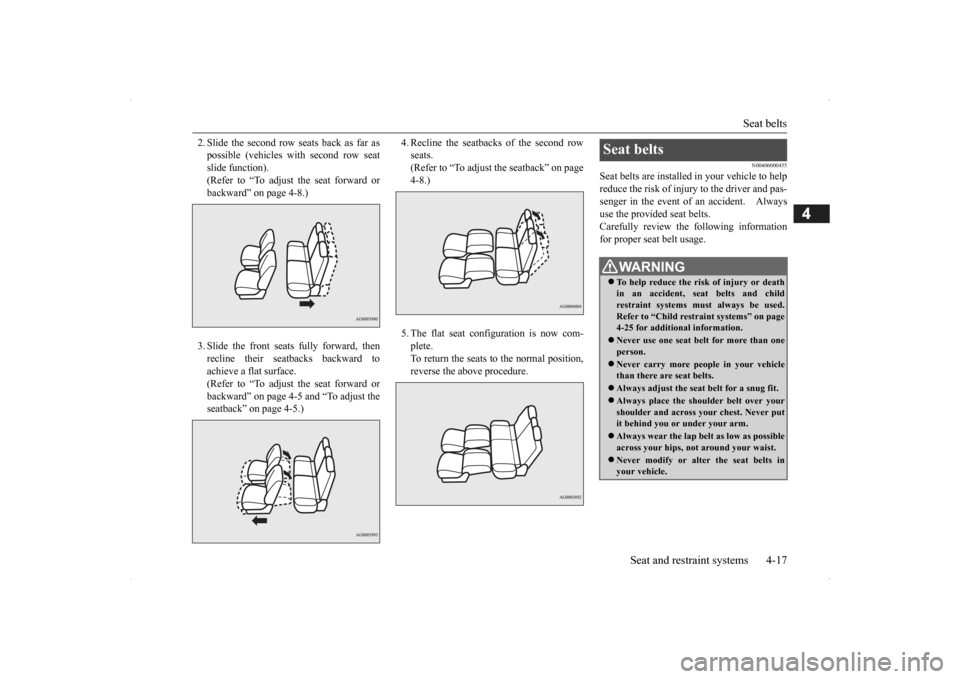
2. Slide the second row seats back as far as possible (vehicles with second row seatslide function). (Refer to “To adjust the seat forward or backward” on page 4-8.) 3. Slide the front seats fully forward, then recline their seatbacks backward to achieve a flat surface.(Refer to “To adjust the seat forward or backward” on page 4-5 and “To adjust the seatback” on page 4-5.)
4. Recline the seatbacks of the second row seats.(Refer to “To adjust the seatback” on page 4-8.) 5. The flat seat configuration is now com- plete. To return the seats to the normal position, reverse the above procedure.
N00406000455
Seat belts are installed in your vehicle to help reduce the risk of injury to the driver and pas- senger in the event of an accident. Alwaysuse the provided seat belts. Carefully review the
following information
for proper seat belt usage.Seat belts
WA R N I N G To help reduce the risk of injury or death in an accident, se
at belts and child
restraint systems must always be used. Refer to “Child restra
int systems” on page
4-25 for additional information. Never use one seat belt for more than one person. Never carry more peop
le in your vehicle
than there are seat belts. Always adjust the seat
belt for a snug fit.
Always place the shou
lder belt over your
shoulder and across you
r chest. Never put
it behind you or
under your arm.
Always wear the lap belt as low as possible across your hips, not around your waist. Never modify or alter the seat belts in your vehicle.
BK0200500US.book 17 ページ 2013年2月12日 火曜日 午前9時46分
Page 45 of 451
Seat belts 4-18 Seat and restraint systems
4
N00406201467
All seats are equipped with a seat belt which uses one combined lap-and-shoulder belt with an emergency locking retractor. This system is designed to provide both com- fort and safety. It perm
its full extension and
automatic retraction of the belts during nor- mal vehicle operation.
A sensing device
inside the belt retractor is designed to lock the retractor in the event of a sudden change inthe vehicle’s motion.
To reduce the risk to the driver of serious injury or death duri
ng deployment of the
driver’s airbag, always
properly wear the
seat belt and adjust th
e driver’s seat as far
back as possible while maintaining a posi- tion that still enables
you to fully apply the
pedals, easily control the steering wheel, and safely operate the vehicle. To reduce the risk to a front seat passen- ger of serious injury or death from a deploying airbag, make sure the passengeralways wears the seat belt properly, remains seated all the way back and upright in their seat,
and moves the seat as
far back as possible. Refer to “Supplemen- tal Restraint System (SRS) - airbag” on page 4-33 for additional information. Never hold an infant
or child in your arms
or on your lap when ri
ding in this vehicle
even when you are we
aring your seat belt.
Never place any part of the seat belt you are wearing around an infant or child.Failure to follow these simple instructions creates a risk of serious injury or death to your child in the even
t of an accident or
sudden stop.WA R N I N G
Children 12 years ol
d and under should
always ride in the re
ar seat and be prop-
erly restrained. This reduces their risk ofserious injury or de
ath in an accident,
especially due to a deploying front passen- ger airbag. Refe
r to “Child restraint sys-
tems” on page 4-25 for additional information. Any child who is t
oo small to properly
wear a seat belt must be properly restrained in an
appropriate child
restraint system. Infants MUST be placed in a rear-facing child safety seat and
positioned in the rear
seat. In the event of an ac
cident, all seat belt
assemblies, including retractors and attachment hardware, should be inspectedby an authorized Mitsubishi Motors dealer to determine whether replacement is necessary.
Seat belt instructions
WA R N I N G
NOTE
For instructions on inst
alling a child restraint
system using a seat belt
, refer to “Installing a
child restraint system using the seat belt” on page 4-30.
BK0200500US.book 18 ページ 2013年2月12日 火曜日 午前9時46分
Page 46 of 451
Seat belts
Seat and restraint systems 4-19
4
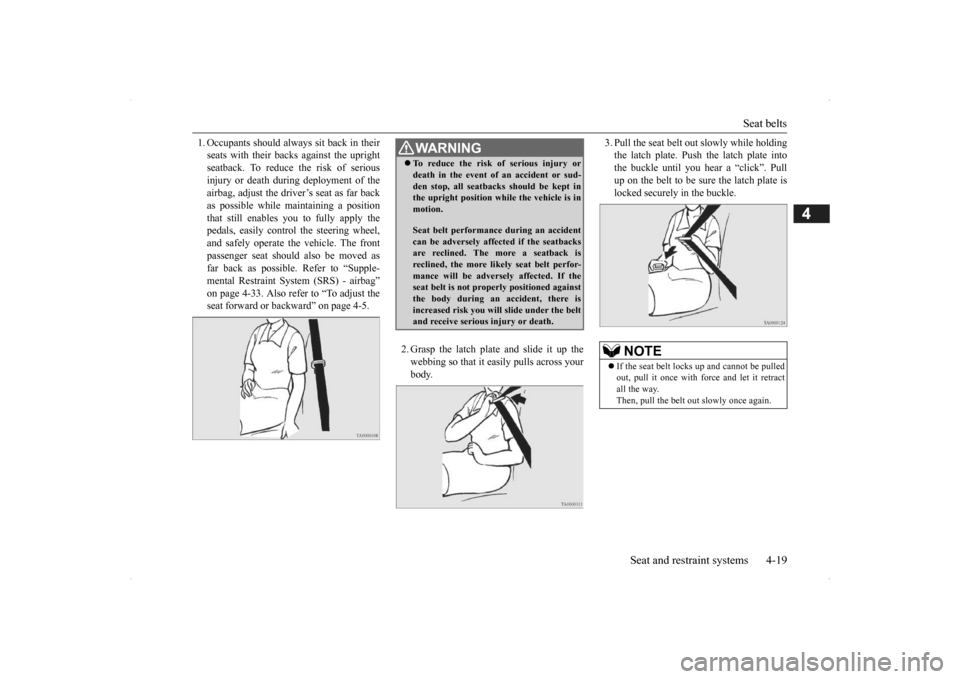
1. Occupants shoul
d always sit back in their
seats with their backs against the uprightseatback. To reduce the risk of serious injury or death during deployment of the airbag, adjust the driver’s seat as far backas possible while ma
intaining a position
that still enables you to fully apply the pedals, easily contro
l the steering wheel,
and safely operate the vehicle. The front passenger seat should
also be moved as
far back as possible. Refer to “Supple- mental Restraint Syst
em (SRS) - airbag”
on page 4-33. Also refe
r to “To adjust the
seat forward or backward” on page 4-5.
2. Grasp the latch plate and slide it up the webbing so that it ea
sily pulls across your
body.
3. Pull the seat belt out
slowly while holding
the latch plate. Push the latch plate intothe buckle until you he
ar a “click”. Pull
up on the belt to be sure the latch plate is locked securely in the buckle.
WA R N I N G To reduce the risk of serious injury or death in the event of
an accident or sud-
den stop, all seatbacks should be kept inthe upright position while the vehicle is in motion. Seat belt performance during an accident can be adversely affect
ed if the seatbacks
are reclined. The more a seatback isreclined, the more likely seat belt perfor- mance will be advers
ely affected. If the
seat belt is not proper
ly positioned against
the body during an accident, there is increased risk you will slide under the belt and receive serious
injury or death.
NOTE
If the seat belt lock
s up and cannot be pulled
out, pull it once with fo
rce and let it retract
all the way. Then, pull the belt out
slowly once again.
BK0200500US.book 19 ページ 2013年2月12日 火曜日 午前9時46分
Page 47 of 451
Seat belts 4-20 Seat and restraint systems
4
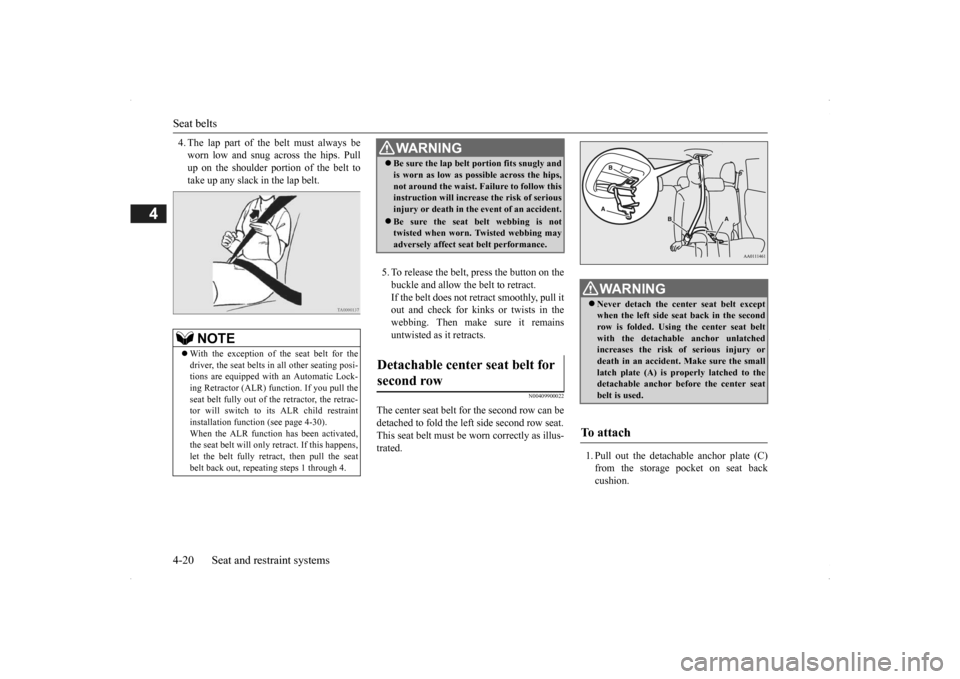
4. The lap part of the belt must always be worn low and snug across the hips. Pullup on the shoulder portion of the belt to take up any slack in the lap belt.
5. To release the belt,
press the button on the
buckle and allow the belt to retract. If the belt does not retract smoothly, pull it out and check for kinks or twists in thewebbing. Then make sure it remains untwisted as it retracts.
N00409900022
The center seat belt for the second row can be detached to fold the le
ft side second row seat.
This seat belt must be worn correctly as illus- trated.
1. Pull out the detachable anchor plate (C) from the storage pocket on seat back cushion.
NOTE
With the exception of the seat belt for the driver, the seat belts in all other seating posi-tions are equipped with an Automatic Lock- ing Retractor (ALR) func
tion. If you pull the
seat belt fully out of th
e retractor, the retrac-
tor will switch to its ALR child restraint installation function (see page 4-30). When the ALR function has been activated,the seat belt will only
retract. If this happens,
let the belt fully retract, then pull the seat belt back out, repeating steps 1 through 4.
WA R N I N G Be sure the lap belt portion fits snugly and is worn as low as possible across the hips,not around the waist. Failure to follow thisinstruction will increase the risk of serious injury or death in the
event of an accident.
Be sure the seat belt webbing is not twisted when worn. Twisted webbing may adversely affect seat belt performance.
Detachable center seat belt for second row
WA R N I N G Never detach the center seat belt except when the left side seat back in the secondrow is folded. Using the center seat belt with the detachable
anchor unlatched
increases the risk of serious injury ordeath in an accident. Make sure the small latch plate (A) is properly latched to the detachable anchor be
fore the center seat
belt is used.
To attach
BK0200500US.book 20 ページ 2013年2月12日 火曜日 午前9時46分
Page 48 of 451
Seat belts
Seat and restraint systems 4-21
4
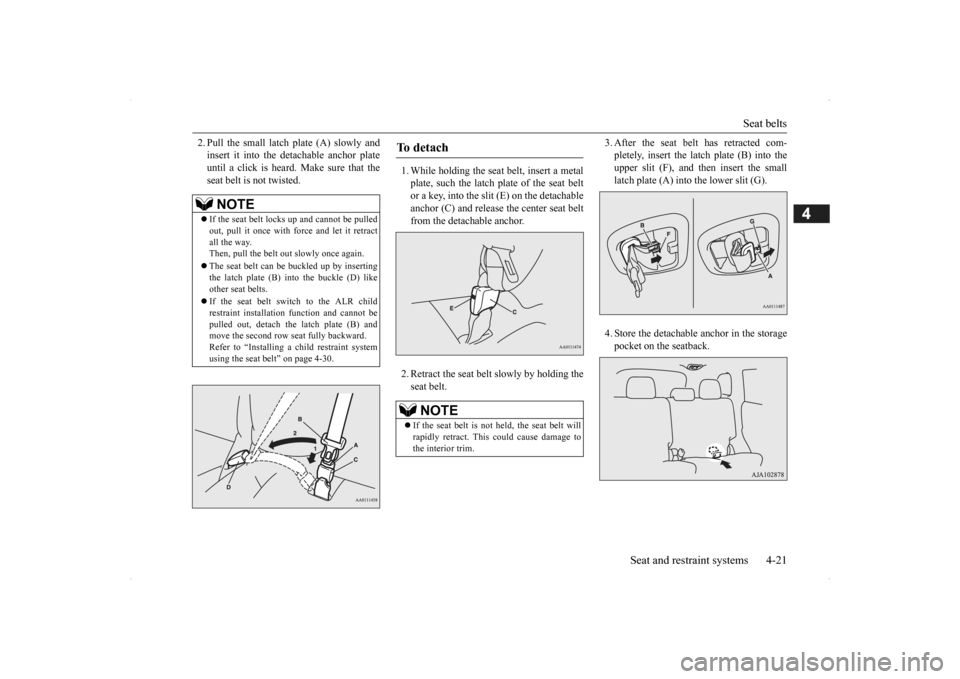
2. Pull the small latch plate (A) slowly and insert it into the detachable anchor plateuntil a click is heard. Make sure that the seat belt is not twisted.
1. While holding the seat
belt, insert a metal
plate, such the latch plate of the seat belt or a key, into the slit (E) on the detachable anchor (C) and release the center seat beltfrom the detachable anchor. 2. Retract the seat belt slowly by holding the seat belt.
3. After the seat belt has retracted com- pletely, insert the latch plate (B) into theupper slit (F), and th
en insert the small
latch plate (A) into the lower slit (G). 4. Store the detachable anchor in the storage pocket on the seatback.
NOTE
If the seat belt lock
s up and cannot be pulled
out, pull it once with fo
rce and let it retract
all the way. Then, pull the belt out
slowly once again.
The seat belt can be
buckled up by inserting
the latch plate (B) into the buckle (D) like other seat belts. If the seat belt switch to the ALR child restraint installation
function and cannot be
pulled out, detach the latch plate (B) and move the second row seat fully backward. Refer to “Installing a child restraint systemusing the seat be
lt” on page 4-30.
To d e t a c h
NOTE
If the seat belt is not held, the seat belt will rapidly retract. This
could cause damage to
the interior trim.
BK0200500US.book 21 ページ 2013年2月12日 火曜日 午前9時46分
Page 49 of 451
Seat belts 4-22 Seat and restraint systems
4
N00418401394
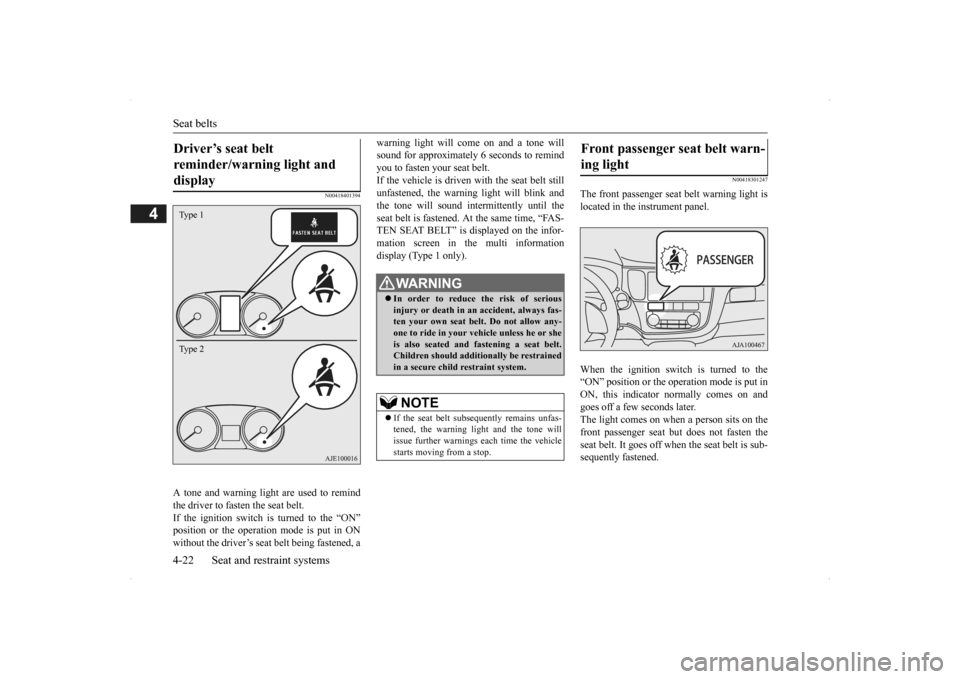
A tone and warning light are used to remind the driver to fasten the seat belt. If the ignition switch is turned to the “ON” position or the operation mode is put in ONwithout the driver’s seat belt being fastened, a
warning light will come on and a tone will sound for approximately 6 seconds to remindyou to fasten your seat belt. If the vehicle is driven with the seat belt still unfastened, the warning light will blink andthe tone will sound inte
rmittently until the
seat belt is fastened. At the same time, “FAS- TEN SEAT BELT” is displayed on the infor-mation screen in the multi information display (Type 1 only).
N00418301247
The front passenger seat
belt warning light is
located in the instrument panel. When the ignition switch is turned to the “ON” position or the ope
ration mode is put in
ON, this indicator
normally comes on and
goes off a few seconds later.The light comes on when a person sits on the front passenger seat but does not fasten the seat belt. It goes off wh
en the seat belt is sub-
sequently fastened.
Driver’s seat belt reminder/warning light and display Type 1 Type 2
WA R N I N G In order to reduce the risk of serious injury or death in an accident, always fas- ten your own seat belt. Do not allow any-one to ride in your ve
hicle unless he or she
is also seated and fastening a seat belt. Children should additi
onally be restrained
in a secure child restraint system.NOTE
If the seat belt subs
equently remains unfas-
tened, the warning li
ght and the tone will
issue further warnings
each time the vehicle
starts moving from a stop.
Front passenger seat belt warn- ing light
BK0200500US.book 22 ページ 2013年2月12日 火曜日 午前9時46分
Page 50 of 451
Seat belts
Seat and restraint systems 4-23
4
N00406301354
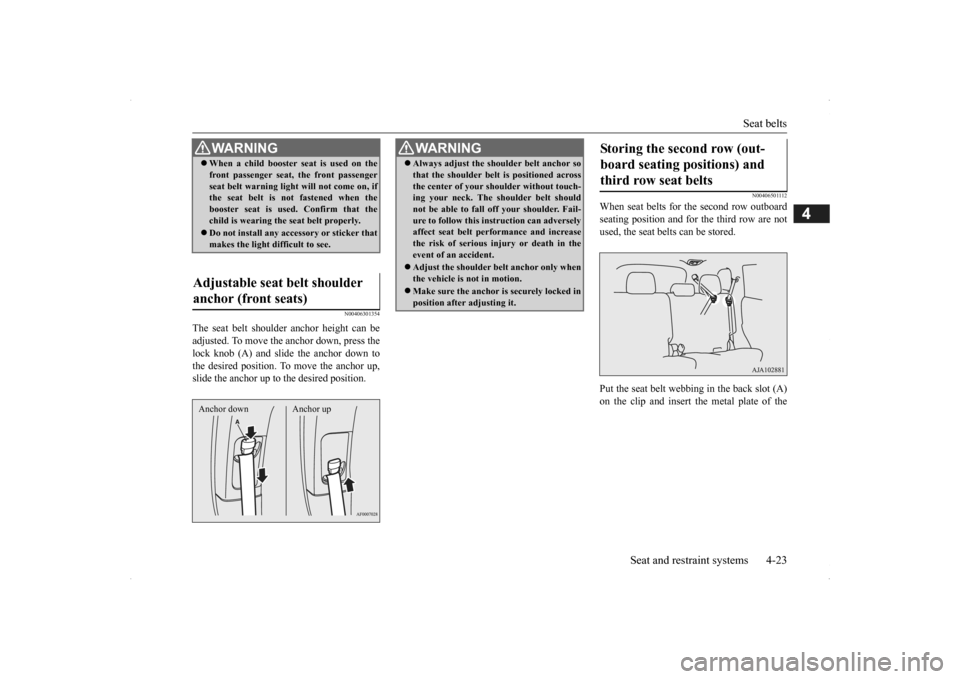
The seat belt shoulder
anchor height can be
adjusted. To move the anchor down, press thelock knob (A) and slide the anchor down to the desired position. To
move the anchor up,
slide the anchor up to the desired position.
N00406501112
When seat belts for the second row outboardseating position and for the third row are not used, the seat belts can be stored. Put the seat belt webbing in the back slot (A) on the clip and insert the metal plate of the
WA R N I N G When a child booster se
at is used on the
front passenger seat, the front passengerseat belt warning ligh
t will not come on, if
the seat belt is not fastened when the booster seat is used
. Confirm that the
child is wearing the seat belt properly. Do not install any acce
ssory or sticker that
makes the light difficult to see.
Adjustable seat belt shoulder anchor (front seats) Anchor down Anchor up
WA R N I N G Always adjust the shou
lder belt anchor so
that the shoulder belt
is positioned across
the center of your shoulder without touch-ing your neck. The sh
oulder belt should
not be able to fall off your shoulder. Fail- ure to follow this instruction can adverselyaffect seat belt performance and increase the risk of serious in
jury or death in the
event of an accident. Adjust the shoulder be
lt anchor only when
the vehicle is not in motion. Make sure the anchor is securely locked in position after adjusting it.
Storing the second row (out- board seating positions) and third row seat belts
BK0200500US.book 23 ページ 2013年2月12日 火曜日 午前9時46分