sensor MITSUBISHI OUTLANDER PHEV 2014 Owner's Manual (in English)
[x] Cancel search | Manufacturer: MITSUBISHI, Model Year: 2014, Model line: OUTLANDER PHEV, Model: MITSUBISHI OUTLANDER PHEV 2014Pages: 442, PDF Size: 19.04 MB
Page 26 of 442

Fuel selectionE00200104275Recom-
mended fuelUnleaded petrol octane number(EN228) 95 RON or higherCAUTIONlThe use of leaded fuel can result in serious
damage to the engine and catalytic convert- er. Do not use leaded fuel.NOTEl Poor quality petrol can cause problems such
as difficult starting, stalling, engine noise
and hesitation. If you experience these prob- lems, try another brand and/or grade of pet-
rol.
If the check engine warning lamp flashes,
have the system checked as soon as possible at a MITSUBISHI MOTORS Authorized
Service Point.
E10 type petrol
The petrol engine are compatible with E10
type petrol (containing 10 % ethanol) con- forming to European standards EN 228.
CAUTIONl Do not use more than 10 % concentration of
ethanol (grain alcohol) by volume.
Use of more than 10 % concentration may
lead to damage to your vehicle fuel system,
engine, engine sensors and exhaust system.Filling the fuel tank
E00200203804WARNINGlWhen handling fuel, comply with the safe-
ty regulations displayed by garages and
filling stations.
l Gasoline is highly flammable and explo-
sive. You could be burned or seriously in-
jured when handling it. When refueling
your vehicle, always put the operation mode of the power switch in OFF and
keep away from flames, sparks, and smoking materials. Always handle fuel in
well-ventilated outdoor areas.
l Before removing the fuel cap, be sure to
get rid of your body’s static electricity by
touching a metal part of the car or the fuel pump. Any static electricity on your
body could create a spark that ignites fuel vapour.WARNINGl Perform the whole refueling process
(opening the fuel tank filler door, remov- ing the fuel cap, etc.) by yourself. Do notlet any other person come near the fuel
tank filler. If you allowed a person to help you and that person was carrying static
electricity, fuel vapour could be ignited.
l Do not perform charging and refueling at
the same time. If you charged with staticelectricity, fuel vapour could be ignited by the discharge spark.
l Do not move away from the fuel tank fill-
er until refueling is finished. If you moved away and did something else (for exam-
ple, sitting on a seat) part-way through the refueling process, you could pick up afresh charge of static electricity.
l Be careful not to inhale fuel vapour. Fuel
contains toxic substances.
l Keep the doors and windows closed while
refueling the vehicle. If they were open,fuel vapour could get into the cabin.
l If the tank cap must be replaced, use only
a MITSUBISHI MOTORS genuine part.CAUTIONl Depending on the operating conditions of
your vehicle, the fuel in the fuel tank may
not be used for a long time and stay in the tank, resulting in deterioration of the fuel
quality. As this may affect the engine and
Fuel selection
2-12OGGE14E5General information2
Page 78 of 442

NOTElThe electric tailgate does not operate nor-
mally under the following conditions:
• When parked on an incline
• In strong winds
• When the electric tailgate is covered with
snow
l Repeated continuous operation between
opening and closing the electric tailgate will
activate the built-in protection circuit and
switch the tailgate to manual operation.
l If the electric tailgate handle is operated
while the tailgate is operating or immediate- ly after it is closed, the tailgate will move in
the direction opposite to the one in which it
was operating.
l If the battery or fuse is replaced while the
electric tailgate is open, it cannot be closed automatically.
In this case close the electric tailgate man-
ually.Operating conditions
E00313101064
The electric tailgate can be opened automati-
cally when all of the following conditions are met.
l The operation mode is in OFF.
l The electric tailgate is completely
closed.
l The electric tailgate is unlocked.
l The operation mode is in ON with the
electrical parking switch is pressed.
l The electric tailgate is completely
closed.
l The electric tailgate is unlocked.
l The electric tailgate is unlocked.
l The keyless operation key is within the
operating range (70 cm from the electric
tailgate switch) and the tailgate is
locked.
The factory setting is “Inactive”.
To modify the setting to “Active”, please
contact an authorized MITSUBISHI
MOTORS dealer.
The electric tailgate can be closed automati-
cally when all of the following conditions are met.
l The operation mode is in OFF.
l The electric tailgate is completely open.
l People, luggage, etc., are not touching
the sensors.
electrical parking switch is pressed.
l The electric tailgate is completely open.
l People, luggage, etc., are not touching
the sensors.
Operating the electric tailgate using the keyless operation keyor the driver’s side electric tail-
gate switch
After unlocking the doors and the electric tailgate, the electric tailgate can be operated by pressing the switch (A) of the keyless op-
eration key or the driver’s side electric tail-
gate switch (B).
If the electric tailgate switch is pressed twice
in a row, the electric tailgate operates after the warning buzzer sounds and the hazardwarning flasher brinks 2 times.
Electric tailgate*
4-22OGGE14E5Locking and unlocking4
Page 80 of 442
NOTElWhen you are carrying the keyless operation
key with the tailgate is locked, the electric tailgate can be opened by pressing the open
switch even if the tailgate is locked. The factory setting of the function is “Inac- tive”.
To modify the setting to “Active”, please
contact an authorized MITSUBISHI
MOTORS dealer.
Closing the electric tailgate us-
ing the close switch
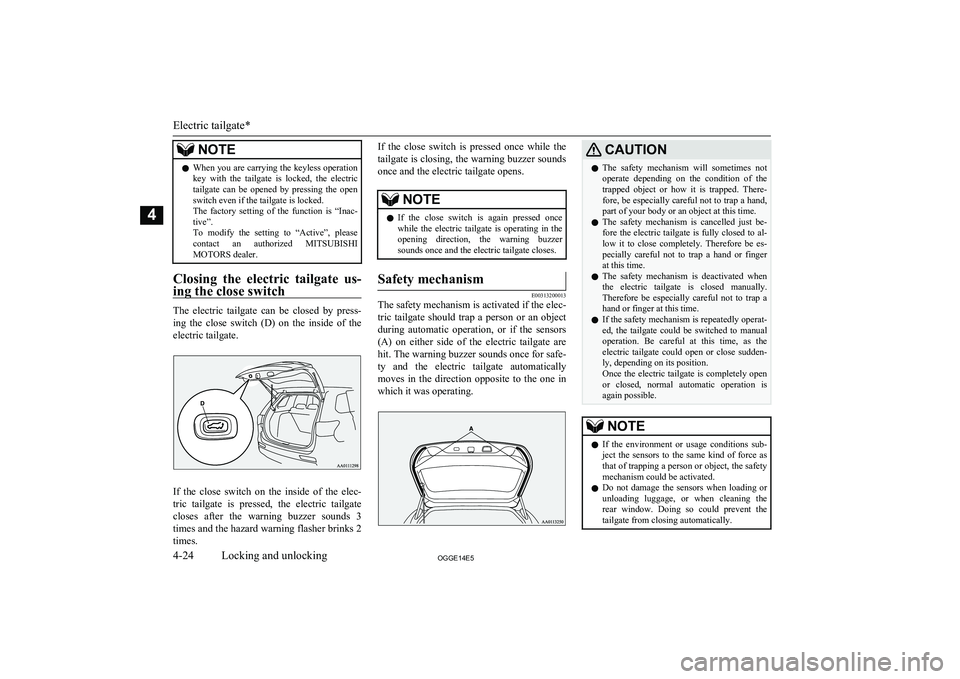
The electric tailgate can be closed by press-
ing the close switch (D) on the inside of the electric tailgate.
If the close switch on the inside of the elec-tric tailgate is pressed, the electric tailgate
closes after the warning buzzer sounds 3
times and the hazard warning flasher brinks 2 times.
If the close switch is pressed once while the
tailgate is closing, the warning buzzer sounds
once and the electric tailgate opens.NOTEl If the close switch is again pressed once
while the electric tailgate is operating in the
opening direction, the warning buzzer sounds once and the electric tailgate closes.Safety mechanism
E00313200013
The safety mechanism is activated if the elec-
tric tailgate should trap a person or an object
during automatic operation, or if the sensors (A) on either side of the electric tailgate are
hit. The warning buzzer sounds once for safe- ty and the electric tailgate automatically moves in the direction opposite to the one in which it was operating.
CAUTIONl The safety mechanism will sometimes not
operate depending on the condition of the
trapped object or how it is trapped. There- fore, be especially careful not to trap a hand,
part of your body or an object at this time.
l The safety mechanism is cancelled just be-
fore the electric tailgate is fully closed to al-
low it to close completely. Therefore be es-
pecially careful not to trap a hand or finger
at this time.
l The safety mechanism is deactivated when
the electric tailgate is closed manually. Therefore be especially careful not to trap ahand or finger at this time.
l If the safety mechanism is repeatedly operat-
ed, the tailgate could be switched to manual
operation. Be careful at this time, as the electric tailgate could open or close sudden-
ly, depending on its position.
Once the electric tailgate is completely open
or closed, normal automatic operation is
again possible.NOTEl If the environment or usage conditions sub-
ject the sensors to the same kind of force as
that of trapping a person or object, the safety mechanism could be activated.
l Do not damage the sensors when loading or
unloading luggage, or when cleaning therear window. Doing so could prevent the tailgate from closing automatically.
Electric tailgate*
4-24OGGE14E5Locking and unlocking4
Page 105 of 442
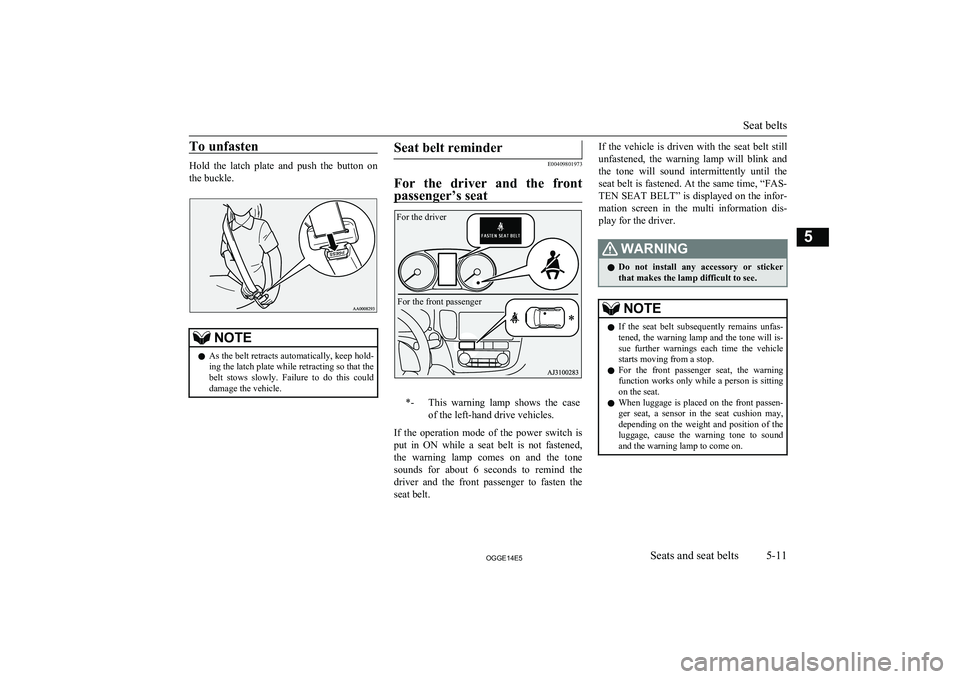
To unfasten
Hold the latch plate and push the button on
the buckle.
NOTEl As the belt retracts automatically, keep hold-
ing the latch plate while retracting so that the
belt stows slowly. Failure to do this could damage the vehicle.Seat belt reminder
E00409801973
For the driver and the front
passenger’s seat
*-This warning lamp shows the case
of the left-hand drive vehicles.
If the operation mode of the power switch is put in ON while a seat belt is not fastened,
the warning lamp comes on and the tone sounds for about 6 seconds to remind the
driver and the front passenger to fasten the
seat belt.
If the vehicle is driven with the seat belt still
unfastened, the warning lamp will blink and
the tone will sound intermittently until the
seat belt is fastened. At the same time, “FAS- TEN SEAT BELT” is displayed on the infor-
mation screen in the multi information dis-
play for the driver.WARNINGl Do not install any accessory or sticker
that makes the lamp difficult to see.NOTEl If the seat belt subsequently remains unfas-
tened, the warning lamp and the tone will is-
sue further warnings each time the vehicle starts moving from a stop.
l For the front passenger seat, the warning
function works only while a person is sitting
on the seat.
l When luggage is placed on the front passen-
ger seat, a sensor in the seat cushion may,
depending on the weight and position of the
luggage, cause the warning tone to sound
and the warning lamp to come on.
Seat belts
5-11OGGE14E5Seats and seat belts5 For the driverFor the front passenger
Page 163 of 442
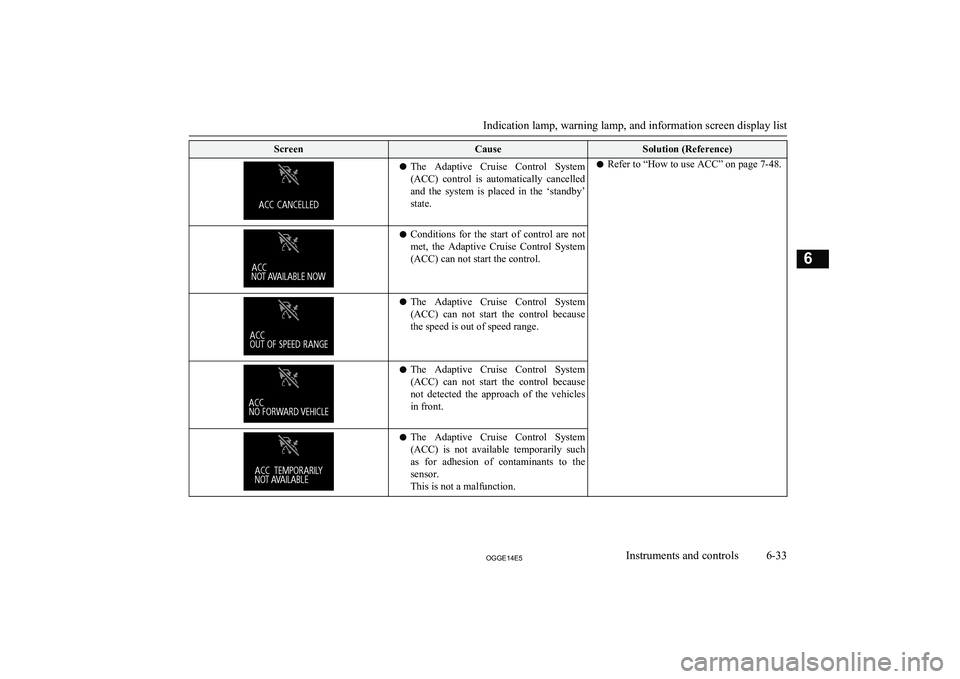
ScreenCauseSolution (Reference)lThe Adaptive Cruise Control System
(ACC) control is automatically cancelled
and the system is placed in the ‘standby’
state.l Refer to “How to use ACC” on page 7-48.lConditions for the start of control are not
met, the Adaptive Cruise Control System (ACC) can not start the control.l The Adaptive Cruise Control System
(ACC) can not start the control because
the speed is out of speed range.l The Adaptive Cruise Control System
(ACC) can not start the control because
not detected the approach of the vehicles in front.l The Adaptive Cruise Control System
(ACC) is not available temporarily such
as for adhesion of contaminants to the sensor.
This is not a malfunction.
Indication lamp, warning lamp, and information screen display list
6-33OGGE14E5Instruments and controls6
Page 164 of 442
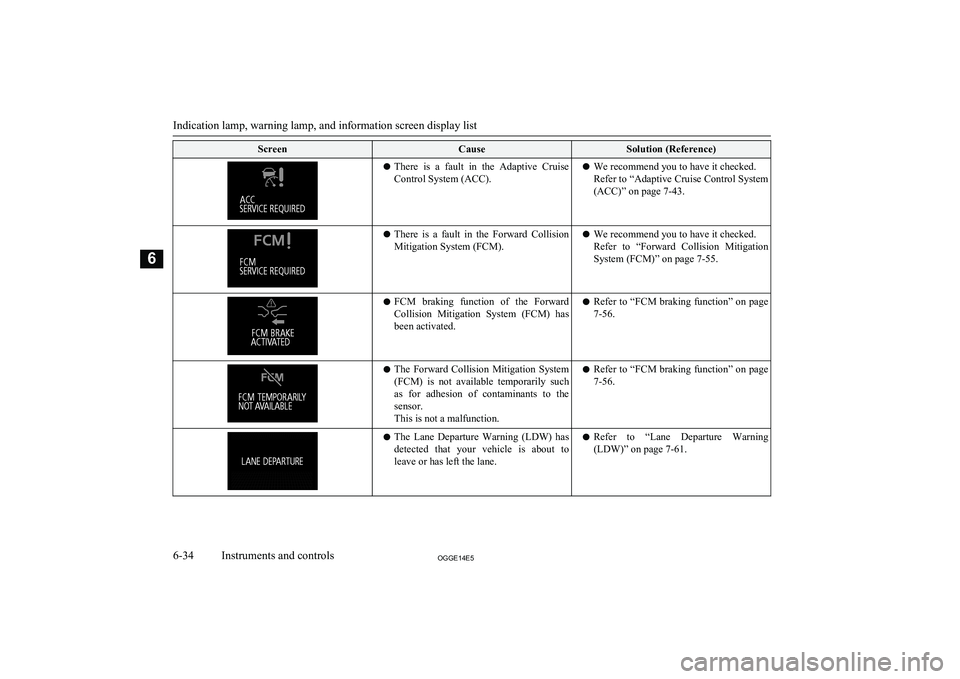
ScreenCauseSolution (Reference)lThere is a fault in the Adaptive Cruise
Control System (ACC).l We recommend you to have it checked.
Refer to “Adaptive Cruise Control System
(ACC)” on page 7-43.l There is a fault in the Forward Collision
Mitigation System (FCM).l We recommend you to have it checked.
Refer to “Forward Collision Mitigation System (FCM)” on page 7-55.l FCM braking function of the Forward
Collision Mitigation System (FCM) hasbeen activated.l Refer to “FCM braking function” on page
7-56.l The Forward Collision Mitigation System
(FCM) is not available temporarily such
as for adhesion of contaminants to the
sensor.
This is not a malfunction.l Refer to “FCM braking function” on page
7-56.l The Lane Departure Warning (LDW) has
detected that your vehicle is about to
leave or has left the lane.l Refer to “Lane Departure Warning
(LDW)” on page 7-61.
Indication lamp, warning lamp, and information screen display list
6-34OGGE14E5Instruments and controls6
Page 169 of 442
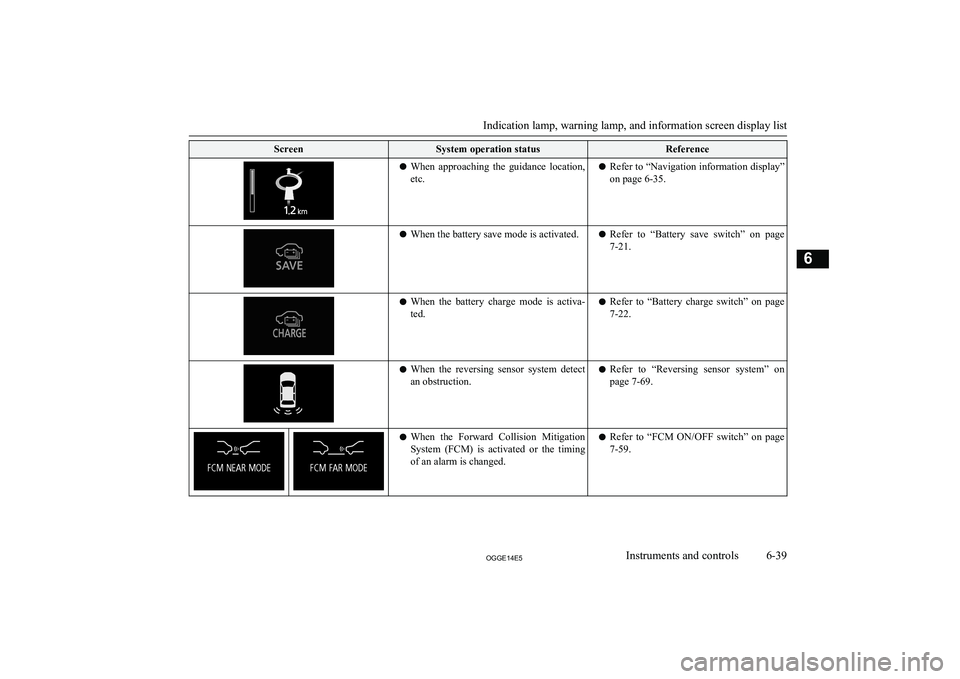
ScreenSystem operation statusReferencelWhen approaching the guidance location,
etc.l Refer to “Navigation information display”
on page 6-35.l When the battery save mode is activated.l Refer to “Battery save switch” on page
7-21.l When the battery charge mode is activa-
ted.l Refer to “Battery charge switch” on page
7-22.l When the reversing sensor system detect
an obstruction.l Refer to “Reversing sensor system” on
page 7-69.l When the Forward Collision Mitigation
System (FCM) is activated or the timing
of an alarm is changed.l Refer to “FCM ON/OFF switch” on page
7-59.
Indication lamp, warning lamp, and information screen display list
6-39OGGE14E5Instruments and controls6
Page 176 of 442
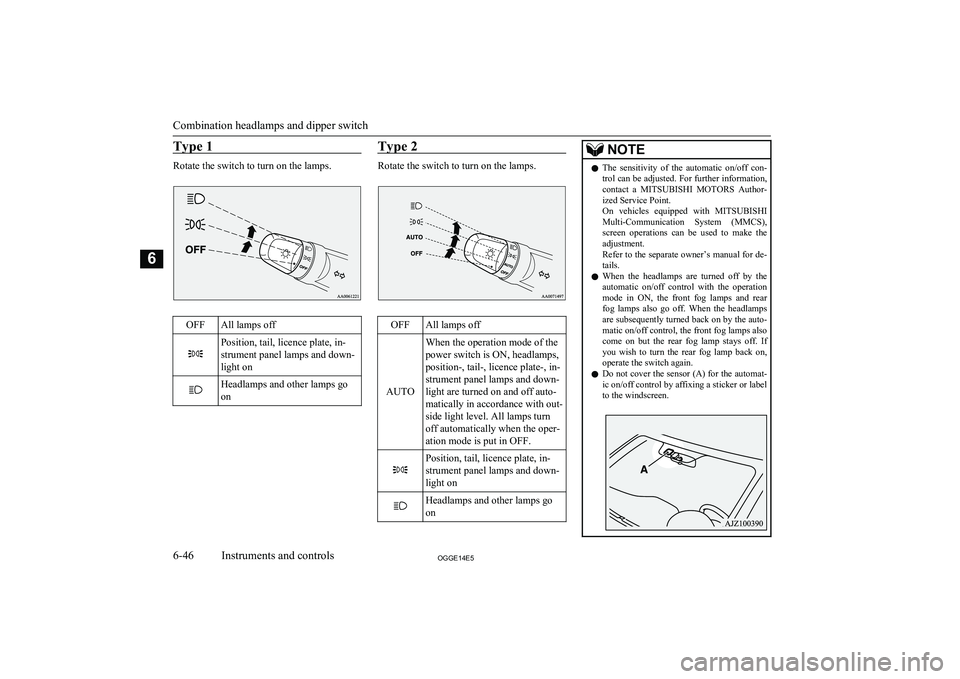
Type 1
Rotate the switch to turn on the lamps.
OFFAll lamps offPosition, tail, licence plate, in-
strument panel lamps and down-
light onHeadlamps and other lamps go
onType 2
Rotate the switch to turn on the lamps.
OFFAll lamps off
AUTO
When the operation mode of the
power switch is ON, headlamps,
position-, tail-, licence plate-, in-
strument panel lamps and down-
light are turned on and off auto-
matically in accordance with out-
side light level. All lamps turn
off automatically when the oper-
ation mode is put in OFF.Position, tail, licence plate, in-
strument panel lamps and down-
light onHeadlamps and other lamps go
onNOTEl The sensitivity of the automatic on/off con-
trol can be adjusted. For further information,contact a MITSUBISHI MOTORS Author-
ized Service Point.
On vehicles equipped with MITSUBISHI
Multi-Communication System (MMCS), screen operations can be used to make theadjustment.
Refer to the separate owner’s manual for de-
tails.
l When the headlamps are turned off by the
automatic on/off control with the operation
mode in ON, the front fog lamps and rear fog lamps also go off. When the headlamps
are subsequently turned back on by the auto-
matic on/off control, the front fog lamps also come on but the rear fog lamp stays off. If
you wish to turn the rear fog lamp back on, operate the switch again.
l Do not cover the sensor (A) for the automat-
ic on/off control by affixing a sticker or label
to the windscreen.
Combination headlamps and dipper switch
6-46OGGE14E5Instruments and controls6
Page 183 of 442
Wiper and washer switchE00507101218CAUTIONlIf the washer is used in cold weather, the
washer fluid sprayed against the glass may
freeze, which may hinder visibility. Warm the glass with the defroster or rear window
demister before using the washer.Windscreen wipers
E00516901690NOTEl To ensure a clear rearward view, the rear
window wiper will automatically perform several continuous operations if the selector lever is put in the “R” position while the
windscreen wipers are operating.
Refer to “Rear window wiper and washer” on page 6-57.
Except for vehicles equipped
with rain sensor
The windscreen wipers can be operated with
the operation mode of the power switch in ON or ACC.
If the blades are frozen to the windscreen or
rear window, do not operate the wipers until
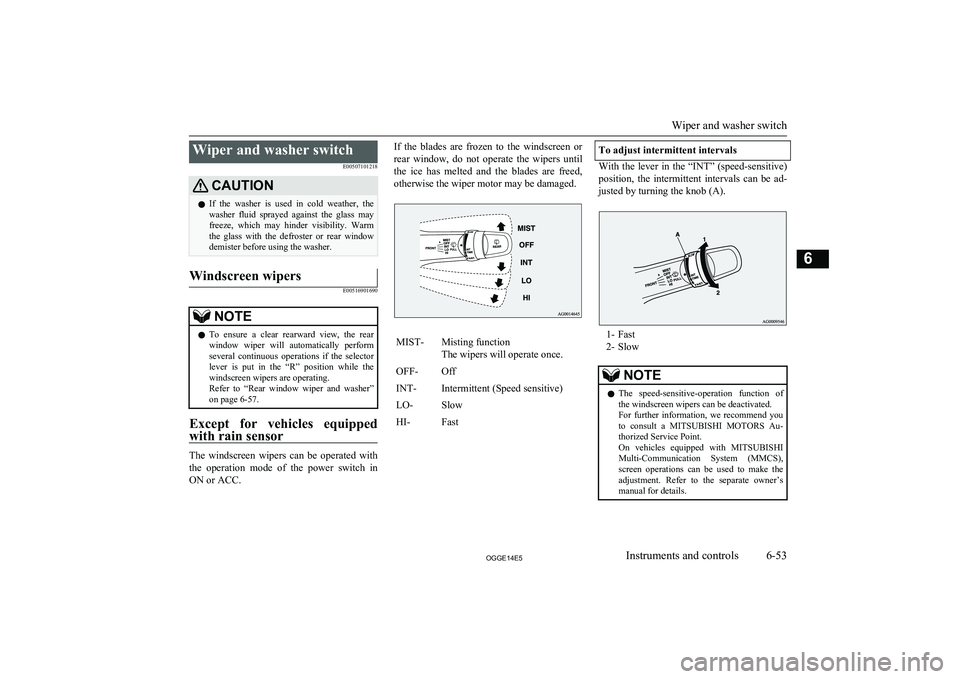
the ice has melted and the blades are freed, otherwise the wiper motor may be damaged.MIST-Misting function
The wipers will operate once.OFF-OffINT-Intermittent (Speed sensitive)LO-SlowHI-FastTo adjust intermittent intervals
With the lever in the “INT” (speed-sensitive) position, the intermittent intervals can be ad-justed by turning the knob (A).
1- Fast
2- Slow
NOTEl The speed-sensitive-operation function of
the windscreen wipers can be deactivated.
For further information, we recommend you to consult a MITSUBISHI MOTORS Au-
thorized Service Point.
On vehicles equipped with MITSUBISHI
Multi-Communication System (MMCS), screen operations can be used to make theadjustment. Refer to the separate owner’s
manual for details.
Wiper and washer switch
6-53OGGE14E5Instruments and controls6
Page 184 of 442
Misting function
The misting function can be operated withthe operation mode of the power switch in
ON or ACC.
The wipers will operate once if the wiper lev- er is raised to the “MIST” position and re- leased. This operation is useful when it is
drizzling, etc. The wipers will continue to op- erate while the lever is held in the “MIST”
position.
Vehicles with rain sensor
E00517001412
The windscreen wipers can be operated with the operation mode of the power switch in
ON or ACC.
If the blades are frozen to the windscreen or
rear window, do not operate the wipers until the ice has melted and the blades are freed,
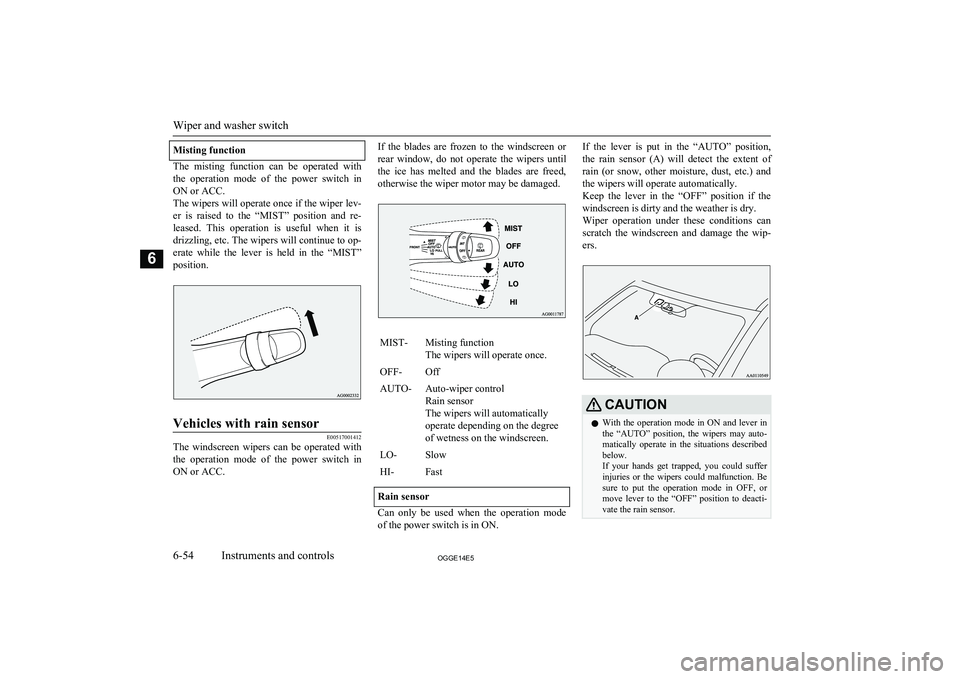
otherwise the wiper motor may be damaged.MIST-Misting function
The wipers will operate once.OFF-OffAUTO-Auto-wiper control
Rain sensor
The wipers will automatically
operate depending on the degree
of wetness on the windscreen.LO-SlowHI-Fast
Rain sensor
Can only be used when the operation mode of the power switch is in ON.
If the lever is put in the “AUTO” position,
the rain sensor (A) will detect the extent of rain (or snow, other moisture, dust, etc.) and the wipers will operate automatically.
Keep the lever in the “OFF” position if the
windscreen is dirty and the weather is dry.
Wiper operation under these conditions can scratch the windscreen and damage the wip-
ers.CAUTIONl With the operation mode in ON and lever in
the “AUTO” position, the wipers may auto-
matically operate in the situations described below.
If your hands get trapped, you could suffer injuries or the wipers could malfunction. Be sure to put the operation mode in OFF, or move lever to the “OFF” position to deacti-
vate the rain sensor.
Wiper and washer switch
6-54OGGE14E5Instruments and controls6