display MITSUBISHI OUTLANDER PHEV 2014 (in English) User Guide
[x] Cancel search | Manufacturer: MITSUBISHI, Model Year: 2014, Model line: OUTLANDER PHEV, Model: MITSUBISHI OUTLANDER PHEV 2014Pages: 442, PDF Size: 19.04 MB
Page 26 of 442

Fuel selectionE00200104275Recom-
mended fuelUnleaded petrol octane number(EN228) 95 RON or higherCAUTIONlThe use of leaded fuel can result in serious
damage to the engine and catalytic convert- er. Do not use leaded fuel.NOTEl Poor quality petrol can cause problems such
as difficult starting, stalling, engine noise
and hesitation. If you experience these prob- lems, try another brand and/or grade of pet-
rol.
If the check engine warning lamp flashes,
have the system checked as soon as possible at a MITSUBISHI MOTORS Authorized
Service Point.
E10 type petrol
The petrol engine are compatible with E10
type petrol (containing 10 % ethanol) con- forming to European standards EN 228.
CAUTIONl Do not use more than 10 % concentration of
ethanol (grain alcohol) by volume.
Use of more than 10 % concentration may
lead to damage to your vehicle fuel system,
engine, engine sensors and exhaust system.Filling the fuel tank
E00200203804WARNINGlWhen handling fuel, comply with the safe-
ty regulations displayed by garages and
filling stations.
l Gasoline is highly flammable and explo-
sive. You could be burned or seriously in-
jured when handling it. When refueling
your vehicle, always put the operation mode of the power switch in OFF and
keep away from flames, sparks, and smoking materials. Always handle fuel in
well-ventilated outdoor areas.
l Before removing the fuel cap, be sure to
get rid of your body’s static electricity by
touching a metal part of the car or the fuel pump. Any static electricity on your
body could create a spark that ignites fuel vapour.WARNINGl Perform the whole refueling process
(opening the fuel tank filler door, remov- ing the fuel cap, etc.) by yourself. Do notlet any other person come near the fuel
tank filler. If you allowed a person to help you and that person was carrying static
electricity, fuel vapour could be ignited.
l Do not perform charging and refueling at
the same time. If you charged with staticelectricity, fuel vapour could be ignited by the discharge spark.
l Do not move away from the fuel tank fill-
er until refueling is finished. If you moved away and did something else (for exam-
ple, sitting on a seat) part-way through the refueling process, you could pick up afresh charge of static electricity.
l Be careful not to inhale fuel vapour. Fuel
contains toxic substances.
l Keep the doors and windows closed while
refueling the vehicle. If they were open,fuel vapour could get into the cabin.
l If the tank cap must be replaced, use only
a MITSUBISHI MOTORS genuine part.CAUTIONl Depending on the operating conditions of
your vehicle, the fuel in the fuel tank may
not be used for a long time and stay in the tank, resulting in deterioration of the fuel
quality. As this may affect the engine and
Fuel selection
2-12OGGE14E5General information2
Page 45 of 442
NOTElIf you want to turn the operation mode to
“OFF” after “ACC” or “ON” position in or-
der to use the electrical device such as audio
during charging, make sure that the select
position is in “P”, press the power switch to turn “OFF” without depressing the brakepedal.
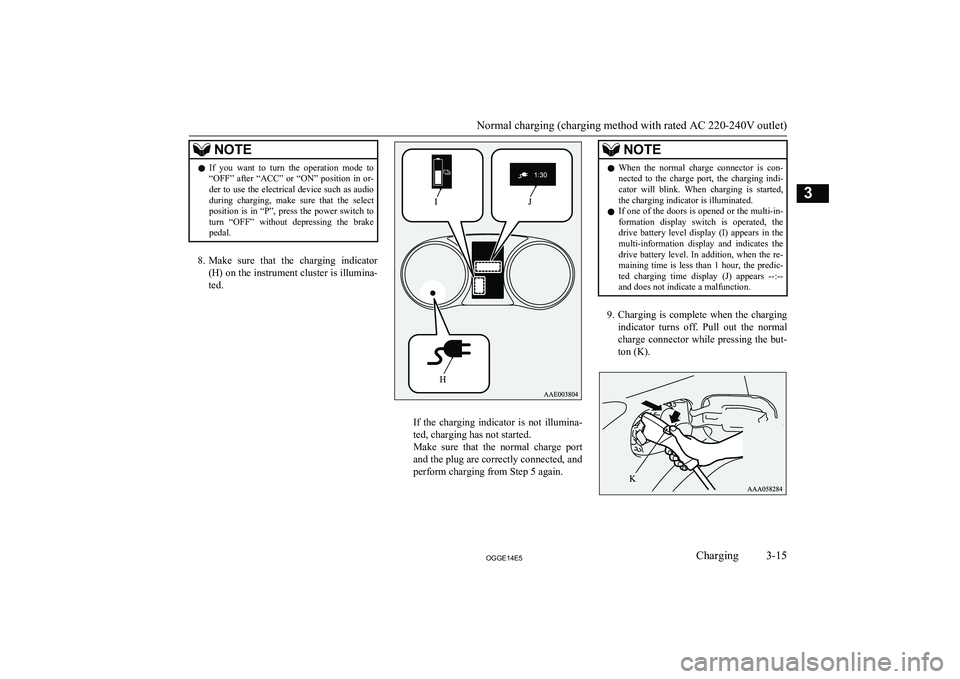
8. Make sure that the charging indicator
(H) on the instrument cluster is illumina-
ted.
If the charging indicator is not illumina-
ted, charging has not started.
Make sure that the normal charge port
and the plug are correctly connected, and
perform charging from Step 5 again.
NOTEl When the normal charge connector is con-
nected to the charge port, the charging indi-
cator will blink. When charging is started, the charging indicator is illuminated.
l If one of the doors is opened or the multi-in-
formation display switch is operated, the drive battery level display (I) appears in the
multi-information display and indicates the drive battery level. In addition, when the re-
maining time is less than 1 hour, the predic- ted charging time display (J) appears --:--
and does not indicate a malfunction.
9. Charging is complete when the charging
indicator turns off. Pull out the normal
charge connector while pressing the but-
ton (K).
Normal charging (charging method with rated AC 220-240V outlet)
3-15OGGE14E5Charging3
Page 48 of 442
CAUTIONlDuring quick charging, the quick charge
connector cannot be removed because it is locked. Do not touch or remove the quick
charge connector during charging. Doing so, the quick charge connector might be dam-
aged. If you want to stop the quick charging
on the way, stop the charging according to
the procedures of a quick charger, and re- move the quick charge connector after con-
firming the charging is stopped.NOTEl There is a hole on the charge port for water
drainage. If this hole is blocked and watergets trapped in the charge port, do not
charge. Contact a MITSUBISHI MOTORS
Authorized Service Point.
l If the charge port is frozen, melt the ice us-
ing a hair drier. Forcing the charge connec-
tor to connect while frozen could result in malfunction.
5. Connect the quick charge connector in
the quick charge port to begin charging.
For connecting and disconnecting, fol- low the instruction manual for each
quick charger.
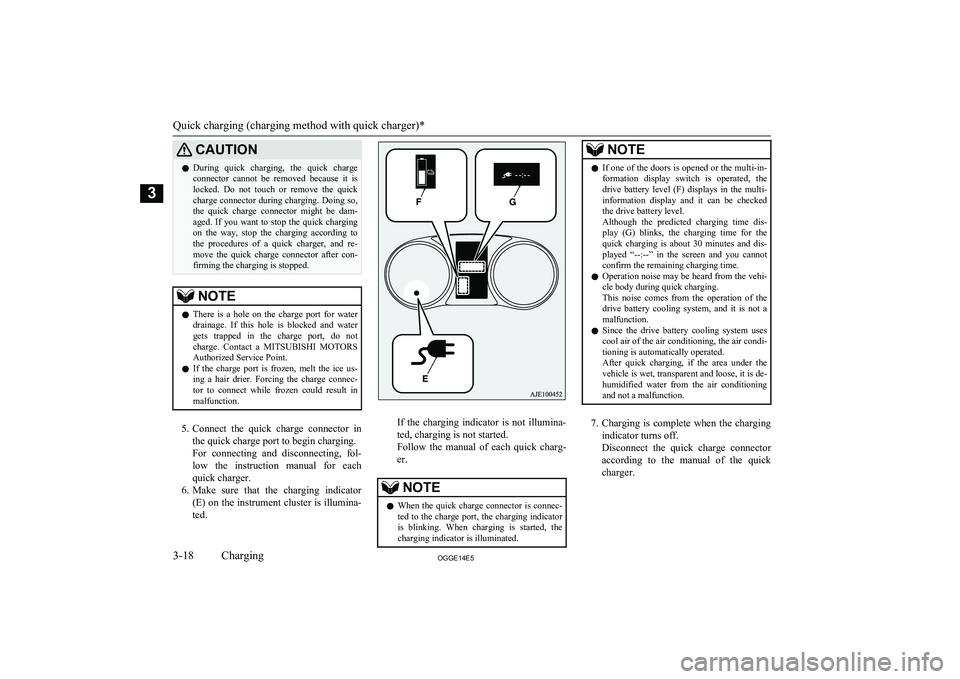
6. Make sure that the charging indicator
(E) on the instrument cluster is illumina-
ted.If the charging indicator is not illumina-
ted, charging is not started.
Follow the manual of each quick charg-
er.
NOTEl When the quick charge connector is connec-
ted to the charge port, the charging indicator
is blinking. When charging is started, the charging indicator is illuminated.NOTEl If one of the doors is opened or the multi-in-
formation display switch is operated, thedrive battery level (F) displays in the multi-
information display and it can be checked
the drive battery level.
Although the predicted charging time dis- play (G) blinks, the charging time for thequick charging is about 30 minutes and dis-
played “--:--” in the screen and you cannot confirm the remaining charging time.
l Operation noise may be heard from the vehi-
cle body during quick charging.
This noise comes from the operation of the drive battery cooling system, and it is not a malfunction.
l Since the drive battery cooling system uses
cool air of the air conditioning, the air condi-tioning is automatically operated.
After quick charging, if the area under the vehicle is wet, transparent and loose, it is de- humidified water from the air conditioning
and not a malfunction.
7. Charging is complete when the charging
indicator turns off.
Disconnect the quick charge connector according to the manual of the quick
charger.
Quick charging (charging method with quick charger)*
3-18OGGE14E5Charging3
Page 50 of 442
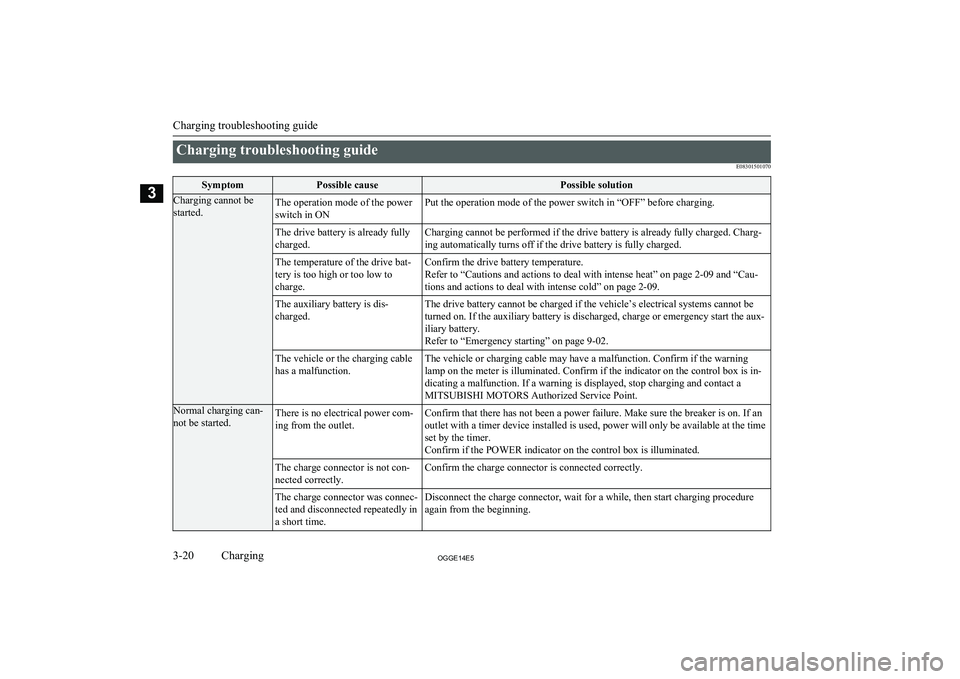
Charging troubleshooting guideE08301501070SymptomPossible causePossible solutionCharging cannot be
started.The operation mode of the power
switch in ONPut the operation mode of the power switch in “OFF” before charging.The drive battery is already fully
charged.Charging cannot be performed if the drive battery is already fully charged. Charg-
ing automatically turns off if the drive battery is fully charged.The temperature of the drive bat-
tery is too high or too low to
charge.Confirm the drive battery temperature.
Refer to “Cautions and actions to deal with intense heat” on page 2-09 and “Cau-
tions and actions to deal with intense cold” on page 2-09.The auxiliary battery is dis-
charged.The drive battery cannot be charged if the vehicle’s electrical systems cannot be turned on. If the auxiliary battery is discharged, charge or emergency start the aux-
iliary battery.
Refer to “Emergency starting” on page 9-02.The vehicle or the charging cable
has a malfunction.The vehicle or charging cable may have a malfunction. Confirm if the warning
lamp on the meter is illuminated. Confirm if the indicator on the control box is in-
dicating a malfunction. If a warning is displayed, stop charging and contact a
MITSUBISHI MOTORS Authorized Service Point.Normal charging can-
not be started.There is no electrical power com-
ing from the outlet.Confirm that there has not been a power failure. Make sure the breaker is on. If an outlet with a timer device installed is used, power will only be available at the time
set by the timer.
Confirm if the POWER indicator on the control box is illuminated.The charge connector is not con-
nected correctly.Confirm the charge connector is connected correctly.The charge connector was connec-
ted and disconnected repeatedly in
a short time.Disconnect the charge connector, wait for a while, then start charging procedure
again from the beginning.
Charging troubleshooting guide
3-20OGGE14E5Charging3
Page 53 of 442
MITSUBISHI Remote
Control* E08304200042
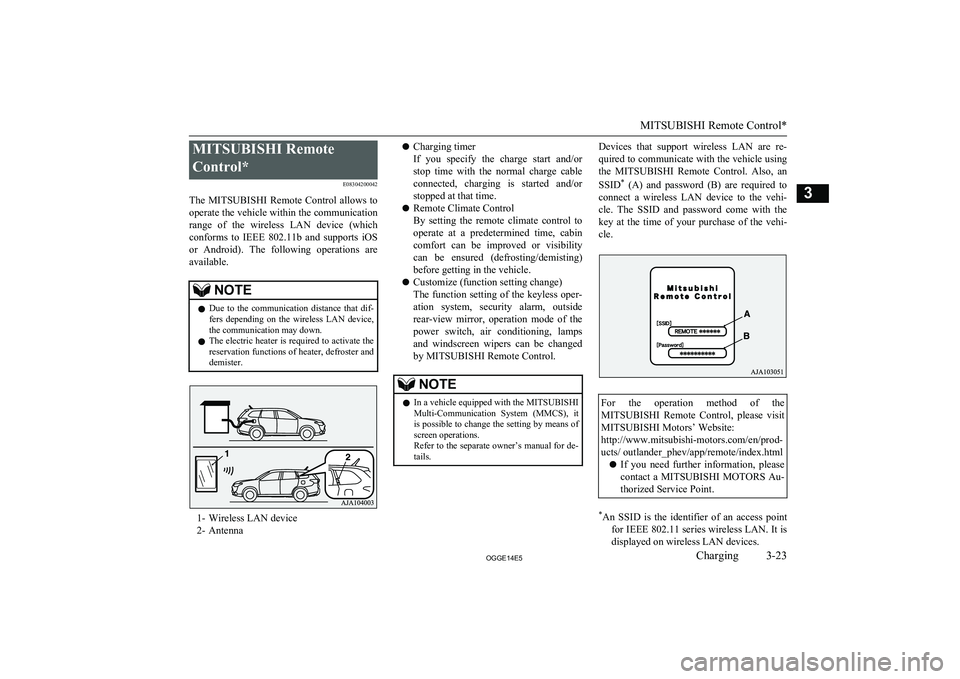
The MITSUBISHI Remote Control allows to
operate the vehicle within the communication
range of the wireless LAN device (which conforms to IEEE 802.11b and supports iOS or Android). The following operations areavailable.NOTEl Due to the communication distance that dif-
fers depending on the wireless LAN device, the communication may down.
l The electric heater is required to activate the
reservation functions of heater, defroster and
demister.
1- Wireless LAN device
2- Antenna
l Charging timer
If you specify the charge start and/or
stop time with the normal charge cable connected, charging is started and/or
stopped at that time.
l Remote Climate Control
By setting the remote climate control to operate at a predetermined time, cabin comfort can be improved or visibilitycan be ensured (defrosting/demisting)
before getting in the vehicle.
l Customize (function setting change)
The function setting of the keyless oper-
ation system, security alarm, outsiderear-view mirror, operation mode of the
power switch, air conditioning, lamps
and windscreen wipers can be changed by MITSUBISHI Remote Control.NOTEl In a vehicle equipped with the MITSUBISHI
Multi-Communication System (MMCS), it is possible to change the setting by means of
screen operations.
Refer to the separate owner’s manual for de-
tails.Devices that support wireless LAN are re-
quired to communicate with the vehicle using
the MITSUBISHI Remote Control. Also, an
SSID *
(A) and password (B) are required to
connect a wireless LAN device to the vehi- cle. The SSID and password come with the
key at the time of your purchase of the vehi- cle.For the operation method of the MITSUBISHI Remote Control, please visit
MITSUBISHI Motors’ Website:
http://www.mitsubishi-motors.com/en/prod-
ucts/ outlander_phev/app/remote/index.html
l If you need further information, please
contact a MITSUBISHI MOTORS Au-
thorized Service Point.* An SSID is the identifier of an access point
for IEEE 802.11 series wireless LAN. It is
displayed on wireless LAN devices.
MITSUBISHI Remote Control*
3-23OGGE14E5Charging3
Page 68 of 442
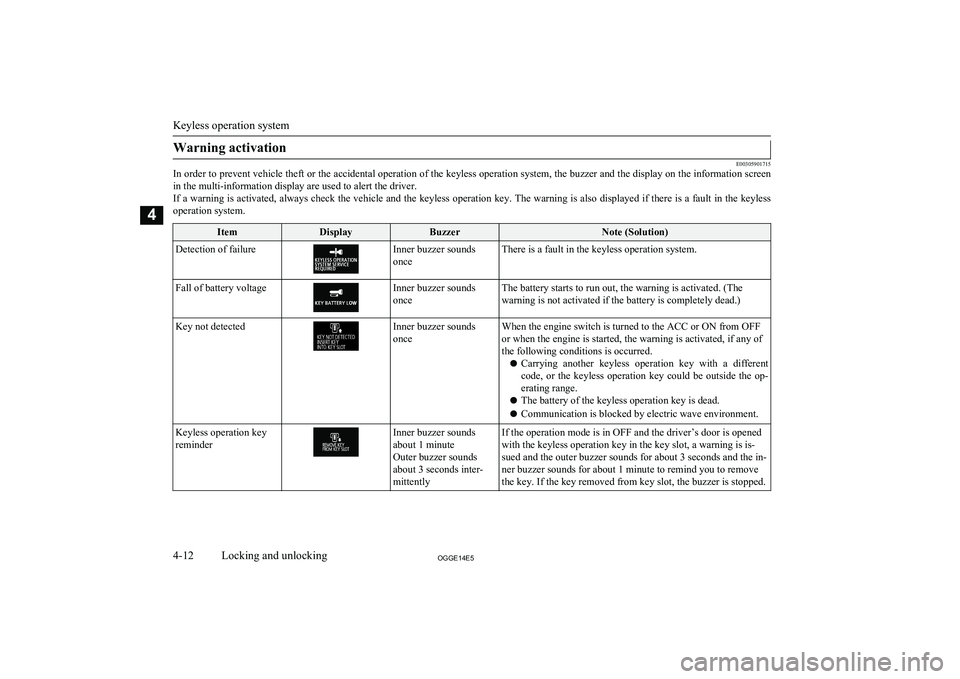
Warning activation
E00305901715
In order to prevent vehicle theft or the accidental operation of the keyless operation system, the buzzer and the display on the information screen
in the multi-information display are used to alert the driver.If a warning is activated, always check the vehicle and the keyless operation key. The warning is also displayed if there is a fault in the keyless operation system.
ItemDisplayBuzzerNote (Solution)Detection of failureInner buzzer sounds
onceThere is a fault in the keyless operation system.Fall of battery voltageInner buzzer sounds
onceThe battery starts to run out, the warning is activated. (The warning is not activated if the battery is completely dead.)Key not detectedInner buzzer sounds
onceWhen the engine switch is turned to the ACC or ON from OFF
or when the engine is started, the warning is activated, if any of
the following conditions is occurred.
l Carrying another keyless operation key with a different
code, or the keyless operation key could be outside the op- erating range.
l The battery of the keyless operation key is dead.
l Communication is blocked by electric wave environment.Keyless operation key
reminderInner buzzer sounds
about 1 minute
Outer buzzer sounds
about 3 seconds inter-
mittentlyIf the operation mode is in OFF and the driver’s door is opened
with the keyless operation key in the key slot, a warning is is-
sued and the outer buzzer sounds for about 3 seconds and the in-
ner buzzer sounds for about 1 minute to remind you to remove
the key. If the key removed from key slot, the buzzer is stopped.
Keyless operation system
4-12OGGE14E5Locking and unlocking4
Page 69 of 442
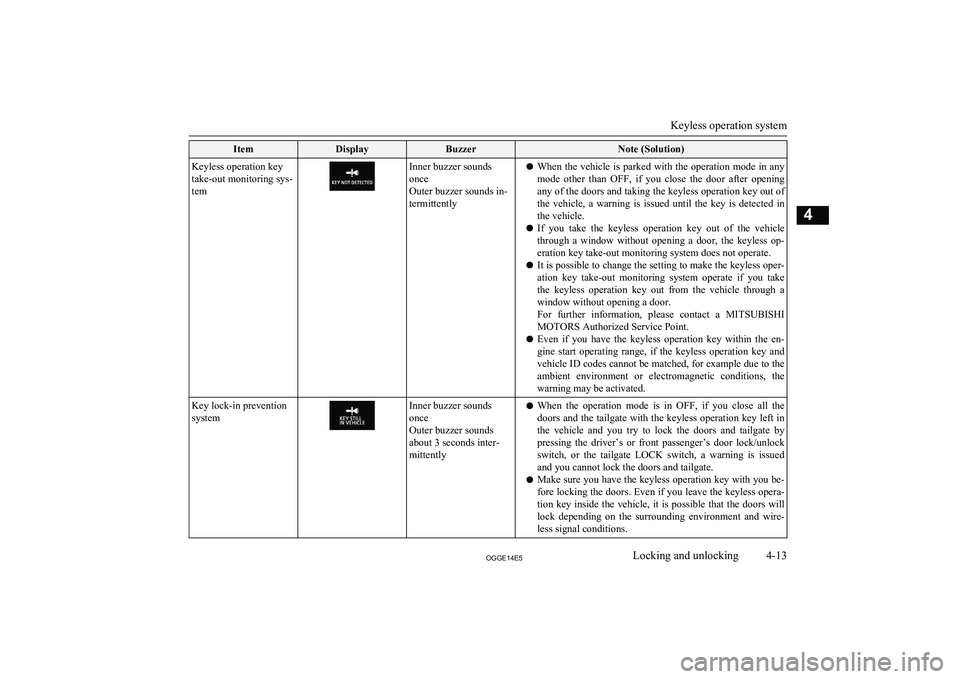
ItemDisplayBuzzerNote (Solution)Keyless operation key
take-out monitoring sys-
temInner buzzer sounds
once
Outer buzzer sounds in-
termittentlyl When the vehicle is parked with the operation mode in any
mode other than OFF, if you close the door after opening
any of the doors and taking the keyless operation key out of
the vehicle, a warning is issued until the key is detected in the vehicle.
l If you take the keyless operation key out of the vehicle
through a window without opening a door, the keyless op-
eration key take-out monitoring system does not operate.
l It is possible to change the setting to make the keyless oper-
ation key take-out monitoring system operate if you take
the keyless operation key out from the vehicle through a
window without opening a door.
For further information, please contact a MITSUBISHI
MOTORS Authorized Service Point.
l Even if you have the keyless operation key within the en-
gine start operating range, if the keyless operation key and
vehicle ID codes cannot be matched, for example due to the ambient environment or electromagnetic conditions, the
warning may be activated.Key lock-in prevention
systemInner buzzer sounds
once
Outer buzzer sounds
about 3 seconds inter-
mittentlyl When the operation mode is in OFF, if you close all the
doors and the tailgate with the keyless operation key left inthe vehicle and you try to lock the doors and tailgate by
pressing the driver’s or front passenger’s door lock/unlock
switch, or the tailgate LOCK switch, a warning is issued and you cannot lock the doors and tailgate.
l Make sure you have the keyless operation key with you be-
fore locking the doors. Even if you leave the keyless opera- tion key inside the vehicle, it is possible that the doors will
lock depending on the surrounding environment and wire-
less signal conditions.
Keyless operation system
4-13OGGE14E5Locking and unlocking4
Page 70 of 442
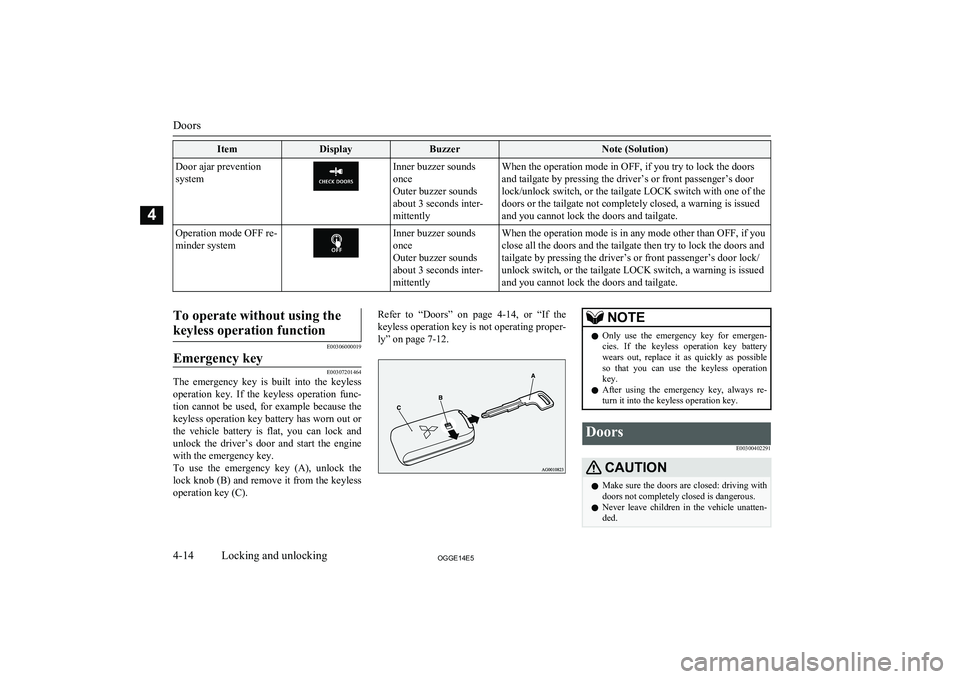
ItemDisplayBuzzerNote (Solution)Door ajar prevention
systemInner buzzer sounds
once
Outer buzzer sounds
about 3 seconds inter-
mittentlyWhen the operation mode in OFF, if you try to lock the doors
and tailgate by pressing the driver’s or front passenger’s door
lock/unlock switch, or the tailgate LOCK switch with one of the
doors or the tailgate not completely closed, a warning is issued
and you cannot lock the doors and tailgate.Operation mode OFF re-
minder systemInner buzzer sounds
once
Outer buzzer sounds
about 3 seconds inter-
mittentlyWhen the operation mode is in any mode other than OFF, if you
close all the doors and the tailgate then try to lock the doors and
tailgate by pressing the driver’s or front passenger’s door lock/
unlock switch, or the tailgate LOCK switch, a warning is issued and you cannot lock the doors and tailgate.
To operate without using the
keyless operation function
E00306000019
Emergency key
E00307201464
The emergency key is built into the keyless operation key. If the keyless operation func-
tion cannot be used, for example because the keyless operation key battery has worn out or the vehicle battery is flat, you can lock and
unlock the driver’s door and start the engine
with the emergency key.
To use the emergency key (A), unlock the lock knob (B) and remove it from the keyless
operation key (C).
Refer to “Doors” on page 4-14, or “If the
keyless operation key is not operating proper- ly” on page 7-12.NOTEl Only use the emergency key for emergen-
cies. If the keyless operation key batterywears out, replace it as quickly as possible
so that you can use the keyless operation
key.
l After using the emergency key, always re-
turn it into the keyless operation key.Doors
E00300402291CAUTIONlMake sure the doors are closed: driving with
doors not completely closed is dangerous.
l Never leave children in the vehicle unatten-
ded.
Doors
4-14OGGE14E5Locking and unlocking4
Page 105 of 442
To unfasten
Hold the latch plate and push the button on
the buckle.
NOTEl As the belt retracts automatically, keep hold-
ing the latch plate while retracting so that the
belt stows slowly. Failure to do this could damage the vehicle.Seat belt reminder
E00409801973
For the driver and the front
passenger’s seat
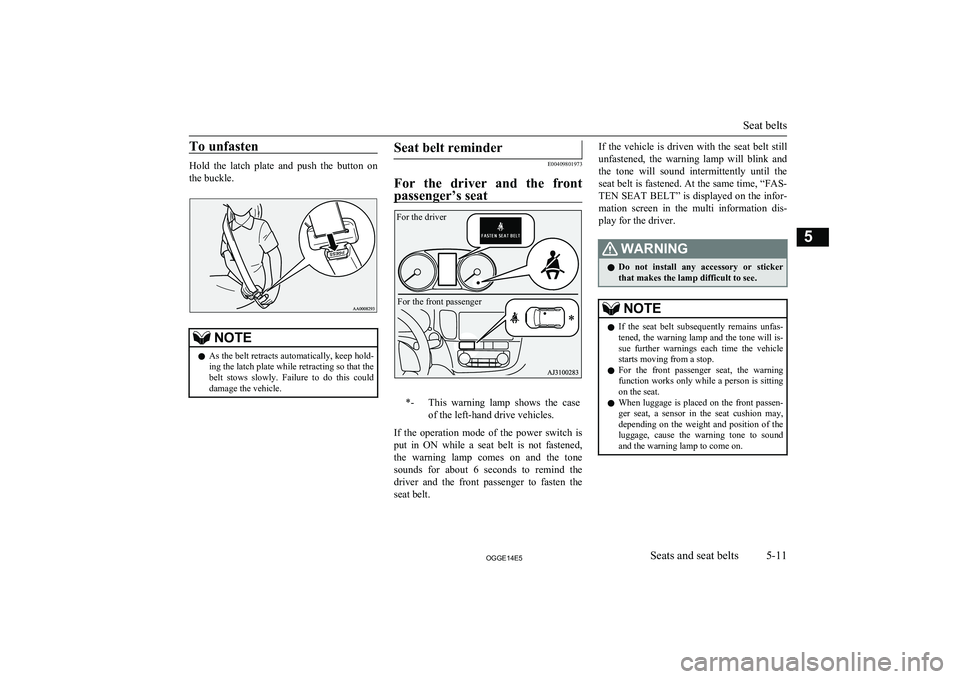
*-This warning lamp shows the case
of the left-hand drive vehicles.
If the operation mode of the power switch is put in ON while a seat belt is not fastened,
the warning lamp comes on and the tone sounds for about 6 seconds to remind the
driver and the front passenger to fasten the
seat belt.
If the vehicle is driven with the seat belt still
unfastened, the warning lamp will blink and
the tone will sound intermittently until the
seat belt is fastened. At the same time, “FAS- TEN SEAT BELT” is displayed on the infor-
mation screen in the multi information dis-
play for the driver.WARNINGl Do not install any accessory or sticker
that makes the lamp difficult to see.NOTEl If the seat belt subsequently remains unfas-
tened, the warning lamp and the tone will is-
sue further warnings each time the vehicle starts moving from a stop.
l For the front passenger seat, the warning
function works only while a person is sitting
on the seat.
l When luggage is placed on the front passen-
ger seat, a sensor in the seat cushion may,
depending on the weight and position of the
luggage, cause the warning tone to sound
and the warning lamp to come on.
Seat belts
5-11OGGE14E5Seats and seat belts5 For the driverFor the front passenger
Page 109 of 442
NOTElThe pretensioner seat belts will be activated
if the vehicle suffers a severe impact, even if the seat belts are not worn.
l The pretensioner seat belts are designed to
work only once. After the pretensioner seat
belts have been activated, we recommend you have them replaced by a MITSUBISHI
MOTORS Authorized Service Point.SRS warning
E00405900360
The same warning lamp/display is shared by
the SRS airbags and the pretensioner seat
belts.
Refer to “SRS warning lamp/display” on page 5-35.
Force limiter system
E00406000209
In the event of a collision, each force limitersystem will effectively absorb the load ap- plied to the seat belt to minimize the impact
to the passenger.
Child restraint
E00406403259
When transporting children in your vehicle,some type of child restraint system should al-
ways be used according to the size of the child. This is required by law in most coun-
tries.
The regulations concerning driving with chil-
dren in the front seat may differ from country
to country. You are advised to comply with the relevant regulations.WARNINGl When possible, put children in the rear
seat. Accident statistics indicate that chil- dren of all sizes and ages are safer when
properly restrained in the rear seat rather than in the front seat.
l Holding a child in your arms is no substi-
tute for a restraint system. Failure to use
a proper restraint system can result in se- vere or fatal injury to the child.
l Each child restraint device or fixing is to
be used only by one child.
l When attaching a child restraint system
to the rear seat, prevent the front seat- backs from touching the child restraintsystem.
Otherwise, the child could be seriously in-
jured in the event of hard braking or a
collision.Caution for installing the child
restraint on vehicles with a front passenger’s airbag
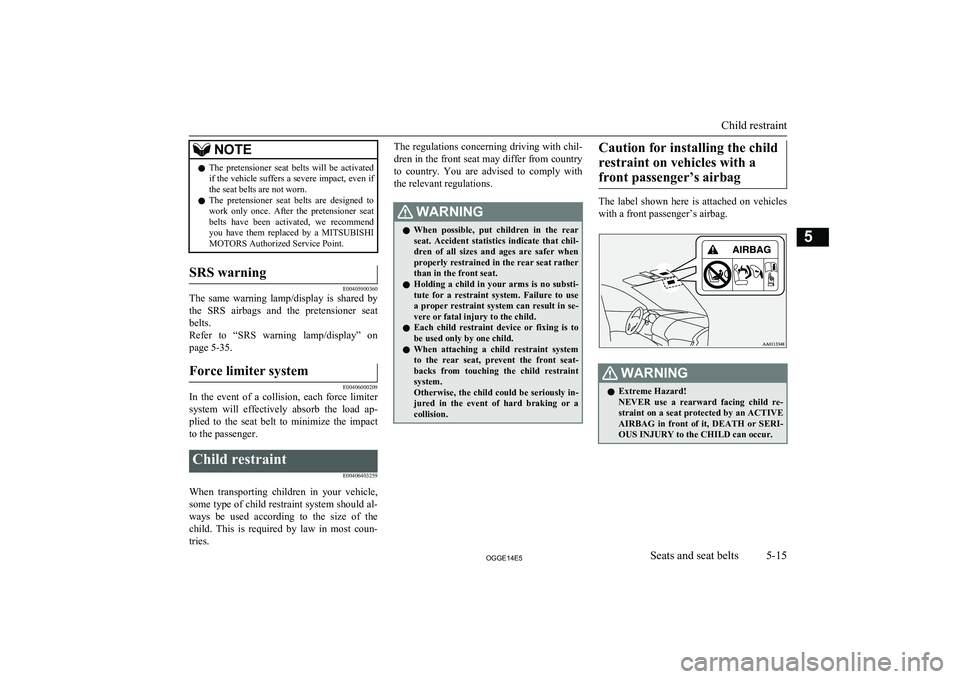
The label shown here is attached on vehicles with a front passenger’s airbag.
WARNINGl Extreme Hazard!
NEVER use a rearward facing child re- straint on a seat protected by an ACTIVEAIRBAG in front of it, DEATH or SERI- OUS INJURY to the CHILD can occur.
Child restraint
5-15OGGE14E5Seats and seat belts5