height MITSUBISHI OUTLANDER PHEV 2014 Owner's Manual (in English)
[x] Cancel search | Manufacturer: MITSUBISHI, Model Year: 2014, Model line: OUTLANDER PHEV, Model: MITSUBISHI OUTLANDER PHEV 2014Pages: 442, PDF Size: 19.04 MB
Page 4 of 442
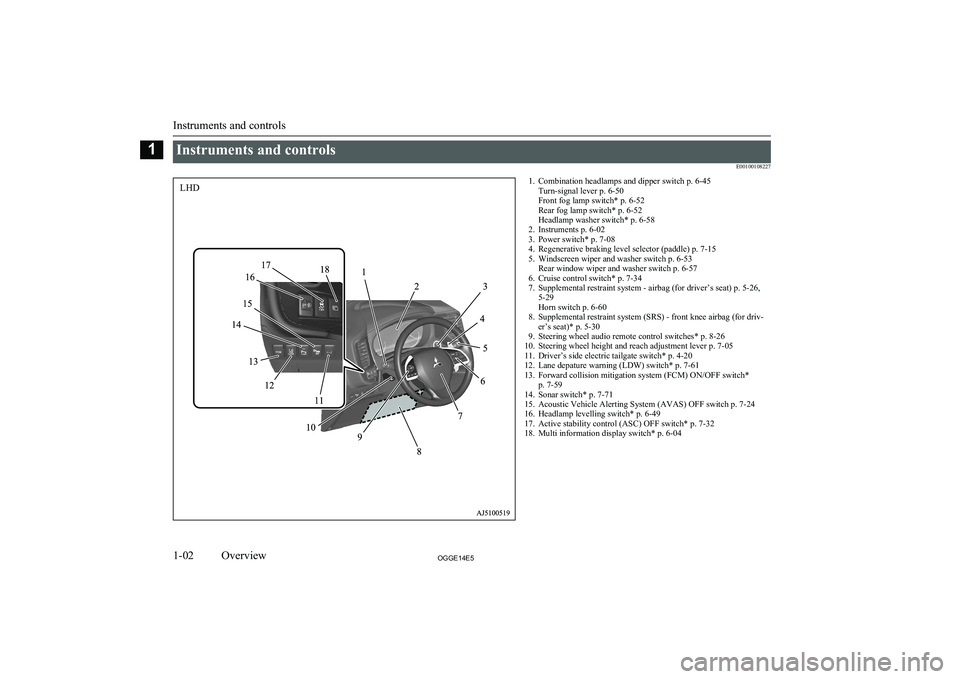
Instruments and controlsE001001082271. Combination headlamps and dipper switch p. 6-45Turn-signal lever p. 6-50
Front fog lamp switch* p. 6-52
Rear fog lamp switch* p. 6-52
Headlamp washer switch* p. 6-58
2. Instruments p. 6-02
3. Power switch* p. 7-08
4. Regenerative braking level selector (paddle) p. 7-15
5. Windscreen wiper and washer switch p. 6-53 Rear window wiper and washer switch p. 6-57
6. Cruise control switch* p. 7-34
7. Supplemental restraint system - airbag (for driver’s seat) p. 5-26, 5-29
Horn switch p. 6-60
8. Supplemental restraint system (SRS) - front knee airbag (for driv- er’s seat)* p. 5-30
9. Steering wheel audio remote control switches* p. 8-26
10. Steering wheel height and reach adjustment lever p. 7-05
11. Driver’s side electric tailgate switch* p. 4-20
12. Lane depature warning (LDW) switch* p. 7-61
13. Forward collision mitigation system (FCM) ON/OFF switch* p. 7-59
14. Sonar switch* p. 7-71
15. Acoustic Vehicle Alerting System (AVAS) OFF switch p. 7-24
16. Headlamp levelling switch* p. 6-49
17. Active stability control (ASC) OFF switch* p. 7-32
18. Multi information display switch* p. 6-04
Instruments and controls
1-02OGGE14E5Overview1LHD
Page 5 of 442
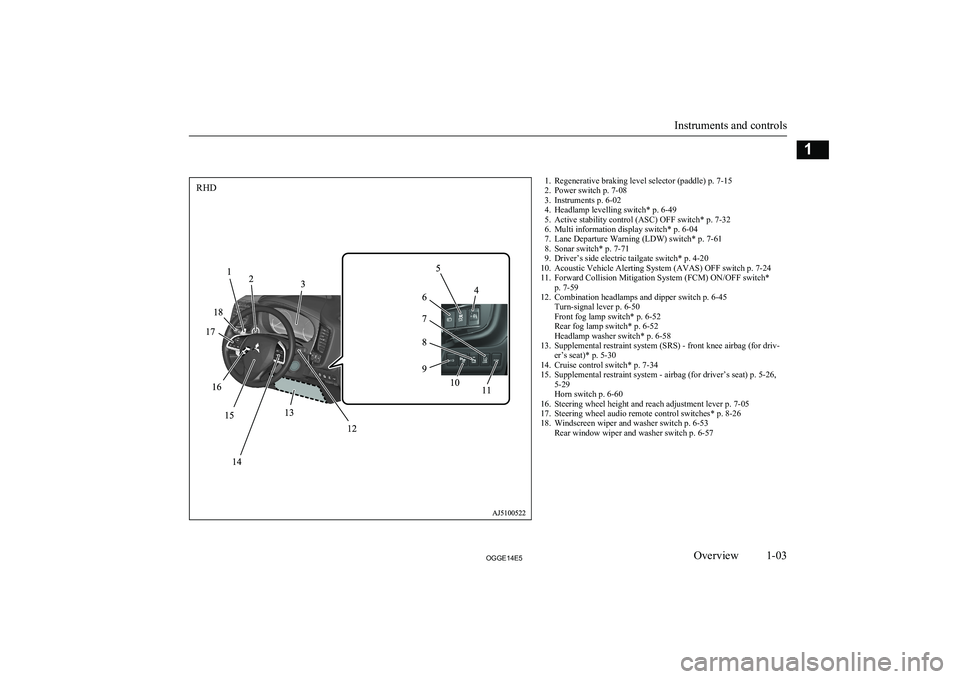
1. Regenerative braking level selector (paddle) p. 7-15
2. Power switch p. 7-08
3. Instruments p. 6-02
4. Headlamp levelling switch* p. 6-49
5. Active stability control (ASC) OFF switch* p. 7-32
6. Multi information display switch* p. 6-04
7. Lane Departure Warning (LDW) switch* p. 7-61
8. Sonar switch* p. 7-71
9. Driver’s side electric tailgate switch* p. 4-20
10. Acoustic Vehicle Alerting System (AVAS) OFF switch p. 7-24
11. Forward Collision Mitigation System (FCM) ON/OFF switch* p. 7-59
12. Combination headlamps and dipper switch p. 6-45 Turn-signal lever p. 6-50
Front fog lamp switch* p. 6-52
Rear fog lamp switch* p. 6-52
Headlamp washer switch* p. 6-58
13. Supplemental restraint system (SRS) - front knee airbag (for driv- er’s seat)* p. 5-30
14. Cruise control switch* p. 7-34
15. Supplemental restraint system - airbag (for driver’s seat) p. 5-26, 5-29
Horn switch p. 6-60
16. Steering wheel height and reach adjustment lever p. 7-05
17. Steering wheel audio remote control switches* p. 8-26
18. Windscreen wiper and washer switch p. 6-53 Rear window wiper and washer switch p. 6-57
Instruments and controls
1-03OGGE14E5Overview1RHD
Page 97 of 442
WARNINGlDo not attempt to adjust the seat while
driving. This can cause loss of vehicle con- trol and result in an accident. After ad-
justments are made, ensure the seating is locked in position by attempting to move
the seat forward and rearward without
using the adjusting mechanism.
l Do not allow people or children to ride in
any area of your vehicle that is not equip- ped with seats and seat belts, and make
sure that everyone travelling in your vehi- cle is in a seat and wearing a seat belt, or
in the case of a child is strapped in a child restraint.
l To minimize the risk of personal injury in
the event of a collision or sudden braking,the seatbacks should always be in the al-
most upright position while the vehicle is in motion. The protection provided by theseat belts may be reduced significantly
when the seatback is reclined. There is greater risk that the passenger will slide
under the seat belt, resulting in serious in- jury, when the seatback is reclined.CAUTIONl Make sure the seat is adjusted by an adult or
with adult supervision for correct and safe operation.CAUTIONl Do not place a cushion or the like between
your back and the seatback while driving.The effectiveness of the head restraints will be reduced in the event of an accident.
l The reclining mechanism of the front seat’s
seatback is spring loaded, causing it to return
to the vertical position when the lock lever is
operated. When using the lever, sit close to the seatback or hold it with your hand to
control its return motion.
l When sliding the seats, be careful not to
catch your hand or foot.
l When adjusting the front seat while the rear
seat is folded, be careful not to apply strongforce to the flipped rear seat cushion.
Doing so could cause damage to the cover of
the front seat and the fitting of the rear seat
cushion.Front seats
E00400401253
Manual type
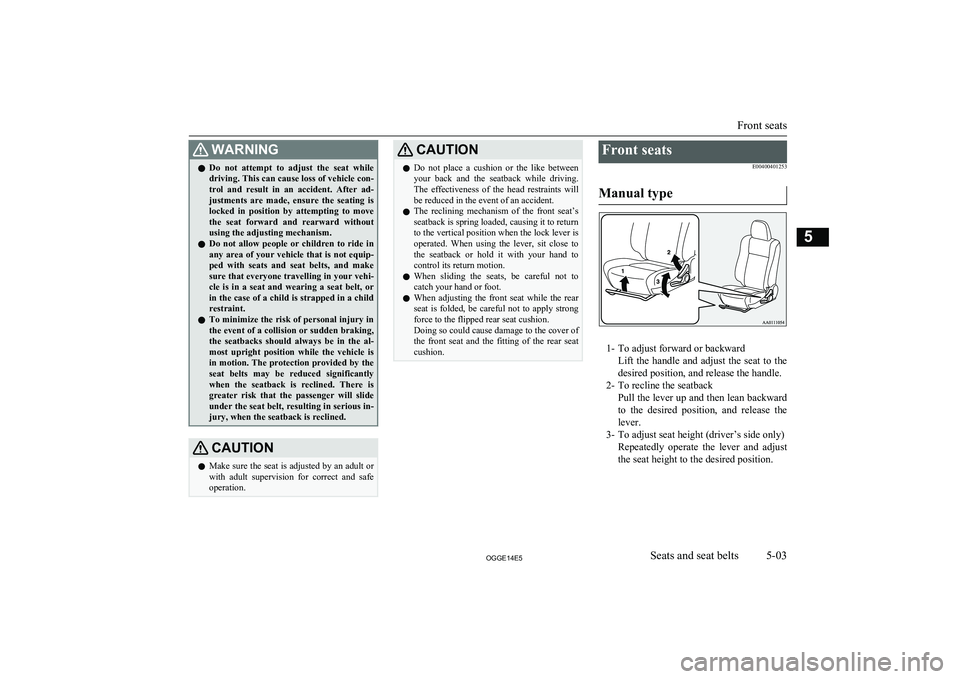
1- To adjust forward or backward Lift the handle and adjust the seat to the
desired position, and release the handle.
2- To recline the seatback Pull the lever up and then lean backwardto the desired position, and release the
lever.
3- To adjust seat height (driver’s side only)
Repeatedly operate the lever and adjustthe seat height to the desired position.
Front seats
5-03OGGE14E5Seats and seat belts5
Page 98 of 442
Power type*
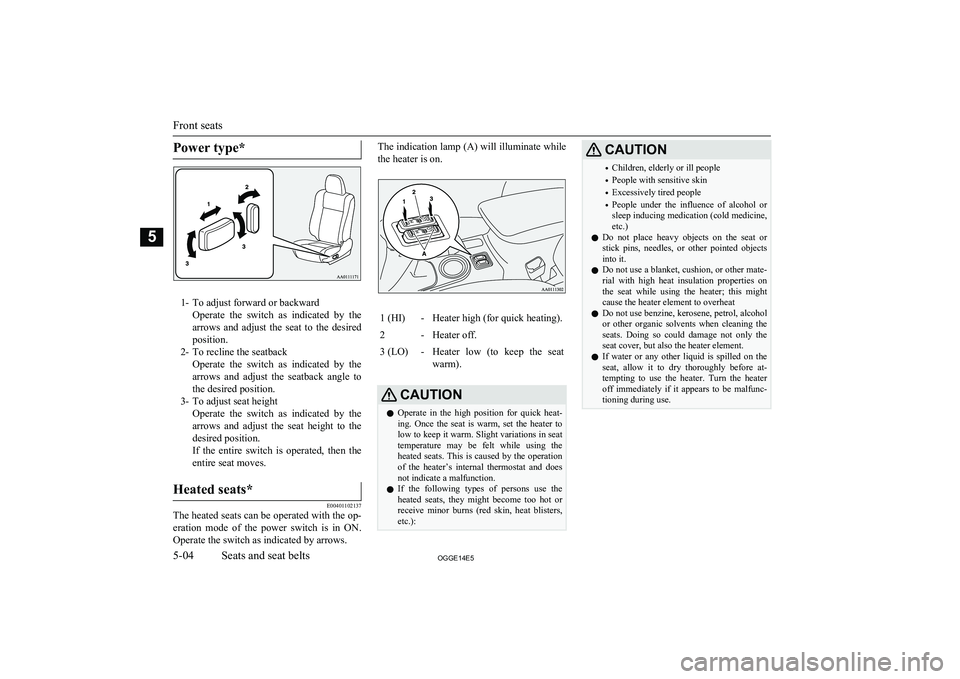
1- To adjust forward or backwardOperate the switch as indicated by thearrows and adjust the seat to the desired
position.
2- To recline the seatback Operate the switch as indicated by thearrows and adjust the seatback angle to
the desired position.
3- To adjust seat height Operate the switch as indicated by thearrows and adjust the seat height to the
desired position.
If the entire switch is operated, then the entire seat moves.
Heated seats*
E00401102137
The heated seats can be operated with the op-
eration mode of the power switch is in ON.
Operate the switch as indicated by arrows.
The indication lamp (A) will illuminate while
the heater is on.1 (HI)-Heater high (for quick heating).2-Heater off.3 (LO)-Heater low (to keep the seat
warm).CAUTIONl Operate in the high position for quick heat-
ing. Once the seat is warm, set the heater to low to keep it warm. Slight variations in seat
temperature may be felt while using the heated seats. This is caused by the operation
of the heater’s internal thermostat and does not indicate a malfunction.
l If the following types of persons use the
heated seats, they might become too hot or receive minor burns (red skin, heat blisters,
etc.):CAUTION• Children, elderly or ill people
• People with sensitive skin
• Excessively tired people
• People under the influence of alcohol or
sleep inducing medication (cold medicine, etc.)
l Do not place heavy objects on the seat or
stick pins, needles, or other pointed objects into it.
l Do not use a blanket, cushion, or other mate-
rial with high heat insulation properties on
the seat while using the heater; this might
cause the heater element to overheat
l Do not use benzine, kerosene, petrol, alcohol
or other organic solvents when cleaning the seats. Doing so could damage not only the
seat cover, but also the heater element.
l If water or any other liquid is spilled on the
seat, allow it to dry thoroughly before at-tempting to use the heater. Turn the heater
off immediately if it appears to be malfunc- tioning during use.
Front seats
5-04OGGE14E5Seats and seat belts5
Page 99 of 442
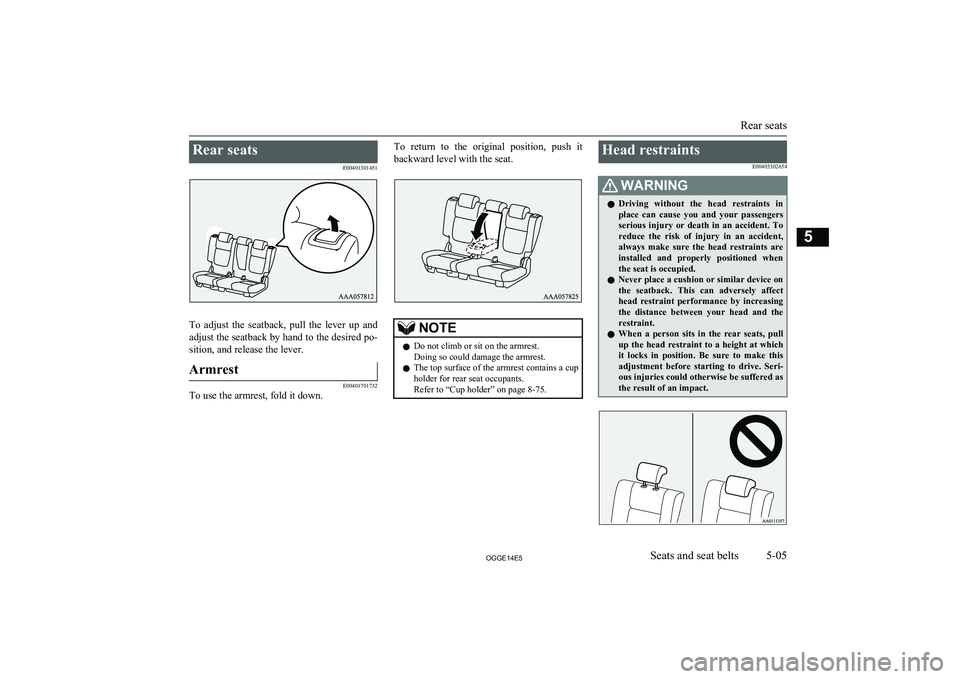
Rear seatsE00401301451
To adjust the seatback, pull the lever up andadjust the seatback by hand to the desired po-
sition, and release the lever.
Armrest
E00401701732
To use the armrest, fold it down.
To return to the original position, push it
backward level with the seat.NOTEl Do not climb or sit on the armrest.
Doing so could damage the armrest.
l The top surface of the armrest contains a cup
holder for rear seat occupants.
Refer to “Cup holder” on page 8-75.Head restraints
E00403302654WARNINGlDriving without the head restraints in
place can cause you and your passengers serious injury or death in an accident. Toreduce the risk of injury in an accident,
always make sure the head restraints are installed and properly positioned when
the seat is occupied.
l Never place a cushion or similar device on
the seatback. This can adversely affect
head restraint performance by increasing the distance between your head and the
restraint.
l When a person sits in the rear seats, pull
up the head restraint to a height at which it locks in position. Be sure to make thisadjustment before starting to drive. Seri-
ous injuries could otherwise be suffered as
the result of an impact.
Rear seats
5-05OGGE14E5Seats and seat belts5
Page 100 of 442
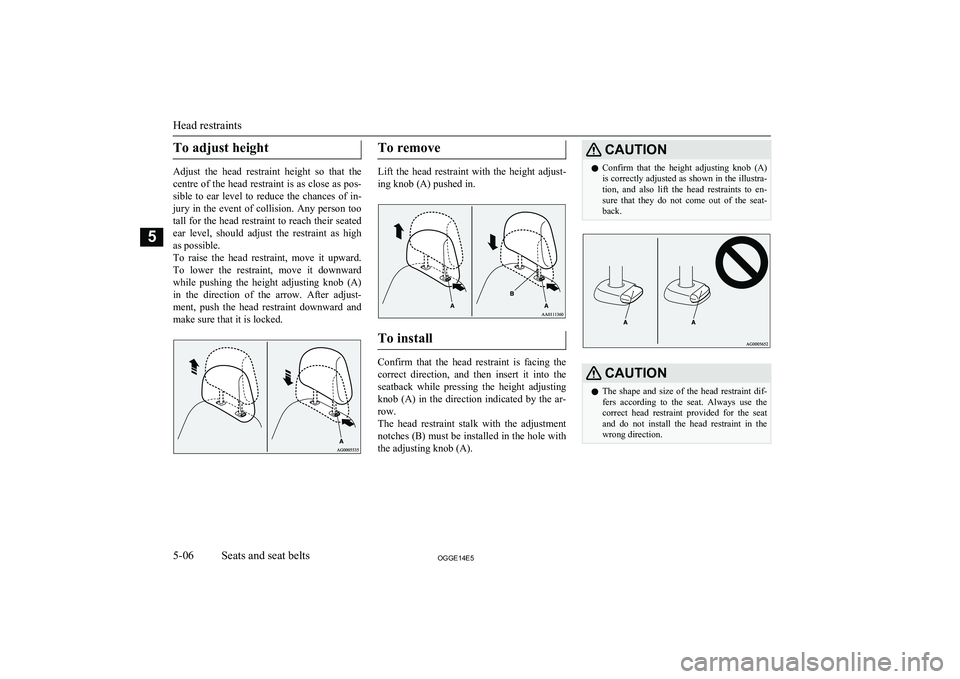
To adjust height
Adjust the head restraint height so that thecentre of the head restraint is as close as pos- sible to ear level to reduce the chances of in-
jury in the event of collision. Any person too
tall for the head restraint to reach their seated ear level, should adjust the restraint as highas possible.
To raise the head restraint, move it upward. To lower the restraint, move it downward while pushing the height adjusting knob (A)
in the direction of the arrow. After adjust- ment, push the head restraint downward and
make sure that it is locked.
To remove
Lift the head restraint with the height adjust-
ing knob (A) pushed in.
To install
Confirm that the head restraint is facing the
correct direction, and then insert it into the seatback while pressing the height adjusting
knob (A) in the direction indicated by the ar-
row.
The head restraint stalk with the adjustment notches (B) must be installed in the hole withthe adjusting knob (A).
CAUTIONl Confirm that the height adjusting knob (A)
is correctly adjusted as shown in the illustra- tion, and also lift the head restraints to en- sure that they do not come out of the seat-back.CAUTIONl The shape and size of the head restraint dif-
fers according to the seat. Always use the
correct head restraint provided for the seat and do not install the head restraint in the
wrong direction.
Head restraints
5-06OGGE14E5Seats and seat belts5
Page 101 of 442
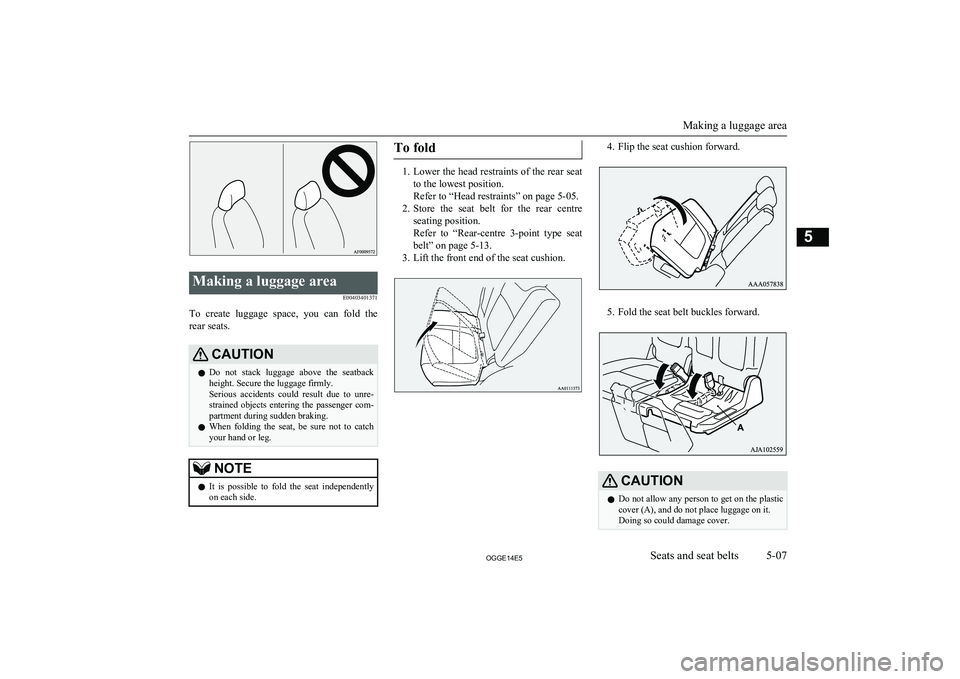
Making a luggage areaE00403401371
To create luggage space, you can fold therear seats.
CAUTIONl Do not stack luggage above the seatback
height. Secure the luggage firmly.
Serious accidents could result due to unre-
strained objects entering the passenger com-
partment during sudden braking.
l When folding the seat, be sure not to catch
your hand or leg.NOTEl It is possible to fold the seat independently
on each side.To fold
1. Lower the head restraints of the rear seat
to the lowest position.
Refer to “Head restraints” on page 5-05.
2. Store the seat belt for the rear centre
seating position.
Refer to “Rear-centre 3-point type seat belt” on page 5-13.
3. Lift the front end of the seat cushion.
4. Flip the seat cushion forward.
5. Fold the seat belt buckles forward.
CAUTIONl Do not allow any person to get on the plastic
cover (A), and do not place luggage on it.
Doing so could damage cover.
Making a luggage area
5-07OGGE14E5Seats and seat belts5
Page 106 of 442
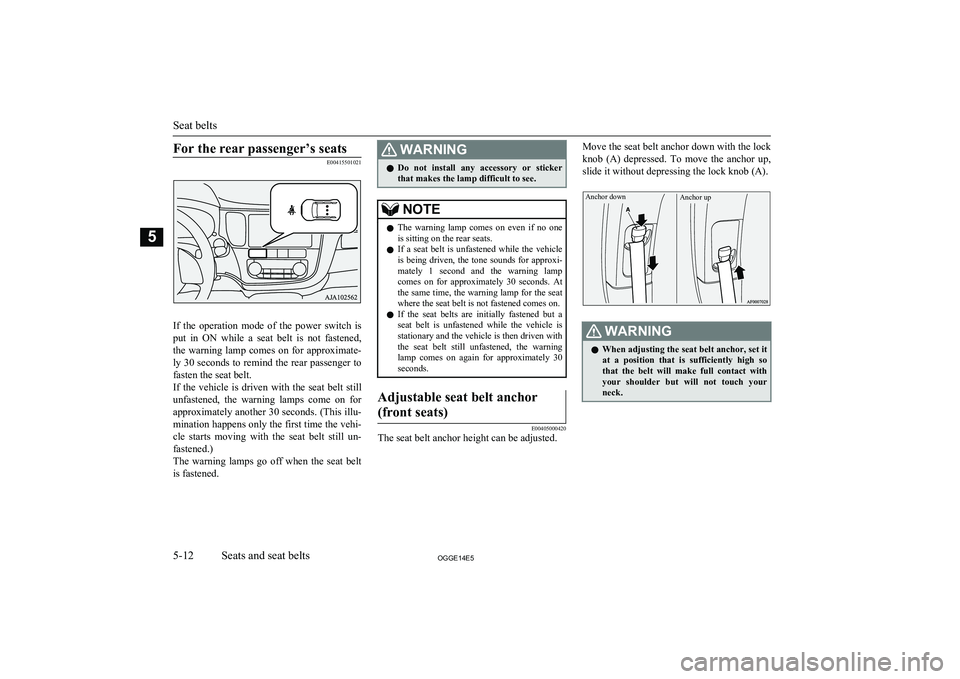
For the rear passenger’s seats
E00415501021
If the operation mode of the power switch isput in ON while a seat belt is not fastened,
the warning lamp comes on for approximate-
ly 30 seconds to remind the rear passenger to fasten the seat belt.
If the vehicle is driven with the seat belt still
unfastened, the warning lamps come on for
approximately another 30 seconds. (This illu-
mination happens only the first time the vehi- cle starts moving with the seat belt still un-
fastened.)
The warning lamps go off when the seat belt is fastened.
WARNINGl Do not install any accessory or sticker
that makes the lamp difficult to see.NOTEl The warning lamp comes on even if no one
is sitting on the rear seats.
l If a seat belt is unfastened while the vehicle
is being driven, the tone sounds for approxi- mately 1 second and the warning lampcomes on for approximately 30 seconds. At the same time, the warning lamp for the seat
where the seat belt is not fastened comes on.
l If the seat belts are initially fastened but a
seat belt is unfastened while the vehicle is
stationary and the vehicle is then driven with the seat belt still unfastened, the warning
lamp comes on again for approximately 30 seconds.Adjustable seat belt anchor
(front seats)
E00405000420
The seat belt anchor height can be adjusted.
Move the seat belt anchor down with the lock knob (A) depressed. To move the anchor up,
slide it without depressing the lock knob (A).Anchor downAnchor up
WARNINGl When adjusting the seat belt anchor, set it
at a position that is sufficiently high so
that the belt will make full contact with your shoulder but will not touch your
neck.
Seat belts
5-12OGGE14E5Seats and seat belts5
Page 110 of 442
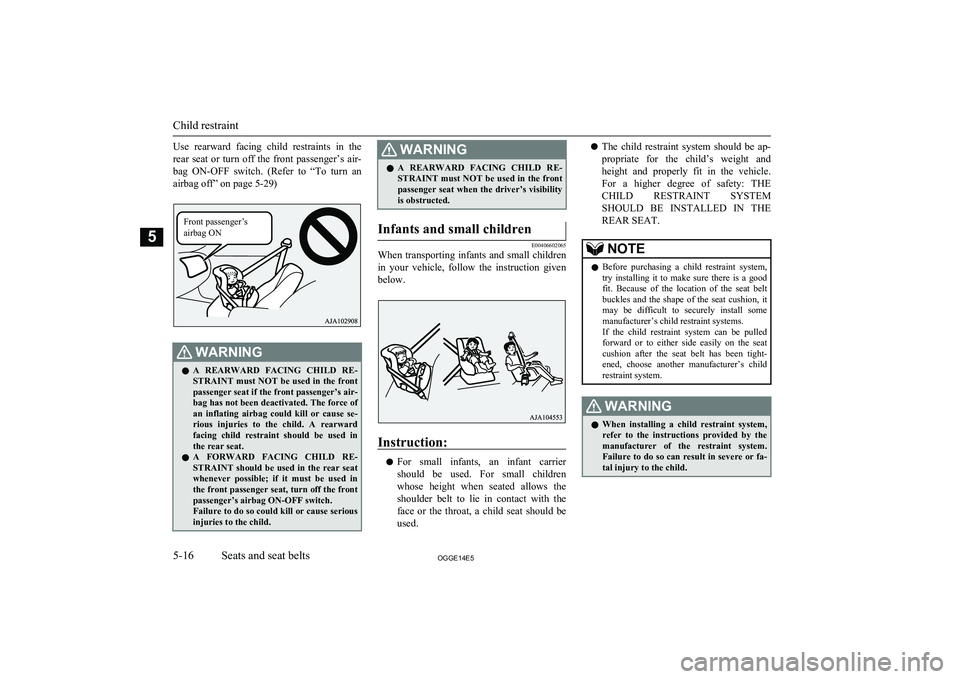
Use rearward facing child restraints in the
rear seat or turn off the front passenger’s air- bag ON-OFF switch. (Refer to “To turn an airbag off” on page 5-29)WARNINGl A REARWARD FACING CHILD RE-
STRAINT must NOT be used in the front passenger seat if the front passenger’s air-
bag has not been deactivated. The force of an inflating airbag could kill or cause se-
rious injuries to the child. A rearward facing child restraint should be used in
the rear seat.
l A FORWARD FACING CHILD RE-
STRAINT should be used in the rear seat
whenever possible; if it must be used in the front passenger seat, turn off the front
passenger’s airbag ON-OFF switch.
Failure to do so could kill or cause serious
injuries to the child.WARNINGl A REARWARD FACING CHILD RE-
STRAINT must NOT be used in the front passenger seat when the driver’s visibilityis obstructed.Infants and small children
E00406602065
When transporting infants and small children
in your vehicle, follow the instruction given below.
Instruction:
l For small infants, an infant carrier
should be used. For small children whose height when seated allows the shoulder belt to lie in contact with the
face or the throat, a child seat should be used.
l The child restraint system should be ap-
propriate for the child’s weight and
height and properly fit in the vehicle. For a higher degree of safety: THECHILD RESTRAINT SYSTEM
SHOULD BE INSTALLED IN THE REAR SEAT.NOTEl Before purchasing a child restraint system,
try installing it to make sure there is a good fit. Because of the location of the seat belt
buckles and the shape of the seat cushion, it may be difficult to securely install some
manufacturer’s child restraint systems.
If the child restraint system can be pulled forward or to either side easily on the seatcushion after the seat belt has been tight-
ened, choose another manufacturer’s child restraint system.WARNINGl When installing a child restraint system,
refer to the instructions provided by themanufacturer of the restraint system.Failure to do so can result in severe or fa-tal injury to the child.
Child restraint
5-16OGGE14E5Seats and seat belts5Front passenger’s
airbag ON
Page 191 of 442
Economical driving............................................................................. 7-02
Driving, alcohol and drugs.................................................................. 7-02
Safe driving techniques....................................................................... 7-02
Parking brake...................................................................................... 7-03 Parking................................................................................................ 7-04
Steering wheel height and reach adjustment....................................... 7-05
Inside rear-view mirror....................................................................... 7-05
Outside rear-view mirrors................................................................... 7-06
Power switch....................................................................................... 7-08 Starting and stopping the Plug-in Hybrid EV System........................ 7-11
Selector Lever (Joystick Type)........................................................... 7-12
Select Position indicator......................................................................7-14
Electrical Parking switch.................................................................... 7-14
Regenerative braking level selector (paddle)*.................................... 7-15
S-AWC (Super All Wheel Control).................................................... 7-17
4-wheel drive operation...................................................................... 7-19
Inspection and maintenance following rough road operation............. 7-20
Cautions on handling of 4-wheel drive vehicles................................. 7-20
Battery save switch............................................................................. 7-21
Battery charge switch.......................................................................... 7-22
Acoustic Vehicle Alerting System (AVAS)....................................... 7-23
Braking................................................................................................ 7-24
Hill start assist..................................................................................... 7-26
Brake assist system............................................................................. 7-27
Emergency stop signal system............................................................ 7-27
Anti-lock brake system (ABS)............................................................ 7-28
Electric power steering system (EPS)................................................. 7-30 Active stability control (ASC)............................................................ 7-31Cruise control*.................................................................................... 7-34Speed Limiter*.................................................................................... 7-38
Adaptive Cruise Control System (ACC)*...........................................7-43 Forward Collision Mitigation System (FCM)*...................................7-55Lane Departure Warning (LDW)*...................................................... 7-61
Tyre pressure monitoring system (TPMS).......................................... 7-64 Reversing sensor system*................................................................... 7-69
Rear-view camera*............................................................................. 7-72
Cargo loads......................................................................................... 7-75Trailer towing......................................................................................7-76Starting and driving
OGGE14E57