MITSUBISHI OUTLANDER PHEV 2017 Owner's Manual (in English)
Manufacturer: MITSUBISHI, Model Year: 2017, Model line: OUTLANDER PHEV, Model: MITSUBISHI OUTLANDER PHEV 2017Pages: 548, PDF Size: 25.5 MB
Page 421 of 548
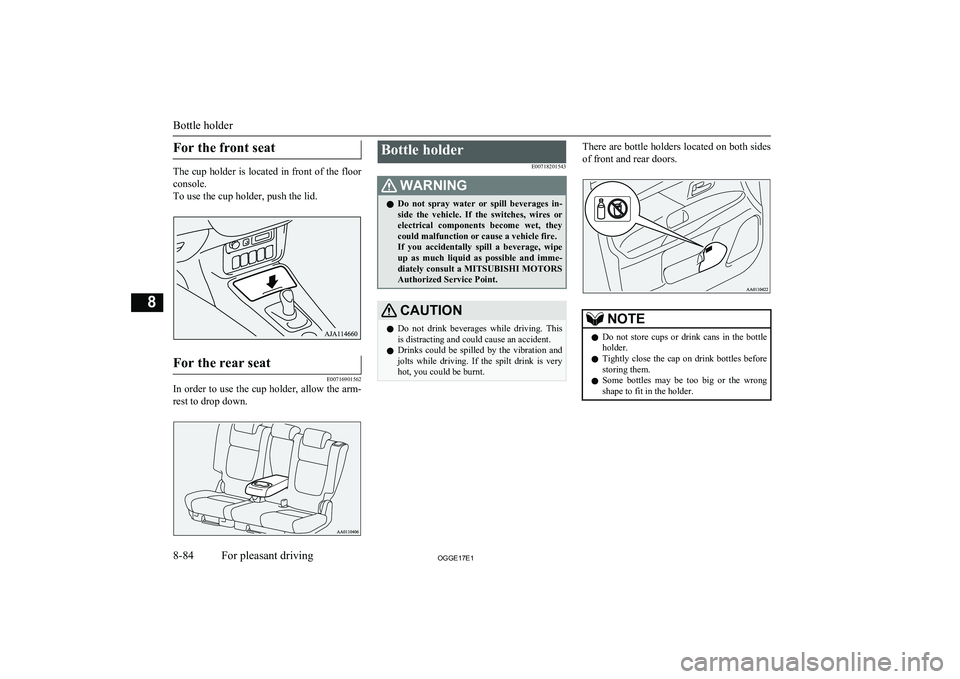
For the front seat
The cup holder is located in front of the floorconsole.
To use the cup holder, push the lid.
For the rear seat
E00716901562
In order to use the cup holder, allow the arm-
rest to drop down.
Bottle holder
E00718201543WARNINGlDo not spray water or spill beverages in-
side the vehicle. If the switches, wires or
electrical components become wet, they could malfunction or cause a vehicle fire.If you accidentally spill a beverage, wipe
up as much liquid as possible and imme- diately consult a MITSUBISHI MOTORS
Authorized Service Point.CAUTIONl Do not drink beverages while driving. This
is distracting and could cause an accident.
l Drinks could be spilled by the vibration and
jolts while driving. If the spilt drink is very
hot, you could be burnt.There are bottle holders located on both sides
of front and rear doors.NOTEl Do not store cups or drink cans in the bottle
holder.
l Tightly close the cap on drink bottles before
storing them.
l Some bottles may be too big or the wrong
shape to fit in the holder.
Bottle holder
8-84OGGE17E1For pleasant driving8
Page 422 of 548
Cargo area coverE00733601160
To use
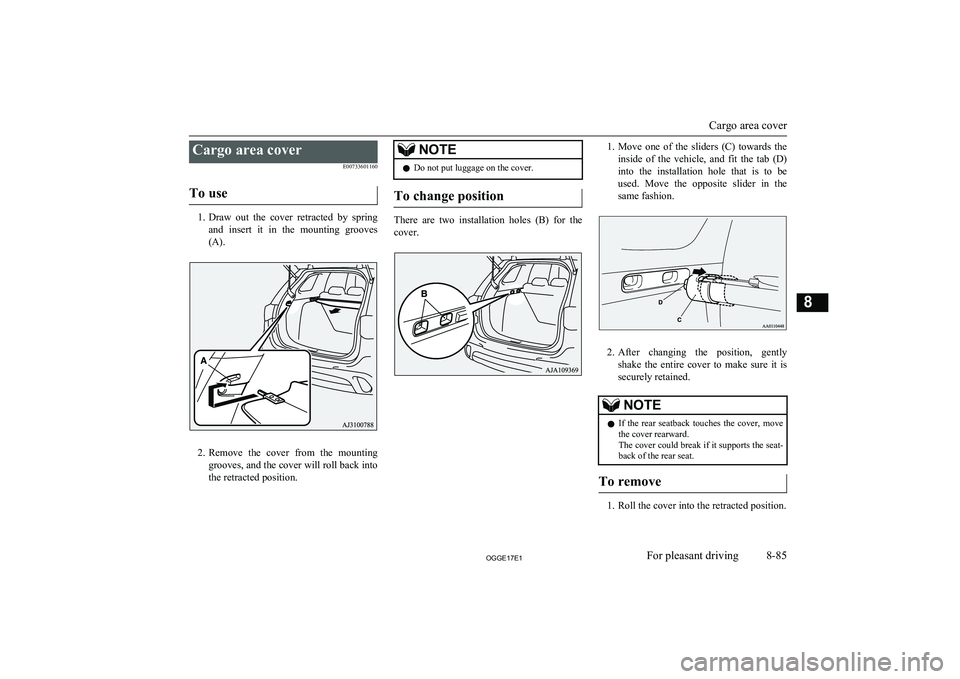
1. Draw out the cover retracted by spring
and insert it in the mounting grooves (A).
2. Remove the cover from the mounting
grooves, and the cover will roll back into
the retracted position.
NOTEl Do not put luggage on the cover.
To change position
There are two installation holes (B) for the
cover.
1. Move one of the sliders (C) towards the
inside of the vehicle, and fit the tab (D) into the installation hole that is to be
used. Move the opposite slider in the
same fashion.
2. After changing the position, gently
shake the entire cover to make sure it is securely retained.
NOTEl If the rear seatback touches the cover, move
the cover rearward.
The cover could break if it supports the seat- back of the rear seat.
To remove
1. Roll the cover into the retracted position.
Cargo area cover
8-85OGGE17E1For pleasant driving8
Page 423 of 548
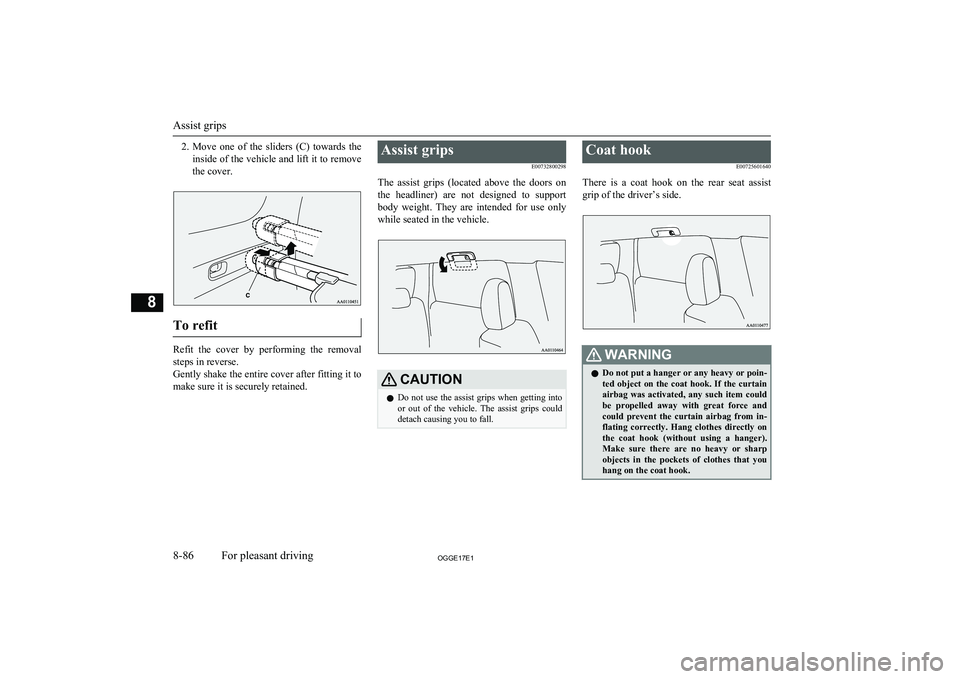
2.Move one of the sliders (C) towards the
inside of the vehicle and lift it to remove
the cover.
To refit
Refit the cover by performing the removal steps in reverse.
Gently shake the entire cover after fitting it to make sure it is securely retained.
Assist grips
E00732800298
The assist grips (located above the doors on the headliner) are not designed to support
body weight. They are intended for use only while seated in the vehicle.CAUTIONl Do not use the assist grips when getting into
or out of the vehicle. The assist grips could
detach causing you to fall.Coat hook
E00725601640
There is a coat hook on the rear seat assist
grip of the driver’s side.WARNINGl Do not put a hanger or any heavy or poin-
ted object on the coat hook. If the curtain
airbag was activated, any such item could
be propelled away with great force and could prevent the curtain airbag from in-
flating correctly. Hang clothes directly on the coat hook (without using a hanger).
Make sure there are no heavy or sharp objects in the pockets of clothes that you
hang on the coat hook.
Assist grips
8-86OGGE17E1For pleasant driving8
Page 424 of 548
Luggage hooksE00715700579
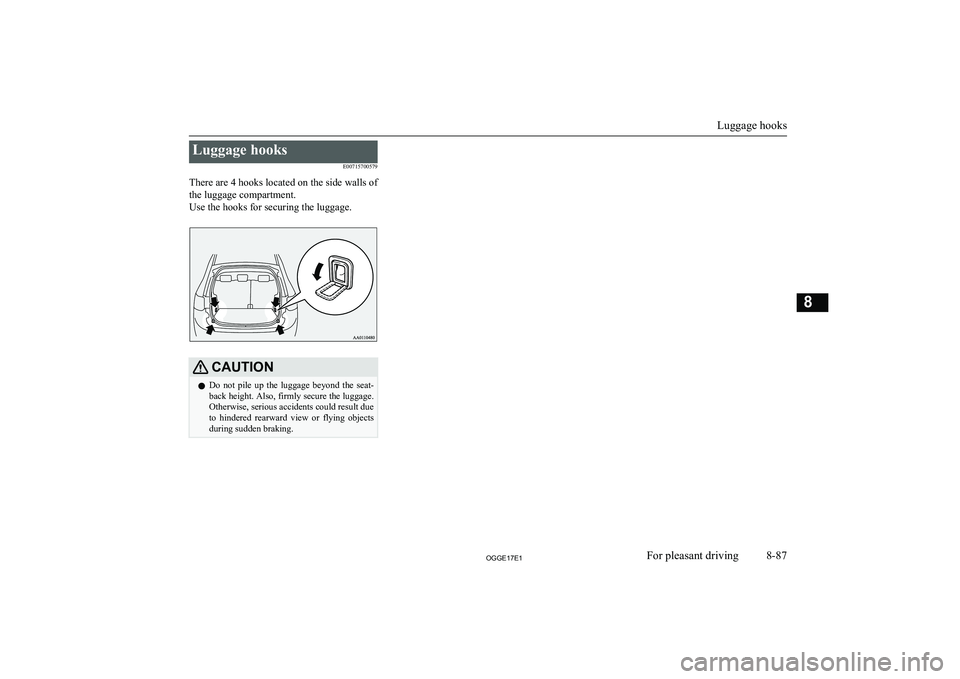
There are 4 hooks located on the side walls of
the luggage compartment.
Use the hooks for securing the luggage.CAUTIONl Do not pile up the luggage beyond the seat-
back height. Also, firmly secure the luggage. Otherwise, serious accidents could result due
to hindered rearward view or flying objects
during sudden braking.
Luggage hooks
8-87OGGE17E1For pleasant driving8
Page 425 of 548
OGGE17E1
Page 426 of 548
ERA-GLONASS*............................................................................... 9-02
If the vehicle breaks down.................................................................. 9-07 Emergency starting............................................................................. 9-07
Engine overheating............................................................................. 9-09
Tools and jack..................................................................................... 9-11
Tyre repair kit......................................................................................9-12
How to change a tyre.......................................................................... 9-18
Towing................................................................................................ 9-22
Operation under adverse driving conditions....................................... 9-26For emergencies
OGGE17E19
Page 427 of 548
ERA-GLONASS*E00804800063
ERA-GLONASS is a system designed to re- duce the severity of accidents. The location
and vehicle information is transmitted from
the system to the emergency call centre in
case of an accident or sudden illness, and the emergency call centre arranges for despatch
of emergency vehicles as required.WARNINGl If an emergency occurs and you notice a
fuel smell or bad smell, do not stay insidethe vehicle and escape to a safe place im-
mediately.
l While waiting for the rescue after the
emergency call, take action to prevent sec-
ondary accidents such as a rear end colli- sion with the following vehicle, and escapeto a safe place.
l If the system fails because of a collision,
etc. the system does not operate. In this case, directly arrange an emergency vehi-
cle or road service with a cellular phone, etc.WARNINGl In a place where radio waves cannot be
transmitted and received, you cannot call
the emergency call centre. (for example,
indoor, a basement parking area, a moun-
tainous area, inside a tunnel, etc.)
In addition, if the line to the emergency call centre is busy, it may be difficult to
call the emergency call centre even in a place where you can transmit and receive
radio waves. In this case, directly arrange
an emergency vehicle or road service with
a cellular phone, etc.NOTEl This system reports to the emergency call
centre, but does not directly arrange anemergency vehicle or pass to the road serv-
ice.
l This system helps to maken an emergency
call for a traffic accident or sudden illness,
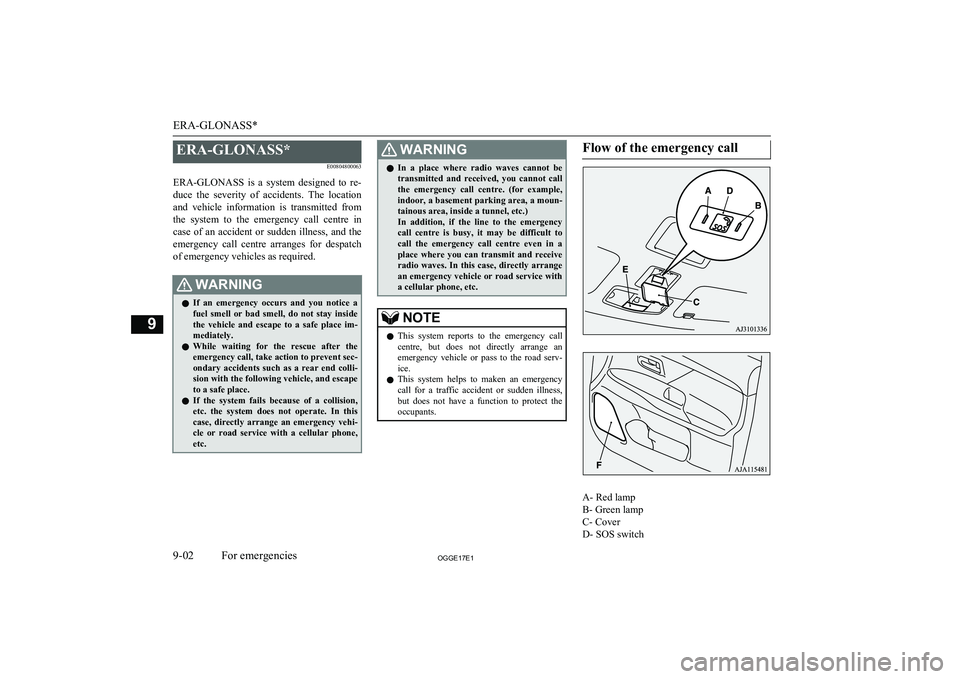
but does not have a function to protect the occupants.Flow of the emergency call
A- Red lamp
B- Green lamp
C- Cover
D- SOS switch
ERA-GLONASS*
9-02OGGE17E1For emergencies9
Page 428 of 548
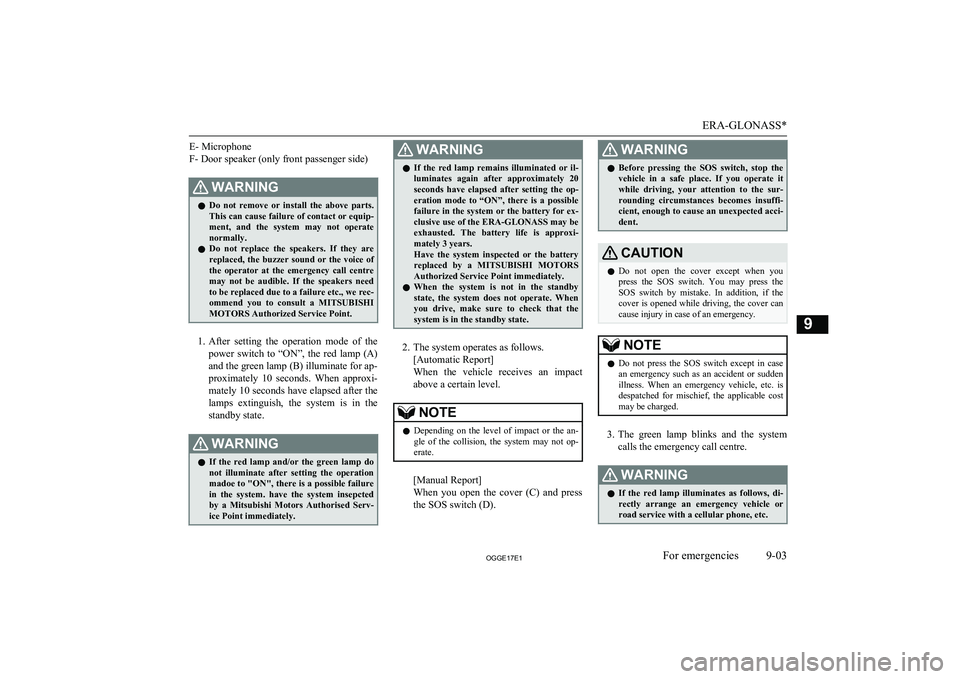
E- Microphone
F- Door speaker (only front passenger side)WARNINGl Do not remove or install the above parts.
This can cause failure of contact or equip- ment, and the system may not operate
normally.
l Do not replace the speakers. If they are
replaced, the buzzer sound or the voice of the operator at the emergency call centre
may not be audible. If the speakers need
to be replaced due to a failure etc., we rec- ommend you to consult a MITSUBISHI
MOTORS Authorized Service Point.
1. After setting the operation mode of the
power switch to “ON”, the red lamp (A)
and the green lamp (B) illuminate for ap-
proximately 10 seconds. When approxi-
mately 10 seconds have elapsed after the lamps extinguish, the system is in the
standby state.
WARNINGl If the red lamp and/or the green lamp do
not illuminate after setting the operation
madoe to "ON", there is a possible failure in the system. have the system insepcted by a Mitsubishi Motors Authorised Serv-
ice Point immediately.WARNINGl If the red lamp remains illuminated or il-
luminates again after approximately 20
seconds have elapsed after setting the op-
eration mode to “ON”, there is a possible failure in the system or the battery for ex-
clusive use of the ERA-GLONASS may be
exhausted. The battery life is approxi- mately 3 years.
Have the system inspected or the battery replaced by a MITSUBISHI MOTORS
Authorized Service Point immediately.
l When the system is not in the standby
state, the system does not operate. When you drive, make sure to check that thesystem is in the standby state.
2. The system operates as follows.
[Automatic Report]
When the vehicle receives an impact
above a certain level.
NOTEl Depending on the level of impact or the an-
gle of the collision, the system may not op-erate.
[Manual Report]
When you open the cover (C) and press
the SOS switch (D).
WARNINGl Before pressing the SOS switch, stop the
vehicle in a safe place. If you operate itwhile driving, your attention to the sur- rounding circumstances becomes insuffi-
cient, enough to cause an unexpected acci-
dent.CAUTIONl Do not open the cover except when you
press the SOS switch. You may press theSOS switch by mistake. In addition, if the
cover is opened while driving, the cover can cause injury in case of an emergency.NOTEl Do not press the SOS switch except in case
an emergency such as an accident or sudden
illness. When an emergency vehicle, etc. is
despatched for mischief, the applicable cost
may be charged.
3. The green lamp blinks and the system
calls the emergency call centre.
WARNINGl If the red lamp illuminates as follows, di-
rectly arrange an emergency vehicle or
road service with a cellular phone, etc.
ERA-GLONASS*
9-03OGGE17E1For emergencies9
Page 429 of 548
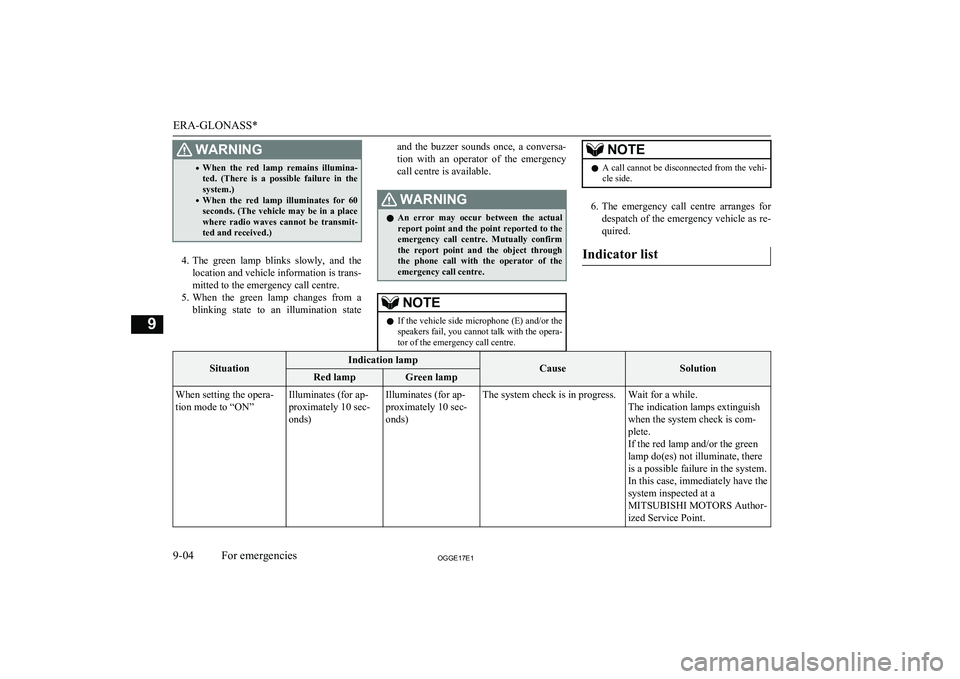
WARNING•When the red lamp remains illumina-
ted. (There is a possible failure in the system.)
• When the red lamp illuminates for 60
seconds. (The vehicle may be in a place where radio waves cannot be transmit-
ted and received.)
4. The green lamp blinks slowly, and the
location and vehicle information is trans-
mitted to the emergency call centre.
5. When the green lamp changes from a
blinking state to an illumination state
and the buzzer sounds once, a conversa-
tion with an operator of the emergencycall centre is available.WARNINGl An error may occur between the actual
report point and the point reported to the
emergency call centre. Mutually confirm
the report point and the object through the phone call with the operator of the
emergency call centre.NOTEl If the vehicle side microphone (E) and/or the
speakers fail, you cannot talk with the opera-tor of the emergency call centre.NOTEl A call cannot be disconnected from the vehi-
cle side.
6. The emergency call centre arranges for
despatch of the emergency vehicle as re- quired.
Indicator list
SituationIndication lampCauseSolutionRed lampGreen lampWhen setting the opera-
tion mode to “ON”Illuminates (for ap-
proximately 10 sec-
onds)Illuminates (for ap-
proximately 10 sec-
onds)The system check is in progress.Wait for a while.
The indication lamps extinguish
when the system check is com-
plete.
If the red lamp and/or the green
lamp do(es) not illuminate, there
is a possible failure in the system.
In this case, immediately have the
system inspected at a
MITSUBISHI MOTORS Author-
ized Service Point.
ERA-GLONASS*
9-04OGGE17E1For emergencies9
Page 430 of 548
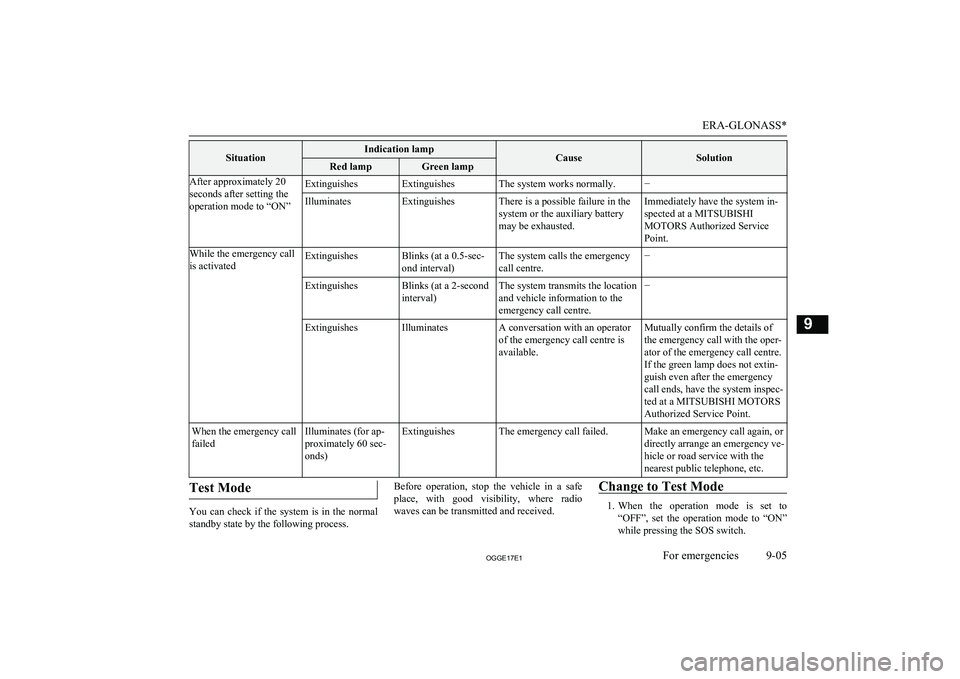
SituationIndication lampCauseSolutionRed lampGreen lampAfter approximately 20
seconds after setting the
operation mode to “ON”ExtinguishesExtinguishesThe system works normally.−IlluminatesExtinguishesThere is a possible failure in the
system or the auxiliary battery
may be exhausted.Immediately have the system in-
spected at a MITSUBISHI
MOTORS Authorized Service
Point.While the emergency call
is activatedExtinguishesBlinks (at a 0.5-sec-
ond interval)The system calls the emergency
call centre.−ExtinguishesBlinks (at a 2-second
interval)The system transmits the location
and vehicle information to the
emergency call centre.−ExtinguishesIlluminatesA conversation with an operator
of the emergency call centre is
available.Mutually confirm the details of
the emergency call with the oper-
ator of the emergency call centre.
If the green lamp does not extin-
guish even after the emergency
call ends, have the system inspec-
ted at a MITSUBISHI MOTORS
Authorized Service Point.When the emergency call
failedIlluminates (for ap-
proximately 60 sec-
onds)ExtinguishesThe emergency call failed.Make an emergency call again, or
directly arrange an emergency ve-
hicle or road service with the
nearest public telephone, etc.Test Mode
You can check if the system is in the normal
standby state by the following process.
Before operation, stop the vehicle in a safe place, with good visibility, where radio
waves can be transmitted and received.Change to Test Mode
1. When the operation mode is set to
“OFF”, set the operation mode to “ON” while pressing the SOS switch.ERA-GLONASS*
9-05OGGE17E1For emergencies9