MITSUBISHI OUTLANDER PHEV 2018 Owner's Manual (in English)
Manufacturer: MITSUBISHI, Model Year: 2018, Model line: OUTLANDER PHEV, Model: MITSUBISHI OUTLANDER PHEV 2018Pages: 538, PDF Size: 25.01 MB
Page 471 of 538
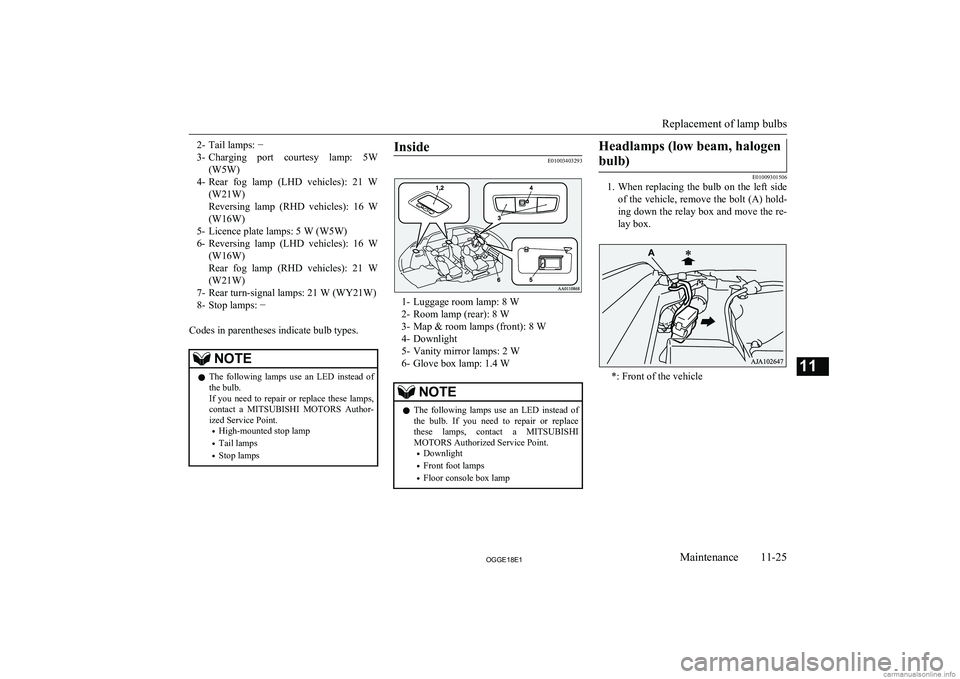
2- Tail lamps: −
3- Charging port courtesy lamp: 5W
(W5W)
4- Rear fog lamp (LHD vehicles): 21 W
(W21W)
Reversing lamp (RHD vehicles): 16 W
(W16W)
5- Licence plate lamps: 5 W (W5W)
6- Reversing lamp (LHD vehicles): 16 W
(W16W)
Rear fog lamp (RHD vehicles): 21 W (W21W)
7- Rear turn-signal lamps: 21 W (WY21W)
8- Stop lamps: −
Codes in parentheses indicate bulb types.NOTEl The following lamps use an LED instead of
the bulb.
If you need to repair or replace these lamps,
contact a MITSUBISHI MOTORS Author-
ized Service Point.
• High-mounted stop lamp
• Tail lamps
• Stop lampsInside
E01003403293
1- Luggage room lamp: 8 W
2- Room lamp (rear): 8 W
3- Map & room lamps (front): 8 W
4- Downlight
5- Vanity mirror lamps: 2 W
6- Glove box lamp: 1.4 W
NOTEl The following lamps use an LED instead of
the bulb. If you need to repair or replacethese lamps, contact a MITSUBISHI
MOTORS Authorized Service Point.
• Downlight
• Front foot lamps
• Floor console box lampHeadlamps (low beam, halogen
bulb)
E01009301506
1. When replacing the bulb on the left side
of the vehicle, remove the bolt (A) hold-ing down the relay box and move the re-
lay box.
*: Front of the vehicle
Replacement of lamp bulbs
11-25OGGE18E1Maintenance11
Page 472 of 538
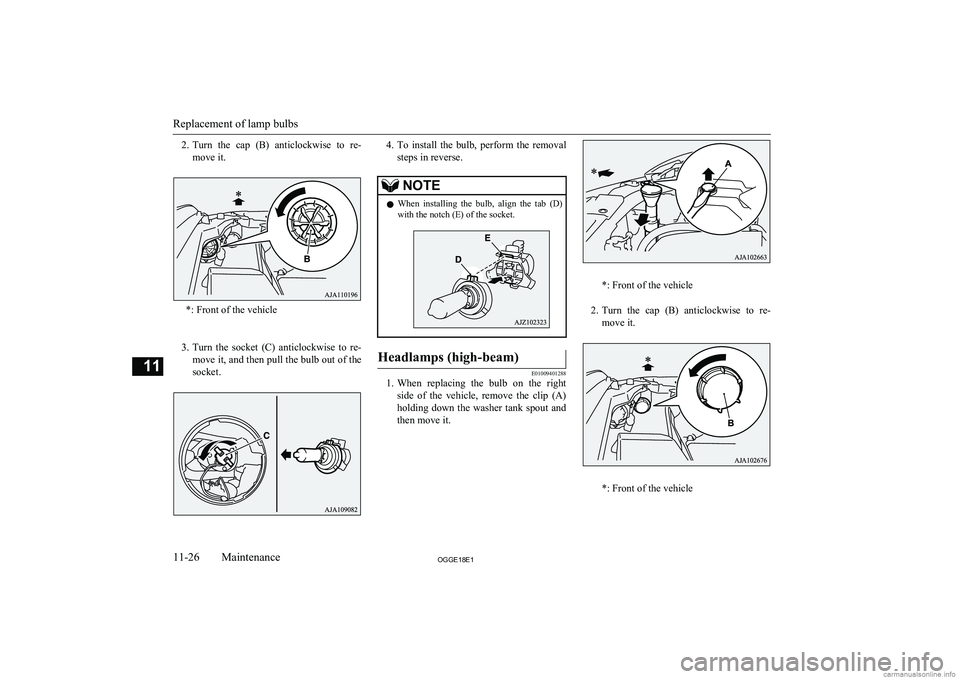
2.Turn the cap (B) anticlockwise to re-
move it.
*: Front of the vehicle
3. Turn the socket (C) anticlockwise to re-
move it, and then pull the bulb out of the
socket.
4. To install the bulb, perform the removal
steps in reverse.NOTEl When installing the bulb, align the tab (D)
with the notch (E) of the socket.Headlamps (high-beam)
E01009401288
1. When replacing the bulb on the right
side of the vehicle, remove the clip (A) holding down the washer tank spout and
then move it.
*: Front of the vehicle
2. Turn the cap (B) anticlockwise to re-
move it.
*: Front of the vehicle
Replacement of lamp bulbs
11-26OGGE18E1Maintenance11
Page 473 of 538
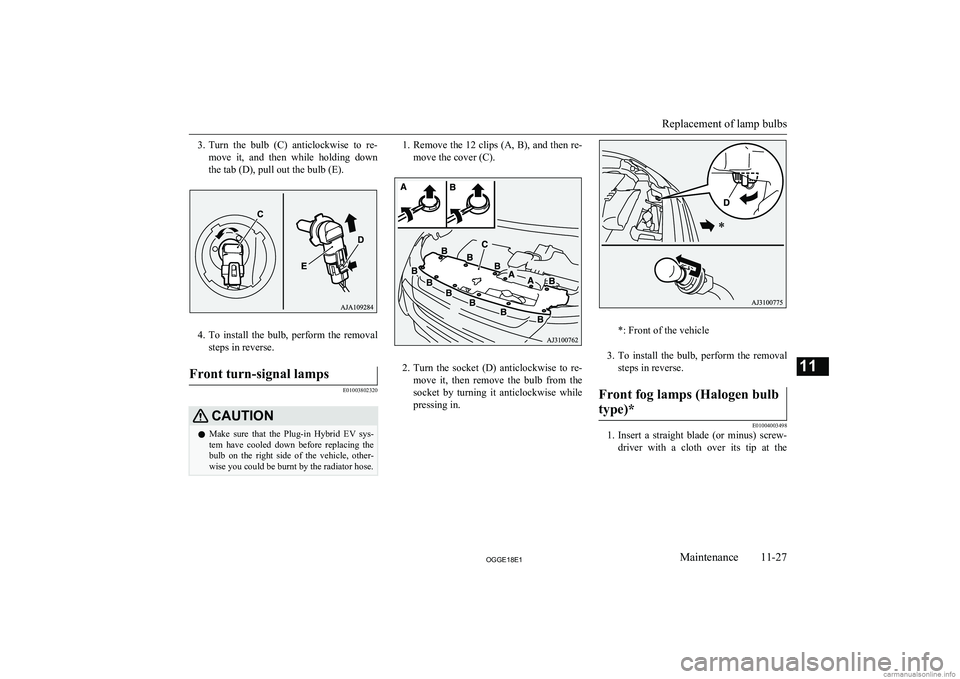
3.Turn the bulb (C) anticlockwise to re-
move it, and then while holding down
the tab (D), pull out the bulb (E).
4. To install the bulb, perform the removal
steps in reverse.
Front turn-signal lamps
E01003802320
CAUTIONl Make sure that the Plug-in Hybrid EV sys-
tem have cooled down before replacing the bulb on the right side of the vehicle, other-wise you could be burnt by the radiator hose.1. Remove the 12 clips (A, B), and then re-
move the cover (C).
2. Turn the socket (D) anticlockwise to re-
move it, then remove the bulb from the socket by turning it anticlockwise while
pressing in.
*: Front of the vehicle
3. To install the bulb, perform the removal
steps in reverse.
Front fog lamps (Halogen bulb
type)*
E01004003498
1. Insert a straight blade (or minus) screw-
driver with a cloth over its tip at the
Replacement of lamp bulbs
11-27OGGE18E1Maintenance11
Page 474 of 538
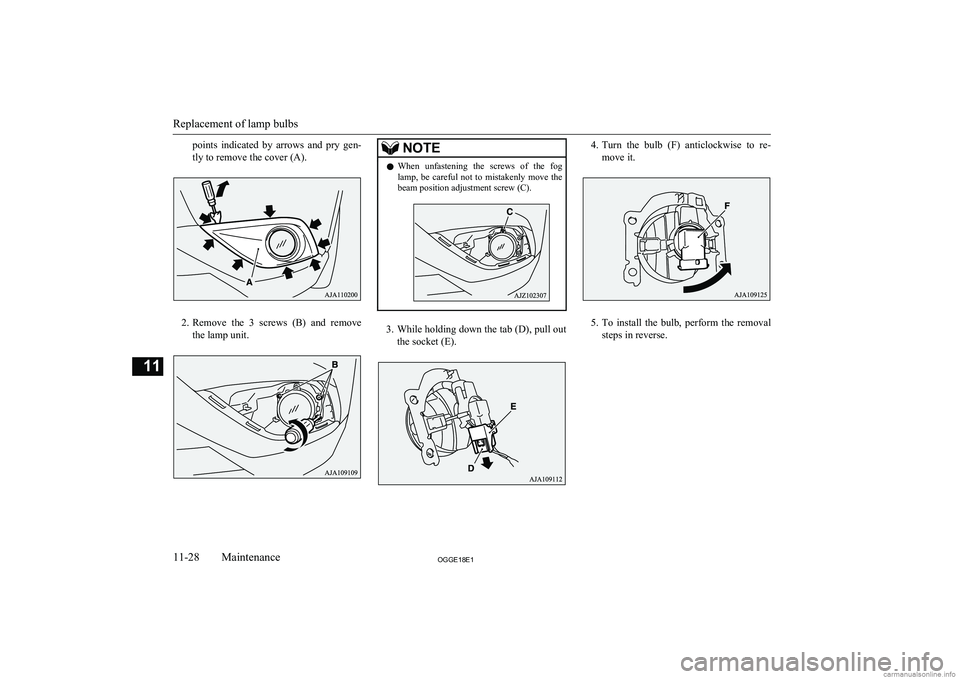
points indicated by arrows and pry gen-tly to remove the cover (A).
2. Remove the 3 screws (B) and remove
the lamp unit.
NOTEl When unfastening the screws of the fog
lamp, be careful not to mistakenly move thebeam position adjustment screw (C).
3. While holding down the tab (D), pull out
the socket (E).
4. Turn the bulb (F) anticlockwise to re-
move it.
5. To install the bulb, perform the removal
steps in reverse.
Replacement of lamp bulbs
11-28OGGE18E1Maintenance11
Page 475 of 538
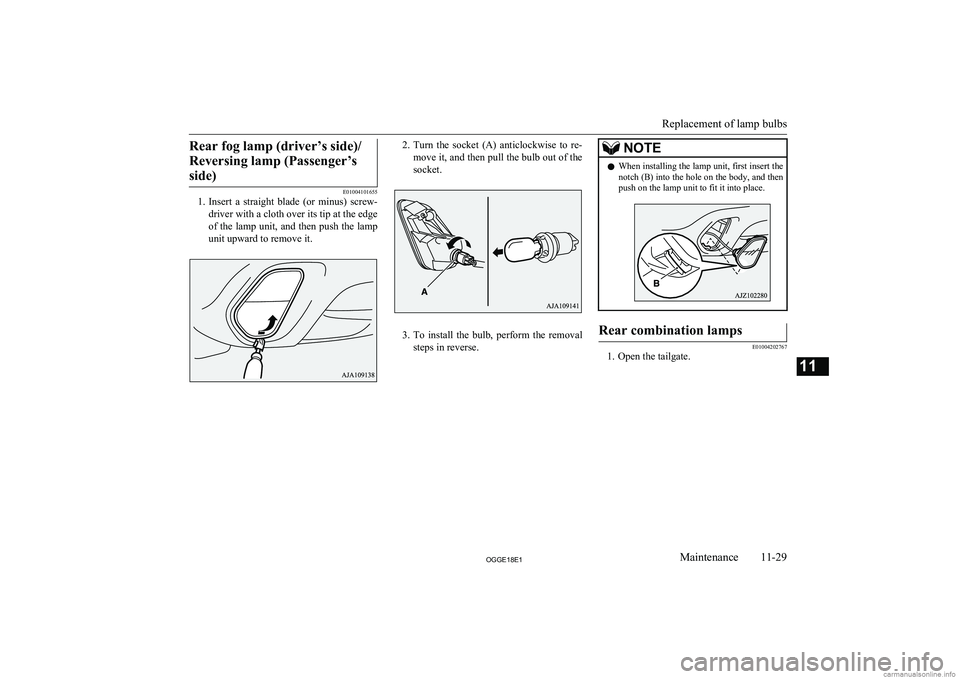
Rear fog lamp (driver’s side)/Reversing lamp (Passenger’s side)
E01004101655
1. Insert a straight blade (or minus) screw-
driver with a cloth over its tip at the edge
of the lamp unit, and then push the lamp
unit upward to remove it.
2. Turn the socket (A) anticlockwise to re-
move it, and then pull the bulb out of the socket.
3. To install the bulb, perform the removal
steps in reverse.
NOTEl When installing the lamp unit, first insert the
notch (B) into the hole on the body, and thenpush on the lamp unit to fit it into place.Rear combination lamps
E01004202767
1. Open the tailgate.
Replacement of lamp bulbs
11-29OGGE18E1Maintenance11
Page 476 of 538
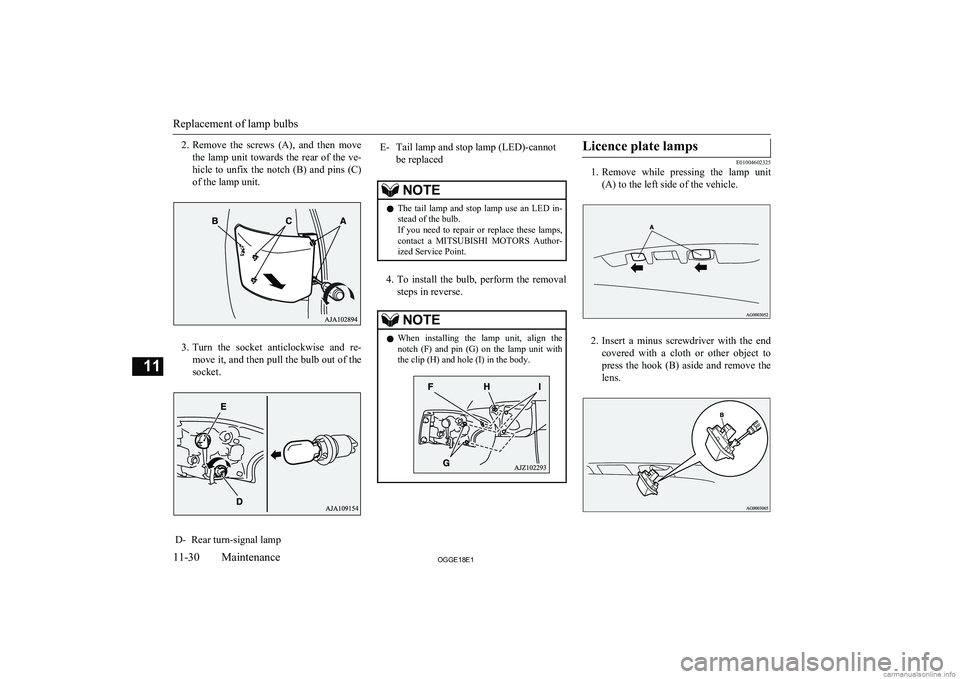
2.Remove the screws (A), and then move
the lamp unit towards the rear of the ve-
hicle to unfix the notch (B) and pins (C) of the lamp unit.
3. Turn the socket anticlockwise and re-
move it, and then pull the bulb out of the
socket.
D-Rear turn-signal lampE-Tail lamp and stop lamp (LED)-cannot
be replacedNOTEl The tail lamp and stop lamp use an LED in-
stead of the bulb.
If you need to repair or replace these lamps, contact a MITSUBISHI MOTORS Author-
ized Service Point.
4. To install the bulb, perform the removal
steps in reverse.
NOTEl When installing the lamp unit, align the
notch (F) and pin (G) on the lamp unit with the clip (H) and hole (I) in the body.Licence plate lamps
E01004602325
1. Remove while pressing the lamp unit
(A) to the left side of the vehicle.
2. Insert a minus screwdriver with the end
covered with a cloth or other object to press the hook (B) aside and remove the lens.
Replacement of lamp bulbs
11-30OGGE18E1Maintenance11
Page 477 of 538
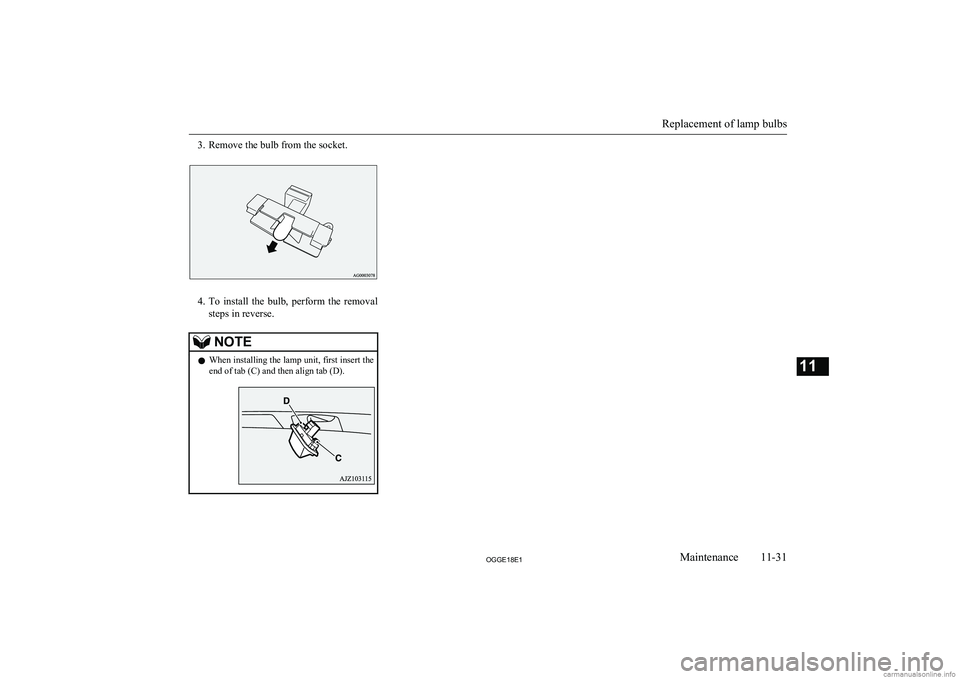
3. Remove the bulb from the socket.
4.To install the bulb, perform the removal
steps in reverse.
NOTEl When installing the lamp unit, first insert the
end of tab (C) and then align tab (D).
Replacement of lamp bulbs
11-31OGGE18E1Maintenance11
Page 478 of 538
OGGE18E1
Page 479 of 538
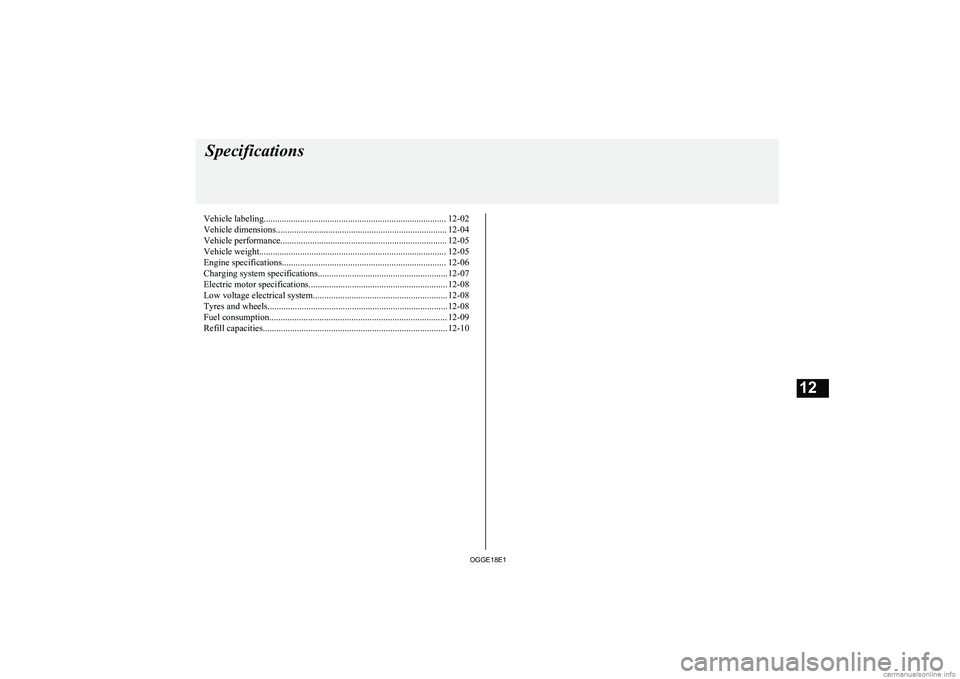
Vehicle labeling................................................................................ 12-02
Vehicle dimensions........................................................................... 12-04
Vehicle performance......................................................................... 12-05 Vehicle weight.................................................................................. 12-05
Engine specifications........................................................................ 12-06
Charging system specifications.........................................................12-07
Electric motor specifications.............................................................12-08
Low voltage electrical system........................................................... 12-08Tyres and wheels...............................................................................12-08
Fuel consumption.............................................................................. 12-09
Refill capacities................................................................................. 12-10Specifications
OGGE18E112
Page 480 of 538
Vehicle labelingE01100105210
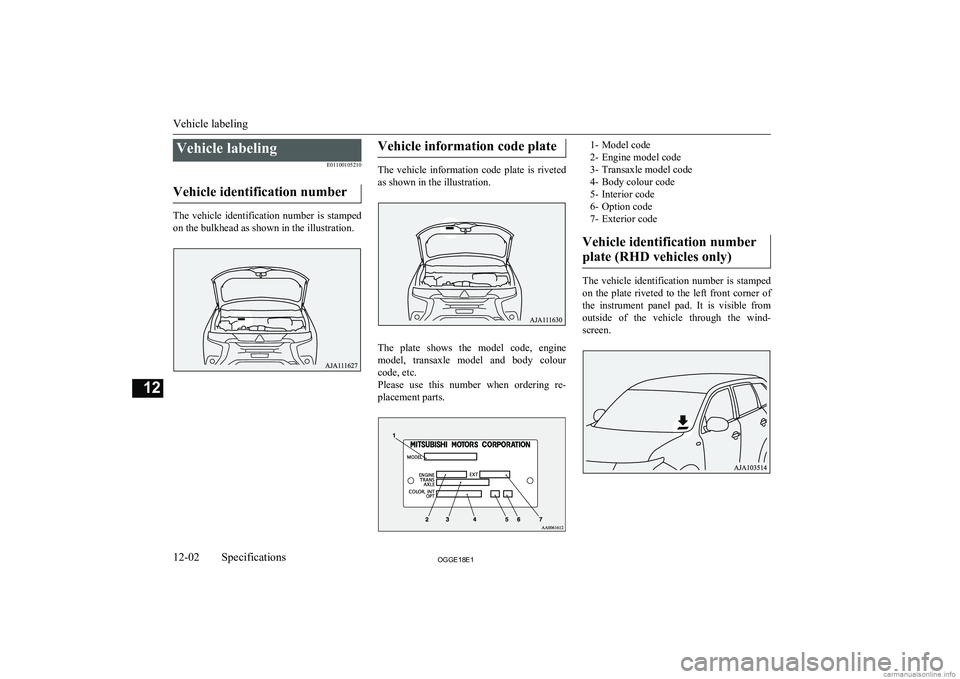
Vehicle identification number
The vehicle identification number is stamped on the bulkhead as shown in the illustration.
Vehicle information code plate
The vehicle information code plate is riveted as shown in the illustration.
The plate shows the model code, engine
model, transaxle model and body colour
code, etc.
Please use this number when ordering re- placement parts.
1- Model code
2- Engine model code
3- Transaxle model code
4- Body colour code
5- Interior code
6- Option code
7- Exterior code
Vehicle identification number plate (RHD vehicles only)
The vehicle identification number is stamped on the plate riveted to the left front corner of
the instrument panel pad. It is visible from outside of the vehicle through the wind-
screen.
Vehicle labeling
12-02OGGE18E1Specifications12