turn signal MITSUBISHI PAJERO IV 2011 Owners Manual
[x] Cancel search | Manufacturer: MITSUBISHI, Model Year: 2011, Model line: PAJERO IV, Model: MITSUBISHI PAJERO IV 2011Pages: 377, PDF Size: 29.43 MB
Page 3 of 377
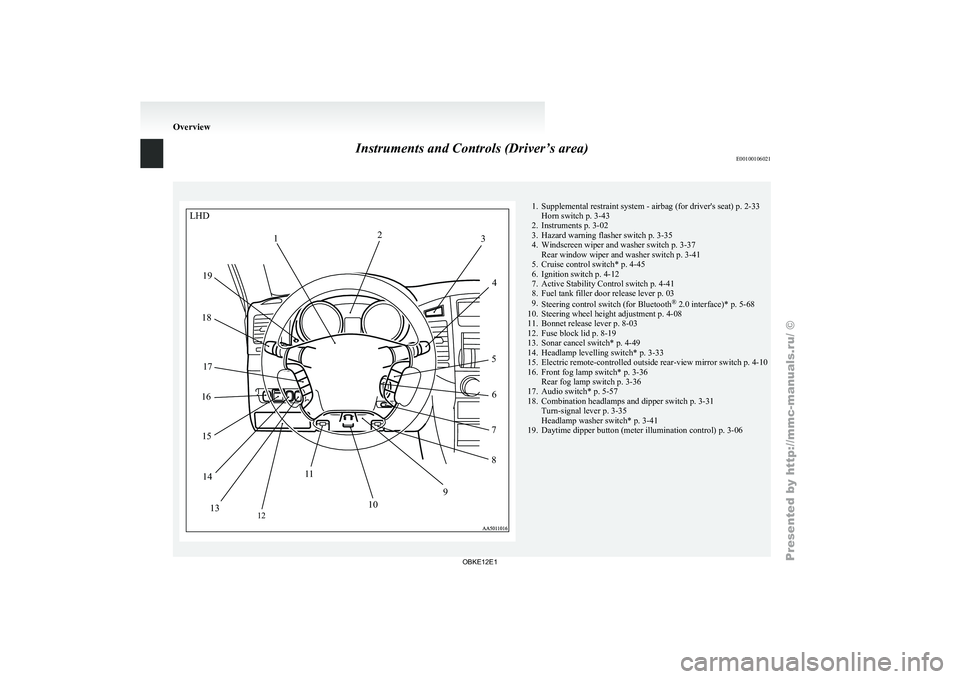
Instruments and Controls (Driver’s area)
E00100106021 1. Supplemental restraint system - airbag (for driver's seat) p. 2-33
Horn switch p. 3-43
2. Instruments p. 3-02
3. Hazard warning flasher switch p. 3-35
4.
Windscreen wiper and washer switch p. 3-37Rear window wiper and washer switch p. 3-41
5. Cruise control switch* p. 4-45
6. Ignition switch p. 4-12
7. Active Stability Control switch p. 4-41
8. Fuel tank filler door release lever p. 03
9. Steering control switch (for Bluetooth ®
2.0 interface)* p. 5-68
10. Steering wheel height adjustment p. 4-08
11. Bonnet release lever p. 8-03
12. Fuse block lid p. 8-19
13. Sonar cancel switch* p. 4-49
14. Headlamp levelling switch* p. 3-33
15. Electric remote-controlled outside rear-view mirror switch p. 4-10
16. Front fog lamp switch* p. 3-36 Rear fog lamp switch p. 3-36
17. Audio switch* p. 5-57
18. Combination headlamps and dipper switch p. 3-31 Turn-signal lever p. 3-35
Headlamp washer switch* p. 3-41
19. Daytime dipper button (meter illumination control) p. 3-06 OverviewLHD
2
1 3
4
5 6
7
8
9
10
1
1
12
13
14
15
16
17
18
19
OBKE12E1
Page 4 of 377
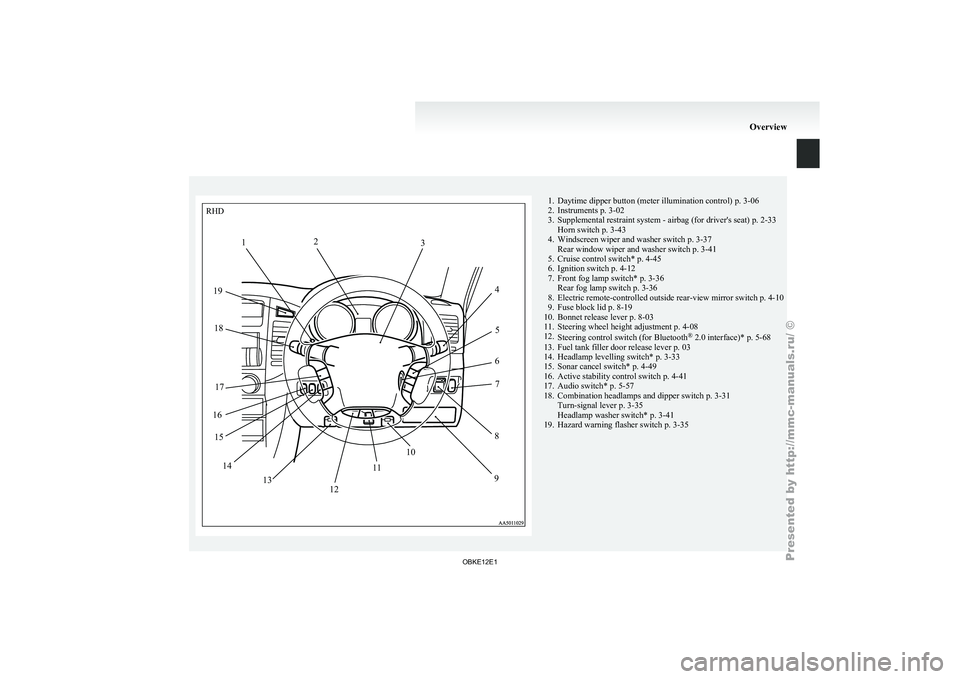
1. Daytime dipper button (meter illumination control) p. 3-06
2. Instruments p. 3-02
3. Supplemental restraint system - airbag (for driver's seat)
p. 2-33
Horn switch p. 3-43
4. Windscreen wiper and washer switch p. 3-37 Rear window wiper and washer switch p. 3-41
5. Cruise control switch* p. 4-45
6. Ignition switch p. 4-12
7. Front fog lamp switch* p. 3-36 Rear fog lamp switch p. 3-36
8. Electric remote-controlled outside rear-view mirror switch p. 4-10
9. Fuse block lid p. 8-19
10. Bonnet release lever p. 8-03
11. Steering wheel height adjustment p. 4-08
12. Steering control switch (for Bluetooth ®
2.0 interface)* p. 5-68
13. Fuel tank filler door release lever p. 03
14. Headlamp levelling switch* p. 3-33
15. Sonar cancel switch* p. 4-49
16. Active stability control switch p. 4-41
17. Audio switch* p. 5-57
18. Combination headlamps and dipper switch p. 3-31 Turn-signal lever p. 3-35
Headlamp washer switch* p. 3-41
19. Hazard warning flasher switch p. 3-35 OverviewRHD
1 2
3
45
6 7
8
9
12 10
1
1
13
14
15
16 17
18
19
OBKE12E1
Page 10 of 377
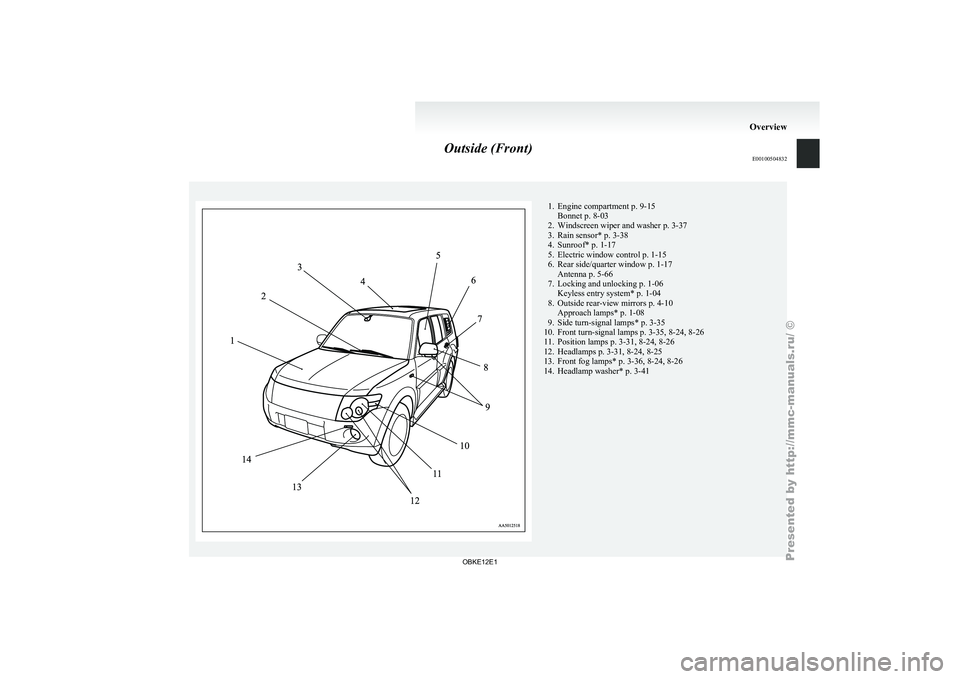
Outside (Front)
E00100504832 1. Engine compartment p. 9-15
Bonnet p. 8-03
2. Windscreen wiper and washer p. 3-37
3. Rain sensor* p. 3-38
4.
Sunroof* p. 1-17
5. Electric window control p. 1-15
6. Rear side/quarter window p. 1-17 Antenna p. 5-66
7. Locking and unlocking p. 1-06 Keyless entry system* p. 1-04
8. Outside rear-view mirrors p. 4-10 Approach lamps* p. 1-08
9. Side turn-signal lamps* p. 3-35
10. Front turn-signal lamps p. 3-35, 8-24, 8-26
11. Position lamps p. 3-31, 8-24, 8-26
12. Headlamps p. 3-31, 8-24, 8-25
13. Front fog lamps* p. 3-36, 8-24, 8-26
14. Headlamp washer* p. 3-41 Overview
OBKE12E1
Page 11 of 377
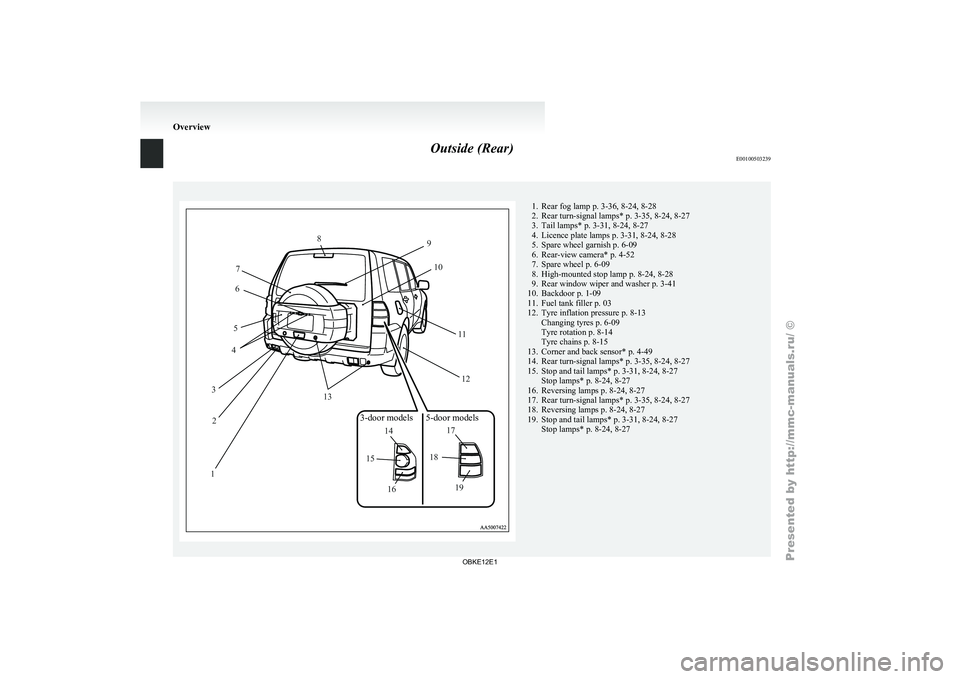
Outside (Rear)
E0010050323912
3 4
5 6
7 8
9
10
1112
13
14
15
16 17
18
19
3-door models 5-door models 1. Rear fog lamp p. 3-36, 8-24, 8-28
2. Rear turn-signal lamps*
p. 3-35, 8-24, 8-27
3.
Tail lamps* p. 3-31, 8-24, 8-27
4. Licence plate lamps p. 3-31, 8-24, 8-28
5. Spare wheel garnish p. 6-09
6. Rear-view camera* p. 4-52
7. Spare wheel p. 6-09
8. High-mounted stop lamp p. 8-24, 8-28
9. Rear window wiper and washer p. 3-41
10. Backdoor p. 1-09
11. Fuel tank filler p. 03
12. Tyre inflation pressure p. 8-13 Changing tyres p. 6-09
Tyre rotation p. 8-14
Tyre chains p. 8-15
13. Corner and back sensor* p. 4-49
14. Rear turn-signal lamps* p. 3-35, 8-24, 8-27
15. Stop and tail lamps* p. 3-31, 8-24, 8-27 Stop lamps* p. 8-24, 8-27
16. Reversing lamps p. 8-24, 8-27
17. Rear turn-signal lamps* p. 3-35, 8-24, 8-27
18. Reversing lamps p. 8-24, 8-27
19. Stop and tail lamps* p. 3-31, 8-24, 8-27 Stop lamps* p. 8-24, 8-27 Overview
OBKE12E1
Page 21 of 377
Keyless entry system*
E00300302085
Press the remote
control switch, and all doors (in-
cluding the backdoor) will be locked or unlocked
as desired. It is also possible to operate the outside
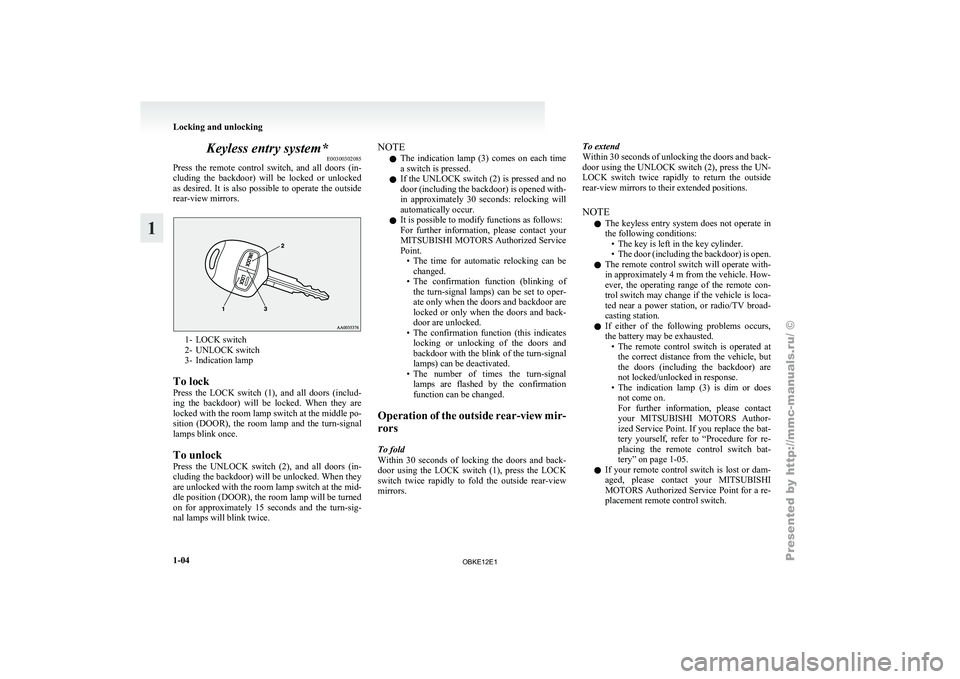
rear-view mirrors. 1- LOCK switch
2- UNLOCK switch
3-
Indication lamp
To lock
Press
the LOCK switch (1), and all doors (includ-
ing the backdoor) will be locked. When they are
locked with the room lamp switch at the middle po-
sition (DOOR), the room lamp and the turn-signal
lamps blink once.
To unlock
Press the UNLOCK switch (2), and all doors (in-
cluding the backdoor) will be unlocked. When they
are unlocked with the room lamp switch at the mid-
dle position (DOOR), the room lamp will be turned
on for approximately 15 seconds and the turn-sig-
nal lamps will blink twice. NOTE
l The
indication lamp
(3) comes on each time
a switch is pressed.
l If the UNLOCK switch (2) is pressed and no
door (including the backdoor) is opened with-
in approximately 30 seconds: relocking will
automatically occur.
l It is possible to modify functions as follows:
For further information, please contact your
MITSUBISHI MOTORS Authorized Service
Point.
• The time for automatic relocking can bechanged.
• The confirmation function (blinking of the turn-signal lamps) can be set to oper-
ate only when the doors and backdoor are
locked or only when the doors and back-
door are unlocked.
• The confirmation function (this indicates locking or unlocking of the doors and
backdoor with the blink of the turn-signal
lamps) can be deactivated.
• The number of times the turn-signal lamps are flashed by the confirmation
function can be changed.
Operation of the outside rear-view mir-
rors
To fold
Within 30 seconds of locking the doors and back-
door using the LOCK switch (1), press the LOCK
switch twice rapidly to fold the outside rear-view
mirrors. To extend
Within 30 seconds
of unlocking the doors and back-
door using the UNLOCK switch (2), press the UN-
LOCK switch twice rapidly to return the outside
rear-view mirrors to their extended positions.
NOTE
l The keyless entry system does not operate in
the following conditions:
• The key is left in the key cylinder.
• The door (including the backdoor) is open.
l The remote control switch will operate with-
in approximately 4 m from the vehicle. How-
ever, the operating range of the remote con-
trol switch may change if the vehicle is loca-
ted near a power station, or radio/TV broad-
casting station.
l If either of the following problems occurs,
the battery may be exhausted.
• The remote control switch is operated atthe correct distance from the vehicle, but
the doors (including the backdoor) are
not locked/unlocked in response.
• The indication lamp (3) is dim or does not come on.
For further information, please contact
your MITSUBISHI MOTORS Author-
ized Service Point. If you replace the bat-
tery yourself, refer to “Procedure for re-
placing the remote control switch bat-
tery” on page 1-05.
l If your remote control switch is lost or dam-
aged, please contact your MITSUBISHI
MOTORS Authorized Service Point for a re-
placement remote control switch. Locking and unlocking
1-04
1
OBKE12E1
Page 27 of 377
Backdoor stopper
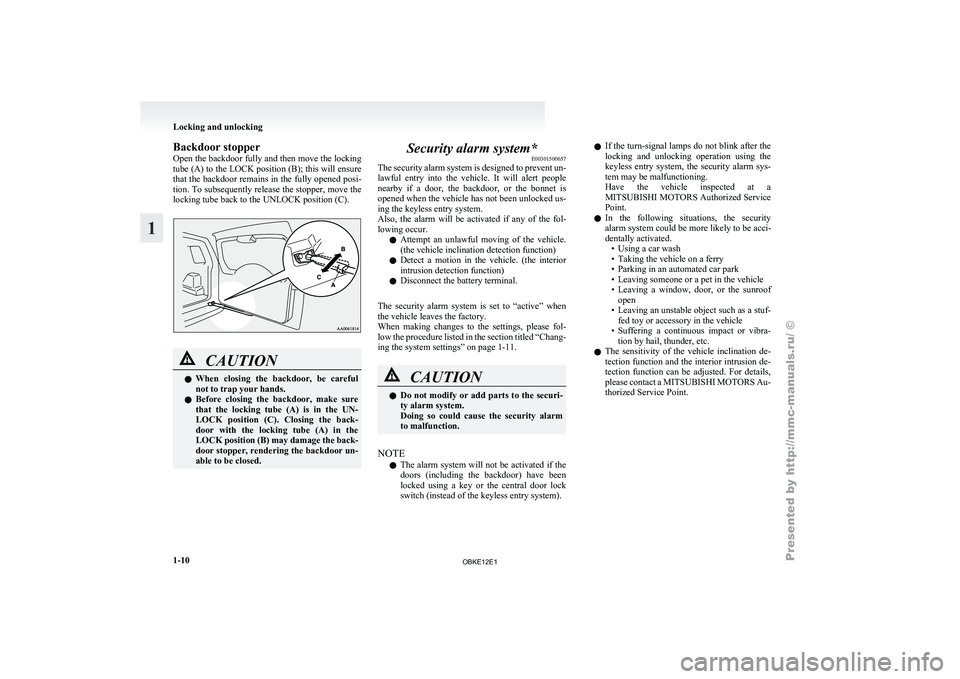
Open the
backdoor
fully and then move the locking
tube (A) to the LOCK position (B); this will ensure
that the backdoor remains in the fully opened posi-
tion. To subsequently release the stopper, move the
locking tube back to the UNLOCK position (C). CAUTION
l
When closing the
backdoor, be careful
not to trap your hands.
l Before closing the backdoor, make sure
that the locking tube (A) is in the UN-
LOCK position (C). Closing the back-
door with the locking tube (A) in the
LOCK position (B) may damage the back-
door stopper, rendering the backdoor un-
able to be closed. Security alarm system*
E00301500657
The security alarm
system is designed to prevent un-
lawful entry into the vehicle. It will alert people
nearby if a door, the backdoor, or the bonnet is
opened when the vehicle has not been unlocked us-
ing the keyless entry system.
Also, the alarm will be activated if any of the fol-
lowing occur.
l Attempt an unlawful moving of the vehicle.
(the vehicle inclination detection function)
l Detect a motion in the vehicle. (the interior
intrusion detection function)
l Disconnect the battery terminal.
The security alarm system is set to “active” when
the vehicle leaves the factory.
When making changes to the settings, please fol-
low the procedure listed in the section titled “Chang-
ing the system settings” on page 1-11. CAUTION
l
Do not
modify
or add parts to the securi-
ty alarm system.
Doing so could cause the security alarm
to malfunction.
NOTE l The
alarm system
will not be activated if the
doors (including the backdoor) have been
locked using a key or the central door lock
switch (instead of the keyless entry system). l
If the
turn-signal
lamps do not blink after the
locking and unlocking operation using the
keyless entry system, the security alarm sys-
tem may be malfunctioning.
Have the vehicle inspected at a
MITSUBISHI MOTORS Authorized Service
Point.
l In the following situations, the security
alarm system could be more likely to be acci-
dentally activated.
• Using a car wash
• Taking the vehicle on a ferry
• Parking in an automated car park
• Leaving someone or a pet in the vehicle
• Leaving a window, door, or the sunroofopen
• Leaving an unstable object such as a stuf- fed toy or accessory in the vehicle
• Suffering a continuous impact or vibra- tion by hail, thunder, etc.
l The sensitivity of the vehicle inclination de-
tection function and the interior intrusion de-
tection function can be adjusted. For details,
please contact a MITSUBISHI MOTORS Au-
thorized Service Point. Locking and unlocking
1-10
1
OBKE12E1
Page 28 of 377
The security alarm has four modes:
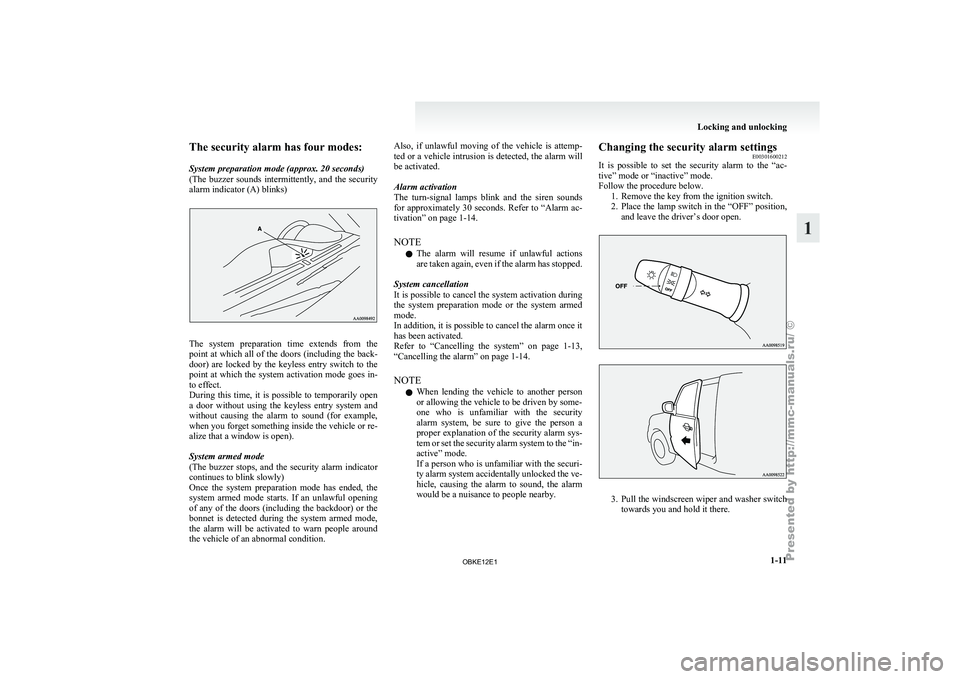
System preparation mode (approx. 20 seconds)
(The buzzer
sounds
intermittently, and the security
alarm indicator (A) blinks) The system preparation time extends from the
point at
which
all of the doors (including the back-
door) are locked by the keyless entry switch to the
point at which the system activation mode goes in-
to effect.
During this time, it is possible to temporarily open
a door without using the keyless entry system and
without causing the alarm to sound (for example,
when you forget something inside the vehicle or re-
alize that a window is open).
System armed mode
(The buzzer stops, and the security alarm indicator
continues to blink slowly)
Once the system preparation mode has ended, the
system armed mode starts. If an unlawful opening
of any of the doors (including the backdoor) or the
bonnet is detected during the system armed mode,
the alarm will be activated to warn people around
the vehicle of an abnormal condition. Also, if unlawful moving of the vehicle is attemp-
ted or
a
vehicle intrusion is detected, the alarm will
be activated.
Alarm activation
The turn-signal lamps blink and the siren sounds
for approximately 30 seconds. Refer to “Alarm ac-
tivation” on page 1-14.
NOTE
l The alarm will resume if unlawful actions
are taken again, even if the alarm has stopped.
System cancellation
It is possible to cancel the system activation during
the system preparation mode or the system armed
mode.
In addition, it is possible to cancel the alarm once it
has been activated.
Refer to “Cancelling the system” on page 1-13,
“Cancelling the alarm” on page 1-14.
NOTE l When lending the vehicle to another person
or allowing the vehicle to be driven by some-
one who is unfamiliar with the security
alarm system, be sure to give the person a
proper explanation of the security alarm sys-
tem or set the security alarm system to the “in-
active” mode.
If a person who is unfamiliar with the securi-
ty alarm system accidentally unlocked the ve-
hicle, causing the alarm to sound, the alarm
would be a nuisance to people nearby. Changing the security alarm settings
E00301600212
It is possible
to set the security alarm to the “ac-
tive” mode or “inactive” mode.
Follow the procedure below. 1. Remove the key from the ignition switch.
2. Place the lamp switch in the “OFF” position,and leave the driver’s door open. 3. Pull
the windscreen wiper and washer switch
towards you and hold it there. Locking and unlocking
1-11 1
OBKE12E1
Page 31 of 377
NOTE
l If
the bonnet
is opened during the system prep-
aration mode, the system preparation mode
is suspended. The system returns to the sys-
tem preparation mode when the bonnet is
closed.
l If the battery terminals are disconnected
while the system is in the system preparation
mode, the memory will be erased.
l It is possible to register up to 4 remote con-
trol switches. As long as they are registered,
any of the 4 remote control switches, other
than the one used to activate the system, can
be used to cancel the system.
If you want to register additional remote con-
trol switches, please contact a MITSUBISHI
MOTORS Authorized Service Point.
l The activation distance for the keyless entry
system is approximately 4 m.
If it is not possible to lock or unlock the vehi-
cle by pressing the switch at the correct dis-
tance or the security alarm system cannot be
set or cancelled using the switch, the battery
may need to be replaced.
For further information, please consult a
MITSUBISHI MOTORS Authorized Service
Point.
If you replace the battery yourself, refer to
“Procedure for replacing the remote control
switch battery” on page 1-05. l
If
the
UNLOCK switch is pressed and no
door is (including the backdoor) opened with-
in 30 seconds, the doors will automatically re-
lock. In this case as well, the system prepara-
tion mode will go into effect.
The time between pressing the UNLOCK
switch and automatic locking can be adjus-
ted. Consult a MITSUBISHI MOTORS Au-
thorized Service Point.
Alarm activation E00301900840
When the system is in the system armed mode, the
alarm will be
activated as follows if the vehicle is
unlocked and any of the doors (including the back-
door) or bonnet is opened using a method other
than pressing the UNLOCK switch on the keyless
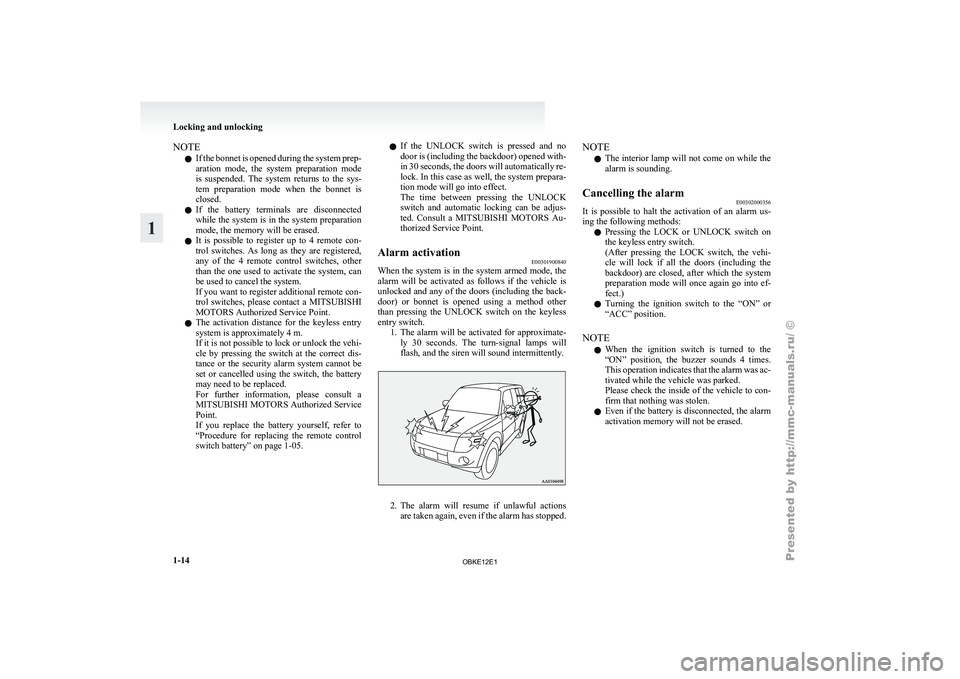
entry switch. 1. The alarm will be activated for approximate-ly 30 seconds. The turn-signal lamps will
flash, and the siren will sound intermittently. 2. The alarm will resume if unlawful actions
are taken
again, even if the alarm has stopped. NOTE
l The
interior lamp
will not come on while the
alarm is sounding.
Cancelling the alarm E00302000356
It is possible to halt the activation of an alarm us-
ing the following methods:
l Pressing the
LOCK
or UNLOCK switch on
the keyless entry switch.
(After pressing the LOCK switch, the vehi-
cle will lock if all the doors (including the
backdoor) are closed, after which the system
preparation mode will once again go into ef-
fect.)
l Turning the ignition switch to the “ON” or
“ACC” position.
NOTE l When the ignition switch is turned to the
“ON” position, the buzzer sounds 4 times.
This operation indicates that the alarm was ac-
tivated while the vehicle was parked.
Please check the inside of the vehicle to con-
firm that nothing was stolen.
l Even if the battery is disconnected, the alarm
activation memory will not be erased. Locking and unlocking
1-14
1
OBKE12E1
Page 82 of 377
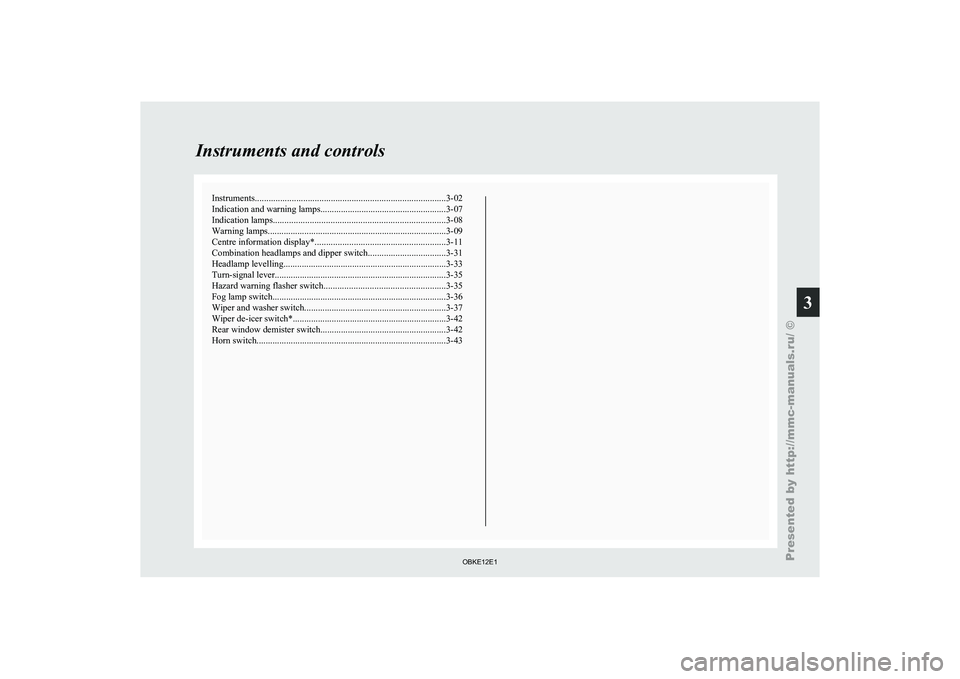
Instruments...................................................................................
3-02
Indication and warning lamps....................................................... 3-07
Indication lamps ........................................................................... 3-08
Warning lamps .............................................................................. 3-09
Centre information display* ......................................................... 3-11
Combination headlamps and dipper switch ..................................3-31
Headlamp levelling ....................................................................... 3-33
Turn-signal lever........................................................................... 3-35
Hazard warning flasher switch ..................................................... 3-35
Fog lamp switch............................................................................
3-36
Wiper and washer switch .............................................................. 3-37
Wiper de-icer switch* ................................................................... 3-42
Rear window demister switch....................................................... 3-42
Horn switch................................................................................... 3-43Instruments and controls
3
OBKE12E1
Page 88 of 377
Indication and warning lamps
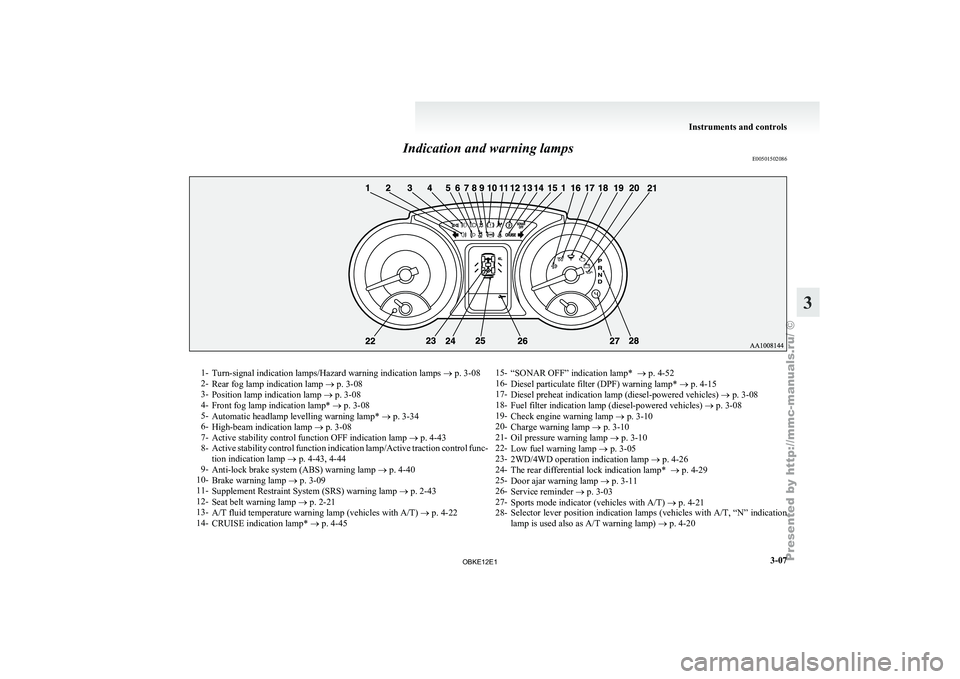
E005015020861-
Turn-signal indication lamps/Hazard warning indication lamps ® p. 3-08
2- Rear fog lamp indication lamp
® p. 3-08
3- Position lamp indication lamp ® p. 3-08
4- Front fog lamp indication lamp* ® p. 3-08
5- Automatic headlamp levelling warning lamp* ® p. 3-34
6- High-beam indication lamp ® p. 3-08
7- Active stability control function OFF indication lamp ® p. 4-43
8- Active stability control function indication lamp/Active traction control func-
tion indication lamp ® p. 4-43, 4-44
9- Anti-lock brake system (ABS) warning lamp ® p. 4-40
10- Brake warning lamp ® p. 3-09
11- Supplement Restraint System (SRS) warning lamp ® p. 2-43
12- Seat belt warning lamp ® p. 2-21
13- A/T fluid temperature warning lamp (vehicles with A/T) ® p. 4-22
14- CRUISE indication lamp* ® p. 4-45 15-
“SONAR OFF” indication lamp* ® p. 4-52
16- Diesel particulate filter (DPF) warning lamp* ®
p. 4-15
17- Diesel preheat indication lamp (diesel-powered vehicles) ® p. 3-08
18- Fuel filter indication lamp (diesel-powered vehicles) ® p. 3-08
19- Check engine warning lamp ® p. 3-10
20- Charge warning lamp ® p. 3-10
21- Oil pressure warning lamp ® p. 3-10
22- Low fuel warning lamp ® p. 3-05
23- 2WD/4WD operation indication lamp ® p. 4-26
24- The rear differential lock indication lamp* ® p. 4-29
25- Door ajar warning lamp ® p. 3-11
26- Service reminder ® p. 3-03
27- Sports mode indicator (vehicles with A/T) ® p. 4-21
28- Selector lever position indication lamps (vehicles with A/T, “N” indication
lamp is used also as A/T warning lamp) ® p. 4-20 Instruments and controls
3-07 3
OBKE12E1