stop start MITSUBISHI SHOGUN 2003 (in English) User Guide
[x] Cancel search | Manufacturer: MITSUBISHI, Model Year: 2003, Model line: SHOGUN, Model: MITSUBISHI SHOGUN 2003Pages: 392, PDF Size: 14.34 MB
Page 177 of 392
I04A196A
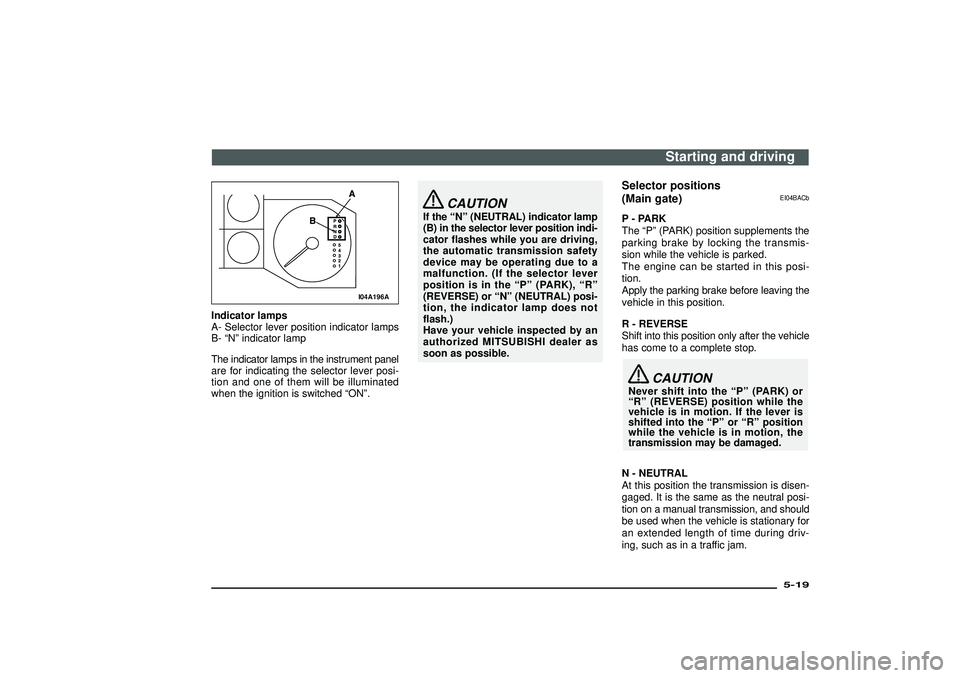
Indicator lamps
A- Selector lever position indicator lamps
B-“N”indicator lamp
The indicator lamps in the instrument panel
are for indicating the selector lever posi-
tion and one of them will be illuminated
when the ignition is switched“ON”.
CAUTION
If the“N”(NEUTRAL) indicator lamp
(B) in the selector lever position indi-
cator flashes while you are driving,
the automatic transmission safety
device may be operating due to a
malfunction. (If the selector lever
position is in the“P”(PARK),“R”
(REVERSE) or“N”(NEUTRAL) posi-
tion, the indicator lamp does not
flash.)
Have your vehicle inspected by an
authorized MITSUBISHI dealer as
soon as possible.
Selector positions
(Main gate)
EI04BACb
P - PARK
The“P”(PARK) position supplements the
parking brake by locking the transmis-
sion while the vehicle is parked.
The engine can be started in this posi-
tion.
Apply the parking brake before leaving the
vehicle in this position.
R - REVERSE
Shift into this position only after the vehicle
has come to a complete stop.
CAUTION
Never shift into the“P”(PARK) or
“R”(REVERSE) position while the
vehicle is in motion. If the lever is
shifted into the“P”or“R”position
while the vehicle is in motion, the
transmission may be damaged.
N - NEUTRAL
At this position the transmission is disen-
gaged. It is the same as the neutral posi-
tion on a manual transmission, and should
be used when the vehicle is stationary for
an extended length of time during driv-
ing, such as in a traffic jam.
Starting and driving
5-19
Div:
Out put date:
Page 179 of 392
CAUTION
(1) Upward shifts do not take place
automatically in sports mode.
The driver must execute upward
shifts in accordance with pre-
vailing road conditions, taking
care to keep the engine speed
below the red zone.
(2) By rapidly moving the selector
lever backwards (DOWN) twice,
it is possible to skip one gear,
i.e., 3rd to 1st, 4th to 2nd or 5th
to 3rd. Since sudden engine
braking and/or rapid accelera-
tion can cause a loss of trac-
tion, however, downshifts must
be made carefully in accor-
dance with the vehicle’s speed.
NOTE
(1) In sports mode, only the 5 forward
gears can be selected. To reverse or
park the vehicle, move the selector
lever to the“R”(REVERSE) or“P”
(PARK) position as required.
(2) To maintain good running perfor-
mance, the transmission may refuse to
perform an upshift when the selector
lever is moved to the“+ (UP)”posi-
tion at certain vehicle speeds. Also, to
prevent over-revving of the engine, the
transmission may refuse to perform a
downshift when the lever is moved to
the“−(DOWN)”position at certain
vehicle speeds.(3) In sports mode, downward shifts are
made automatically when the vehicle
slows down. When the vehicle stops,
1st gear is automatically selected.
(4) When driving away on a slippery road,
push the selector lever forward into the
+ (UP) position. This causes the trans-
mission to shift into the 2nd gear which
is better for smooth driving away on a
slippery road. Push the selector lever
to the—(DOWN) side to shift back to
the 1st gear.
(5) Move the selector lever gently between
the manual and main gates and
between positions in the manual gate.
Undue force could damage the selec-
tor lever.
I04S021A
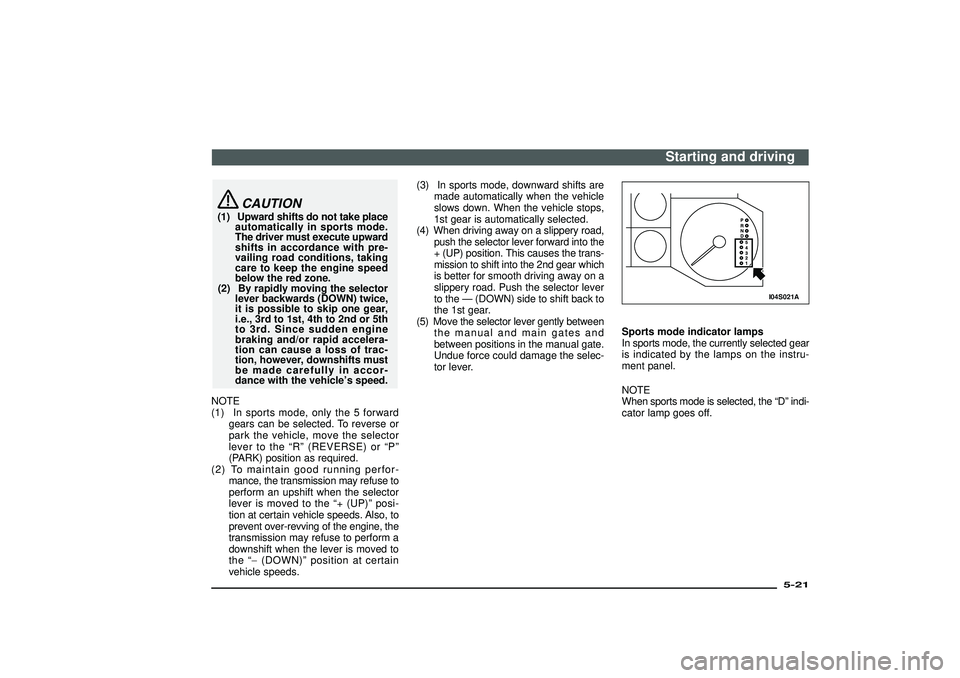
Sports mode indicator lamps
In sports mode, the currently selected gear
is indicated by the lamps on the instru-
ment panel.
NOTE
When sports mode is selected, the“D”indi-
cator lamp goes off.
Starting and driving
5-21
Div:
Out put date:
Page 181 of 392
Waiting
EI04G-Ee
For short waiting periods, such as at traf-
fic signal, the vehicle can be left in gear and
held stationary with the service brake.
For longer waiting periods with the engine
running, the selector lever should be placed
in the“N”(NEUTRAL) position.
CAUTION
(1) Never hold the vehicle station-
ary while in gear on a hill with
the accelerator, always apply the
parking brake and/or service
brake.
(2) Unexpected acceleration may
occur if the selector lever is in a
position other than“P”(PARK)
or“N”(NEUTRAL).
Prior to moving off after having
stopped the vehicle, make sure
that the selector lever is in“D”
(DRIVE) or“Sports mode”posi-
tion.
Parking
EI04H-Be
To park the vehicle, first bring it to a com-
plete stop, fully engage the parking brake,
and then move the selector lever to the“P”
(PARK) position.
If you are going to leave the vehicle unat-
tended, always switch off the engine and
remove the ignition key.
NOTE
On a slope, be sure to apply the parking
brake before moving the selector lever to
the“P”(PARK) position. If you move the
selector lever to the“P”(PARK) position
without first applying the parking brake, a
stronger than normal resistance force may
be encountered. In this situation, move the
selector lever strongly when you next wish
to drive.
Starting and driving
5-23
Div:
Out put date:
Page 183 of 392

I31D019A
CAUTION
(1) Use 1st gear in the“4L”posi-
tion for very low-speed off-road
driving.
(2) Your vehicle engine should never
be operated with the engine oil
level below the MIN mark on the
dipstick. In rough terrain which
requires four-wheel drive trac-
tion, ensure that the engine oil
level is above the MIN mark on
the dipstick.
Transfer shift lever operation
EI31D-Sb
To shift transfer
case fromTo Procedure
2H 4HThe transfer shift lever can be operated while the vehicle is either moving or sta-
tionary.
In case lever operation is necessary while the vehicle is moving, place the vehicle
in the straight ahead position and depress the clutch pedal to the floor before oper-
ating the lever. 4H 2H
4H 4L
Stop the vehicle, depress the clutch pedal to the floor and operate the transfer shift
lever.
4L 4HNOTE
(1) Shifting of the lever between“2H”↔“4H”should only be made at speeds below 100
km/h (62 mph).
(2) During driving, never attempt to shift from“4H”to“4L”or vice versa.
Starting and driving
5-25
Div:
Out put date:
Page 184 of 392
CAUTION
(1) Do not operate the transfer shift
lever while the rear wheels of the
vehicle are slipping on a snow
covered road.
(2) Do not drive your vehicle in the
“4H”or“4L”position on paved
roads and highway; this would
result in early wear of the tyres,
increased fuel consumption and
possible noise generation.
It may also increase the differ-
ential oil temperature, resulting
in possible damage to the driv-
ing system parts. It is neces-
sary to operate the lever“2H”
position while driving under
these condition.NOTE
(1) When shifting from“2H”to“4H”soon
after driving the vehicle in a cold
weather area, the transmission gear
may make a noise. So try to shift the
gear while the vehicle is stopped.
(2) The 4WD operation indication lamp will
go out momentarily during shifting pro-
cess from“4H”to“4L”or vice versa, as
the shift lever passes through the neu-
tral position.
Be sure to operate the shift lever until
the 2WD/4WD operation indication
lamp illuminates again.
(3) There may be a case that the trans-
fer shift lever feels heavy when it is
moved from“4H”to“2H”with the steer-
ing wheel in turned position. This is nor-
mal and not any indication of trouble.
I31B009A
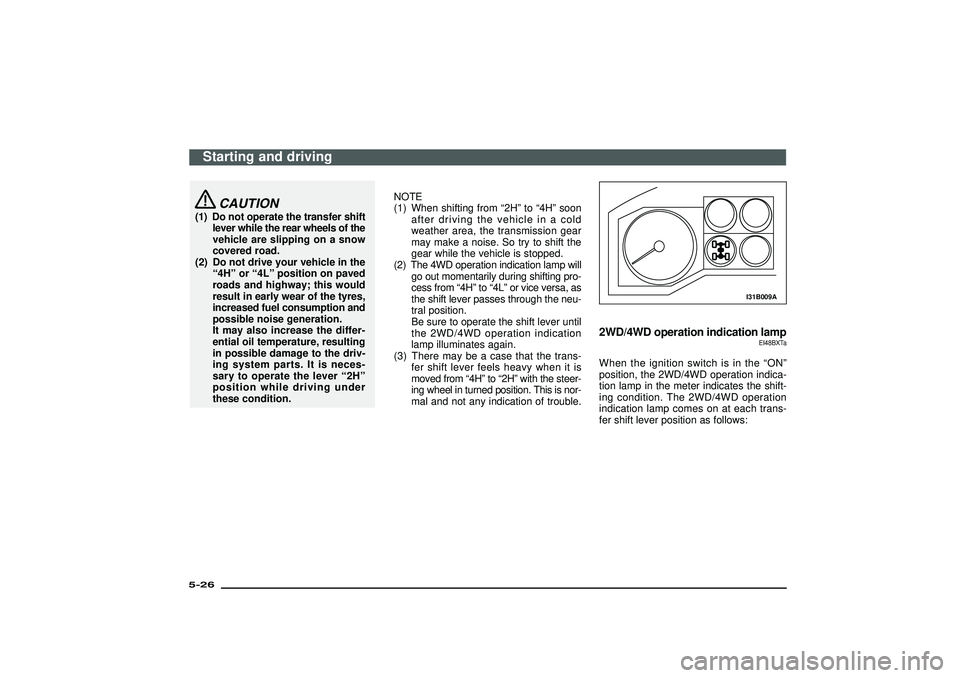
2WD/4WD operation indication lamp
EI48BXTa
When the ignition switch is in the“ON”
position, the 2WD/4WD operation indica-
tion lamp in the meter indicates the shift-
ing condition. The 2WD/4WD operation
indication lamp comes on at each trans-
fer shift lever position as follows:
Starting and driving
5-26Div:
Out put date:
Page 188 of 392
I30C014A
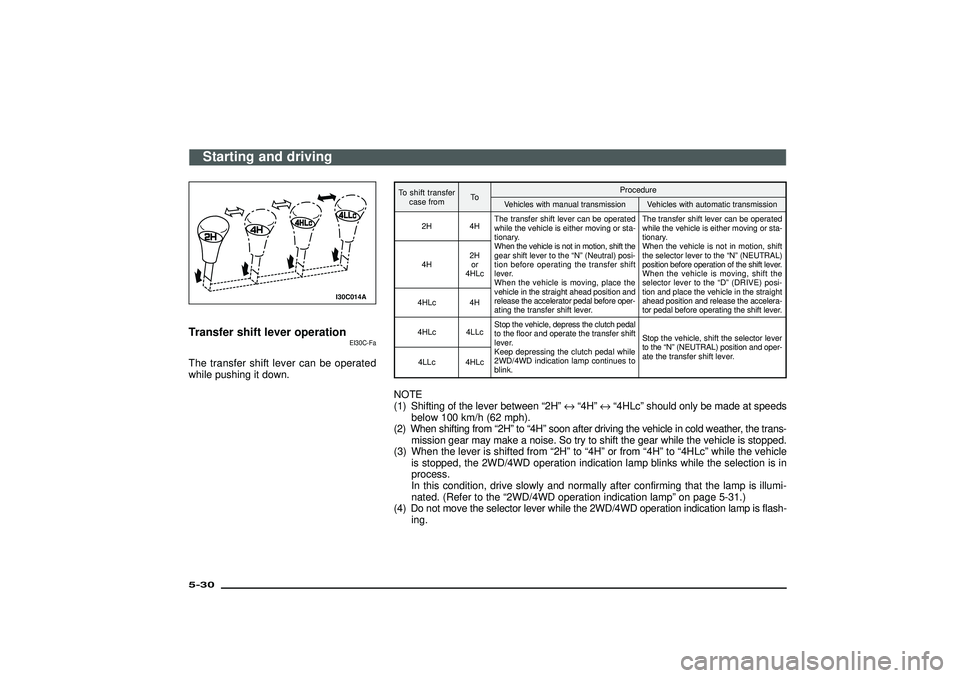
Transfer shift lever operation
EI30C-Fa
The transfer shift lever can be operated
while pushing it down.
To shift transfer
case fromToProcedure
Vehicles with manual transmission Vehicles with automatic transmission
2H 4HThe transfer shift lever can be operated
while the vehicle is either moving or sta-
tionary.
When the vehicle is not in motion, shift the
gear shift lever to the“N”(Neutral) posi-
tion before operating the transfer shift
lever.
When the vehicle is moving, place the
vehicle in the straight ahead position and
release the accelerator pedal before oper-
ating the transfer shift lever.The transfer shift lever can be operated
while the vehicle is either moving or sta-
tionary.
When the vehicle is not in motion, shift
the selector lever to the“N”(NEUTRAL)
position before operation of the shift lever.
When the vehicle is moving, shift the
selector lever to the“D”(DRIVE) posi-
tion and place the vehicle in the straight
ahead position and release the accelera-
tor pedal before operating the shift lever. 4H2H
or
4HLc
4HLc 4H
4HLc 4LLcStop the vehicle, depress the clutch pedal
to the floor and operate the transfer shift
lever.
Keep depressing the clutch pedal while
2WD/4WD indication lamp continues to
blink.Stop the vehicle, shift the selector lever
to the“N”(NEUTRAL) position and oper-
ate the transfer shift lever.
4LLc 4HLcNOTE
(1) Shifting of the lever between“2H”↔“4H”↔“4HLc”should only be made at speeds
below 100 km/h (62 mph).
(2) When shifting from“2H”to“4H”soon after driving the vehicle in cold weather, the trans-
mission gear may make a noise. So try to shift the gear while the vehicle is stopped.
(3) When the lever is shifted from“2H”to“4H”or from“4H”to“4HLc”while the vehicle
is stopped, the 2WD/4WD operation indication lamp blinks while the selection is in
process.
In this condition, drive slowly and normally after confirming that the lamp is illumi-
nated. (Refer to the“2WD/4WD operation indication lamp”on page 5-31.)
(4) Do not move the selector lever while the 2WD/4WD operation indication lamp is flash-
ing.
Starting and driving
5-30Div:
Out put date:
Page 191 of 392
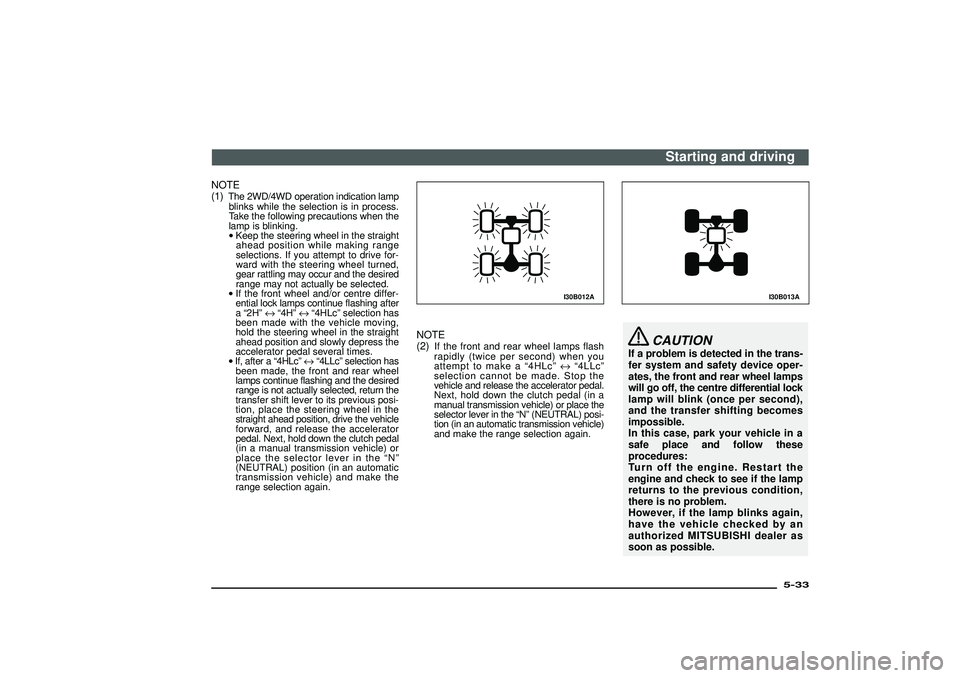
NOTE
(1)
The 2WD/4WD operation indication lamp
blinks while the selection is in process.
Take the following precautions when the
lamp is blinking.
•Keep the steering wheel in the straight
ahead position while making range
selections. If you attempt to drive for-
ward with the steering wheel turned,
gear rattling may occur and the desired
range may not actually be selected.
•If the front wheel and/or centre differ-
ential lock lamps continue flashing after
a“2H”↔“4H”↔“4HLc”selection has
been made with the vehicle moving,
hold the steering wheel in the straight
ahead position and slowly depress the
accelerator pedal several times.
•If, after a“4HLc”↔“4LLc”selection has
been made, the front and rear wheel
lamps continue flashing and the desired
range is not actually selected, return the
transfer shift lever to its previous posi-
tion, place the steering wheel in the
straight ahead position, drive the vehicle
forward, and release the accelerator
pedal. Next, hold down the clutch pedal
(in a manual transmission vehicle) or
place the selector lever in the“N”
(NEUTRAL) position (in an automatic
transmission vehicle) and make the
range selection again.
I30B012A
NOTE
(2)
If the front and rear wheel lamps flash
rapidly (twice per second) when you
attempt to make a“4HLc”↔“4LLc”
selection cannot be made. Stop the
vehicle and release the accelerator pedal.
Next, hold down the clutch pedal (in a
manual transmission vehicle) or place the
selector lever in the“N”(NEUTRAL) posi-
tion (in an automatic transmission vehicle)
and make the range selection again.
I30B013A
CAUTION
If a problem is detected in the trans-
fer system and safety device oper-
ates, the front and rear wheel lamps
will go off, the centre differential lock
lamp will blink (once per second),
and the transfer shifting becomes
impossible.
In this case, park your vehicle in a
safe place and follow these
procedures:
Turn off the engine. Restart the
engine and check to see if the lamp
returns to the previous condition,
there is no problem.
However, if the lamp blinks again,
have the vehicle checked by an
authorized MITSUBISHI dealer as
soon as possible.
Starting and driving
5-33
Div:
Out put date:
Page 192 of 392
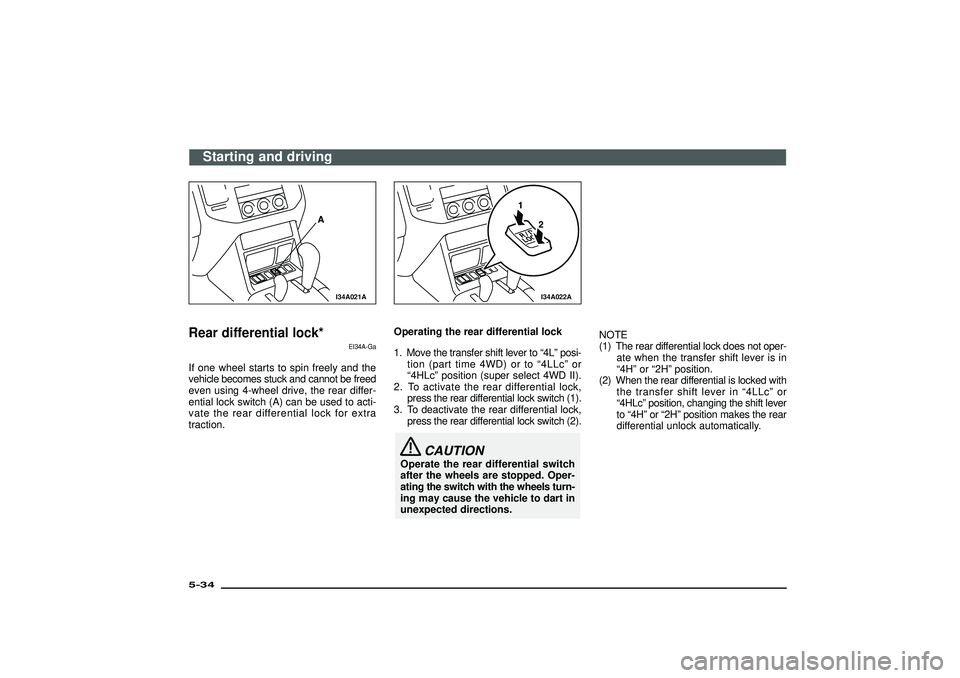
I34A021A
Rear differential lock*
EI34A-Ga
If one wheel starts to spin freely and the
vehicle becomes stuck and cannot be freed
even using 4-wheel drive, the rear differ-
ential lock switch (A) can be used to acti-
vate the rear differential lock for extra
traction.
I34A022A
Operating the rear differential lock
1. Move the transfer shift lever to“4L”posi-
tion (part time 4WD) or to“4LLc”or
“4HLc”position (super select 4WD II).
2. To activate the rear differential lock,
press the rear differential lock switch (1).
3. To deactivate the rear differential lock,
press the rear differential lock switch (2).
CAUTION
Operate the rear differential switch
after the wheels are stopped. Oper-
ating the switch with the wheels turn-
ing may cause the vehicle to dart in
unexpected directions.NOTE
(1) The rear differential lock does not oper-
ate when the transfer shift lever is in
“4H”or“2H”position.
(2) When the rear differential is locked with
the transfer shift lever in“4LLc”or
“4HLc”position, changing the shift lever
to“4H”or“2H”position makes the rear
differential unlock automatically.
Starting and driving
5-34Div:
Out put date:
Page 200 of 392
Cautions on handling of 4WD
vehicles
EI49A-Xa
Tyre and disc wheelsSince the driving torque can be applied to
the 4 wheels, the performance of the
vehicle when operating in 4WD is greatly
affected by the condition of the tyres.
Pay close attention to the tyres.
•Install specified tyres on all wheels. Refer
to“Tyre and wheels”on page 10-10.
•Be sure to equip the car with all four tyres
and wheels of the same size and type.
When replacement of any of the tyres or
wheels is necessary, replace all of them.
•All tyres should be rotated whenever the
wear difference between front and rear
tyres is recognizable.
Good vehicle performance cannot be
expected if there is a difference in wear
between tyres. Refer to the“Tyre rotation”
on page 9-15.
•Check the tyre inflation pressure regu-
larly.
CAUTION
Always use tyres of the same size,
same type, and same brand, which
have no wear differences.
Using the tyres of differ in size, type,
brand or a different degree of wear
will cause excessive loading, result-
ing in possible damage to the drive
system.Jacking up a 4-wheel drive vehicles
WARNING
Do not crank the engine while jack-
ing up the vehicle.
The tyre on the ground may turn and
the vehicle may roll off the jack.Operate clutch pedal slowly and
positivelyQuick or slight clutch engagement made
while the engine is running at high speed
will cause damage to the clutch and trans-
mission because the tractive force is very
great.
Operate the pedal slowly and positively.
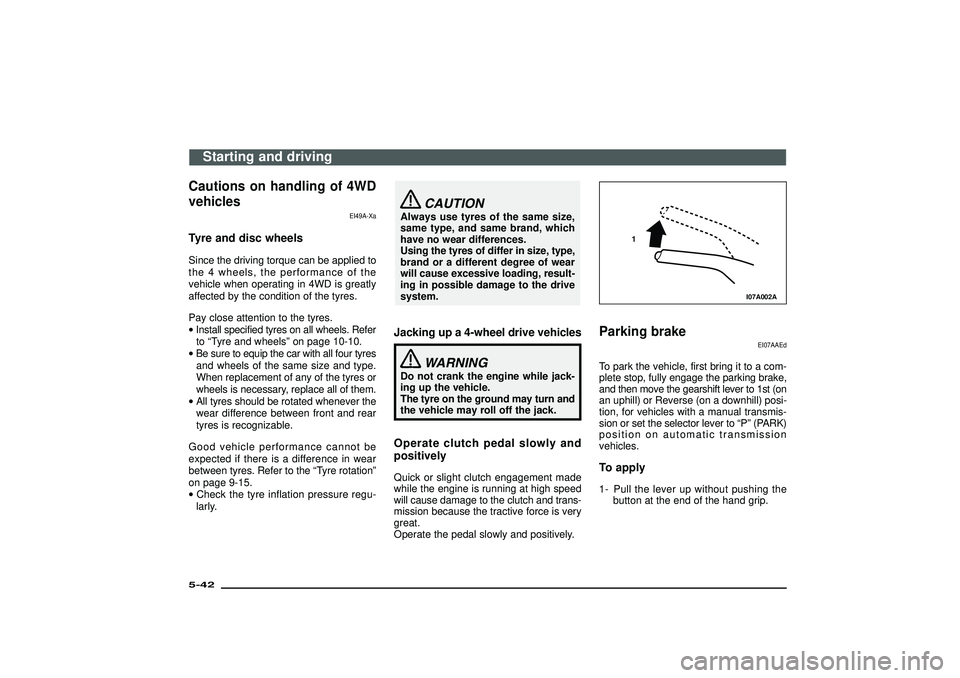
I07A002A
1
Parking brake
EI07AAEd
To park the vehicle, first bring it to a com-
plete stop, fully engage the parking brake,
and then move the gearshift lever to 1st (on
an uphill) or Reverse (on a downhill) posi-
tion, for vehicles with a manual transmis-
sion or set the selector lever to“P”(PARK)
position on automatic transmission
vehicles.To apply1- Pull the lever up without pushing the
button at the end of the hand grip.
Starting and driving
5-42Div:
Out put date:
Page 202 of 392
Braking
EI23AAGa
All the parts of the brake system are criti-
cal to safety. Have the vehicle serviced by an
authorized MITSUBISHI dealer at regular
intervals according to the service booklet.Brake system(1) The service brake is divided into two
brake circuits so that when one brake
circuit fails, the other is available to stop
the vehicle. If this occurs, however, the
brake pedal must be depressed fur-
ther than usual; stop driving as soon as
possible and have the brake system
repaired at the nearest authorized
MITSUBISHI dealer.
(2) The brake boosting force is lost after
the brake pedal is depressed once or
twice while the engine is off. If this
occurs, the brake will require greater
force than usual. This is especially
important when the vehicle is being
towed.
Vehicles equipped with anti-lock brake
system
The brake system uses brake fluid pres-
surized by the pump to power-assist the
brake. If the brake system fails during driv-
ing, the brake warning lamp comes on and
buzzer sounds continuously. In this case,
the brake may not work properly.If this buzzer should continue to sound,
park your vehicle in a safe place and con-
tact your nearest authorized MITSUB-
ISHI dealer.
Please refer to“Brake warning lamp”on
page 4-7.
CAUTION
Bring the vehicle to halt in a safe
location by applying the brakes gen-
tly. Applying the brakes rapidly or
driving at high speed may make the
vehicle unstable.
NOTE
(1) Depressing the brake pedal repeat-
edly may turn on the brake warning
lamp, ABS warning lamp and brake
warning buzzer. It is normal if the lamp
goes out and the buzzer stops sound-
ing after a few seconds.
(2) In certain cases immediately after the
engine has been started or when the
brake pedal is depressed repeatedly, a
noise generated by operation of brake
devices may be heard coming from the
engine compartment. This type of noise
is normal and is no need for concern.
In fact, it indicates that the correspond-
ing devices are operating normal.
Warning lampThe brake warning lamp lets you know if
your brake system is working properly.
Read“Brake warning lamp”on page 4-7.When brakes are wetCheck the brake system while driving at a
low speed immediately after starting, espe-
cially when the brakes are wet, to con-
firm they work normally.
A film of water can form on the brake discs
and prevent normal functioning after driv-
ing in heavy rain or through large puddles,
or after the vehicle is washed. If this occurs,
dry the brakes out by driving slowly while
lightly depressing the brake pedal.When driving downhillIt is important to take advantage of the
engine braking by shifting to a lower gear
while driving on steep downhill roads in
order to prevent the brakes from overheat-
ing.
Starting and driving
5-44Div:
Out put date: