stop start MITSUBISHI SHOGUN 2003 (in English) Owner's Guide
[x] Cancel search | Manufacturer: MITSUBISHI, Model Year: 2003, Model line: SHOGUN, Model: MITSUBISHI SHOGUN 2003Pages: 392, PDF Size: 14.34 MB
Page 203 of 392
Brake pads(1) With new brake pads, avoid where pos-
sible sudden full application of the
brakes for the first 200 km (125 miles)
of driving.
(2) The disc brakes are provided with a
warning device which emits a shriek-
ing metallic sound while braking if the
brake pads have reached their limit.
If you hear this sound, have the brake
pads replaced by your MITSUBISHI
dealer.
CAUTION
(1) Do not leave any objects or place
a thick floor mat around the
brake pedal; doing so could pre-
vent the full pedal stroke that
would be necessary in an emer-
gency. Make sure that the pedal
can be operated freely at all
times.
(2) Avoid driving habits that cause
heavy braking and never“ride”
the brakes by resting your foot
on the brake pedal while driv-
ing.
It causes brake overheating and
fade.
Anti - lock brake system (ABS)*
EI24ABCb
Environmental conditions can have an
effect on braking. During sudden braking
when there is snow, ice, oil, water etc. on
the road surface, a skid may occur. In this
situation, steering control and braking effec-
tiveness are reduced and the stopping dis-
tance is increased. The vehicle may also
go into an uncontrolled spin.
The ABS helps prevent the wheels from
locking during braking, thus maintaining
directional stability, ensuring controlabil-
ity and providing optimum braking force.Driving hints(1) With ABS fitted, steering during sud-
den braking (when the ABS functions)
differs slightly from when the brakes
are not being applied.
Steer the vehicle carefully in these con-
ditions.(2) Always maintain the same distance
from the vehicle in front of you as you
would for a vehicle not equipped with
ABS.
Compared with vehicles not fitted with
ABS, your vehicle may require a longer
stopping distance in the following
cases:
•Driving on gravel or snow-covered
roads.
•Driving with tyre chains installed.
•Driving on roads where the road sur-
face is pitted or has other differ-
ences in surface height.
•Driving on bumpy roads or other poor
driving surfaces.
(3) In order to ensure that the anti-lock
brake system (ABS) will operate cor-
rectly in situations where tyre chains
have been fitted, drive in“4H”or“4L”
for part time 4WD, or in“4H”,“4HLc”,
or“4LLc”for super select 4WD II.
(4) Operation of ABS is not restricted to
situations where brakes are applied
suddenly. This system may also oper-
ate to prevent wheel lock when you are
driving over manholes, steel road-work
plates, or the vehicle is driven over
steps or level differences in the road,
road markings, or other surfaces which
are difficult for the wheels to grip.
Starting and driving
5-45
Div:
Out put date:
Page 205 of 392
NOTE
Depressing the brake pedal repeatedly may
turn on the brake warning lamp, ABS warn-
ing lamp and brake warning buzzer. It is
normal if the lamp goes out and the buzzer
stops sounding after a few seconds.
If the lamp illuminates while
driving(1) Since there will always be a possibil-
ity of the vehicle becoming unstable
when brakes are applied rapidly,
ensure that brakes are applied gently
and that high-speed driving is not
attempted; furthermore, bring the
vehicle to halt in a safe location.
Restart the engine and check to see
whether the lamp goes out after a few
minutes driving; if it then remains off
during driving, there is no problem.
However, if the lamp does not go out,
or if it lights up again when the vehicle
is driven, have the vehicle checked by
an authorized MITSUBISHI dealer as
soon as possible.
(2) After starting the engine using jumper
cables, if you attempt to drive the
vehicle before the battery is suffi-
ciently charged, the engine will run
irregularly and the ABS warning lamp
will illuminate indicating that the vehicle
should not be driven.
This situation, however, is caused
merely by insufficient battery voltage
and is not an abnormal situation.
If such a situation occurs, run the
engine at idle for some time to charge
the battery.
I24A119A
FrontNOTE
(1) Immediately after the vehicle starts
moving after engine start up, a brake
pedal pulsating is felt when the brake
pedal is depressed. This pulsation is
due to the self-diagnosis operation of
the ABS and does not indicate a mal-
function.
(2) After driving on snowy roads, remove
any snow and ice which may have
become adhered to the wheel areas.
When doing this, be careful not to dam-
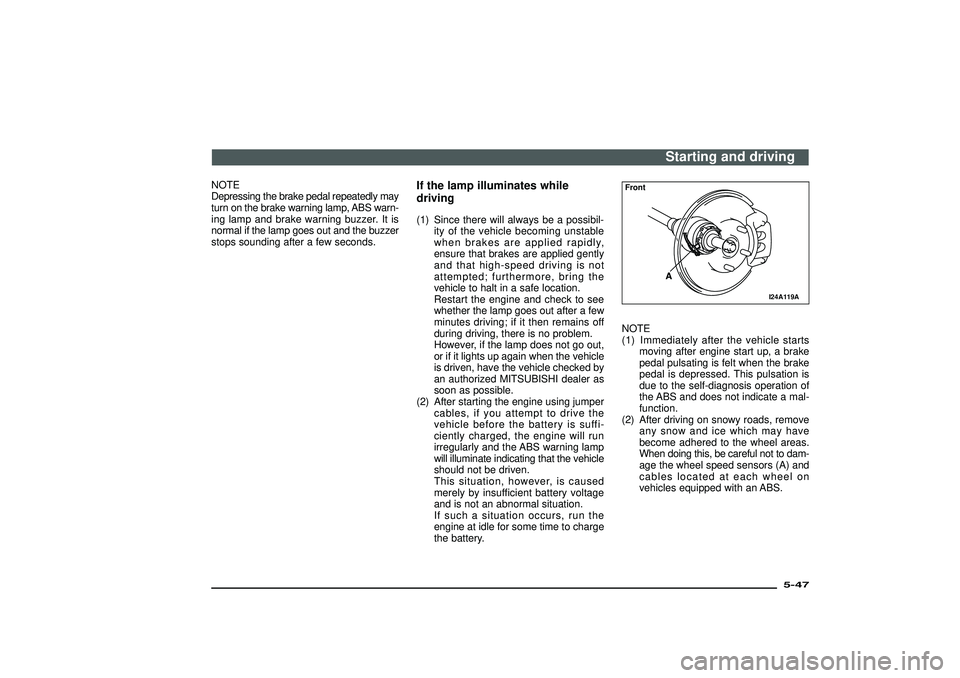
age the wheel speed sensors (A) and
cables located at each wheel on
vehicles equipped with an ABS.
Starting and driving
5-47
Div:
Out put date:
Page 206 of 392
I24A120A
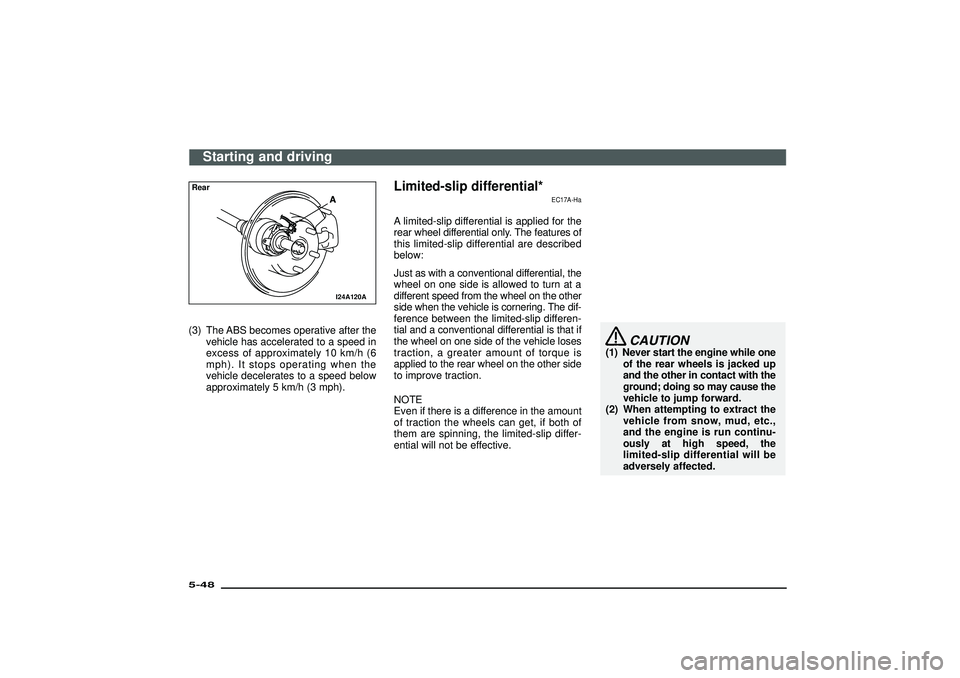
Rear(3) The ABS becomes operative after the
vehicle has accelerated to a speed in
excess of approximately 10 km/h (6
mph). It stops operating when the
vehicle decelerates to a speed below
approximately 5 km/h (3 mph).
Limited-slip differential*
EC17A-Ha
A limited-slip differential is applied for the
rear wheel differential only. The features of
this limited-slip differential are described
below:
Just as with a conventional differential, the
wheel on one side is allowed to turn at a
different speed from the wheel on the other
side when the vehicle is cornering. The dif-
ference between the limited-slip differen-
tial and a conventional differential is that if
the wheel on one side of the vehicle loses
traction, a greater amount of torque is
applied to the rear wheel on the other side
to improve traction.
NOTE
Even if there is a difference in the amount
of traction the wheels can get, if both of
them are spinning, the limited-slip differ-
ential will not be effective.
CAUTION
(1) Never start the engine while one
of the rear wheels is jacked up
and the other in contact with the
ground; doing so may cause the
vehicle to jump forward.
(2) When attempting to extract the
vehicle from snow, mud, etc.,
and the engine is run continu-
ously at high speed, the
limited-slip differential will be
adversely affected.
Starting and driving
5-48Div:
Out put date:
Page 207 of 392
G09A014A
1
2
Steering wheel height adjustment
EG09A-Ci
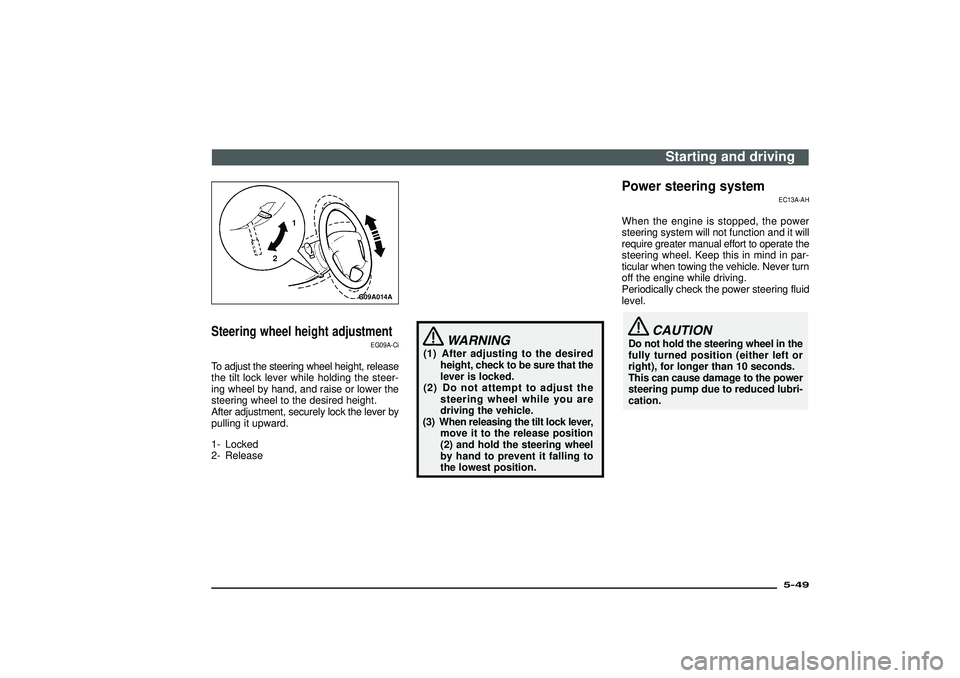
To adjust the steering wheel height, release
the tilt lock lever while holding the steer-
ing wheel by hand, and raise or lower the
steering wheel to the desired height.
After adjustment, securely lock the lever by
pulling it upward.
1- Locked
2- Release
WARNING
(1) After adjusting to the desired
height, check to be sure that the
lever is locked.
(2) Do not attempt to adjust the
steering wheel while you are
driving the vehicle.
(3) When releasing the tilt lock lever,
move it to the release position
(2) and hold the steering wheel
by hand to prevent it falling to
the lowest position.
Power steering system
EC13A-AH
When the engine is stopped, the power
steering system will not function and it will
require greater manual effort to operate the
steering wheel. Keep this in mind in par-
ticular when towing the vehicle. Never turn
off the engine while driving.
Periodically check the power steering fluid
level.
CAUTION
Do not hold the steering wheel in the
fully turned position (either left or
right), for longer than 10 seconds.
This can cause damage to the power
steering pump due to reduced lubri-
cation.
Starting and driving
5-49
Div:
Out put date:
Page 216 of 392
Driving hintsWhen extricating the vehicle from mud or
fresh snow with the transfer shift lever in
the“2H”,“4H”or“4HLc”position, you may
find that operation of the M-ASTC pre-
vents the engine speed from increasing in
response to depression of the accelera-
tor pedal. If this happens and the vehicle
remains stuck as a result, place the trans-
fer shift lever in the“4LLc”position or turn
the active stability control switch OFF. The
vehicle will then be easier to extricate.Active stability control systemThe active stability control system is
designed to improve the vehicle’s stabil-
ity by restraining its tendency to slip side-
ways (for example, when rounding a curve
in slippery conditions, or when the driver
takes rapid steering action to avoid an
obstacle). It works by controlling the engine
output and the brake on each wheel.
NOTE
When the engine starts, a click is heard
from the engine compartment. This is only
the sound of the active stability control sys-
tem being checked. It does not indicate a
fault.
I19A022A
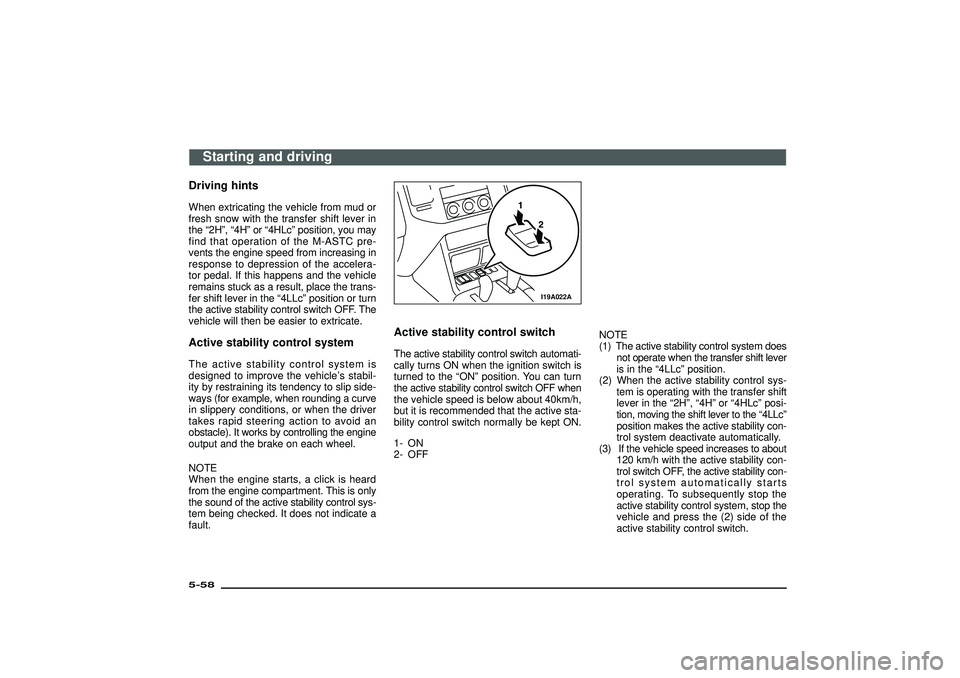
Active stability control switchThe active stability control switch automati-
cally turns ON when the ignition switch is
turned to the“ON”position. You can turn
the active stability control switch OFF when
the vehicle speed is below about 40km/h,
but it is recommended that the active sta-
bility control switch normally be kept ON.
1- ON
2- OFFNOTE
(1) The active stability control system does
not operate when the transfer shift lever
is in the“4LLc”position.
(2) When the active stability control sys-
tem is operating with the transfer shift
lever in the“2H”,“4H”or“4HLc”posi-
tion, moving the shift lever to the“4LLc”
position makes the active stability con-
trol system deactivate automatically.
(3) If the vehicle speed increases to about
120 km/h with the active stability con-
trol switch OFF, the active stability con-
trol system automatically starts
operating. To subsequently stop the
active stability control system, stop the
vehicle and press the (2) side of the
active stability control switch.
Starting and driving
5-58Div:
Out put date:
Page 217 of 392
I19A023A
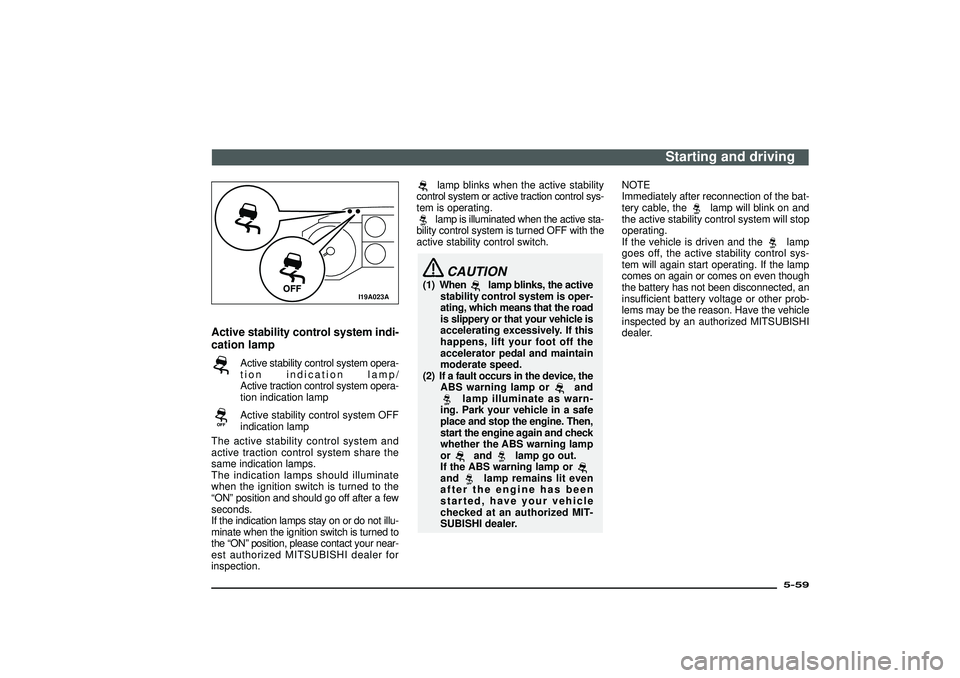
Active stability control system indi-
cation lamp
Active stability control system opera-
tion indication lamp/
Active traction control system opera-
tion indication lampActive stability control system OFF
indication lamp
The active stability control system and
active traction control system share the
same indication lamps.
The indication lamps should illuminate
when the ignition switch is turned to the
“ON”position and should go off after a few
seconds.
If the indication lamps stay on or do not illu-
minate when the ignition switch is turned to
the“ON”position, please contact your near-
est authorized MITSUBISHI dealer for
inspection.
lamp blinks when the active stability
control system or active traction control sys-
tem is operating.lamp is illuminated when the active sta-
bility control system is turned OFF with the
active stability control switch.CAUTION
(1) When
lamp blinks, the active
stability control system is oper-
ating, which means that the road
is slippery or that your vehicle is
accelerating excessively. If this
happens, lift your foot off the
accelerator pedal and maintain
moderate speed.
(2) If a fault occurs in the device, the
ABS warning lamp or
and
lamp illuminate as warn-
ing. Park your vehicle in a safe
place and stop the engine. Then,
start the engine again and check
whether the ABS warning lamp
orand
lamp go out.
If the ABS warning lamp or
and
lamp remains lit even
after the engine has been
started, have your vehicle
checked at an authorized MIT-
SUBISHI dealer.NOTE
Immediately after reconnection of the bat-
tery cable, the
lamp will blink on and
the active stability control system will stop
operating.
If the vehicle is driven and the
lamp
goes off, the active stability control sys-
tem will again start operating. If the lamp
comes on again or comes on even though
the battery has not been disconnected, an
insufficient battery voltage or other prob-
lems may be the reason. Have the vehicle
inspected by an authorized MITSUBISHI
dealer.
Starting and driving
5-59
Div:
Out put date:
Page 218 of 392
Active traction control systemThe active traction control system main-
tains traction on slippery road surfaces by
automatically controlling the engine out-
put and applying the brakes so the driv-
ing wheels are prevented from spinning.
The active traction control system auto-
matically turns ON when the ignition switch
is turned to the“ON”position.
CAUTION
If the temperature in the braking sys-
tem increases excessively due to
continuous brake control on a slip-
pery road surface, a warning buzzer
will sound intermittently to warn the
driver. If driving continues in spite of
the buzzer and the temperature in the
braking system increases further, the
lamp will illuminate, the warn-
ing buzzer will sound continuously
for approximately 3 seconds, and
active traction control system opera-
tion will be suspended to protect the
braking system. (Normal operation of
the vehicle will not be affected.) If the
vehicle is stopped and the
lamp
goes off, the active traction control
system will start operating again.NOTE
(1) When the engine starts, a click is heard
from the engine compartment. This is
only the sound of the active traction
control system being checked. It does
not indicate a fault.
(2) When the active traction control sys-
tem operates, you may feel vibration
and/or hear the active traction control
system’s operating noise, which indi-
cates that the active traction control
system is working normally. They do
not indicate a fault.
(3) The active traction control system does
not operate while the ABS warning
lamp is illuminated.
I19B001A
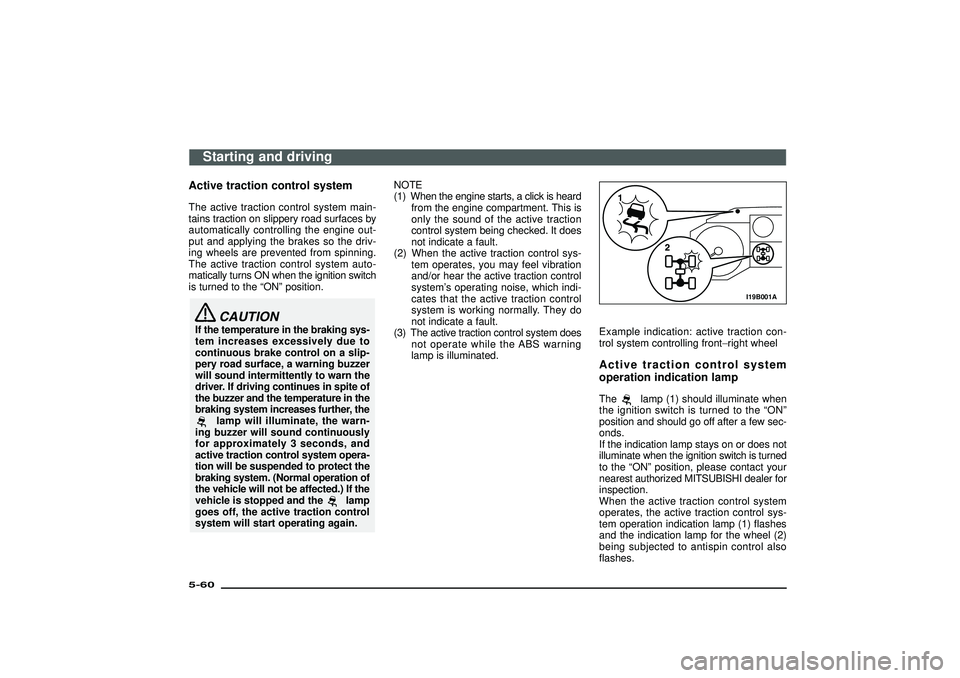
Example indication: active traction con-
trol system controlling front−right wheelActive traction control system
operation indication lampThe
lamp (1) should illuminate when
the ignition switch is turned to the“ON”
position and should go off after a few sec-
onds.
If the indication lamp stays on or does not
illuminate when the ignition switch is turned
to the“ON”position, please contact your
nearest authorized MITSUBISHI dealer for
inspection.
When the active traction control system
operates, the active traction control sys-
tem operation indication lamp (1) flashes
and the indication lamp for the wheel (2)
being subjected to antispin control also
flashes.
Starting and driving
5-60Div:
Out put date:
Page 234 of 392
1. After checking to be sure the tape in the
cassette is wound tightly, push a cas-
sette straight into the slot; the tape
player will automatically start playing.
When a cassette is inserted, the tape
player will begin playing even if the radio
is being used. The tape player will also
start playing when the TAPE button (2)
is pressed with a tape cassette in the
player even if the radio is being used.
2. Press the
(Dolby noise reduction)
button (7) when playing Dolby NR
encoded tapes. The Dolby noise reduc-
tion circuitry reduces tape hiss. The indi-
cator illuminates when the circuit is
activated. Pressing the
(Dolby noise
reduction) button a second time will
switch off the Dolby system.
NOTE
Dolby noise reduction is manufactured
under licence from Dolby Laboratories
Licensing Corporation.
“DOLBY”and the Double-D symbol
are
trademarks of Dolby Laboratories Licens-
ing Corporation.
3. When listening to a metal or chrome
tape, press the MTL button (6).
The indicator will illuminate when the
button is pressed.
NOTE
Use this button only when listening to a
metal or chrome tape.4. To adjust the volume and tone, refer to
the section“How to adjust the volume”
and“How to adjust the tone”on page
6-4.
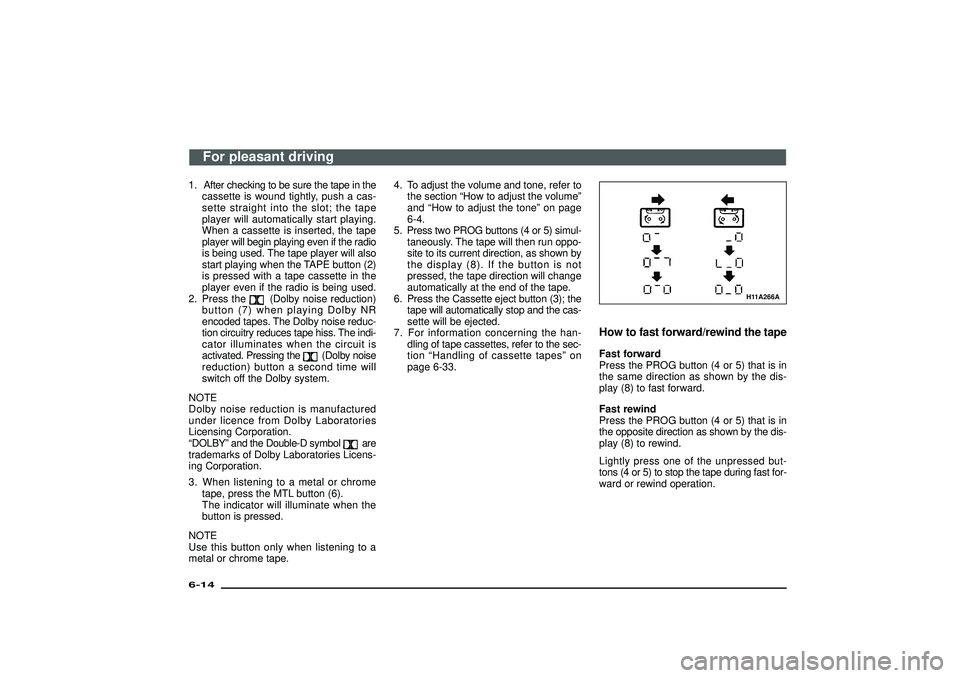
5. Press two PROG buttons (4 or 5) simul-
taneously. The tape will then run oppo-
site to its current direction, as shown by
the display (8). If the button is not
pressed, the tape direction will change
automatically at the end of the tape.
6. Press the Cassette eject button (3); the
tape will automatically stop and the cas-
sette will be ejected.
7. For information concerning the han-
dling of tape cassettes, refer to the sec-
tion“Handling of cassette tapes”on
page 6-33.
H11A266A
How to fast forward/rewind the tapeFast forward
Press the PROG button (4 or 5) that is in
the same direction as shown by the dis-
play (8) to fast forward.
Fast rewind
Press the PROG button (4 or 5) that is in
the opposite direction as shown by the dis-
play (8) to rewind.
Lightly press one of the unpressed but-
tons (4 or 5) to stop the tape during fast for-
ward or rewind operation.
For pleasant driving
6-14Div:
Out put date:
Page 236 of 392
To listen to a CD1. Press the CD button (3), and the CD
mode will be selected, starting play-
back.
NOTE
If the system is equipped with a CD
autochanger, press the DISC button (5), to
select the another disc. Every time theside of the DISC button is pressed, the next
disc is selected. Every time the
side of
the button is pressed, changeover to the
previous disc is made.
2. To adjust the volume and tone, refer to
the section“How to adjust the volume”
and“How to adjust the tone”on page
6-4.
3. To stop the CD, turn off the power by
pressing the PWR switch (1) or make a
changeover to the other mode by press-
ing the TAPE button (4) or U/M/L but-
ton (2).
4. For information concerning the han-
dling of compact discs, refer to the sec-
tion“Handling of compact discs”on
page 6-33.
To find the start of a desired trackThe start of each track on a disc can be
found by using the
or
button (6 or
7).
Track up:
Press the
button (7) the number of
tracks to skip over.
The frequency-display window will dis-
play the track number thus selected.
Track down:
Press thebutton (6) the number of
tracks to skip over.
The frequency-display window will dis-
play the track number thus selected.
How to repeat the same trackYou can repeatedly listen to the same track
by pressing the RPT button (9).
Press the RPT button, and the RPT indi-
cator (14) will come on.
To release, press the button again.
To change the order of tracks
played back (For CD player)Press the RDM button (10), and the RDM
indicator (15) will light and tracks for play-
back will be randomly selected.
To release, press the button again.To change the order of discs played
back (For CD autochanger)Press the RDM button (10), and the RDM
indicator (15) will light and random tracks
for playback will be selected randomly from
all discs loaded into the autochanger.
To release, press the button again.How to use the SCAN buttonUse the SCAN button (8) to search for a
particular track, etc. When this button is
pressed, the first 10 seconds of each track
on the disc will be played.
The disc will advance at fast-forward speed
between each 10-second played in this
way, press the SCAN button (8) again, that
track will then be played from its begin-
ning. After completion of this scanning of
tracks, the disc will begin ordinary play.
For pleasant driving
6-16Div:
Out put date:
Page 249 of 392
![MITSUBISHI SHOGUN 2003 (in English) Owners Guide To listen to a CD
[With a CD player]1. Insert the disc with the label facing
upward.
When a disc is inserted, the CD player
will begin playing even if the radio or
tape player is being used.
The CD pl MITSUBISHI SHOGUN 2003 (in English) Owners Guide To listen to a CD
[With a CD player]1. Insert the disc with the label facing
upward.
When a disc is inserted, the CD player
will begin playing even if the radio or
tape player is being used.
The CD pl](/img/19/34883/w960_34883-248.png)
To listen to a CD
[With a CD player]1. Insert the disc with the label facing
upward.
When a disc is inserted, the CD player
will begin playing even if the radio or
tape player is being used.
The CD player will also start the play-
back when the CD button (3) is pressed
with a disc in the player even if the radio
or tape player is being used.
NOTE
If the system is equipped with a CD
autochanger, the system operation is
changed over from the CD player mode to
the CD autochanger mode and vice versa
each time the CD button (3) is pressed.
2. To adjust the volume and tone, refer to
the section“How to adjust the volume”
and“How to adjust the tone”on page
6-19.
3. When the CD eject button (5) on the CD
player is pressed, the disc will automati-
cally stop and be ejected.
4. When the 3-inch compact disc is used,
playback can be made without using the
adapter. Insert the disc about in the cen-
tre of the discloading slot.
5. For information concerning the han-
dling of compact discs, refer to the sec-
tion“Handling of compact discs”on
page 6-33.
[With a CD autochanger]1. Press the CD button (3), and the CD
autochanger mode will be selected,
starting a playback. Each time the CD
button is pressed, one in the CD
autochanger is played back alter-
nately.
NOTE
When listening to another disc the CD
autochanger, press the DISC button (6), to
select the disc. Every time the
side of
the DISC button is pressed, the next disc
is selected. Every time the
side of the
button is pressed, changeover to the pre-
vious disc is made.
2. To adjust the volume and tone, refer to
the section“How to adjust the volume”
and“How to adjust the tone”on page
6-19.
3. To stop the CD, turn off the power by
pressing the PWR switch (1) or make a
changeover to the other mode by press-
ing the U/M/L button (2).
4. For information concerning the han-
dling of compact discs, refer to the sec-
tion“Handling of compact discs”on
page 6-33.
To find the start of a desired trackThe start of each track on a disc can be
found by using the
or
button (7 or
8).
Track up:
Press the
button (8) the number of
tracks to skip over.
The frequency-display window will dis-
play the track number thus selected.
Track down:
Press thebutton (7) the number of
tracks to skip over.
The frequency-display window will dis-
play the track number thus selected.
How to repeat the same trackYou can repeatedly listen to the same track
by pressing the RPT button (10).
Press the PRT button, and the RPT indi-
cator (15) will come on.
To release, press the button again.
For pleasant driving
6-29
Div:
Out put date: