low beam MITSUBISHI SHOGUN 2003 Owner's Manual (in English)
[x] Cancel search | Manufacturer: MITSUBISHI, Model Year: 2003, Model line: SHOGUN, Model: MITSUBISHI SHOGUN 2003Pages: 392, PDF Size: 14.34 MB
Page 98 of 392
D50A529D
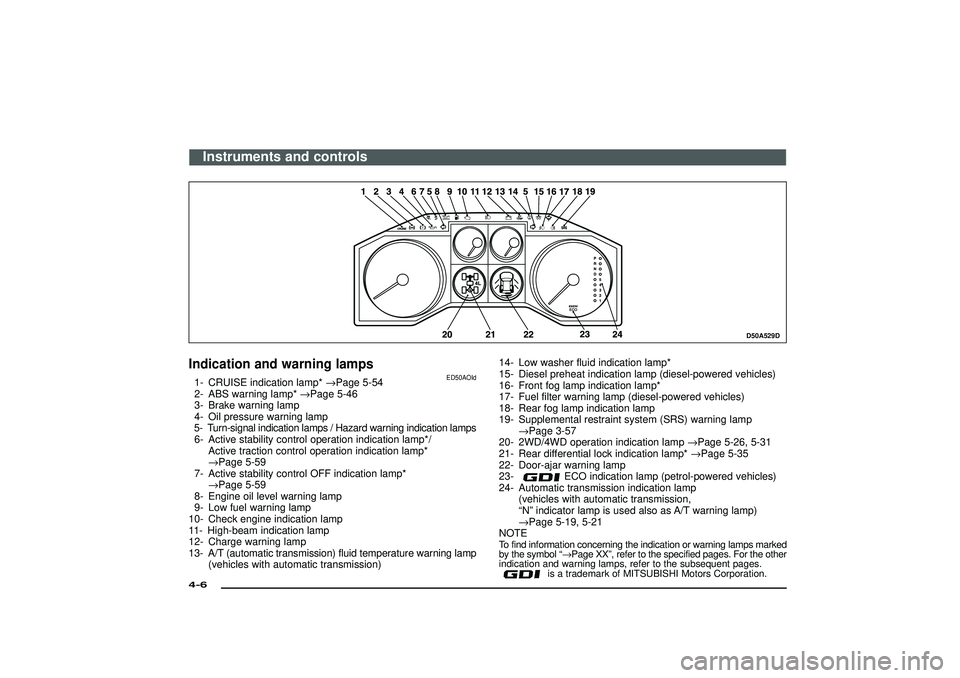
Indication and warning lamps
ED50AOId
1- CRUISE indication lamp*→Page 5-54
2- ABS warning lamp*→Page 5-46
3- Brake warning lamp
4- Oil pressure warning lamp
5- Turn-signal indication lamps / Hazard warning indication lamps
6- Active stability control operation indication lamp*/
Active traction control operation indication lamp*
→Page 5-59
7- Active stability control OFF indication lamp*
→Page 5-59
8- Engine oil level warning lamp
9- Low fuel warning lamp
10- Check engine indication lamp
11- High-beam indication lamp
12- Charge warning lamp
13- A/T (automatic transmission) fluid temperature warning lamp
(vehicles with automatic transmission)14- Low washer fluid indication lamp*
15- Diesel preheat indication lamp (diesel-powered vehicles)
16- Front fog lamp indication lamp*
17- Fuel filter warning lamp (diesel-powered vehicles)
18- Rear fog lamp indication lamp
19- Supplemental restraint system (SRS) warning lamp
→Page 3-57
20- 2WD/4WD operation indication lamp→Page 5-26, 5-31
21- Rear differential lock indication lamp*→Page 5-35
22- Door-ajar warning lamp
23-
ECO indication lamp (petrol-powered vehicles)
24- Automatic transmission indication lamp
(vehicles with automatic transmission,
“N”indicator lamp is used also as A/T warning lamp)
→Page 5-19, 5-21
NOTE
To find information concerning the indication or warning lamps marked
by the symbol“→Page XX”, refer to the specified pages. For the other
indication and warning lamps, refer to the subsequent pages.
is a trademark of MITSUBISHI Motors Corporation.
Instruments and controls
4-6Div:
Out put date:
Page 106 of 392
E11A039A
Combination headlamps, dip-
per and turn signal switch
EE11AHEe
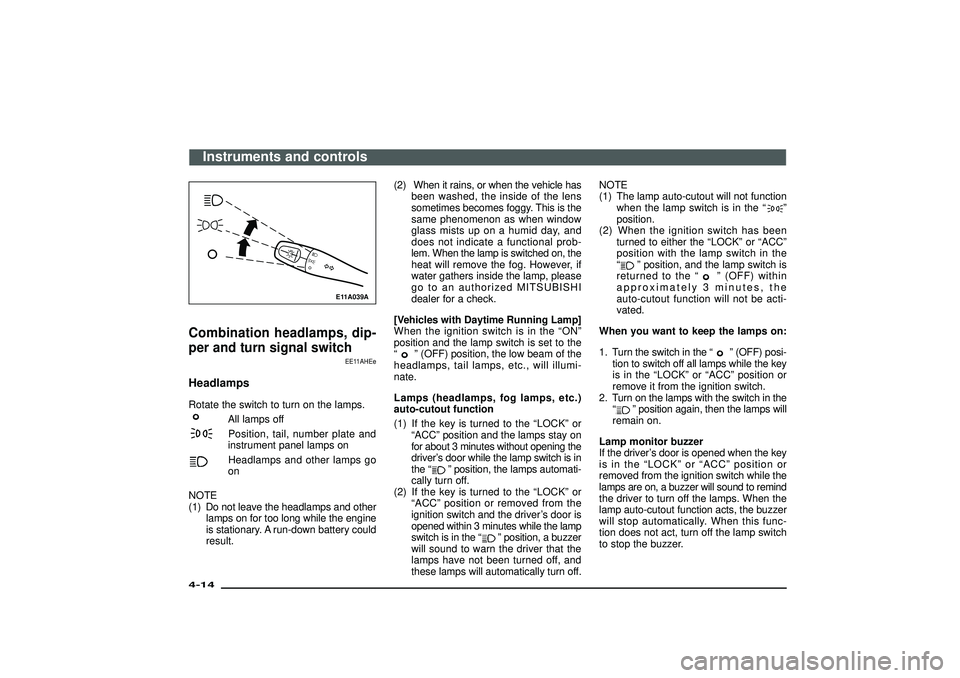
HeadlampsRotate the switch to turn on the lamps.
All lamps offPosition, tail, number plate and
instrument panel lamps onHeadlamps and other lamps go
on
NOTE
(1) Do not leave the headlamps and other
lamps on for too long while the engine
is stationary. A run-down battery could
result.(2) When it rains, or when the vehicle has
been washed, the inside of the lens
sometimes becomes foggy. This is the
same phenomenon as when window
glass mists up on a humid day, and
does not indicate a functional prob-
lem. When the lamp is switched on, the
heat will remove the fog. However, if
water gathers inside the lamp, please
go to an authorized MITSUBISHI
dealer for a check.
[Vehicles with Daytime Running Lamp]
When the ignition switch is in the“ON”
position and the lamp switch is set to the
“
”(OFF) position, the low beam of the
headlamps, tail lamps, etc., will illumi-
nate.
Lamps (headlamps, fog lamps, etc.)
auto-cutout function
(1) If the key is turned to the“LOCK”or
“ACC”position and the lamps stay on
for about 3 minutes without opening the
driver’s door while the lamp switch is in
the“
”position, the lamps automati-
cally turn off.
(2) If the key is turned to the“LOCK”or
“ACC”position or removed from the
ignition switch and the driver’s door is
opened within 3 minutes while the lamp
switch is in the“
”position, a buzzer
will sound to warn the driver that the
lamps have not been turned off, and
these lamps will automatically turn off.NOTE
(1) The lamp auto-cutout will not function
when the lamp switch is in the“
”
position.
(2) When the ignition switch has been
turned to either the“LOCK”or“ACC”
position with the lamp switch in the
“
”position, and the lamp switch is
returned to the“
”(OFF) within
approximately 3 minutes, the
auto-cutout function will not be acti-
vated.
When you want to keep the lamps on:
1. Turn the switch in the“
”(OFF) posi-
tion to switch off all lamps while the key
is in the“LOCK”or“ACC”position or
remove it from the ignition switch.
2. Turn on the lamps with the switch in the
“
”position again, then the lamps will
remain on.
Lamp monitor buzzer
If the driver’s door is opened when the key
is in the“LOCK”or“ACC”position or
removed from the ignition switch while the
lamps are on, a buzzer will sound to remind
the driver to turn off the lamps. When the
lamp auto-cutout function acts, the buzzer
will stop automatically. When this func-
tion does not act, turn off the lamp switch
to stop the buzzer.
Instruments and controls
4-14Div:
Out put date:
Page 107 of 392
E11C034A
Dipper (High/Low beam change)
EE11B-Ia
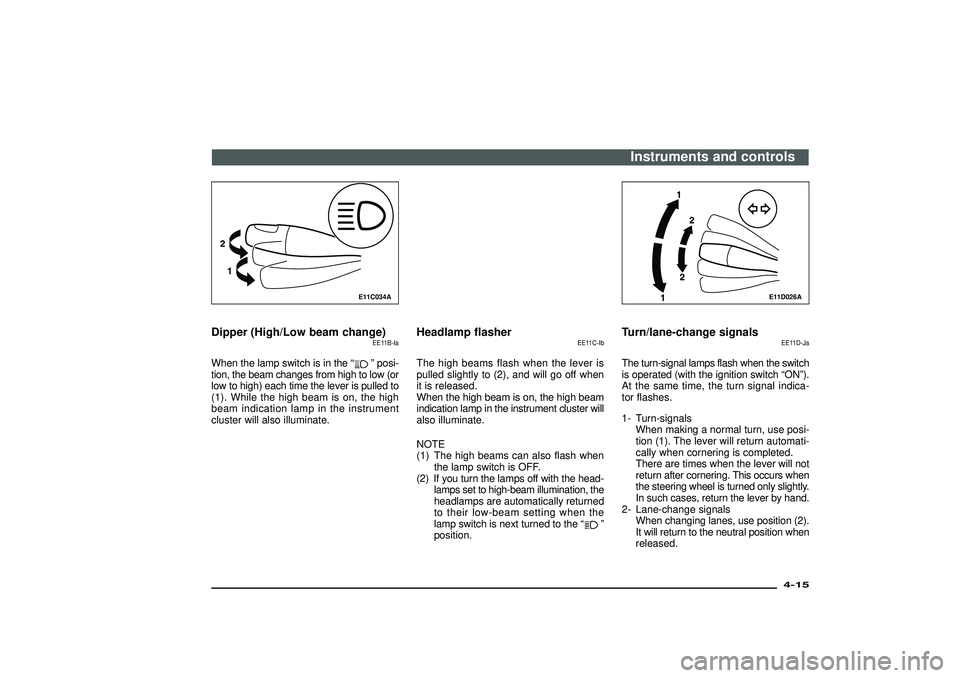
When the lamp switch is in the“
”posi-
tion, the beam changes from high to low (or
low to high) each time the lever is pulled to
(1). While the high beam is on, the high
beam indication lamp in the instrument
cluster will also illuminate.
Headlamp flasher
EE11C-Ib
The high beams flash when the lever is
pulled slightly to (2), and will go off when
it is released.
When the high beam is on, the high beam
indication lamp in the instrument cluster will
also illuminate.
NOTE
(1) The high beams can also flash when
the lamp switch is OFF.
(2) If you turn the lamps off with the head-
lamps set to high-beam illumination, the
headlamps are automatically returned
to their low-beam setting when the
lamp switch is next turned to the“
”
position.
E11D026A
Turn/lane-change signals
EE11D-Ja
The turn-signal lamps flash when the switch
is operated (with the ignition switch“ON”).
At the same time, the turn signal indica-
tor flashes.
1- Turn-signals
When making a normal turn, use posi-
tion (1). The lever will return automati-
cally when cornering is completed.
There are times when the lever will not
return after cornering. This occurs when
the steering wheel is turned only slightly.
In such cases, return the lever by hand.
2- Lane-change signals
When changing lanes, use position (2).
It will return to the neutral position when
released.Instruments and controls
4-15
Div:
Out put date:
Page 108 of 392
NOTE
If the lamp flashes unusually quickly, the
bulb in a turn-signal lamp may have burned
out. Have the vehicle inspected by an
authorized MITSUBISHI dealer.
E01G050A
LHDHeadlamp levelling switch
EE01GIOc
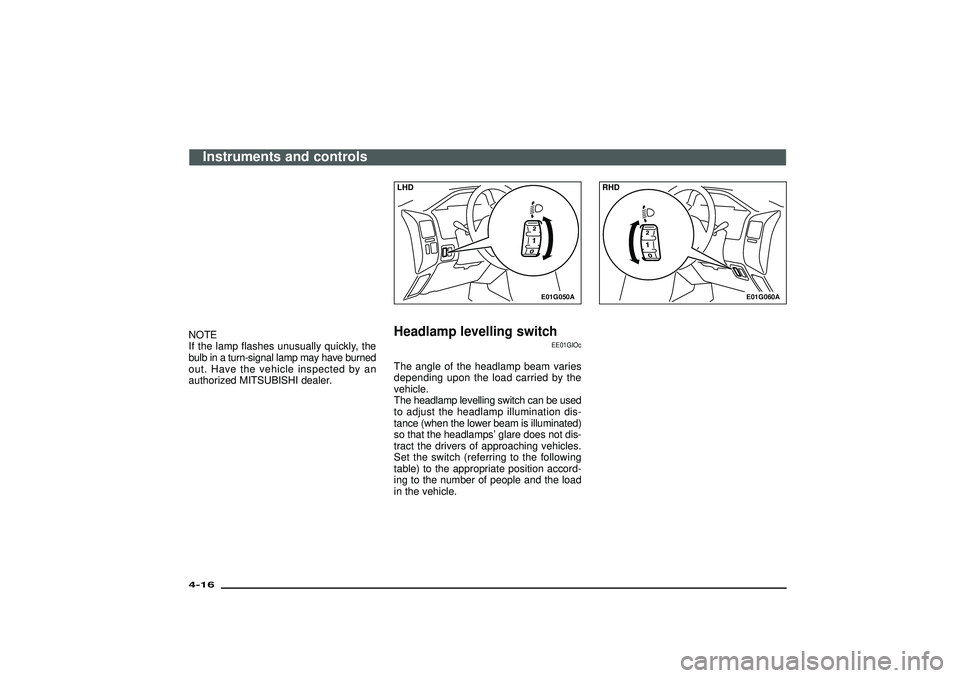
The angle of the headlamp beam varies
depending upon the load carried by the
vehicle.
The headlamp levelling switch can be used
to adjust the headlamp illumination dis-
tance (when the lower beam is illuminated)
so that the headlamps’glare does not dis-
tract the drivers of approaching vehicles.
Set the switch (referring to the following
table) to the appropriate position accord-
ing to the number of people and the load
in the vehicle.
E01G060A
RHD
Instruments and controls
4-16Div:
Out put date:
Page 114 of 392
E08A017A
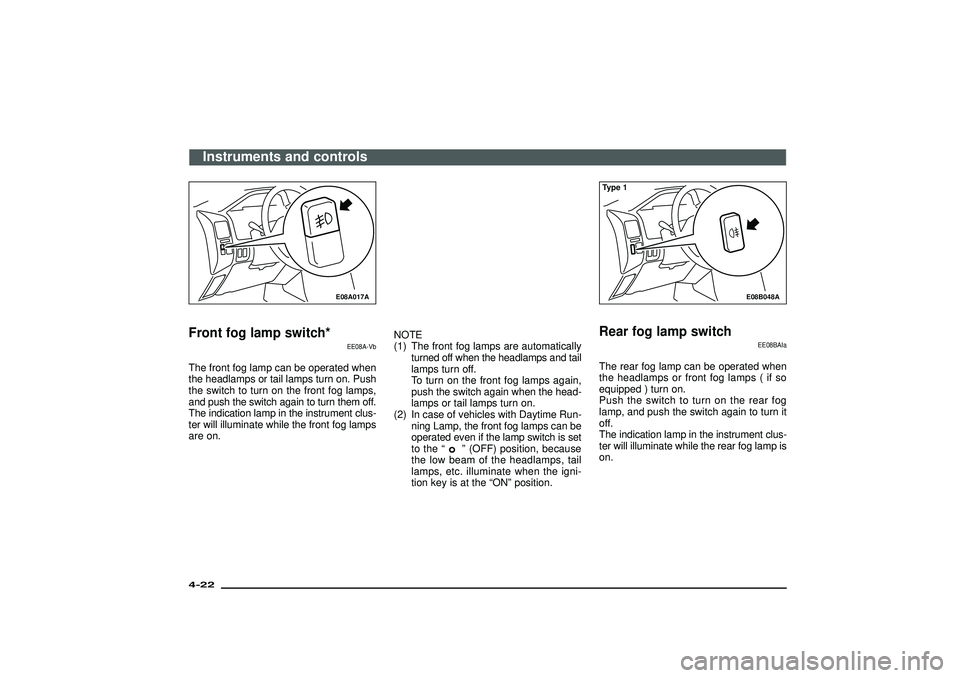
Front fog lamp switch*
EE08A-Vb
The front fog lamp can be operated when
the headlamps or tail lamps turn on. Push
the switch to turn on the front fog lamps,
and push the switch again to turn them off.
The indication lamp in the instrument clus-
ter will illuminate while the front fog lamps
are on.NOTE
(1) The front fog lamps are automatically
turned off when the headlamps and tail
lamps turn off.
To turn on the front fog lamps again,
push the switch again when the head-
lamps or tail lamps turn on.
(2) In case of vehicles with Daytime Run-
ning Lamp, the front fog lamps can be
operated even if the lamp switch is set
to the“
”(OFF) position, because
the low beam of the headlamps, tail
lamps, etc. illuminate when the igni-
tion key is at the“ON”position.
E08B048A
Type 1Rear fog lamp switch
EE08BAIa
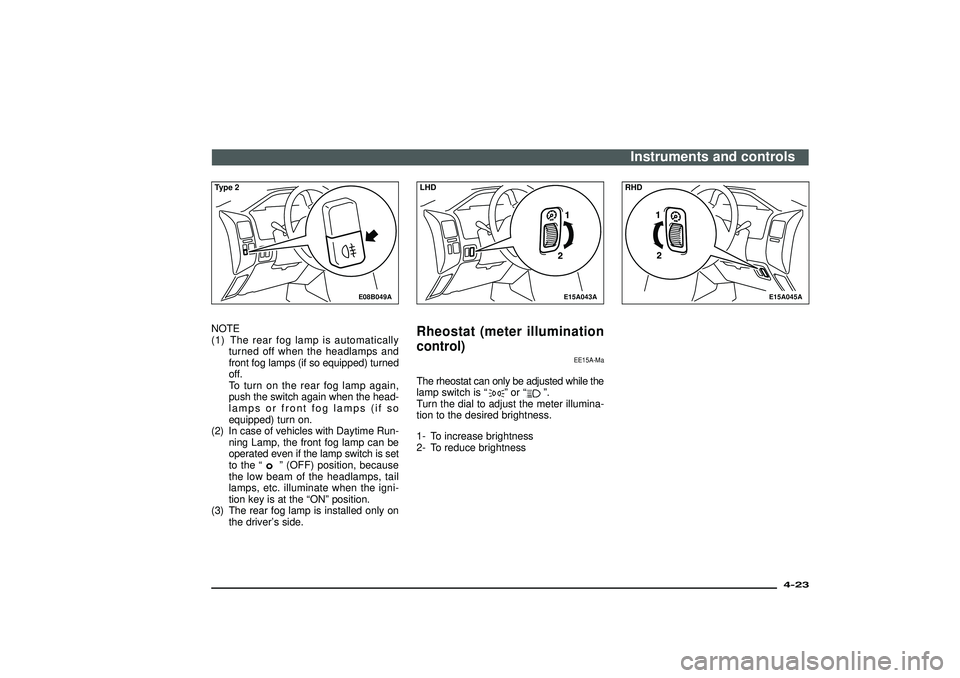
The rear fog lamp can be operated when
the headlamps or front fog lamps ( if so
equipped ) turn on.
Push the switch to turn on the rear fog
lamp, and push the switch again to turn it
off.
The indication lamp in the instrument clus-
ter will illuminate while the rear fog lamp is
on.
Instruments and controls
4-22Div:
Out put date:
Page 115 of 392
E08B049A
Type 2NOTE
(1) The rear fog lamp is automatically
turned off when the headlamps and
front fog lamps (if so equipped) turned
off.
To turn on the rear fog lamp again,
push the switch again when the head-
lamps or front fog lamps (if so
equipped) turn on.
(2) In case of vehicles with Daytime Run-
ning Lamp, the front fog lamp can be
operated even if the lamp switch is set
to the“
”(OFF) position, because
the low beam of the headlamps, tail
lamps, etc. illuminate when the igni-
tion key is at the“ON”position.
(3) The rear fog lamp is installed only on
the driver’s side.
E15A043A
LHDRheostat (meter illumination
control)
EE15A-Ma
The rheostat can only be adjusted while the
lamp switch is“
”or“
”.
Turn the dial to adjust the meter illumina-
tion to the desired brightness.
1- To increase brightness
2- To reduce brightness
E15A045A
RHDInstruments and controls
4-23
Div:
Out put date:
Page 170 of 392
(3) For vehicles equipped with the Day-
time Running Lamp, when the igni-
tion switch is“ON”, the headlamp low
beams etc. are turned on.
Refer to“Headlamps”.
(4) As your vehicle is equipped with an
electronic immobilizer, to start the
engine, the ID code which the tran-
sponder inside the key sends must
match the one registered to the immo-
bilizer computer. (Refer to page 2-2).
CAUTION
(1) Do not remove the ignition key
from the ignition switch while
driving. The steering wheel will
be locked, causing loss of con-
trol.
(2) If the engine is stopped while
driving, the brake servomecha-
nism will cease to function and
braking efficiency will deterio-
rate. Also, power steering sys-
tem will not function and it will
require greater manual effort to
operate the steering.
(3) Do not leave the key in the“ON”
position for a long time when the
engine is not running; doing so
will cause the battery to be dis-
charged.
(4) Do not turn the key to the
“START”position when the
engine is running; doing so
could damage the starter motor.
I01B016A
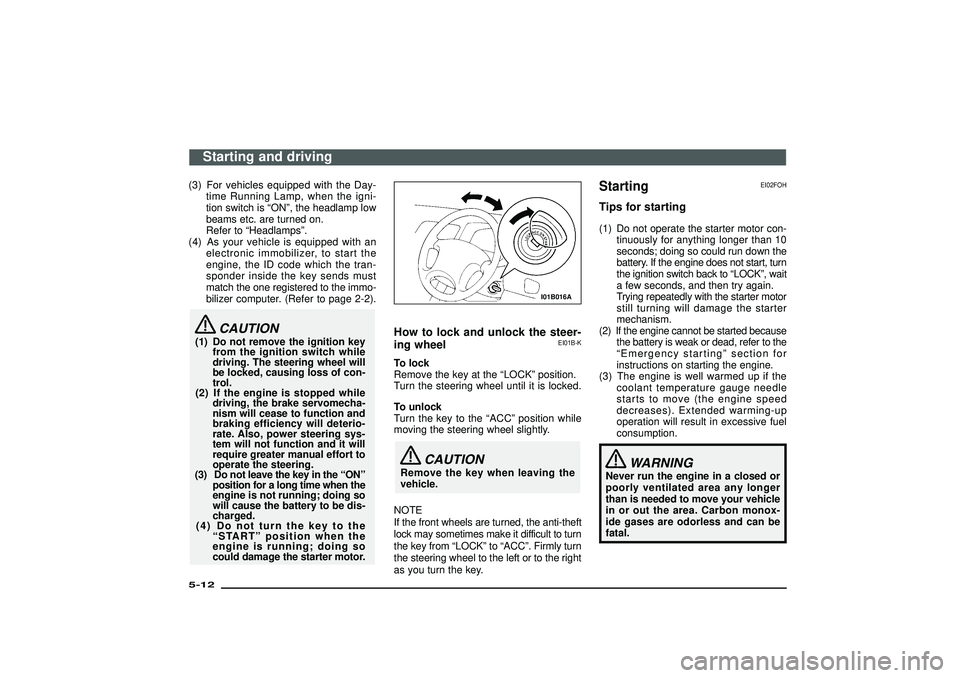
How to lock and unlock the steer-
ing wheel
EI01B-K
To lock
Remove the key at the“LOCK”position.
Turn the steering wheel until it is locked.
To unlock
Turn the key to the“ACC”position while
moving the steering wheel slightly.
CAUTION
Remove the key when leaving the
vehicle.
NOTE
If the front wheels are turned, the anti-theft
lock may sometimes make it difficult to turn
the key from“LOCK”to“ACC”. Firmly turn
the steering wheel to the left or to the right
as you turn the key.
Starting
EI02FOH
Tips for starting(1) Do not operate the starter motor con-
tinuously for anything longer than 10
seconds; doing so could run down the
battery. If the engine does not start, turn
the ignition switch back to“LOCK”, wait
a few seconds, and then try again.
Trying repeatedly with the starter motor
still turning will damage the starter
mechanism.
(2) If the engine cannot be started because
the battery is weak or dead, refer to the
“Emergency starting”section for
instructions on starting the engine.
(3) The engine is well warmed up if the
coolant temperature gauge needle
starts to move (the engine speed
decreases). Extended warming-up
operation will result in excessive fuel
consumption.
WARNING
Never run the engine in a closed or
poorly ventilated area any longer
than is needed to move your vehicle
in or out the area. Carbon monox-
ide gases are odorless and can be
fatal.
Starting and driving
5-12Div:
Out put date:
Page 330 of 392
N29B218E
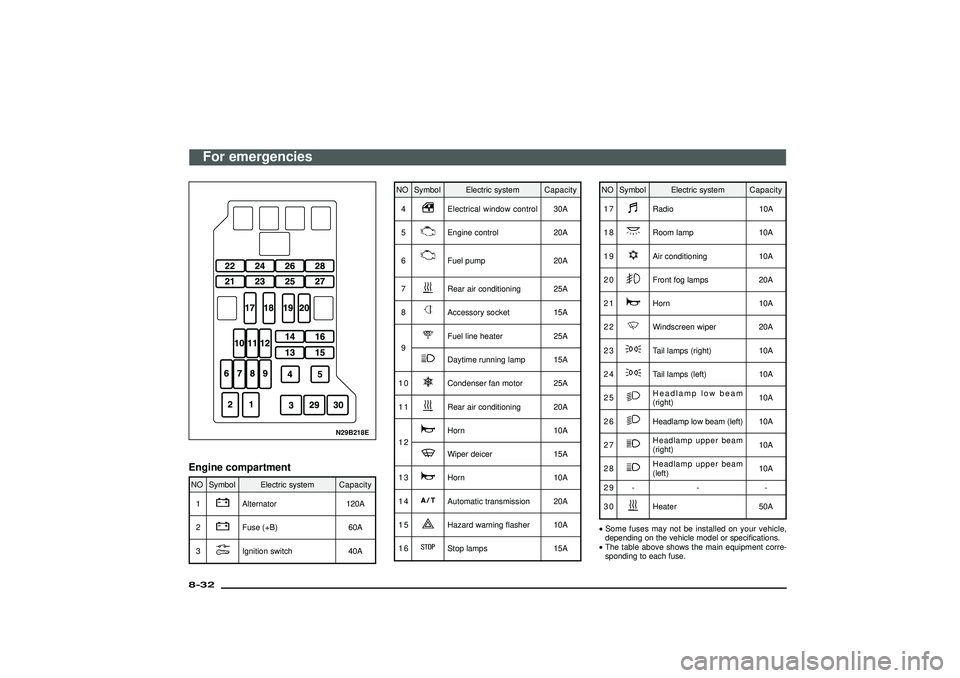
Engine compartmentNO Symbol Electric systemCapacity
1
Alternator 120A
2Fuse (+B) 60A
3Ignition switch 40A
NO Symbol Electric systemCapacity
4
Electrical window control 30A
5Engine control 20A
6Fuel pump 20A
7Rear air conditioning 25A
8Accessory socket 15A
9Fuel line heater 25ADaytime running lamp 15A
10Condenser fan motor 25A
11Rear air conditioning 20A
12Horn 10AWiper deicer 15A
13Horn 10A
14Automatic transmission 20A
15Hazard warning flasher 10A
16Stop lamps 15A
NO Symbol Electric systemCapacity
17
Radio 10A
18Room lamp 10A
19Air conditioning 10A
20Front fog lamps 20A
21Horn 10A
22Windscreen wiper 20A
23Tail lamps (right) 10A
24Tail lamps (left) 10A
25Headlamp low beam
(right)10A
26Headlamp low beam (left) 10A
27Headlamp upper beam
(right)10A
28Headlamp upper beam
(left)10A
29 - - -
30Heater 50A
•Some fuses may not be installed on your vehicle,
depending on the vehicle model or specifications.
•The table above shows the main equipment corre-
sponding to each fuse.
For emergencies
8-32Div:
Out put date:
Page 332 of 392

N29C001A
6. Insert a new fuse of the same capac-
ity by using the fuse puller and insert the
fuse at the same place in the fuse box.
CAUTION
(1) If the newly inserted fuse blows
again after a short time, have the
electric system checked by an
authorized MITSUBISHI dealer to
find the cause and rectify it.
(2) Never use a fuse with a capac-
ity larger than that specified or
any substitute, such as wire, foil,
etc.; doing so will cause the cir-
cuit wiring to heat up and could
cause a fire.
Replacement of lamp bulbs
EN10A-Ab
Before replacing a bulb, ensure the lamp
is off. Do not touch the glass part of the
new bulb with your bare fingers; the skin oil
left on the glass will evaporate when the
bulb gets hot and the vapor will con-
dense on the reflector and dim the sur-
face.
N10B307A
Bulb capacity
EN10BOIb
A bulb should only be replaced with a new
bulb of the same rating and type. The des-
ignation can be found on the base of the
bulb.
Outside
1- Headlamps, upper/lower beam
..................................60/55W (H4)
2- Front fog lamps*
........................... 51W(HB4)·9006
3- Front turn-signal lamps . 21W (W21W)
4- Position lamps................ 5W(W5W)
5- Side turn-signal lamps ... 5W (WY5W)
6- Side step lamps*........... 5W(WY5W)
For emergencies
8-34Div:
Out put date: