maintenance MITSUBISHI SHOGUN 2003 Owner's Manual (in English)
[x] Cancel search | Manufacturer: MITSUBISHI, Model Year: 2003, Model line: SHOGUN, Model: MITSUBISHI SHOGUN 2003Pages: 392, PDF Size: 14.34 MB
Page 1 of 392
T
able
of
contents
General
information
Locking
and
unlocking
Seat
and
seat
belts
Instruments
and
controls
Starting
and
driving
For
pleasant
driving
V
ehicle
care
For
emergenciesMaintenance
Specifications
Div:Out
put
date:
April
3,2001
Page 90 of 392
SRS servicing
EG29G-A
The entire SRS including air bag and
pre-tensioner seat belt must be inspected
by an authorized MITSUBISHI dealer after
10 years.
WARNING
(1) Any maintenance performed on
or near the components of the
SRS must be performed only by
an authorized MITSUBISHI
dealer. Do not permit anyone
else to do service, inspection,
maintenance or repair on any
SRS components or wiring;
similarly, no part of the SRS
should ever be handled or dis-
posed of by anyone except an
authorized MITSUBISHI dealer.
Improper work on the SRS com-
ponents or wiring could result in
inadvertent deployment of the air
bags, or could render the SRS
inoperative; either situation
could result in serious injury.
(2) Do not modify your steering
wheel, seat belt retractor or any
other SRS components. For
example, replacement of the
steering wheel, or modifica-
tions to the front bumper or
body structure can adversely
affect SRS performance and lead
to possible injury.
WARNING
(3) If your vehicle has received any
front-end damage, you should
have the SRS inspected by an
authorized MITSUBISHI dealer to
ensure it is in proper working
order.
(4) On vehicles with the side air
bags, do not modify your front
seats centre pillar and centre
console.
It can adversely affect SRS per-
formance and lead to possible
injury.
Also, if you have found any tear
or open seam in the seat fabric
at the portion near the side air
bag, have the seat inspected at
an authorized MITSUBISHI
dealer.
(5) On vehicles with the side air
bags, if your vehicles has
received any damage to either
side, you should have the SRS
inspected by an authorized MIT-
SUBISHI dealer to ensure it is in
proper working order.NOTE
(1) When you transfer ownership of the
vehicle to some other person, we urge
you to alert the new owner that it is
equipped with the SRS and refer that
owner to the applicable section in this
owner’s handbook.
(2) If you junk or scrap the vehicle, we urge
you to first take the vehicle to an autho-
rized MITSUBISHI dealer so that the
SRS can be rendered safe.
Seat and seat belts
3-58Div:
Out put date:
Page 196 of 392
Correct 4-wheel drive
operation
EI32ABCa
By shifting lock to 4-wheel drive, both axles
of the vehicle are rigidly connected with
each other. This improves the traction char-
acteristics. When turning sharp corners or
moving forward and backward repeat-
edly, however, the drive line is stressed,
which is felt as a braking effect. A 4-wheel
drive vehicle can accelerate more quickly
and smoothly.
However, note that the braking distance is
not shorter than that of a rear-wheel drive
vehicle.
When using 4-wheel drive on rough roads
(snow, mud, sand, etc.), it is important to
operate the vehicle correctly.
NOTE
(1) The driving posture should be more
upright and closer to the wheel than
usual; adjust the seat to a good posi-
tion for easy steering and pedal opera-
tion. Be sure to wear the seat belt.
(2) After driving on rough roads, check
each part of the vehicle and wash it
thoroughly with water. Refer to the sec-
tions“Vehicle care”and“Inspection and
maintenance following rough road
operation”.
Driving on dry paved road and high-
waySelect“2H”(part time 4WD),“2H”or“4H”
(super select 4WD II) to drive on a dry
paved road. Especially on dry highway,
never select the“4H”or“4L”(part time
4WD),“4HLc”or“4LLc”(super select 4WD
II).
CAUTION
Selecting“4H”or“4L”(part time
4WD),“4HLc”or“4LLc”(super select
4WD II), to drive on dry paved road
will increase the fuel consumption
with possible noise generation and
early tyre wear.
It may also increase the differential
oil temperature, resulting in pos-
sible damage to the driving system.
Further, the drive train will be sub-
jected to excessive loading, possi-
bly leading to oil leakage, component
seizure, or other serious faults.Driving on snowy or icy roadsSet the transfer shift lever to“4H”or“4L”
(part time 4WD),“4H”or“4HLc”(super
select 4WD II) in accordance with the road
conditions, and then gradually depress the
accelerator pedal for a smooth start.NOTE
(1) The use of snow tyres and/or tyre
chains is recommended.
(2) In order to ensure that the anti-lock
brake system (ABS) will operate cor-
rectly in situations where tyre chains
have been fitted, drive in“4H”or“4L”
for part time 4WD, or in“4H”,“4HLc”or
“4LLc”for super select 4WD II.
(3) Maintain a safe distance between
vehicles, avoid sudden braking, and
use engine braking (downshifting).
CAUTION
Avoid sudden braking, sudden accel-
eration, and sharp turning; such
operations could cause skidding and
spinouts.Driving on sandy or muddy roadsSet the transfer shift lever to“4H”or“4L”
(part time 4WD),“4HLc”or“4LLc”(super
select 4WD II), and then gradually depress
the accelerator pedal for a smooth start.
Keep the pressure on the accelerator pedal
as constant as possible, and drive at low
speed.
Starting and driving
5-38Div:
Out put date:
Page 199 of 392
Crossing a stream4-wheel drive vehicles are not necessar-
ily waterproof. If the electrical circuits
become wet, further operation of the
vehicle will be impossible; therefore, avoid
crossing streams unless absolutely nec-
essary. If crossing a stream is unavoid-
able, use the following procedure:
(1) Check depths of the stream and geo-
graphical features before attempting to
cross a stream and ford the stream
where the water is as shallow as prac-
ticable.
(2) Cross at a place where the water is less
than 6 cm deep.
(3) Set the transfer shift lever to“4L”(part
time 4WD) or“4LLc”(super select 4WD
II).
(4) Drive slowly at a speed of approxi-
mately 5 km/h (3 mph) to avoid splash-
ing too much water.
CAUTION
Do not attempt to cross a stream at
a place where the water is more than
60 cm deep.
Frequent crossing of streams can
adversely affect the life span of the
vehicle; consult an authorized
MITSUBISHI dealer and take the nec-
essary measures to prepare, inspect,
and repair the vehicle.
After crossing a stream, apply the brakes
to be sure they are functioning properly. If
the brakes are wet and not functioning
properly, dry them out by driving slowly
while lightly depressing the brake pedal.
Inspect each part of the vehicle carefully.
Inspection and maintenance follow-
ing rough road operationAfter operating the vehicle in rough road
conditions, be sure to perform the follow-
ing inspection and maintenance proce-
dures :
(1) Check that the vehicle has not been
damaged by rocks, gravel, etc.
(2) Carefully wash the vehicle with water.
Drive the vehicle slowly while lightly
depressing the brake pedal in order to
dry out the brakes. If the brakes still do
not function properly, contact an autho-
rized MITSUBISHI dealer as soon as
possible to have the brakes checked.
(3) Remove insects, dried grass, etc. clog-
ging the radiator core.
(4) If a stream has been crossed, check
the engine, transmission, and differen-
tial oil. If the oil or grease is milky or
cloudy because of water contamina-
tion, it must be replaced with new oil.
(5) Check the inside of the vehicle. If
ingress of water is found, dry the car-
pet etc.
(6) Inspect the headlamps. If the head-
lamp bulb is flooded with water, have
the bulb drained off at an authorized
MITSUBISHI dealer.
(7) Have an authorized MITSUBISHI
dealer replace grease in the wheel
bearings.
Starting and driving
5-41
Div:
Out put date:
Page 292 of 392
EK21A-Ad
In order to maintain the value of your
vehicle, it is necessary to perform regular
maintenance using the proper proce-
dures. Always maintain your vehicle in
compliance with any environmental pollu-
tion control regulations. Carefully select the
materials used for washing, etc., to be sure
that they do not contain corrosives; if in
doubt, contact your authorized
MITSUBISHI dealer for assistance in the
selection of these materials.
CAUTION
Cleaning products can be danger-
ous. Some are poisonous. Others
can burst into flame if you strike a
match or drop them on a hot part of
the vehicle. Some are dangerous if
you breathe their fumes in a closed
space. When you use anything in a
container to clean your vehicle,
always follow the instructions and
always open your vehicle doors or
windows when you’re cleaning the
inside. Never use the following to
clean your vehicle:
•Gasoline•Paint Thinner
•Benzine•Turpentine
•Naphtha•Lacquer Thinner
•Carbon Tetrachloride
•Nail Polish Remover
•Acetone
These are all dangerous, and can
damage your vehicle.
Cleaning the inside of your
vehicle
EK23A-Ad
After cleaning the inside of your vehicle with
water, cleaner or similar, wipe and dry in a
shady, well-ventilated area.
NOTE
Always read the instructions on the cleaner
label.Plastic, vinyl leather, fabric and
flocked parts
EK24A-Aa
1. Gently wipe off with gauze or other soft
cloth soaked with a 3% aqueous solu-
tion of neutral detergent.
2. Dip cloth in fresh water and wring out
well. Using this cloth, wipe off the deter-
gent thoroughly.
Vehicle care
7-2Div:
Out put date:
Page 320 of 392
WARNING
(1) Remember that under the bon-
net, there can be boiling water
gushing out, or the support bar
could be burning hot. If the bon-
net is opened suddenly, you
could get burnt.
(2) Be careful of hot steam, which
could be blowing off the reserve
tank cap.
(3) Do not attempt to remove the
radiator cap while the engine is
hot.
N26A209A
3. After the engine coolant temperature has
dropped to the normal temperature, stop
the engine.
N26A143A
4. Check the coolant level in the reserve
tank. If there is none, make sure that the
engine has cooled down before remov-
ing the radiator cap, because hot steam
or boiling water otherwise will gush from
the filler port and may scald you.
5. Add coolant to the radiator and/or
reserve tank if necessary (refer to the
“Maintenance”section).
CAUTION
Adding cold water rapidly when the
engine is hot could cause the cylin-
der head and/or block to crack, add
the water a little at a time while run-
ning the engine.
For emergencies
8-22Div:
Out put date:
Page 343 of 392
Maintenance
Engine oil ...................................................... 9- 2
Automatic transmission fluid ...................... 9- 4
Engine coolant ............................................. 9- 5
Battery ........................................................... 9- 6
Brake fluid .................................................... 9- 8
Power steering fluid...................................... 9- 9
Clutch fluid ................................................... 9-10
Washer fluid ................................................... 9-11
Wheel condition ............................................ 9-12
Tyre inflation pressure ................................. 9-14
Tyre rotation ................................................. 9-15
Snow tyres .................................................... 9-16
Tyre chains ................................................... 9-16
Fuel, engine coolant,
oil and exhaust gas leakage..................... 9-17
Exterior and interior lamp operation........... 9-18
Meter, gauge and indication /
warning lamp operation ............................ 9-18
Clutch pedal free play ................................. 9-18
Brake pedal free play.................................... 9-18
Parking brake lever stroke ........................... 9-19
Hinges and latches lubrication.................... 9-19
Wiper blades.................................................. 9-19
Ventilation slots ............................................ 9-21
Weatherstripping........................................... 9-21
Additional equipment
(For regions where snow is encountered). 9-21
Div:
Out put date:
Page 344 of 392
EM01A-Hh
Adequate care of your vehicle at regular
intervals serves to preserve the value and
appearance as long as possible.
Some maintenance items can be carried
out by the owner (do it yourself), while oth-
ers should be carried out by an autho-
rized MITSUBISHI dealer (periodic
inspection and maintenance). This sec-
tion describes only those items which can
be carried out by the owner. In the event a
malfunction or other problem is discov-
ered, have it corrected by an authorized
MITSUBISHI dealer. This section con-
tains information on inspection mainte-
nance procedures that you can do yourself,
if you wish to do so. Follow the instruc-
tions and cautions for each of the various
procedures.
WARNING
(1) When checking or servicing the
inside of the engine compart-
ment, make sure the engine is
switched off and has had a
chance to cool down.
(2) If it is necessary to do work in
the engine compartment with the
engine running, be especially
careful that your clothing, hair,
etc., does not become caught by
the fan, drive belts, or other
moving parts.
(3) Do not smoke, cause sparks or
allow open flames around fuel or
battery. The fumes are flam-
mable.
(4) Be extremely cautious when
working around the battery. It
contains poisonous and corro-
sive sulphuric acid.
(5) Do not get under your vehicle
with just the body jack support-
ing it. Always use automotive
jack stands.
(6) Improper handling of compo-
nents and materials used in the
vehicle can endanger your per-
sonal safety.
Consult an authorized
MITSUBISHI dealer for neces-
sary information.
M03A081A
A : 2500 models
B : 3200 models
C : 3500 modelsEngine oil
EM03A-Ja
The engine oil used has a significant effect
on the engine’s performance, service life
and startability. Be sure to use oil of the
recommended quality and appropriate vis-
cosity.
All engines consume a certain amount of
oil during normal operation (See note
below). Therefore, it is important to check
the oil at regular intervals or before start-
ing a long journey.
Maintenance
9-2Div:
Out put date:
Page 345 of 392
M03A126A
This check must be carried out with the
vehicle on a flat level surface with the
engine at normal operating temperature,
but NOT running. If the engine has been
running, wait for a few minutes to allow the
engine oil to return to the oil pan to ensure
an accurate measurement.
Remove the dipstick and wipe it with a
clean cloth, re-insert the dipstick as far as
it will go. Remove the dipstick and check
the oil level. This should always be within
the range as indicated .
If the oil level is below the specified limit,
remove the filler cap located on the rocker
cover and add oil. Then recheck the level.
When satisfied that the level is correct, refit
the oil filler cap making sure that it is
securely fitted.
M03A083A
Use only the recommended oils with an
ACEA or API classification as specified in
this manual.
NOTE
(1) Engine oil consumption is greatly influ-
enced by payload, engine speed, etc.
It may reach 1.0 lit./1, 000 km(620
miles) depending on style of driving.
(2) The engine oil will deteriorate rapidly if
the vehicle is subjected to severe con-
ditions (for example, repeated opera-
tion on rough roads, in mountainous
regions, on roads with many uphill and
downhill gradients, or over short
distances). Consequently, the oil will
require earlier replacement.
(3) For handling of used engine oils, refer
to page 1-13.
M03B037A
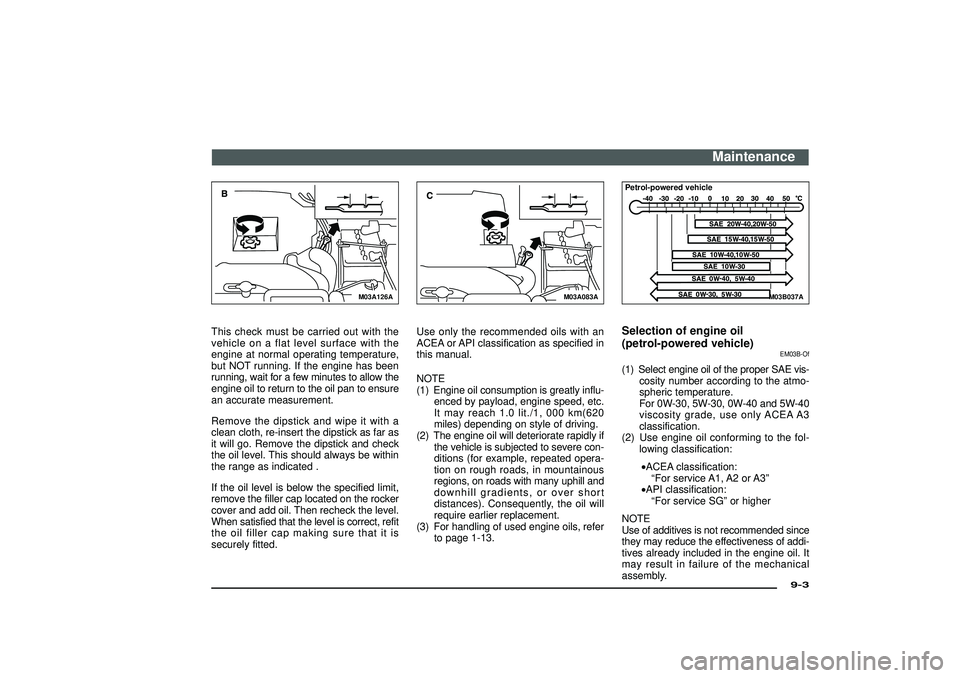
Petrol-powered vehicleSelection of engine oil
(petrol-powered vehicle)
EM03B-Of
(1) Select engine oil of the proper SAE vis-
cosity number according to the atmo-
spheric temperature.
For 0W-30, 5W-30, 0W-40 and 5W-40
viscosity grade, use only ACEA A3
classification.
(2) Use engine oil conforming to the fol-
lowing classification:
•ACEA classification:
“For service A1, A2 or A3”
•API classification:
“For service SG”or higher
NOTE
Use of additives is not recommended since
they may reduce the effectiveness of addi-
tives already included in the engine oil. It
may result in failure of the mechanical
assembly.
Maintenance
9-3
Div:
Out put date:
Page 346 of 392
M03B017A
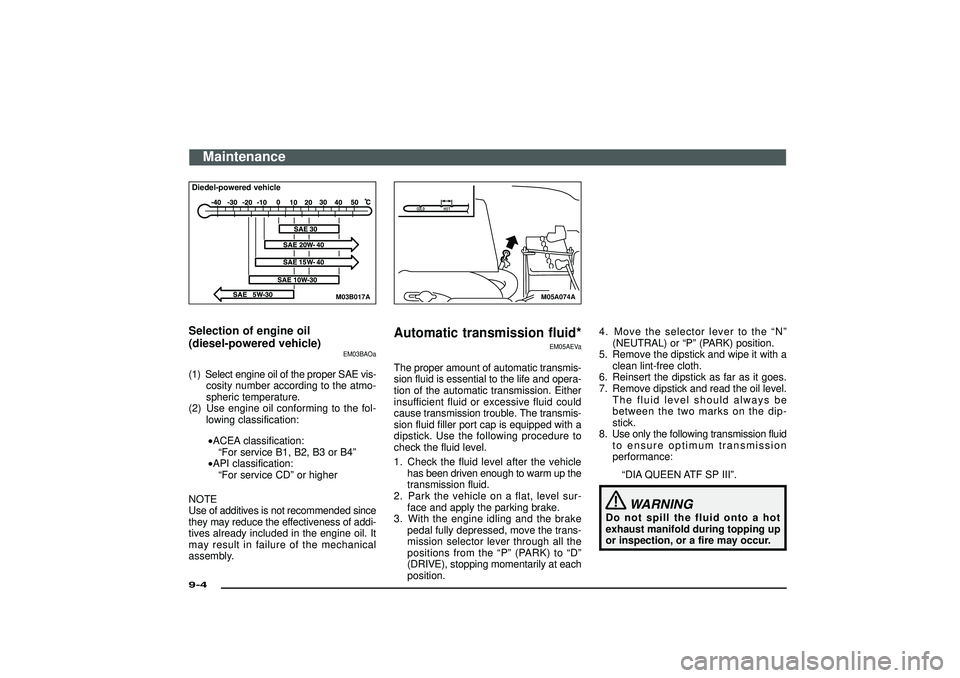
Diedel-powered vehicleSelection of engine oil
(diesel-powered vehicle)
EM03BAOa
(1) Select engine oil of the proper SAE vis-
cosity number according to the atmo-
spheric temperature.
(2) Use engine oil conforming to the fol-
lowing classification:
•ACEA classification:
“For service B1, B2, B3 or B4”
•API classification:
“For service CD”or higher
NOTE
Use of additives is not recommended since
they may reduce the effectiveness of addi-
tives already included in the engine oil. It
may result in failure of the mechanical
assembly.
M05A074A
Automatic transmission fluid*
EM05AEVa
The proper amount of automatic transmis-
sion fluid is essential to the life and opera-
tion of the automatic transmission. Either
insufficient fluid or excessive fluid could
cause transmission trouble. The transmis-
sion fluid filler port cap is equipped with a
dipstick. Use the following procedure to
check the fluid level.
1. Check the fluid level after the vehicle
has been driven enough to warm up the
transmission fluid.
2. Park the vehicle on a flat, level sur-
face and apply the parking brake.
3. With the engine idling and the brake
pedal fully depressed, move the trans-
mission selector lever through all the
positions from the“P”(PARK) to“D”
(DRIVE), stopping momentarily at each
position.4. Move the selector lever to the“N”
(NEUTRAL) or“P”(PARK) position.
5. Remove the dipstick and wipe it with a
clean lint-free cloth.
6. Reinsert the dipstick as far as it goes.
7. Remove dipstick and read the oil level.
The fluid level should always be
between the two marks on the dip-
stick.
8. Use only the following transmission fluid
to ensure optimum transmission
performance:
“DIA QUEEN ATF SP III”.
WARNING
Do not spill the fluid onto a hot
exhaust manifold during topping up
or inspection, or a fire may occur.
Maintenance
9-4Div:
Out put date: