parking brake MITSUBISHI SHOGUN 2017 Owner's Manual (in English)
[x] Cancel search | Manufacturer: MITSUBISHI, Model Year: 2017, Model line: SHOGUN, Model: MITSUBISHI SHOGUN 2017Pages: 394, PDF Size: 19 MB
Page 6 of 394
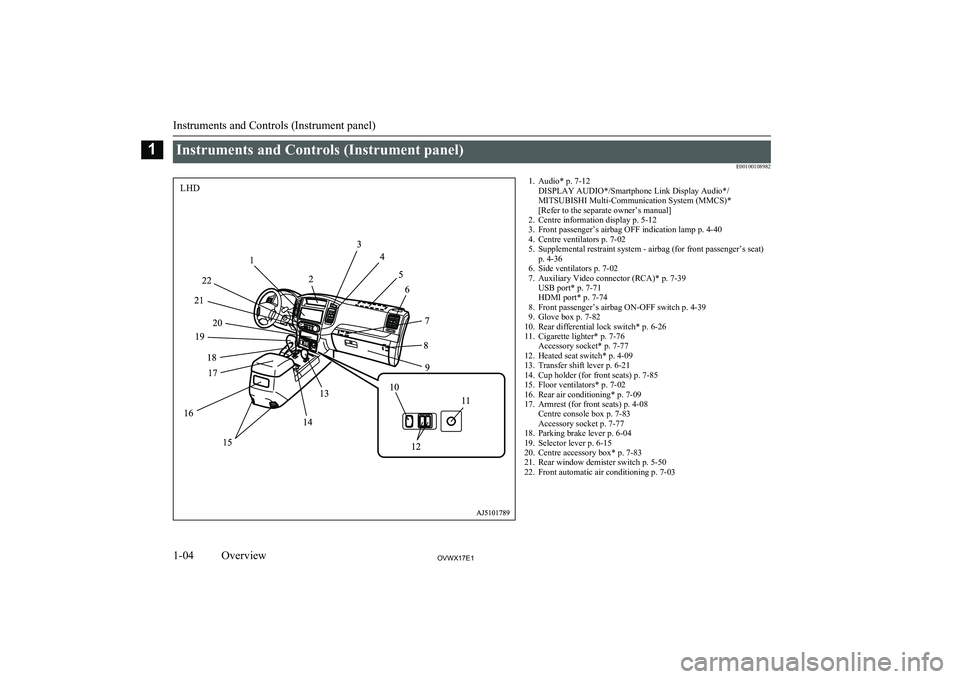
Instruments and Controls (Instrument panel)E001001089821. Audio* p. 7-12DISPLAY AUDIO*/Smartphone Link Display Audio*/
MITSUBISHI Multi-Communication System (MMCS)*
[Refer to the separate owner’s manual]
2. Centre information display p. 5-12
3. Front passenger’s airbag OFF indication lamp p. 4-40
4. Centre ventilators p. 7-02
5. Supplemental restraint system - airbag (for front passenger’s seat) p. 4-36
6. Side ventilators p. 7-02
7. Auxiliary Video connector (RCA)* p. 7-39 USB port* p. 7-71
HDMI port* p. 7-74
8. Front passenger’s airbag ON-OFF switch p. 4-39
9. Glove box p. 7-82
10. Rear differential lock switch* p. 6-26
11. Cigarette lighter* p. 7-76 Accessory socket* p. 7-77
12. Heated seat switch* p. 4-09
13. Transfer shift lever p. 6-21
14. Cup holder (for front seats) p. 7-85
15. Floor ventilators* p. 7-02
16. Rear air conditioning* p. 7-09
17. Armrest (for front seats) p. 4-08 Centre console box p. 7-83
Accessory socket p. 7-77
18. Parking brake lever p. 6-04
19. Selector lever p. 6-15
20. Centre accessory box* p. 7-83
21. Rear window demister switch p. 5-50
22. Front automatic air conditioning p. 7-03
Instruments and Controls (Instrument panel)
1-04OVWX17E1Overview1LHD
Page 7 of 394

1. Audio* p. 7-12DISPLAY AUDIO*/Smartphone Link Display Audio*/
MITSUBISHI Multi-Communication System (MMCS)*
[Refer to the separate owner’s manual]
2. Front automatic air conditioning p. 7-03
3. Rear window demister switch p. 5-50
4. Centre accessory box* p. 7-83
5. Selector lever p. 6-15
6. Parking brake lever p. 6-04
7. Armrest (for front seats) p. 4-08 Centre console box p. 7-83
Accessory socket p. 7-77
8. Rear air conditioning* p. 7-09
9. Floor ventilators* p. 7-02
10. Cup holder (for front seats) p. 7-85
11. Transfer shift lever p. 6-21
12. Cigarette lighter* p. 7-76 Accessory socket* p. 7-77
13. Heated seat switch* p. 4-09
14. Rear differential lock switch* p. 6-26
15. Glove box p. 7-82
16. Front passenger’s airbag ON-OFF switch p. 4-39
17. Auxiliary Video connector (RCA)* p. 7-39 USB port* p. 7-71
HDMI port* p. 7-74
18. Side ventilators p. 7-02
19. Supplemental restraint system - airbag (for front passenger’s seat) p. 4-36
20. Centre ventilators p. 7-02
21. Front passenger’s airbag OFF indication lamp p. 4-40
22. Centre information display p. 5-12
Instruments and Controls (Instrument panel)
1-05OVWX17E1Overview1RHD
Page 98 of 394
CAUTIONlIf the diesel preheat indication lamp comes
on after the engine is started, the engine speed may not rise above the idling speedbecause of fuel freezing. In this case, keep
the engine idling for about ten minutes, then turn off the ignition switch and immediately
turn it on again to confirm that the diesel
preheat indication lamp is off.NOTEl If the engine is cold, the diesel preheat indi-
cation lamp is on for a longer time.
l When the engine has not been started within
about 5 seconds after the diesel preheat indi- cation lamp went out, return the ignition
switch to the “LOCK” position. Then, turn
the switch to the “ON” position to preheat the engine again.
l When the engine is warm, the diesel preheat
indication lamp does not come on even if the
ignition switch is placed in the “ON” posi-
tion.Fuel filter indication lamp (die-
sel-powered vehicles)
E00509901337
This indication lamp illumi-
nates when the ignition
switch is turned to the “ON” position and goes off after
the engine has started. If it lights up while the engine is
running, it indicates that water has accumula-
ted inside the fuel filter; if this happens, re- move the water from the fuel filter. Refer to
“ Removal of water from the fuel filter (die- sel-powered vehicles only) ” on page 8-06.
When the lamp goes out, you can resume
driving. If it either does not go out or comes on from time to time, we recommend you to
have the vehicle inspected.
Warning lamps
E00502400017Brake warning lamp (brake
warning buzzer)
E00502501712
This lamp illuminates when
the ignition switch is turned to the “ON” position, and goes off after a few seconds.
Always make sure that the
lamp goes off before driving.
With the ignition switch in the “ON” posi-
tion, the brake warning lamp illuminates un- der the following conditions:
l When the parking brake lever has been
engaged.
l When the brake fluid level in the reser-
voir falls to a low level.
l When the brake force distribution func-
tion or the brake system is not operating
correctly.Brake warning buzzer
When there is a danger of brake performance
becoming compromised, a buzzer will sound
to alert the driver. If this buzzer should con-
tinue to sound, park your vehicle in a safe place and we recommend you to have itchecked.
NOTEl Depressing the brake pedal repeatedly may
turn on the brake warning lamp, ABS warn-ing lamp and brake warning buzzer. It is
normal if the lamp goes out and the buzzer stops sounding after a few seconds.CAUTIONl In the situations listed below, brake perform-
ance may be compromised or the vehicle may become unstable if brakes are applied
Warning lamps
5-10OVWX17E1Instruments and controls5
Page 99 of 394
CAUTIONsuddenly; consequently, avoid driving athigh speeds or applying the brakes suddenly.
Furthermore, the vehicle should be brought
to a stop in a safe location and to have it checked.
• The brake warning lamp does not illumi-
nate when the parking brake is applied ordoes not turn off when the parking brake
is released.
• The ABS warning lamp and brake warn-
ing lamp illuminate at the same time.
For details, refer to “ABS warning lamp” on page 6-38.
• The brake warning lamp remains illumi-
nated during driving.
• The brake warning buzzer does not turn
off.
l The vehicle should be brought to a halt in
the following manner when brake perform-
ance has deteriorated.
• Depress the brake pedal harder than usual.
Even if the brake pedal moves down to
the very end of its possible stroke, keep it pressed down hard.
• Should the brakes fail, use engine braking
to reduce your speed and pull the parking
brake lever.
Depress the brake pedal to operate the
stop lamp to alert the vehicles behind you.NOTEl In certain cases immediately after the engine
has been started or when the brake pedal is
depressed repeatedly, a noise generated by operation of brake devices may be heard coming from the engine compartment. At
this time, you may feel a shock from the brake pedal if you depress it. This type of
noise or shock is normal and there is no need for concern. In fact, they indicate that the
corresponding devices are operating normal- ly.
l The brake system uses brake fluid pressur-
ized by the pump.
Please refer to “Braking” on page 6-35.Check engine warning lamp
E00502603052
This lamp is a part of an on-
board diagnostic system
which monitors the emis-
sions, engine control system or automatic transmission
control systems.
If a problem is detected in one of these sys-
tems, this lamp illuminates.
Although your vehicle will usually be driva-
ble and not need towing, we recommend you to have the system checked as soon as possi-
ble.
[Vehicles to comply with the Euro 4 regula-
tion]
This lamp will also illuminate for a few sec-
onds when the ignition switch is turned to the
“ON” position. If it does not go off after a few seconds, we recommend you to have the vehicle checked.
[Vehicles to comply with the Euro 5 and Eu-
ro 6]
This lamp will also illuminate when the igni-
tion switch is turned “ON”, and goes off after the engine has started. If it does not go off af- ter the engine has started, we recommend youto have the system checked.CAUTIONl Prolonged driving with this lamp on may
cause further damage to the emission control system. It could also affect fuel economy
and drivability.
l If the lamp does not illuminate when the ig-
nition switch is turned to the “ON” position,
we recommend you to have the system
checked.
l If the lamp illuminates while the engine is
running, avoid driving at high speeds and we recommend you to have the system checked.
Accelerator pedal and brake pedal response may be negatively influenced under these
conditions.
Warning lamps
5-11OVWX17E1Instruments and controls5
Page 139 of 394
Economical driving............................................................................. 6-02
Driving, alcohol and drugs.................................................................. 6-02
Safe driving techniques....................................................................... 6-03
Running-in recommendations............................................................. 6-04 Parking brake...................................................................................... 6-04
Parking................................................................................................ 6-05
Steering wheel height adjustment....................................................... 6-06
Inside rear-view mirror....................................................................... 6-07 Outside rear-view mirrors................................................................... 6-08
Ignition switch.....................................................................................6-10 Steering wheel lock............................................................................. 6-12
Starting................................................................................................ 6-12 NOx trap catalyst (dieselpowered vehicles)*......................................6-14
Diesel particulate filter (DPF)*........................................................... 6-14 Automatic transmission INVECS-II Sports Mode 5A/T (Intelligent & Innovative Vehicle Electronic Control System II)...6-15
Super select 4WD II (SS4 II).............................................................. 6-21
Rear differential lock*........................................................................ 6-26 4-wheel drive operation...................................................................... 6-30
Inspection and maintenance following rough road operation............. 6-33
Cautions on handling of 4-wheel drive vehicles................................. 6-33
Braking................................................................................................ 6-35
Brake assist system............................................................................. 6-36
Anti-lock brake system (ABS)............................................................ 6-37
Power steering system.........................................................................6-39
Active stability & traction control (ASTC).........................................6-40
Cruise control*.................................................................................... 6-44
Tyre pressure monitoring system (TPMS)*........................................ 6-48 Reversing sensor system*................................................................... 6-52Rear-view camera*............................................................................. 6-56
Cargo loads......................................................................................... 6-59Trailer towing......................................................................................6-60Starting and driving
OVWX17E16
Page 142 of 394
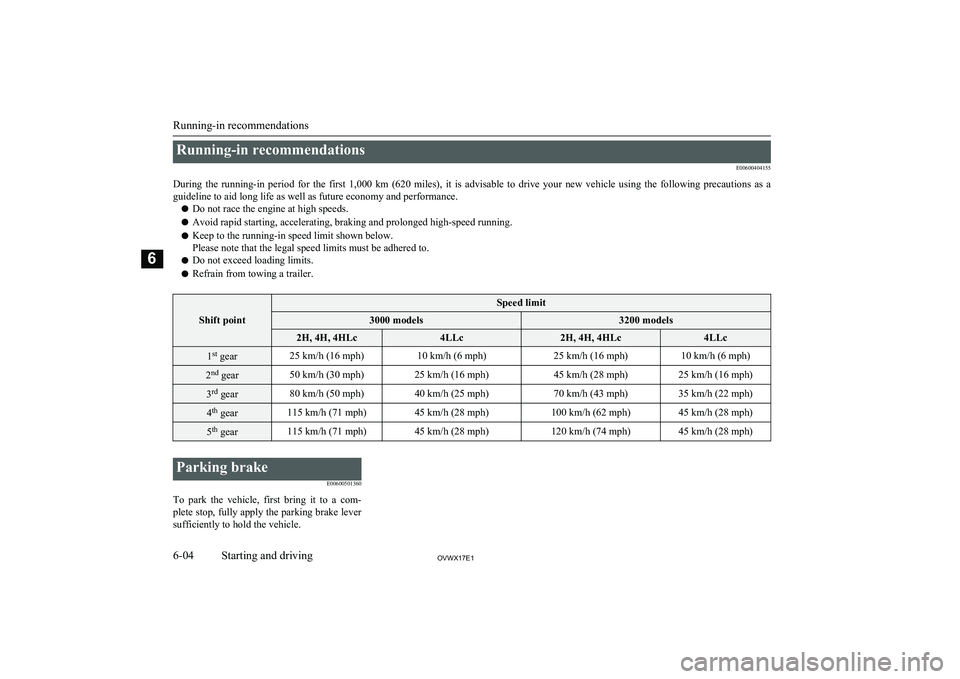
Running-in recommendationsE00600404155
During the running-in period for the first 1,000 km (620 miles), it is advisable to drive your new vehicle using the following precautions as a guideline to aid long life as well as future economy and performance.
l Do not race the engine at high speeds.
l Avoid rapid starting, accelerating, braking and prolonged high-speed running.
l Keep to the running-in speed limit shown below.
Please note that the legal speed limits must be adhered to.
l Do not exceed loading limits.
l Refrain from towing a trailer.
Shift point
Speed limit3000 models3200 models2H, 4H, 4HLc4LLc2H, 4H, 4HLc4LLc1st
gear25 km/h (16 mph)10 km/h (6 mph)25 km/h (16 mph)10 km/h (6 mph)2nd
gear50 km/h (30 mph)25 km/h (16 mph)45 km/h (28 mph)25 km/h (16 mph)3rd
gear80 km/h (50 mph)40 km/h (25 mph)70 km/h (43 mph)35 km/h (22 mph)4th
gear115 km/h (71 mph)45 km/h (28 mph)100 km/h (62 mph)45 km/h (28 mph)5th
gear115 km/h (71 mph)45 km/h (28 mph)120 km/h (74 mph)45 km/h (28 mph)
Parking brake
E00600501360
To park the vehicle, first bring it to a com- plete stop, fully apply the parking brake leversufficiently to hold the vehicle.
Running-in recommendations
6-04OVWX17E1Starting and driving6
Page 143 of 394

To apply the parking brake
1- Firmly depress and hold the brake pedal,then pull the lever up without pushing
the button at the end of hand grip.
CAUTIONl When you intend to apply the parking brake,
firmly press the brake pedal to bring the ve-hicle to a complete stop before pulling theparking brake lever. Pulling the parking brake lever with the vehicle moving could
make the rear wheels lock up, thereby mak- ing the vehicle unstable. It could also make
the parking brake malfunction.NOTEl Apply sufficient force to the parking brake
lever to hold the vehicle stationary after the foot brake is released.NOTEl If the parking brake does not hold the vehi-
cle stationary after the foot brake is released,
have your vehicle checked immediately.
To release the parking brake
1- Firmly depress and hold the brake pedal,
then pull the lever up slightly.
2- Push the button at the end of hand grip.
3- Lower the lever fully.
CAUTIONl Before driving, be sure that the parking
brake is fully released and brake warning
lamp is off.
If a vehicle is driven without releasing the
parking brake, the brake will be overheated, resulting in ineffective braking and possible
brake failure.CAUTIONl If the brake warning lamp does not extin-
guish when the parking brake is fully re- leased, the brake system may be abnormal.
Have your vehicle checked immediately.
For details, refer to “Brake warning lamp” on page 5-10.Parking
E00600602791
To park the vehicle, fully engage the parkingbrake, and then set the selector lever to the
“P” (PARK) position.
Parking on a hill
To prevent the vehicle from rolling, followthese procedures:
Parking on a downhill slope
Turn the front wheels towards the kerb andmove the vehicle forward until the kerb side wheel gently touches the kerb.
Apply the parking brake and place the selec- tor lever into the “P” (PARK) position.
If necessary, apply chocks to wheels.
Parking on an uphill slope
Turn the front wheels away from the kerb and move the vehicle back until the kerb side
wheel gently touches the kerb.
Parking
6-05OVWX17E1Starting and driving6
Page 144 of 394
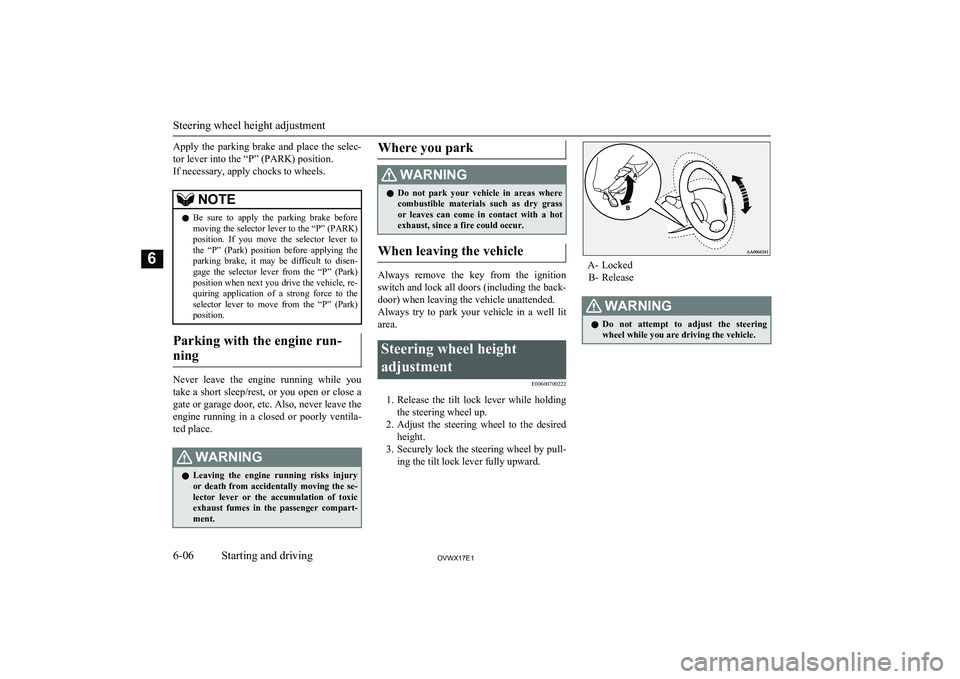
Apply the parking brake and place the selec-tor lever into the “P” (PARK) position.
If necessary, apply chocks to wheels.NOTEl Be sure to apply the parking brake before
moving the selector lever to the “P” (PARK)
position. If you move the selector lever to the “P” (Park) position before applying the
parking brake, it may be difficult to disen-
gage the selector lever from the “P” (Park) position when next you drive the vehicle, re-quiring application of a strong force to the
selector lever to move from the “P” (Park) position.
Parking with the engine run-
ning
Never leave the engine running while you
take a short sleep/rest, or you open or close a gate or garage door, etc. Also, never leave the
engine running in a closed or poorly ventila-
ted place.
WARNINGl Leaving the engine running risks injury
or death from accidentally moving the se- lector lever or the accumulation of toxic
exhaust fumes in the passenger compart-
ment.Where you parkWARNINGl Do not park your vehicle in areas where
combustible materials such as dry grass
or leaves can come in contact with a hot exhaust, since a fire could occur.
When leaving the vehicle
Always remove the key from the ignition
switch and lock all doors (including the back-
door) when leaving the vehicle unattended. Always try to park your vehicle in a well lit area.
Steering wheel height
adjustment E00600700222
1.Release the tilt lock lever while holding
the steering wheel up.
2. Adjust the steering wheel to the desired
height.
3. Securely lock the steering wheel by pull-
ing the tilt lock lever fully upward.
A- Locked
B- Release
WARNINGl Do not attempt to adjust the steering
wheel while you are driving the vehicle.
Steering wheel height adjustment
6-06OVWX17E1Starting and driving6
Page 150 of 394
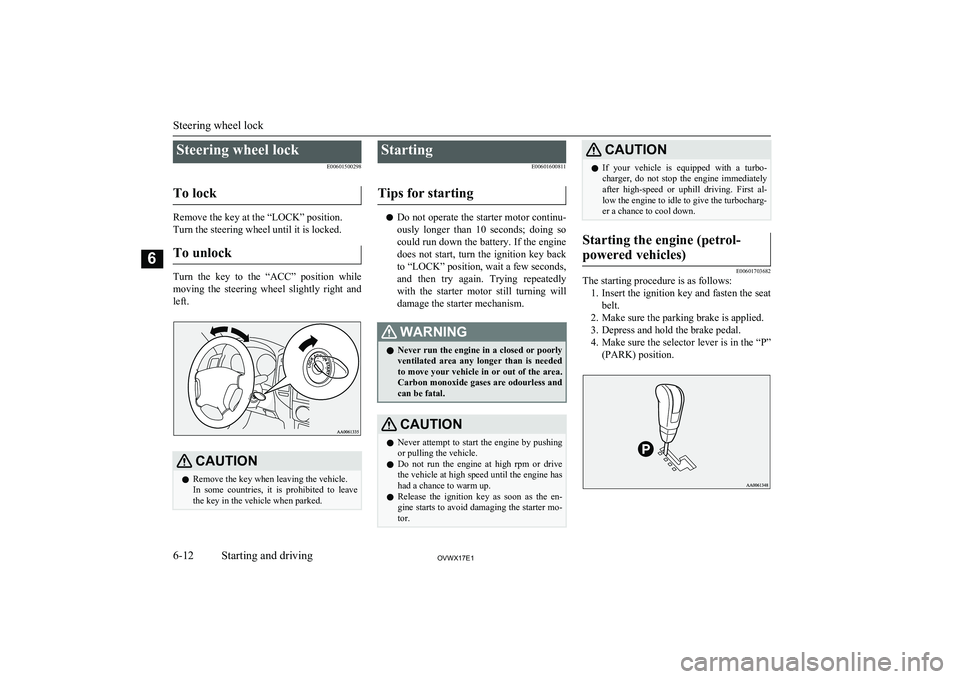
Steering wheel lockE00601500298
To lock
Remove the key at the “LOCK” position.
Turn the steering wheel until it is locked.
To unlock
Turn the key to the “ACC” position while
moving the steering wheel slightly right and left.
CAUTIONl Remove the key when leaving the vehicle.
In some countries, it is prohibited to leave the key in the vehicle when parked.Starting
E00601600811
Tips for starting
l Do not operate the starter motor continu-
ously longer than 10 seconds; doing so
could run down the battery. If the engine
does not start, turn the ignition key back to “LOCK” position, wait a few seconds,and then try again. Trying repeatedly with the starter motor still turning will
damage the starter mechanism.
WARNINGl Never run the engine in a closed or poorly
ventilated area any longer than is needed to move your vehicle in or out of the area.Carbon monoxide gases are odourless and
can be fatal.CAUTIONl Never attempt to start the engine by pushing
or pulling the vehicle.
l Do not run the engine at high rpm or drive
the vehicle at high speed until the engine has had a chance to warm up.
l Release the ignition key as soon as the en-
gine starts to avoid damaging the starter mo-
tor.CAUTIONl If your vehicle is equipped with a turbo-
charger, do not stop the engine immediately
after high-speed or uphill driving. First al-
low the engine to idle to give the turbocharg-
er a chance to cool down.Starting the engine (petrol-
powered vehicles)
E00601703682
The starting procedure is as follows: 1. Insert the ignition key and fasten the seat
belt.
2. Make sure the parking brake is applied.
3. Depress and hold the brake pedal.
4. Make sure the selector lever is in the “P”
(PARK) position.
Steering wheel lock
6-12OVWX17E1Starting and driving6
Page 151 of 394
5.After turning the ignition key to the
“ON” position, make certain that all
warning lamps are functioning properly before starting the engine.
6. Turn the ignition key to the “START”
position without depressing the accelera-
tor pedal, and release it when the engine starts.NOTEl A ticking noise may be heard after starting
the engine. This is not an abnormal condi-tion. The noise will disappear after a shorttime of engine running.
If the ticking noise continues after the en-
gine is warmed up, we recommend you to have your vehicle checked.
When it is difficult to start the
engine
After several attempts, you may experience that the engine still does not start. 1. Make sure that all electric devices, such
as lamps, air conditioning blower and
rear window demister, are turned off.
2. While depressing the brake pedal, press
the accelerator pedal halfway and hold it
there, then crank the engine. Release the
accelerator pedal, immediately after the
engine starts.
3. If the engine still will not start, the en-
gine could be flooded with too much
petrol. While depressing the brake pedal, push the accelerator pedal all the way
down and hold it there, then crank the
engine for 5 to 6 seconds. Return the ig- nition switch to the “LOCK” position
and release the accelerator pedal. Wait a few seconds, and then crank the engine
again for 5 to 6 seconds while depress-
ing the brake pedal, but do not push the accelerator pedal. Release the ignition
key if the engine starts. If the engine
fails to start, repeat these procedures. If the engine still will not start, we recom-
mend you to have the vehicle checked.
Using the MIVEC engine
The MIVEC engine automatically switches its intake-valve control between a low-speed mode and a high-speed mode in accordancewith the driving conditions for maximum en-
gine performance.
NOTEl To protect the engine, the high-speed mode
may not be selected while the engine coolanttemperature is low. In such a case, the en-
gine revolutions do not rise to over
5,000 rpm even if the accelerator pedal is depressed.Starting the engine (diesel-
powered vehicles)
E00601801331
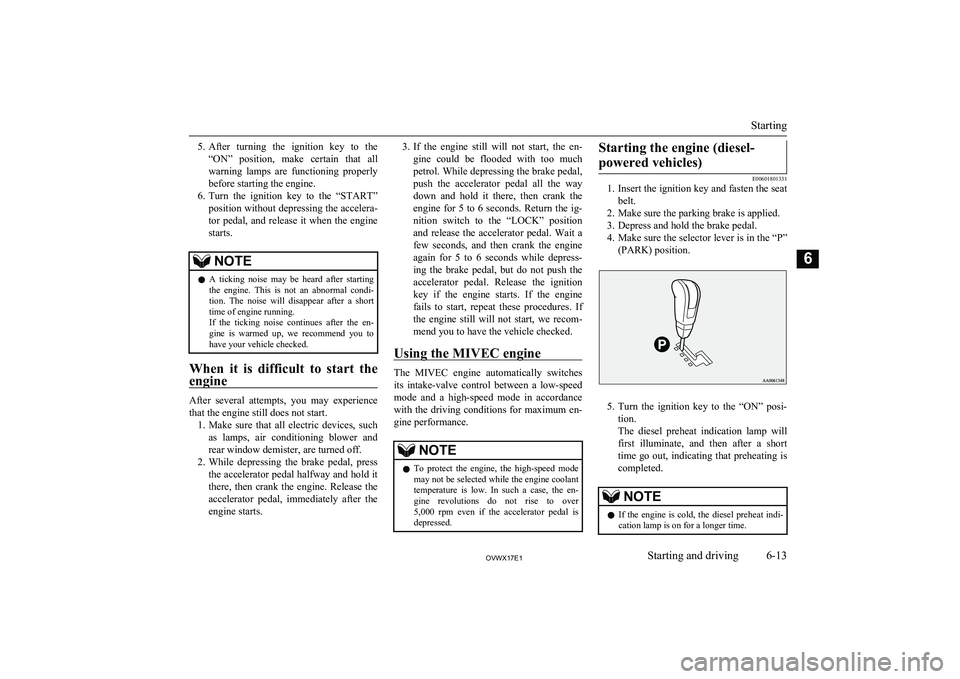
1. Insert the ignition key and fasten the seat
belt.
2. Make sure the parking brake is applied.
3. Depress and hold the brake pedal.
4. Make sure the selector lever is in the “P”
(PARK) position.
5. Turn the ignition key to the “ON” posi-
tion.
The diesel preheat indication lamp will
first illuminate, and then after a short
time go out, indicating that preheating is completed.
NOTEl If the engine is cold, the diesel preheat indi-
cation lamp is on for a longer time.
Starting
6-13OVWX17E1Starting and driving6