MITSUBISHI TRITON 1997 Workshop Manual
TRITON 1997
MITSUBISHI
MITSUBISHI
https://www.carmanualsonline.info/img/19/57346/w960_57346-0.png
MITSUBISHI TRITON 1997 Workshop Manual
Trending: belt, brakes, service, wheel, speakers, cooling, instrument panel
Page 201 of 1310
O
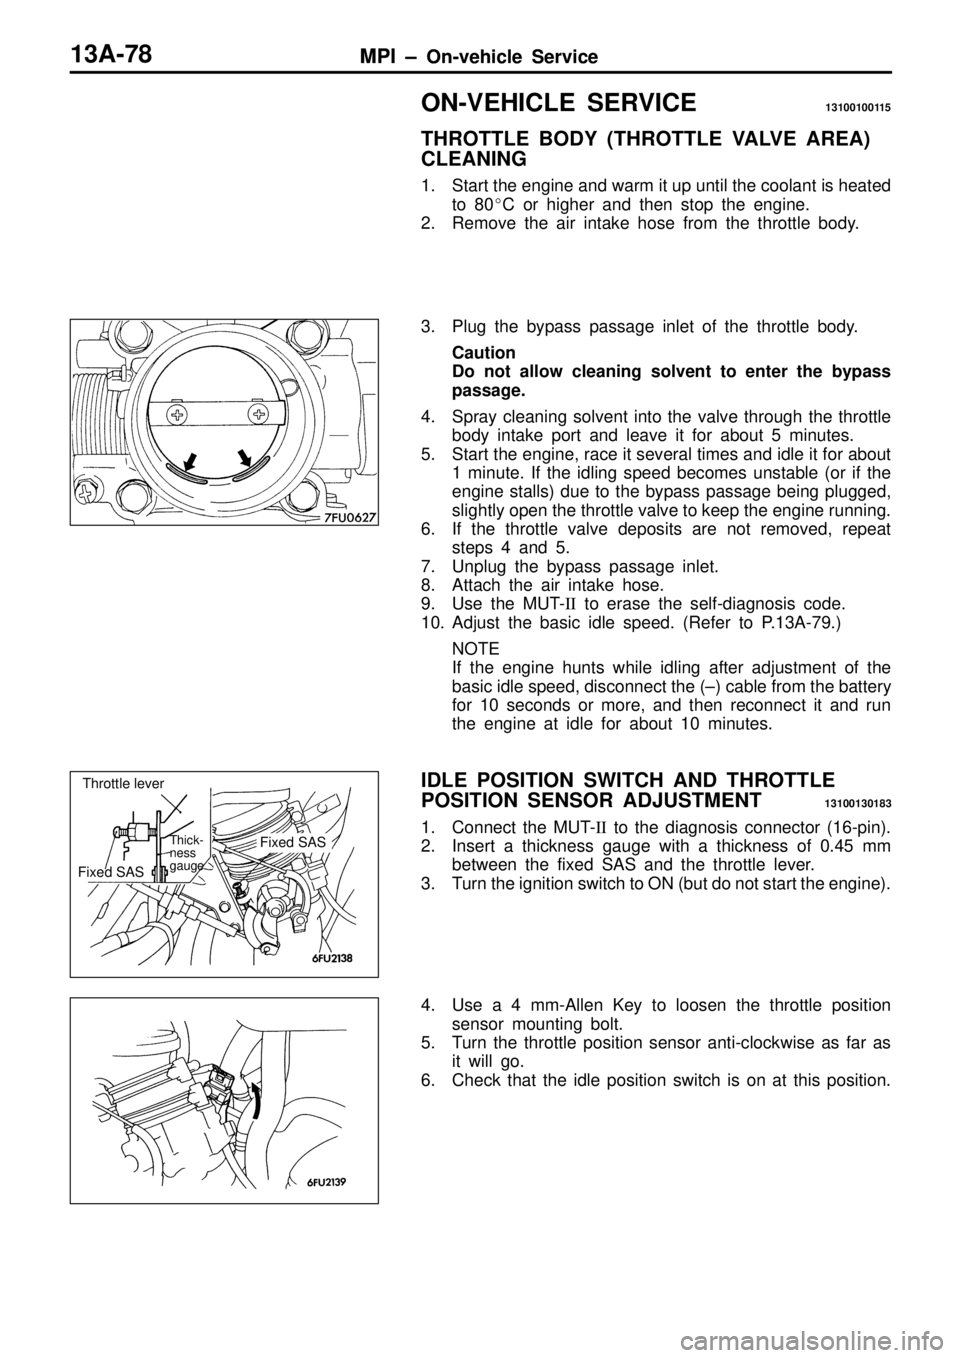
N-V EH IC LE S ER VIC E 1310010011 5
T H RO TTLE B O DY ( T H RO TTLE V A LV E A REA )
C LE A NIN G
1 . Sta rt th e e ngin e a nd w arm it u p u ntil th e c o ola nt is h eate d
t o 8 0 �C o r h ig her a nd th en s to p th e e ngin e.
2 . Rem ove th e a ir in ta ke h ose fr o m th e th ro ttle b ody.
3 . Plu g th e b yp ass p assa ge in le t o f th e th ro ttle b ody.
C au tio n
D o n ot a llo w c le an in g s o lv en t t o e n te r t h e b yp ass
p assag e.
4 . Spra y c le anin g s o lv e nt in to th e v a lv e th ro ugh th e th ro ttle
b ody in ta ke p ort a nd le ave it fo r a bout 5 m in ute s.
5 . Sta rt th e e ngin e, r a ce it s e ve ra l tim es a nd id le it fo r a bout
1 m in ute . If th e id lin g s p eed b eco m es u nsta ble ( o r if th e
e ngin e s ta lls ) d ue to th e b yp ass p assa ge b ein g p lu gged,
s lig htly o pen th e th ro ttle v a lv e to k e ep th e e ngin e r u nnin g.
6 . If th e th ro ttle v a lv e d eposit s a re n ot r e m ove d, r e peat
s te ps 4 a nd 5 .
7 . Unplu g th e b yp ass p assa ge in le t.
8 . Atta ch th e a ir in ta ke h ose .
9 . Use th e M UT-II to e ra se th e s e lf - d ia gnosis c o de.
1 0. Adju st th e b asic id le s p eed. ( R efe r to P .1 3A -7 9.)
N O TE
I f th e e ngin e h unts w hile id lin g a fte r a dju stm ent o f th e
b asic id le s p eed, d is co nnect th e ( ± ) c a ble fr o m th e b atte ry
f o r 1 0 s e co nds o r m ore , a nd th en r e co nnect it a nd r u n
t h e e ngin e a t id le fo r a bout 1 0 m in ute s.
I D LE P O SIT IO N S W IT C H A ND T H RO TTLE
P O SIT IO N S EN SO R A DJU STM EN T 1
3100130183
1 . Connect th e M UT-II to th e d ia gnosis c o nnecto r ( 1 6-p in ).
2 . In se rt a th ic kn ess g auge w it h a th ic kn ess o f 0 .4 5 m m
b etw een th e fix e d S AS a nd th e th ro ttle le ve r.
3 . Turn th e ig nit io n s w it c h to O N ( b ut d o n ot s ta rt th e e ngin e).
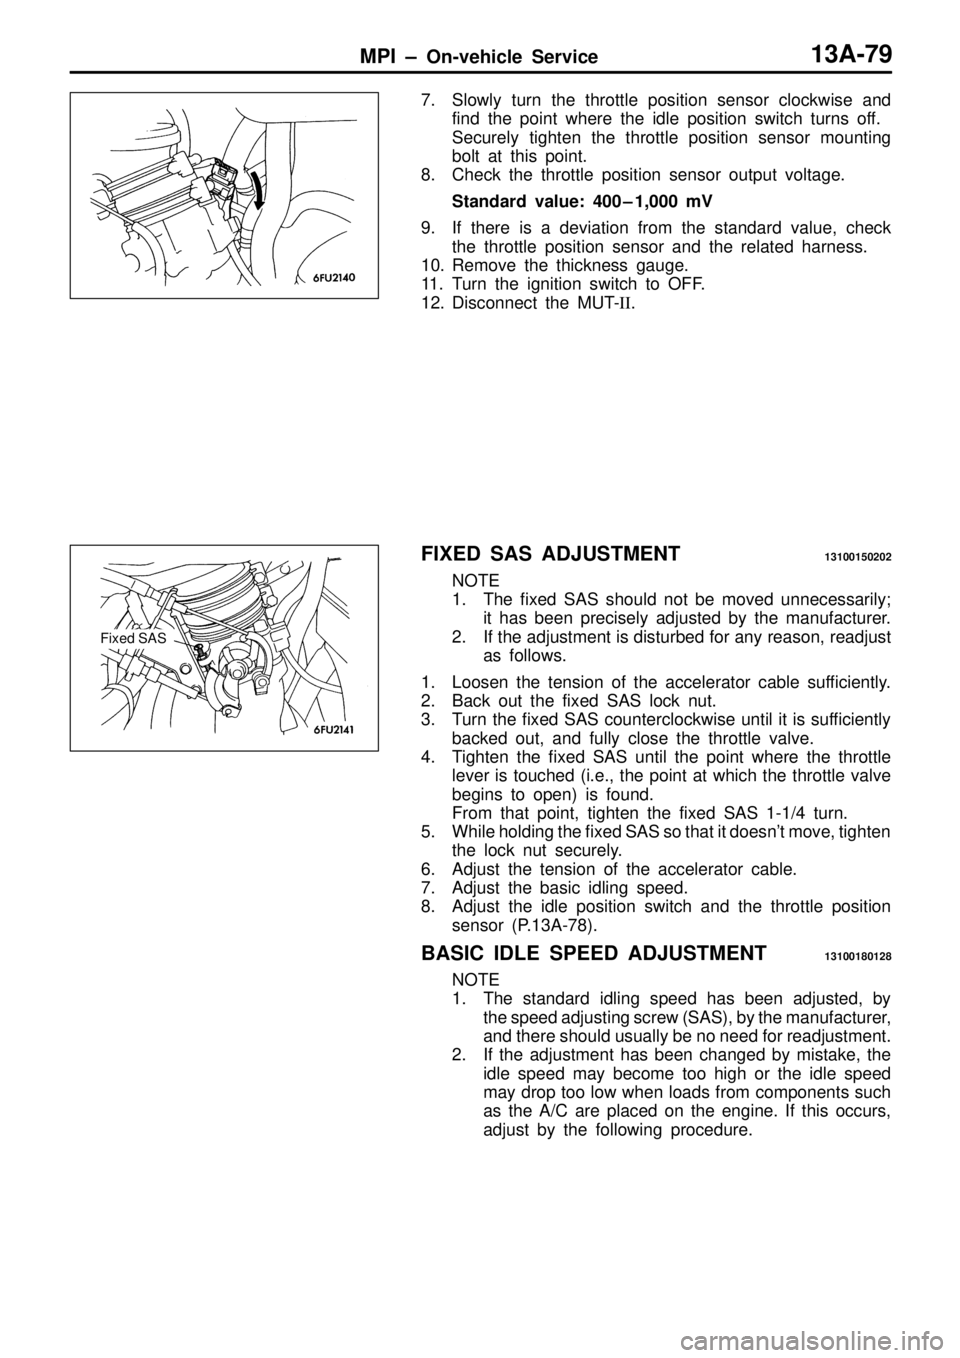
4 . Use a 4 m m-A lle n K ey to lo ose n th e th ro ttle p osit io n
s e nso r m ountin g b olt .
5 . Turn th e th ro ttle p osit io n s e nso r a nti- c lo ckw is e a s fa r a s
i t w ill g o.
6 . Check th at th e id le p osit io n s w it c h is o n a t th is p osit io n.
Page 202 of 1310
Page 203 of 1310
I
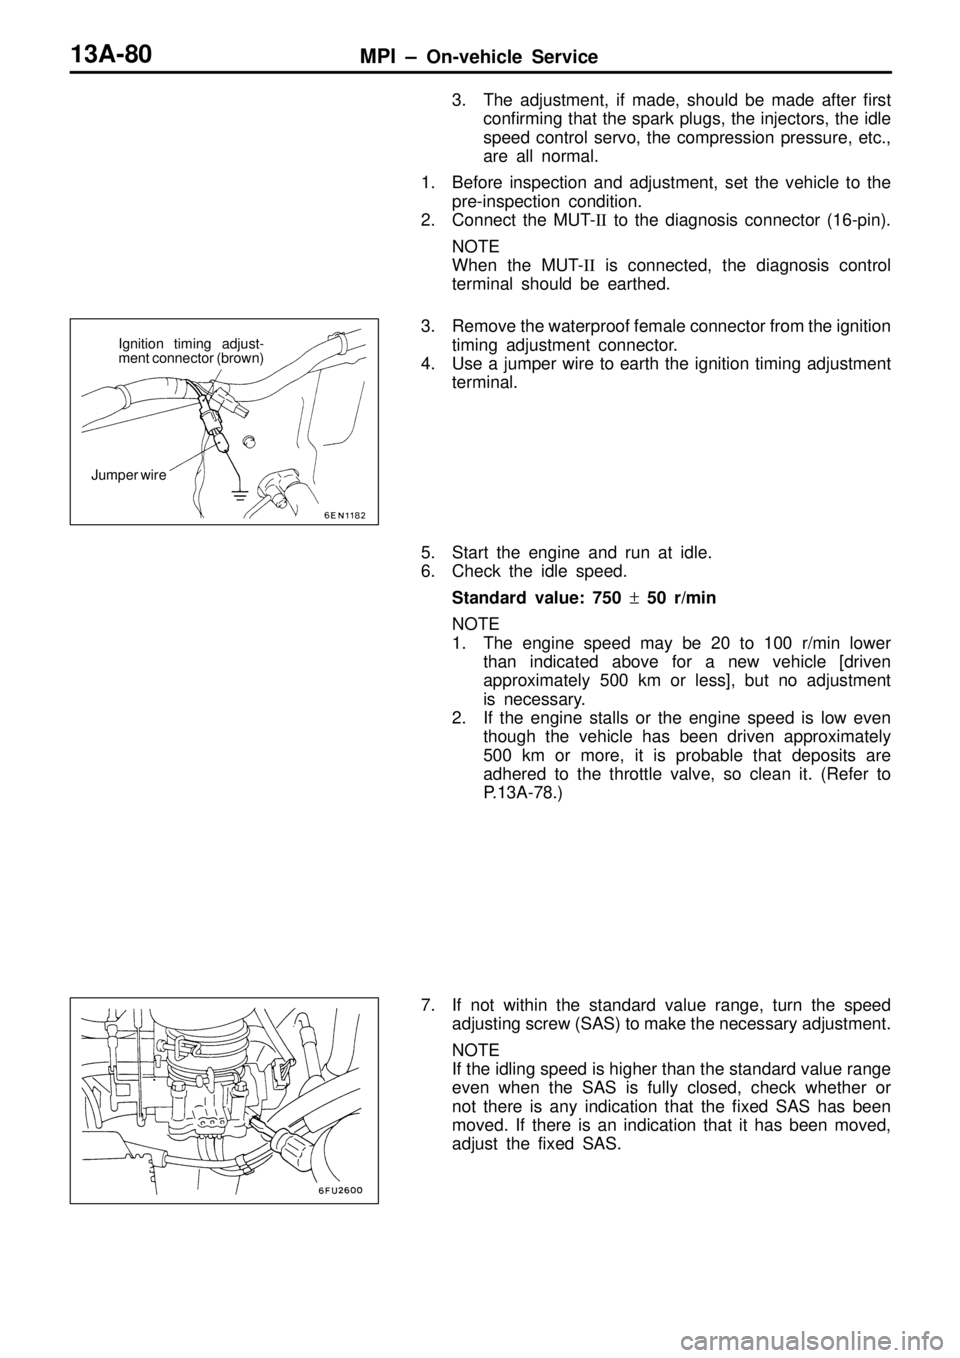
g nit io n tim in g a dju st-
m ent c o nnecto r ( b ro w n)
Page 204 of 1310
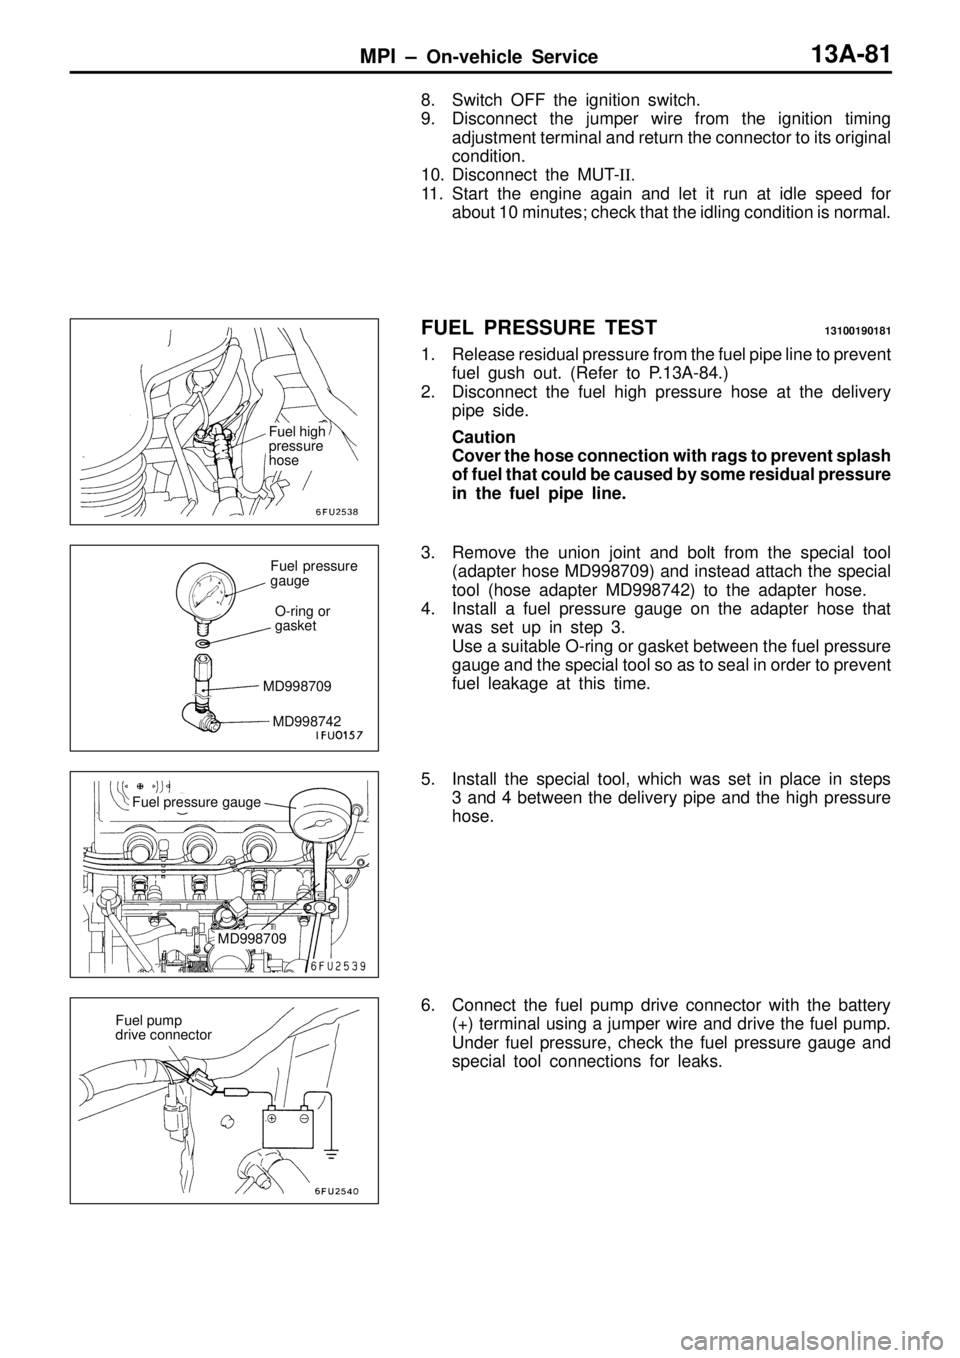
F
uel p re ssu re
g auge
O -rin g o r
g aske t
M D998709
M D998742 F
uel p re ssu re g auge M
D998709 F
uel p um p
d riv e c o nnecto r
Page 205 of 1310
P
ro bable c a use R
em edy r
e ssu re dro s
afte r ra cin g C
lo gged fu el filt e r R
epla ce fu el filt e r r
e ssu re d
ro s a
fte r r
a cin g F
uel le akin g to r e tu rn s id e d ue to p oor
f u el r e gula to r v a lv e s e atin g o r s e ttle d
s p rin g R
epla ce fu el p re ssu re r e gula to r L
ow fu el p um p d eliv e ry p re ssu re R
epla ce fu el p um p F
uel p re ssu re to o h ig h B
in din g v a lv e in fu el p re ssu re
r e gula to r R
epla ce fu el p re ssu re r e gula to r C
lo gged fu el r e tu rn h ose o r p ip e C
le an o r r e pla ce h ose o r p ip e S
am e fu el p re ssu re w hen v a cu um
h ose is c o nnecte d a nd w hen
d is co nnecte d D
am aged v a cu um h ose o r c lo gged
n ip ple R
epla ce v a cu um h ose o r c le an n ip ple
Page 206 of 1310
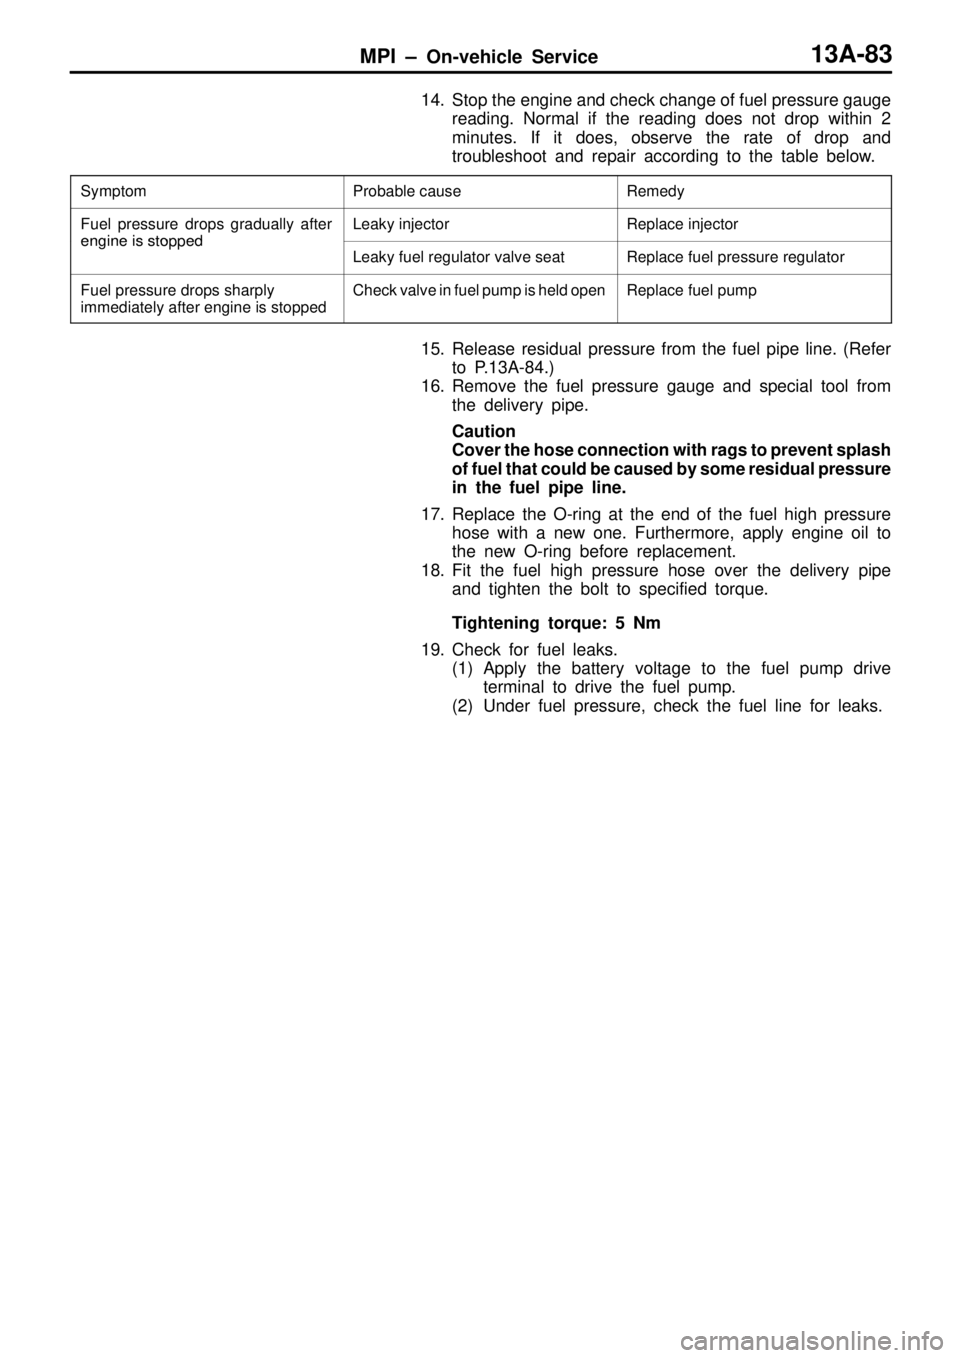
MPI ± On-vehicle Service13A-83
14. Stop the engine and check change of fuel pressure gauge
reading. Normal if the reading does not drop within 2
minutes. If it does, observe the rate of drop and
troubleshoot and repair according to the table below.
SymptomProbable causeRemedy
Fuel pressure drops gradually after
engine is stopped
Leaky injectorReplace injector
engine is sto ed
Leaky fuel regulator valve seatReplace fuel pressure regulator
Fuel pressure drops sharply
immediately after engine is stoppedCheck valve in fuel pump is held openReplace fuel pump
15. Release residual pressure from the fuel pipe line. (Refer
to P.13A-84.)
16. Remove the fuel pressure gauge and special tool from
the delivery pipe.
Caution
Cover the hose connection with rags to prevent splash
of fuel that could be caused by some residual pressure
in the fuel pipe line.
17. Replace the O-ring at the end of the fuel high pressure
hose with a new one. Furthermore, apply engine oil to
the new O-ring before replacement.
18. Fit the fuel high pressure hose over the delivery pipe
and tighten the bolt to specified torque.
Tightening torque: 5 Nm
19. Check for fuel leaks.
(1) Apply the battery voltage to the fuel pump drive
terminal to drive the fuel pump.
(2) Under fuel pressure, check the fuel line for leaks.
Page 207 of 1310
Page 208 of 1310
S
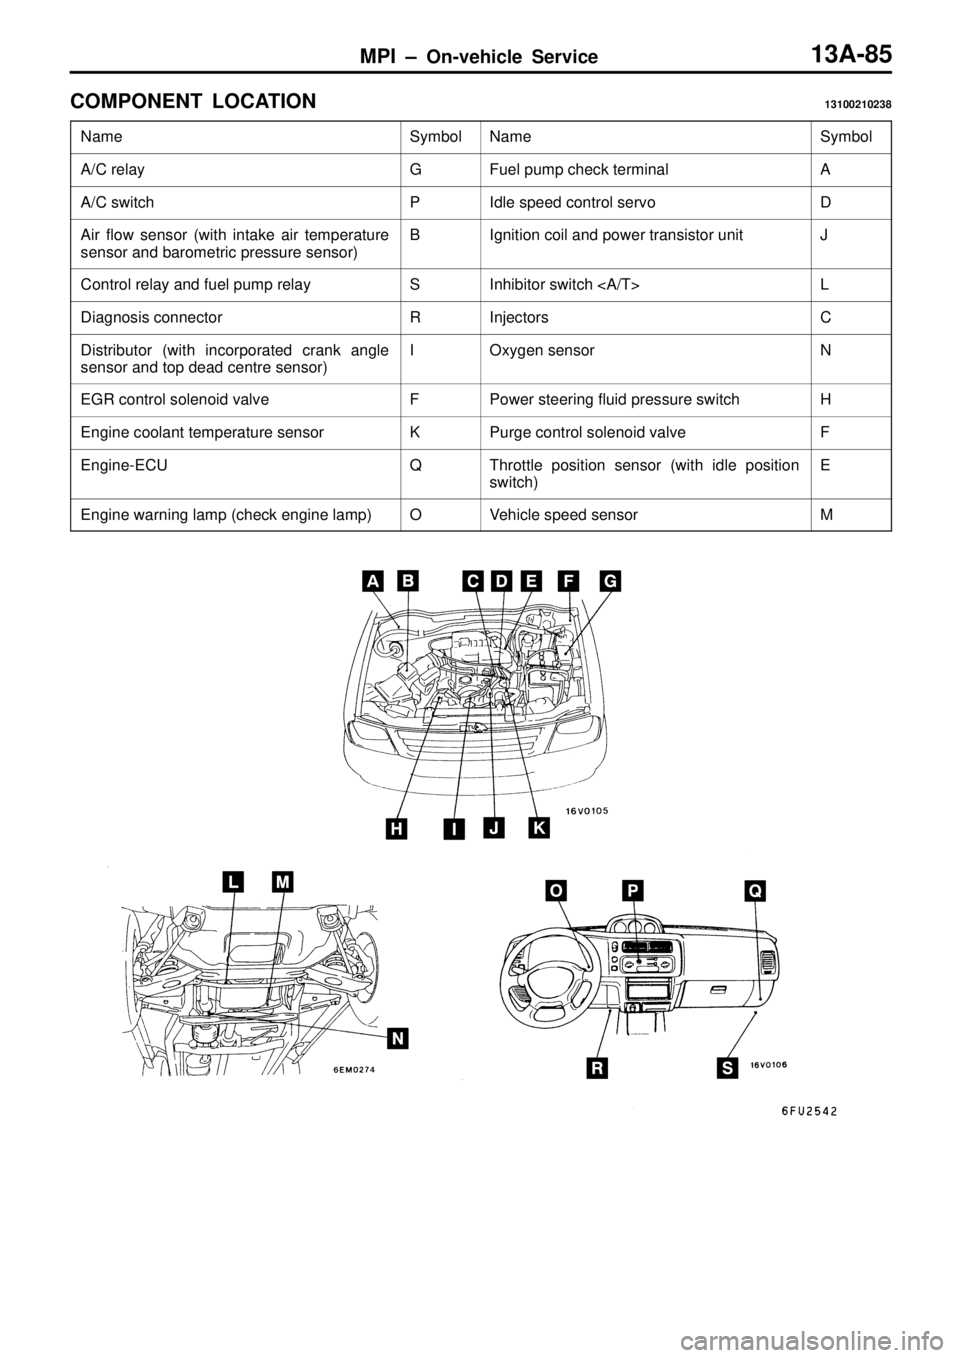
ym bol N
am e S
ym bol A
/C r e la y G F
uel p um p c h eck te rm in al A
A
/C s w it c h P I
d le s p eed c o ntr o l s e rv o D
A
ir flo w s e nso r ( w it h in ta ke a ir te m pera tu re
s e nso r a nd b aro m etr ic p re ssu re s e nso r) B I
g nit io n c o il a nd p ow er tr a nsis to r u nit J
C
ontr o l r e la y a nd fu el p um p r e la y S I
n hib it o r s w it c h < A /T > L
D
ia gnosis c o nnecto r R I
n je cto rs C
D
is tr ib uto r ( w it h in co rp ora te d c ra nk a ngle
s e nso r a nd to p d ead c e ntr e s e nso r) I O
xyg en s e nso r N
E
G R c o ntr o l s o le noid v a lv e F P
ow er s te erin g flu id p re ssu re s w it c h H
E
ngin e c o ola nt te m pera tu re s e nso r K P
urg e c o ntr o l s o le noid v a lv e F
E
ngin e-E C U Q T
hro ttle p osit io n s e nso r ( w it h id le p osit io n
s w it c h ) E
E
ngin e w arn in g la m p ( c h eck e ngin e la m p) O V
ehic le s p eed s e nso r M
Page 209 of 1310
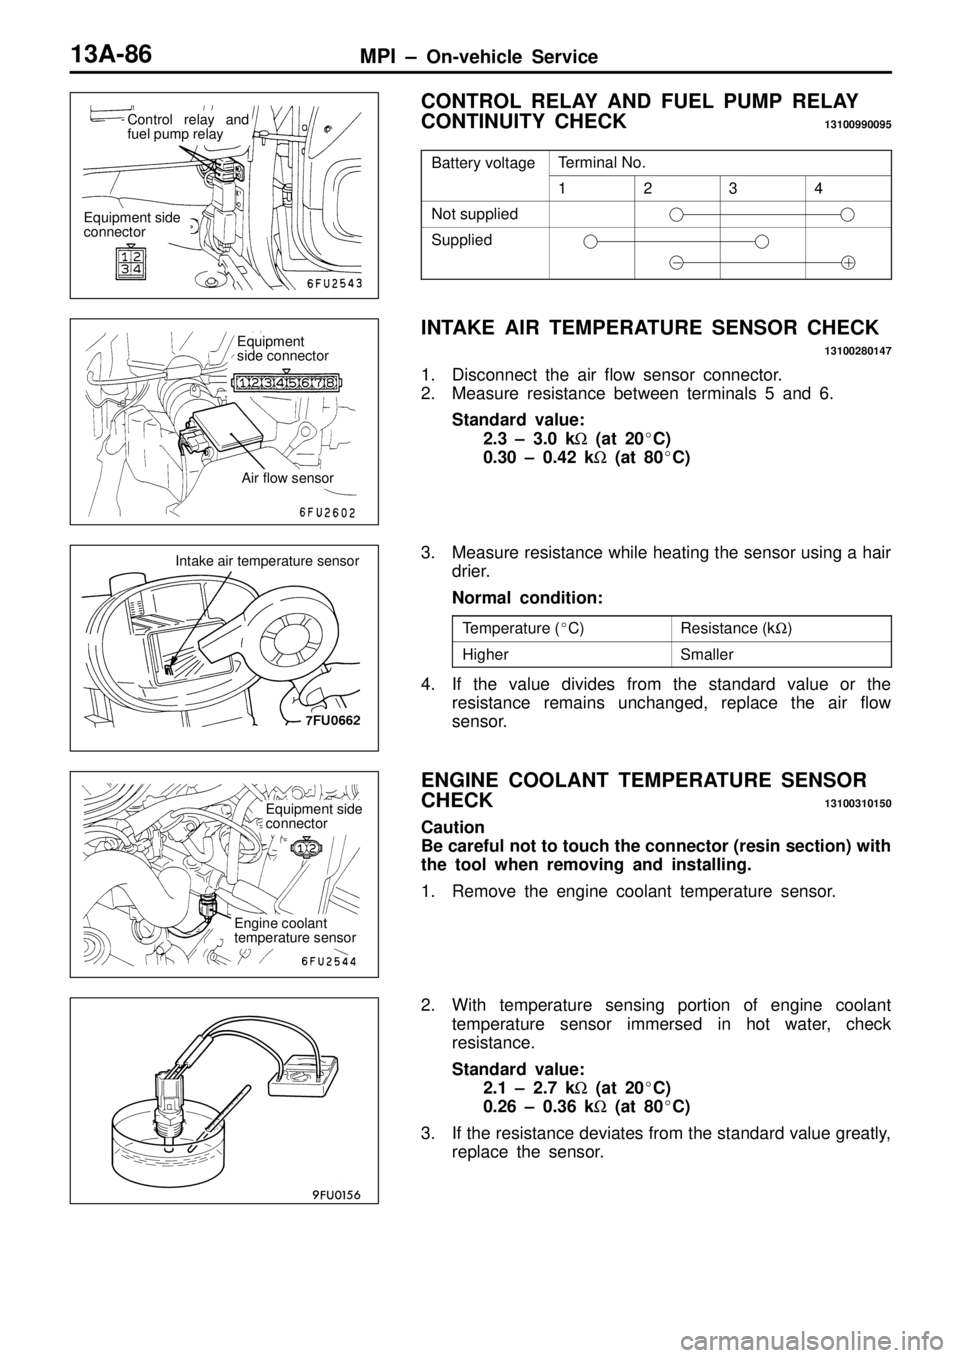
T
e rm in al N o. 1 2 3 4
N
ot s u pplie d S
upplie d R
esis ta nce ( k W ) H
ig her S
m alle r C
ontr o l r e la y a nd
f u el p um p r e la y A
ir flo w s e nso r E
quip m ent
s id e c o nnecto r I
n ta ke a ir te m pera tu re s e nso r E
quip m ent s id e
c o nnecto r E
ngin e c o ola nt
t e m pera tu re s e nso r
Page 210 of 1310
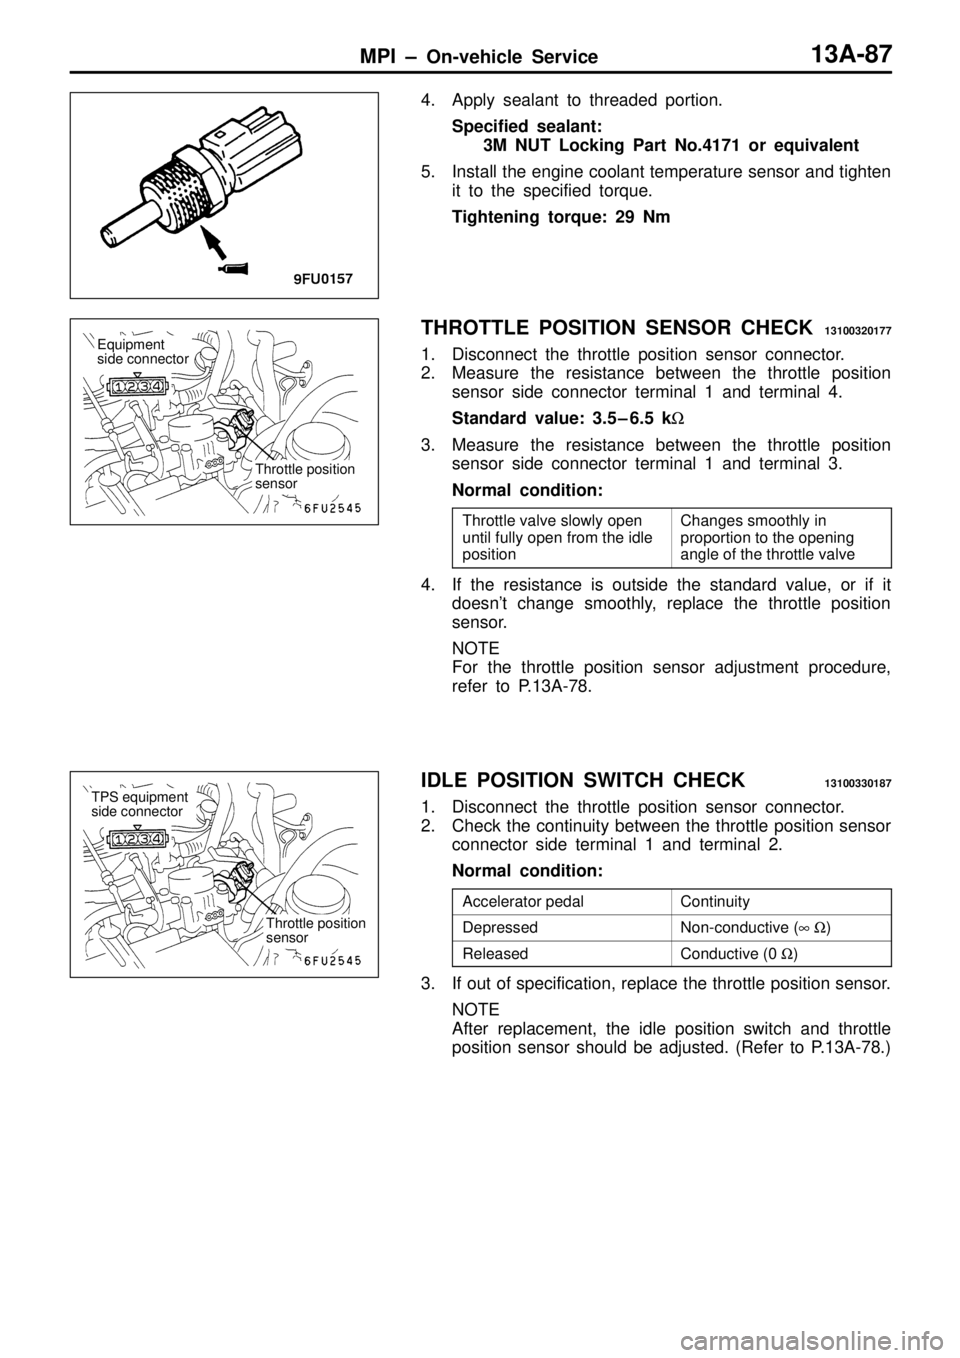
C
hanges s m ooth ly in
p ro portio n to th e o penin g
a ngle o f th e th ro ttle v a lv e C
ontin uit y D
epre sse d N
on-c o nductiv e ( 8 W ) R
ele ase d C
onductiv e ( 0 W ) T
hro ttle p osit io n
s e nso r T
P S e quip m ent
s id e c o nnecto r T
hro ttle p osit io n
s e nso r
Trending: phone, reset, oil level, brake light, sensor, fuel type, transmission fluid

