ignition MITSUBISHI TRITON 2011 Workshop Manual
[x] Cancel search | Manufacturer: MITSUBISHI, Model Year: 2011, Model line: TRITON, Model: MITSUBISHI TRITON 2011Pages: 369, PDF Size: 26.15 MB
Page 178 of 369
To deactivate
E00609701088
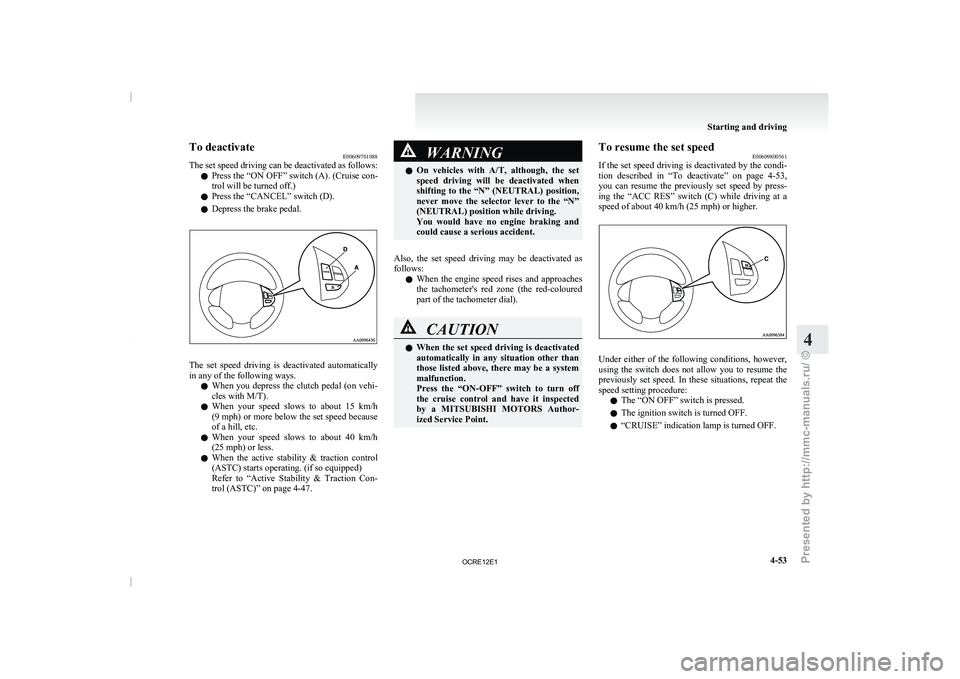
The set speed driving can
be deactivated as follows:
l Press the “ON OFF” switch (A). (Cruise con-
trol will be turned off.)
l Press the “CANCEL” switch (D).
l Depress the brake pedal. The set speed driving is deactivated automatically
in any of the following ways.
l When you depress the
clutch
pedal (on vehi-
cles with M/T).
l When your speed slows to about 15 km/h
(9 mph) or more below the set speed because
of a hill, etc.
l When your speed slows to about 40 km/h
(25 mph) or less.
l When the active stability & traction control
(ASTC) starts operating. (if so equipped)
Refer to “Active Stability & Traction Con-
trol (ASTC)” on page 4-47. WARNING
l On vehicles with A/T, although,
the set
speed driving will be deactivated when
shifting to the “N” (NEUTRAL) position,
never move the selector lever to the “N”
(NEUTRAL) position while driving.
You would have no engine braking and
could cause a serious accident.
Also, the set speed driving may be deactivated as
follows: l When
the engine
speed rises
and approaches
the tachometer's red zone (the red-coloured
part of the tachometer dial). CAUTION
l
When the set speed driving
is deactivated
automatically in any situation other than
those listed above, there may be a system
malfunction.
Press the “ON-OFF” switch to turn off
the cruise control and have it inspected
by a MITSUBISHI MOTORS Author-
ized Service Point. To resume the set speed
E00609800561
If the set speed driving
is deactivated by the condi-
tion described in “To deactivate” on page 4-53,
you can resume the previously set speed by press-
ing the “ACC RES” switch (C) while driving at a
speed of about 40 km/h (25 mph) or higher. Under either of the following conditions, however,
using the switch does
not
allow you to resume the
previously set speed. In these situations, repeat the
speed setting procedure:
l The “ON OFF” switch is pressed.
l The ignition switch is turned OFF.
l “CRUISE” indication lamp is turned OFF. Starting and driving
4-53 4
OCRE12E1
Presented by http://mmc-manuals.ru/ \251
Page 196 of 369
LW/MW/FM electronic tuning radio with CD player*
E00708501745
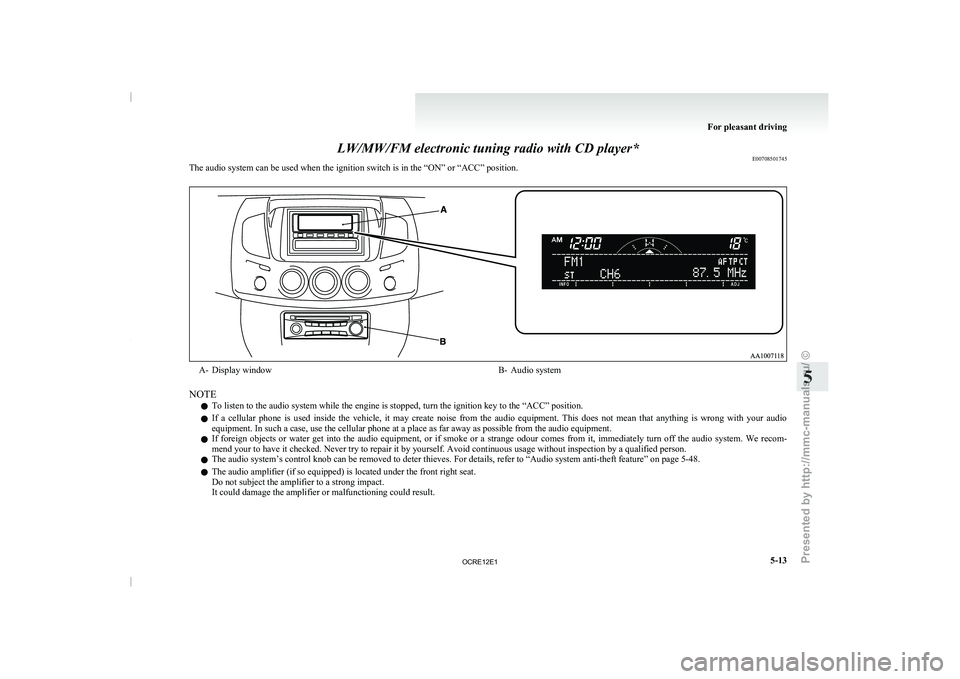
The audio system can be used when the ignition switch is in the “ON” or “ACC” position. A- Display window
B- Audio system
NOTE l To listen to the audio system while the engine is stopped, turn the ignition key to the “ACC” position.
l If
a cellular phone is
used inside the vehicle, it may create noise from the audio equipment. This does not mean that anything is wrong with your audio
equipment. In such a case, use the cellular phone at a place as far away as possible from the audio equipment.
l If foreign objects or water get into the audio equipment, or if smoke or a strange odour comes from it, immediately turn off the audio system. We recom-
mend your to have it checked. Never try to repair it by yourself. Avoid continuous usage without inspection by a qualified person.
l The audio system’s control knob can be removed to deter thieves. For details, refer to
“Audio system anti-theft feature” on page 5-48.
l The audio amplifier (if so equipped) is located under the front right seat.
Do not subject the amplifier to a strong impact.
It could damage the amplifier or malfunctioning could result. For pleasant driving
5-13 5
OCRE12E1
Presented by http://mmc-manuals.ru/ \251
Page 204 of 369
Emergency broadcasts
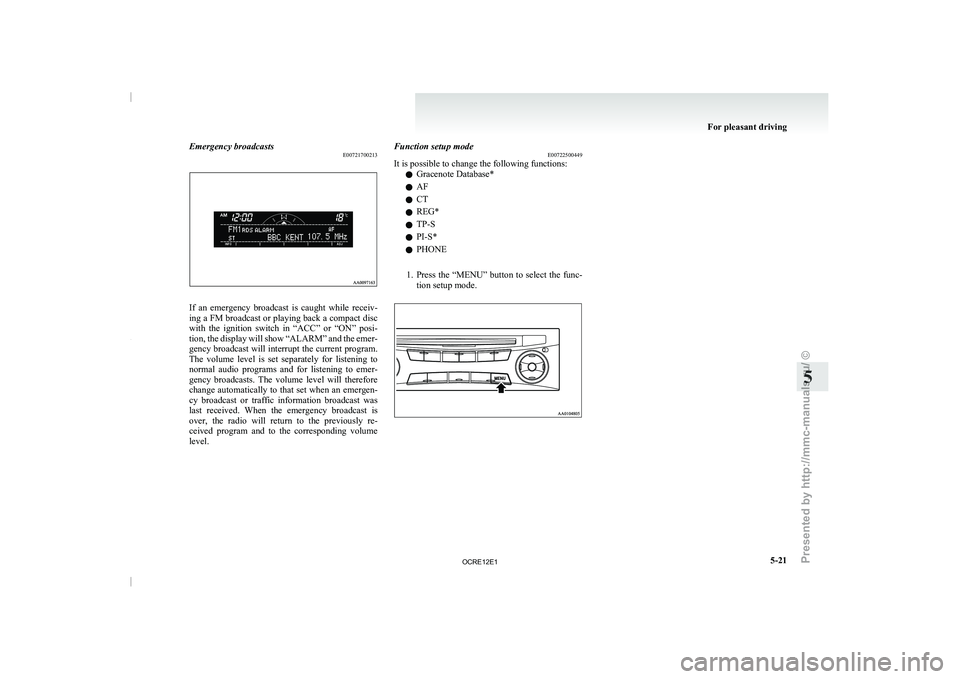
E00721700213If an emergency broadcast is caught while receiv-
ing a FM broadcast or
playing back a compact disc
with the ignition switch in “ACC” or “ON” posi-
tion, the display will show “ALARM” and the emer-
gency broadcast will interrupt the current program.
The volume level is set separately for listening to
normal audio programs and for listening to emer-
gency broadcasts. The volume level will therefore
change automatically to that set when an emergen-
cy broadcast or traffic information broadcast was
last received. When the emergency broadcast is
over, the radio will return to the previously re-
ceived program and to the corresponding volume
level. Function setup mode
E00722500449
It is possible to change the following functions:
l Gracenote Database*
l AF
l CT
l REG*
l TP-S
l PI-S*
l PHONE
1. Press the “MENU” button to
select the func-
tion setup mode. For pleasant driving
5-21 5
OCRE12E1
Presented by http://mmc-manuals.ru/ \251
Page 223 of 369
CAUTION
l
Do not operate the connected audio equip-
ment while driving.
This could distract you and an accident
might occur.
NOTE l The
connected audio equipment cannot
be op-
erated with the vehicle’s audio system.
l Depending on the connected audio equip-
ment, it may produce noise from the speakers.
l Use the connected audio equipment’s own
power source, such as its battery.
Noise may be produced from the speakers if
the connected audio equipment is used while
charging it using the accessory socket of the
vehicle.
l Do not activate the external audio input
mode when no audio equipment is connected.
Otherwise, noise may be produced from the
speakers.
l Connect audio equipment when the external
audio input mode is deactivated or lower the
vehicle’s speaker volume before connecting it.
Noise may be produced from the speakers if
audio equipment is connected after the exter-
nal audio input mode is activated.
l For information on how to connect and oper-
ate the audio equipment, refer to the owner’s
manual for the equipment. Steering wheel remote control
switch* E00710000955
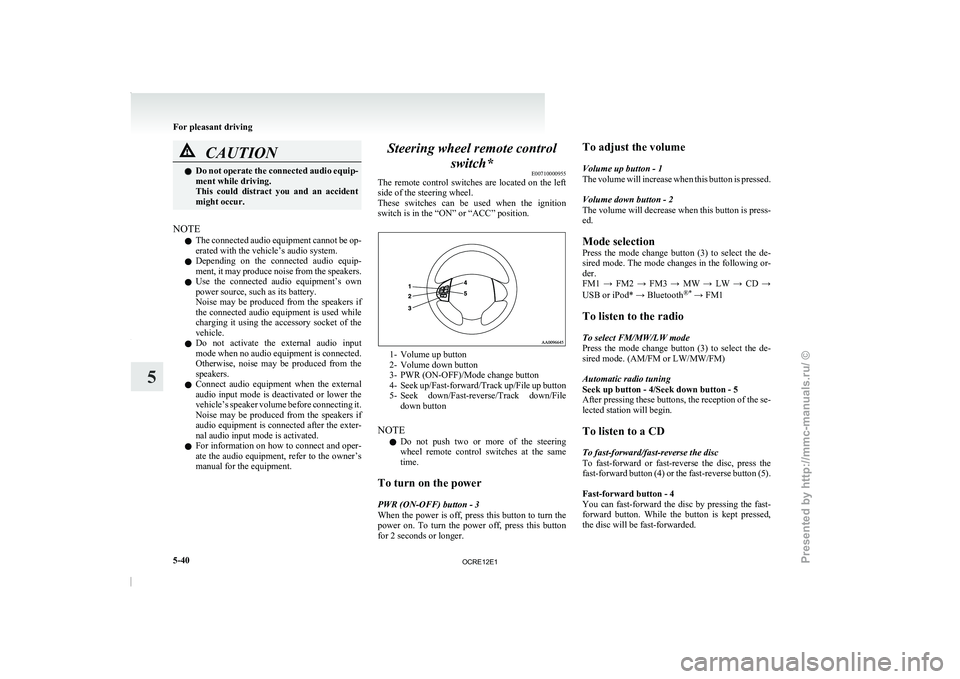
The remote control switches are
located on the left
side of the steering wheel.
These switches can be used when the ignition
switch is in the “ON” or “ACC” position. 1- Volume up button
2-
Volume down button
3- PWR (ON-OFF)/Mode change button
4- Seek up/Fast-forward/Track
up/File up button
5- Seek down/Fast-reverse/Track down/File down button
NOTE l Do not push two or more of the steering
wheel remote control switches at the same
time.
To turn on the power
PWR (ON-OFF) button - 3
When the power is off, press this button to turn the
power on. To turn the power off, press this button
for 2 seconds or longer. To adjust the volume
Volume up button - 1
The volume will increase
when
this button is pressed.
Volume down button - 2
The volume will decrease when this button is press-
ed.
Mode selection
Press the mode change button (3) to select the de-
sired mode. The mode changes in the following or-
der.
FM1 → FM2 → FM3 → MW → LW → CD →
USB or iPod* → Bluetooth ®*
→ FM1
To listen to the radio
To select FM/MW/LW mode
Press the mode change button (3) to select the de-
sired mode. (AM/FM or LW/MW/FM)
Automatic radio tuning
Seek up button - 4/Seek down button - 5
After pressing these buttons, the reception of the se-
lected station will begin.
To listen to a CD
To fast-forward/fast-reverse the disc
To fast-forward or fast-reverse the disc, press the
fast-forward button (4) or the fast-reverse button (5).
Fast-forward button - 4
You can fast-forward the disc by pressing the fast-
forward button. While the button is kept pressed,
the disc will be fast-forwarded.
For pleasant driving
5-40
5
OCRE12E1
Presented by http://mmc-manuals.ru/ \251
Page 231 of 369
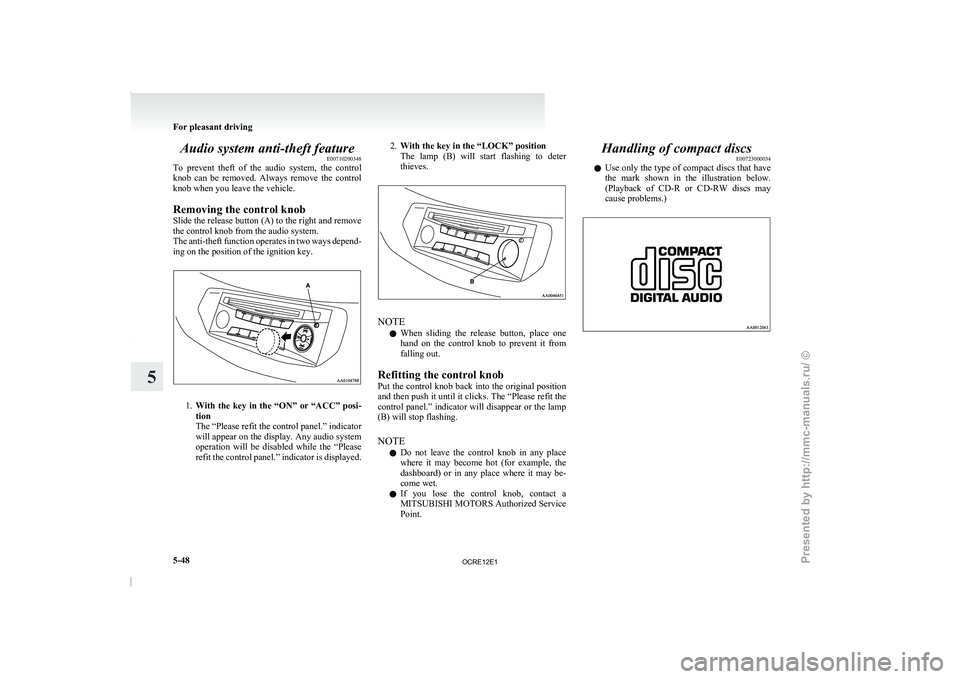
Audio system anti-theft feature
E00710200348
To prevent theft of the
audio system, the control
knob can be removed. Always remove the control
knob when you leave the vehicle.
Removing the control knob
Slide the release button (A) to the right and remove
the control knob from the audio system.
The anti-theft function operates in two ways depend-
ing on the position of the ignition key. 1.
With the key in the “ON” or “ACC” posi-
tion
The “Please refit the control panel.” indicator
will appear on the
display. Any audio system
operation will be disabled while the “Please
refit the control panel.” indicator is displayed. 2.
With the key in the “LOCK” position
The lamp (B) will start
flashing to deter
thieves. NOTE
l When
sliding the release button,
place one
hand on the control knob to prevent it from
falling out.
Refitting the control knob
Put the control knob back into the original position
and then push it until it clicks. The “Please refit the
control panel.” indicator will disappear or the lamp
(B) will stop flashing.
NOTE l Do not leave the control knob in any place
where it may become hot (for example, the
dashboard) or in any place where it may be-
come wet.
l If you lose the control knob, contact a
MITSUBISHI MOTORS Authorized Service
Point. Handling of compact discs
E00723000034
l Use only the type
of
compact discs that have
the mark shown in the illustration below.
(Playback of CD-R or CD-RW discs may
cause problems.) For pleasant driving
5-48
5
OCRE12E1
Presented by http://mmc-manuals.ru/ \251
Page 234 of 369
NOTE
l Be
sure to remove the
roof antenna in the fol-
lowing cases: • When using an automatic car wash.
• When placing a car cover over the vehicle.
l Before driving into a structure that has a low
ceiling, fold down the antenna to prevent it
from hitting the ceiling. Link System*
E00764500012
The Link System takes
overall
control of the devi-
ces connected via the USB input terminal or the
Bluetooth ®
2.0 interface allowing the connected de-
vices to be operated by using the switches in the ve-
hicle or voice commands.
See the following section for details on how to op-
erate.
Refer to “Bluetooth ®
2.0 interface” on page 5-51.
Refer to “USB input terminal” on page 5-67.
Refer to “To play tracks from USB device” on
page 5-27.
Refer to “To play tracks from a Bluetooth ®
device”
on page 5-36.
Refer to “To use the external audio input function”
on page 5-39.
Bluetooth ®
is a registered trademark of BLUE-
TOOTH SIG, INC.
Link System End User Licence Agree-
ment E00764600013
You have acquired a device that includes software
licensed by MITSUBISHI MOTORS
CORPORA-
TION from JOHNSON CONTROLS Inc (the auto-
motive experience business unit), and their subse-
quent 3 rd
party suppliers. For a complete list of
these 3 rd
party products and their end user licence
agreements, please go to the following website.
http://www.jciblueconnect.com/faq/fulldisclo-
sure.pdf Bluetooth
®
2.0 interface*
E00726000556
The Bluetooth ®
2.0 interface allows for
making/re-
ceiving hands-free calls in the vehicle using a Blue-
tooth ®
compatible cellular phone based on the wire-
less communication technology commonly known
as Bluetooth ®
. It also allows the user to play mu-
sic, saved in a Bluetooth ®
music player, from the
vehicle’s speakers.
The system is equipped with a voice recognition
function, which allows you to make hands-free
calls by simple switch operations and voice com-
mand operations using a defined voice tree.
The Bluetooth ®
2.0 interface can be used when the
ignition switch is in the “ON” or “ACC” position.
Before you can use the Bluetooth ®
2.0 interface,
you must pair the Bluetooth ®
device and Blue-
tooth ®
2.0 interface. Refer to “Connecting the Blue-
tooth® 2.0 interface and Bluetooth® device” on
page 5-55.
Bluetooth ®
is a registered trademark of BLUE-
TOOTH SIG, INC. For pleasant driving
5-51 5
OCRE12E1
Presented by http://mmc-manuals.ru/ \251
Page 237 of 369
1. Press the SPEECH button.
2. Say “Setup”.
3. Say “Confirmation prompts”.
4. The voice
guide will say “Confirmation
prompts are
confirmation prompts
Answer “Yes” to change the setting or an-
swer “No” to keep the current setting.
5. The voice guide will say “Confirmation prompts are
will return to the main menu.
Security function E00760500131
It is possible to use a password as a security func-
tion by setting a password
of your choice for the
Bluetooth ®
2.0 interface.
When the security function is turned on, it is neces-
sary to make a voice input of a 4-digit password in
order to use all functions of the Bluetooth ®
2.0 in-
terface, except for reception.
Setting the password
Use the following procedure to turn on the security
function by setting a password. 1. Press the SPEECH button.
2. Say “Setup”.
3. Say “Password.”
4. The voice guide will say “Password is disa-bled. Would you like to enable it?” Answer
“Yes.”
Answer “No” to cancel the setting of the pass-
word and return to the main menu.
5. The voice guide will say “Please say a 4-dig- it password. Remember this password. It will
be required to use this system”.
Say a 4-digit number which you want to set
as a password. 6. For confirmation purposes, the voice guide
will say “Password <4-digit
password>. Is
this correct?” Answer “Yes.”
Answer “No” to return to the password input
in Step 5.
7. When the registration of the password is com- pleted, the voice guide will say “Password is
enabled” and the system will return to the
main menu.
NOTE l Password will be required to access the sys-
tem after the next ignition cycle.
l It is required for a little time after engine
stop that the entered password is actually re-
corded in the system.
If the ignition switch is made to “ACC” or
“ON” or the engine is started immediately af-
ter engine stop, there is a case when the en-
tered password is not recorded in the system.
At this time, please try to enter the password
again.
Entering the password
If a password has been set and the security function
is enabled, the voice guide will say “Hands-free sys-
tem is locked. State the password to continue”
when the SPEECH button is pressed to enter voice
recognition mode. Say the 4-digit password num-
ber to enter the password.
If the entered password is wrong, the voice guide
will say “<4- digit password>, Incorrect password.
Please try again”. Enter the correct password.
NOTE l You can re-enter the password as many times
as you want. l
If
you have forgotten your password, say
“Cancel” to quit the voice input mode and
then check with a MITSUBISHI MOTORS
Authorized Service Point.
Disabling the password
Use the following procedure to turn off the security
function by disabling the password.
NOTE l System must be unlocked to disable the pass-
word.
1. Press the SPEECH button.
2. Say “Setup”.
3. Say “Password.”
4. The voice guide will say “Password is ena- bled. Would you like to disable it?”
Answer “Yes.” Answer “No” to cancel the
disabling of the password and return to the
main menu.
5. When the disabling of the password is com- pleted, the voice guide will say “Password is
disabled” and the system will return to the
main menu.
Speaker enrollment function E00727400209
The Bluetooth ®
2.0 interface can use
the speaker en-
rollment function to create a voice model for one
person per language.
This makes it easier for the Bluetooth ®
2.0 inter-
face to recognise voice commands said by you.
You can turn a voice model registered with the
speaker enrollment function on and off whenever
you want. For pleasant driving
5-54
5
OCRE12E1
Presented by http://mmc-manuals.ru/ \251
Page 250 of 369
USB input terminal*
E00761900015
You can connect your USB
memory device or
iPod* to play music files stored in the USB memo-
ry device or iPod.
The following explains how to connect and remove
a USB memory device or iPod.
Refer to the following sections for details on how
to play music files:
Refer to “To play tracks from USB device” on
page 5-27.
*: “iPod” is a registered trademark of Apple Inc. in
the United States and other countries.
How to connect a USB memory device E00762000202
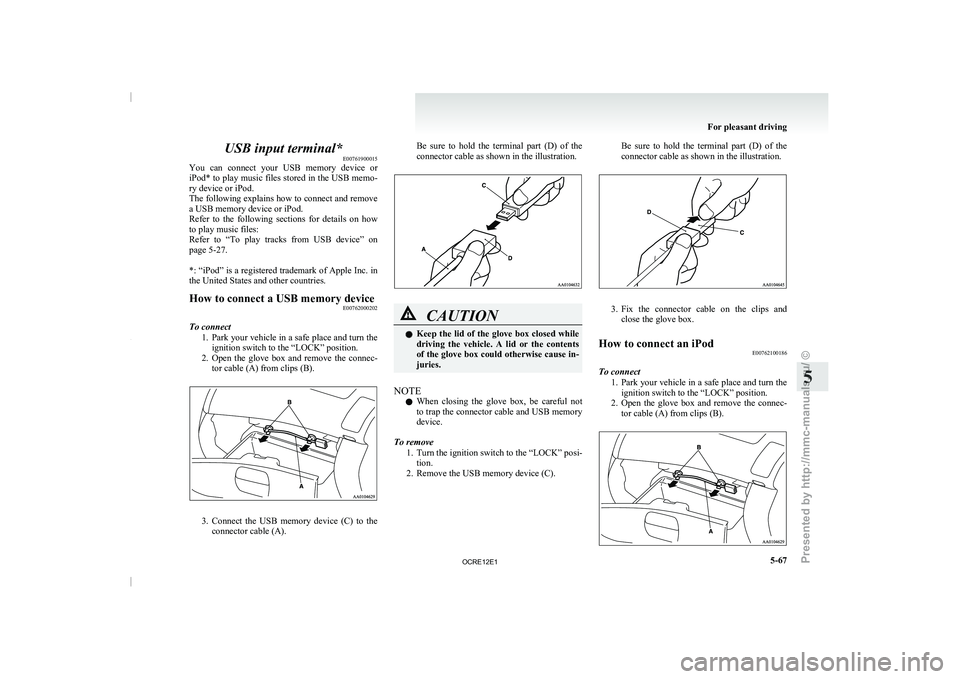
To connect 1. Park your vehicle in a
safe place and turn the
ignition switch to the “LOCK” position.
2. Open the glove box and remove the connec- tor cable (A) from clips (B). 3. Connect the USB memory device (C) to the
connector cable (A). Be sure to
hold
the terminal part (D) of the
connector cable as shown in the illustration. CAUTION
l
Keep the lid of
the
glove box closed while
driving the vehicle. A lid or the contents
of the glove box could otherwise cause in-
juries.
NOTE l When
closing the glove box,
be careful not
to trap the connector cable and USB memory
device.
To remove 1. Turn the ignition switch to the “LOCK” posi-tion.
2. Remove the USB memory device (C). Be sure to hold the terminal part (D) of the
connector cable as shown in the illustration.
3. Fix the connector cable on the clips and
close the glove box.
How to connect an iPod E00762100186
To connect 1. Park your vehicle in
a
safe place and turn the
ignition switch to the “LOCK” position.
2. Open the glove box and remove the connec- tor cable (A) from clips (B). For pleasant driving
5-67 5
OCRE12E1
Presented by http://mmc-manuals.ru/ \251
Page 251 of 369
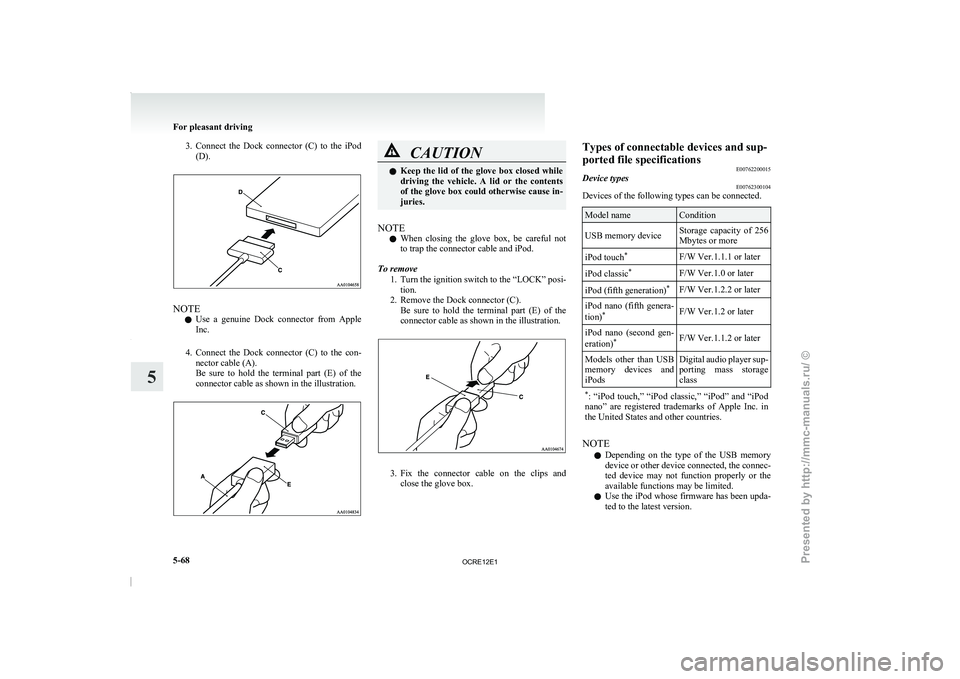
3. Connect the Dock connector (C) to the iPod
(D). NOTE
l Use
a genuine Dock connector
from Apple
Inc.
4. Connect the Dock connector (C) to the con- nector cable (A).
Be sure to hold the terminal part (E) of the
connector cable as shown in the illustration. CAUTION
l
Keep the lid of the
glove box closed while
driving the vehicle. A lid or the contents
of the glove box could otherwise cause in-
juries.
NOTE l When
closing the glove box,
be careful not
to trap the connector cable and iPod.
To remove 1. Turn the ignition switch to the “LOCK” posi-tion.
2. Remove the Dock connector (C). Be sure to hold the terminal part (E) of the
connector cable as shown in the illustration. 3. Fix the connector cable on the clips and
close the glove box. Types of connectable devices and sup-
ported file specifications
E00762200015
Device types E00762300104
Devices of the following types can be connected. Model name Condition
USB memory device Storage capacity of 256
Mbytes or more
iPod touch *
F/W Ver.1.1.1 or later
iPod classic *
F/W Ver.1.0 or later
iPod (fifth generation) *
F/W Ver.1.2.2 or later
iPod nano (fifth genera-
tion) *
F/W Ver.1.2 or later
iPod nano (second gen-
eration) *
F/W Ver.1.1.2 or later
Models other than USB
memory devices and
iPods Digital audio
player
sup-
porting mass storage
class
* : “iPod touch,” “iPod classic,”
“iPod” and “iPod
nano” are registered trademarks of Apple Inc. in
the United States and other countries. NOTE
l Depending
on the
type of
the USB memory
device or other device connected, the connec-
ted device may not function properly or the
available functions may be limited.
l Use the iPod whose firmware has been upda-
ted to the latest version. For pleasant driving
5-68
5
OCRE12E1
Presented by http://mmc-manuals.ru/ \251
Page 252 of 369
l
You can charge your iPod by connecting it to
the USB input terminal
when
the ignition
switch is in the “ACC” or “ON” position.
l Do not keep your USB memory device or
iPod in your vehicle.
l It is recommended that you back up files in
case of data damage.
l Do not connect to the USB input terminal
any device (hard disk, card reader, memory
reader, etc.) other than the connectable devi-
ces specified in the previous section. The de-
vice and/or data may be damaged. If any of
these devices was connected by mistake, re-
move it after turning the ignition switch to
the “LOCK” position.
File specifications E00762400017
You can play music files of the following specifica-
tions that are saved in
a USB memory device or oth-
er device supporting mass storage class. Item Condition
File format MP3, WMA, AAC,
WAV
Maximum number of
levels (including the
root) Level 8
Number of folders 700
Number of files 65,535 Sun visors
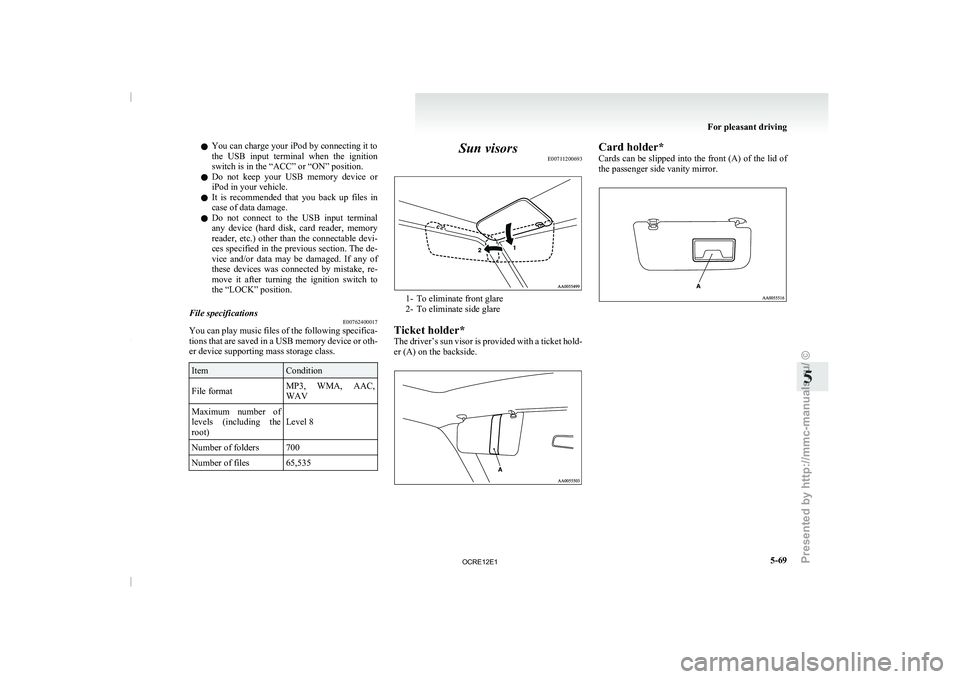
E00711200693 1- To eliminate front glare
2- To eliminate side glare
Ticket holder*
The driver’s sun visor
is provided with a ticket hold-
er (A) on the backside. Card holder*
Cards can be slipped
into
the front (A) of the lid of
the passenger side vanity mirror. For pleasant driving
5-69 5
OCRE12E1
Presented by http://mmc-manuals.ru/ \251