key NISSAN 350Z 2003 Z33 Service Manual
[x] Cancel search | Manufacturer: NISSAN, Model Year: 2003, Model line: 350Z, Model: NISSAN 350Z 2003 Z33Pages: 227, PDF Size: 2.39 MB
Page 126 of 227
AUTOMATIC TRANSMISSION
5 speed automatic transmissionThe automatic transmission in your vehicle is
electronically controlled by a transmission con-
trol module to produce maximum power and
smooth operation.
Shown on the following pages are the recom-
mended operating procedures for this transmis-
sion. Follow these procedures for maximum ve-
hicle performance and driving enjoyment.Starting the vehicleAfter starting the engine, fully depress the foot
brake pedal and push the selector lever button
before shifting the selector lever to the R (Re-
verse), N (Neutral), D (Drive) or Manual shift
mode position. Be sure the vehicle is fully
stopped before attempting to shift the selector
lever.
This automatic transmission model is de-
signed so that the foot brake pedal must
be depressed before shifting from P (Park)
to any drive position while the ignition
switch is ON.
The selector lever cannot be moved out of
P (Park) position and into any of the other
gear positions if the ignition key is turned
to the LOCK, OFF or ACC position or if thekey is removed from the switch.
1. Keep the foot brake pedal depressed and
push the selector lever button to shift into a
driving gear.
2. Release the parking brake and foot brake,
then gradually start the vehicle in motion.
WARNING
IDo not depress the accelerator pedal
while shifting from P (Park) or N
(Neutral) to R (Reverse), D (Drive) or
manual shift mode. Always depress
the brake pedal until shifting is com-
pleted. Failure to do so could cause
you to lose control and have an acci-
dent.
ICold engine idle speed is high, so use
caution when shifting into a forward
or reverse gear before the engine has
warmed up.
IOn slippery roads, do not downshift.
This may cause a loss of control.
INever shift to P (Park) or R (Reverse)
while the vehicle is moving forward.Never shift to P (Park) or D (Drive)
while vehicle is moving rearward.
These could cause an accident.
CAUTION
When stopping the vehicle on an uphill
grade, do not hold the vehicle by de-
pressing the accelerator pedal. The foot
brakes should be used for this purpose.
DRIVING THE VEHICLE
Starting and driving
5-9
Z
02.9.13/Z33-D/V5.0
X
Page 127 of 227

To move the selector lever,
: Push the button while depressing the
brake pedal,: Push the button,: Just move the selector lever.
ShiftingAfter starting the engine, fully depress the brake
pedal and shift the selector lever from P (Park) to
R (Reverse), N (Neutral), D (Drive), or Manual
shift mode position.
Push the button to shift into P (Park) or R
(Reverse). All other positions can be selected
without pushing the button.
WARNING
Apply the parking brake if the selector
lever is in any position while the engine
is not running. Failure to do so could
cause the vehicle to move unexpectedly
or roll away and result in serious per-
sonal injury and/or property damage.
If the key is turned to OFF or ACC for any reason
while the vehicle is in R (Reverse), N (Neutral), or
any D (Drive) position, the key cannot be turned
to LOCK and be removed from the ignition
switch. Move the selector lever to P (Park)
position, then the key can be turned to LOCK.
P (Park):
Use this selector position when the vehicle is
parked or when starting the engine. Make sure
the vehicle is completely stopped.The brake
pedal must be depressed and the selector
lever button pushed in to move the selec-
tor lever from N (Neutral) or any drive
position to P (Park).Apply the parking brake.
When parking on a hill, apply the parking brake
first, then move the lever to the P (Park) position.
CAUTION
Use this position only when the vehicle
is completely stopped.
R (Reverse):
Use this position to back up. Always be sure the
vehicle is completely stopped before selecting R
(Reverse).The brake pedal must be de-
pressed and the selector lever button
pushed in to move the selector lever from
P (Park), N (Neutral) or any drive position
to R (Reverse).
N (Neutral):
Neither forward nor reverse gear is engaged.
The engine can be started in this position. You
may shift to N (Neutral) and restart a stalled
engine while the vehicle is moving.
D (Drive):
Use this position for all normal forward driving.Manual shift modeWhen the selector lever is shifted from D to the
manual shift gate with the vehicle stopped or
while driving, the transmission enters the manual
SSD0276
5-10
Starting and driving
Z
02.9.13/Z33-D/V5.0
X
Page 128 of 227

shift mode. Shift range can be selected manu-
ally.
In the manual shift mode, the shift range is
displayed on the position indicator in the meter.
Shift ranges up or down one by one as follows:M1®
¬
M2®
¬
M3®
¬
M4®
¬
M5
M5 (5th):
Use this position for all normal forward driving.M4 (4th):
For driving up or down long slopes where engine
braking would be advantageous.M3 (3rd) and
M2 (2nd):
Use for hill climbing or engine braking on down-
hill grades.
M1 (1st):
Use this position when climbing steep hills
slowly or driving slowly through deep snow,
sand or mud, or for maximum engine braking on
steep downhill grades.
IRemember not to drive at high speeds for
extended periods of time in lower than
M4
range. This reduces the fuel economy.
IWhen shifting up, move the selector lever to
the + (up) side. (Shifts to higher range.)IWhen shifting down, move the selector lever
to the þ (down) side. (Shifts to lower range.)
IMoving the selector lever to the same side
twice will shift the ranges in succession.
However, if this motion is rapidly done, the
second shifting may not be completed prop-
erly.
IIn the manual shift mode, the transmis-
sion automatically shifts down to 1st
gear before the vehicle comes to a stop.
When accelerating again, it is necessary
to shift up to the desired range.
IWhen canceling the manual shift mode, re-
turn the selector lever to the D position. The
transmission returns to the normal driving
mode.
IIn the manual shift mode, the transmis-
sion may not shift to the selected gear.
This helps maintain driving performance
and reduces the chance of vehicle dam-
age or loss of control.
Accelerator downshift
Ð In D position ÐFor passing or hill climbing, fully depress the
accelerator pedal to the floor. This shifts the
transmission down into the lower gear, depend-
ing on the vehicle speed.
Fail-safeWhen the fail-safe operation occurs, the next
time the key is turned to the ON position, the
warning light will blink for approximately 8
seconds after coming on for 2 seconds. While
the vehicle can be driven under these circum-
stances please note that the gears in the auto-
matic transmission will be locked in 4th gear.
If the vehicle is driven under extreme con-
ditions, such as excessive wheel spinning
and subsequent hard braking, the fail-safe
system may be activated. This will occur
even if all electrical circuits are functioning
properly. In this case, turn the ignition key
OFF and wait for 3 seconds. Then turn the
key back to the ON position. The vehicle
should return to its normal operating con-
dition. If it does not return to its normal
operating condition, have your NISSAN
dealer check the transmission and repair if
necessary.
Starting and driving
5-11
Z
02.9.13/Z33-D/V5.0
X
Page 136 of 227
WARNING
ISafe parking procedures require that
both the parking brake be set and the
transmission placed into P (Park) for
automatic transmission models or in
an appropriate gear for manual
transmission models. Failure to do
so could cause the vehicle to move
unexpectedly or roll away and result
in an accident.
IMake sure the automatic transmis-
sion selector lever has been pushed
as far forward as it can go and cannot
be moved without depressing the
button at the end of the lever.
3. To help prevent the vehicle from rolling into
the street when parked on a sloping drive
way, it is a good practice to turn the wheels
as illustrated.
IHEADED DOWNHILL WITH CURB:
q1
Turn the wheels into the curb and move the
vehicle forward until the curb side wheel
gently touches the curb.IHEADED UPHILL WITH CURB:
q2
Turn the wheels away from the curb and
move the vehicle back until the curb side
wheel gently touches the curb.
IHEADED UPHILL OR DOWNHILL, NO
CURB:
q3
Turn the wheels toward the side of the road
so the vehicle will move away from the center
of the road if it moves.
4. Turn the ignition key to the LOCK position
and remove the key.The power assisted steering is designed to use
a hydraulic pump, driven by the engine, to assist
steering.
If the engine stops or drive belt breaks, you will
still have control of the vehicle. However, much
greater steering effort is needed, especially in
sharp turns or at low speeds.
WARNING
If the engine is not running or is turned
off while driving, the power assist for
the steering will not work. Steering will
be much harder to operate.POWER STEERING
Starting and driving
5-19
Z
02.9.13/Z33-D/V5.0
X
Page 141 of 227

FREEING A FROZEN DOOR LOCKTo prevent a door lock from freezing, apply
de-icer or glycerin to it through the key hole. If
the lock becomes frozen, heat the key before
inserting it into the key hole.ANTI-FREEZEIn the winter when it is anticipated that the
temperature will drop below 32ÉF (0ÉC), check
anti-freeze to assure proper winter protection.
For additional information, see ªEngine Cooling
Systemº in the ª8. Maintenance and do-it-
yourselfº section.BATTERYIf the battery is not fully charged during extremely
cold weather conditions, the battery fluid may
freeze and damage the battery. To maintain
maximum efficiency, the battery should be
checked regularly. For additional information,
see ªBatteryº in the ª8. Maintenance and do-it-
yourselfº section.DRAINING OF COOLANT WATERIf the vehicle is to be left outside without anti-
freeze, drain the cooling system by opening the
drain plug located under the radiator. Refill
before operating the vehicle. See ªEngine cool-
ing systemº in the ª8. Maintenance and do-it-
yourselfº section for changing engine coolant.
TIRE EQUIPMENT1. SUMMER tires are of a tread design to
provide superior performance on dry pave-
ment. However, the performance of these
tires will be substantially reduced in snowy
and icy conditions. If you operate your vehicle
on snowy or icy roads, NISSAN recommends
the use of MUD & SNOW or ALL SEASON
tires on all four wheels. Please consult your
NISSAN dealer for the tire type, size, speed
rating and availability information.
2. For additional traction on icy roads, studded
tires may be used. However, some provinces
and states prohibit their use. Check local,
state and provincial laws before installing
studded tires.
Skid and traction capabilities of studded
snow tires, on wet or dry surfaces, may be
poorer than that of non-studded snow
tires.
3. Tire chains may be used if desired. Make sure
they are of proper size for the tires on your
vehicle and are installed according to the
chain manufacturer's suggestions. Use of tire
chains may be prohibited according to loca-
tion. Check the local laws before installing
tire chains. When installing tire chains, make
sure they are of proper size for the tires on
your vehicle and are installed according tothe chain manufacturer's suggestions.Use
only SAE Class S chains.Class ªSº chains
are used on vehicles with restricted tire to
vehicle clearance. Vehicles that can use
Class ªSº chains are designed to meet the
SAE standard minimum clearances between
the tire and the closest vehicle suspension or
body component required to accommodate
the use of a winter traction device (tire chains
or cables). The minimum clearances are de-
termined using the factory equipped tire size.
Other types may damage your vehicle. Use
chain tensioners when recommended by the
tire chain manufacturer to ensure a tight fit.
Loose end links of the tire chain must be
secured or removed to prevent the possibility
of whipping action damage to the fenders or
underbody. If possible, avoid fully loading
your vehicle when using tire chains. In addi-
tion, drive at a reduced speed. Otherwise,
your vehicle may be damaged and/or vehicle
handling and performance may be adversely
affected.
Never install tire chains on a T-type spare tire.
Do not use tire chains on dry roads.
SPECIAL WINTER EQUIPMENTIt is recommended that the following items be
carried in the vehicle during winter:
Ia scraper and stiff-bristled brush to remove
COLD WEATHER DRIVING5-24
Starting and driving
Z
02.9.13/Z33-D/V5.0
X
Page 151 of 227
CAUTION
IAlways connect positive (+) to posi-
tive (+) and negative (þ) to body
ground (for example, strut mounting
bolt, etc. Ð not to the battery).
IMake sure that cables do not touch
moving parts in the engine compart-
ment and that clamps do not contact
any other metal.
5. Start the engine of the other vehicle and let it
run for a few minutes.
6. Keep the engine speed of the other vehicle at
about 2,000 rpm, and start your engine in the
normal manner.
CAUTION
Do not keep starter motor engaged for
more than 10 seconds. If the engine
does not start right away, turn the key
off and wait 3 to 4 seconds before trying
again.7. After starting your engine, carefully discon-
nect the negative cable and then the positive
cable.
8. Replace the vent caps (if so equipped). Be
sure to dispose of the cloth used to cover the
vent holes as it may be contaminated with
corrosive acid.Do not attempt to start the engine by pushing.
CAUTION
IAutomatic transmission models can-
not be push started. Attempting to do
so may cause transmission damage.
IThree way catalyst equipped models
should not be started by pushing
since the three way catalyst may be
damaged.
INever try to start the vehicle by tow-
ing it; when the engine starts, the
forward surge could cause the ve-
hicle to collide with the tow vehicle.PUSH STARTING
6-8
In case of emergency
Z
02.9.13/Z33-D/V5.0
X
Page 154 of 227
CAUTION
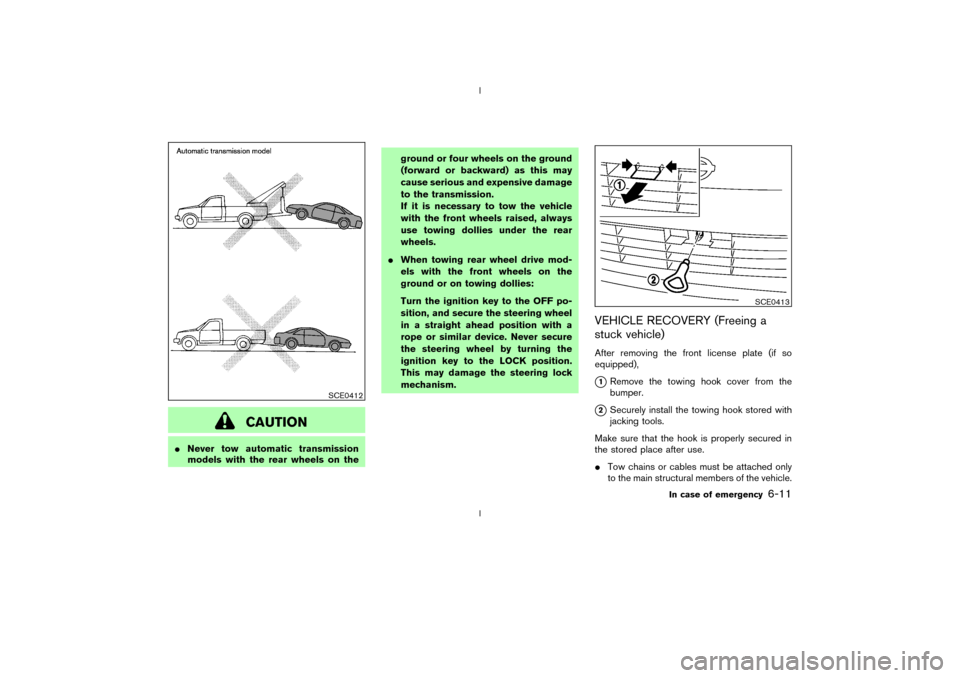
INever tow automatic transmission
models with the rear wheels on theground or four wheels on the ground
(forward or backward) as this may
cause serious and expensive damage
to the transmission.
If it is necessary to tow the vehicle
with the front wheels raised, always
use towing dollies under the rear
wheels.
IWhen towing rear wheel drive mod-
els with the front wheels on the
ground or on towing dollies:
Turn the ignition key to the OFF po-
sition, and secure the steering wheel
in a straight ahead position with a
rope or similar device. Never secure
the steering wheel by turning the
ignition key to the LOCK position.
This may damage the steering lock
mechanism.
VEHICLE RECOVERY (Freeing a
stuck vehicle)After removing the front license plate (if so
equipped),q1Remove the towing hook cover from the
bumper.
q2Securely install the towing hook stored with
jacking tools.
Make sure that the hook is properly secured in
the stored place after use.
ITow chains or cables must be attached only
to the main structural members of the vehicle.
SCE0412
SCE0413
In case of emergency
6-11
Z
02.9.13/Z33-D/V5.0
X
Page 162 of 227

8 Maintenance and do-it-yourselfMaintenance requirements .................................................. 8-2
General maintenance ............................................................ 8-2
Explanation of general maintenance items ................ 8-2
Maintenance precautions ..................................................... 8-5
Engine compartment check locations .............................. 8-7
Engine cooling system.......................................................... 8-8
Checking engine coolant level...................................... 8-8
Changing engine coolant ............................................... 8-9
Engine oil ............................................................................... 8-10
Checking engine oil level ............................................ 8-10
Changing engine oil and filter .................................... 8-10
Automatic transmission fluid ............................................. 8-12
Power steering fluid ............................................................ 8-13
Brake and clutch fluid ........................................................ 8-13
Brake fluid ....................................................................... 8-13
Clutch fluid ...................................................................... 8-14
Window washer fluid.......................................................... 8-14
Battery .................................................................................... 8-15
Jump starting .................................................................. 8-16
Drive belts ............................................................................. 8-17
Spark plugs ........................................................................... 8-17Replacing spark plugs.................................................. 8-17
Air cleaner ............................................................................. 8-18
Windshield wiper blades ................................................... 8-19
Cleaning ........................................................................... 8-19
Replacing ......................................................................... 8-20
Parking brake and brake pedal ........................................ 8-21
Checking parking brake ............................................... 8-21
Checking brake pedal .................................................. 8-21
Brake booster ................................................................. 8-22
Fuses ...................................................................................... 8-22
Engine compartment ..................................................... 8-22
Passenger compartment .............................................. 8-23
Keyfob battery replacement .............................................. 8-24
Lights ...................................................................................... 8-25
Headlights ....................................................................... 8-26
Exterior and interior lights............................................ 8-27
Wheels and tires ................................................................. 8-29
Tire pressure ................................................................... 8-29
Types of tires .................................................................. 8-30
Tire chains ....................................................................... 8-31
Changing wheels and tires ......................................... 8-31
Z
02.9.13/Z33-D/V5.0
X
Page 166 of 227
When performing any inspection or maintenance
work on your vehicle, always take care to prevent
serious accidental injury to yourself or damage to
the vehicle. The following are general precau-
tions which should be closely observed.
WARNING
IPark the vehicle on a level surface,
apply the parking brake securely and
block the wheels to prevent the ve-
hicle from moving. For a manual
transmission, move the shift lever to
N (Neutral) position. For an auto-
matic transmission, move the selec-
tor lever to P (Park) position.
IBe sure the ignition key is OFF or
LOCK when performing any parts re-
placement or repairs.
IIf you must work with the engine
running, keep your hands, clothing,
hair and tools away from moving
fans, belts and any other moving
parts.
IIt is advised to secure or remove any
loose clothing and any jewelry, suchas rings, watches, etc. before work-
ing on your vehicle.
IAlways wear eye protection when-
ever you work on your vehicle.
IIf you must run the engine in an
enclosed space such as a garage, be
sure there is proper ventilation for
exhaust gases to escape.
INever get under the vehicle while it is
supported only by a jack. If it is nec-
essary to work under the vehicle,
support it with safety stands.
IKeep smoking materials, flame and
sparks away from fuel and the bat-
tery.
IOn gasoline engine models with the
Multiport Fuel Injection (MFI) Sys-
tem, the fuel filter or fuel lines should
be serviced by a NISSAN dealer be-
cause the fuel lines are under high
pressure even when the engine is off.
CAUTION
IDo not work under the hood while
the engine is hot. Turn off the engine
and wait until it cools down.
INever connect or disconnect either
the battery or any transistorized
component connector while the igni-
tion key is on.
INever leave the engine or the auto-
matic transmission related compo-
nent harness connector discon-
nected while the ignition key is on.
IAvoid direct contact with used engine
oil and coolant. Improperly disposed
engine oil, engine coolant and/or
other vehicle fluids can hurt the envi-
ronment. Always conform to local
regulations for disposal of vehicle
fluid.
This ª8. Maintenance and do-it-yourselfº section
gives instructions regarding only those items
which are relatively easy for an owner to perform.
A genuine NISSAN Service Manual is also avail-
MAINTENANCE PRECAUTIONS
Maintenance and do-it-yourself
8-5
Z
02.9.13/Z33-D/V5.0
X
Page 178 of 227
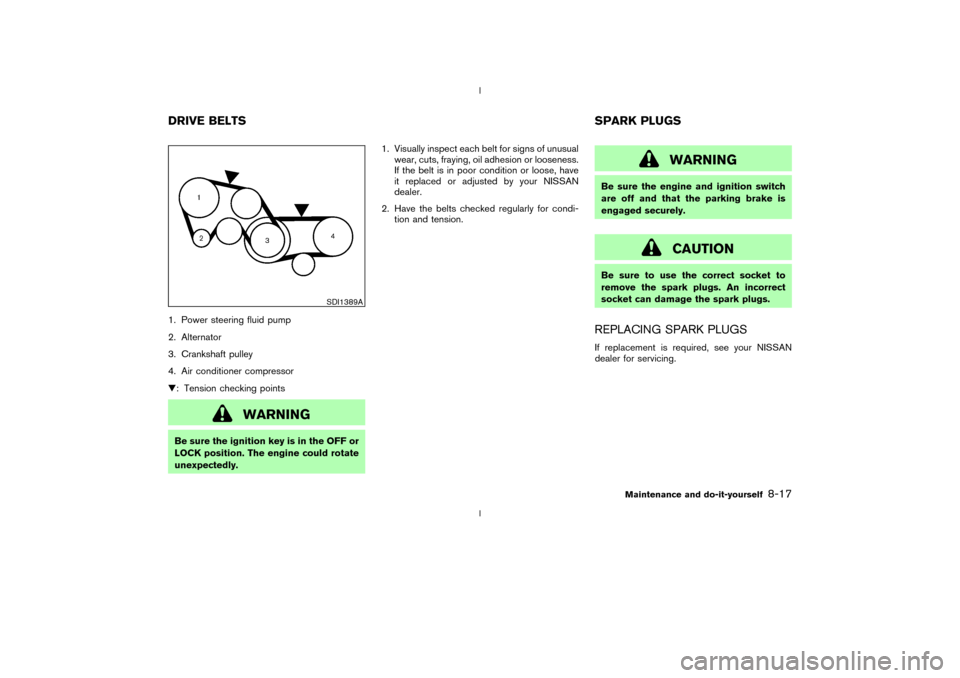
1. Power steering fluid pump
2. Alternator
3. Crankshaft pulley
4. Air conditioner compressor
H: Tension checking points
WARNING
Be sure the ignition key is in the OFF or
LOCK position. The engine could rotate
unexpectedly.1. Visually inspect each belt for signs of unusual
wear, cuts, fraying, oil adhesion or looseness.
If the belt is in poor condition or loose, have
it replaced or adjusted by your NISSAN
dealer.
2. Have the belts checked regularly for condi-
tion and tension.
WARNING
Be sure the engine and ignition switch
are off and that the parking brake is
engaged securely.
CAUTION
Be sure to use the correct socket to
remove the spark plugs. An incorrect
socket can damage the spark plugs.REPLACING SPARK PLUGSIf replacement is required, see your NISSAN
dealer for servicing.
SDI1389A
DRIVE BELTS SPARK PLUGS
Maintenance and do-it-yourself
8-17
Z
02.9.13/Z33-D/V5.0
X