change time NISSAN 370Z 2020 Owner´s Manual
[x] Cancel search | Manufacturer: NISSAN, Model Year: 2020, Model line: 370Z, Model: NISSAN 370Z 2020Pages: 455, PDF Size: 2.22 MB
Page 270 of 455
4-102Center display, heater, air conditioner, audio, phone and voice recognition systems
“Select Phone”
Use the Select Phone command to select
from a list of phones connected to the
vehicle. The system will list the names
assigned to each phone and then prompt
you for the phone you wish to select. Only
one phone can be active at a time.
“Delete Phone”
Use the Delete Phone command to delete
a phone that is connected to the vehicle.
The system will list the names assigned to
each phone and then prompt you for the
phone you wish to delete. Deleting a
phone from the vehicle will also delete
that phonebook for that phone.
“Bluetooth Off”
Use the Bluetooth Off command to pre-
vent a wireless connection to your phone.
“Replace phone”
This can be used to reconnect a new
phone with the vehicle you have changed
your cellular phone.
SPEAKER ADAPTATION (SA) MODE
Speaker Adaptation allows up to two out-
of dialect users to train the system to
improve recognition accuracy. By repeat-
ing a number of commands, the users
can create a voice model of their own
voice that is stored in the system. The
system is capable of storing a differentspeaker adaptation model for each con-
nected phone.
Training procedure
1. Position the vehicle in a reasonably
quiet outdoor location.
2. Sit in the driver’s seat with the engine running, the parking brake on, and the
transmission in Park.
3. Push and hold the
button for
more than 5 seconds.
4. The system announces: “Press the PHONE SEND (
) button for the
hands-free phone system to enter
the speaker adaptation mode or press
the PHONE END (
) button to select
a different language.”
5. Push the
button.
For information on selecting a differ-
ent language, see “Choosing a lan-
guage” (P.4-96).
6. If the connected phone is already in use, the system will prompt you to
overwrite. Follow the instructions pro-
vided by the system.
7. When preparation is complete and you are ready to begin, push the
button.
8. The SA mode will be explained. Follow the instructions provided by the sys-
tem. 9. When training is finished, the system
will tell you an adequate number of
phrases have been recorded.
10. The system will announce that speak- er adaptation has been completed
and the system is ready.
The SA mode will stop if:
. The
button is pressed for more
than 5 seconds in SA mode.
. The vehicle is driven during SA mode.
. The ignition switch is placed in the
OFF or LOCK position.
Training phrases
During the SA mode, the system instructs
you to say the following phrases.
(The system will prompt you for each
phrase.)
.phonebook transfer entry
. dial 3 0 4 2 9
. delete call back number
. Incoming
. Transfer entry
. 8 pause 9 3 2 pause 7
. delete all entries
. call 7 2 4 0 9
. phonebook delete entry
. next entry
Page 300 of 455
5-2Starting and driving
WARNING
.Do not leave children or adults
who would normally require the
support of others alone in your
vehicle. Pets should not be left
alone either. They could acciden-
tally injure themselves or others
through inadvertent operation of
the vehicle. Also, on hot, sunny
days, temperatures in a closed
vehicle could quickly become
high enough to cause severe or
possibly fatal injuries to people or
animals.
. Properly secure all cargo to help
prevent it from sliding or shifting.
Do not place cargo higher than
the seatbacks. In a sudden stop
or collision, unsecured cargo
could cause personal injury
(Coupe models).
. Closely supervise children when
they are around cars to prevent
them from playing and becoming
locked in the trunk where they
could be seriously injured. Keep
the car locked with the trunk
closed when not in use, and pre-
vent children’s access to car keys (Roadster models).
If the engine oil temperature is high, the
engine protection mode, which helps
reduce the chance of engine damage,
could activate and automatically de-
crease engine power. Driving while the
engine oil temperature is high may
result in engine damage.
EXHAUST GAS (carbon monoxide)
WARNING
. Do not breathe exhaust gases;
they contain colorless and odor-
less carbon monoxide. Carbon
monoxide is dangerous. It can
cause unconsciousness or death.
. If you suspect that exhaust fumes
are entering the vehicle, drive
with all windows fully open, and
have the vehicle inspected imme-
diately.
. Do not run the engine in closed
spaces such as a garage.
. Do not park the vehicle with the
engine running for any extended
length of time.
. Keep the rear hatch/trunk lid
closed while driving, otherwise exhaust gases could be drawn
into the passenger compartment.
If you must drive with the rear
hatch/trunk lid open, follow these
precautions:
1) Open all the windows.
2) Set the
air recirculation to
off and the fan control to high
to circulate the air.
. The exhaust system and body
should be inspected by a quali-
fied mechanic whenever:
— The vehicle is raised for ser-
vice.
— You suspect that exhaust fumes are entering into the
passenger compartment.
— You notice a change in the sound of the exhaust system.
— You have had an accident involving damage to the ex-
haust system, underbody, or
rear of the vehicle.
PRECAUTIONS WHEN STARTING
AND DRIVING
Page 305 of 455
this manual.
If a tire rapidly loses air pressure or
“blows-out” while driving maintain control
of the vehicle by following the procedure
below. Please note that this procedure is
only a general guide. The vehicle must be
driven as appropriate based on the con-
ditions of the vehicle, road and traffic.
WARNING
The following actions can increase
the chance of losing control of the
vehicle if there is a sudden loss of tire
air pressure. Losing control of the
vehicle may cause a collision and
result in personal injury.
.The vehicle generally moves or
pulls in the direction of the flat
tire.
. Do not rapidly apply the brakes.
. Do not rapidly release the accel-
erator pedal.
. Do not rapidly turn the steering
wheel.
1. Remain calm and do not overreact.
2. Maintain a firm grip on the steering wheel with both hands and try to hold
a straight course. 3. When appropriate, slowly release the
accelerator pedal to gradually slow
the vehicle.
4. Gradually steer the vehicle to a safe location off the road and away from
traffic if possible.
5. Lightly apply the brake pedal to gra- dually stop the vehicle.
6. Turn on the hazard warning flashers and either contact a roadside emer-
gency service to change the tire or see
“Changing a flat tire (for models with
spare tire)” (P.6-4) of this Owner’s
Manual.
DRINKING ALCOHOL/DRUGS AND
DRIVING
WARNING
Never drive under the influence of
alcohol or drugs. Alcohol in the
bloodstream reduces coordination,
delays reaction time and impairs
judgement. Driving after drinking
alcohol increases the likelihood of
being involved in an accident injuring
yourself and others. Additionally, if
you are injured in an accident, alco-
hol can increase the severity of the
injury. NISSAN is committed to safe driving.
However, you must choose not to drive
under the influence of alcohol. Every year
thousands of people are injured or killed
in alcohol-related accidents. Although the
local laws vary on what is considered to
be legally intoxicated, the fact is that
alcohol affects all people differently and
most people underestimate the effects of
alcohol.
Remember, drinking and driving don’t
mix! And that is true for drugs, too (over-
the-counter, prescription, and illegal
drugs). Don’t drive if your ability to oper-
ate your vehicle is impaired by alcohol,
drugs, or some other physical condition.
Starting and driving5-7
Page 307 of 455
SSD1021
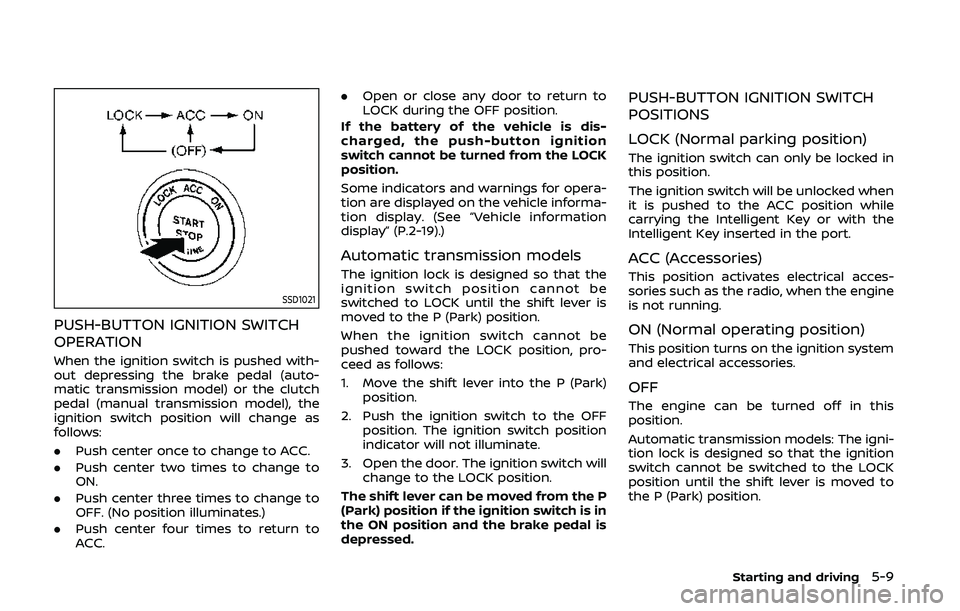
PUSH-BUTTON IGNITION SWITCH
OPERATION
When the ignition switch is pushed with-
out depressing the brake pedal (auto-
matic transmission model) or the clutch
pedal (manual transmission model), the
ignition switch position will change as
follows:
.Push center once to change to ACC.
. Push center two times to change to
ON.
. Push center three times to change to
OFF. (No position illuminates.)
. Push center four times to return to
ACC. .
Open or close any door to return to
LOCK during the OFF position.
If the battery of the vehicle is dis-
charged, the push-button ignition
switch cannot be turned from the LOCK
position.
Some indicators and warnings for opera-
tion are displayed on the vehicle informa-
tion display. (See “Vehicle information
display” (P.2-19).)
Automatic transmission models
The ignition lock is designed so that the
ignition switch position cannot be
switched to LOCK until the shift lever is
moved to the P (Park) position.
When the ignition switch cannot be
pushed toward the LOCK position, pro-
ceed as follows:
1. Move the shift lever into the P (Park) position.
2. Push the ignition switch to the OFF position. The ignition switch position
indicator will not illuminate.
3. Open the door. The ignition switch will change to the LOCK position.
The shift lever can be moved from the P
(Park) position if the ignition switch is in
the ON position and the brake pedal is
depressed.
PUSH-BUTTON IGNITION SWITCH
POSITIONS
LOCK (Normal parking position)
The ignition switch can only be locked in
this position.
The ignition switch will be unlocked when
it is pushed to the ACC position while
carrying the Intelligent Key or with the
Intelligent Key inserted in the port.
ACC (Accessories)
This position activates electrical acces-
sories such as the radio, when the engine
is not running.
ON (Normal operating position)
This position turns on the ignition system
and electrical accessories.
OFF
The engine can be turned off in this
position.
Automatic transmission models: The igni-
tion lock is designed so that the ignition
switch cannot be switched to the LOCK
position until the shift lever is moved to
the P (Park) position.
Starting and driving5-9
Page 323 of 455
.Recirculating the cool air in thecabin when the A/C is on reduces
cooling load.
4. Drive at economical speeds and dis- tances.
.Observing the speed limit and notexceeding 60 MPH (97 km/h)
(where legally allowed) can improve
fuel efficiency due to reduced aero-
dynamic drag.
.Maintaining a safe following dis-tance behind other vehicles re-
duces unnecessary braking.
.Safely monitoring traffic to antici- pate changes in speed permits
reduced braking and smooth accel-
eration changes.
.Select a gear range suitable to roadconditions.
5. Use cruise control.
.Using cruise control during highway driving helps maintain a steady
speed.
.Cruise control is particularly effec-tive in providing fuel savings when
driving on flat terrains.
6. Plan for the shortest route.
.Utilize a map or navigation system to determine the best route to save
time. 7. Avoid idling.
.Shutting off your engine when safe
for stops exceeding 30-60 seconds
saves fuel and reduces emissions.
8. Buy an automated pass for toll roads.
.Automated passes permit drivers to use special lanes to maintain cruis-
ing speed through the toll and
avoid stopping and starting.
9. Winter warm up.
.Limit idling time to minimize impact to fuel economy.
.Vehicles typically need no morethan 30 seconds of idling at start-
up to effectively circulate the en-
gine oil before driving.
.Your vehicle will reach its ideal
operating temperature more
quickly while driving versus idling.
10. Keeping your vehicle cool.
.Park your vehicle in a covered parking area or in the shade when-
ever possible.
.When entering a hot vehicle, open- ing the windows will help to reduce
the inside temperature faster, re-
sulting in reduced demand on your
A/C system. .
Keep your engine tuned up.
. Follow the recommended scheduled
maintenance.
. Keep the tires inflated to the correct
pressure. Low tire pressure increases
tire wear and lowers fuel economy.
. Keep the wheels in correct alignment.
Improper alignment increases tire
wear and lowers fuel economy.
. Use the recommended viscosity en-
gine oil. (See “Engine oil and oil filter
recommendation” (P.10-7).)
Starting and driving5-25
INCREASING FUEL ECONOMY
Page 375 of 455
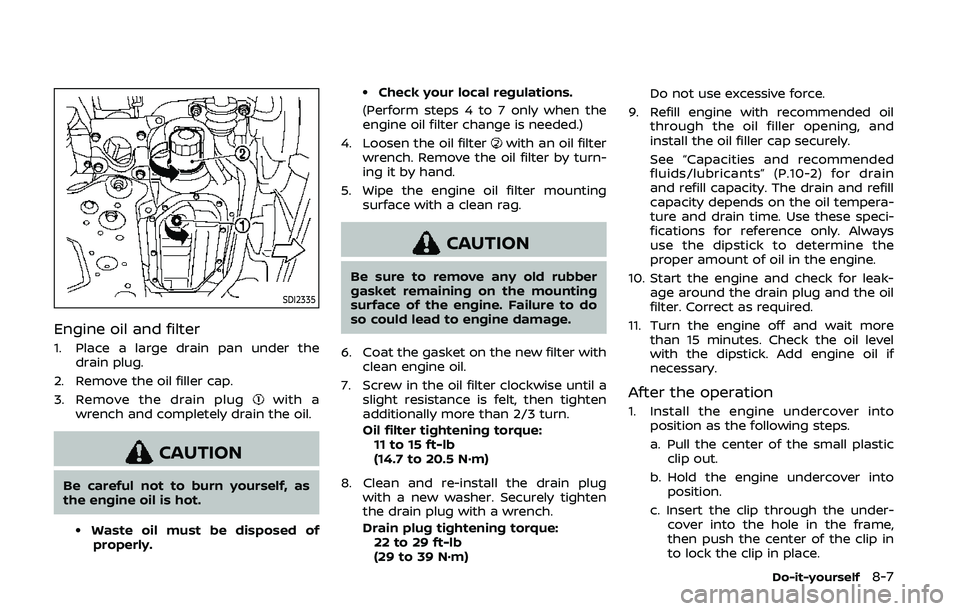
SDI2335
Engine oil and filter
1. Place a large drain pan under thedrain plug.
2. Remove the oil filler cap.
3. Remove the drain plug
with a
wrench and completely drain the oil.
CAUTION
Be careful not to burn yourself, as
the engine oil is hot.
.Waste oil must be disposed of properly.
.Check your local regulations.
(Perform steps 4 to 7 only when the
engine oil filter change is needed.)
4. Loosen the oil filter
with an oil filter
wrench. Remove the oil filter by turn-
ing it by hand.
5. Wipe the engine oil filter mounting surface with a clean rag.
CAUTION
Be sure to remove any old rubber
gasket remaining on the mounting
surface of the engine. Failure to do
so could lead to engine damage.
6. Coat the gasket on the new filter with clean engine oil.
7. Screw in the oil filter clockwise until a slight resistance is felt, then tighten
additionally more than 2/3 turn.
Oil filter tightening torque:11 to 15 ft-lb
(14.7 to 20.5 N·m)
8. Clean and re-install the drain plug with a new washer. Securely tighten
the drain plug with a wrench.
Drain plug tightening torque:22 to 29 ft-lb
(29 to 39 N·m) Do not use excessive force.
9. Refill engine with recommended oil through the oil filler opening, and
install the oil filler cap securely.
See “Capacities and recommended
fluids/lubricants” (P.10-2) for drain
and refill capacity. The drain and refill
capacity depends on the oil tempera-
ture and drain time. Use these speci-
fications for reference only. Always
use the dipstick to determine the
proper amount of oil in the engine.
10. Start the engine and check for leak- age around the drain plug and the oil
filter. Correct as required.
11. Turn the engine off and wait more than 15 minutes. Check the oil level
with the dipstick. Add engine oil if
necessary.
After the operation
1. Install the engine undercover intoposition as the following steps.
a. Pull the center of the small plastic
clip out.
b. Hold the engine undercover into position.
c. Insert the clip through the under- cover into the hole in the frame,
then push the center of the clip in
to lock the clip in place.
Do-it-yourself8-7
Page 410 of 455
9-4Maintenance and schedules
so equipped) hold securely in all latched
positions.
Seat belts:Check that all parts of the seat
belt system (for example, buckles, an-
chors, adjuster and retractors) operate
properly and smoothly, and are installed
securely. Check the belt webbing for cuts,
fraying, wear or damage.
Steering wheel: Check for changes in the
steering conditions, such as excessive
free play, hard steering or strange noises.
Warning lights and chimes: Make sure
that all warning lights and chimes are
operating properly.
Windshield defroster: Check that the air
comes out of the defroster outlets prop-
erly and in sufficient quantity when oper-
ating the heater or air conditioner.
Windshield wiper and washer*: Check
that the wipers and washer operate
properly and that the wipers do not
streak.
Under the hood and vehicle
The maintenance items listed here should
be checked periodically (for example,
each time you check the engine oil or
refuel).
Battery*: Check the fluid level in each cell.
It should be between the MAX and MIN
lines. Vehicles operated in high tempera- tures or under severe condition require
frequent checks of the battery fluid level.
NOTE:
Care should be taken to avoid situations
that can lead to potential battery dis-
charge and potential no-start condi-
tions such as:
1.
Installation or extended use of elec-
tronic accessories that consume
battery power when the engine is
not running (Phone chargers, GPS,
DVD players, etc.)
2. Vehicle is not driven regularly and/
or only driven short distances.
In these cases, the battery may need to
be charged to maintain battery health.
Brake and clutch fluid levels*: Make sure
that the brake and clutch fluid levels are
between the MAX and MIN lines on the
reservoir.
Engine coolant level*: Check the coolant
level when the engine is cold.
Engine drive belts*: Make sure that no
belt is frayed, worn, cracked or oily.
Engine oil level*: Check the level after
parking the vehicle on a level spot and
turning off the engine. Wait more than 15
minutes for the oil to drain back into the
oil pan.
Exhaust system: Make sure there are no loose supports, cracks or holes. If the
sound of the exhaust seems unusual or
there is a smell of exhaust fumes, im-
mediately have the exhaust system in-
spected. It is recommended you visit a
NISSAN dealer for this service. (See “Pre-
cautions when starting and driving” (P.5-
2) for exhaust gas (carbon monoxide).)
Fluid leaks:
Check under the vehicle for
fuel, oil, water or other fluid leaks after the
vehicle has been parked for a while. Water
dripping from the air conditioner after use
is normal. If you should notice any leaks
or if gasoline fumes are evident, check for
the cause and have it corrected immedi-
ately.
Power steering fluid level* and lines:
Check the level when the fluid is cold, with
the engine off. Check the lines for proper
attachment, leaks, cracks, etc.
Radiator and hoses: Check the front of
the radiator and clean off any dirt, insects,
leaves, etc., that may have accumulated.
Make sure the hoses have no cracks,
deformation, rot or loose connections.
Underbody: The underbody is frequently
exposed to corrosive substances such as
those used on icy roads or to control
dust. It is very important to remove these
substances, otherwise rust will form on
the floor pan, frame, fuel lines and around
the exhaust system. At the end of winter,
Page 425 of 455
Gasoline containing oxygenates
Some fuel suppliers sell gasoline contain-
ing oxygenates such as ethanol, MTBE
and methanol with or without advertising
their presence. NISSAN does not recom-
mend the use of fuels of which the
oxygenate content and the fuel compat-
ibility for your NISSAN cannot be readily
determined. If in doubt, ask your service
station manager.
If you use oxygenate-blend gasoline,
please take the following precautions as
the usage of such fuels may cause vehicle
performance problems and/or fuel sys-
tem damage.
.The fuel should be unleaded and
have an octane rating no lower than
that recommended for unleaded
gasoline.
. If an oxygenate-blend, excepting a
methanol blend, is used, it should
contain no more than 15% oxyge-
nate.
. If a methanol blend is used, it should
contain no more than 5% methanol
(methyl alcohol, wood alcohol). It
should also contain a suitable
amount of appropriate cosolvents
and corrosion inhibitors. If not prop-
erly formulated with appropriate
cosolvents and corrosion inhibitors,
such methanol blends may cause fuel system damage and/or vehicle
performance problems. At this time,
sufficient data is not available to
ensure that all methanol blends are
suitable for use in NISSAN vehicles.
If any undesirable driveability problems
such as engine stalling or hard hot
starting are experienced after using oxy-
genate-blend fuels, immediately change
to a non-oxygenate fuel or a fuel with a
low blend of MTBE.
Take care not to spill gasoline during
refueling. Gasoline containing oxyge-
nates can cause paint damage.
E-15 fuel
E-15 fuel is a mixture of approximately
15% fuel ethanol and 85% unleaded gaso-
line. E-15 can only be used in vehicles
designed to run on E-15 fuel. U.S. govern-
ment regulations require fuel ethanol
dispensing pumps to be identified with
small, square, orange and black label with
the common abbreviation or the appro-
priate percentage for that region.
E-85 fuel
E-85 fuel is a mixture of approximately
85% fuel ethanol and 15% unleaded gaso-
line. E-85 can only be used in a Flexible
Fuel Vehicle (FFV). Do not use E-85 fuel in
your vehicle. U.S. government regulations
require fuel ethanol dispensing pumps to
be identified by a small, square, orange
and black label with the common abbre-
viation or the appropriate percentage for
that region.
Fuel containing MMT
MMT, or methylcyclopentadienyl manga-
nese tricarbonyl, is an octane boosting
additive. NISSAN does not recommend
the use of fuel containing MMT. Such fuel
may adversely affect vehicle perfor-
mance, including the emissions control
system. Note that while some fuel pumps
label MMT content, not all do, so you may
have to consult your gasoline retailer for
more details.
Aftermarket fuel additives
NISSAN does not recommend the use of
any aftermarket fuel additives (Example:
fuel injector cleaner, octane booster, in-
take valve deposit removers, etc.) which
are sold commercially. Many of these
additives intended for gum, varnish or
deposit removal may contain active sol-
Technical and consumer information10-5