hood release NISSAN 370Z 2020 Owner´s Manual
[x] Cancel search | Manufacturer: NISSAN, Model Year: 2020, Model line: 370Z, Model: NISSAN 370Z 2020Pages: 455, PDF Size: 2.22 MB
Page 18 of 455
0-10Illustrated table of contents
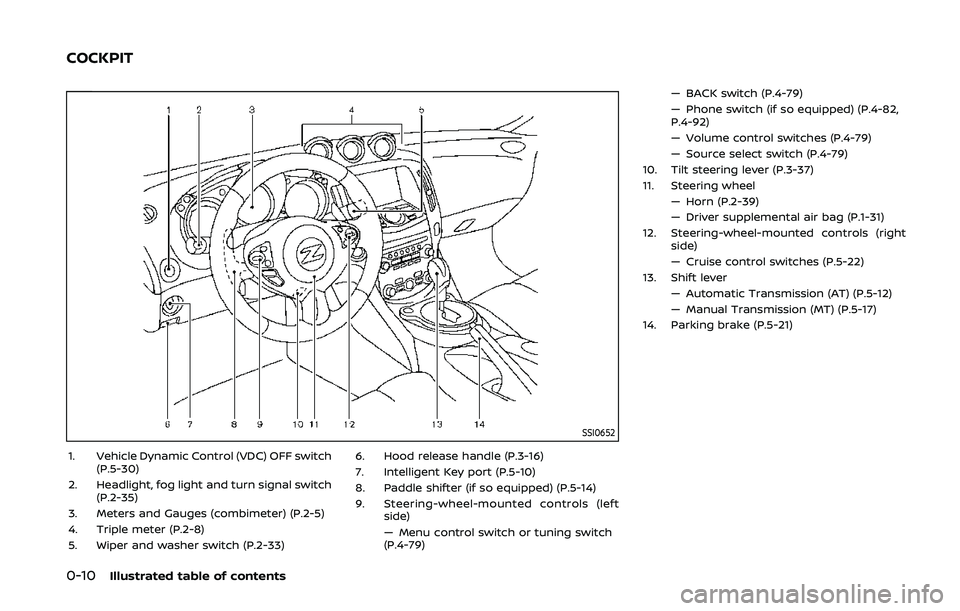
SSI0652
1. Vehicle Dynamic Control (VDC) OFF switch(P.5-30)
2. Headlight, fog light and turn signal switch (P.2-35)
3. Meters and Gauges (combimeter) (P.2-5)
4. Triple meter (P.2-8)
5. Wiper and washer switch (P.2-33) 6. Hood release handle (P.3-16)
7. Intelligent Key port (P.5-10)
8. Paddle shifter (if so equipped) (P.5-14)
9. Steering-wheel-mounted controls (left
side)
— Menu control switch or tuning switch
(P.4-79) — BACK switch (P.4-79)
— Phone switch (if so equipped) (P.4-82,
P.4-92)
— Volume control switches (P.4-79)
— Source select switch (P.4-79)
10. Tilt steering lever (P.3-37)
11. Steering wheel — Horn (P.2-39)
— Driver supplemental air bag (P.1-31)
12. Steering-wheel-mounted controls (right side)
— Cruise control switches (P.5-22)
13. Shift lever — Automatic Transmission (AT) (P.5-12)
— Manual Transmission (MT) (P.5-17)
14. Parking brake (P.5-21)
COCKPIT
Page 71 of 455
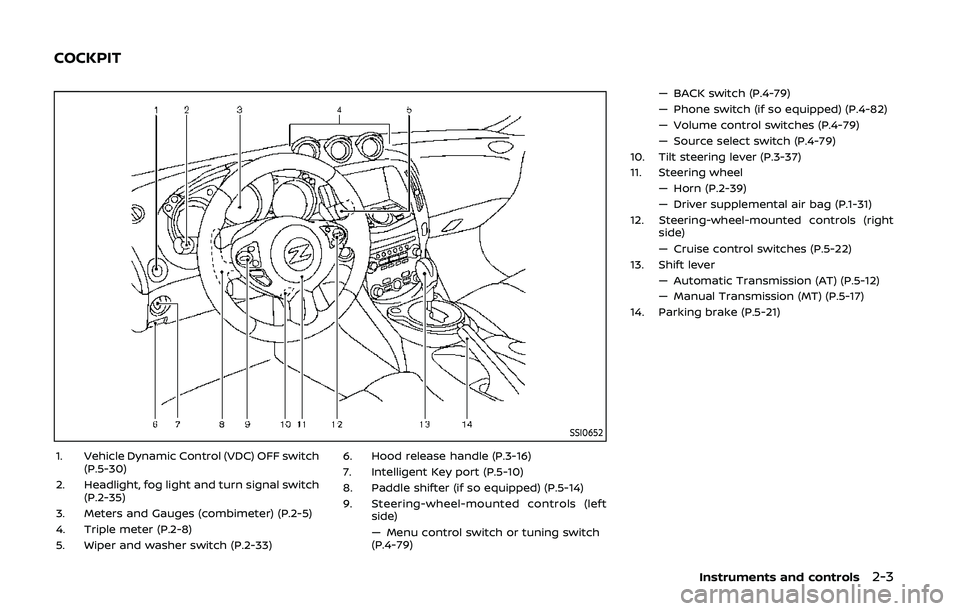
SSI0652
1. Vehicle Dynamic Control (VDC) OFF switch(P.5-30)
2. Headlight, fog light and turn signal switch (P.2-35)
3. Meters and Gauges (combimeter) (P.2-5)
4. Triple meter (P.2-8)
5. Wiper and washer switch (P.2-33) 6. Hood release handle (P.3-16)
7. Intelligent Key port (P.5-10)
8. Paddle shifter (if so equipped) (P.5-14)
9. Steering-wheel-mounted controls (left
side)
— Menu control switch or tuning switch
(P.4-79) — BACK switch (P.4-79)
— Phone switch (if so equipped) (P.4-82)
— Volume control switches (P.4-79)
— Source select switch (P.4-79)
10. Tilt steering lever (P.3-37)
11. Steering wheel — Horn (P.2-39)
— Driver supplemental air bag (P.1-31)
12. Steering-wheel-mounted controls (right side)
— Cruise control switches (P.5-22)
13. Shift lever — Automatic Transmission (AT) (P.5-12)
— Manual Transmission (MT) (P.5-17)
14. Parking brake (P.5-21)
Instruments and controls2-3
COCKPIT
Page 98 of 455
2-30Instruments and controls
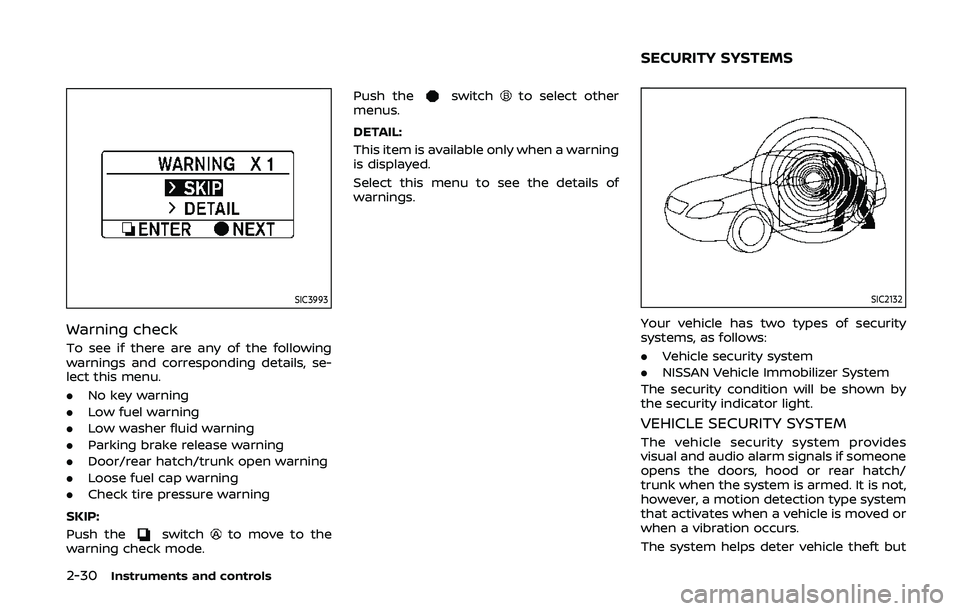
SIC3993
Warning check
To see if there are any of the following
warnings and corresponding details, se-
lect this menu.
.No key warning
. Low fuel warning
. Low washer fluid warning
. Parking brake release warning
. Door/rear hatch/trunk open warning
. Loose fuel cap warning
. Check tire pressure warning
SKIP:
Push the
switchto move to the
warning check mode. Push the
switchto select other
menus.
DETAIL:
This item is available only when a warning
is displayed.
Select this menu to see the details of
warnings.
SIC2132
Your vehicle has two types of security
systems, as follows:
. Vehicle security system
. NISSAN Vehicle Immobilizer System
The security condition will be shown by
the security indicator light.
VEHICLE SECURITY SYSTEM
The vehicle security system provides
visual and audio alarm signals if someone
opens the doors, hood or rear hatch/
trunk when the system is armed. It is not,
however, a motion detection type system
that activates when a vehicle is moved or
when a vibration occurs.
The system helps deter vehicle theft but
SECURITY SYSTEMS
Page 99 of 455
cannot prevent it, nor can it prevent the
theft of interior or exterior vehicle com-
ponents in all situations. Always secure
your vehicle even if parking for a brief
period. Never leave your Intelligent Key(s)
in the vehicle, and always lock it when
unattended. Be aware of your surround-
ings, and park in secure, well-lit areas
whenever possible.
Many devices offering additional protec-
tion, such as component locks, identifica-
tion markers, and tracking systems, are
available at auto supply stores and speci-
alty shops. Your NISSAN dealer may also
offer such equipment. Check with your
insurance company to see if you may be
eligible for discounts for various theft
protection features.
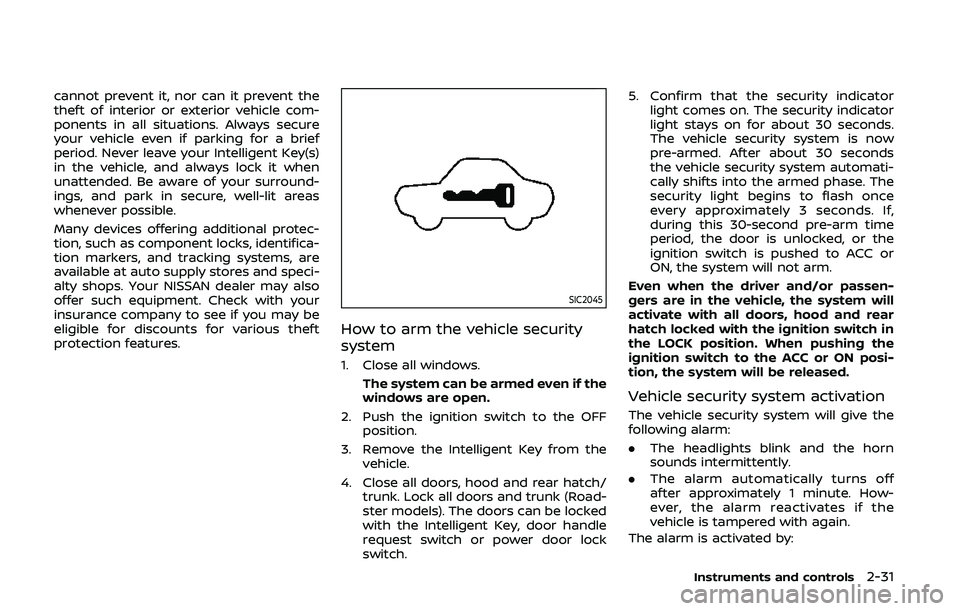
SIC2045
How to arm the vehicle security
system
1. Close all windows.The system can be armed even if the
windows are open.
2. Push the ignition switch to the OFF position.
3. Remove the Intelligent Key from the vehicle.
4. Close all doors, hood and rear hatch/ trunk. Lock all doors and trunk (Road-
ster models). The doors can be locked
with the Intelligent Key, door handle
request switch or power door lock
switch. 5. Confirm that the security indicator
light comes on. The security indicator
light stays on for about 30 seconds.
The vehicle security system is now
pre-armed. After about 30 seconds
the vehicle security system automati-
cally shifts into the armed phase. The
security light begins to flash once
every approximately 3 seconds. If,
during this 30-second pre-arm time
period, the door is unlocked, or the
ignition switch is pushed to ACC or
ON, the system will not arm.
Even when the driver and/or passen-
gers are in the vehicle, the system will
activate with all doors, hood and rear
hatch locked with the ignition switch in
the LOCK position. When pushing the
ignition switch to the ACC or ON posi-
tion, the system will be released.
Vehicle security system activation
The vehicle security system will give the
following alarm:
. The headlights blink and the horn
sounds intermittently.
. The alarm automatically turns off
after approximately 1 minute. How-
ever, the alarm reactivates if the
vehicle is tampered with again.
The alarm is activated by:
Instruments and controls2-31
Page 127 of 455
3 Pre-driving checks and adjustments
Keys ........................................................................\
................................. 3-2Intelligent Key ........................................................................\
... 3-2
Valet hand-off ........................................................................\
... 3-3
Doors ........................................................................\
.............................. 3-4 Locking with mechanical key ...................................... 3-4
Locking with inside lock knob ..................................... 3-4
Locking with power door lock switch ................... 3-5
Automatic door locks ......................................................... 3-5
Intelligent Key system .............................................................. 3-6 Intelligent Key operating range ................................ 3-7
Door locks/unlocks precaution ................................ 3-8
Intelligent Key operation ................................................. 3-9
Battery saver system ....................................................... 3-10
Warning signals .................................................................... 3-11
Troubleshooting guide ................................................... 3-12
Remote keyless entry system ......................................... 3-13
How to use remote keyless entry system ...... 3-13
Hood ........................................................................\
............................. 3-16
Rear hatch (Coupe models) .............................................. 3-17 Rear hatch opener switch ........................................... 3-17
Rear hatch release switch ........................................... 3-18
Secondary rear hatch release .................................. 3-19
Trunk lid (Roadster models) .............................................. 3-19
Trunk lid opener switch ................................................. 3-20
Trunk release power cancel switch ..................... 3-20 Interior trunk lid release ............................................. 3-20
Secondary trunk lid release ..................................... 3-21
Soft top (Roadster models) .............................................. 3-22
Before operating the top ........................................... 3-22
When operating the top ............................................. 3-24
Opening the top ................................................................ 3-26
Closing the top ................................................................... 3-26
Opening the top using the
Intelligent Key ...................................................................... 3-27
Troubleshooting guide ................................................ 3-28
If the top does not open or
close electrically ................................................................ 3-29
Care of the soft top and the
vehicle body ........................................................................\
.. 3-32
Front, side and rear unique parts
(NISMO models) ........................................................................\
.. 3-33
Fuel-filler door ........................................................................\
..... 3-34 Opening the fuel-filler door ...................................... 3-34
Fuel-filler cap ....................................................................... 3-35
Tilt steering ........................................................................\
............ 3-37
Manual operation ............................................................. 3-37
Sun visors ........................................................................\
................ 3-37
Mirrors ........................................................................\
........................ 3-38
Inside mirror ........................................................................\
. 3-38
Outside mirrors .................................................................. 3-39
Vanity mirror ........................................................................\
3-41
Page 142 of 455
3-16Pre-driving checks and adjustments
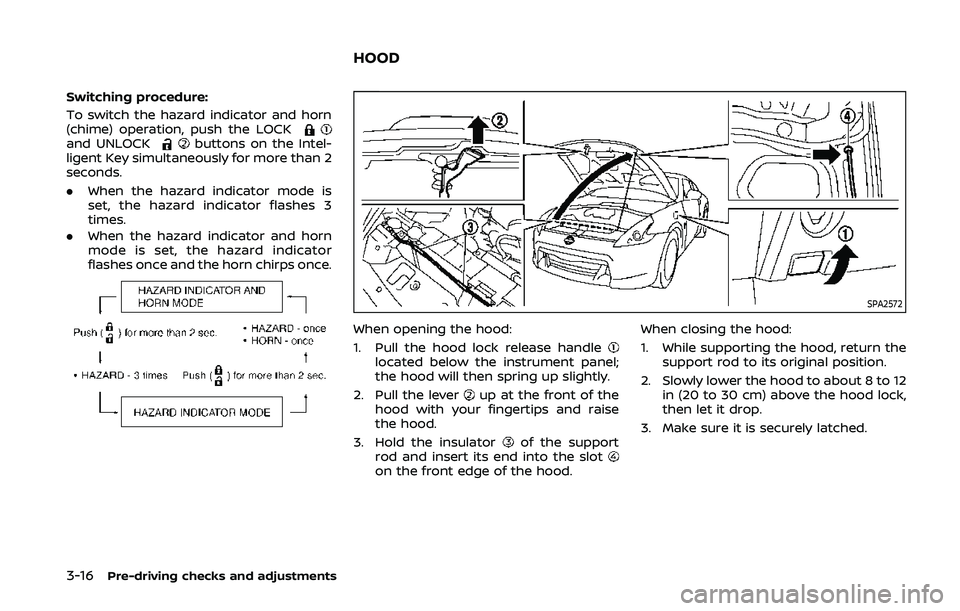
Switching procedure:
To switch the hazard indicator and horn
(chime) operation, push the LOCK
and UNLOCKbuttons on the Intel-
ligent Key simultaneously for more than 2
seconds.
. When the hazard indicator mode is
set, the hazard indicator flashes 3
times.
. When the hazard indicator and horn
mode is set, the hazard indicator
flashes once and the horn chirps once.
SPA2572
When opening the hood:
1. Pull the hood lock release handle
located below the instrument panel;
the hood will then spring up slightly.
2. Pull the lever
up at the front of the
hood with your fingertips and raise
the hood.
3. Hold the insulator
of the support
rod and insert its end into the slot
on the front edge of the hood. When closing the hood:
1. While supporting the hood, return the
support rod to its original position.
2. Slowly lower the hood to about 8 to 12 in (20 to 30 cm) above the hood lock,
then let it drop.
3. Make sure it is securely latched.
HOOD
Page 305 of 455
this manual.
If a tire rapidly loses air pressure or
“blows-out” while driving maintain control
of the vehicle by following the procedure
below. Please note that this procedure is
only a general guide. The vehicle must be
driven as appropriate based on the con-
ditions of the vehicle, road and traffic.
WARNING
The following actions can increase
the chance of losing control of the
vehicle if there is a sudden loss of tire
air pressure. Losing control of the
vehicle may cause a collision and
result in personal injury.
.The vehicle generally moves or
pulls in the direction of the flat
tire.
. Do not rapidly apply the brakes.
. Do not rapidly release the accel-
erator pedal.
. Do not rapidly turn the steering
wheel.
1. Remain calm and do not overreact.
2. Maintain a firm grip on the steering wheel with both hands and try to hold
a straight course. 3. When appropriate, slowly release the
accelerator pedal to gradually slow
the vehicle.
4. Gradually steer the vehicle to a safe location off the road and away from
traffic if possible.
5. Lightly apply the brake pedal to gra- dually stop the vehicle.
6. Turn on the hazard warning flashers and either contact a roadside emer-
gency service to change the tire or see
“Changing a flat tire (for models with
spare tire)” (P.6-4) of this Owner’s
Manual.
DRINKING ALCOHOL/DRUGS AND
DRIVING
WARNING
Never drive under the influence of
alcohol or drugs. Alcohol in the
bloodstream reduces coordination,
delays reaction time and impairs
judgement. Driving after drinking
alcohol increases the likelihood of
being involved in an accident injuring
yourself and others. Additionally, if
you are injured in an accident, alco-
hol can increase the severity of the
injury. NISSAN is committed to safe driving.
However, you must choose not to drive
under the influence of alcohol. Every year
thousands of people are injured or killed
in alcohol-related accidents. Although the
local laws vary on what is considered to
be legally intoxicated, the fact is that
alcohol affects all people differently and
most people underestimate the effects of
alcohol.
Remember, drinking and driving don’t
mix! And that is true for drugs, too (over-
the-counter, prescription, and illegal
drugs). Don’t drive if your ability to oper-
ate your vehicle is impaired by alcohol,
drugs, or some other physical condition.
Starting and driving5-7
Page 327 of 455
faces even with ABS. Stopping
distances may also be longer on
rough, gravel or snow covered
roads, or if you are using tire
chains. Always maintain a safe
distance from the vehicle in front
of you. Ultimately, the driver is
responsible for safety.
. Tire type and condition may also
affect braking effectiveness.
— When replacing tires, install
the specified size of tires on
all four wheels.
— When installing a spare tire, make sure that it is the proper
size and type as specified on
the Tire and Loading Informa-
tion label. See “Tire and Load-
ing Information label” (P.10-
14) of this manual.
— For detailed information, see “Wheels and tires” (P.8-26) of
this manual.
The Anti-lock Braking System (ABS) con-
trols the brakes so the wheels do not lock
during hard braking or when braking on
slippery surfaces. The system detects the
rotation speed at each wheel and varies
the brake fluid pressure to prevent each
wheel from locking and sliding. By pre- venting each wheel from locking, the
system helps the driver maintain steering
control and helps to minimize swerving
and spinning on slippery surfaces.
Using the system
Depress the brake pedal and hold it down.
Depress the brake pedal with firm steady
pressure, but do not pump the brakes.
The ABS will operate to prevent the
wheels from locking up. Steer the vehicle
to avoid obstacles.
WARNING
Do not pump the brake pedal. Doing
so may result in increased stopping
distances.
Self-test feature
The ABS includes electronic sensors, elec-
tric pumps, hydraulic solenoids and a
computer. The computer has a built-in
diagnostic feature that tests the system
each time you start the engine and move
the vehicle at a low speed in forward or
reverse. When the self-test occurs, you
may hear a “clunk” noise and/or feel a
pulsation in the brake pedal. This is
normal and does not indicate a malfunc-
tion. If the computer senses a malfunc-
tion, it switches the ABS off and
illuminates the ABS warning light on the
instrument panel. The brake system then
operates normally, but without anti-lock
assistance.
If the ABS warning light illuminates during
the self-test or while driving, have the
vehicle checked. It is recommended you
visit a NISSAN dealer for this service.
Normal operation
The ABS operates at speeds above 3 to 6
MPH (5 to 10 km/h).
When the ABS senses that one or more
wheels are close to locking up, the
actuator rapidly applies and releases
hydraulic pressure. This action is similar
to pumping the brakes very quickly. You
may feel a pulsation in the brake pedal
and hear a noise from under the hood or
feel a vibration from the actuator when it
is operating. This is normal and indicates
that the ABS is operating properly. How-
ever, the pulsation may indicate that road
conditions are hazardous and extra care
is required while driving.
Starting and driving5-29
Page 384 of 455
8-16Do-it-yourself
CLEANING
If your windshield is not clear after using
the windshield washer or if a wiper blade
chatters when running, wax or other
material may be on the blade or wind-
shield.
Clean the outside of the windshield with a
washer solution or a mild detergent. Your
windshield is clean if beads do not form
when rinsing with clear water.
Clean each blade by wiping it with a cloth
soaked in a washer solution or a mild
detergent. Then rinse the blade with clear
water. If your windshield is still not clear
after cleaning the blades and using the
wiper, replace the blades.
CAUTION
Worn windshield wiper blades can
damage the windshield and impair
driver vision.
SDI2359
REPLACING
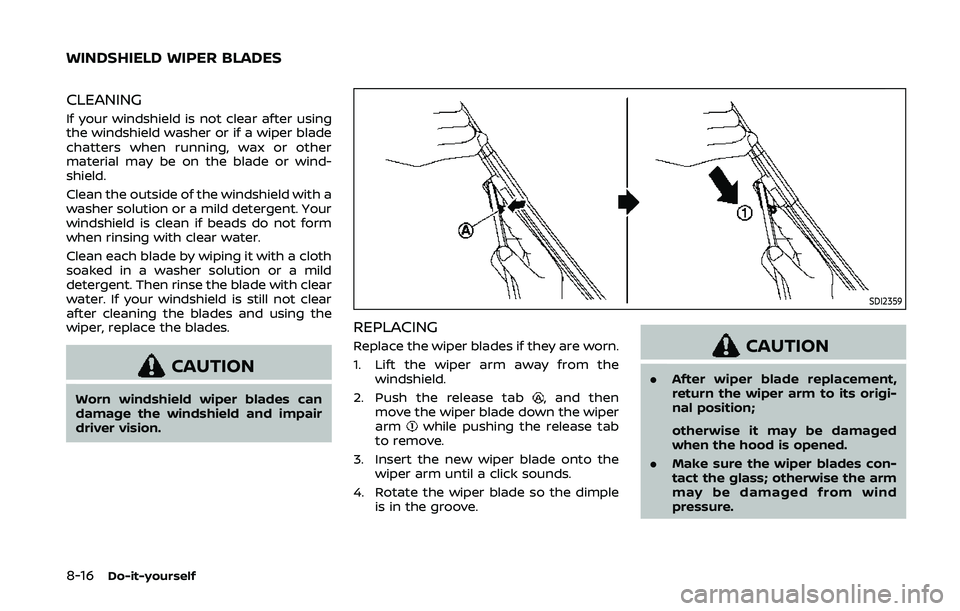
Replace the wiper blades if they are worn.
1. Lift the wiper arm away from thewindshield.
2. Push the release tab
, and then
move the wiper blade down the wiper
arm
while pushing the release tab
to remove.
3. Insert the new wiper blade onto the wiper arm until a click sounds.
4. Rotate the wiper blade so the dimple is in the groove.
CAUTION
.After wiper blade replacement,
return the wiper arm to its origi-
nal position;
otherwise it may be damaged
when the hood is opened.
. Make sure the wiper blades con-
tact the glass; otherwise the arm
may be damaged from wind
pressure.
WINDSHIELD WIPER BLADES
Page 408 of 455
9-2Maintenance and schedules
Some day-to-day and regular mainte-
nance is essential to maintain your vehi-
cle in good mechanical condition, as well
as its emission and engine performance.
It is the owner’s responsibility to make
sure that the scheduled maintenance, as
well as general maintenance, is per-
formed.
As the vehicle owner, you are the only one
who can ensure that your vehicle receives
the proper maintenance. You are a vital
link in the maintenance chain.
GENERAL MAINTENANCE
General maintenance includes those
items which should be checked during
normal day-to-day operation. They are
essential for proper vehicle operation. It is
your responsibility to perform these pro-
cedures regularly as prescribed.
Performing general maintenance checks
requires minimal mechanical skill and
only a few general automotive tools.
These checks or inspections can be done
by yourself, a qualified technician or, if you
prefer, a NISSAN dealer.
SCHEDULED MAINTENANCE
The maintenance items listed in this
section are required to be serviced at
regular intervals. However, under severe
driving conditions, additional or more
frequent maintenance will be required.
WHERE TO GO FOR SERVICE
If maintenance service is required or your
vehicle appears to malfunction, have the
systems checked and serviced. It is re-
commended you visit a NISSAN dealer for
this service.
NISSAN technicians are well-trained spe-
cialists and are kept up to date with the
latest service information through tech-
nical bulletins, service tips and training
programs. They are completely qualified
to work on NISSAN vehiclesbeforework
begins.
If your vehicle is involved in a collision, it is
recommended that you ask your NISSAN
dealer where the nearest NISSAN Certified
Collision Center is located, or go to http://
collision.nissanusa.com.
You can be confident that a NISSAN
dealer’s service department can perform
the service needed to meet the mainte-
nance requirements on your vehicle. During the normal day-to-day operation
of the vehicle, general maintenance
should be performed regularly as pre-
scribed in this section. If you detect any
unusual sounds, vibrations or smells, be
sure to check for the cause, or it is
recommended to have a NISSAN dealer
do it promptly. In addition, it is recom-
mended you visit a NISSAN dealer if you
think that repairs are required.
When performing any checks or mainte-
nance work, closely observe “Mainte-
nance precautions” (P.8-2) of this manual.
EXPLANATION OF GENERAL MAIN-
TENANCE ITEMS
Additional information on the following
items with “*” is found in the “8. Do-it-
yourself” section of this manual.
Outside the vehicle
The maintenance items listed here should
be performed from time to time, unless
otherwise specified.
Doors and engine hood:
Check that all
doors and the engine hood, operate
properly. Also ensure that all latches lock
securely. Lubricate hinges, latches, latch
pins, rollers and links if necessary. Make
sure that the secondary latch keeps the
hood from opening when the primary
latch is released.
MAINTENANCE REQUIREMENT GENERAL MAINTENANCE