manual radio set NISSAN 370Z COUPE 2012 Owners Manual
[x] Cancel search | Manufacturer: NISSAN, Model Year: 2012, Model line: 370Z COUPE, Model: NISSAN 370Z COUPE 2012Pages: 427, PDF Size: 3.25 MB
Page 122 of 427
3-6Pre-driving checks and adjustments
3. Within 20 seconds of performing Step 2,push and hold the power door lock switch to
the
position (UNLOCK) for more than 5
seconds.
4. When activated, the hazard indicator will flash twice. When deactivated, the hazard
indicator will flash once.
5. The ignition switch must be placed in the OFF and ON position again between each
setting change.
When the automatic door unlock system is
deactivated, the doors do not unlock when the
ignition switch is placed in the OFF position. To
unlock the door manually, use the inside lock
knob or the power door lock switch (driver’s or
front passenger’s side).WARNING
. Radio waves could adversely affect
electric medical equipment. Those
who use a pacemaker should con-
tact the electric medical equipment
manufacturer for the possible influ-
ences before use.
. The Intelligent Key transmits radio
waves when the buttons are
pushed. The FAA advises that the
radio waves may affect aircraft na-
vigation and communication sys-
tems. Do not operate the
Intelligent Key while on an airplane.
Make sure the buttons are not
operated unintentionally when the
unit is stored during a flight.
The Intelligent Key system can operate all the
door and rear hatch/trunk lid locks using the
remote controller function or pushing the re-
quest switch on the vehicle without taking the
key out from a pocket or purse. The operating
environment and/or conditions may affect the
Intelligent Key system operation.
Be sure to read the following before using the
Intelligent Key system.
CAUTION
. Be sure to carry the Intelligent Key
with you when operating the vehi-
cle.
. Never leave the Intelligent Key in
the vehicle when you leave the
vehicle.
The Intelligent Key is always communicating with
the vehicle as it receives radio waves. The
Intelligent Key system transmits weak radio
waves. Environmental conditions may interfere
with the operation of the Intelligent Key system
under the following operating conditions.
. When operating near a location where
strong radio waves are transmitted, such
as a TV tower, power station and broad-
casting station.
. When in possession of wireless equipment,
such as a cellular telephone, transceiver,
and CB radio.
. When the Intelligent Key is in contact with or
covered by metallic materials.
. When any type of radio wave remote control
is used nearby.
. When the Intelligent Key is placed near an
electric appliance such as a personal
INTELLIGENT KEY SYSTEM
Page 200 of 427
4-44Center display, heater, air conditioner, audio, phone and voice recognition systems
Balance to the desired level. Fade adjusts the
sound level between the front and rear speakers
and Balance adjusts the sound between the
right and left speakers.
Once you have adjusted the sound quality to the
desired level, push the MENU button repeatedly
until the radio or CD display reappears (normal
mode) . Otherwise, the radio or CD display will
automatically reappear after approximately 10
seconds.
Clock adjustment:
Push the MENU button until the CLOCK mode
appears. Then push the TUNE or SEEK button
to select “CLK-ON” or “CLK-OFF” to turn the
clock on or off.
“CLK-ON” needs to be selected before adjust-
ing the clock display.
1. Push the MENU button.
2. Push the MENU button again. The clockdisplay starts to flash.
3. Push the TUNE or SEEK button to adjust the hours.
4. Push the MENU button again. The display will switch to the minute adjustment mode.
5. Push the TUNE or SEEK button to adjust the minutes. 6. Push the MENU button again to exit the
clock mode.
The display will return to the regular clock
display after 5 seconds.
To reset the minute to zero, hold down the
MENU button and then push the TUNE or SEEK
button, the time will be reset as follows.
. In case the displayed minute is in the range
of 00 - 29, the hour will stay the same and
the minute will be reset to 00.
. In case the displayed minute is in the range
of 30 - 59, the hour will be advanced by one
hour and the minute will be reset to 00.
For example, if the MENU and TUNE buttons are
pushed while the time is between “8:00” and
“8:29”, the display will be reset to “8:00”. If
pushed while the time is between “8:30” and
“8:59”, the display will be reset to “9:00”. At the
same time the display will return to the previous
audio mode.FM-AM radio operation
Radio (FM/AM) band select:
Pushing the radio band select button will
change the band as follows:
AM ?FM1 ?FM2 ?AM
When the radio band select button is pushed
while the ignition switch is in the ACC or ON
position, the radio will come on at the station last
played.
The last station played will also come on when
the PWR button is pushed to ON.
If another audio source is playing when the radio
band select button is pushed, the audio source
will automatically be turned off and the last radio
station played will come on.
When the stereo broadcast signal is weak, the
radio will automatically change from stereo to
monaural reception.
TUNE (Tuning):
Push the TUNE button
orfor manual
tuning.
SEEK tuning:
Push the SEEK button
orto tune from
low to high or high to low frequencies and to
stop at the next broadcasting station.
Page 204 of 427
4-48Center display, heater, air conditioner, audio, phone and voice recognition systems
Audio main operation
Head unit:
The auto loudness circuit enhances the low and
high frequency ranges automatically in both
radio reception and CD playback.
ON·OFF/Volume control:
Push the ignition switch to the ACC or ON
position, and then push the ON·OFF button
while the system is off to call up the mode (radio,
CD or AUX) which was playing immediately
before the system was turned off. While the
system is on, pushing the ON·OFF button turns
the system off.
Turn the VOL control knob to adjust the volume.
MUTE button:
Push the
button to mute the audio sound.
Push the
button again to release the mute.
Adjusting tone quality and speaker bal-
ance:
To adjust Bass, Treble, Balance and Fade, push
the Audio button. When the display shows the
setting you want to change (Bass, Treble,
Balance and Fade) , push the SEEK or TUNE
button to set the desired setting.
These items can also be adjusted by pushing
the AUDIO button. .
Speed Sensitive Vol.
Sound volume is increased according to the
vehicle speed. Choose the effect level from
“HIGH”, “MID”, “LOW” or “OFF”.
. Beep tuning
When this item is turned to ON, you will hear
a beep sound when you use a button.
FM-AM-SAT radio operation
radio (FM/AM) band select:
Pushing the radio band select button will
change the band as follows:
AM ?FM1 ?FM2 ?AM
radio (SAT) band select:
Pushing the radio band select button will
change the band as follows:
XM1 ?XM2 ?XM3 ?XM1
When the radio band select button is pushed
while the ignition switch is in the ACC or ON
position, the radio will come on at the channel
last played.
The last channel played will also come on when
the ON·OFF button is pushed to ON.
The satellite radio mode requires an active XM
Satellite Radio subscription. The satellite radio is
not available in Alaska, Hawaii and Guam. If another audio source is playing when the radio
band select button is turned to ON, the audio
source will automatically be turned off and the
last radio channel played will come on.
When the stereo broadcast signal is weak, the
radio will automatically change from stereo to
monaural reception.
TUNE (Tuning):
. For AM and FM radio
Push the TUNE button
orfor
manual tuning.
. For XM Satellite Radio
Push the TUNE button
orto seek
channels from all of the categories when any
CAT is not selected.
SEEK tuning/CATEGORY
(CAT):
. For AM and FM radio
Push the SEEK button
orto tune
from low to high or high to low frequencies
and to stop at the next broadcasting station.
. For XM Satellite Radio
Push the SEEK button
orto tune
to the first channel of the next or previous
category.
During satellite radio reception, the following
Page 209 of 427
Turn the VOL control knob to adjust the volume.
Adjusting tone quality and speaker bal-
ance:
To adjust Bass, Treble, Balance and Fade, push
the Audio control knob. When the display shows
the setting you want to change (Bass, Treble,
Balance and Fade) , rotate the Audio control
knob to set the desired setting. For the other
setting methods, see “How to use SETTING
button” (P.4-11).
This vehicle has some sound effect functions as
follows:
.Speed Sensitive Vol.
For more details, see “How to use SETTING
button” (P.4-11).
Switching the display:
Pushing the DISC·AUX button will switch the
displays as follows:
iPod
®/USB ?CD/DVD ?Music Box®(if so
equipped) ?Bluetooth®Audio ?AUX ?
iPod®/USB
FM-AM-SAT radio operation
radio (FM/AM) band select:
Pushing the radio band select button will
change the band as follows:
AM ?FM1 ?FM2 ?AM
radio (SAT) band select:
Pushing the radio band select button will
change the band as follows:
XM1 ?XM2 ?XM3 ?XM1
When the radio band select button is pushed
while the ignition switch is in the ACC or ON
position, the radio will come on at the channel
last played.
The last channel played will also come on when
the ON·OFF button is pushed to ON.
The satellite radio is not available in Alaska,
Hawaii and Guam.
If another audio source is playing when the radio
band select button is turned to ON, the audio
source will automatically be turned off and the
last radio channel played will come on.
When the stereo broadcast signal is weak, the
radio will automatically change from stereo to
monaural reception. TUNE (Tuning):
. For AM and FM radio
Turn the radio TUNE knob for manual tuning.
. For XM Satellite Radio
Turn the radio TUNE knob to seek channels
from all of the categories when any category
is not selected.
SEEK tuning/CATEGORY
(CAT):
. For AM and FM radio
Push the SEEK button
orto tune
from low to high or high to low frequencies
and to stop at the next broadcasting station.
. For XM Satellite Radio
Push the SEEK button
orto tune
to the first channel of the next or previous
category.
During satellite radio reception, the following
notices will be displayed under certain condi-
tions.
. NO SIGNAL (No signal is received while the
SAT tuner is connected.)
. OFF AIR (Broadcasting signed off)
. CHECK ANTENNA (Antenna connection
error)
. LOADING (When the initial setting is
performed)
Center display, heater, air conditioner, audio, phone and voice recognition systems4-53
Page 233 of 427
.A new disc may be rough on the inner and
outer edges. Remove the rough edges by
rubbing the inner and outer edges with the
side of a pen or pencil as illustrated.
USB memory
.Never touch the terminal portion of the USB
memory.
. Do not place heavy objects on the USB
memory.
. Do not store the USB memory in highly
humid locations.
. Do not expose the USB memory to direct
sunlight.
. Do not spill any liquids on the USB memory.
Refer to the USB memory Owner’s Manual for
the details.
SAA2555
With navigation system
SAA2556
Without navigation system
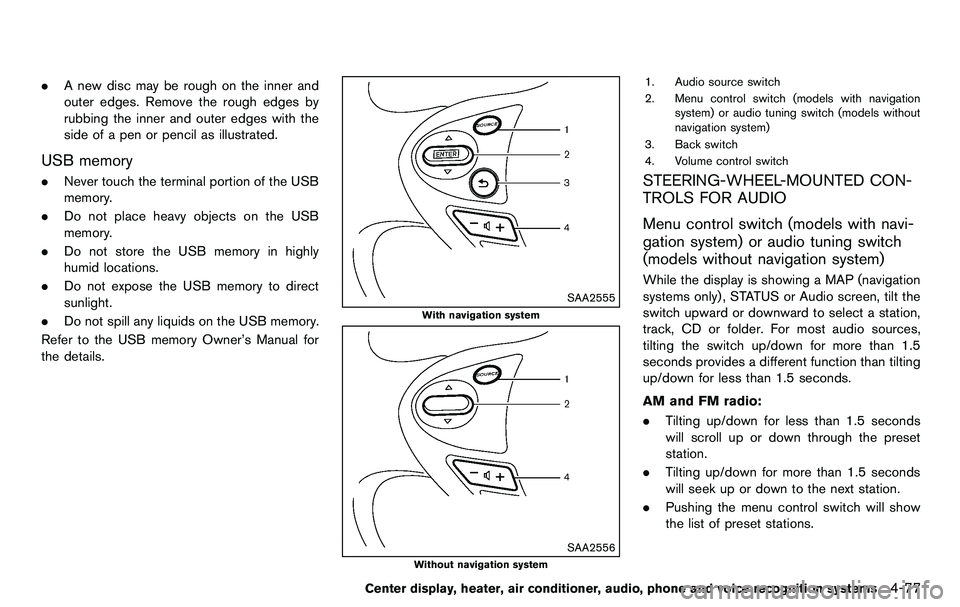
1. Audio source switch
2. Menu control switch (models with navigation system) or audio tuning switch (models without
navigation system)
3. Back switch
4. Volume control switch
STEERING-WHEEL-MOUNTED CON-
TROLS FOR AUDIO
Menu control switch (models with navi-
gation system) or audio tuning switch
(models without navigation system)
While the display is showing a MAP (navigation
systems only), STATUS or Audio screen, tilt the
switch upward or downward to select a station,
track, CD or folder. For most audio sources,
tilting the switch up/down for more than 1.5
seconds provides a different function than tilting
up/down for less than 1.5 seconds.
AM and FM radio:
. Tilting up/down for less than 1.5 seconds
will scroll up or down through the preset
station.
. Tilting up/down for more than 1.5 seconds
will seek up or down to the next station.
. Pushing the menu control switch will show
the list of preset stations.
Center display, heater, air conditioner, audio, phone and voice recognition systems4-77
Page 248 of 427
4-92Center display, heater, air conditioner, audio, phone and voice recognition systems
slow down or disconnect the communica-
tion and cause undesired noise. It is
recommended that you turn off the wireless
LAN (Wi-Fi) when using the Bluetooth
®
functions.
. Set up the wireless connection between a
compatible cellular phone and the in-vehicle
phone module before using the Bluetooth
®
Hands-Free Phone System.
. Some Bluetooth®enabled cellular phones
may not be recognized by the in-vehicle
phone module. Please visit www.nissanusa.
com/bluetooth for a recommended phone
list and connecting.
. You will not be able to use a hands-free
phone under the following conditions:
— Your vehicle is outside of the telephone
service area.
— Your vehicle is in an area where it is difficult to receive radio waves; such as in
a tunnel, in an underground parking
garage, near a tall building or in a
mountainous area.
— Your cellular phone is locked to prevent it from being dialed.
. When the radio wave condition is not ideal
or ambient sound is too loud, it may be
difficult to hear the other person’s voice
during a call. .
Immediately after the ignition switch is
pushed to the ON position, it may be
impossible to receive a call for a short
period of time.
. Do not place the cellular phone in an area
surrounded by metal or far away from the in-
vehicle phone module to prevent tone quality
degradation and wireless connection dis-
ruption.
. While a cellular phone is connected through
the Bluetooth®wireless connection, the
battery power of the cellular phone may
discharge quicker than usual. The Blue-
tooth
®Hands-Free Phone System cannot
charge cellular phones.
. If the Bluetooth
®Hands-Free Phone System
seems to be malfunctioning, see “Trouble-
shooting guide” later in this section. You can
also visit www.nissanusa.com/bluetooth for
troubleshooting help.
. Some cellular phones or other devices may
cause interference or a buzzing noise to
come from the audio system speakers.
Storing the device in a different location
may reduce or eliminate the noise.
. Refer to the cellular phone Owner’s Manual
regarding battery charging, cellular phone
antenna, etc. .
This wireless hands free car kit is based on
Bluetooth
®technology,
— Frequency: 2402 MHz - 2480 MHz
— Output Power: 4.14 dBm E.I.R.P
— Modulation: FHSS GFSK 8DPSK, p/
4DQPSK
— Number of Channel: 79
— This wireless equipment can’t be used for any services related to safety because
there is the possibility of radio interfer-
ence.
REGULATORY INFORMATION
FCC Regulatory information
. CAUTION: To maintain compliance with
FCC’s RF exposure guidelines, use only
the supplied antenna. Unauthorized antenna,
modification, or attachments could damage
the transmitter and may violate FCC regula-
tions.
. Operation is subject to the following two
conditions:
1. this device may not cause interference and
2. this device must accept any interference, including interference that may cause un-
desired operation of the device
Page 423 of 427
FM-AM-SAT radio with compact disc (CD)
player (models with navigation system) ......... 4-52
Rapid air pressure loss................................................ 5-6
Readiness for inspection/maintenance
(I/M) test........................................................................ 9-23
Rear hatch..................................................................... 3-16
Rear hatch opener...................................................... 3-16
Rear hatch opener switch......................................... 3-17
Rear parcel box ........................................................... 2-42
Rear window defroster switch................................. 2-31
RearView monitor (models with
navigation system) ...................................................... 4-18
Recorders, Event data ............................................... 9-23
Registering your vehicle in another country......... 9-11
Remote keyless entry system................................... 3-13
Repairing flat tire (with emergency tire puncture
repair kit) ......................................................................... 6-8
Reporting safety defects........................................... 9-22
Rollover............................................................................ 5-6
Roof, Soft top .............................................................. 3-21
S
Safety, Child seat belts ............................................. 1-15
Satellite radio operation ................................ 4-48, 4-53
Seat adjustment Front manual seat adjustment.............................. 1-4
Front power seat adjustment ............................... 1-2
Front seats................................................................ 1-2
Seat belt(s) Child safety............................................................ 1-15
Infants...................................................................... 1-15
Injured persons..................................................... 1-11
Larger children...................................................... 1-16
Precautions on seat belt usage........................... 1-9
Pregnant women .................................................. 1-11
Seat belt cleaning................................................... 7-7 Seat belt extenders.............................................. 1-14
Seat belt maintenance........................................ 1-14
Seat belt warning light and chime................... 2-13
Seat belts.................................................................. 1-9
Seat belts with pretensioners........................... 1-39
Three-point type................................................... 1-11
Seat(s) Climate controlled seats..................................... 2-38
Heated seats......................................................... 2-36
Seats .......................................................................... 1-2
Secondary rear hatch release.................................. 3-18
Secondary trunk lid release...................................... 3-20
Security system (NISSAN Vehicle Immobilizer
System) , Engine start................................................. 2-28
Security system, Vehicle security system ............. 2-27
Selector lever, Shift lock release ............................ 5-16
Servicing air conditioner............................................ 4-30
SETTING button.......................................................... 4-11
Shift lock release, Transmission .............................. 5-16
Shift “P” warning (Automatic
Transmission models) ................................................ 2-19
Shifting Automatic transmission....................................... 5-12
Manual transmission............................................ 5-16
Soft top Care and cleaning................................................... 7-3
If the top does not open or close.................... 3-28
Opening using the Intelligent Key.................... 3-26
Soft top indicator light............................. 2-15, 3-24
Soft top operation................................................ 3-21
Spare tire......................................................................... 9-9
Spark plugs .................................................................. 8-19
Speedometer.................................................................. 2-6
Starting Before starting the engine................................. 5-11
Jump starting......................................................... 6-14
Precautions when starting and driving .............. 5-2 Push starting ......................................................... 6-16
Starting the engine .............................................. 5-11
STATUS button.............................................................. 4-7
Status light, Front passenger air bag .................... 1-35
Steering Power steering fluid............................................. 8-13
Power steering system ....................................... 5-25
Steering-wheel-mounted controls
for audio ................................................................. 4-77
Storage .......................................................................... 2-40
Sun visors ..................................................................... 3-36
Supplemental air bag warning labels..................... 1-40
Supplemental air bag warning light............ 1-41, 2-13
Supplemental restraint system................................. 1-28 Precautions on supplemental
restraint system..................................................... 1-28
Switch
Autolight switch.................................................... 2-32
Fog light switch.................................................... 2-35
Hazard warning flasher switch.......................... 2-35
Headlight switch................................................... 2-32
Ignition switch....................................................... 5-12
Ignition switch manual
transmission models............................................ 5-16
Power door lock switch......................................... 3-5
Rear window defroster switch.......................... 2-31
Turn signal switch ................................................ 2-35
Vehicle dynamic control (VDC) off switch..... 2-39
SynchroRev Match mode (S-MODE).................... 5-17
T
Tachometer ..................................................................... 2-6
Temperature gauge, Engine coolant
temperature gauge........................................................ 2-7
Theft (NISSAN Vehicle Immobilizer System) ,
Engine start................................................................... 2-28
10-5