NISSAN ALMERA 2001 Service Manual
Manufacturer: NISSAN, Model Year: 2001, Model line: ALMERA, Model: NISSAN ALMERA 2001Pages: 2898, PDF Size: 60.76 MB
Page 2191 of 2898
scratches or seizure. If scratches or seizure is found, hone or
replace the cylinder block.
SEM150B
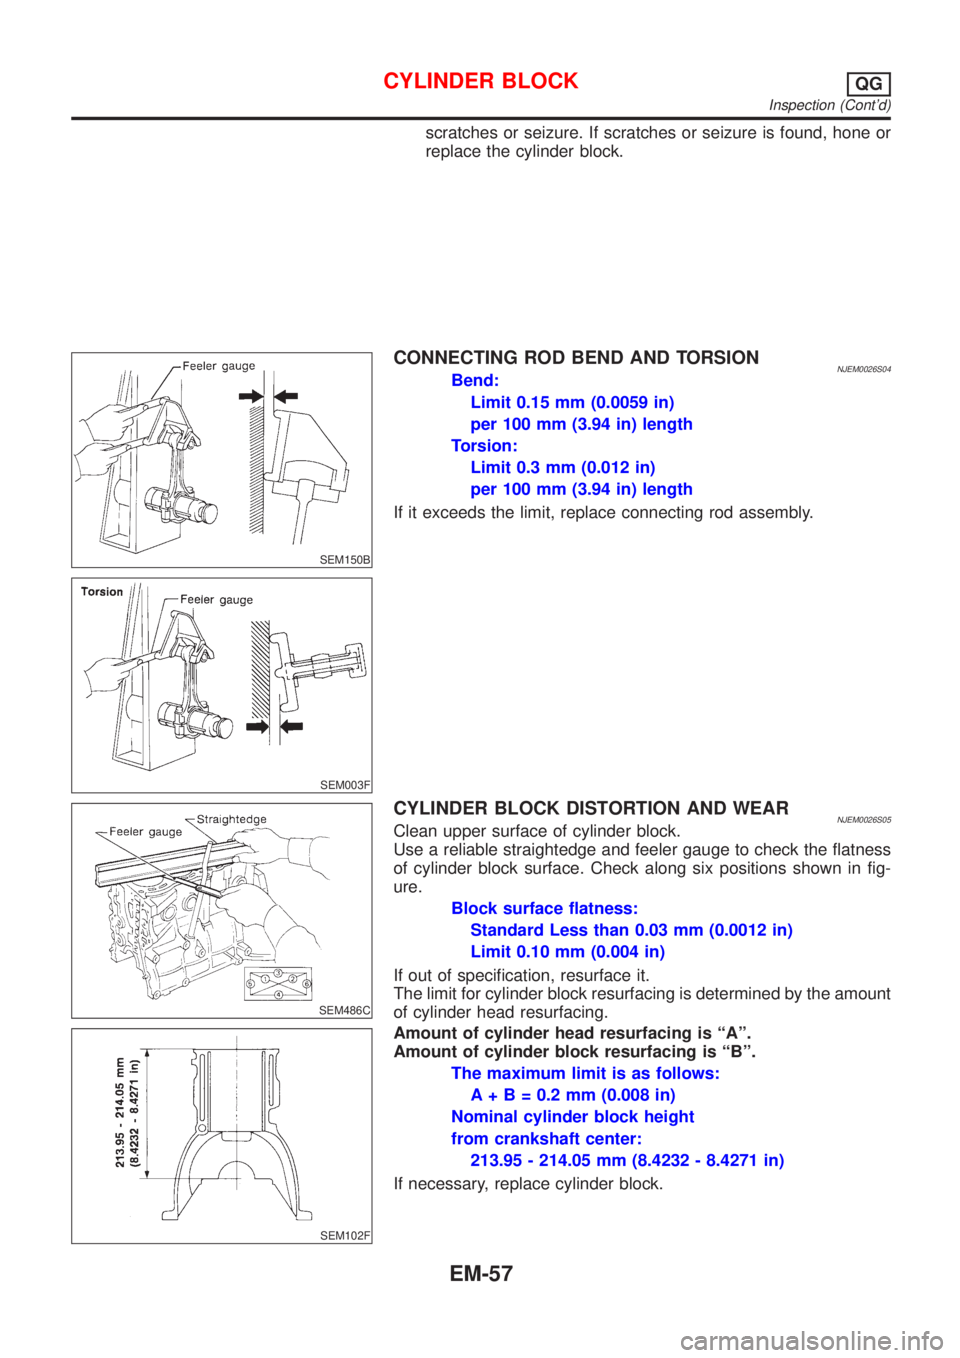
CONNECTING ROD BEND AND TORSIONNJEM0026S04Bend:
Limit 0.15 mm (0.0059 in)
per 100 mm (3.94 in) length
Torsion:
Limit 0.3 mm (0.012 in)
per 100 mm (3.94 in) length
If it exceeds the limit, replace connecting rod assembly.
SEM003F
SEM486C
CYLINDER BLOCK DISTORTION AND WEARNJEM0026S05Clean upper surface of cylinder block.
Use a reliable straightedge and feeler gauge to check the flatness
of cylinder block surface. Check along six positions shown in fig-
ure.
Block surface flatness:
Standard Less than 0.03 mm (0.0012 in)
Limit 0.10 mm (0.004 in)
If out of specification, resurface it.
The limit for cylinder block resurfacing is determined by the amount
of cylinder head resurfacing.
SEM102F
Amount of cylinder head resurfacing is ªAº.
Amount of cylinder block resurfacing is ªBº.
The maximum limit is as follows:
A + B = 0.2 mm (0.008 in)
Nominal cylinder block height
from crankshaft center:
213.95 - 214.05 mm (8.4232 - 8.4271 in)
If necessary, replace cylinder block.
CYLINDER BLOCKQG
Inspection (Cont'd)
EM-57
Page 2192 of 2898
SEM166D
SEM929F
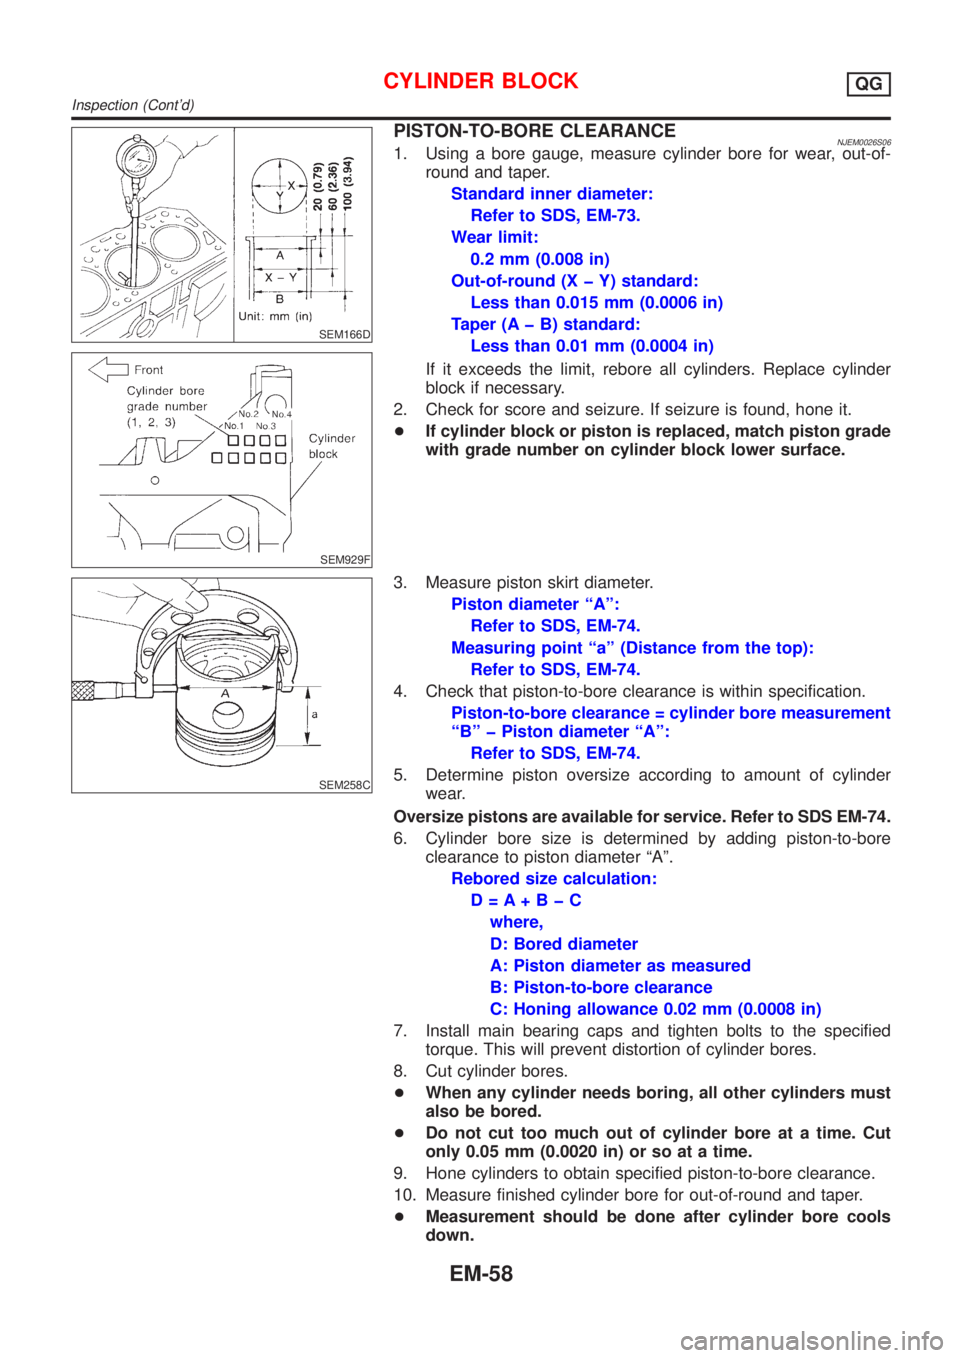
PISTON-TO-BORE CLEARANCENJEM0026S061. Using a bore gauge, measure cylinder bore for wear, out-of-
round and taper.
Standard inner diameter:
Refer to SDS, EM-73.
Wear limit:
0.2 mm (0.008 in)
Out-of-round (X þ Y) standard:
Less than 0.015 mm (0.0006 in)
Taper (A þ B) standard:
Less than 0.01 mm (0.0004 in)
If it exceeds the limit, rebore all cylinders. Replace cylinder
block if necessary.
2. Check for score and seizure. If seizure is found, hone it.
+If cylinder block or piston is replaced, match piston grade
with grade number on cylinder block lower surface.
SEM258C
3. Measure piston skirt diameter.
Piston diameter ªAº:
Refer to SDS, EM-74.
Measuring point ªaº (Distance from the top):
Refer to SDS, EM-74.
4. Check that piston-to-bore clearance is within specification.
Piston-to-bore clearance = cylinder bore measurement
ªBº þ Piston diameter ªAº:
Refer to SDS, EM-74.
5. Determine piston oversize according to amount of cylinder
wear.
Oversize pistons are available for service. Refer to SDS EM-74.
6. Cylinder bore size is determined by adding piston-to-bore
clearance to piston diameter ªAº.
Rebored size calculation:
D=A+BþC
where,
D: Bored diameter
A: Piston diameter as measured
B: Piston-to-bore clearance
C: Honing allowance 0.02 mm (0.0008 in)
7. Install main bearing caps and tighten bolts to the specified
torque. This will prevent distortion of cylinder bores.
8. Cut cylinder bores.
+When any cylinder needs boring, all other cylinders must
also be bored.
+Do not cut too much out of cylinder bore at a time. Cut
only 0.05 mm (0.0020 in) or so at a time.
9. Hone cylinders to obtain specified piston-to-bore clearance.
10. Measure finished cylinder bore for out-of-round and taper.
+Measurement should be done after cylinder bore cools
down.
CYLINDER BLOCKQG
Inspection (Cont'd)
EM-58
Page 2193 of 2898
SEM316A
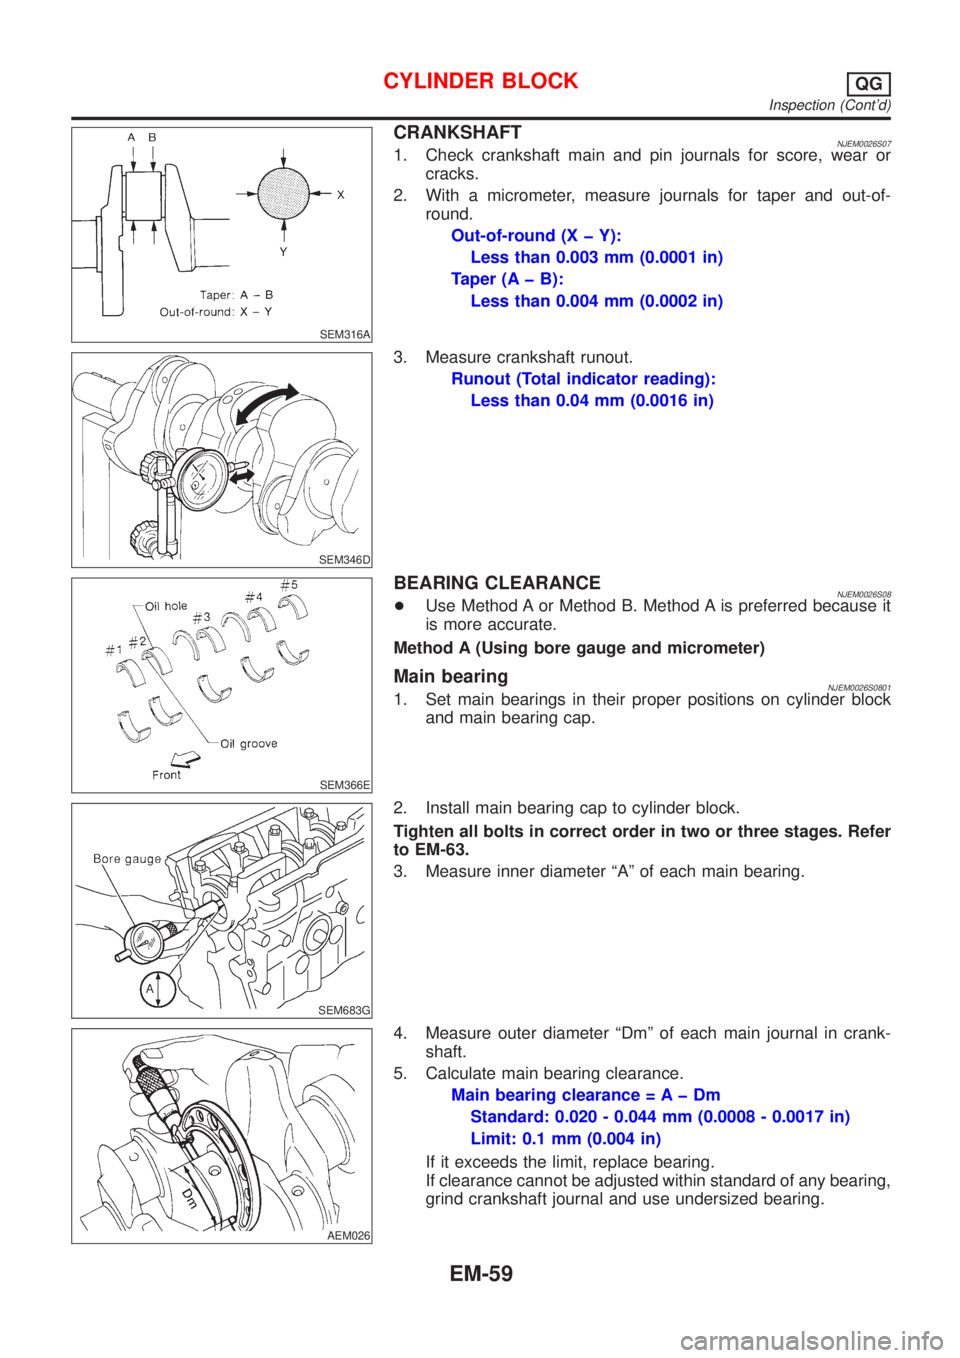
CRANKSHAFTNJEM0026S071. Check crankshaft main and pin journals for score, wear or
cracks.
2. With a micrometer, measure journals for taper and out-of-
round.
Out-of-round (X þ Y):
Less than 0.003 mm (0.0001 in)
Taper (A þ B):
Less than 0.004 mm (0.0002 in)
SEM346D
3. Measure crankshaft runout.
Runout (Total indicator reading):
Less than 0.04 mm (0.0016 in)
SEM366E
BEARING CLEARANCENJEM0026S08+Use Method A or Method B. Method A is preferred because it
is more accurate.
Method A (Using bore gauge and micrometer)
Main bearingNJEM0026S08011. Set main bearings in their proper positions on cylinder block
and main bearing cap.
SEM683G
2. Install main bearing cap to cylinder block.
Tighten all bolts in correct order in two or three stages. Refer
to EM-63.
3. Measure inner diameter ªAº of each main bearing.
AEM026
4. Measure outer diameter ªDmº of each main journal in crank-
shaft.
5. Calculate main bearing clearance.
Main bearing clearance = A þ Dm
Standard: 0.020 - 0.044 mm (0.0008 - 0.0017 in)
Limit: 0.1 mm (0.004 in)
If it exceeds the limit, replace bearing.
If clearance cannot be adjusted within standard of any bearing,
grind crankshaft journal and use undersized bearing.
CYLINDER BLOCKQG
Inspection (Cont'd)
EM-59
Page 2194 of 2898
SEM588A
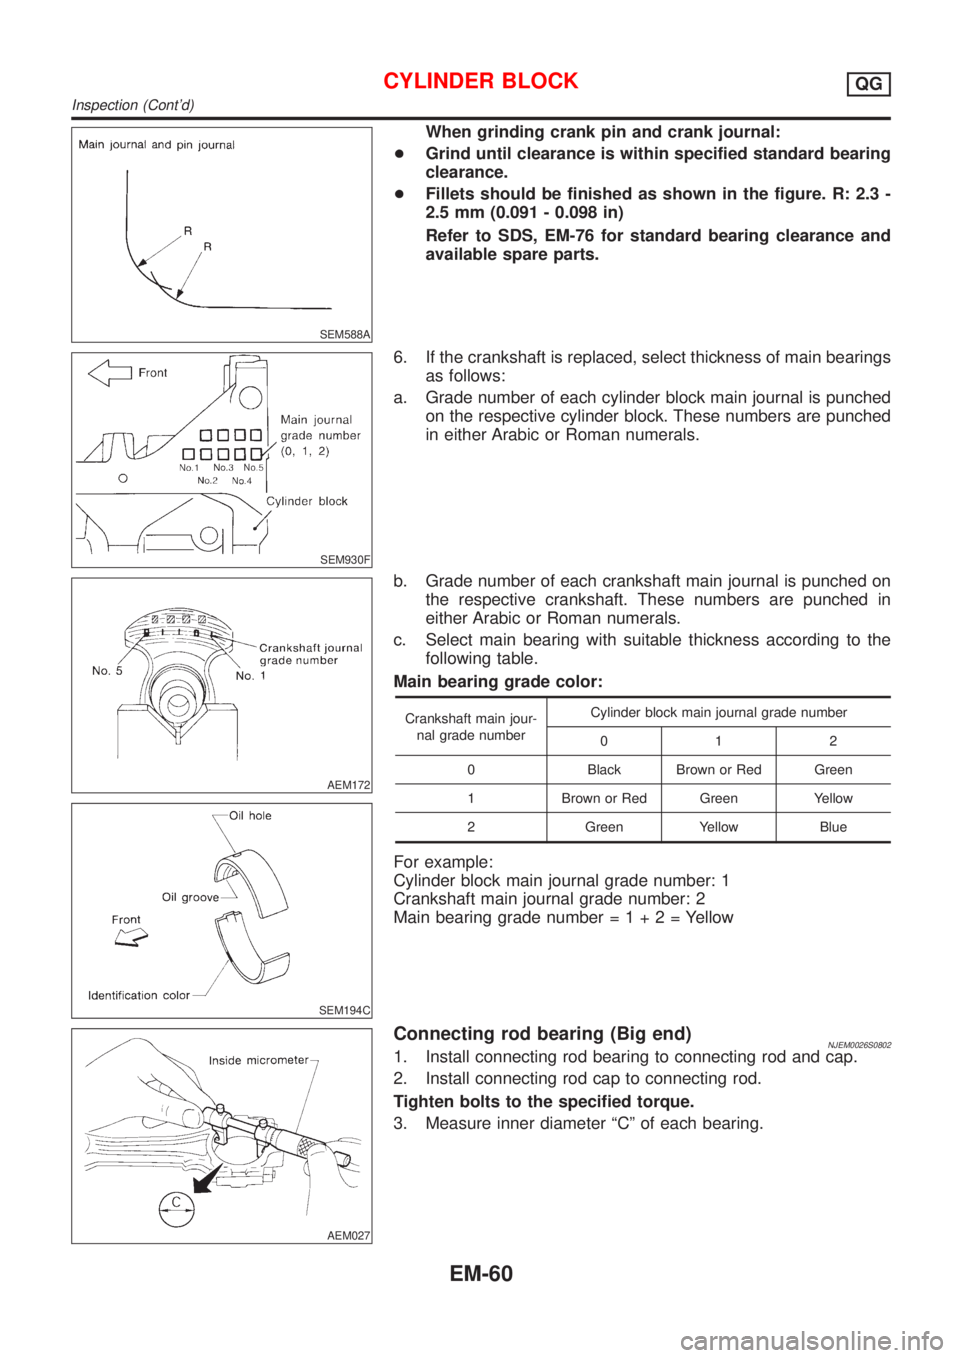
When grinding crank pin and crank journal:
+Grind until clearance is within specified standard bearing
clearance.
+Fillets should be finished as shown in the figure. R: 2.3 -
2.5 mm (0.091 - 0.098 in)
Refer to SDS, EM-76 for standard bearing clearance and
available spare parts.
SEM930F
6. If the crankshaft is replaced, select thickness of main bearings
as follows:
a. Grade number of each cylinder block main journal is punched
on the respective cylinder block. These numbers are punched
in either Arabic or Roman numerals.
AEM172
SEM194C
b. Grade number of each crankshaft main journal is punched on
the respective crankshaft. These numbers are punched in
either Arabic or Roman numerals.
c. Select main bearing with suitable thickness according to the
following table.
Main bearing grade color:
Crankshaft main jour-
nal grade numberCylinder block main journal grade number
012
0 Black Brown or Red Green
1 Brown or Red Green Yellow
2 Green Yellow Blue
For example:
Cylinder block main journal grade number: 1
Crankshaft main journal grade number: 2
Main bearing grade number=1+2=Yellow
AEM027
Connecting rod bearing (Big end)NJEM0026S08021. Install connecting rod bearing to connecting rod and cap.
2. Install connecting rod cap to connecting rod.
Tighten bolts to the specified torque.
3. Measure inner diameter ªCº of each bearing.
CYLINDER BLOCKQG
Inspection (Cont'd)
EM-60
Page 2195 of 2898
AEM028
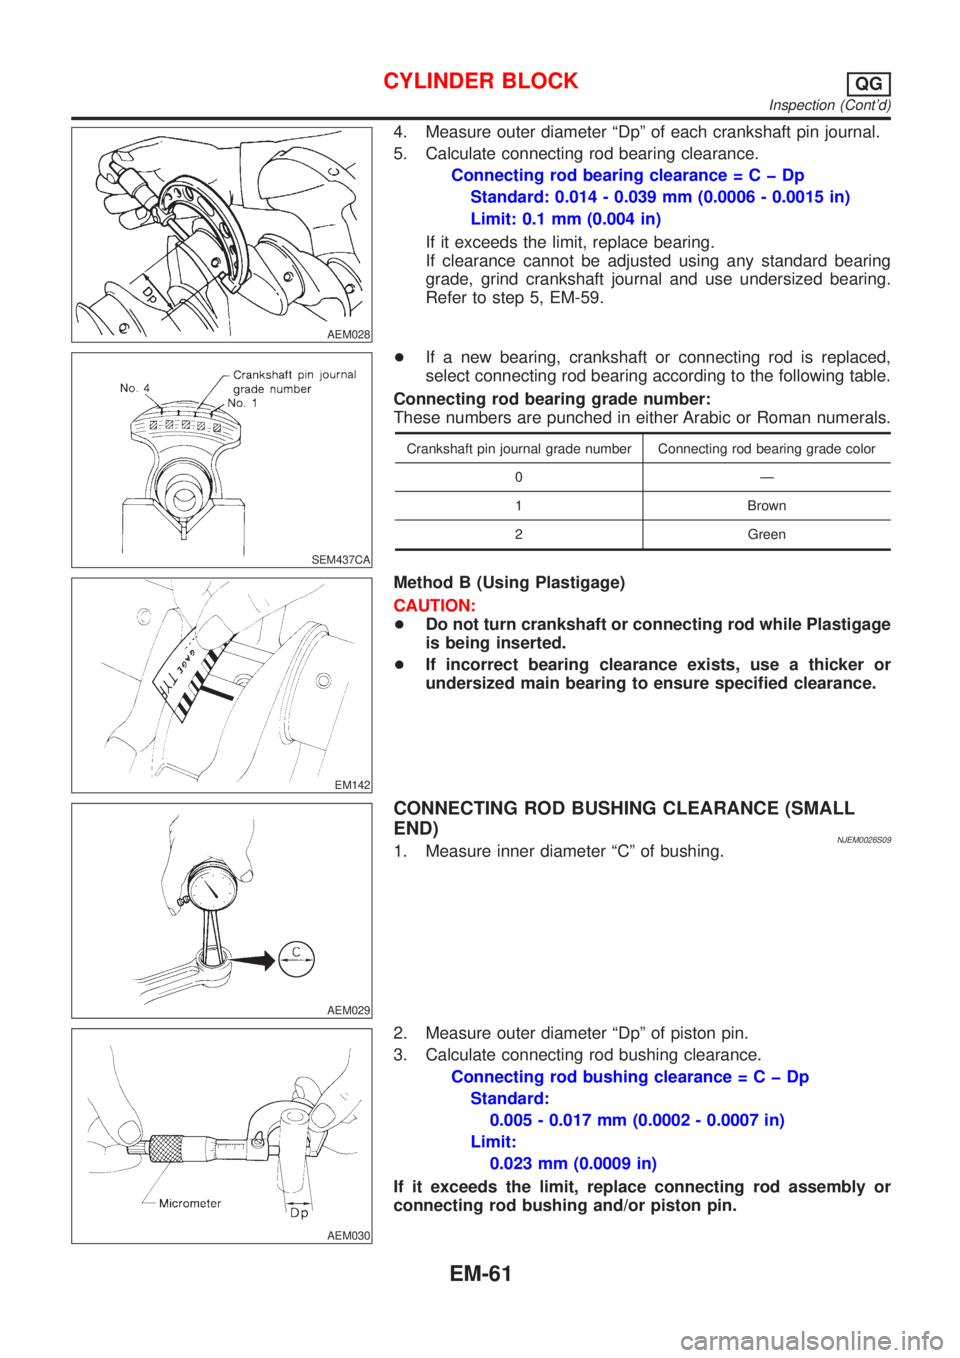
4. Measure outer diameter ªDpº of each crankshaft pin journal.
5. Calculate connecting rod bearing clearance.
Connecting rod bearing clearance=CþDp
Standard: 0.014 - 0.039 mm (0.0006 - 0.0015 in)
Limit: 0.1 mm (0.004 in)
If it exceeds the limit, replace bearing.
If clearance cannot be adjusted using any standard bearing
grade, grind crankshaft journal and use undersized bearing.
Refer to step 5, EM-59.
SEM437CA
+If a new bearing, crankshaft or connecting rod is replaced,
select connecting rod bearing according to the following table.
Connecting rod bearing grade number:
These numbers are punched in either Arabic or Roman numerals.
Crankshaft pin journal grade number Connecting rod bearing grade color
0Ð
1 Brown
2 Green
EM142
Method B (Using Plastigage)
CAUTION:
+Do not turn crankshaft or connecting rod while Plastigage
is being inserted.
+If incorrect bearing clearance exists, use a thicker or
undersized main bearing to ensure specified clearance.
AEM029
CONNECTING ROD BUSHING CLEARANCE (SMALL
END)
NJEM0026S091. Measure inner diameter ªCº of bushing.
AEM030
2. Measure outer diameter ªDpº of piston pin.
3. Calculate connecting rod bushing clearance.
Connecting rod bushing clearance=CþDp
Standard:
0.005 - 0.017 mm (0.0002 - 0.0007 in)
Limit:
0.023 mm (0.0009 in)
If it exceeds the limit, replace connecting rod assembly or
connecting rod bushing and/or piston pin.
CYLINDER BLOCKQG
Inspection (Cont'd)
EM-61
Page 2196 of 2898
SEM062A
REPLACEMENT OF CONNECTING ROD BUSHING
(SMALL END)
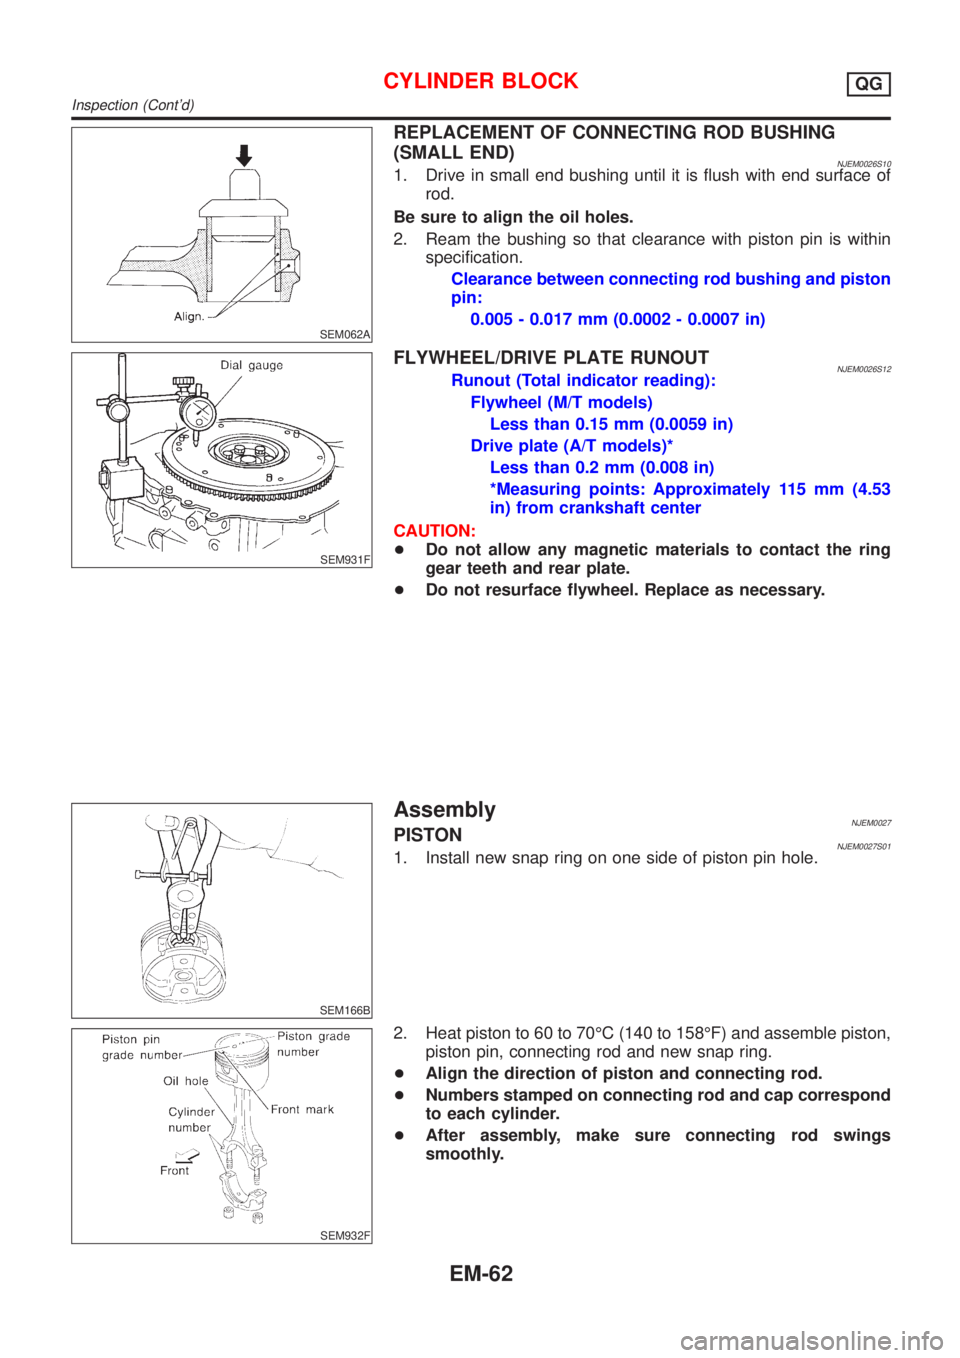
NJEM0026S101. Drive in small end bushing until it is flush with end surface of
rod.
Be sure to align the oil holes.
2. Ream the bushing so that clearance with piston pin is within
specification.
Clearance between connecting rod bushing and piston
pin:
0.005 - 0.017 mm (0.0002 - 0.0007 in)
SEM931F
FLYWHEEL/DRIVE PLATE RUNOUTNJEM0026S12Runout (Total indicator reading):
Flywheel (M/T models)
Less than 0.15 mm (0.0059 in)
Drive plate (A/T models)*
Less than 0.2 mm (0.008 in)
*Measuring points: Approximately 115 mm (4.53
in) from crankshaft center
CAUTION:
+Do not allow any magnetic materials to contact the ring
gear teeth and rear plate.
+Do not resurface flywheel. Replace as necessary.
SEM166B
AssemblyNJEM0027PISTONNJEM0027S011. Install new snap ring on one side of piston pin hole.
SEM932F
2. Heat piston to 60 to 70ÉC (140 to 158ÉF) and assemble piston,
piston pin, connecting rod and new snap ring.
+Align the direction of piston and connecting rod.
+Numbers stamped on connecting rod and cap correspond
to each cylinder.
+After assembly, make sure connecting rod swings
smoothly.
CYLINDER BLOCKQG
Inspection (Cont'd)
EM-62
Page 2197 of 2898
SEM522G
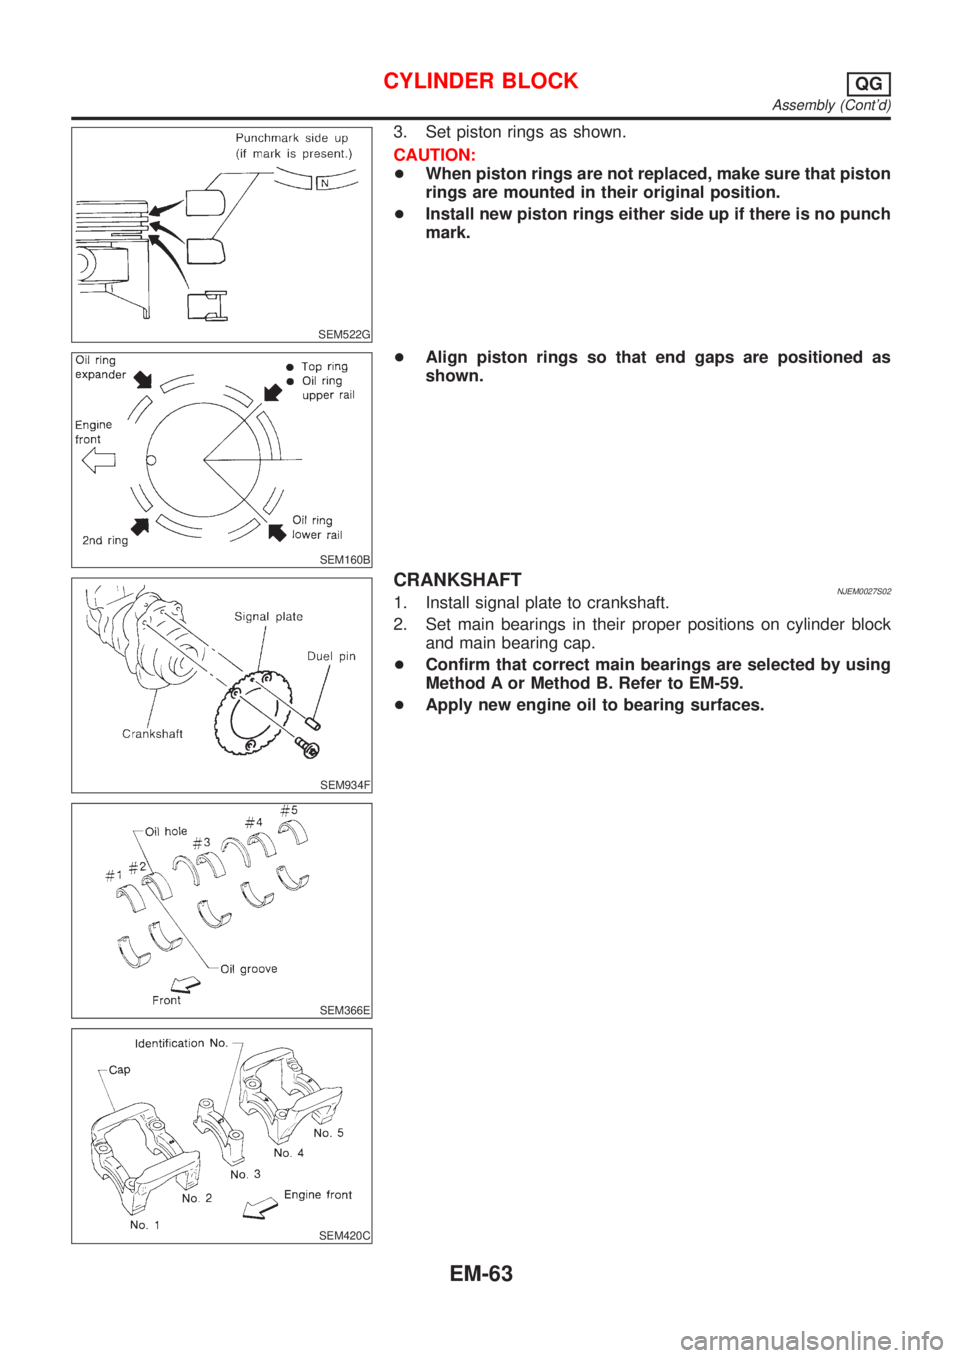
3. Set piston rings as shown.
CAUTION:
+When piston rings are not replaced, make sure that piston
rings are mounted in their original position.
+Install new piston rings either side up if there is no punch
mark.
SEM160B
+Align piston rings so that end gaps are positioned as
shown.
SEM934F
SEM366E
SEM420C
CRANKSHAFTNJEM0027S021. Install signal plate to crankshaft.
2. Set main bearings in their proper positions on cylinder block
and main bearing cap.
+Confirm that correct main bearings are selected by using
Method A or Method B. Refer to EM-59.
+Apply new engine oil to bearing surfaces.
CYLINDER BLOCKQG
Assembly (Cont'd)
EM-63
Page 2198 of 2898
SEM933F
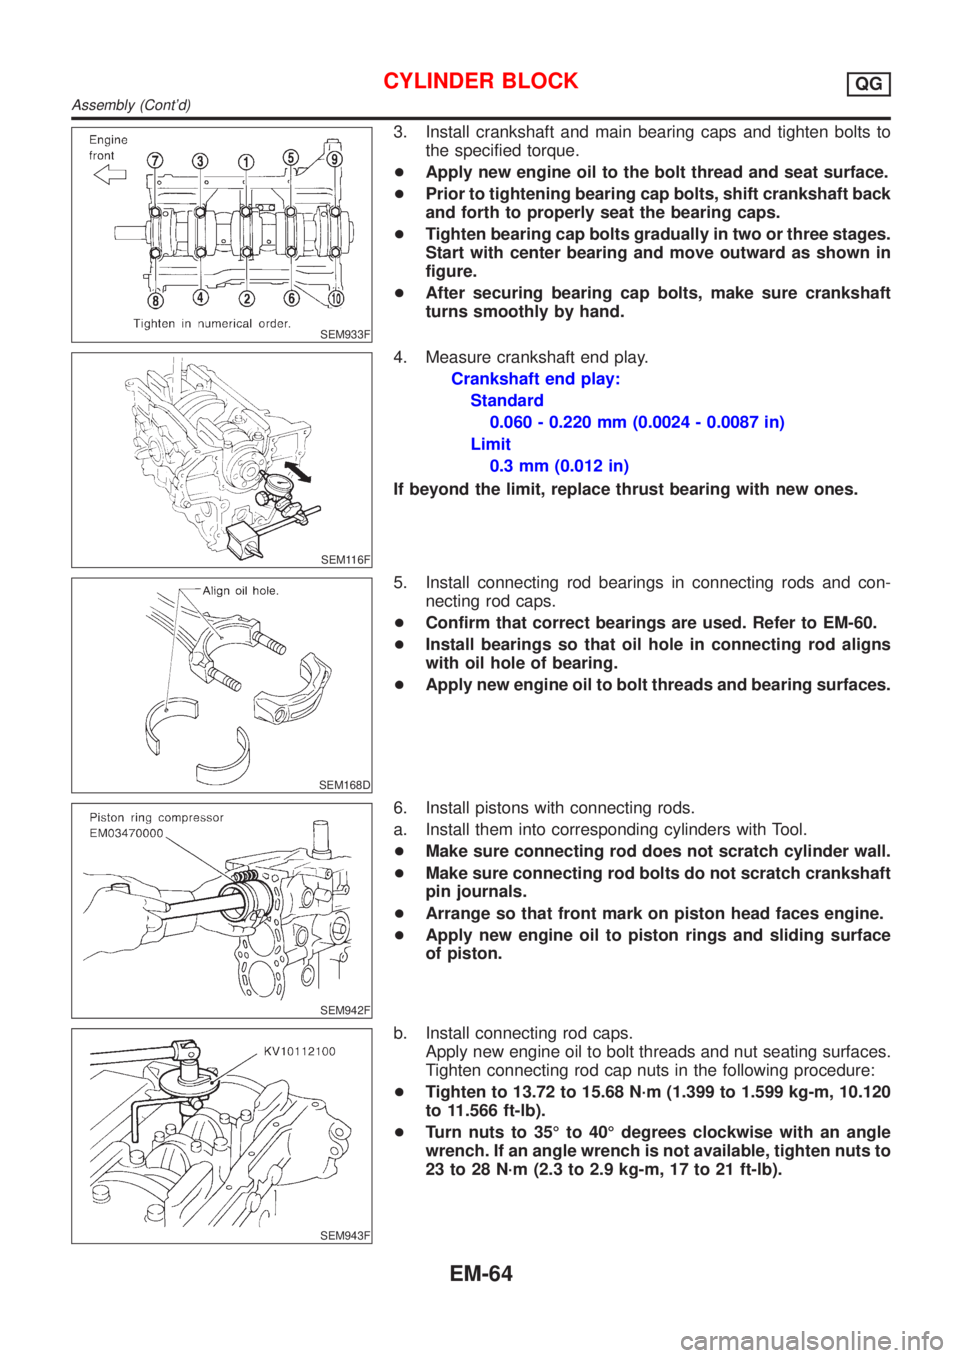
3. Install crankshaft and main bearing caps and tighten bolts to
the specified torque.
+Apply new engine oil to the bolt thread and seat surface.
+Prior to tightening bearing cap bolts, shift crankshaft back
and forth to properly seat the bearing caps.
+Tighten bearing cap bolts gradually in two or three stages.
Start with center bearing and move outward as shown in
figure.
+After securing bearing cap bolts, make sure crankshaft
turns smoothly by hand.
SEM116F
4. Measure crankshaft end play.
Crankshaft end play:
Standard
0.060 - 0.220 mm (0.0024 - 0.0087 in)
Limit
0.3 mm (0.012 in)
If beyond the limit, replace thrust bearing with new ones.
SEM168D
5. Install connecting rod bearings in connecting rods and con-
necting rod caps.
+Confirm that correct bearings are used. Refer to EM-60.
+Install bearings so that oil hole in connecting rod aligns
with oil hole of bearing.
+Apply new engine oil to bolt threads and bearing surfaces.
SEM942F
6. Install pistons with connecting rods.
a. Install them into corresponding cylinders with Tool.
+Make sure connecting rod does not scratch cylinder wall.
+Make sure connecting rod bolts do not scratch crankshaft
pin journals.
+Arrange so that front mark on piston head faces engine.
+Apply new engine oil to piston rings and sliding surface
of piston.
SEM943F
b. Install connecting rod caps.
Apply new engine oil to bolt threads and nut seating surfaces.
Tighten connecting rod cap nuts in the following procedure:
+Tighten to 13.72 to 15.68 N´m (1.399 to 1.599 kg-m, 10.120
to 11.566 ft-lb).
+Turn nuts to 35É to 40É degrees clockwise with an angle
wrench. If an angle wrench is not available, tighten nuts to
23 to 28 N´m (2.3 to 2.9 kg-m, 17 to 21 ft-lb).
CYLINDER BLOCKQG
Assembly (Cont'd)
EM-64
Page 2199 of 2898
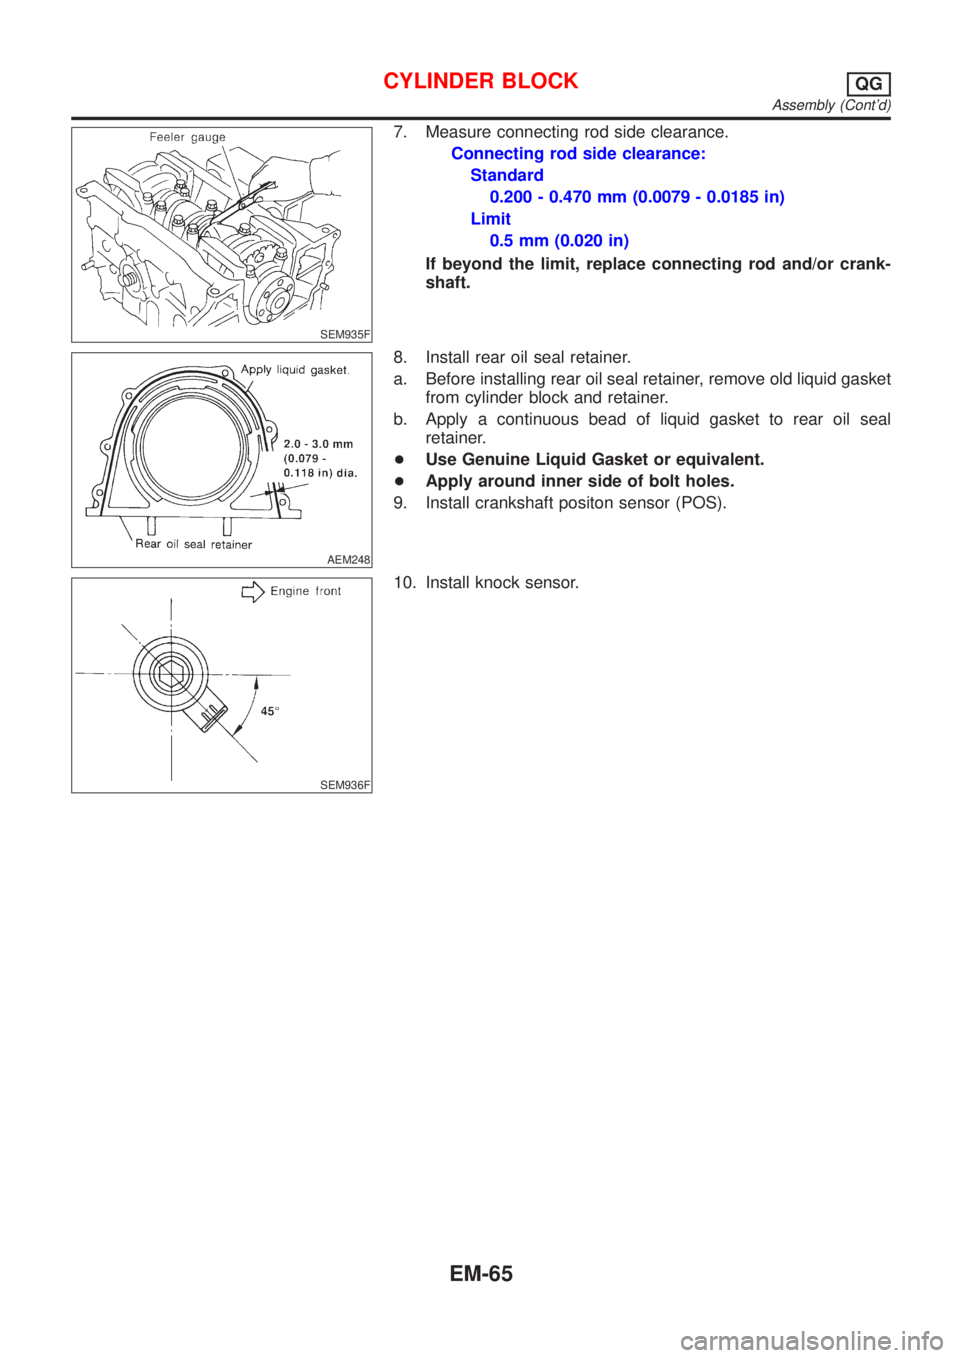
SEM935F
7. Measure connecting rod side clearance.
Connecting rod side clearance:
Standard
0.200 - 0.470 mm (0.0079 - 0.0185 in)
Limit
0.5 mm (0.020 in)
If beyond the limit, replace connecting rod and/or crank-
shaft.
AEM248
8. Install rear oil seal retainer.
a. Before installing rear oil seal retainer, remove old liquid gasket
from cylinder block and retainer.
b. Apply a continuous bead of liquid gasket to rear oil seal
retainer.
+Use Genuine Liquid Gasket or equivalent.
+Apply around inner side of bolt holes.
9. Install crankshaft positon sensor (POS).
SEM936F
10. Install knock sensor.
CYLINDER BLOCKQG
Assembly (Cont'd)
EM-65
Page 2200 of 2898
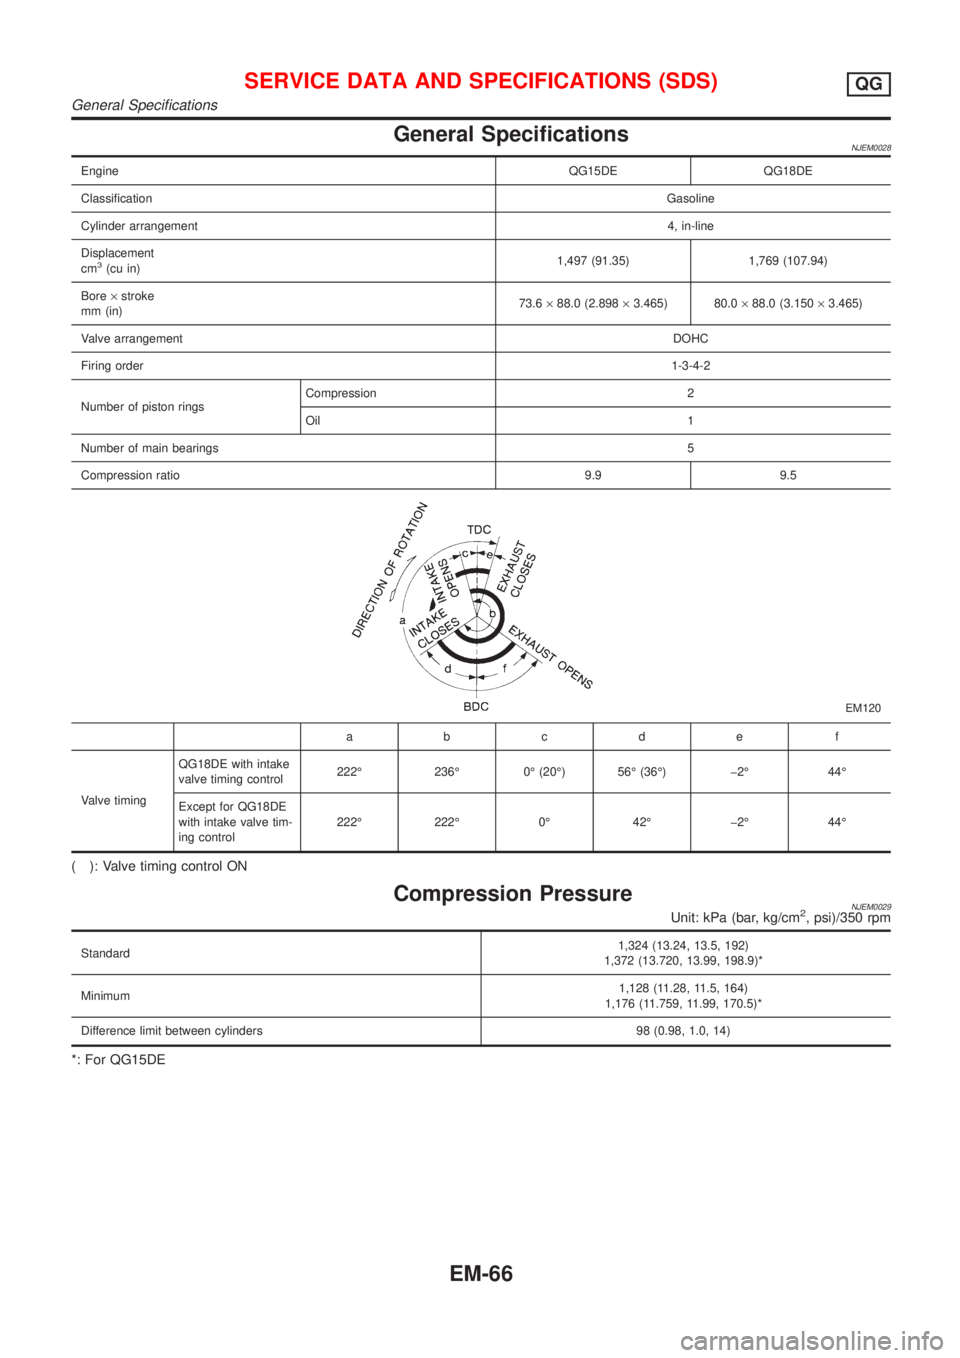
General SpecificationsNJEM0028
EngineQG15DE QG18DE
ClassificationGasoline
Cylinder arrangement4, in-line
Displacement
cm
3(cu in)1,497 (91.35) 1,769 (107.94)
Bore´stroke
mm (in)73.6´88.0 (2.898´3.465) 80.0´88.0 (3.150´3.465)
Valve arrangementDOHC
Firing order1-3-4-2
Number of piston ringsCompression 2
Oil 1
Number of main bearings5
Compression ratio9.9 9.5
EM120
abcde f
Valve timingQG18DE with intake
valve timing control222É 236É 0É (20É) 56É (36É) þ2É 44É
Except for QG18DE
with intake valve tim-
ing control222É 222É 0É 42É þ2É 44É
( ): Valve timing control ON
Compression PressureNJEM0029Unit: kPa (bar, kg/cm2, psi)/350 rpm
Standard1,324 (13.24, 13.5, 192)
1,372 (13.720, 13.99, 198.9)*
Minimum1,128 (11.28, 11.5, 164)
1,176 (11.759, 11.99, 170.5)*
Difference limit between cylinders 98 (0.98, 1.0, 14)
*: For QG15DE
SERVICE DATA AND SPECIFICATIONS (SDS)QG
General Specifications
EM-66