check oil NISSAN ALMERA N15 1995 User Guide
[x] Cancel search | Manufacturer: NISSAN, Model Year: 1995, Model line: ALMERA N15, Model: NISSAN ALMERA N15 1995Pages: 1701, PDF Size: 82.27 MB
Page 71 of 1701
REPAIRFORCOMPONENT PARTS
Oil Pump (Cont'd)
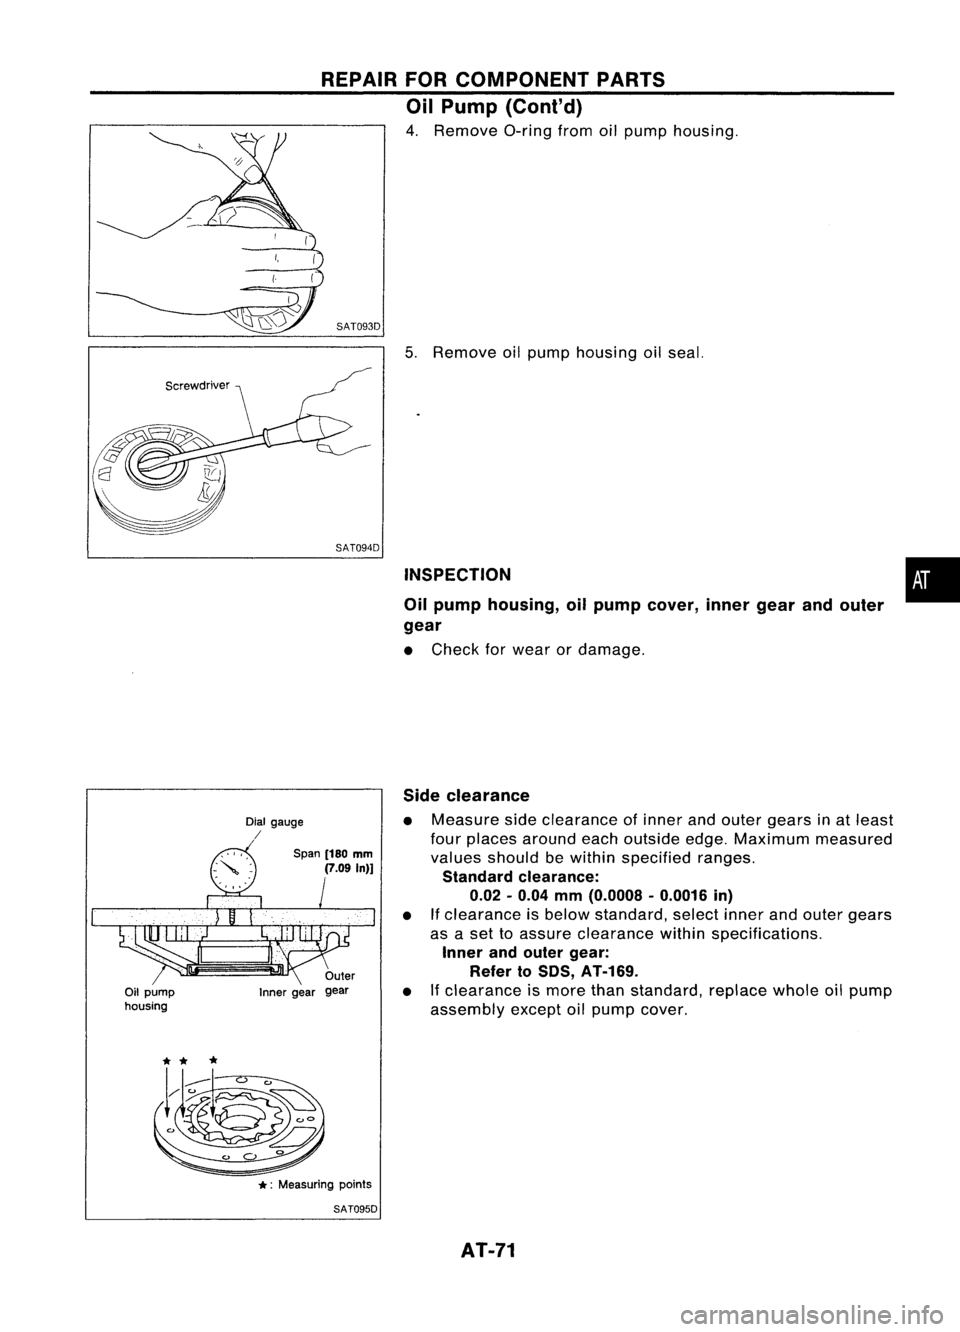
4. Remove O-ringfromoilpump housing.
(
(
~) SAT093D
5.Remove oilpump housing oilseal.
SAT094D INSPECTION
Oil pump housing, oilpump cover, innergearandouter
gear
• Check forwear ordamage.
•
Oil pump
housing Dial
gauge
/
Span(180
mm
(7.09
In)]
Inner gear Side
clearance
• Measure sideclearance ofinner andouter gears inat least
four places around eachoutside edge.Maximum measured
values should bewithin specified ranges.
Standard clearance:
0.02 -0.04
mm
(0.0008 -0.0016
in)
• Ifclearance isbelow standard, selectinnerandouter gears
as aset toassure clearance withinspecifications.
Inner andouter gear:
Refer toSOS, AT-169.
• Ifclearance ismore thanstandard, replacewholeoilpump
assembly exceptoilpump cover.
*:
Measuring points
SAT095D
AT-71
Page 79 of 1701
REPAIRFORCOMPONENT PARTS
Control ValveAssembly (Cont'd)
INSPECTION
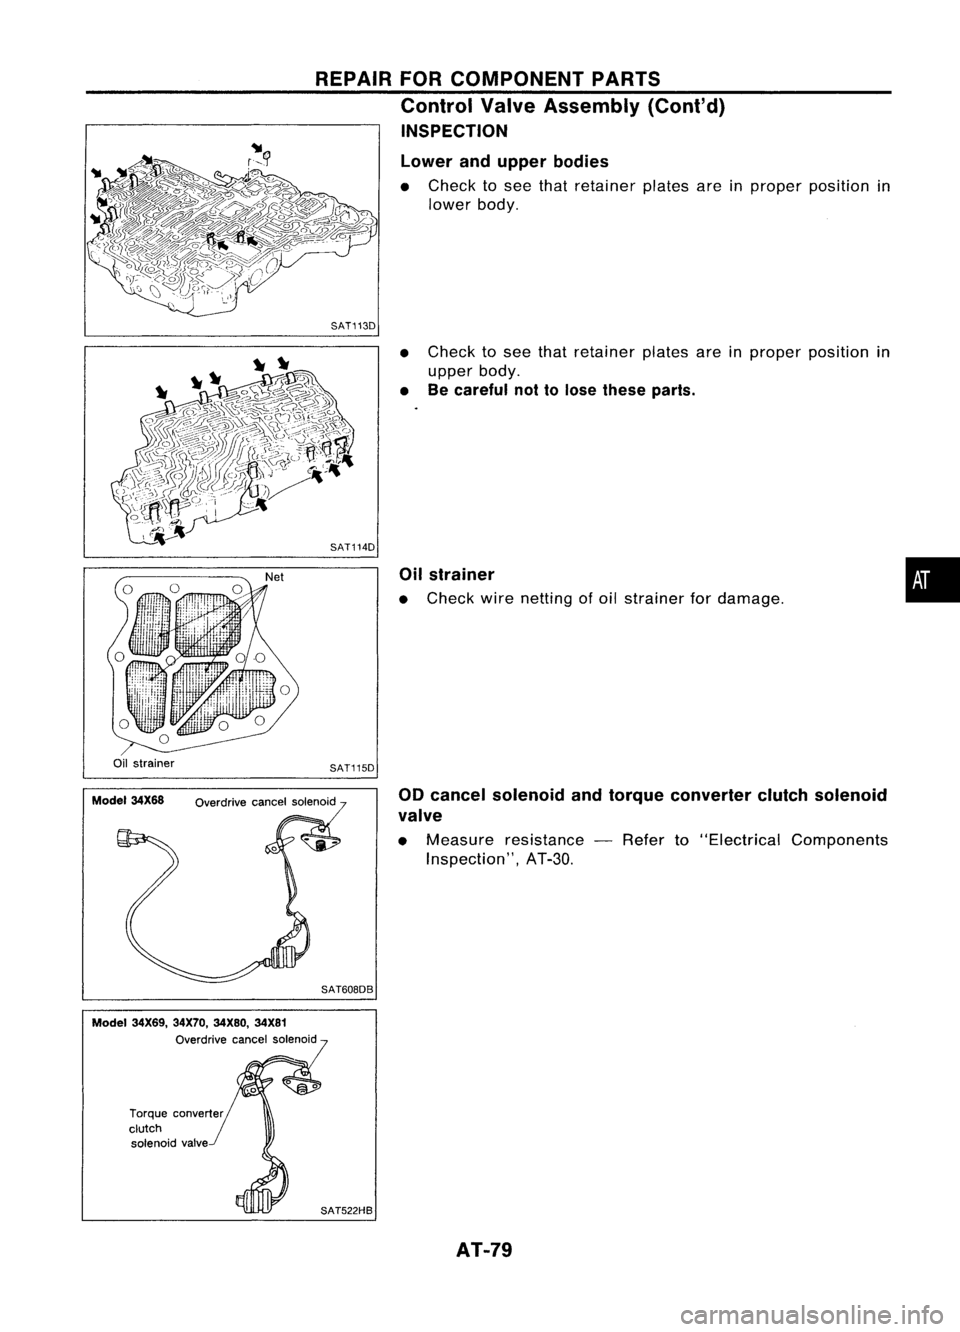
Lower andupper bodies
• Check tosee that retainer platesareinproper position in
lower body.
SAT113D
•Check tosee that retainer platesareinproper position in
upper body.
• Becareful nottolose these parts.
Oil strainer
• Check wirenetting ofoil strainer fordamage.
•
Oil strainer
Model 34X68 SAT115D
Overdrive cancelsolenoid
SAT608DB 00
cancel solenoid andtorque converter clutchsolenoid
valve
• Measure resistance -Refer to"Electrical Components
Inspection", AT-3D.
Model 34X69, 34X70,34X80, 34X81
Overdrive cancelsolenoid
Torque converter
clutch solenoid valve
SAT522HBAT-79
Page 80 of 1701
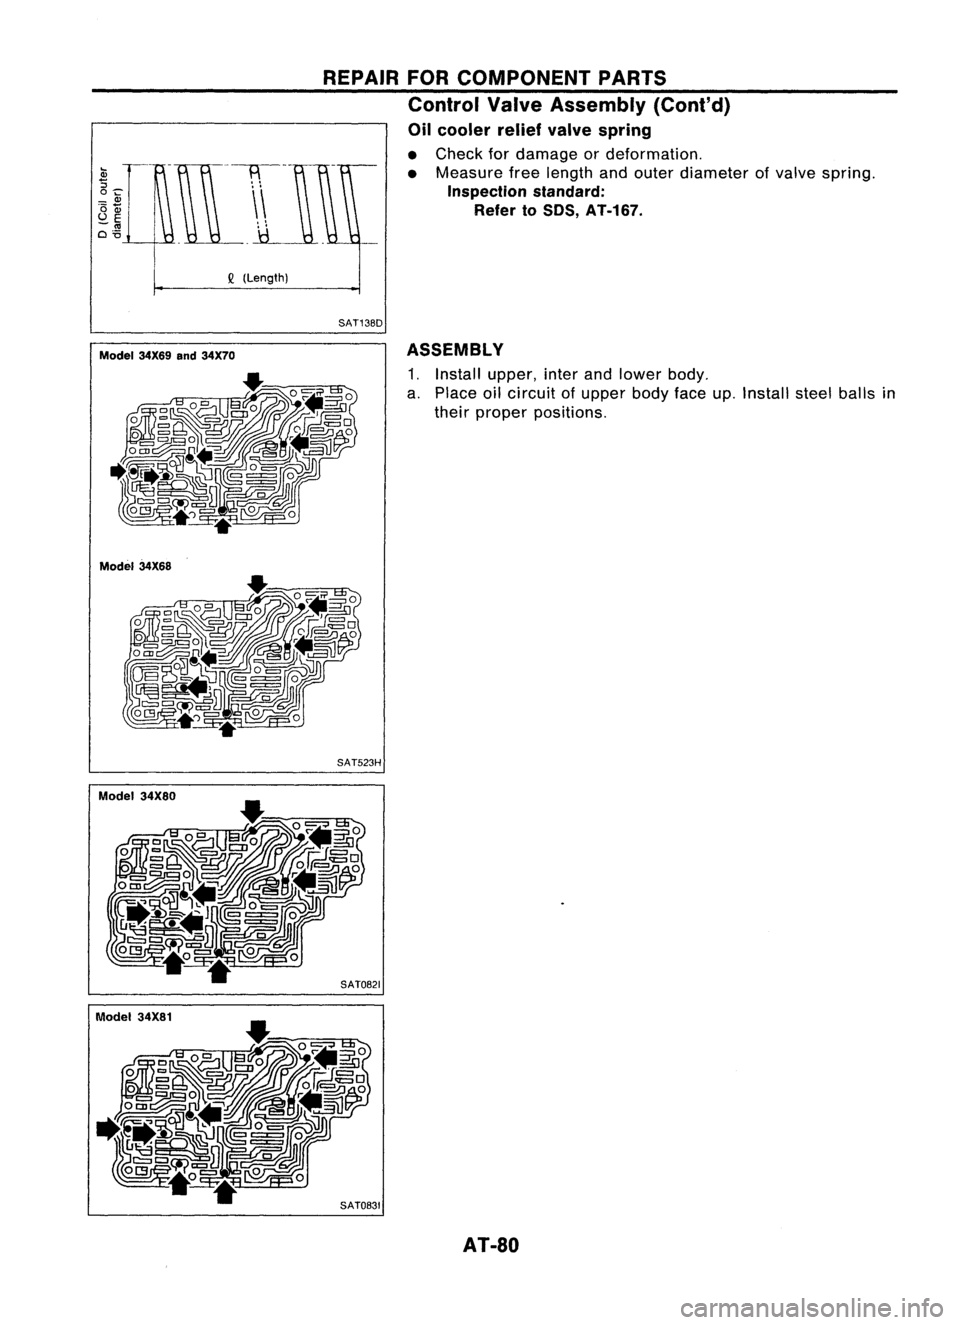
ASSEMBLY
1. Install
a PI upper, inter
. tha~e oilcircuit ofuand lower body
elr pro pperbd .
per posT
0
Yface
I
Ions. up.Install stelb'
e
ails
In
SATOB21
SATOB31
REPAIR
FOR
COMPONE
Control ValNTPARTS
0"1
veAsse b
I
cooler reli
f
mIy(Cont'd)
• Check f
evalve spring
• M ordamag
easure freeIeeor deformation
Inspection
ngthandouter d'.
R
f
standard"
Iameter
of
e er to50S AT.
valvespring
, -167. .
Q
(Length)
Model 34X69and34X70
Model 34X68
Model 34X80
AT-SO
Page 93 of 1701
REPAIRFORCOMPONENT PARTS
Reverse Clutch
Piston
* :
Select proper thickness.
~. ApplyATF.
Oil
seal~@D
D-ring~
@:>
Snap ring~
Dish
plate
Drive plate
SEC.
315
Retaining plate
*
Snap ring
I
Driven plate
Snap ring~
SAT940HA
DISASSEMBLY •
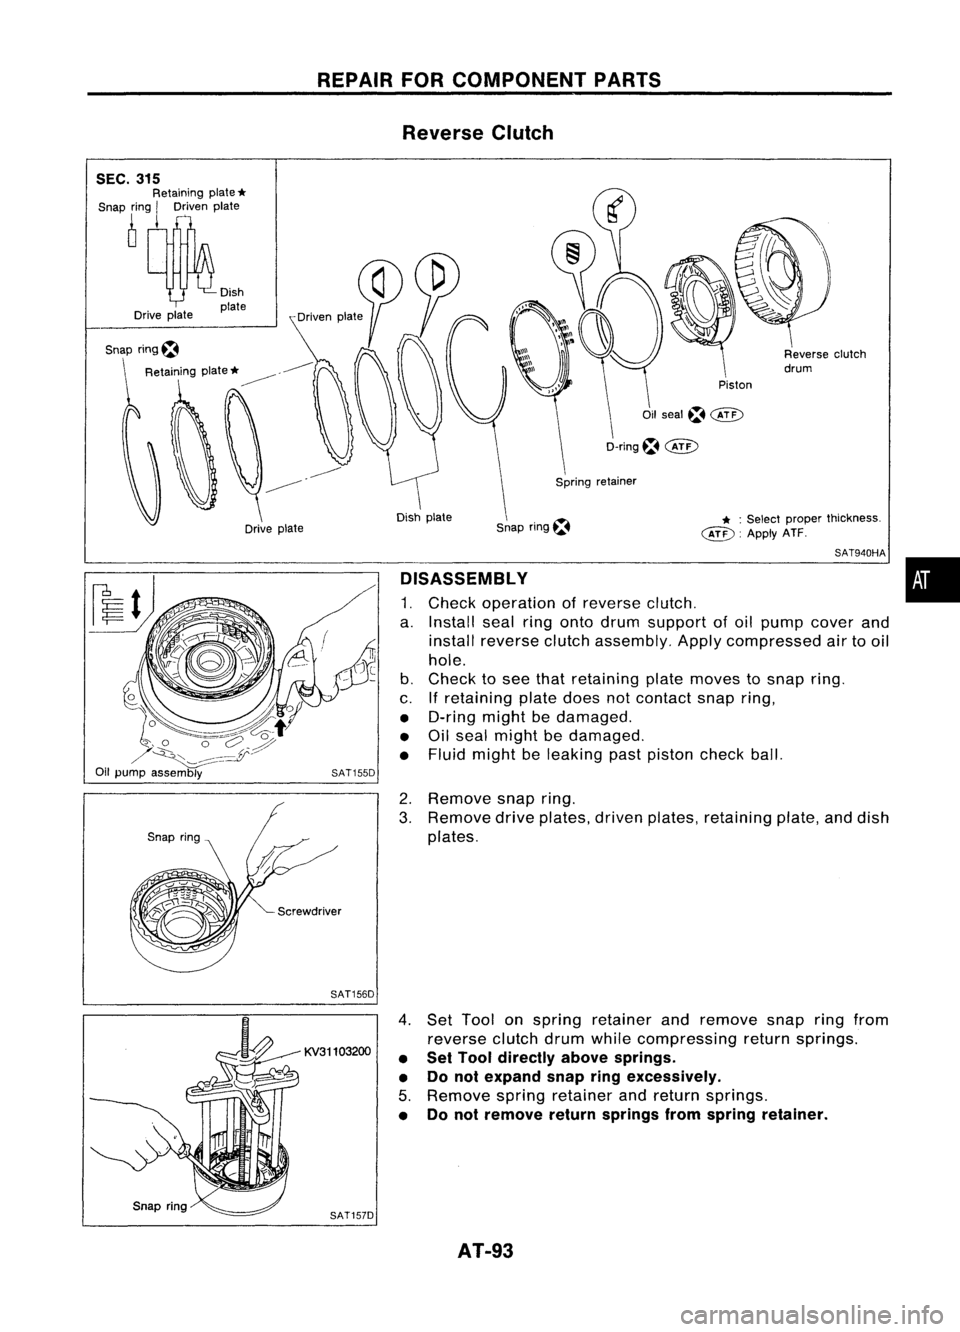
1. Check operation ofreverse clutch.
a. Install sealringonto drum support ofoil pump cover and
install reverse clutchassembly. Applycompressed airtooil
hole.
b. Check tosee that retaining platemoves tosnap ring.
c. Ifretaining platedoesnotcontact snapring,
• D-ring mightbedamaged.
• Oilseal might bedamaged.
• Fluid might beleaking pastpiston checkball.
2. Remove snapring.
3. Remove driveplates, drivenplates, retaining plate,anddish
plates.
SAT156D
KV31103200
SAT157D
4.
Set Tool onspring retainer andremove snapringfrom
reverse clutchdrumwhilecompressing returnsprings.
• Set Tool directly abovesprings.
• Donot expand snapringexcessively.
5. Remove springretainer andreturn springs.
• Donot remove returnsprings fromspring retainer.
AT-93
Page 94 of 1701
REPAIRFORCOMPONENT PARTS
Reverse Clutch(Cont'd)
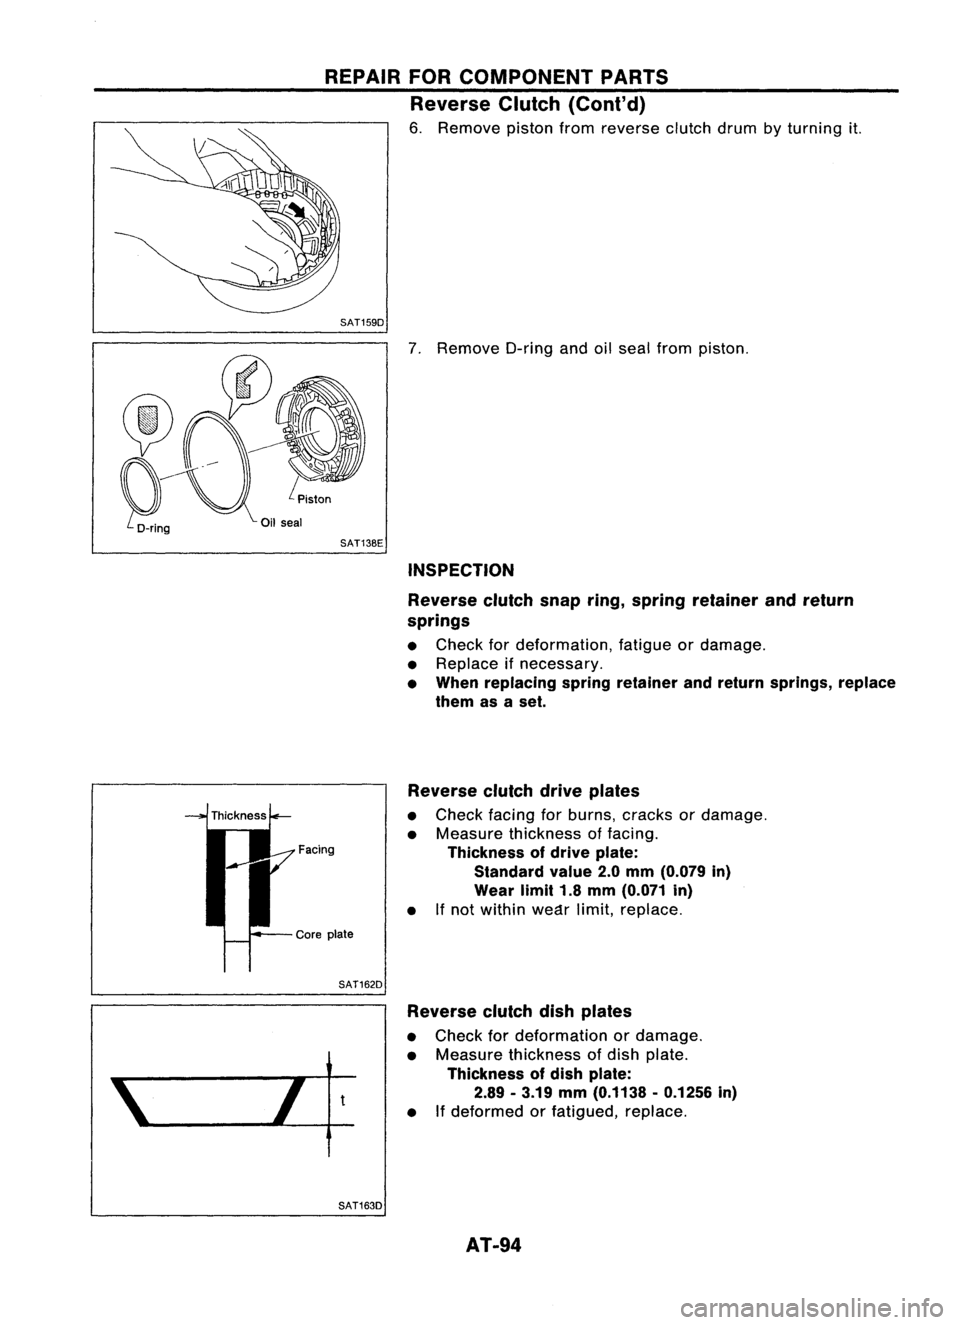
6. Remove pistonfromreverse clutchdrumbyturning
it.
SAT159D
7.Remove O-ringandoilseal from piston.
SAT13BE INSPECTION
Reverse clutchsnapring,spring retainer andreturn
springs
• Check fordeformation, fatigueordamage.
• Replace ifnecessary.
• When replacing springretainer andreturn springs, replace
them asaset.
Reverse clutchdriveplates
• Check facingforburns, cracks ordamage.
• Measure thickness offacing.
Facing Thicknessofdrive plate:
Standard value2.0mm (0.079 in)
Wear limit1.8mm (0.071 in)
• Ifnot within weC1rlimit,replace.
SAT162D Reverse clutchdishplates
• Check fordeformation ordamage.
• Measure thickness ofdish plate.
Thickness ofdish plate:
2.89 -3.19 mm(0.1138 -0.1256 in)
• Ifdeformed orfatigued, replace.
SAT163D AT-94
Page 95 of 1701
Checkairdoes notflow
through ballhole.
REPAIR
FORCOMPONENT PARTS
Reverse Clutch(Cont'd)
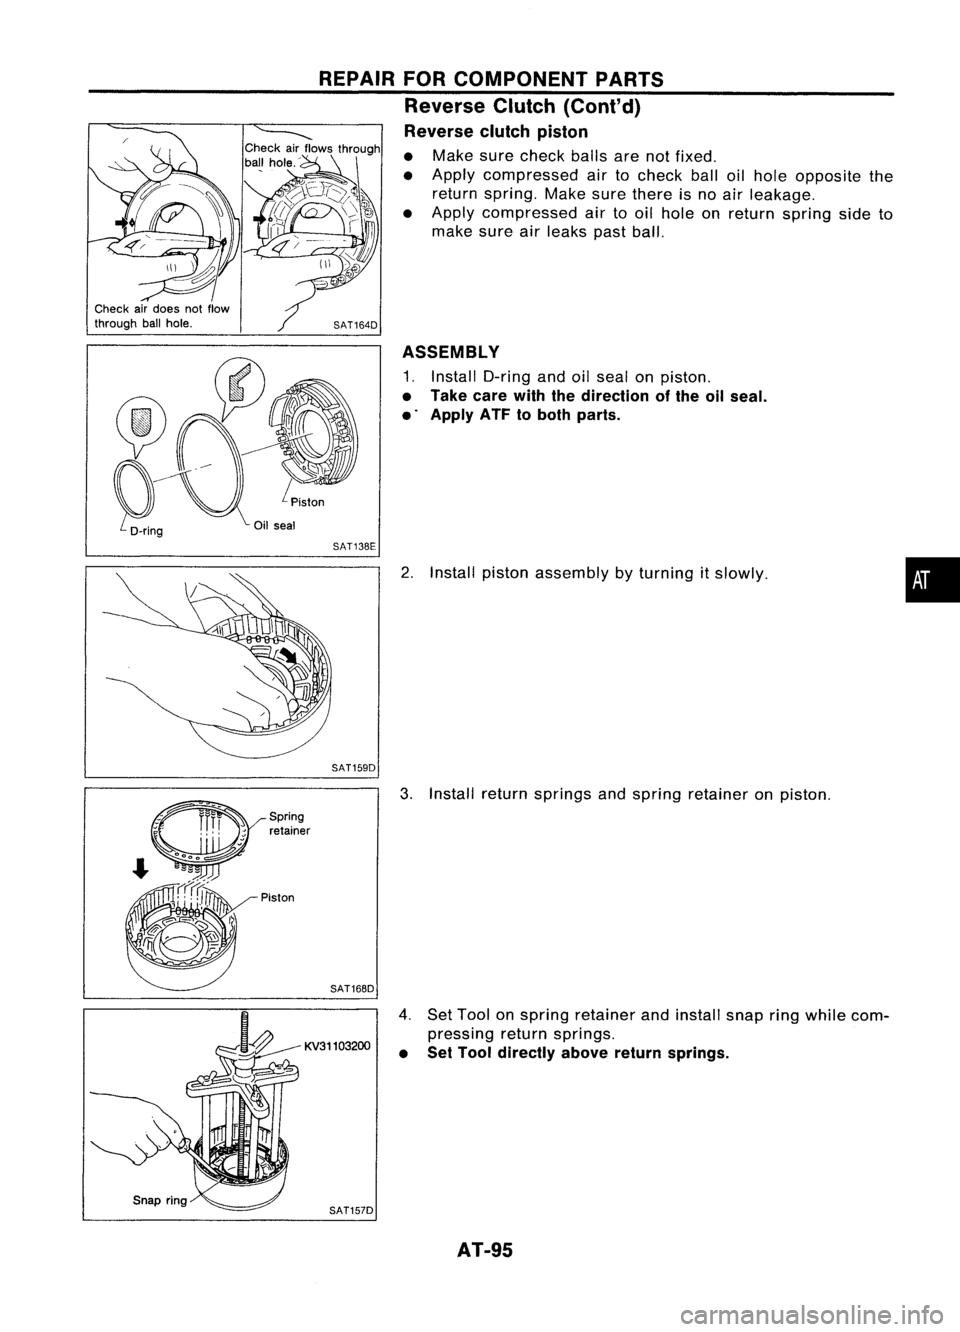
Reverse clutchpiston
• Make surecheck ballsarenotfixed.
• Apply compressed airtocheck balloilhole opposite the
return spring. Makesurethere isno air leakage.
• Apply compressed airtooil hole onreturn spring sideto
make sureairleaks pastball.
SAT164D ASSEMBLY
1. Install O-ring andoilseal onpiston.
• Take carewiththedirection ofthe oilseal.
• Apply ATFtoboth parts.
Oil seal
SAT138E
2.Install piston assembly byturning itslowly.
SAT159D
•
Piston Spring
retainer
SAT168D
KV31103200
SAT157D
3.
Install return springs andspring retainer onpiston.
4. SetTool onspring retainer andinstall snapringwhile com-
pressing returnsprings.
• Set Tool directly abovereturnsprings.
AT-95
Page 97 of 1701
REPAIRFORCOMPONENT PARTS
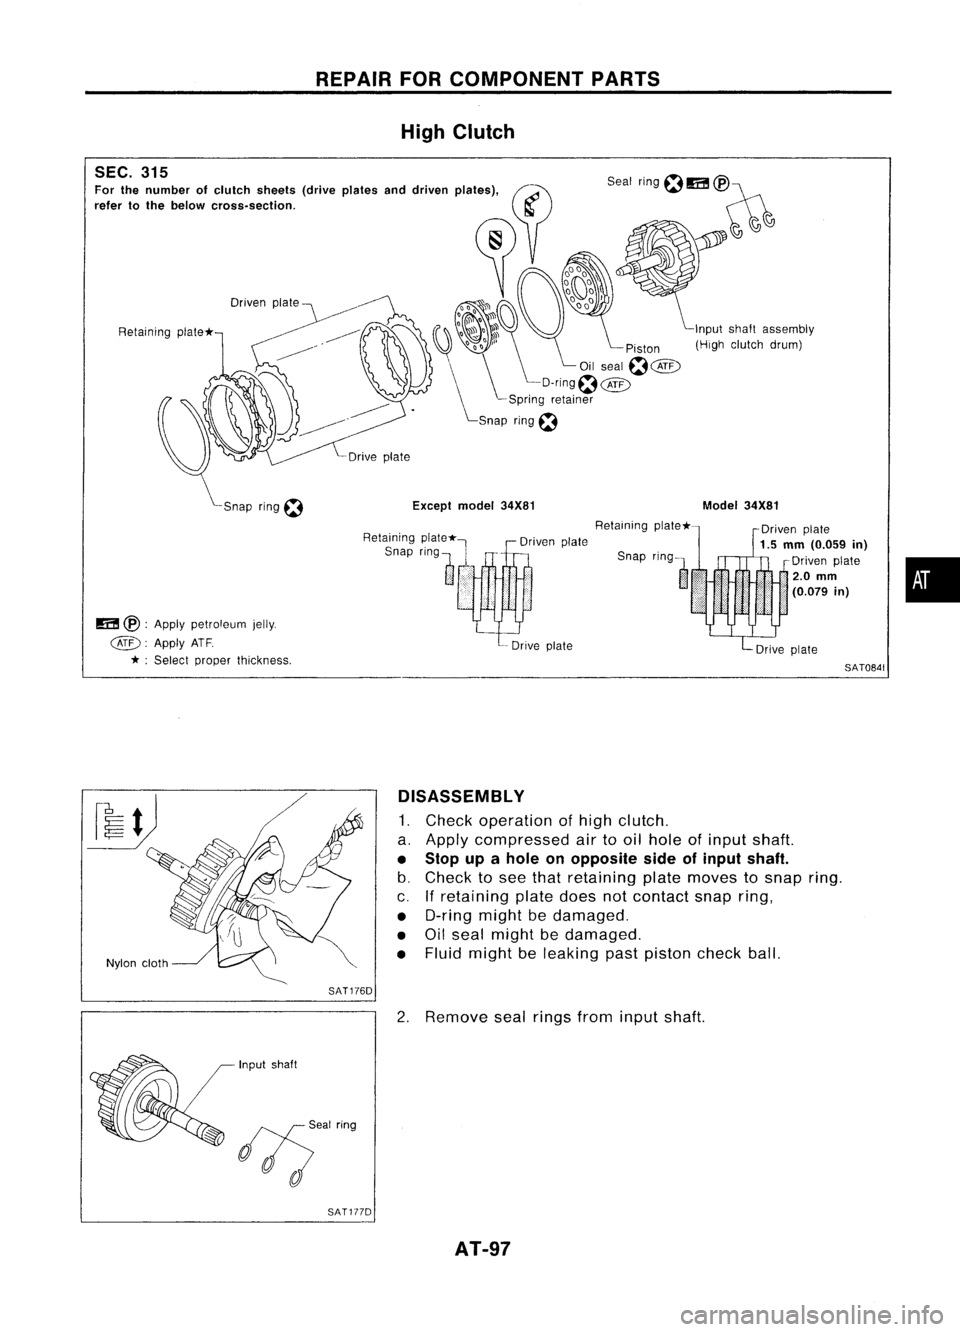
High Clutch
SEC. 315
Fa< th.oumh" of,Iuloh ,h.of. (d".,pI".... dd,I ...
PI'@(if)
,,',' to
fh'
"'ow
010.... ""00. ~)~
Driven
plate
Retaining plate* Input
shaft assembly
(High clutch drum)
Except model34X81
Snap ring
f:1
m
@•
Apply petroleum jelly.
@.
ApplyATF
* ;Select proper thickness. Retaining
Snap ring
l
Driven
plate
-- Drive plate Retaining
plate*-
Model
34X81
Driven
plate
1.5
mm
(0.059
in)
Driven plate
i
2.0
mm
•.•. (0.079
in)
SAT0841
•
Nylon cloth
SAT176D
Input shaft
1/5'"
hog
SAT177D DISASSEMBLY
1. Check operation ofhigh clutch.
a. Apply compressed airtooil hole ofinput shaft.
• Stop upahole onopposite sideofinput shaft.
b. Check tosee that retaining platemoves tosnap ring.
c. Ifretaining platedoesnotcontact snapring,
• O-ring mightbedamaged.
• Oilseal might bedamaged.
• Fluid might beleaking pastpiston checkball.
2. Remove sealrings frominput shaft.
AT-97
Page 98 of 1701
Snapring,
REPAIR
FORCOMPONENT PARTS
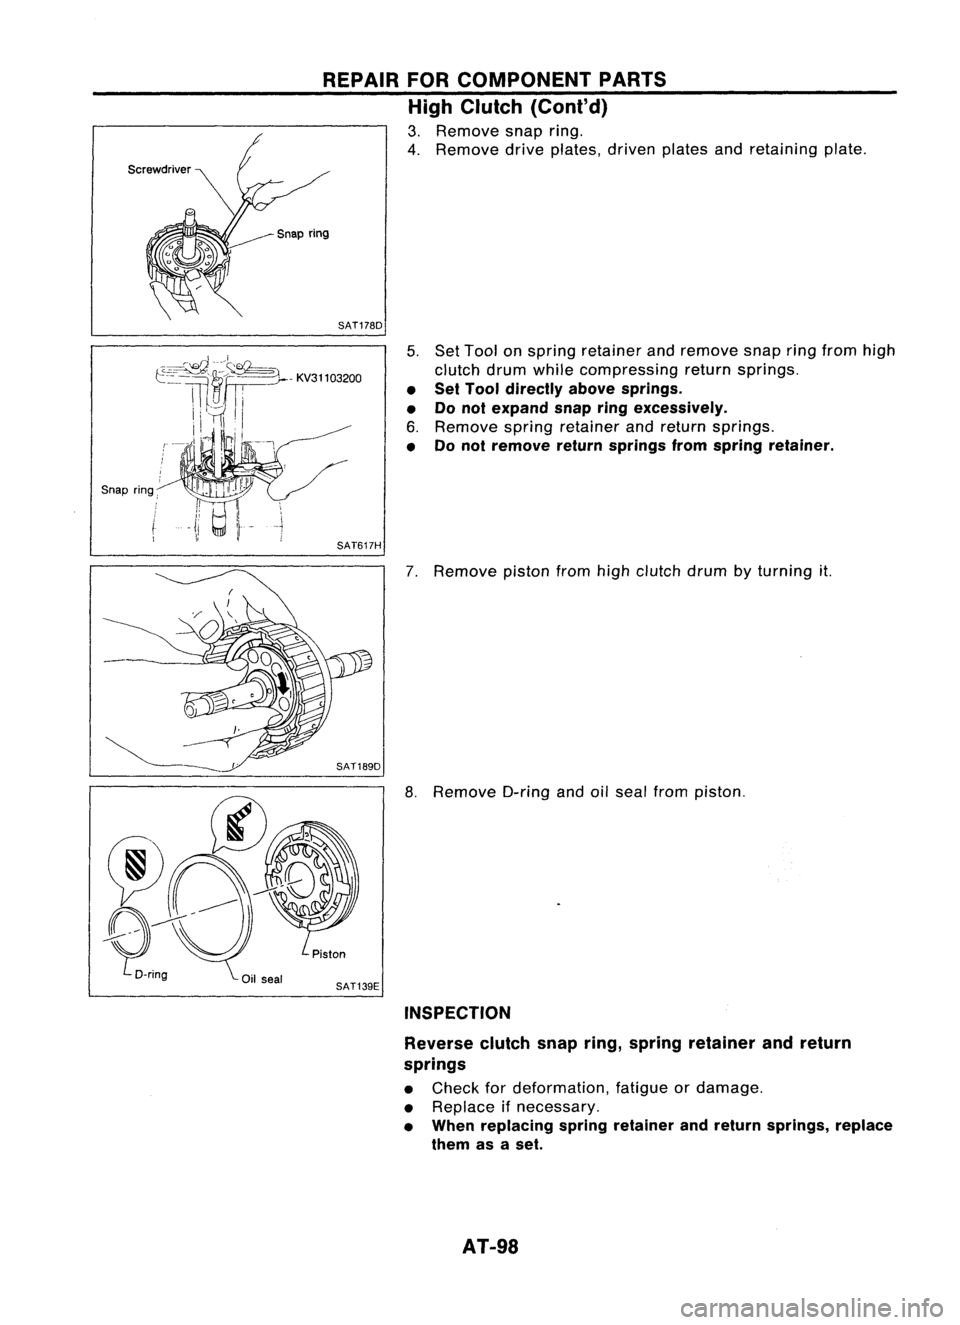
High Clutch (Cont'd)
3. Remove snapring.
4. Remove driveplates, drivenplatesandretaining plate.
SAT178D
5.Set Tool onspring retainer andremove snapringfrom high
clutch drumwhile compressing returnsprings.
• Set Tool directly abovesprings.
• Donot expand snap
ring
excessively.
6. Remove springretainer andreturn springs.
• Donot remove returnsprings fromspring retainer.
SAT617H
7.Remove pistonfromhighclutch drumbyturning it.
8. Remove O-ringandoilseal from piston.
SAT139E INSPECTION
Reverse clutchsnapring,spring retainer andreturn
springs
• Check fordeformation, fatigueordamage.
• Replace ifnecessary.
• When replacing springretainer andreturn springs, replace
them asaset.
AT-98
Page 99 of 1701
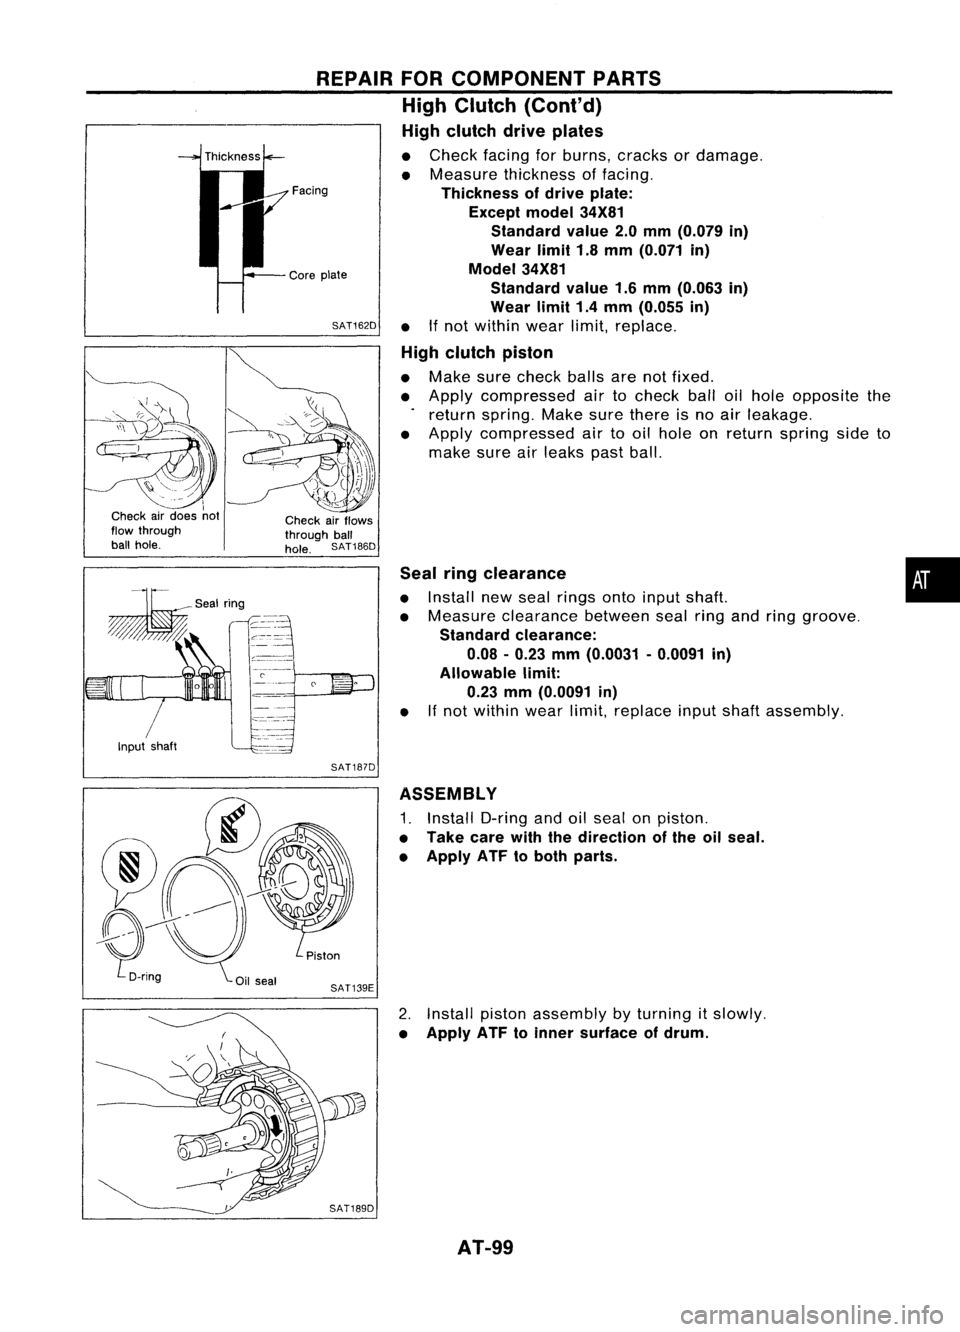
•
Seal
ringclearance
• Install newseal rings ontoinput shaft.
• Measure clearance betweensealringandring groove.
Standard clearance:
0.08 -0.23 mm(0.0031 -0.0091 in)
Allowable limit:
0.23 mm(0.0091 in)
• If
not within wearlimit,replace inputshaftassembly.
REPAIR
FORCOMPONENT PARTS
High Clutch (Cont'd)
High clutch driveplates
• Check facingforburns, cracks ordamage.
• Measure thickness offacing.
Thickness ofdrive plate:
Except model34X81
Standard value2.0mm (0.079 in)
Wear limit1.8mm (0.071 in)
Model 34X81
Standard value1.6mm (0.063 in)
Wear limit1.4mm (0.055 in)
SAT162D •
Ifnot within wearlimit,replace.
High clutch piston
• Make surecheck ballsarenotfixed.
• Apply compressed airtocheck balloilhole opposite the
return spring. Makesurethere isno air leakage.
• Apply compressed airtooil hole onreturn spring sideto
make sureairleaks pastball.
Facing
Core plate
Check airflows
through ball
hole. SAT186D
Input shaft
I
I
Check airdoes not
flow through
ball hole.
SAT187D
ASSEMBLY
1. Install O-ringandoilseal onpiston.
• Take carewiththedirection ofthe oilseal.
• Apply ATFtoboth parts.
2. Install pistonassembly byturning itslowly.
• Apply ATFtoinner surface ofdrum.
AT-99
Page 102 of 1701

andOverrun Clutch
REPAIR
FORCOMPONENT
Forward Clutch PARTS
Spring retainer Overrun
clutch
piston
CD
Snap ring
~ Retaining plate
*
~ Drive plate
o
Driven plate
CID
Dish plate
Oilseal~~
.~
* :
Select
@D:
Applyx~~per thickness.
SAT942HA
DISASSEMBLY
1. Check operat'
~: ~;t~" bearin~o~e~~i~:;ard clutchandov
c. Ch~:k ~ompressed airt~n forward ciutch,;;run clutch.
o see that
011
hole off rum.
retaining plateorwardclutchd
. movestos rum.
nap ring.
Bearing
retainer
•
• •
If
r~taining plated
D~nng mightboesnotconta
0,1
seal m"hedamaged ctsnap ring
F
ig
t
b d' '
luid might beamaged
e leak' '
mg past piston ch
eck ball.
AT.102