torque NISSAN ALMERA N15 1995 Owner's Manual
[x] Cancel search | Manufacturer: NISSAN, Model Year: 1995, Model line: ALMERA N15, Model: NISSAN ALMERA N15 1995Pages: 1701, PDF Size: 82.27 MB
Page 79 of 1701
REPAIRFORCOMPONENT PARTS
Control ValveAssembly (Cont'd)
INSPECTION
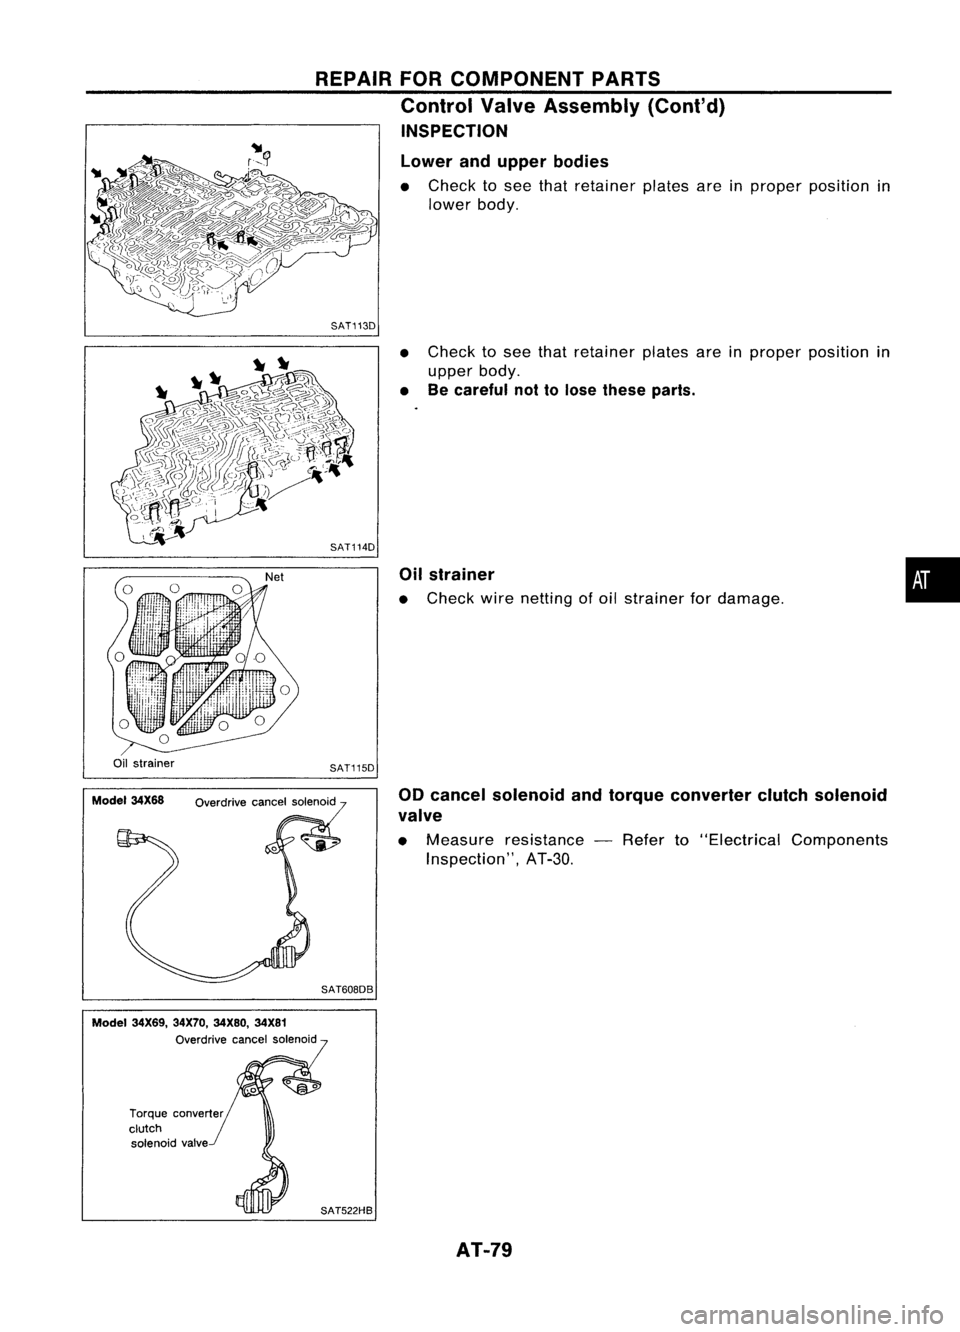
Lower andupper bodies
• Check tosee that retainer platesareinproper position in
lower body.
SAT113D
•Check tosee that retainer platesareinproper position in
upper body.
• Becareful nottolose these parts.
Oil strainer
• Check wirenetting ofoil strainer fordamage.
•
Oil strainer
Model 34X68 SAT115D
Overdrive cancelsolenoid
SAT608DB 00
cancel solenoid andtorque converter clutchsolenoid
valve
• Measure resistance -Refer to"Electrical Components
Inspection", AT-3D.
Model 34X69, 34X70,34X80, 34X81
Overdrive cancelsolenoid
Torque converter
clutch solenoid valve
SAT522HBAT-79
Page 82 of 1701
Lowerseparating
gasket REPAIR
FORCOMPONENT PARTS
Control ValveAssembly (Cont'd)
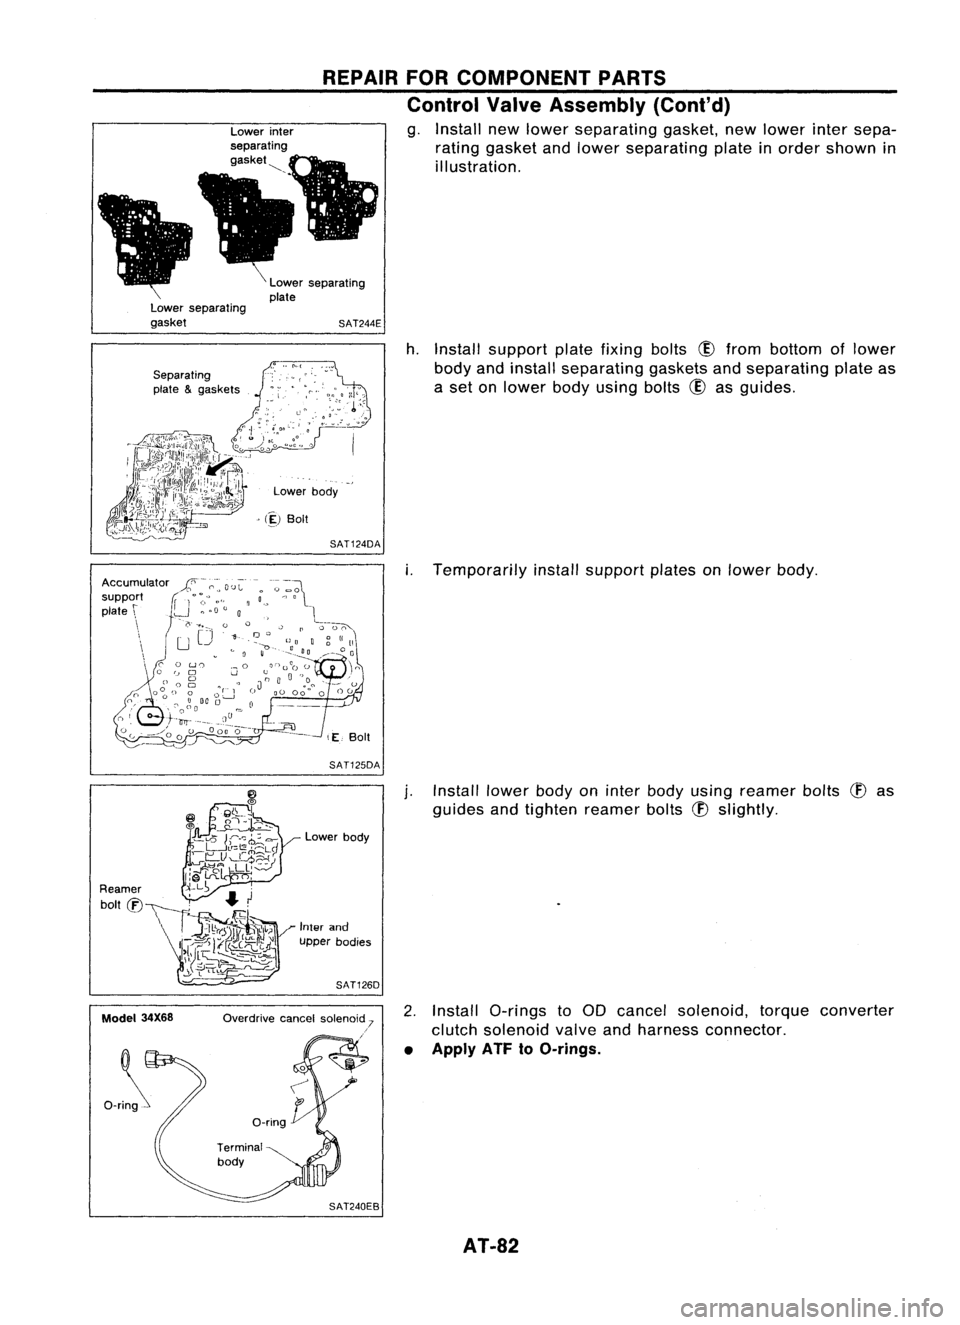
g. Install newlower separating gasket,newlower intersepa-
rating gasket andlower separating plateinorder shown in
illustration.
Lower separating
plate
SAT244E
Separating
plate &gaskets
Lowerbody
> (~)
Boit
SAT124DA
h.
Install support platefixing bolts
CID
from bottom oflower
body andinstall separating gasketsandseparating plateas
a set onlower bodyusing bolts
CID
asguides.
SAT125DA
i.
Temporarily installsupport platesonlower body.
Model 34X68 Lower
body
Inter and
upper bodies
SAT126D
Overdrive cancelsolenoid 7
.'
j.
Install lowerbodyoninter body using reamer bolts
(f)
as
guides andtighten reamer bolts
(f)
slightly.
2. Install a-rings toaD cancel solenoid, torqueconverter
clutch solenoid valveandharness connector.
• Apply ATF
toO-rings.
AT-82
Page 83 of 1701
REPAIRFORCOMPONENT PARTS
Control ValveAssembly (Cont'd)
Model
34X69, 34X70,
34X80, 34X81 Overdrive
cancelsolenoid
Torque~ converter
clutch
'0
solenoid valv~
'"
o_rin~
Terminal
0
body
O-ring~
l\
SAT521HB
Section Z- Z
Reamer bolt
Model
34X68
•
Bolt
symbol
@
@
@
@
(!)
ffi
Bolt length "C"
13.558.0 40.0 66.0
33.078.0
~ Q
mm(in)
(0.531)
(2.283)(1.575) (2.598)(1.299)
(3.071)
Number ofbolts
4
3611
22
3.4 -
4.4 7-9
Tightening torque
7-9 (0.7 -0.9, 61-78) (0.35
-(0.7 -
N'm (kg-m, in-Ib)
0.45,
0.9,61
30.4 - -78)
39.1)
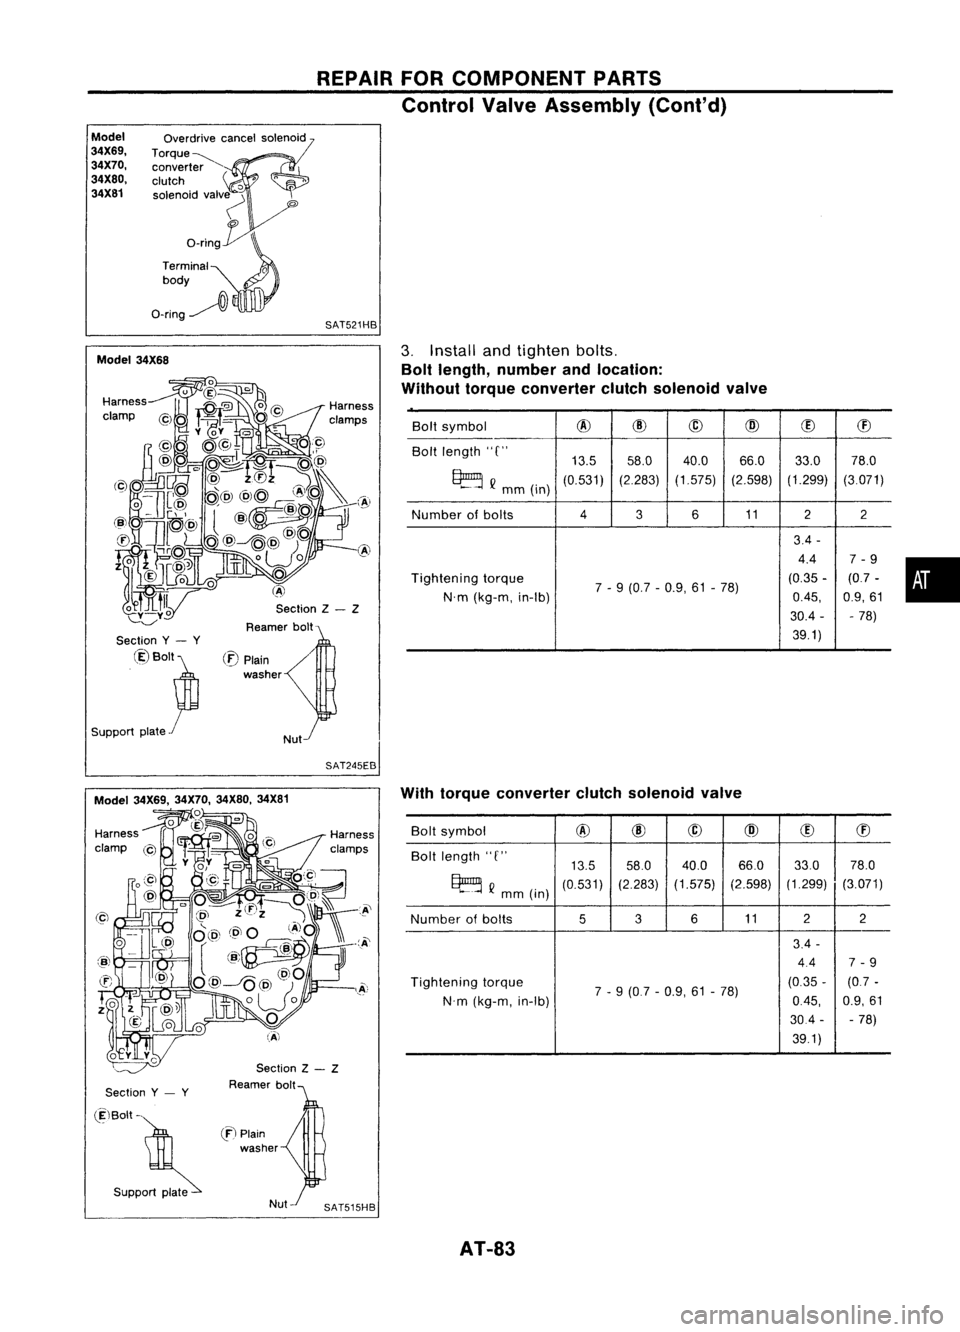
3.
Install andtighten bolts.
Bolt length, number andlocation:
Without torqueconverter clutchsolenoid valve
/
Nut
(:E)
Plain
washer
Section
y- y
@Bolt~
Support plate
r
SAT245EB
Section
y- y
Section
Z- Z
Reamer bolt With
torque converter clutchsolenoid valve
Bolt symbol
@
@
@
@
(!)
ffi
Bolt length "C"
13.558.0
40.0 66.033.0
78.0
~ Q
mm (in)
(0.531)
(2.283)
(1.575) (2.598)(1.299)
(3.071)
Number ofbolts
536
11 2
2
3.4 -
4.4 7-9
Tightening torque
7-9 (0.7 -0.9, 61-78) (0.35
-(0.7 -
N'm (kg-m, in-Ib)
0.45,
0.9,61
30.4 --
78)
39.1)
(ElBolt -
. S"PP~
en
Plain
washer
AT-83
Page 84 of 1701
REPAIRFORCOMPONENT PARTS
Control ValveAssembly (Cont'd)
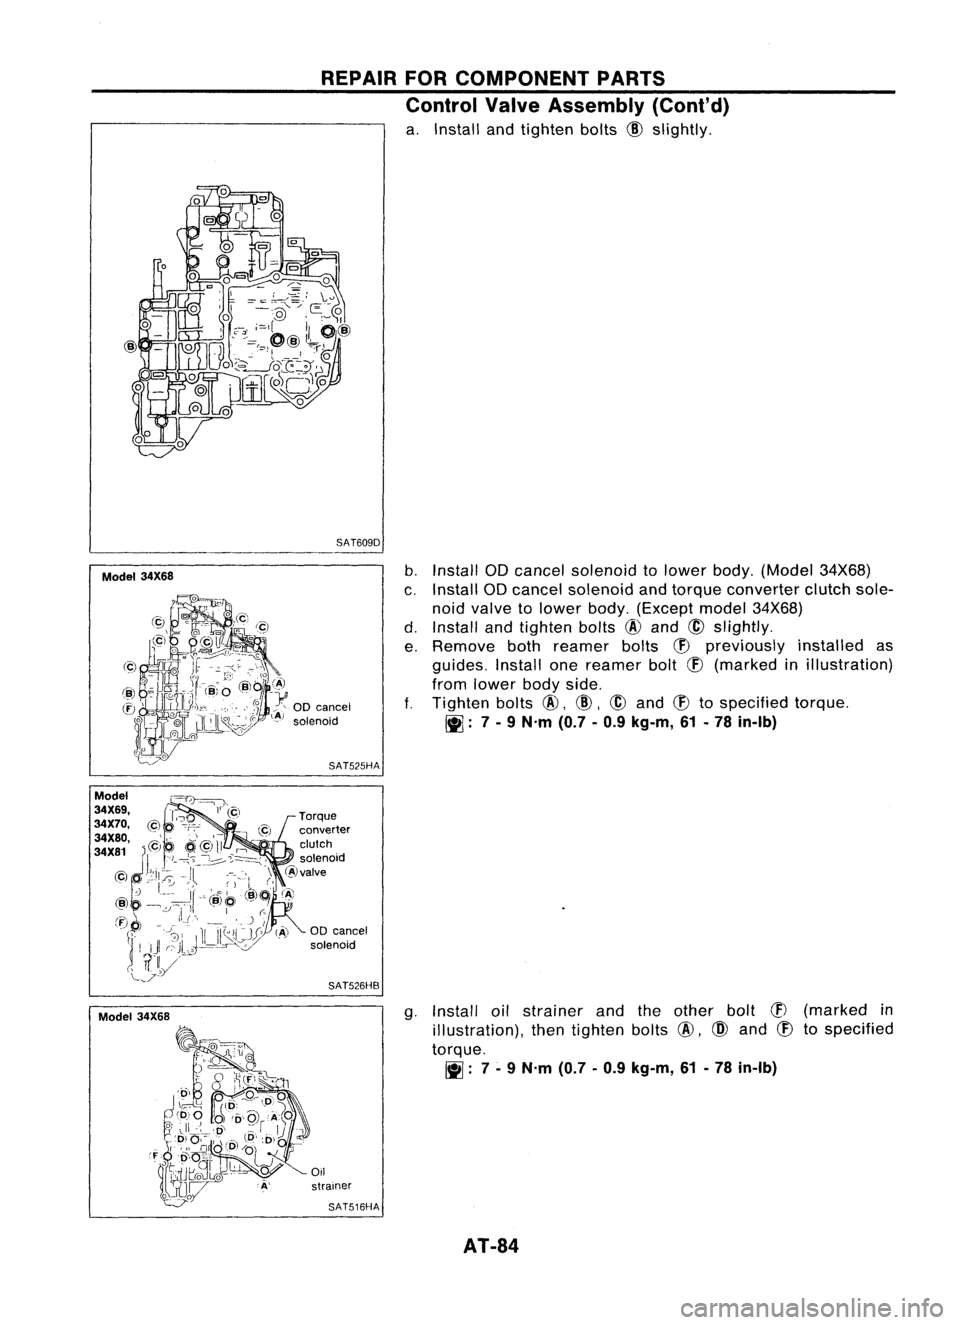
a. Install andtighten bolts
@
slightly.
SAT609D
Model 34X68
b.
Install ODcancel solenoid tolower body.(Model 34X68)
c. Install ODcancel solenoid andtorque converter clutchsole-
noid valve tolower body.(Except model34X68)
d. Install andtighten bolts
@
and
@
slightly.
e. Remove bothreamer bolts
(f)
previously installedas
guides. Installonereamer bolt
(f)
(marked inillustration)
from lower bodyside.
f.
Tighten bolts
@,
@,
@
and
(f)
tospecified torque.
~: 7-
9 N'm (0.7-0.9 kg-m, 61-78 in-Ib)
SAT525HA
00 cancel
solenoid
SAT526HB
g.Install oilstrainer andtheother bolt
CB
(marked in
illustration), thentighten bolts
@,
@
and
CB
tospecified
torque.
~: 7-
9 N'm (0.7-0.9 kg-m, 61-78 in-Ib)
Oil
strainer
SAT516HA
AT-84
Page 85 of 1701
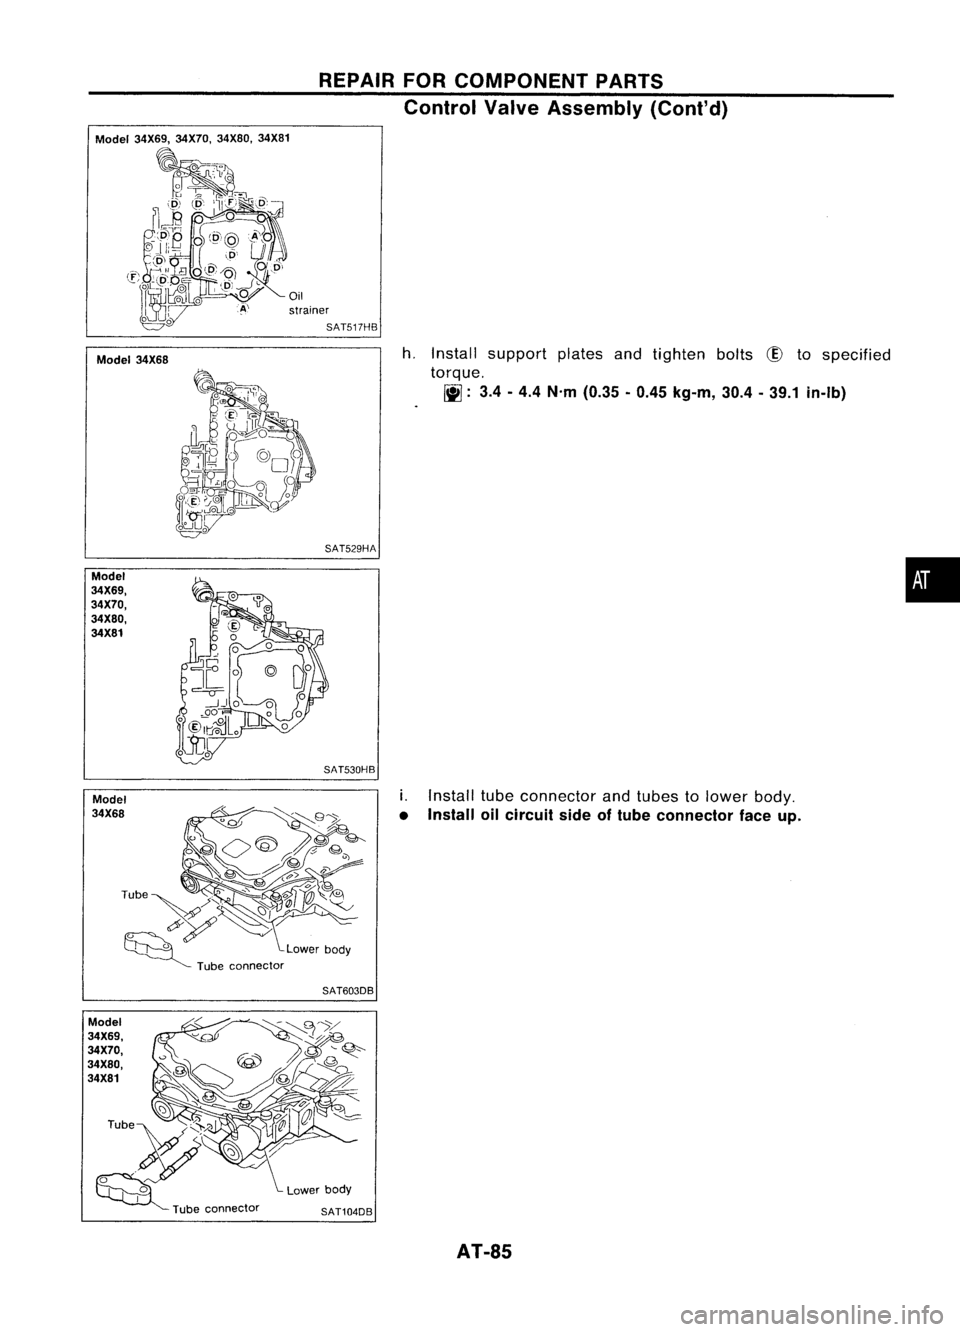
Model34X69, 34X70, 34X80,34X81 REPAIR
FORCOMPONENT PARTS
Control ValveAssembly (Cant'd)
Model 34X68
Model
34X69,
34X70,
34X80,
34X81
Model
34X68
Model
34X69,
34X70,
34X80,
34X81
h,
Install support platesandtighten bolts
CID
tospecified
torque.
[j]:
3.4-4.4 N'm (0.35 -0.45 kg-m, 30.4-39.1 in-Ib)
SAT529HA
i.
Install tubeconnector andtubes tolower body,
• Install oilcircuit sideoftube connector faceup.
SAT603DB
SAT104DB
AT-8S
•
Page 89 of 1701
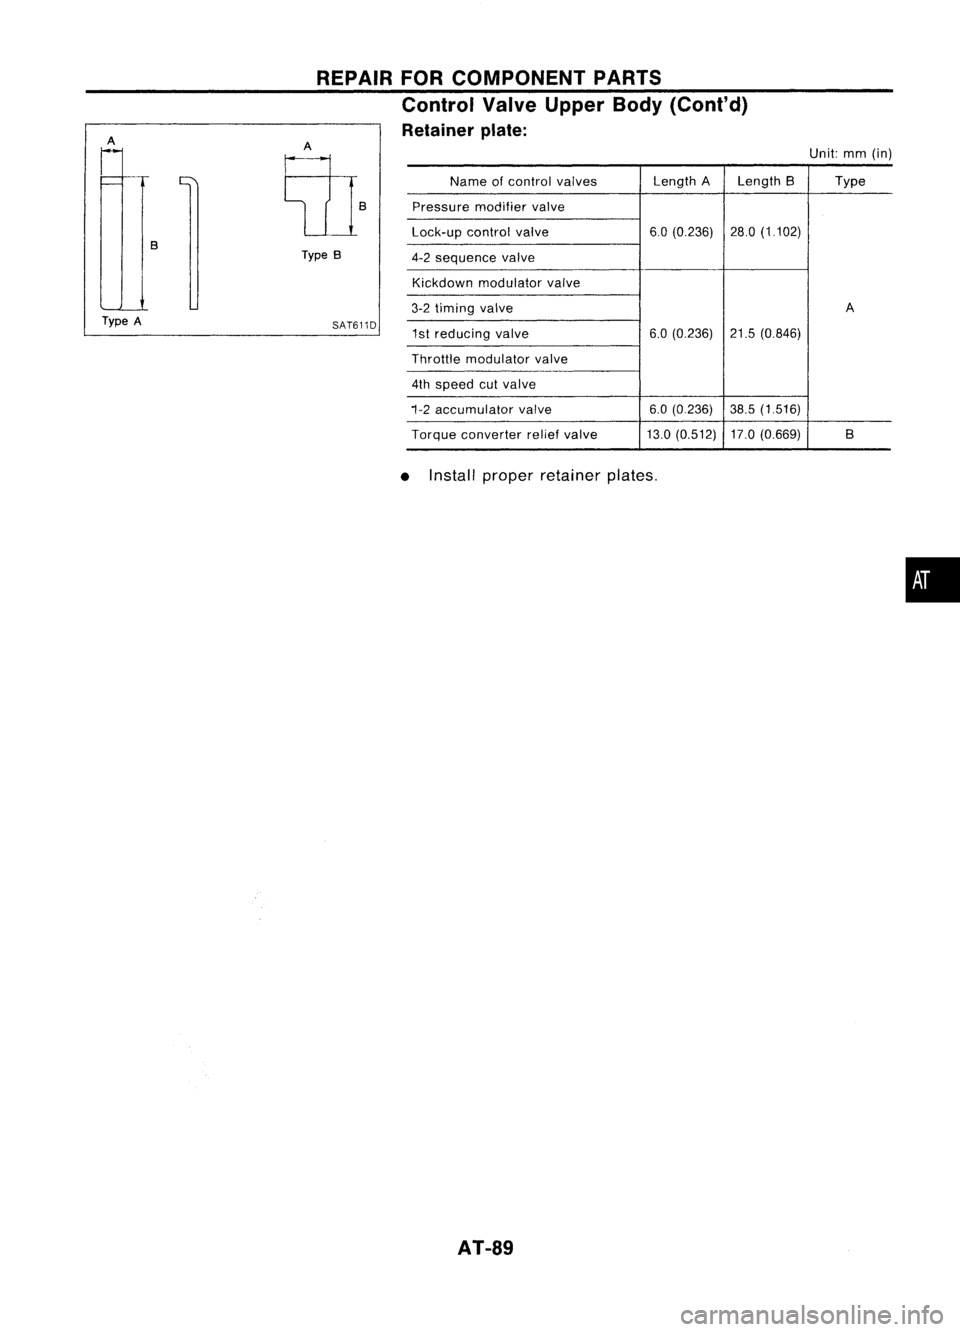
Unit:mm(in)
Name ofcontrol valves Length
ALength B Type
Pressure modifiervalve
Lock-up controlvalve 6.0
(0.236) 28.0(1.102)
4-2 sequence valve
Kickdown modulator valve
3-2 timing valve A
1st reducing valve 6.0
(0.236) 21.5(0.846)
Throttle modulator valve
4th speed cutvalve
1-2 accumulator valve 6.0
(0.236) 38.5(1516)
Torque converter reliefvalve 13.0(0.512) 17.0(0.669) B
SAT611D
REPAIR
FORCOMPONENT PARTS
Control ValveUpper Body(Cont'd)
Retainer plate:
Type B
A
E{1}
B
A
Type A
•Install proper retainer plates.
•
AT-89
Page 139 of 1701
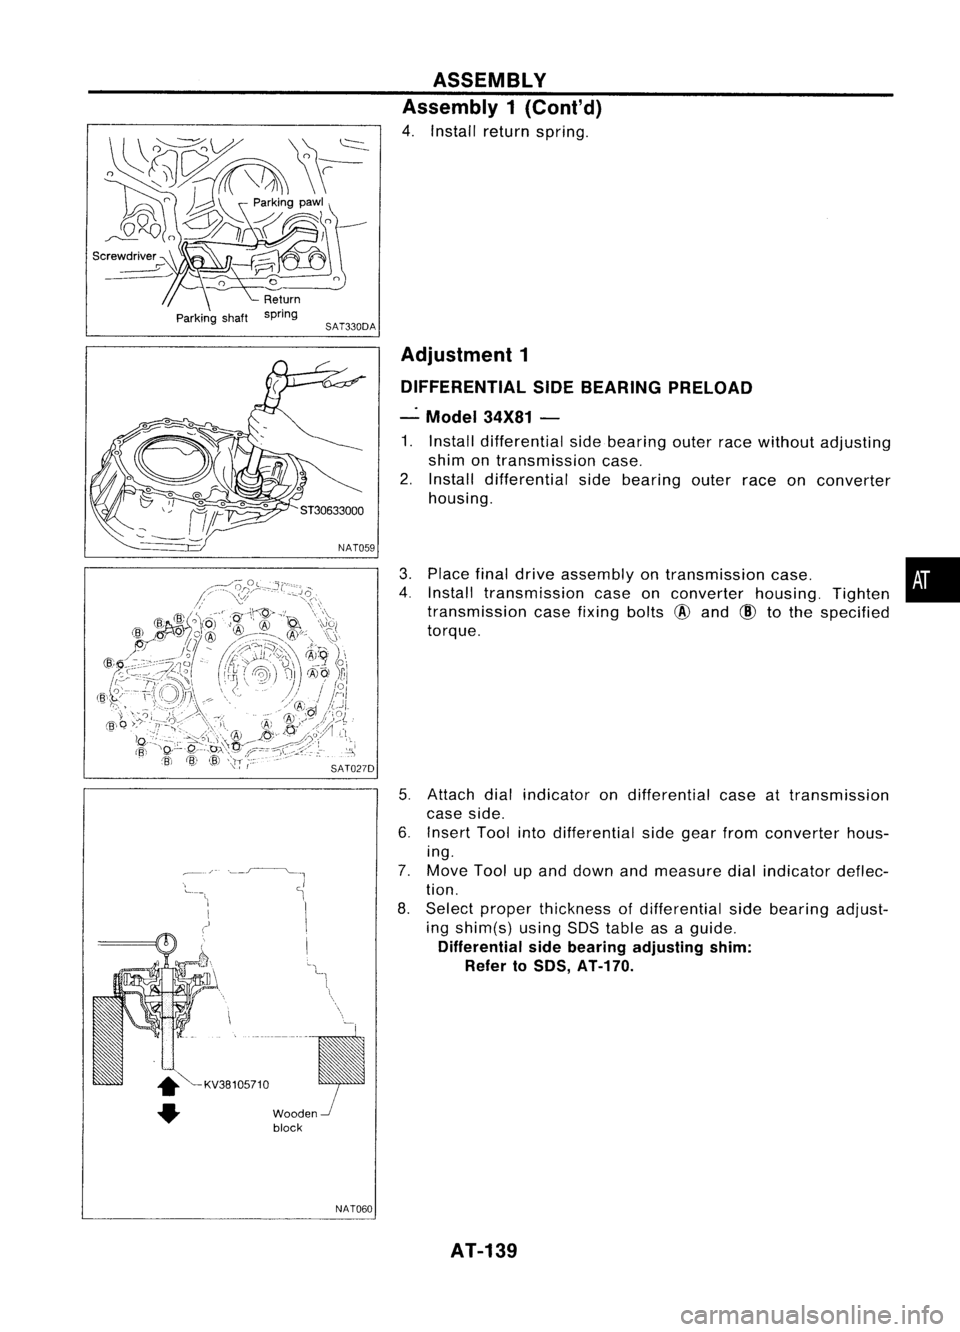
~-_./-'--.~.-l
~
1I
-~------~._--~
.
• ~KV38105710
• Wooden
block
NAT060 ASSEMBLY
Assembly 1(Cont'd)
4. Install returnspring.
Adjustment 1
DIFFERENTIAL SIDEBEARING PRELOAD
-" Model 34X81-
1. Install differential sidebearing outerracewithout adjusting
shim ontransmission case.
2. Install differential sidebearing outerraceonconverter
housing.
3. Place finaldrive assembly ontransmission case. •
4. Install transmission caseonconverter housing.Tighten
transmission casefixing bolts
@
and
CID
tothe specified
torque.
5. Attach dialindicator ondifferential caseattransmission
case side.
6. Insert Toolintodifferential sidegear from converter hous-
ing.
7. Move Toolupand down andmeasure dialindicator deflec-
tion.
8. Select proper thickness ofdifferential sidebearing adjust-
ing shim(s) usingSDStable asaguide.
Differential sidebearing adjusting shim:
Refer to50S, AT-HO.
AT-139
Page 140 of 1701
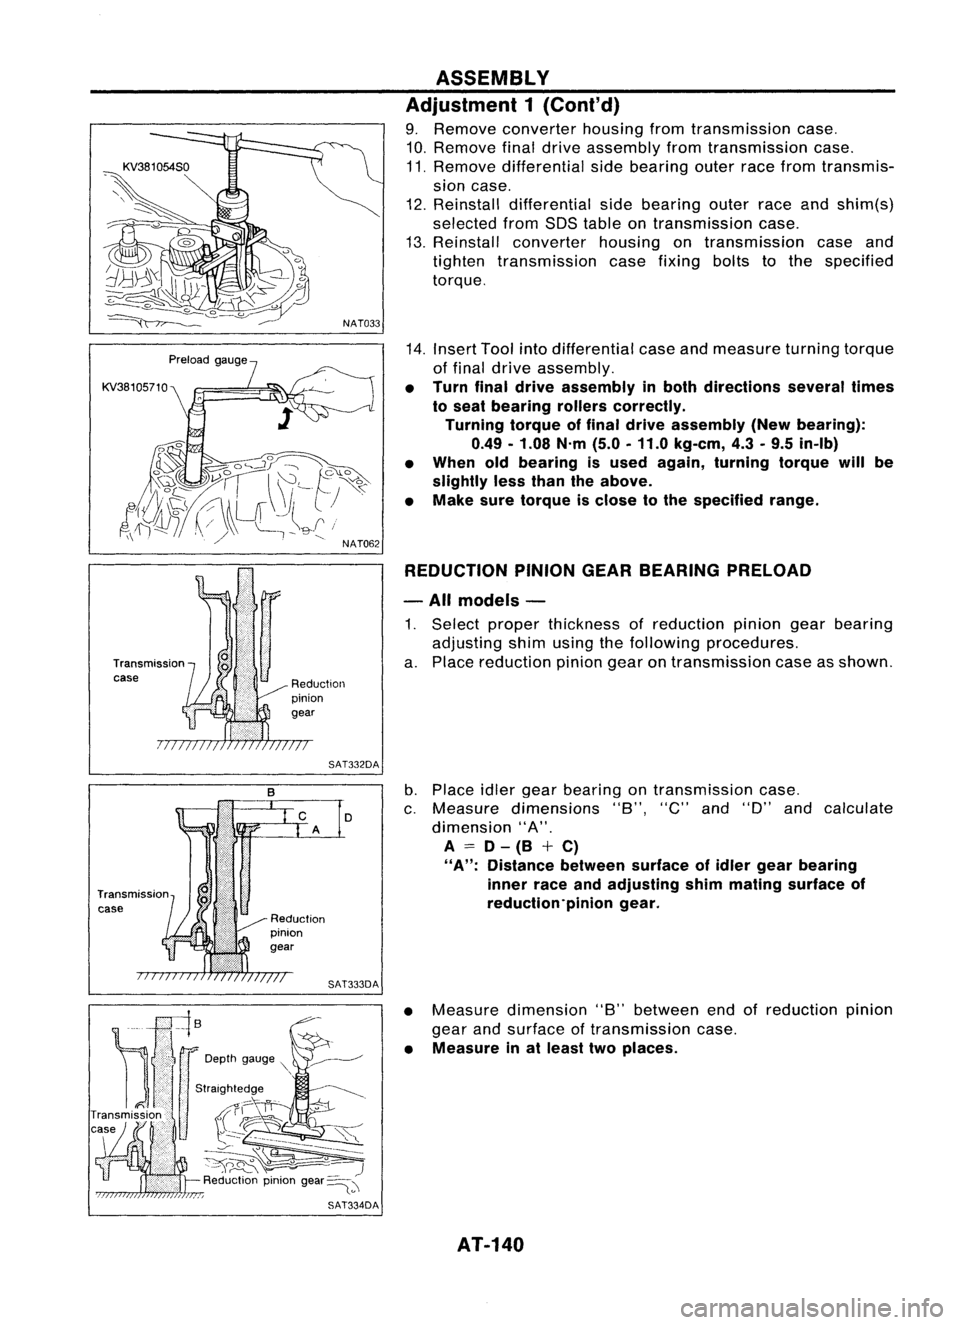
KV38105710
Transmission
case
NAT033
Reduction
pinion
gear
SAT332DA
D
SAT333DA ASSEMBLY
Adjustment 1(Cont'd)
9. Remove converter housingfromtransmission case.
10. Remove finaldrive assembly fromtransmission case.
11. Remove differential sidebearing outerracefrom transmis-
sion case.
12. Reinstall differential sidebearing outerraceandshim(s)
selected fromSDStable ontransmission case.
13. Reinstall converter housingontransmission caseand
tighten transmission casefixing boltstothe specified
torque.
14. Insert Toolintodifferential caseandmeasure turningtorque
of final drive assembly.
• Turn finaldrive assembly inboth directions severaltimes
to seat bearing rollerscorrectly.
Turning torqueoffinal drive assembly (Newbearing):
0.49 -1.08 N'm(5.0-11.0 kg-em, 4.3-9.5 in-Ib)
• When oldbearing isused again, turning torquewillbe
slightly lessthan theabove.
• Make suretorque isclose tothe specified range.
REDUCTION PINIONGEARBEARING PRELOAD
- All models -
1. Select proper thickness ofreduction piniongearbearing
adjusting shimusing thefollowing procedures.
a. Place reduction piniongearontransmission caseasshown.
b. Place idlergear bearing ontransmission case.
c. Measure dimensions "8","C"and"D" andcalculate
dimension "A".
A
=
D-(8 +C)
"A":
Distance betweensurfaceofidler gear bearing
inner raceandadjusting shimmating surface of
reduction'pinion gear.
• Measure dimension "8"between endofreduction pinion
gear andsurface oftransmission case.
• Measure inat least twoplaces.
AT-140
Page 142 of 1701
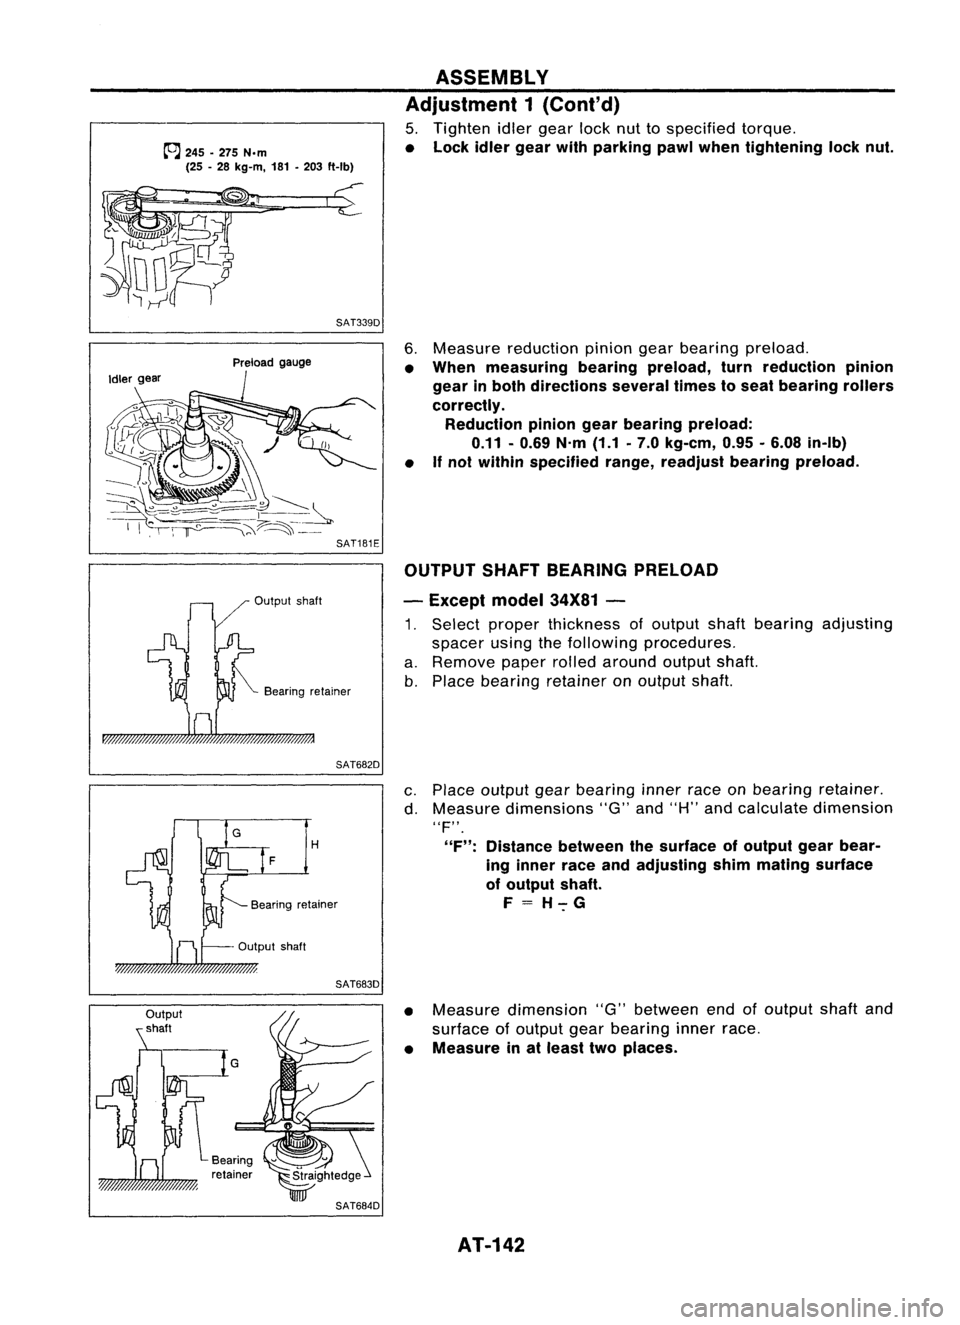
~245 -275 N.m
(25 -28 kg-m, 181-203 ft-Ib)
SAT339D ASSEMBLY
Adjustment 1(Cont'd)
5. Tighten idlergear locknuttospecified torque.
• Lock idlergear withparking pawlwhen tightening locknut.
Output shaft
Preload
gauge
Bearing retainer
6.
Measure reduction piniongearbearing preload.
• When measuring bearingpreload, turnreduction pinion
gear inboth directions severaltimestoseat bearing rollers
correctly. Reduction piniongearbearing preload:
0.11 -0.69 N.m(1.1.7.0 kg-em, 0.95•6.08 in-Ib)
• If
not within specified range,readjust bearingpreload.
OUTPUT SHAFTBEARING PRELOAD
- Except model34X81-
1. Select proper thickness ofoutput shaftbearing adjusting
spacer usingthefollowing procedures.
a. Remove paperrolledaround outputshaft.
b. Place bearing retainer onoutput shaft.
SAT682D
H
F
Output shaft
SAT683D
c.
Place output gearbearing innerraceonbearing retainer.
d. Measure dimensions "G"and"H" andcalculate dimension
"F".
"F": Distance betweenthesurface ofoutput gearbear-
ing inner raceandadjusting shimmating surface
of output shaft.
F=H-:-G
• Measure dimension "G"between endofoutput shaftand
surface ofoutput gearbearing innerrace.
• Measure inat least twoplaces.
AT-142
Page 144 of 1701
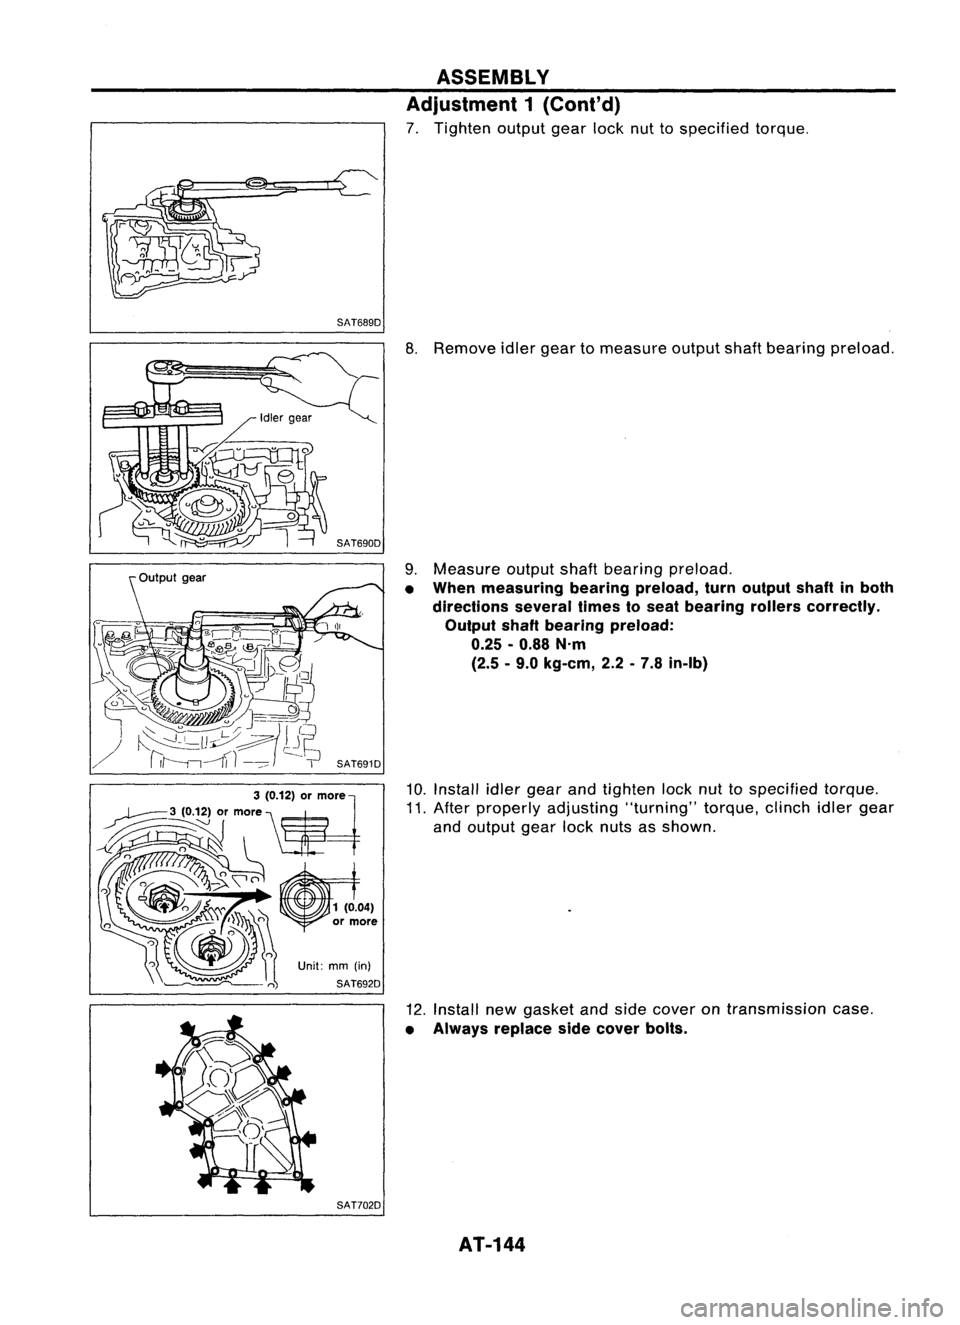
SAT689DASSEMBLY
Adjustment 1(Cont'd)
7. Tighten outputgearlocknuttospecified torque.
SAT702D
8.
Remove idlergear tomeasure outputshaftbearing preload.
9. Measure outputshaftbearing preload.
• When measuring bearingpreload, turnoutput shaftinboth
directions severaltimestoseat bearing rollerscorrectly.
Output shaftbearing preload:
0.25 -0.88 N'm
(2.5 -9.0 kg-em, 2.2-7.8 in-Ib)
10. Install idlergear andtighten locknuttospecified torque.
11. After properly adjusting "turning"torque,clinchidlergear
and output gearlocknuts asshown.
12. Install newgasket andside cover ontransmission case.
• Always replace sidecover bolts.
AT-144