NISSAN ALMERA N16 2001 Electronic Repair Manual
Manufacturer: NISSAN, Model Year: 2001, Model line: ALMERA N16, Model: NISSAN ALMERA N16 2001Pages: 2493, PDF Size: 66.97 MB
Page 1121 of 2493
SMT637A
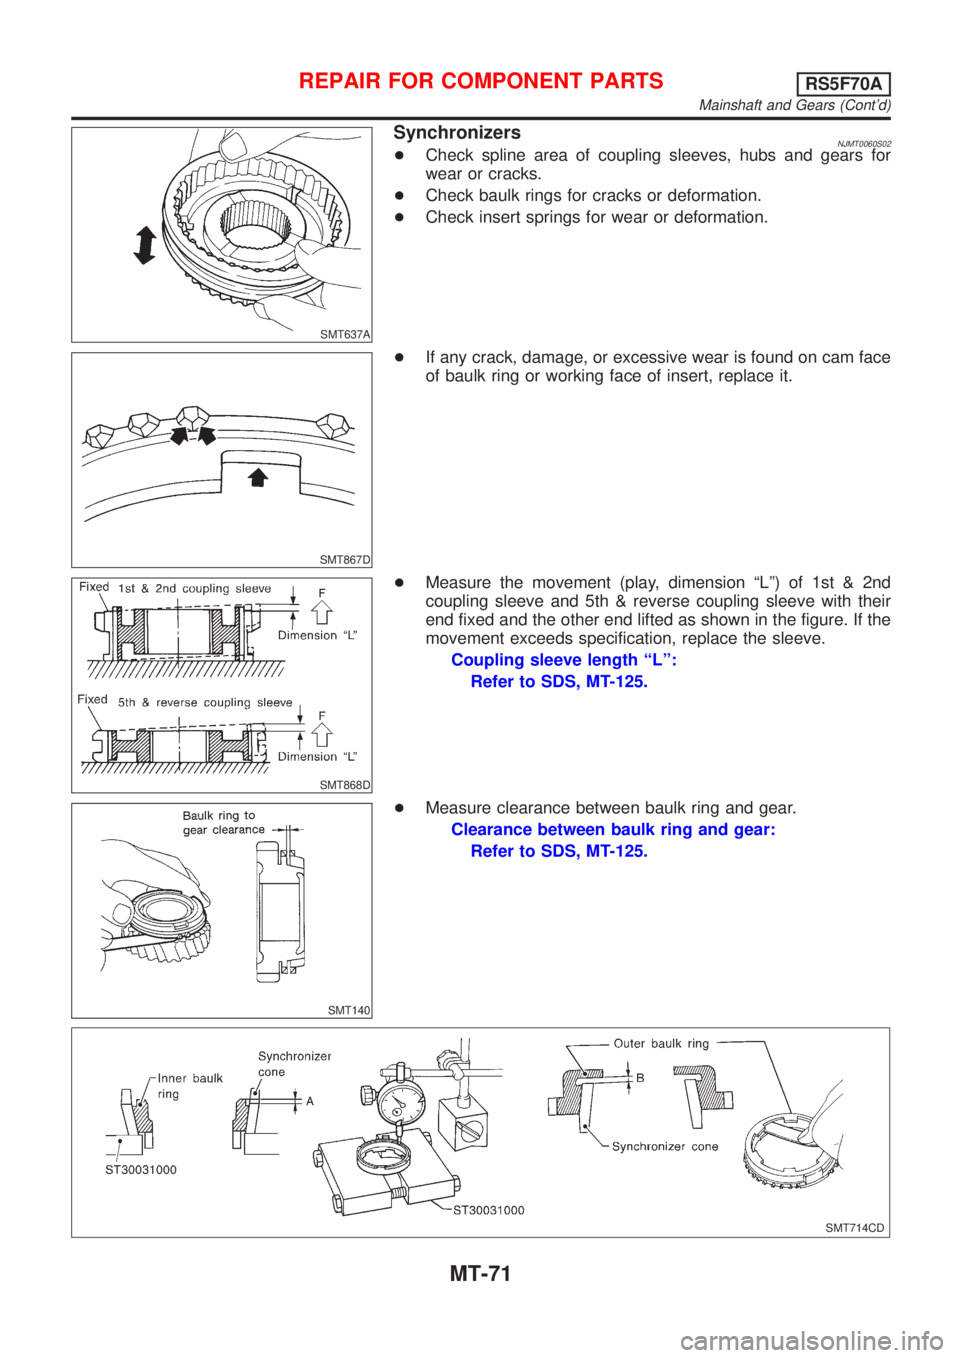
SynchronizersNJMT0060S02+Check spline area of coupling sleeves, hubs and gears for
wear or cracks.
+Check baulk rings for cracks or deformation.
+Check insert springs for wear or deformation.
SMT867D
+If any crack, damage, or excessive wear is found on cam face
of baulk ring or working face of insert, replace it.
SMT868D
+Measure the movement (play, dimension ªLº) of 1st & 2nd
coupling sleeve and 5th & reverse coupling sleeve with their
end fixed and the other end lifted as shown in the figure. If the
movement exceeds specification, replace the sleeve.
Coupling sleeve length ªLº:
Refer to SDS, MT-125.
SMT140
+Measure clearance between baulk ring and gear.
Clearance between baulk ring and gear:
Refer to SDS, MT-125.
SMT714CD
REPAIR FOR COMPONENT PARTSRS5F70A
Mainshaft and Gears (Cont'd)
MT-71
Page 1122 of 2493
+Measure wear of 1st and 2nd baulk ring.
a) Place baulk rings in position on synchronizer cone.
b) While holding baulk ring against synchronizer cone as far as it
will go, measure dimensions ªAº and ªBº.
Standard:
A 0.6 - 0.8 mm (0.024 - 0.031 in)
B 0.6 - 1.1 mm (0.024 - 0.043 in)
Wear limit:
0.2 mm (0.008 in)
+If dimension ªAº or ªBº is smaller than the wear limit,
replace outer baulk ring, inner baulk ring and synchro-
nizer cone as a set.
SMT148A
BearingNJMT0060S03+Make sure bearings roll freely and are free from noise, cracks,
pitting or wear.
SMT706D
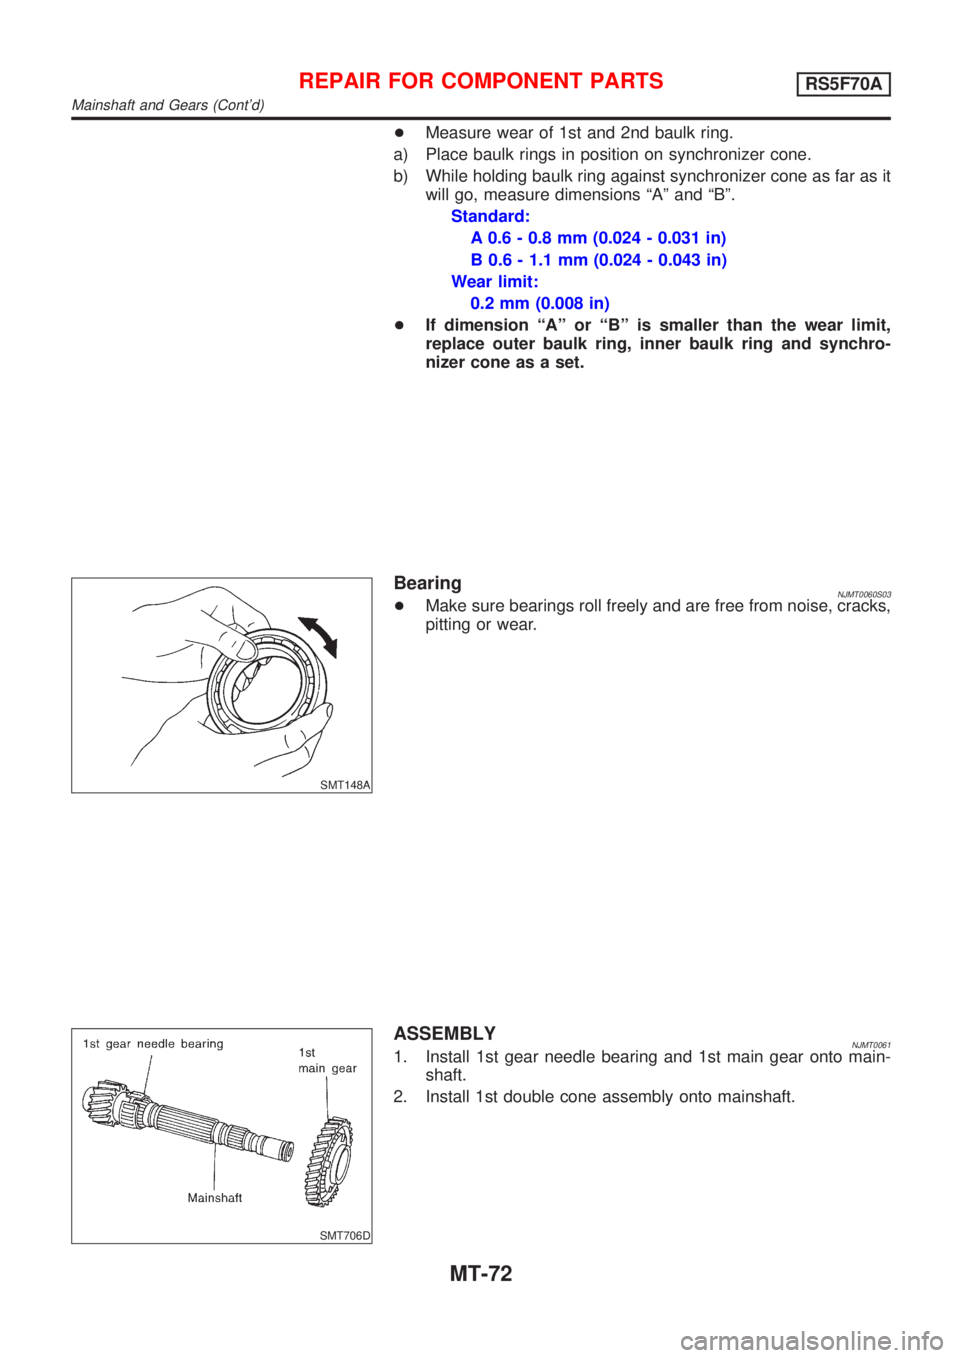
ASSEMBLYNJMT00611. Install 1st gear needle bearing and 1st main gear onto main-
shaft.
2. Install 1st double cone assembly onto mainshaft.
REPAIR FOR COMPONENT PARTSRS5F70A
Mainshaft and Gears (Cont'd)
MT-72
Page 1123 of 2493
SMT695D
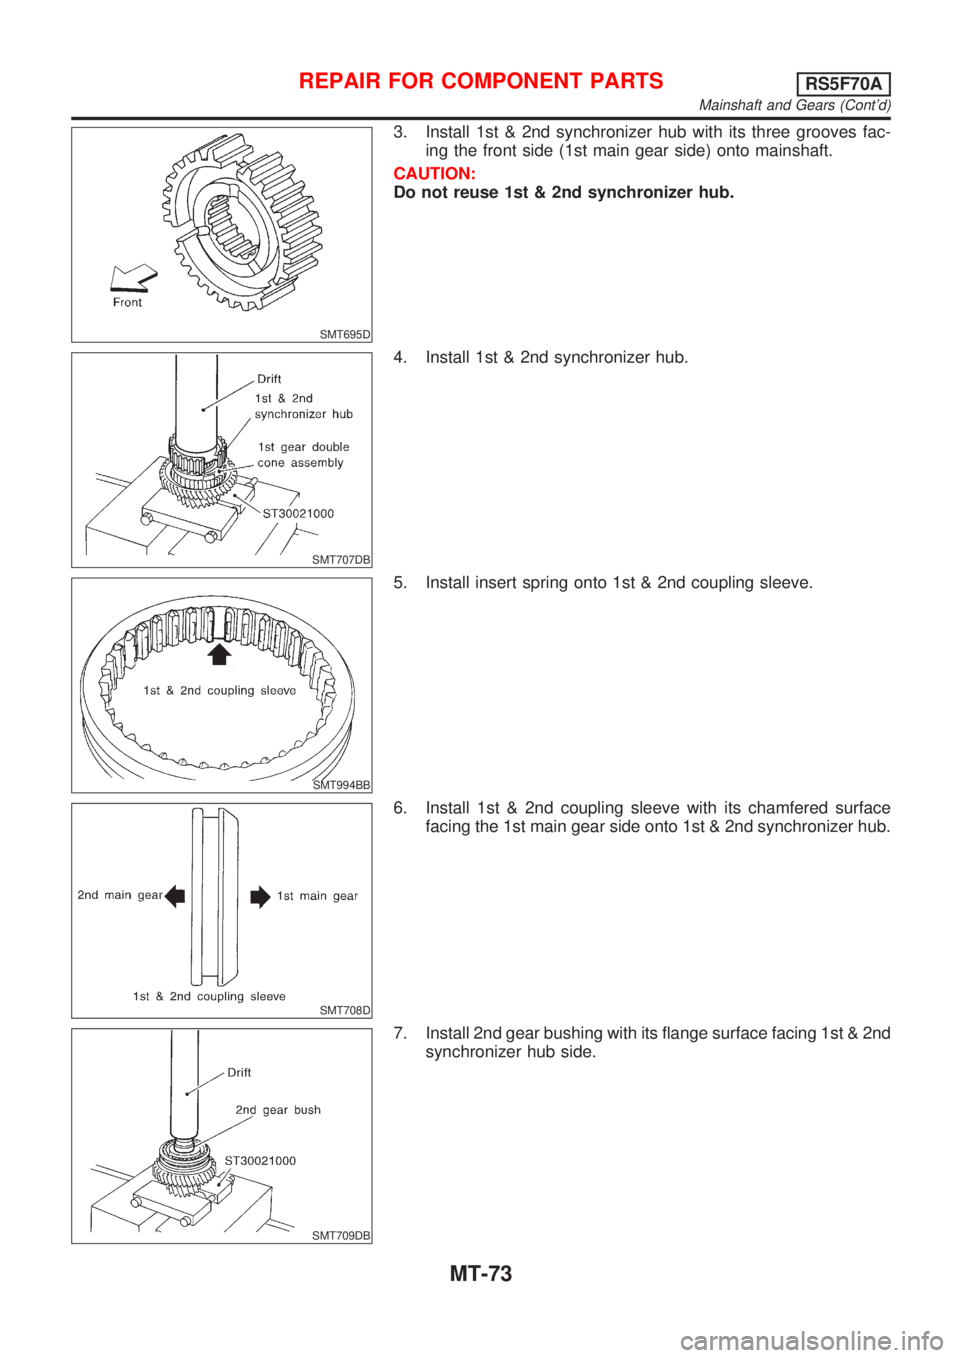
3. Install 1st & 2nd synchronizer hub with its three grooves fac-
ing the front side (1st main gear side) onto mainshaft.
CAUTION:
Do not reuse 1st & 2nd synchronizer hub.
SMT707DB
4. Install 1st & 2nd synchronizer hub.
SMT994BB
5. Install insert spring onto 1st & 2nd coupling sleeve.
SMT708D
6. Install 1st & 2nd coupling sleeve with its chamfered surface
facing the 1st main gear side onto 1st & 2nd synchronizer hub.
SMT709DB
7. Install 2nd gear bushing with its flange surface facing 1st & 2nd
synchronizer hub side.
REPAIR FOR COMPONENT PARTSRS5F70A
Mainshaft and Gears (Cont'd)
MT-73
Page 1124 of 2493
SMT710DB
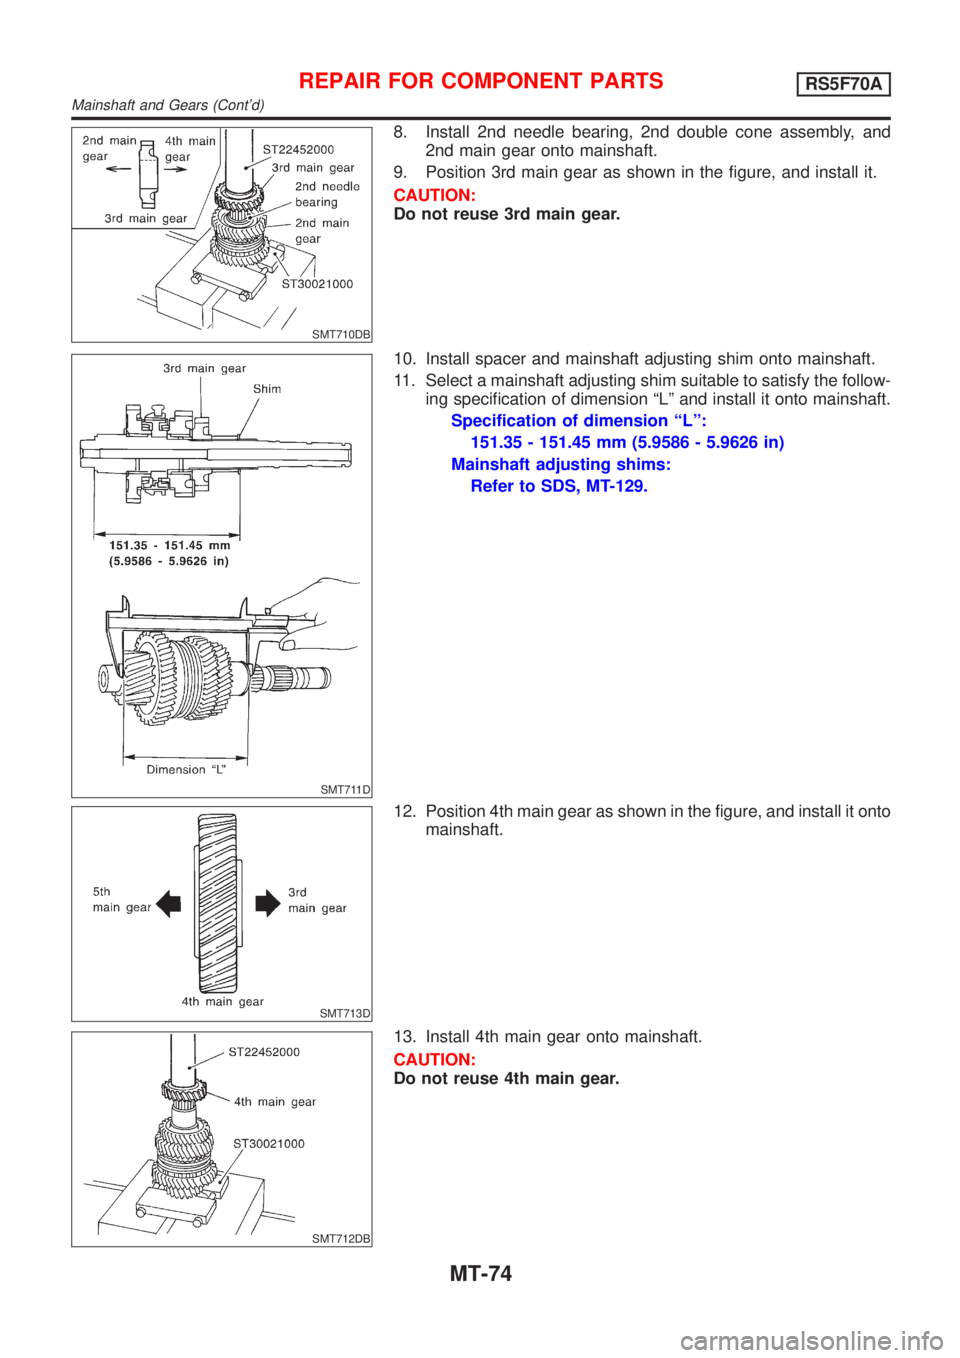
8. Install 2nd needle bearing, 2nd double cone assembly, and
2nd main gear onto mainshaft.
9. Position 3rd main gear as shown in the figure, and install it.
CAUTION:
Do not reuse 3rd main gear.
SMT711D
10. Install spacer and mainshaft adjusting shim onto mainshaft.
11. Select a mainshaft adjusting shim suitable to satisfy the follow-
ing specification of dimension ªLº and install it onto mainshaft.
Specification of dimension ªLº:
151.35 - 151.45 mm (5.9586 - 5.9626 in)
Mainshaft adjusting shims:
Refer to SDS, MT-129.
SMT713D
12. Position 4th main gear as shown in the figure, and install it onto
mainshaft.
SMT712DB
13. Install 4th main gear onto mainshaft.
CAUTION:
Do not reuse 4th main gear.
REPAIR FOR COMPONENT PARTSRS5F70A
Mainshaft and Gears (Cont'd)
MT-74
Page 1125 of 2493
SMT714DB
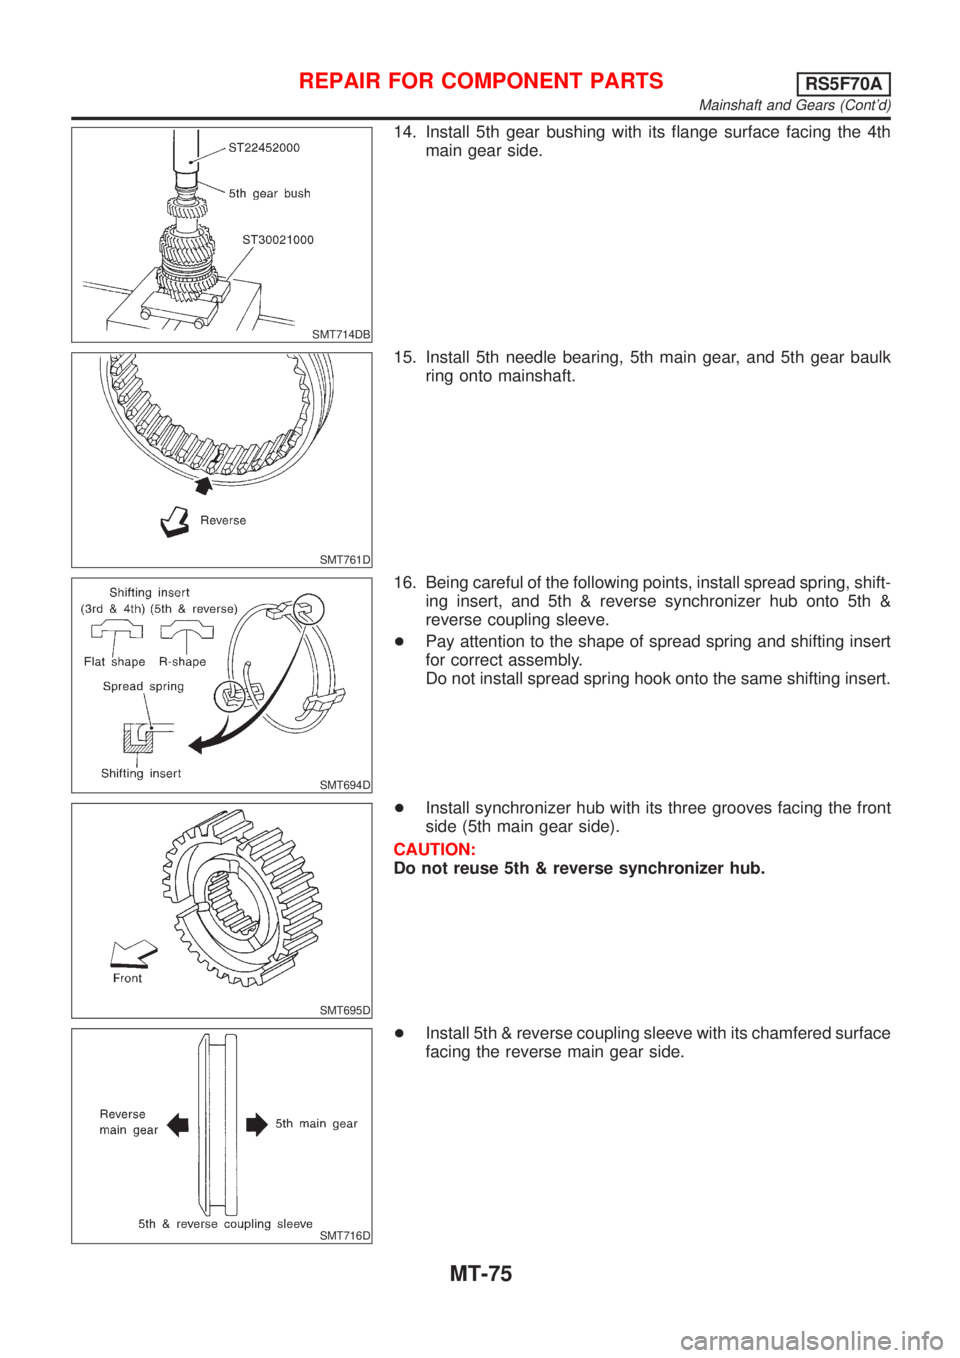
14. Install 5th gear bushing with its flange surface facing the 4th
main gear side.
SMT761D
15. Install 5th needle bearing, 5th main gear, and 5th gear baulk
ring onto mainshaft.
SMT694D
16. Being careful of the following points, install spread spring, shift-
ing insert, and 5th & reverse synchronizer hub onto 5th &
reverse coupling sleeve.
+Pay attention to the shape of spread spring and shifting insert
for correct assembly.
Do not install spread spring hook onto the same shifting insert.
SMT695D
+Install synchronizer hub with its three grooves facing the front
side (5th main gear side).
CAUTION:
Do not reuse 5th & reverse synchronizer hub.
SMT716D
+Install 5th & reverse coupling sleeve with its chamfered surface
facing the reverse main gear side.
REPAIR FOR COMPONENT PARTSRS5F70A
Mainshaft and Gears (Cont'd)
MT-75
Page 1126 of 2493
SMT715DB
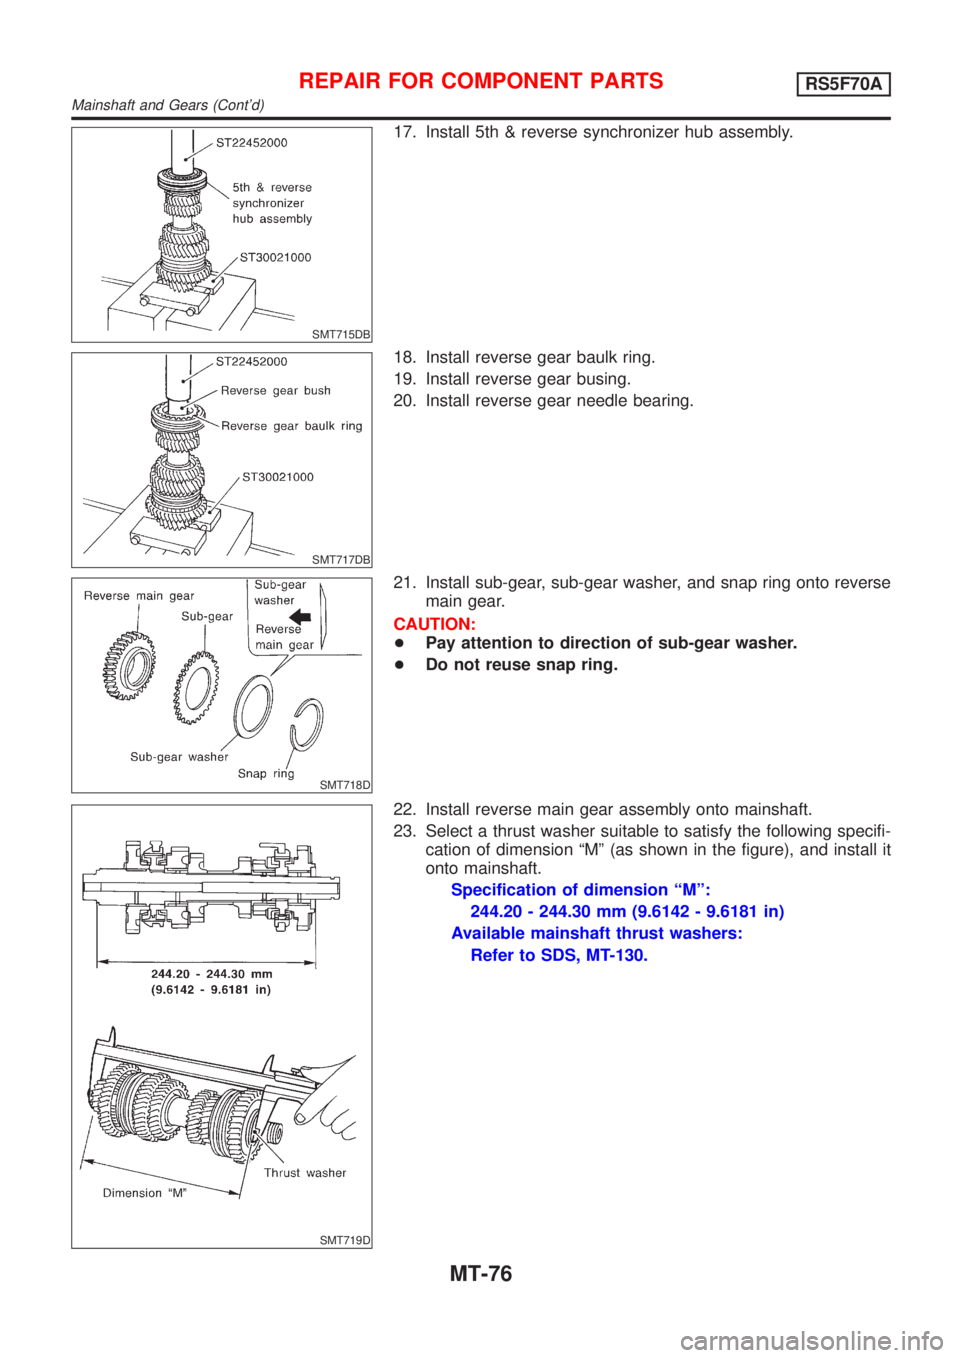
17. Install 5th & reverse synchronizer hub assembly.
SMT717DB
18. Install reverse gear baulk ring.
19. Install reverse gear busing.
20. Install reverse gear needle bearing.
SMT718D
21. Install sub-gear, sub-gear washer, and snap ring onto reverse
main gear.
CAUTION:
+Pay attention to direction of sub-gear washer.
+Do not reuse snap ring.
SMT719D
22. Install reverse main gear assembly onto mainshaft.
23. Select a thrust washer suitable to satisfy the following specifi-
cation of dimension ªMº (as shown in the figure), and install it
onto mainshaft.
Specification of dimension ªMº:
244.20 - 244.30 mm (9.6142 - 9.6181 in)
Available mainshaft thrust washers:
Refer to SDS, MT-130.
REPAIR FOR COMPONENT PARTSRS5F70A
Mainshaft and Gears (Cont'd)
MT-76
Page 1127 of 2493
SMT720DB
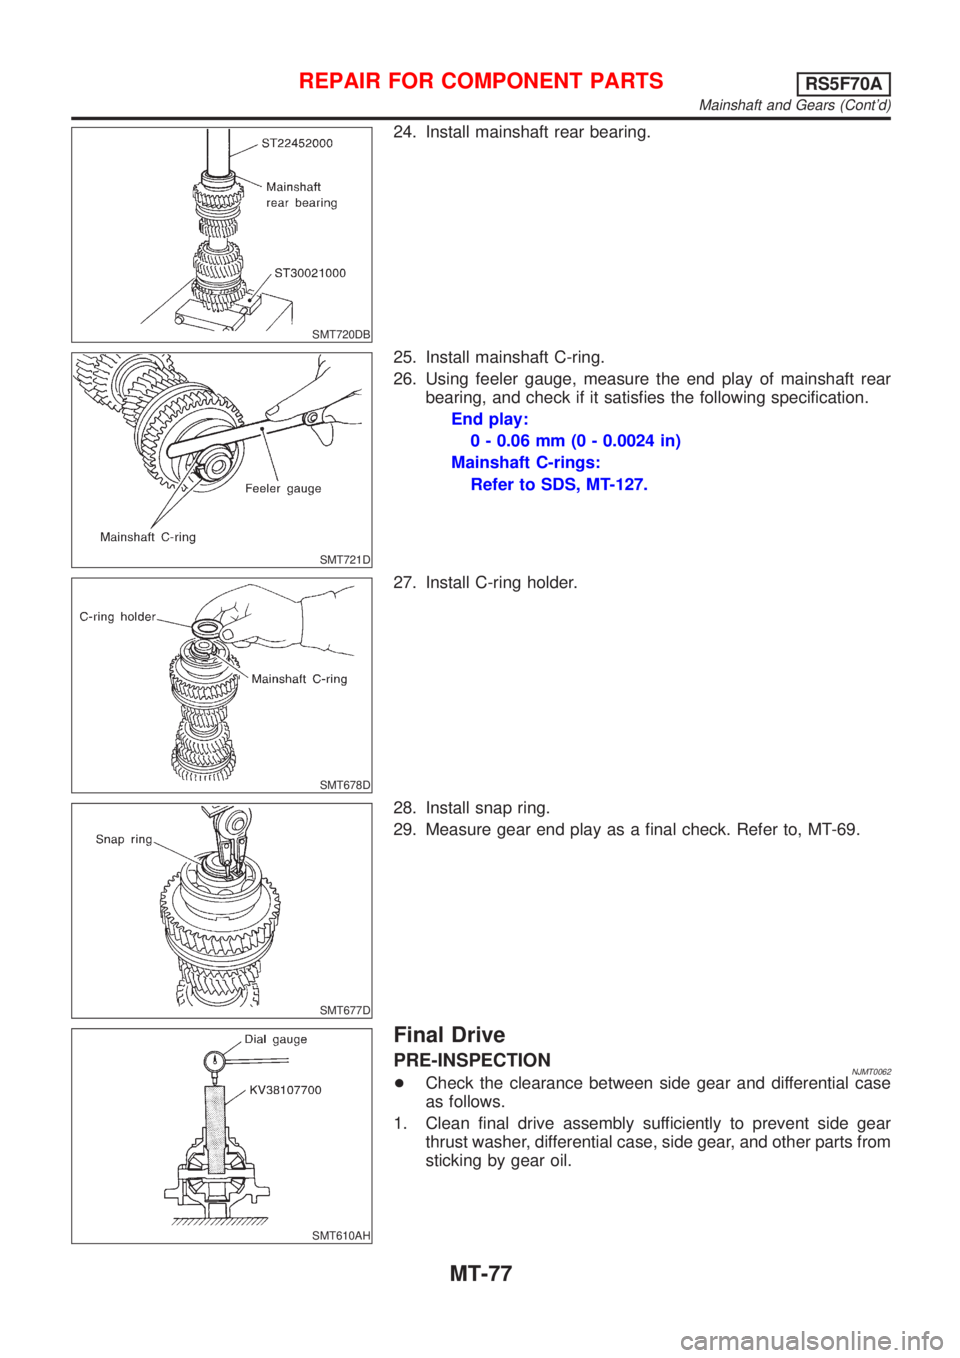
24. Install mainshaft rear bearing.
SMT721D
25. Install mainshaft C-ring.
26. Using feeler gauge, measure the end play of mainshaft rear
bearing, and check if it satisfies the following specification.
End play:
0 - 0.06 mm (0 - 0.0024 in)
Mainshaft C-rings:
Refer to SDS, MT-127.
SMT678D
27. Install C-ring holder.
SMT677D
28. Install snap ring.
29. Measure gear end play as a final check. Refer to, MT-69.
SMT610AH
Final Drive
PRE-INSPECTIONNJMT0062+Check the clearance between side gear and differential case
as follows.
1. Clean final drive assembly sufficiently to prevent side gear
thrust washer, differential case, side gear, and other parts from
sticking by gear oil.
REPAIR FOR COMPONENT PARTSRS5F70A
Mainshaft and Gears (Cont'd)
MT-77
Page 1128 of 2493
SMT685DC
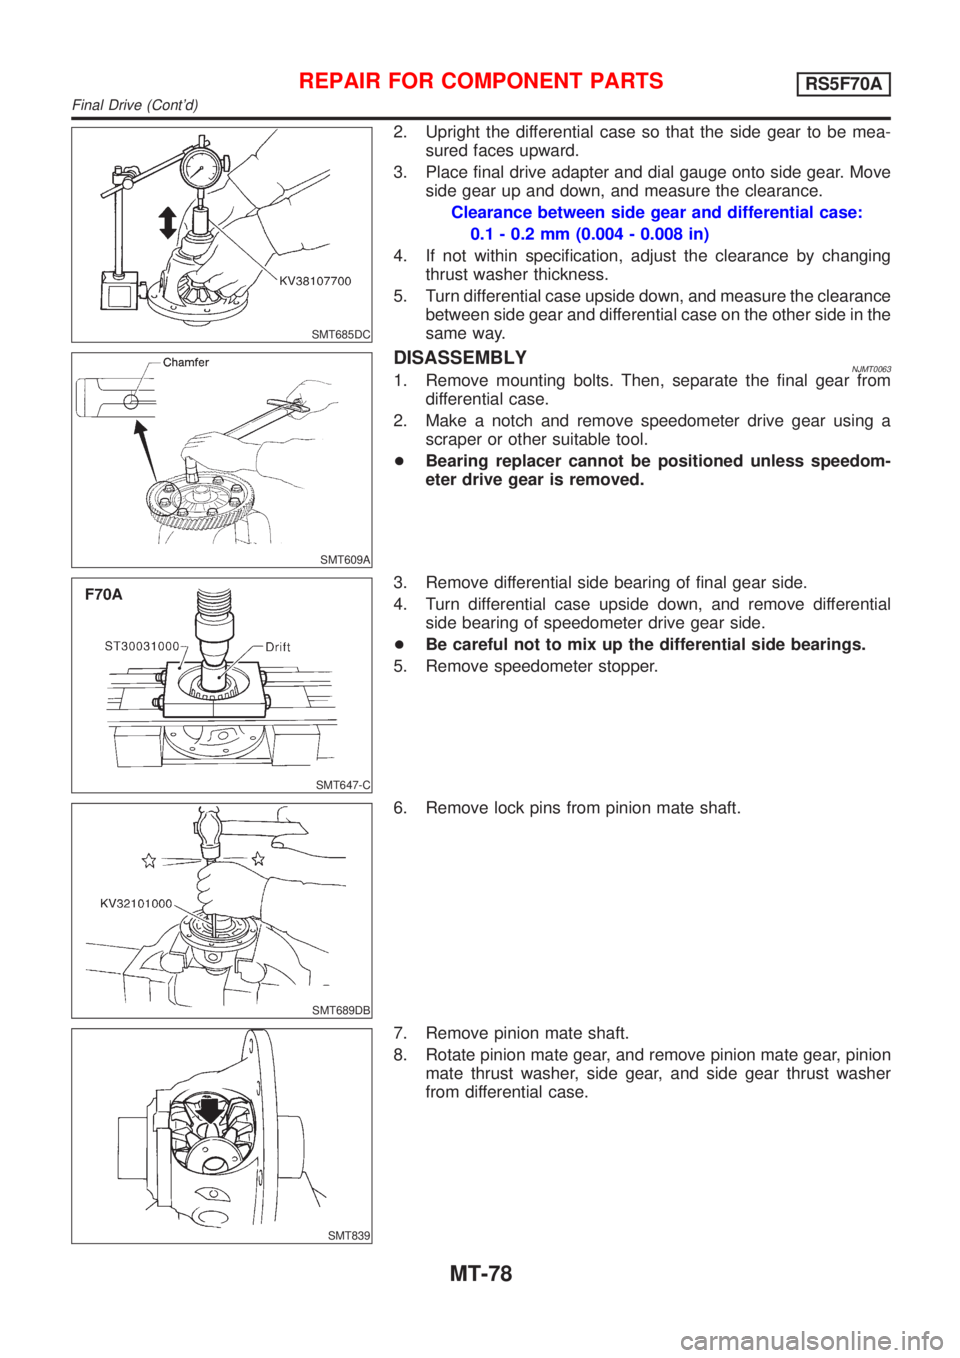
2. Upright the differential case so that the side gear to be mea-
sured faces upward.
3. Place final drive adapter and dial gauge onto side gear. Move
side gear up and down, and measure the clearance.
Clearance between side gear and differential case:
0.1 - 0.2 mm (0.004 - 0.008 in)
4. If not within specification, adjust the clearance by changing
thrust washer thickness.
5. Turn differential case upside down, and measure the clearance
between side gear and differential case on the other side in the
same way.
SMT609A
DISASSEMBLYNJMT00631. Remove mounting bolts. Then, separate the final gear from
differential case.
2. Make a notch and remove speedometer drive gear using a
scraper or other suitable tool.
+Bearing replacer cannot be positioned unless speedom-
eter drive gear is removed.
SMT647-C
3. Remove differential side bearing of final gear side.
4. Turn differential case upside down, and remove differential
side bearing of speedometer drive gear side.
+Be careful not to mix up the differential side bearings.
5. Remove speedometer stopper.
SMT689DB
6. Remove lock pins from pinion mate shaft.
SMT839
7. Remove pinion mate shaft.
8. Rotate pinion mate gear, and remove pinion mate gear, pinion
mate thrust washer, side gear, and side gear thrust washer
from differential case.
REPAIR FOR COMPONENT PARTSRS5F70A
Final Drive (Cont'd)
MT-78
Page 1129 of 2493
SMT083A
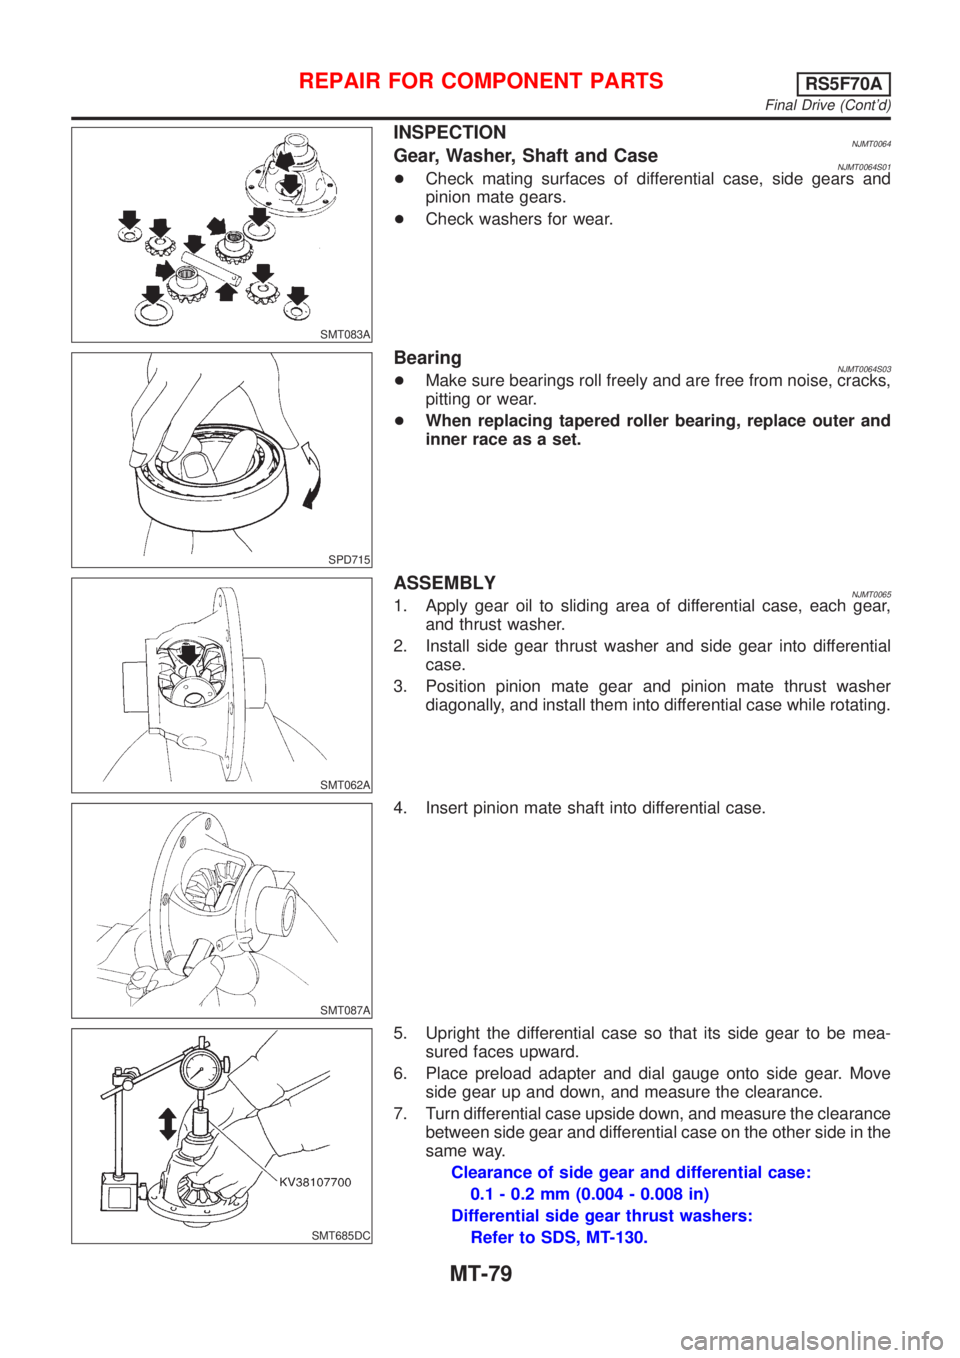
INSPECTIONNJMT0064Gear, Washer, Shaft and CaseNJMT0064S01+Check mating surfaces of differential case, side gears and
pinion mate gears.
+Check washers for wear.
SPD715
BearingNJMT0064S03+Make sure bearings roll freely and are free from noise, cracks,
pitting or wear.
+When replacing tapered roller bearing, replace outer and
inner race as a set.
SMT062A
ASSEMBLYNJMT00651. Apply gear oil to sliding area of differential case, each gear,
and thrust washer.
2. Install side gear thrust washer and side gear into differential
case.
3. Position pinion mate gear and pinion mate thrust washer
diagonally, and install them into differential case while rotating.
SMT087A
4. Insert pinion mate shaft into differential case.
SMT685DC
5. Upright the differential case so that its side gear to be mea-
sured faces upward.
6. Place preload adapter and dial gauge onto side gear. Move
side gear up and down, and measure the clearance.
7. Turn differential case upside down, and measure the clearance
between side gear and differential case on the other side in the
same way.
Clearance of side gear and differential case:
0.1 - 0.2 mm (0.004 - 0.008 in)
Differential side gear thrust washers:
Refer to SDS, MT-130.
REPAIR FOR COMPONENT PARTSRS5F70A
Final Drive (Cont'd)
MT-79
Page 1130 of 2493
SMT699BB
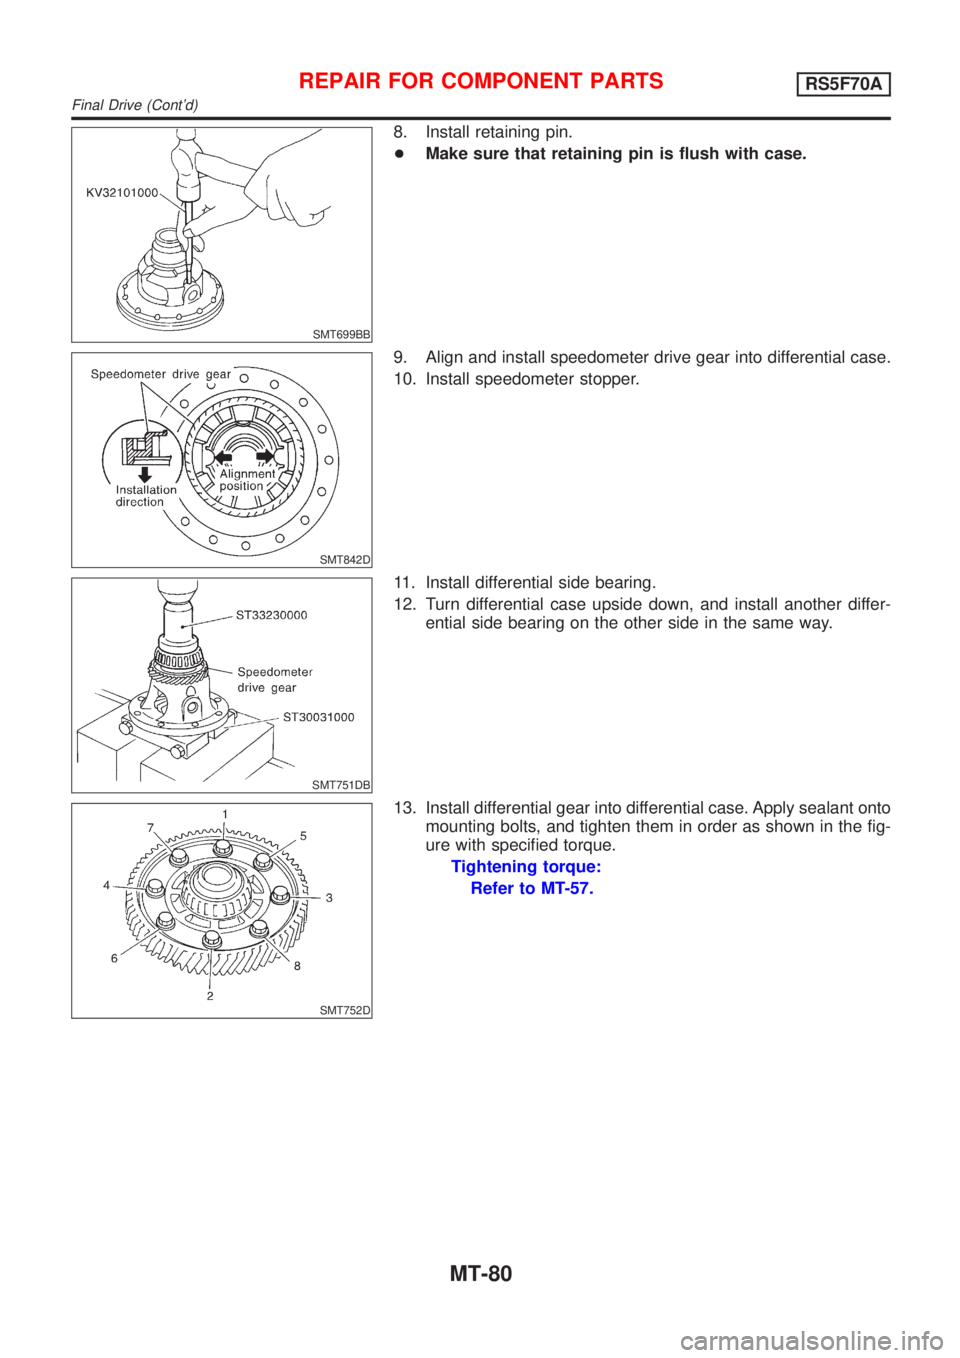
8. Install retaining pin.
+Make sure that retaining pin is flush with case.
SMT842D
9. Align and install speedometer drive gear into differential case.
10. Install speedometer stopper.
SMT751DB
11. Install differential side bearing.
12. Turn differential case upside down, and install another differ-
ential side bearing on the other side in the same way.
SMT752D
13. Install differential gear into differential case. Apply sealant onto
mounting bolts, and tighten them in order as shown in the fig-
ure with specified torque.
Tightening torque:
Refer to MT-57.
REPAIR FOR COMPONENT PARTSRS5F70A
Final Drive (Cont'd)
MT-80