NISSAN ALMERA N16 2001 Electronic Repair Manual
ALMERA N16 2001
NISSAN
NISSAN
https://www.carmanualsonline.info/img/5/57351/w960_57351-0.png
NISSAN ALMERA N16 2001 Electronic Repair Manual
Trending: wiper fluid, transmission oil, air conditioner, high beam, gas type, heater, battery
Page 1621 of 2493
SAT356D
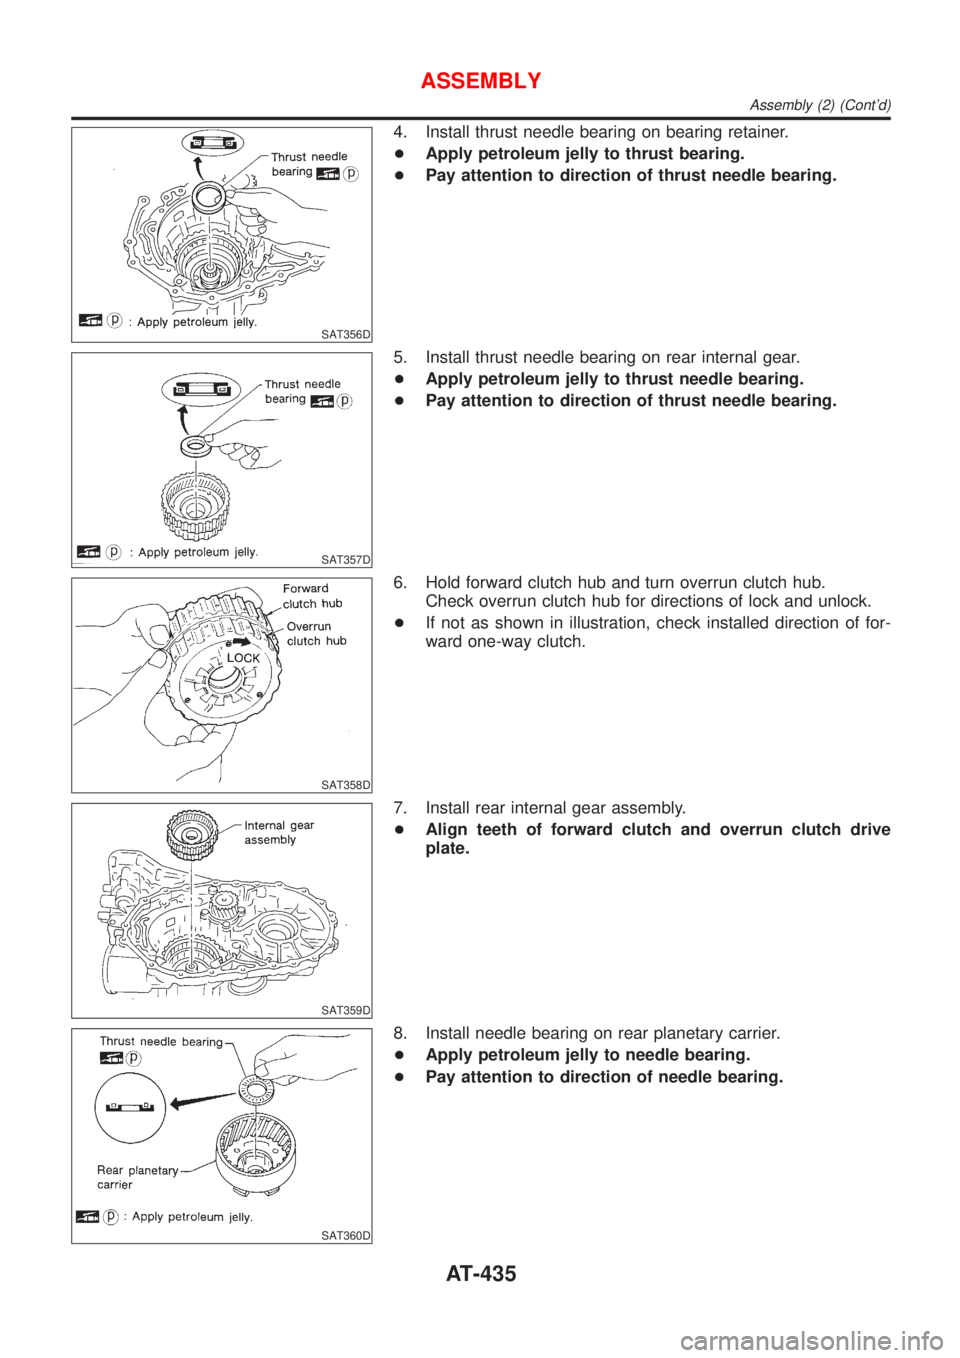
4. Install thrust needle bearing on bearing retainer.
+Apply petroleum jelly to thrust bearing.
+Pay attention to direction of thrust needle bearing.
SAT357D
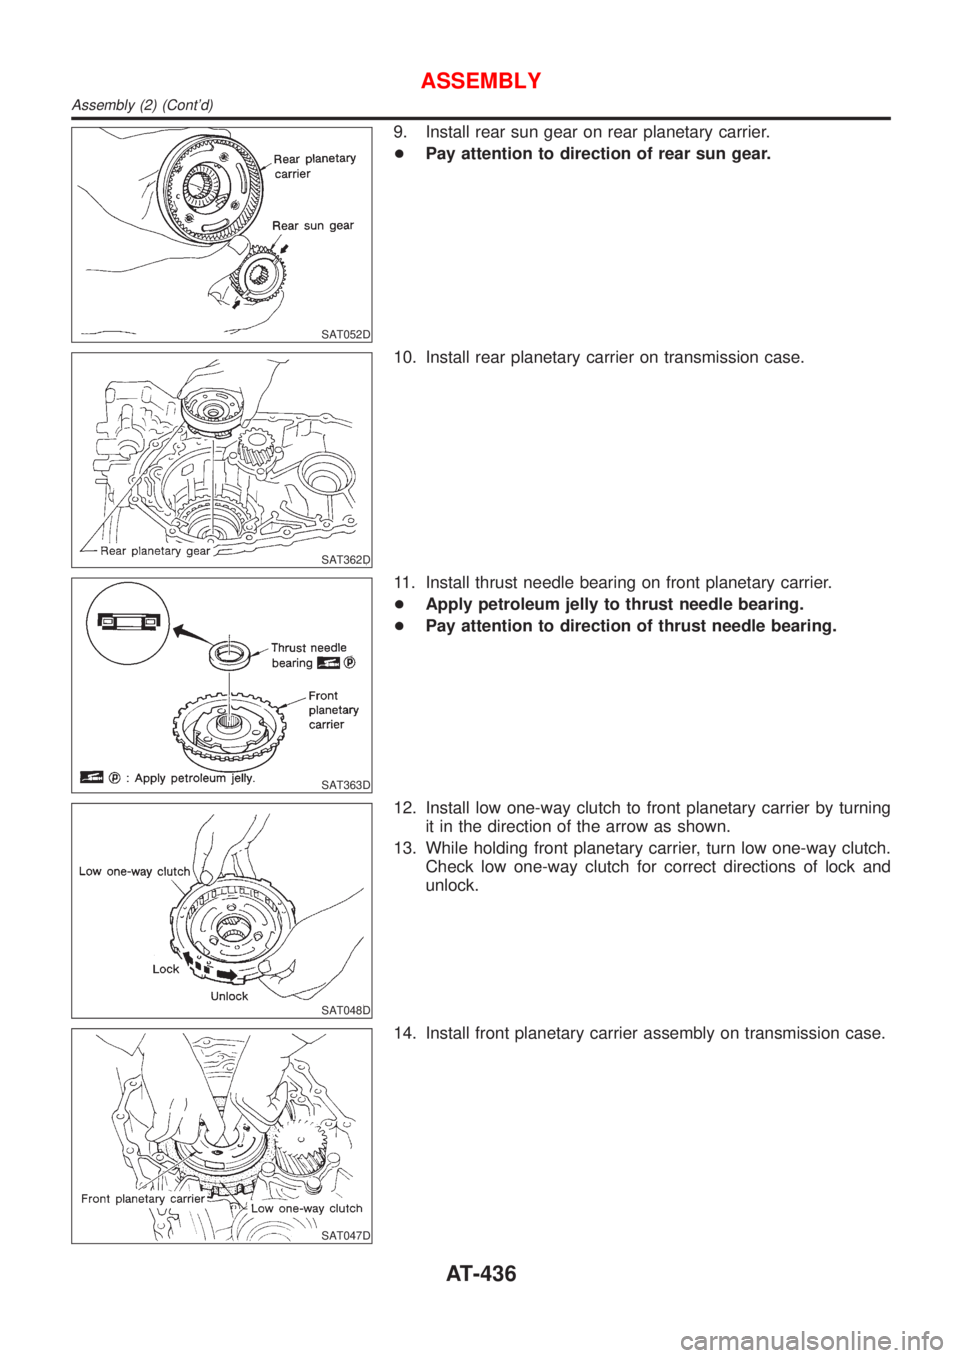
5. Install thrust needle bearing on rear internal gear.
+Apply petroleum jelly to thrust needle bearing.
+Pay attention to direction of thrust needle bearing.
SAT358D
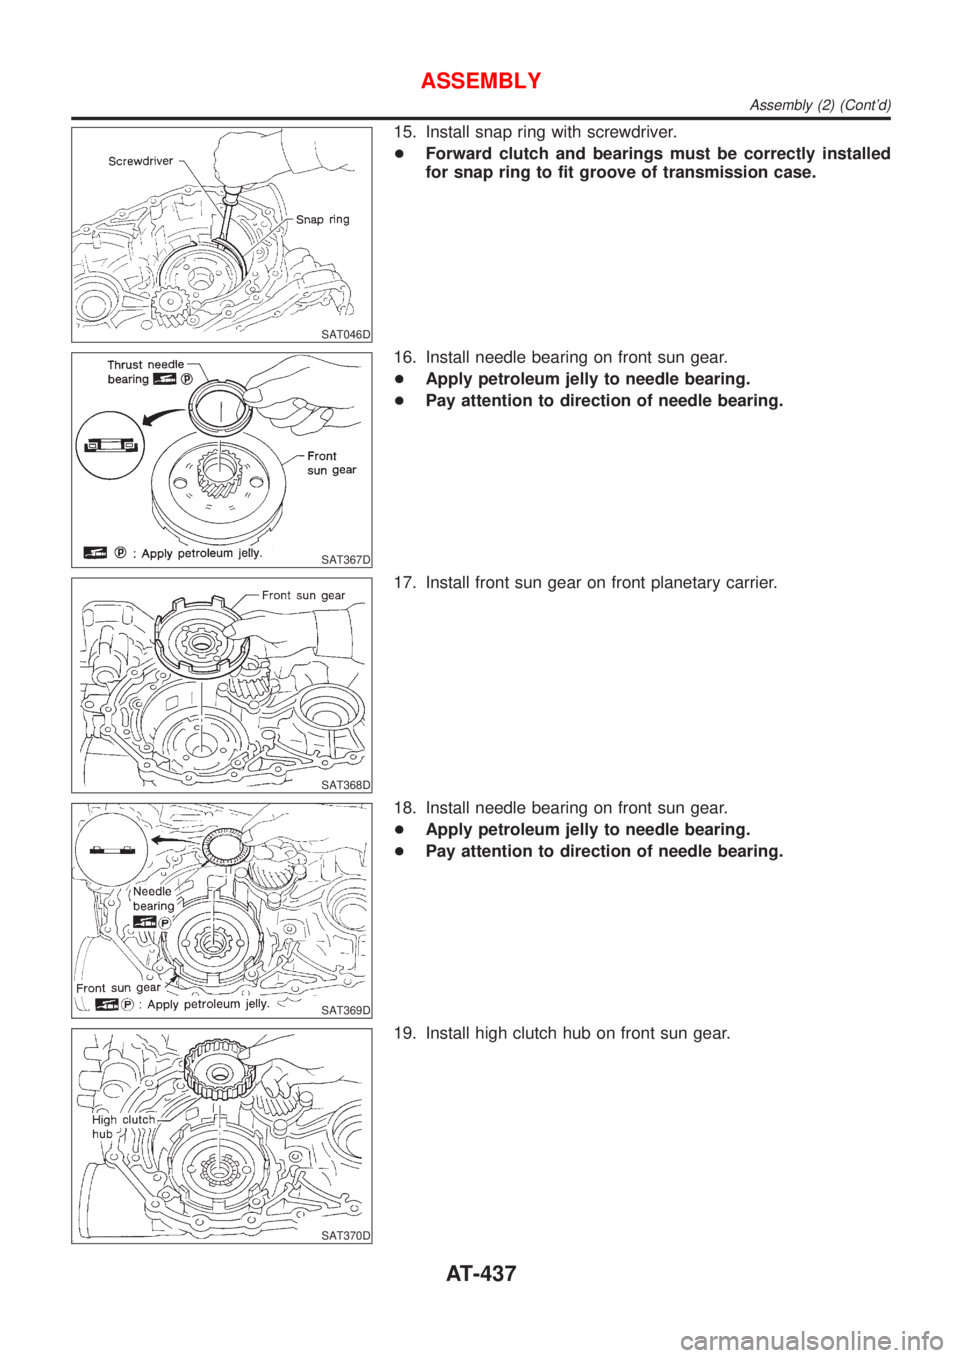
6. Hold forward clutch hub and turn overrun clutch hub.
Check overrun clutch hub for directions of lock and unlock.
+If not as shown in illustration, check installed direction of for-
ward one-way clutch.
SAT359D
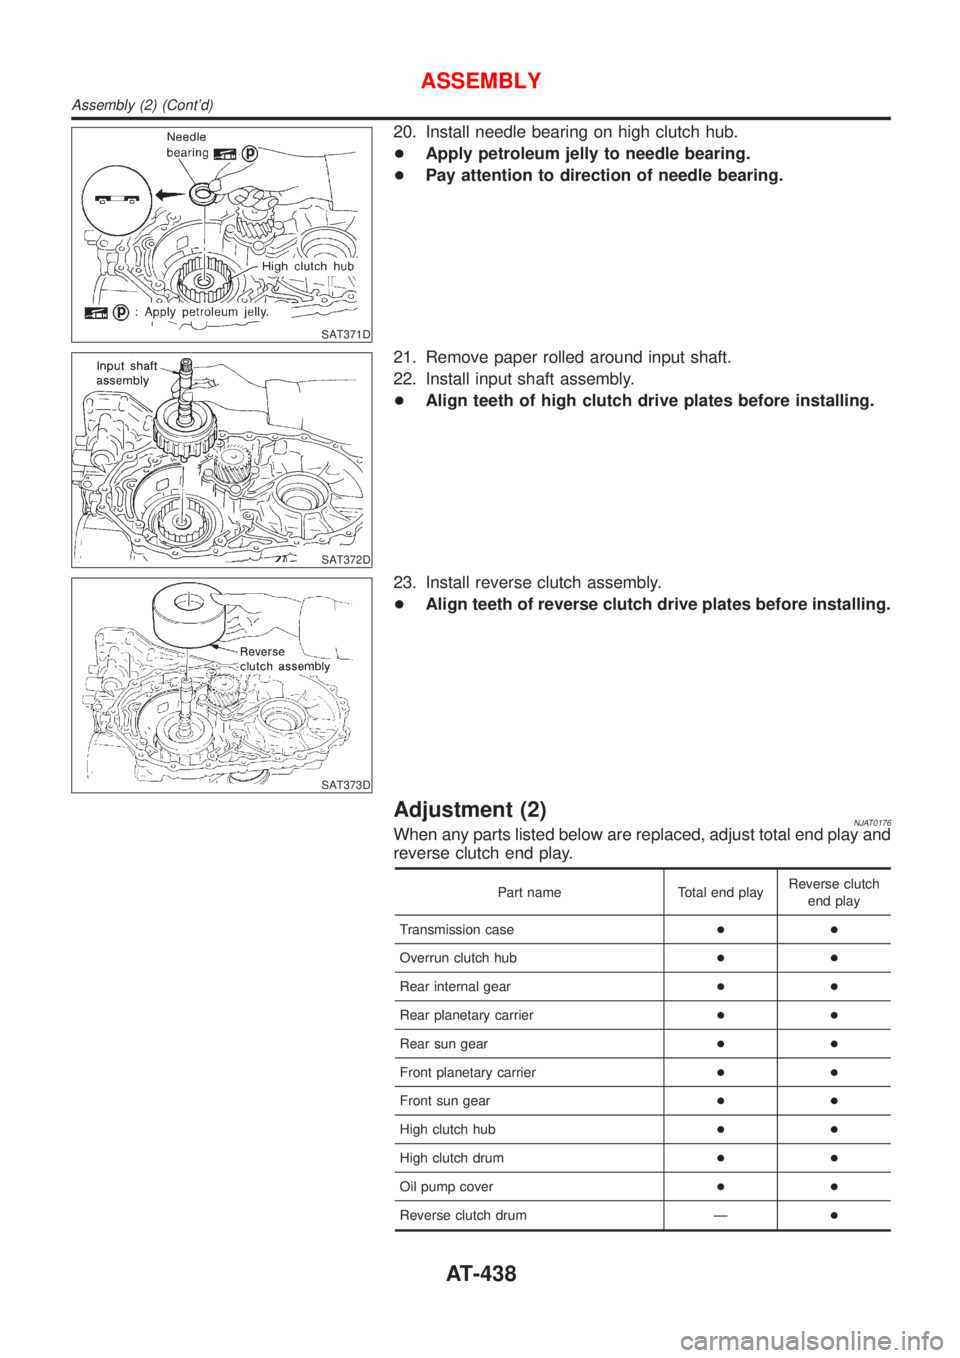
7. Install rear internal gear assembly.
+Align teeth of forward clutch and overrun clutch drive
plate.
SAT360D
8. Install needle bearing on rear planetary carrier.
+Apply petroleum jelly to needle bearing.
+Pay attention to direction of needle bearing.
ASSEMBLY
Assembly (2) (Cont'd)
AT-435
Page 1622 of 2493
SAT052D
9. Install rear sun gear on rear planetary carrier.
+Pay attention to direction of rear sun gear.
SAT362D
10. Install rear planetary carrier on transmission case.
SAT363D
11. Install thrust needle bearing on front planetary carrier.
+Apply petroleum jelly to thrust needle bearing.
+Pay attention to direction of thrust needle bearing.
SAT048D
12. Install low one-way clutch to front planetary carrier by turning
it in the direction of the arrow as shown.
13. While holding front planetary carrier, turn low one-way clutch.
Check low one-way clutch for correct directions of lock and
unlock.
SAT047D
14. Install front planetary carrier assembly on transmission case.
ASSEMBLY
Assembly (2) (Cont'd)
AT-436
Page 1623 of 2493
SAT046D
15. Install snap ring with screwdriver.
+Forward clutch and bearings must be correctly installed
for snap ring to fit groove of transmission case.
SAT367D
16. Install needle bearing on front sun gear.
+Apply petroleum jelly to needle bearing.
+Pay attention to direction of needle bearing.
SAT368D
17. Install front sun gear on front planetary carrier.
SAT369D
18. Install needle bearing on front sun gear.
+Apply petroleum jelly to needle bearing.
+Pay attention to direction of needle bearing.
SAT370D
19. Install high clutch hub on front sun gear.
ASSEMBLY
Assembly (2) (Cont'd)
AT-437
Page 1624 of 2493
SAT371D
20. Install needle bearing on high clutch hub.
+Apply petroleum jelly to needle bearing.
+Pay attention to direction of needle bearing.
SAT372D
21. Remove paper rolled around input shaft.
22. Install input shaft assembly.
+Align teeth of high clutch drive plates before installing.
SAT373D
23. Install reverse clutch assembly.
+Align teeth of reverse clutch drive plates before installing.
Adjustment (2)NJAT0176When any parts listed below are replaced, adjust total end play and
reverse clutch end play.
Part name Total end playReverse clutch
end play
Transmission case++
Overrun clutch hub++
Rear internal gear++
Rear planetary carrier++
Rear sun gear++
Front planetary carrier++
Front sun gear++
High clutch hub++
High clutch drum++
Oil pump cover++
Reverse clutch drum Ð+
ASSEMBLY
Assembly (2) (Cont'd)
AT-438
Page 1625 of 2493
SAT374D
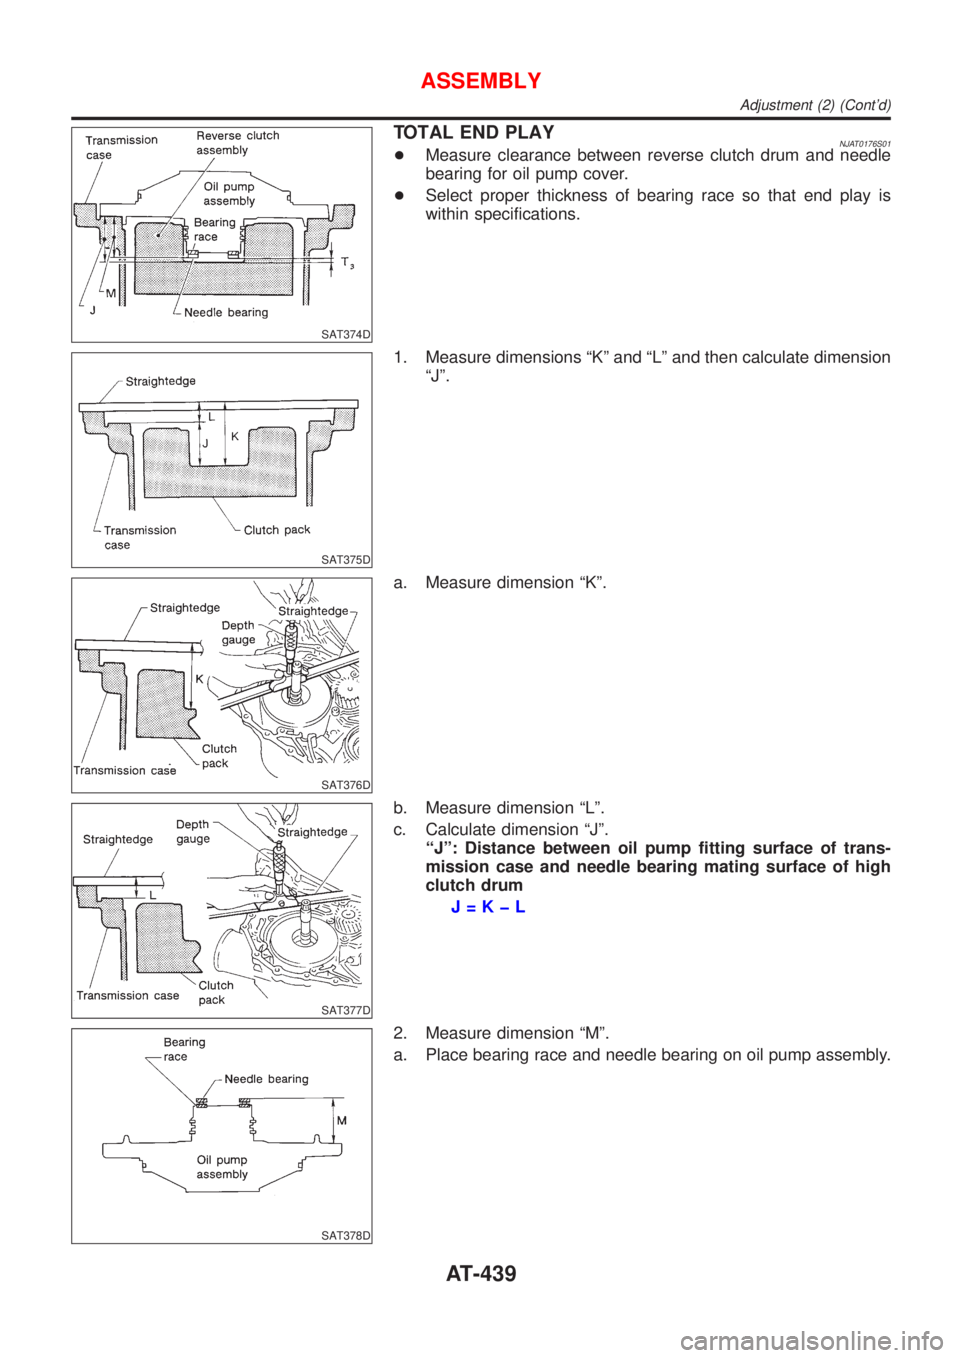
TOTAL END PLAYNJAT0176S01+Measure clearance between reverse clutch drum and needle
bearing for oil pump cover.
+Select proper thickness of bearing race so that end play is
within specifications.
SAT375D
1. Measure dimensions ªKº and ªLº and then calculate dimension
ªJº.
SAT376D
a. Measure dimension ªKº.
SAT377D
b. Measure dimension ªLº.
c. Calculate dimension ªJº.
ªJº: Distance between oil pump fitting surface of trans-
mission case and needle bearing mating surface of high
clutch drum
J=KþL
SAT378D
2. Measure dimension ªMº.
a. Place bearing race and needle bearing on oil pump assembly.
ASSEMBLY
Adjustment (2) (Cont'd)
AT-439
Page 1626 of 2493
SAT379D
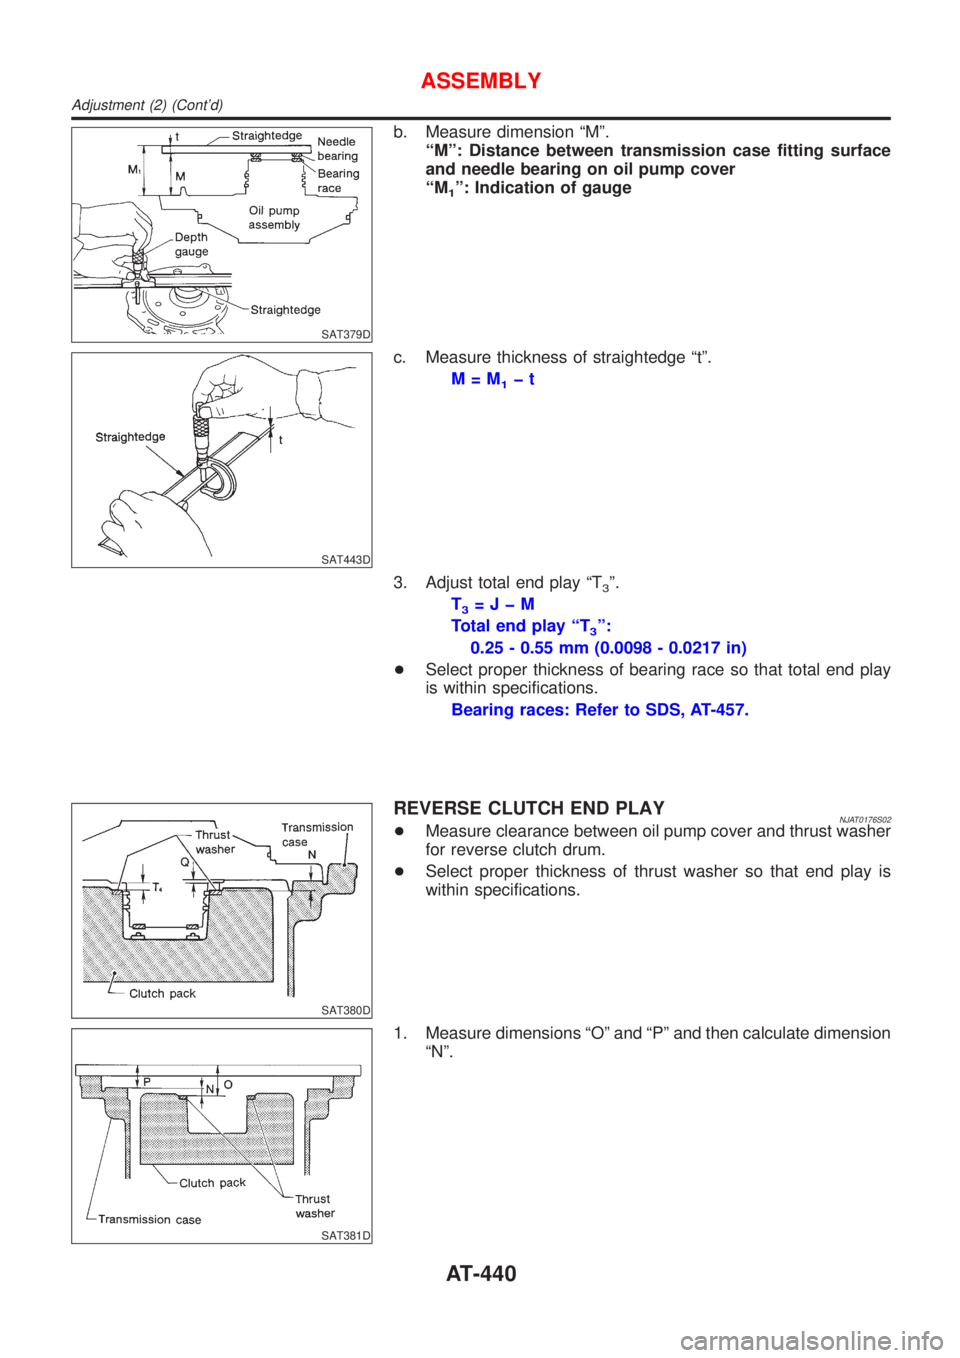
b. Measure dimension ªMº.
ªMº: Distance between transmission case fitting surface
and needle bearing on oil pump cover
ªM
1º: Indication of gauge
SAT443D
c. Measure thickness of straightedge ªtº.
M=M
1þt
3. Adjust total end play ªT
3º.
T
3=JþM
Total end play ªT
3º:
0.25 - 0.55 mm (0.0098 - 0.0217 in)
+Select proper thickness of bearing race so that total end play
is within specifications.
Bearing races: Refer to SDS, AT-457.
SAT380D
REVERSE CLUTCH END PLAYNJAT0176S02+Measure clearance between oil pump cover and thrust washer
for reverse clutch drum.
+Select proper thickness of thrust washer so that end play is
within specifications.
SAT381D
1. Measure dimensions ªOº and ªPº and then calculate dimension
ªNº.
ASSEMBLY
Adjustment (2) (Cont'd)
AT-440
Page 1627 of 2493
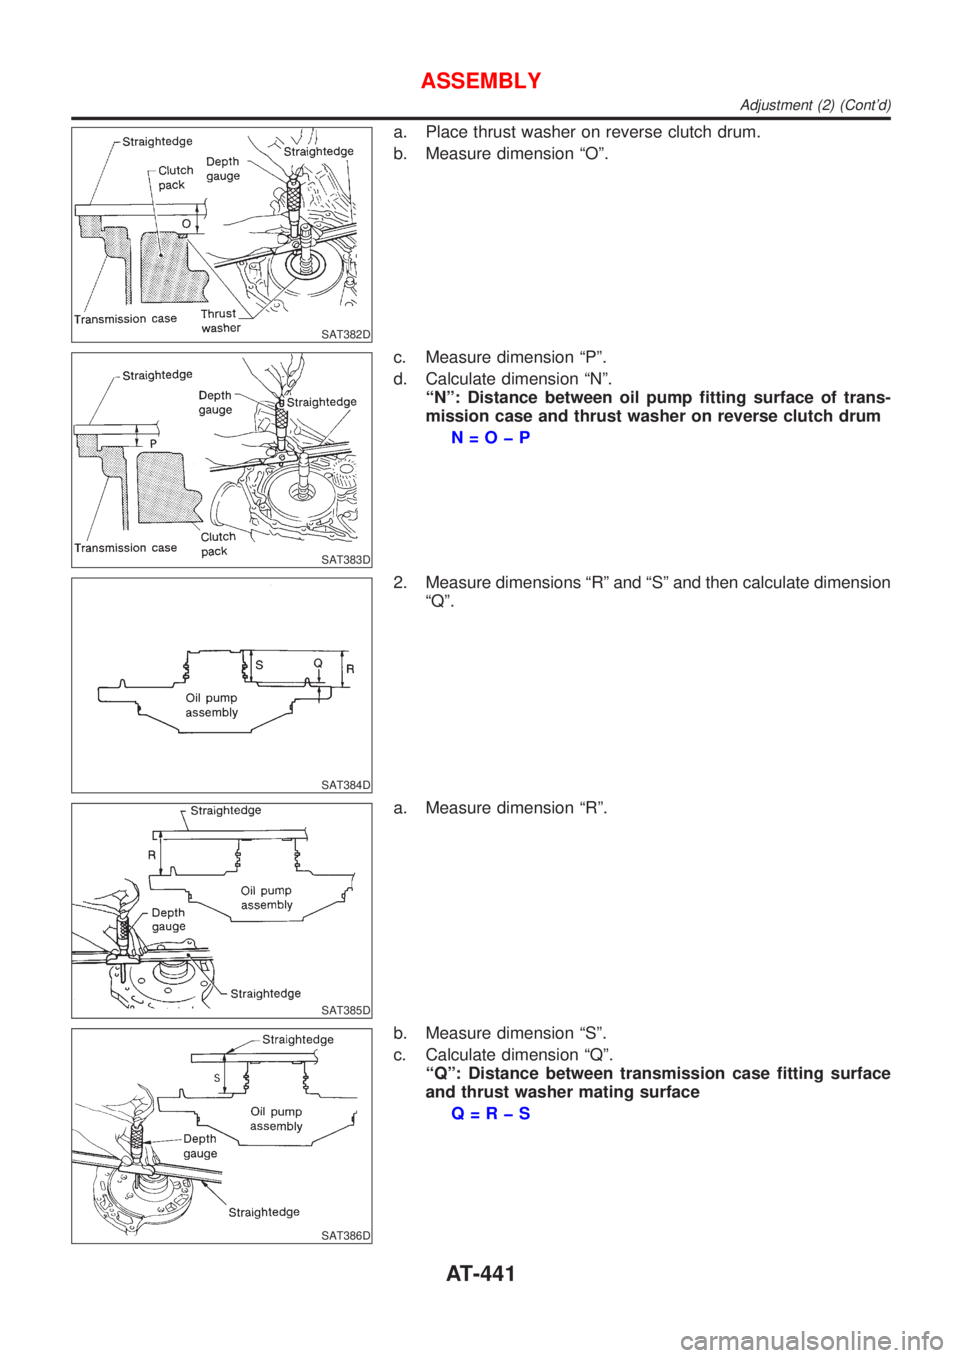
SAT382D
a. Place thrust washer on reverse clutch drum.
b. Measure dimension ªOº.
SAT383D
c. Measure dimension ªPº.
d. Calculate dimension ªNº.
ªNº: Distance between oil pump fitting surface of trans-
mission case and thrust washer on reverse clutch drum
N=OþP
SAT384D
2. Measure dimensions ªRº and ªSº and then calculate dimension
ªQº.
SAT385D
a. Measure dimension ªRº.
SAT386D
b. Measure dimension ªSº.
c. Calculate dimension ªQº.
ªQº: Distance between transmission case fitting surface
and thrust washer mating surface
Q=RþS
ASSEMBLY
Adjustment (2) (Cont'd)
AT-441
Page 1628 of 2493
3. Adjust reverse clutch end play ªT4º.
T
4=NþQ
Reverse clutch end play:
0.65 - 1.00 mm (0.0256 - 0.0394 in)
+Select proper thickness of thrust washer so that reverse clutch
end play is within specifications.
Thrust washer: Refer to SDS, AT-457.
SAT387D
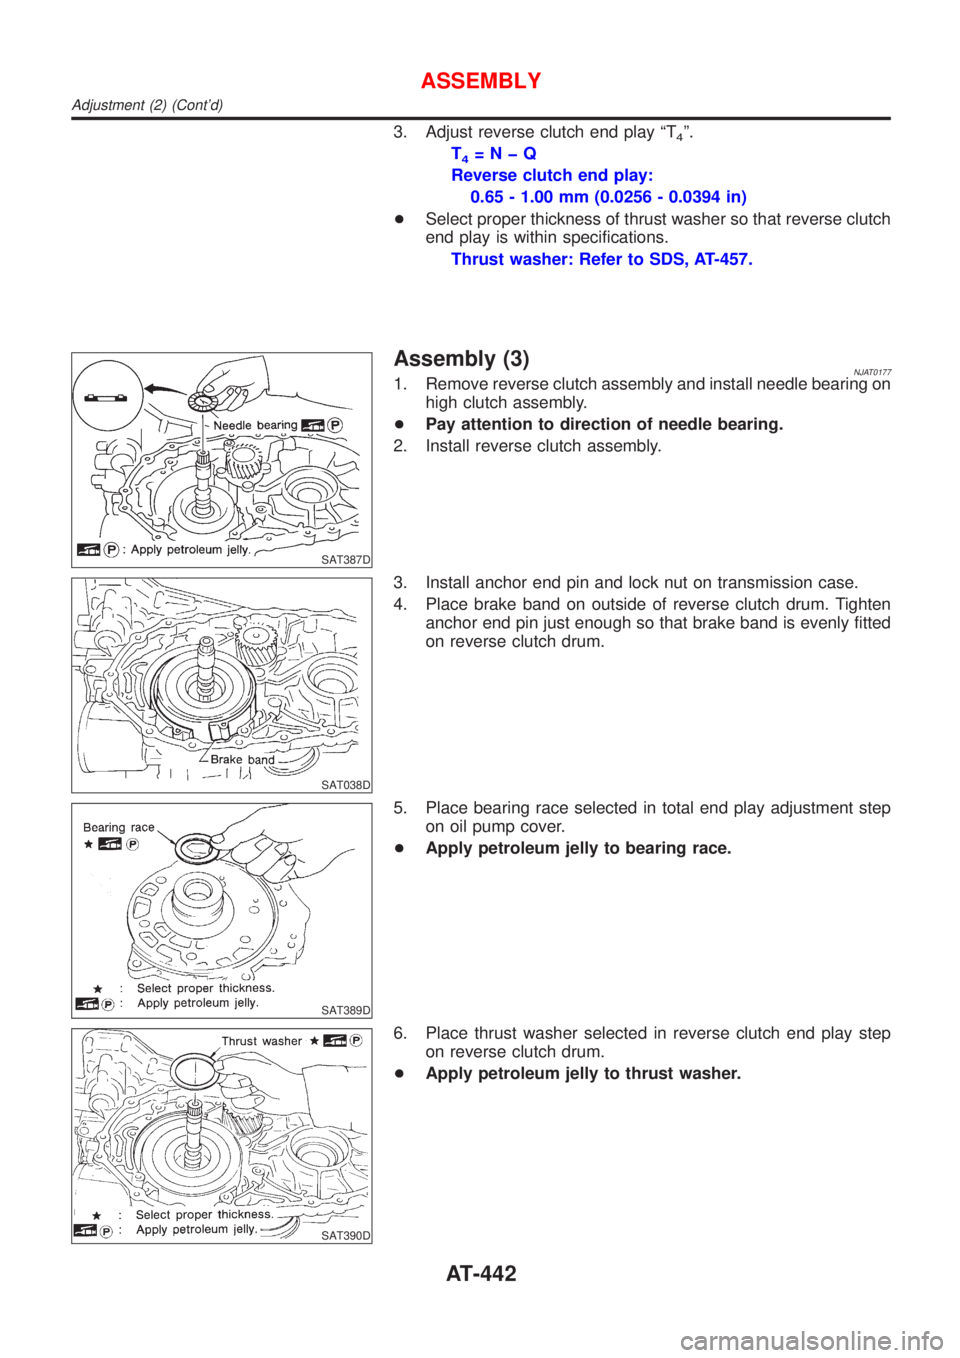
Assembly (3)NJAT01771. Remove reverse clutch assembly and install needle bearing on
high clutch assembly.
+Pay attention to direction of needle bearing.
2. Install reverse clutch assembly.
SAT038D
3. Install anchor end pin and lock nut on transmission case.
4. Place brake band on outside of reverse clutch drum. Tighten
anchor end pin just enough so that brake band is evenly fitted
on reverse clutch drum.
SAT389D
5. Place bearing race selected in total end play adjustment step
on oil pump cover.
+Apply petroleum jelly to bearing race.
SAT390D
6. Place thrust washer selected in reverse clutch end play step
on reverse clutch drum.
+Apply petroleum jelly to thrust washer.
ASSEMBLY
Adjustment (2) (Cont'd)
AT-442
Page 1629 of 2493
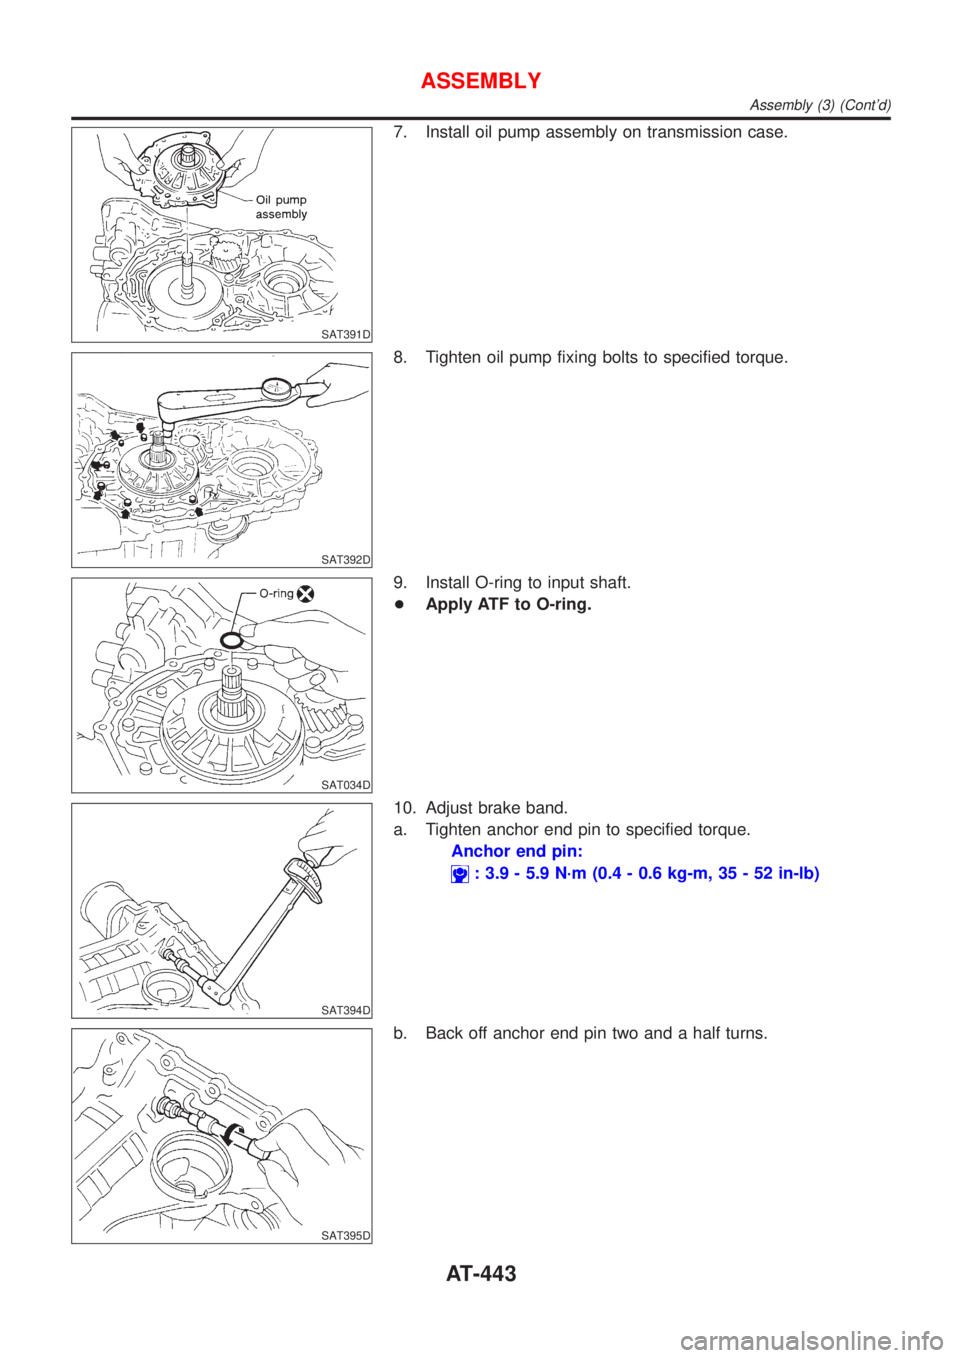
SAT391D
7. Install oil pump assembly on transmission case.
SAT392D
8. Tighten oil pump fixing bolts to specified torque.
SAT034D
9. Install O-ring to input shaft.
+Apply ATF to O-ring.
SAT394D
10. Adjust brake band.
a. Tighten anchor end pin to specified torque.
Anchor end pin:
: 3.9 - 5.9 N´m (0.4 - 0.6 kg-m, 35 - 52 in-lb)
SAT395D
b. Back off anchor end pin two and a half turns.
ASSEMBLY
Assembly (3) (Cont'd)
AT-443
Page 1630 of 2493
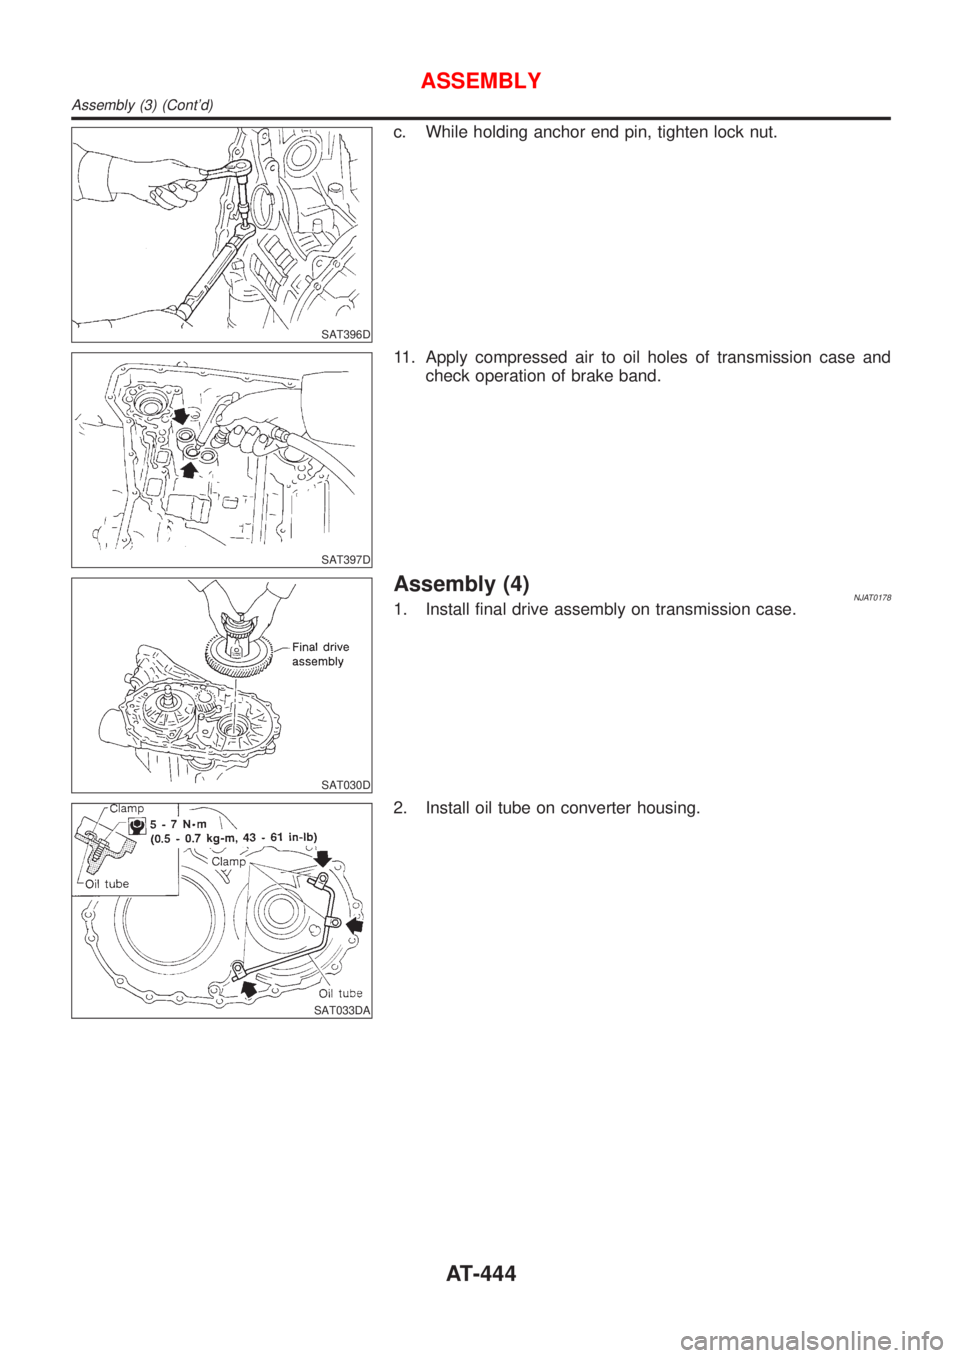
SAT396D
c. While holding anchor end pin, tighten lock nut.
SAT397D
11. Apply compressed air to oil holes of transmission case and
check operation of brake band.
SAT030D
Assembly (4)NJAT01781. Install final drive assembly on transmission case.
SAT033DA
2. Install oil tube on converter housing.
ASSEMBLY
Assembly (3) (Cont'd)
AT-444
Trending: Thermo, overheating, P1690, wiper size, EC-451, refrigerant type, Rad fan
