Thermo NISSAN ALMERA N16 2001 Electronic Repair Manual
[x] Cancel search | Manufacturer: NISSAN, Model Year: 2001, Model line: ALMERA N16, Model: NISSAN ALMERA N16 2001Pages: 2493, PDF Size: 66.97 MB
Page 89 of 2493
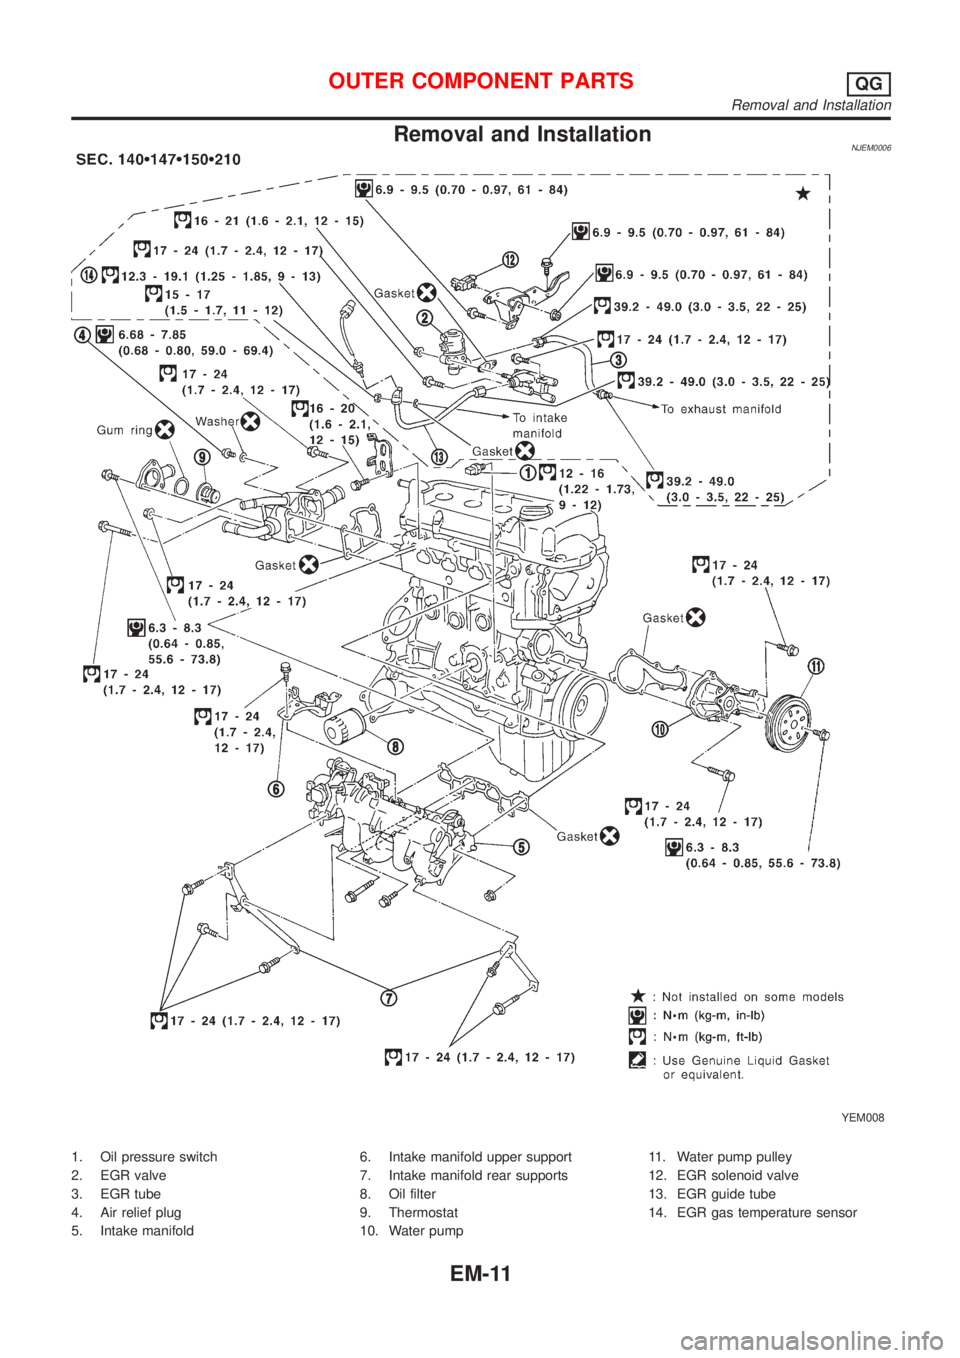
Removal and InstallationNJEM0006
YEM008
1. Oil pressure switch
2. EGR valve
3. EGR tube
4. Air relief plug
5. Intake manifold6. Intake manifold upper support
7. Intake manifold rear supports
8. Oil filter
9. Thermostat
10. Water pump11. Water pump pulley
12. EGR solenoid valve
13. EGR guide tube
14. EGR gas temperature sensor
OUTER COMPONENT PARTSQG
Removal and Installation
EM-11
Page 219 of 2493
JEM193G
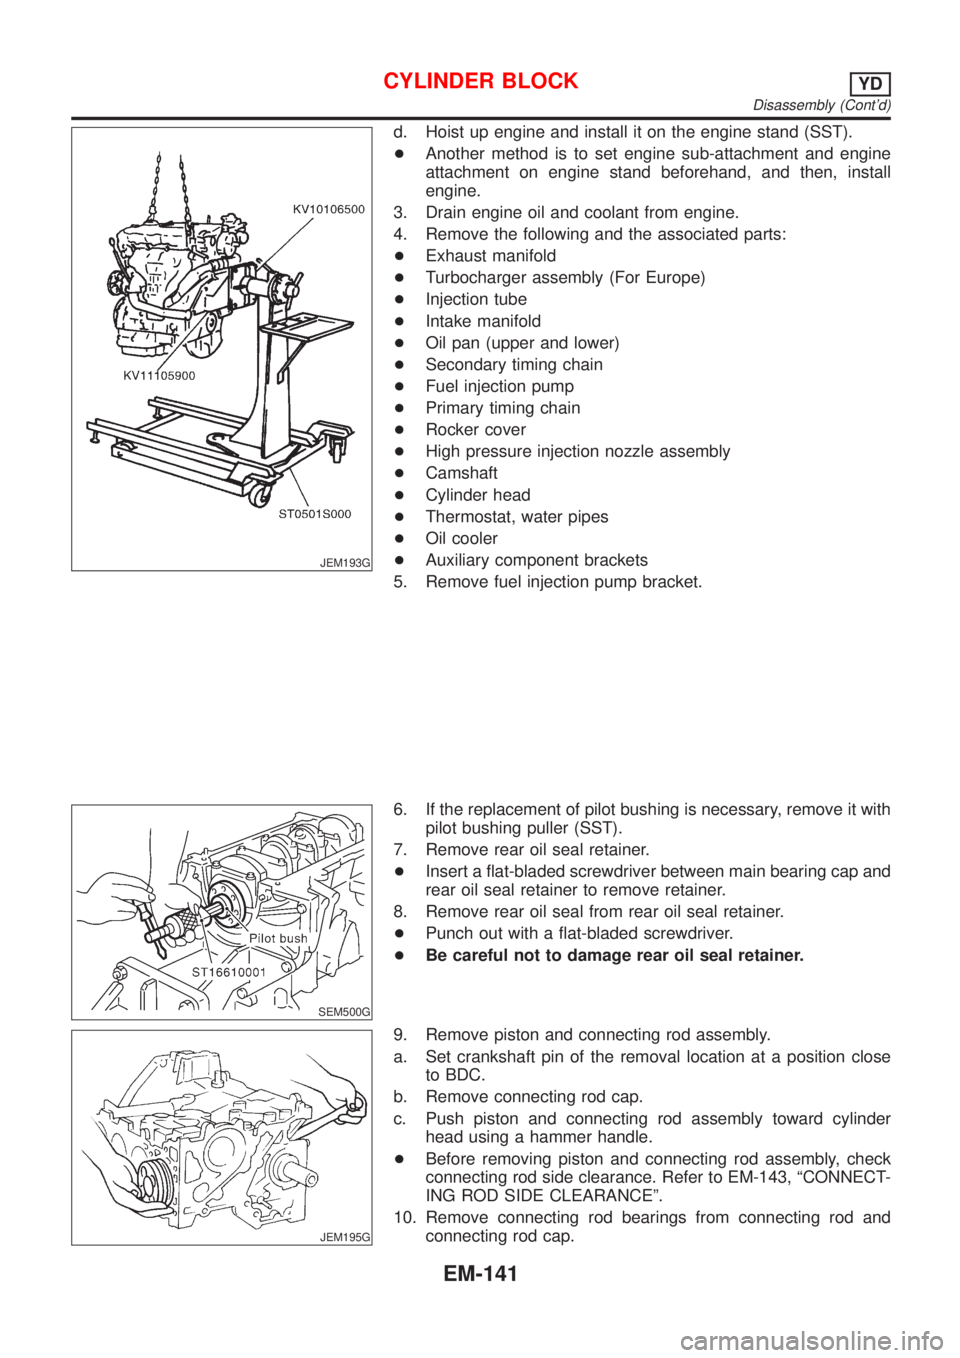
d. Hoist up engine and install it on the engine stand (SST).
+Another method is to set engine sub-attachment and engine
attachment on engine stand beforehand, and then, install
engine.
3. Drain engine oil and coolant from engine.
4. Remove the following and the associated parts:
+Exhaust manifold
+Turbocharger assembly (For Europe)
+Injection tube
+Intake manifold
+Oil pan (upper and lower)
+Secondary timing chain
+Fuel injection pump
+Primary timing chain
+Rocker cover
+High pressure injection nozzle assembly
+Camshaft
+Cylinder head
+Thermostat, water pipes
+Oil cooler
+Auxiliary component brackets
5. Remove fuel injection pump bracket.
SEM500G
6. If the replacement of pilot bushing is necessary, remove it with
pilot bushing puller (SST).
7. Remove rear oil seal retainer.
+Insert a flat-bladed screwdriver between main bearing cap and
rear oil seal retainer to remove retainer.
8. Remove rear oil seal from rear oil seal retainer.
+Punch out with a flat-bladed screwdriver.
+Be careful not to damage rear oil seal retainer.
JEM195G
9. Remove piston and connecting rod assembly.
a. Set crankshaft pin of the removal location at a position close
to BDC.
b. Remove connecting rod cap.
c. Push piston and connecting rod assembly toward cylinder
head using a hammer handle.
+Before removing piston and connecting rod assembly, check
connecting rod side clearance. Refer to EM-143, ªCONNECT-
ING ROD SIDE CLEARANCEº.
10. Remove connecting rod bearings from connecting rod and
connecting rod cap.
CYLINDER BLOCKYD
Disassembly (Cont'd)
EM-141
Page 249 of 2493
ENGINE LUBRICATION &
COOLING SYSTEMS
SECTION
LC
CONTENTS
QG
ENGINE LUBRICATION SYSTEM..................................3
Precautions ..................................................................3
LIQUID GASKET APPLICATION PROCEDURE............3
Preparation ..................................................................3
SPECIAL SERVICE TOOLS........................................3
Lubrication Circuit ........................................................4
Oil Pressure Check......................................................5
Oil Pump ......................................................................5
REMOVAL AND INSTALLATION.................................5
DISASSEMBLY AND ASSEMBLY................................6
INSPECTION.............................................................7
REGULATOR VALVE INSPECTION............................7
Changing Engine Oil....................................................8
Changing Oil Filter .......................................................9
Service Data and Specifications (SDS).....................10
OIL PRESSURE CHECK..........................................10
OIL PUMP INSPECTION..........................................10
REGULATOR VALVE INSPECTION..........................10
OIL CAPACITY........................................................10
ENGINE COOLING SYSTEM........................................ 11
Precautions ................................................................ 11
LIQUID GASKET APPLICATION PROCEDURE.......... 11
Preparation ................................................................ 11
SPECIAL SERVICE TOOLS...................................... 11
Cooling Circuit ...........................................................12
System Check............................................................12
CHECKING COOLING SYSTEM HOSES...................12
CHECKING RADIATOR............................................13
CHECKING RADIATOR CAP....................................13
CHECKING COOLING SYSTEM FOR LEAKS............13
Water Pump ...............................................................14
REMOVAL AND INSTALLATION...............................14
INSPECTION...........................................................14
Thermostat .................................................................15
REMOVAL AND INSTALLATION...............................15
INSPECTION...........................................................16
Radiator .....................................................................16
COMPONENTS.......................................................16
Cooling Fan ...............................................................17
COMPONENTS.......................................................17
CONTROL SYSTEM................................................17
Changing Engine Coolant..........................................17
- DRAINING ENGINE COOLANT -............................17
- REFILLING ENGINE COOLANT -...........................18
- FLUSHING COOLING SYSTEM -............................19
Radiator (Aluminum type) ..........................................20
PREPARATION.......................................................20
DISASSEMBLY........................................................20
ASSEMBLY.............................................................21
INSPECTION...........................................................22
Overheating Cause Analysis .....................................23
Service Data and Specifications (SDS).....................24
THERMOSTAT........................................................24
RADIATOR..............................................................24
COOLANT CAPACITY..............................................24
YD
ENGINE LUBRICATION SYSTEM................................25
Precautions ................................................................25
LIQUID GASKET APPLICATION PROCEDURE..........25
Preparation ................................................................25
SPECIAL SERVICE TOOLS......................................25
Lubrication Circuit ......................................................26
Oil Pressure Check....................................................27
Oil Pump ....................................................................27
REMOVAL AND INSTALLATION...............................27
DISASSEMBLY AND ASSEMBLY..............................28
OIL PUMP INSPECTION..........................................28
REGULATOR VALVE INSPECTION..........................29
Changing Engine Oil..................................................30
Oil Filter Bracket ........................................................31
REMOVAL AND INSTALLATION...............................31
Changing Oil Filter .....................................................31
REMOVAL...............................................................32
INSTALLATION........................................................32
Oil Cooler ...................................................................33
REMOVAL AND INSTALLATION...............................33
Service Data and Specifications (SDS).....................34
OIL PRESSURE CHECK..........................................34
Page 250 of 2493
REGULATOR VALVE INSPECTION..........................34
OIL PUMP INSPECTION..........................................34
ENGINE OIL CAPACITY...........................................34
ENGINE COOLING SYSTEM........................................35
Precautions ................................................................35
LIQUID GASKET APPLICATION PROCEDURE..........35
Preparation ................................................................35
SPECIAL SERVICE TOOLS......................................35
Cooling Circuit ...........................................................36
System Check............................................................37
CHECKING COOLING SYSTEM HOSES...................37
CHECKING RADIATOR............................................37
CHECKING RADIATOR CAP....................................37
CHECKING COOLING SYSTEM FOR LEAKS............38
Water Pump ...............................................................38
REMOVAL AND INSTALLATION...............................38
REMOVAL...............................................................39
INSPECTION...........................................................39
INSTALLATION........................................................39
Thermostat .................................................................40
REMOVAL AND INSTALLATION...............................40
INSPECTION...........................................................41
Radiator .....................................................................41
COMPONENTS.......................................................41
REMOVAL AND INSTALLATION...............................42
Cooling Fan ...............................................................42
COMPONENTS.......................................................42
CONTROL SYSTEM................................................42
Changing Engine Coolant..........................................43
- DRAINING ENGINE COOLANT -............................43
- REFILLING ENGINE COOLANT -...........................43
- FLUSHING COOLING SYSTEM -............................45
Radiator (Aluminum type) ..........................................46
Overheating Cause Analysis .....................................46
Service Data and Specifications (SDS).....................47
THERMOSTAT........................................................47
RADIATOR..............................................................47
ENGINE COOLANT CAPACITY................................47
CONTENTS(Cont'd)
LC-2
Page 263 of 2493
Thermostat
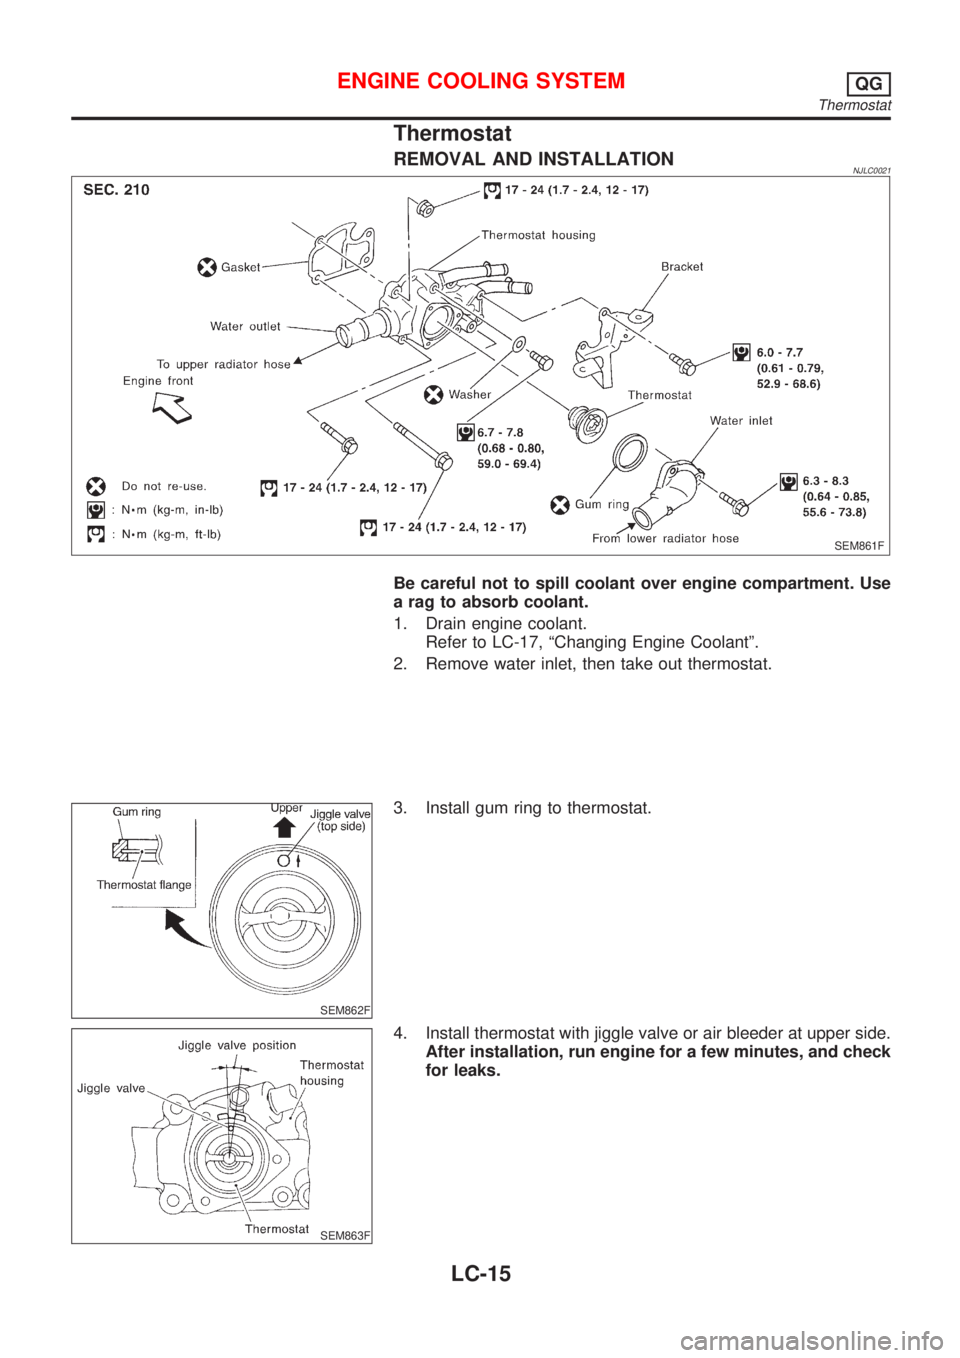
REMOVAL AND INSTALLATIONNJLC0021
SEM861F
Be careful not to spill coolant over engine compartment. Use
a rag to absorb coolant.
1. Drain engine coolant.
Refer to LC-17, ªChanging Engine Coolantº.
2. Remove water inlet, then take out thermostat.
SEM862F
3. Install gum ring to thermostat.
SEM863F
4. Install thermostat with jiggle valve or air bleeder at upper side.
After installation, run engine for a few minutes, and check
for leaks.
ENGINE COOLING SYSTEMQG
Thermostat
LC-15
Page 264 of 2493
SLC343
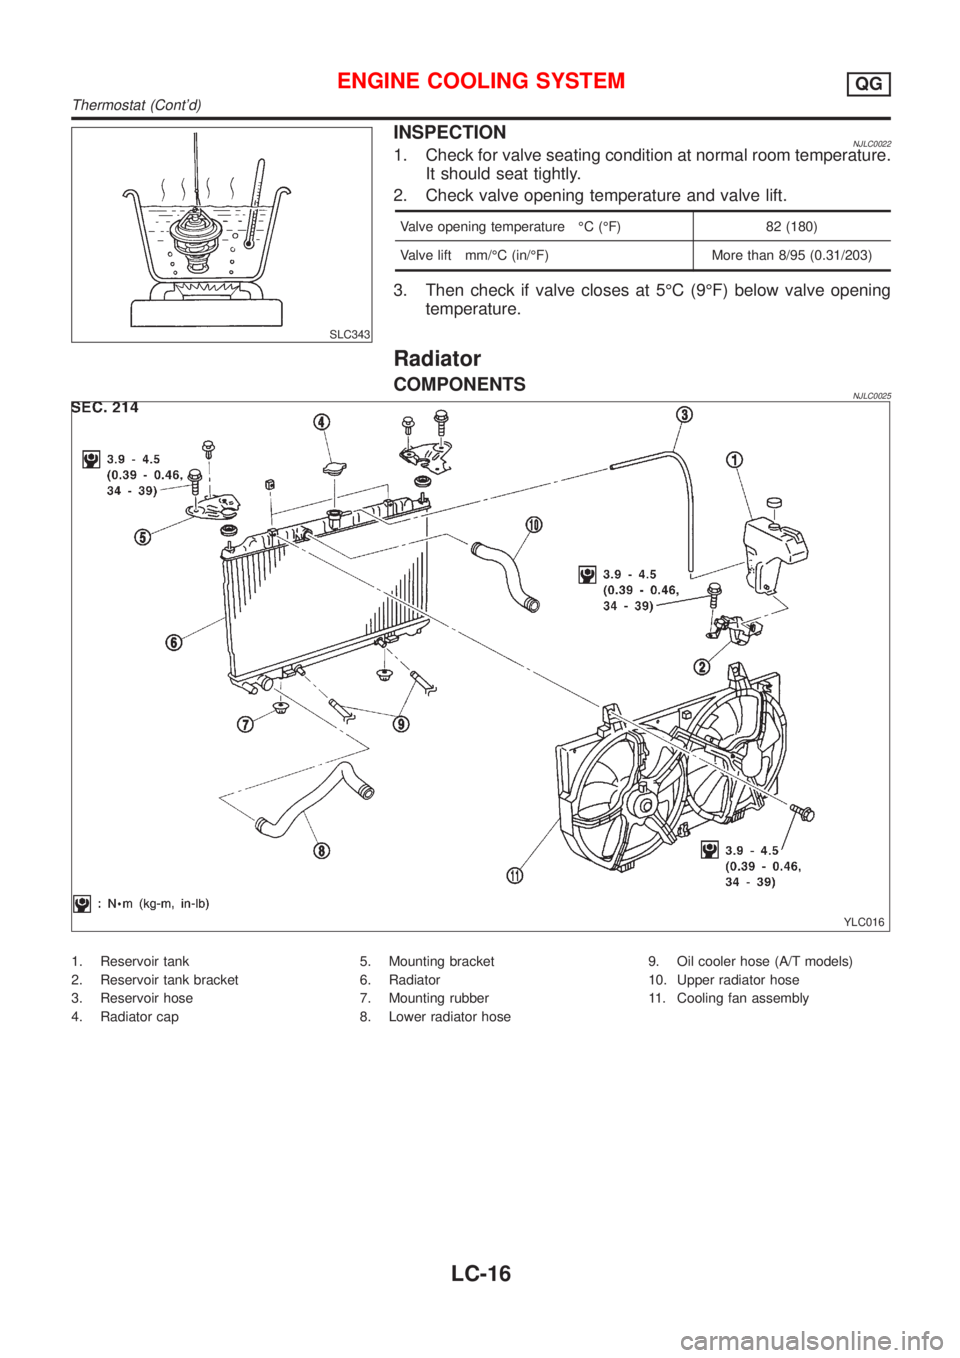
INSPECTIONNJLC00221. Check for valve seating condition at normal room temperature.
It should seat tightly.
2. Check valve opening temperature and valve lift.
Valve opening temperature ÉC (ÉF) 82 (180)
Valve lift mm/ÉC (in/ÉF) More than 8/95 (0.31/203)
3. Then check if valve closes at 5ÉC (9ÉF) below valve opening
temperature.
Radiator
COMPONENTSNJLC0025
YLC016
1. Reservoir tank
2. Reservoir tank bracket
3. Reservoir hose
4. Radiator cap5. Mounting bracket
6. Radiator
7. Mounting rubber
8. Lower radiator hose9. Oil cooler hose (A/T models)
10. Upper radiator hose
11. Cooling fan assembly
ENGINE COOLING SYSTEMQG
Thermostat (Cont'd)
LC-16
Page 271 of 2493
SLC934
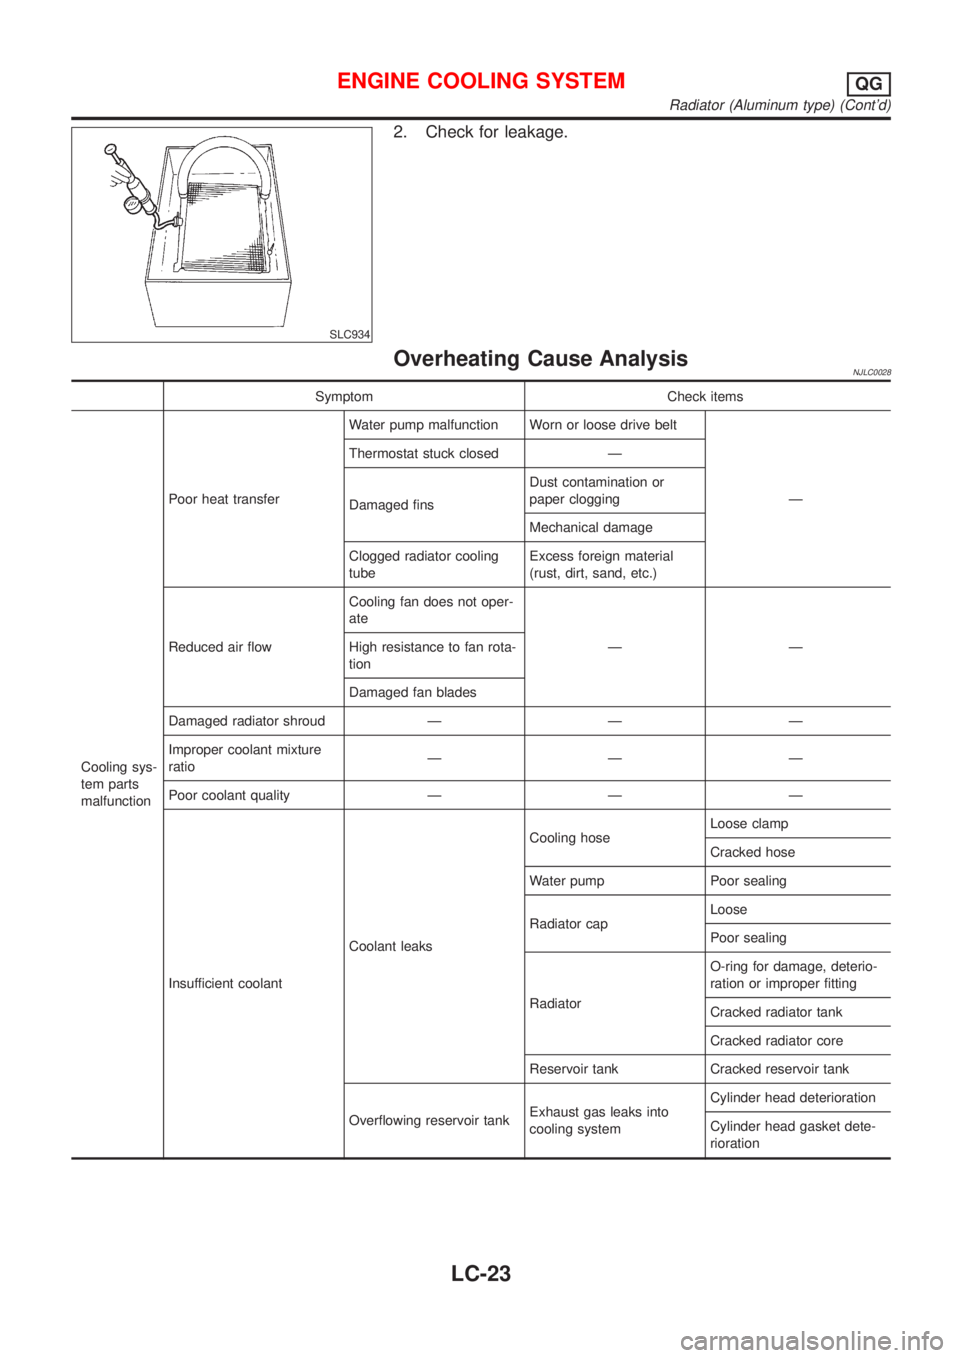
2. Check for leakage.
Overheating Cause AnalysisNJLC0028
Symptom Check items
Cooling sys-
tem parts
malfunctionPoor heat transferWater pump malfunction Worn or loose drive belt
Ð Thermostat stuck closed Ð
Damaged finsDust contamination or
paper clogging
Mechanical damage
Clogged radiator cooling
tubeExcess foreign material
(rust, dirt, sand, etc.)
Reduced air flowCooling fan does not oper-
ate
ÐÐ High resistance to fan rota-
tion
Damaged fan blades
Damaged radiator shroud Ð Ð Ð
Improper coolant mixture
ratioÐÐÐ
Poor coolant quality Ð Ð Ð
Insufficient coolantCoolant leaksCooling hoseLoose clamp
Cracked hose
Water pump Poor sealing
Radiator capLoose
Poor sealing
RadiatorO-ring for damage, deterio-
ration or improper fitting
Cracked radiator tank
Cracked radiator core
Reservoir tank Cracked reservoir tank
Overflowing reservoir tankExhaust gas leaks into
cooling systemCylinder head deterioration
Cylinder head gasket dete-
rioration
ENGINE COOLING SYSTEMQG
Radiator (Aluminum type) (Cont'd)
LC-23
Page 272 of 2493
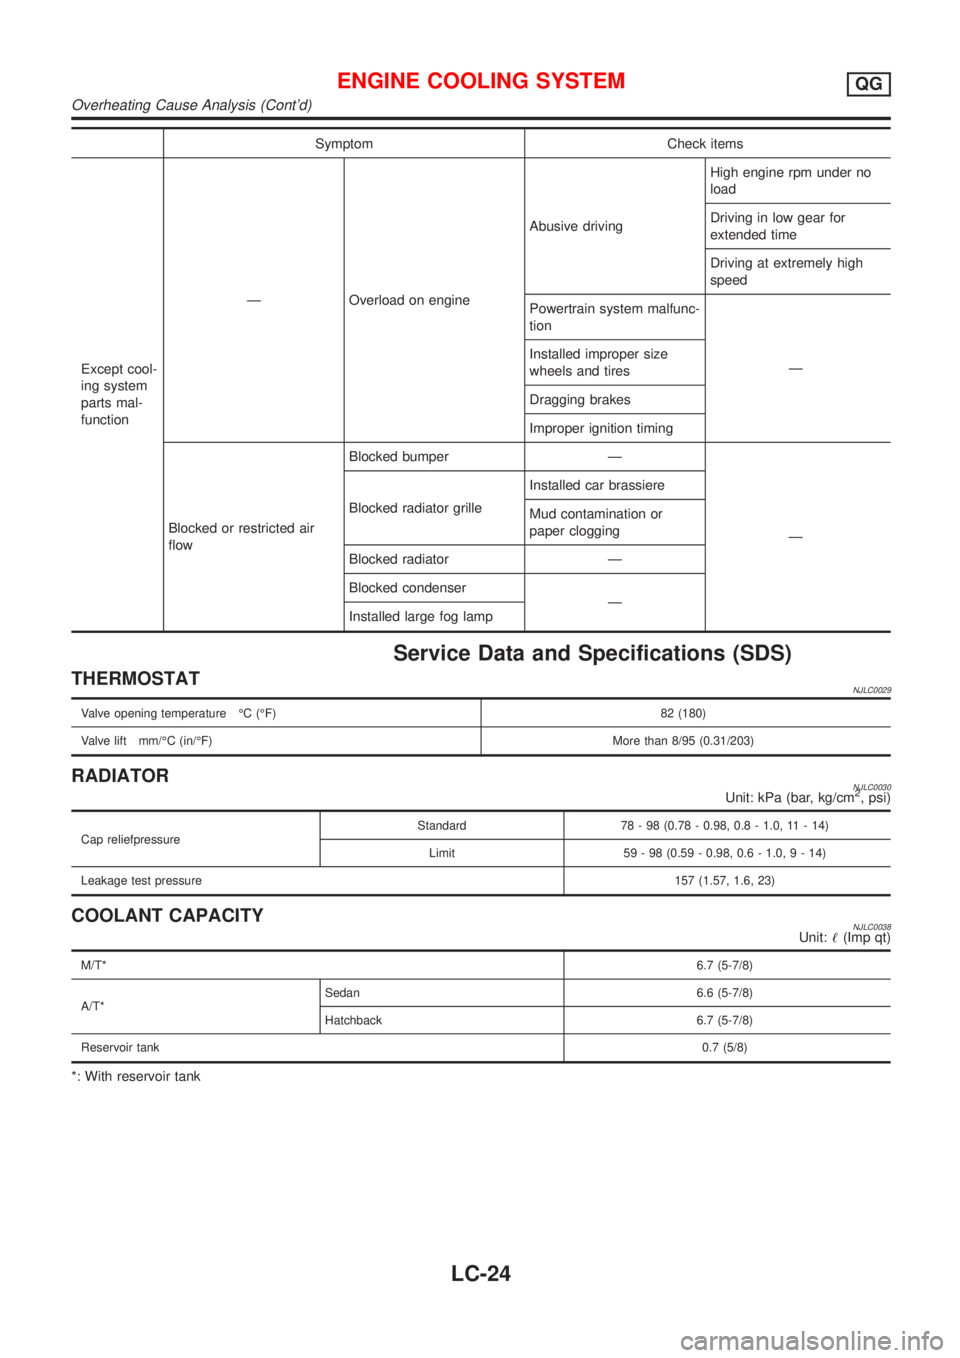
Symptom Check items
Except cool-
ing system
parts mal-
functionÐ Overload on engineAbusive drivingHigh engine rpm under no
load
Driving in low gear for
extended time
Driving at extremely high
speed
Powertrain system malfunc-
tion
Ð Installed improper size
wheels and tires
Dragging brakes
Improper ignition timing
Blocked or restricted air
flowBlocked bumper Ð
Ð Blocked radiator grilleInstalled car brassiere
Mud contamination or
paper clogging
Blocked radiator Ð
Blocked condenser
Ð
Installed large fog lamp
Service Data and Specifications (SDS)
THERMOSTATNJLC0029
Valve opening temperature ÉC (ÉF) 82 (180)
Valve lift mm/ÉC (in/ÉF)More than 8/95 (0.31/203)
RADIATORNJLC0030Unit: kPa (bar, kg/cm2, psi)
Cap reliefpressureStandard 78 - 98 (0.78 - 0.98, 0.8 - 1.0, 11 - 14)
Limit 59 - 98 (0.59 - 0.98, 0.6 - 1.0,9-14)
Leakage test pressure157 (1.57, 1.6, 23)
COOLANT CAPACITYNJLC0038Unit:!(Imp qt)
M/T*6.7 (5-7/8)
A/T*Sedan 6.6 (5-7/8)
Hatchback 6.7 (5-7/8)
Reservoir tank0.7 (5/8)
*: With reservoir tank
ENGINE COOLING SYSTEMQG
Overheating Cause Analysis (Cont'd)
LC-24
Page 288 of 2493
Thermostat
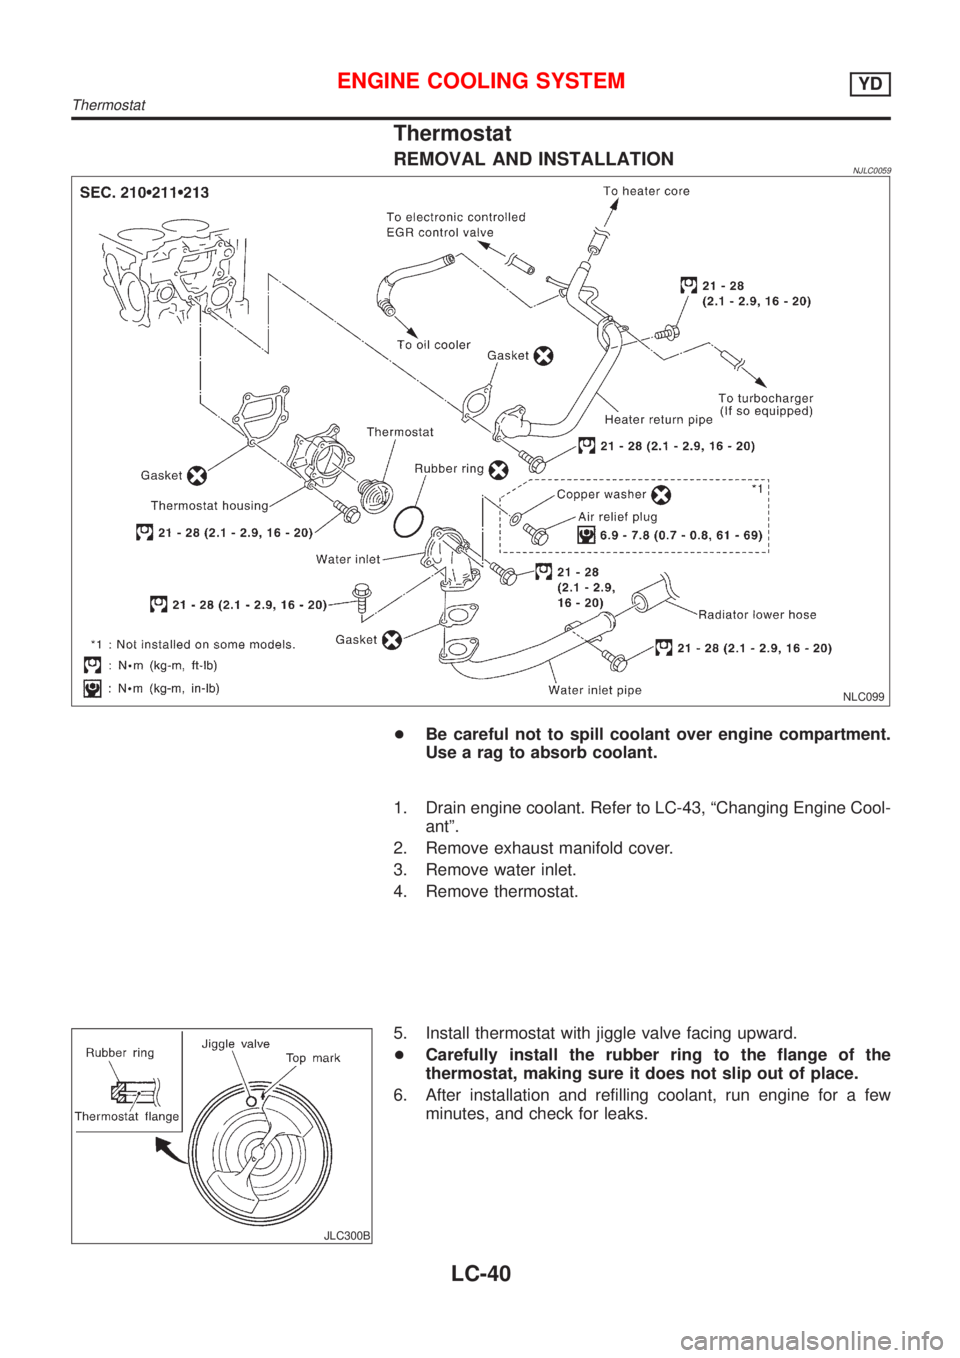
REMOVAL AND INSTALLATIONNJLC0059
NLC099
+Be careful not to spill coolant over engine compartment.
Use a rag to absorb coolant.
1. Drain engine coolant. Refer to LC-43, ªChanging Engine Cool-
antº.
2. Remove exhaust manifold cover.
3. Remove water inlet.
4. Remove thermostat.
JLC300B
5. Install thermostat with jiggle valve facing upward.
+Carefully install the rubber ring to the flange of the
thermostat, making sure it does not slip out of place.
6. After installation and refilling coolant, run engine for a few
minutes, and check for leaks.
ENGINE COOLING SYSTEMYD
Thermostat
LC-40
Page 289 of 2493
SLC252B
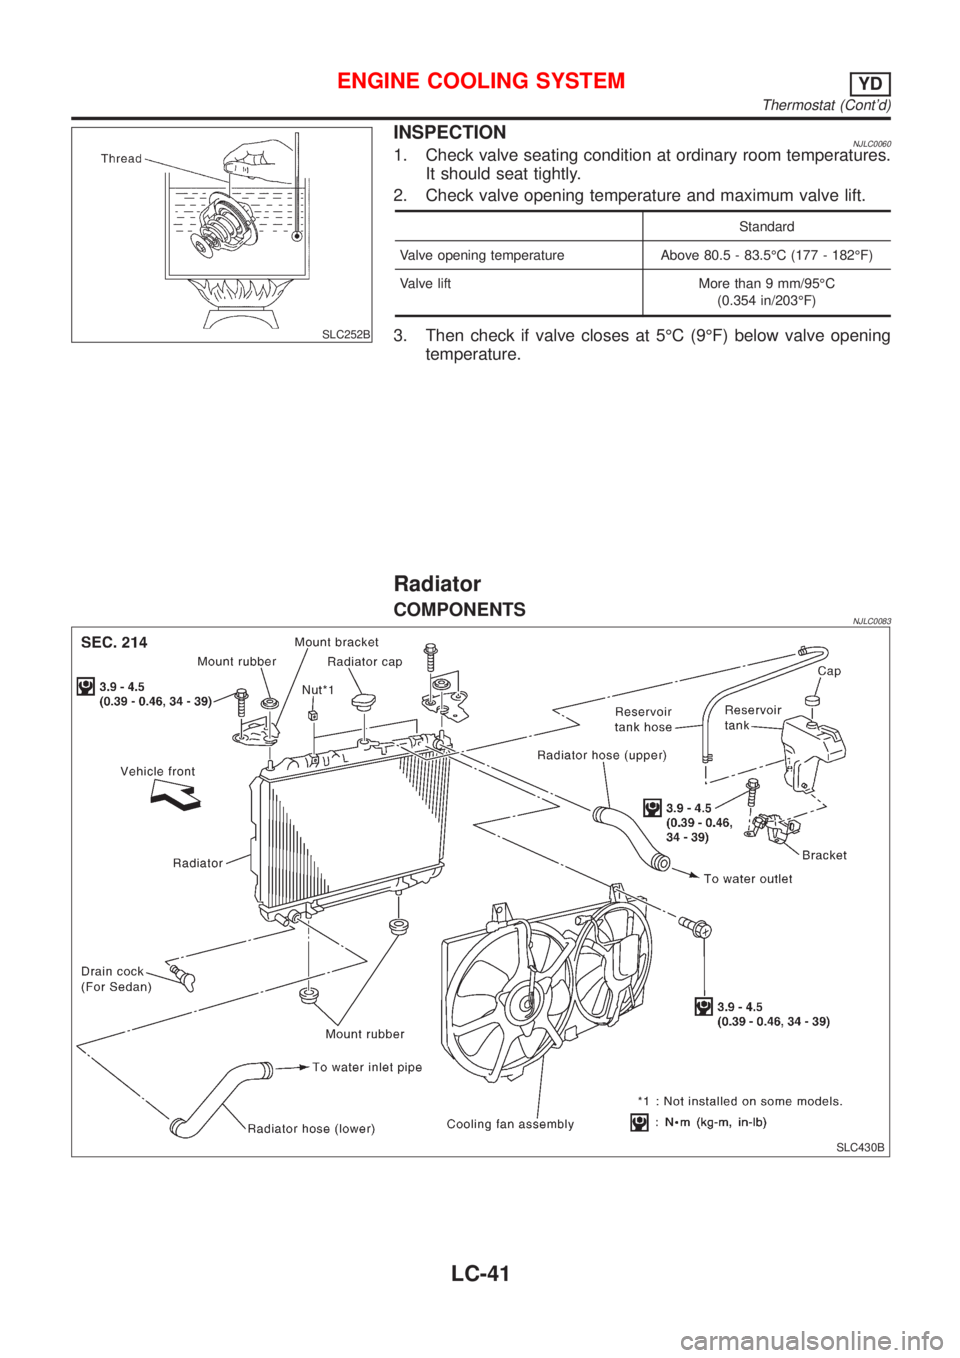
INSPECTIONNJLC00601. Check valve seating condition at ordinary room temperatures.
It should seat tightly.
2. Check valve opening temperature and maximum valve lift.
Standard
Valve opening temperature Above 80.5 - 83.5ÉC (177 - 182ÉF)
Valve lift More than 9 mm/95ÉC
(0.354 in/203ÉF)
3. Then check if valve closes at 5ÉC (9ÉF) below valve opening
temperature.
Radiator
COMPONENTSNJLC0083
SLC430B
ENGINE COOLING SYSTEMYD
Thermostat (Cont'd)
LC-41