timing chain NISSAN ALMERA N16 2003 Electronic Owner's Manual
[x] Cancel search | Manufacturer: NISSAN, Model Year: 2003, Model line: ALMERA N16, Model: NISSAN ALMERA N16 2003Pages: 3189, PDF Size: 54.76 MB
Page 204 of 3189
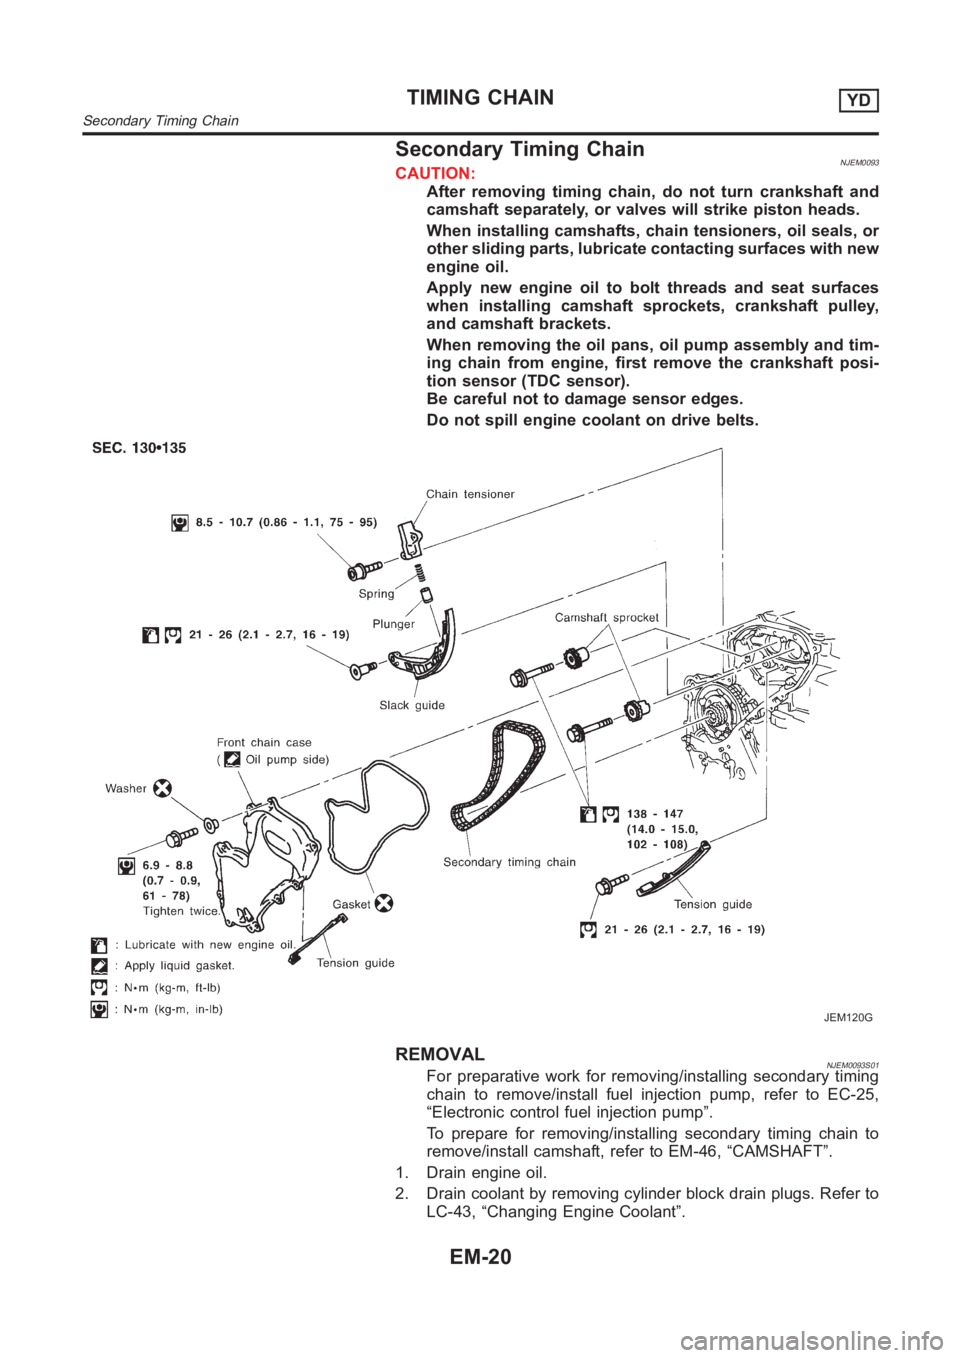
Secondary Timing ChainNJEM0093CAUTION:
After removing timing chain, do not turn crankshaft and
camshaft separately, or valves will strike piston heads.
When installing camshafts, chain tensioners, oil seals, or
other sliding parts, lubricate contacting surfaces with new
engine oil.
Apply new engine oil to bolt threads and seat surfaces
when installing camshaft sprockets, crankshaft pulley,
and camshaft brackets.
When removing the oil pans, oil pump assembly and tim-
ing chain from engine, first remove the crankshaft posi-
tion sensor (TDC sensor).
Be careful not to damage sensor edges.
Do not spill engine coolant on drive belts.
JEM120G
REMOVALNJEM0093S01For preparative work for removing/installing secondary timing
chain to remove/install fuel injection pump, refer to EC-25,
“Electronic control fuel injection pump”.
To prepare for removing/installing secondary timing chain to
remove/install camshaft, refer to EM-46, “CAMSHAFT”.
1. Drain engine oil.
2. Drain coolant by removing cylinder block drain plugs. Refer to
LC-43, “Changing Engine Coolant”.
TIMING CHAINYD
Secondary Timing Chain
EM-20
Page 205 of 3189
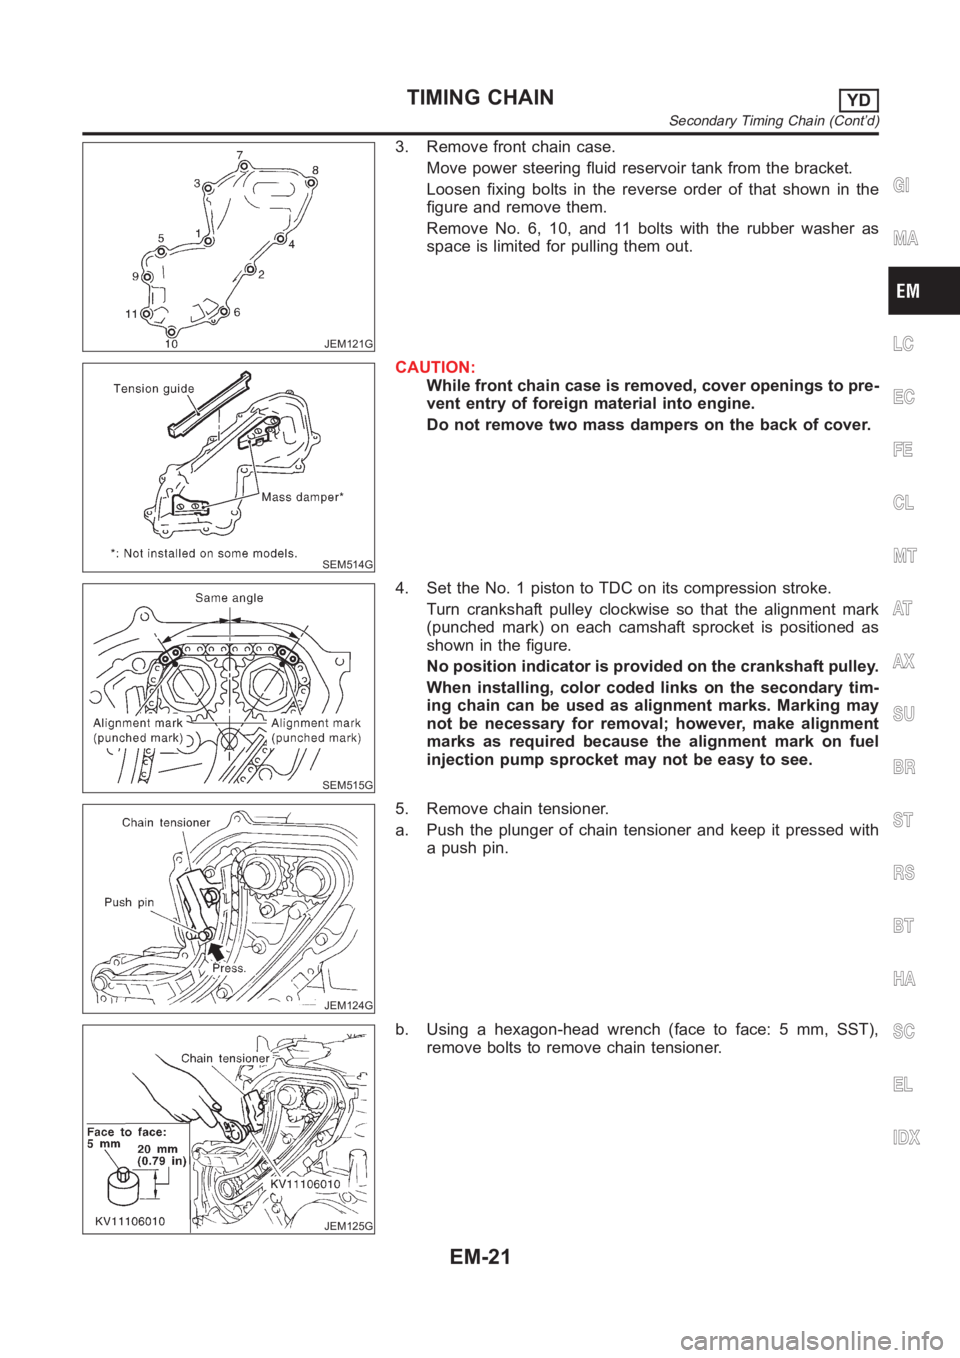
JEM121G
3. Remove front chain case.
Move power steering fluid reservoir tank from the bracket.
Loosen fixing bolts in the reverse order of that shown in the
figure and remove them.
Remove No. 6, 10, and 11 bolts with the rubber washer as
space is limited for pulling them out.
SEM514G
CAUTION:
While front chain case is removed, cover openings to pre-
vent entry of foreign material into engine.
Do not remove two mass dampers on the back of cover.
SEM515G
4. Set the No. 1 piston to TDC on its compression stroke.
Turn crankshaft pulley clockwise so that the alignment mark
(punched mark) on each camshaft sprocket is positioned as
shown in the figure.
No position indicator is provided on the crankshaft pulley.
When installing, color coded links on the secondary tim-
ing chain can be used as alignment marks. Marking may
not be necessary for removal; however, make alignment
marks as required because the alignment mark on fuel
injection pump sprocket may not be easy to see.
JEM124G
5. Remove chain tensioner.
a. Push the plunger of chain tensioner and keep it pressed with
a push pin.
JEM125G
b. Using a hexagon-head wrench (face to face: 5 mm, SST),
remove bolts to remove chain tensioner.
GI
MA
LC
EC
FE
CL
MT
AT
AX
SU
BR
ST
RS
BT
HA
SC
EL
IDX
TIMING CHAINYD
Secondary Timing Chain (Cont’d)
EM-21
Page 206 of 3189
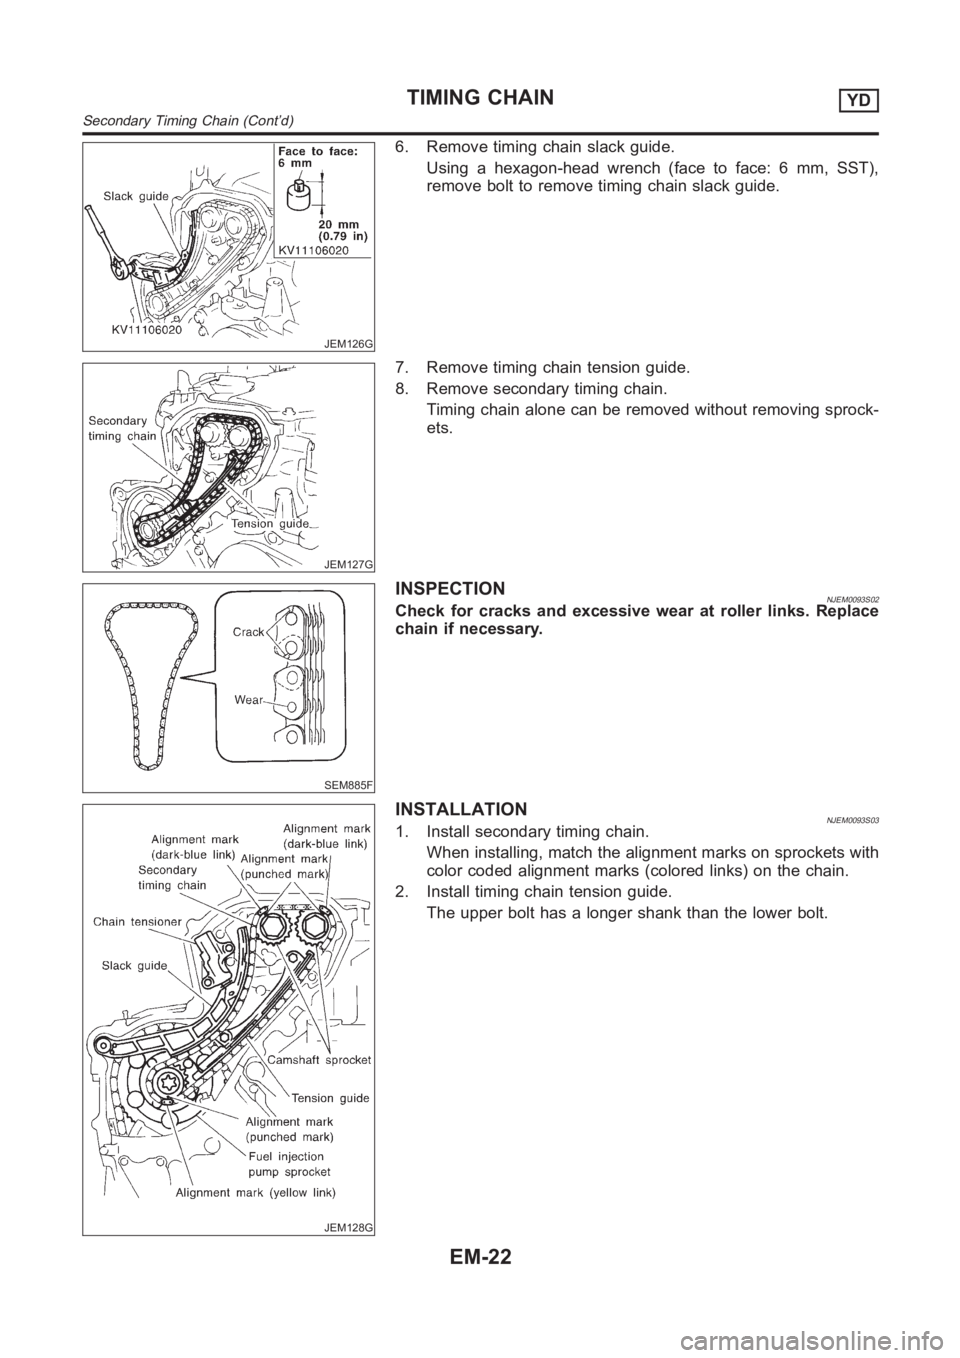
JEM126G
6. Remove timing chain slack guide.
Using a hexagon-head wrench (face to face: 6 mm, SST),
remove bolt to remove timing chain slack guide.
JEM127G
7. Remove timing chain tension guide.
8. Remove secondary timing chain.
Timing chain alone can be removed without removing sprock-
ets.
SEM885F
INSPECTIONNJEM0093S02Check for cracks and excessive wear at roller links. Replace
chain if necessary.
JEM128G
INSTALLATIONNJEM0093S031. Install secondary timing chain.
When installing, match the alignment marks on sprockets with
color coded alignment marks (colored links) on the chain.
2. Install timing chain tension guide.
The upper bolt has a longer shank than the lower bolt.
TIMING CHAINYD
Secondary Timing Chain (Cont’d)
EM-22
Page 207 of 3189
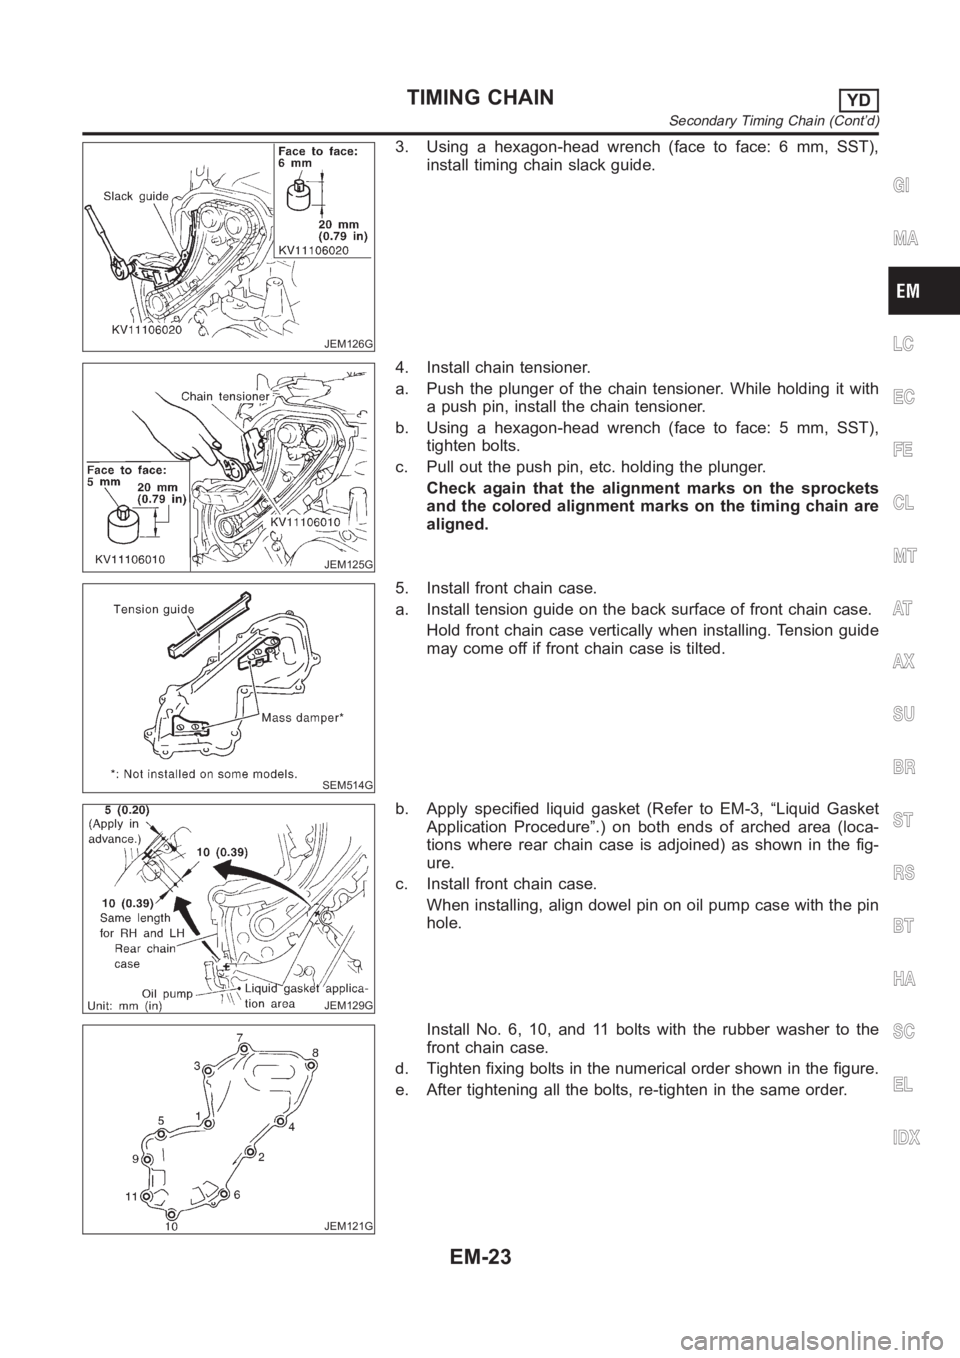
JEM126G
3. Using a hexagon-head wrench (face to face: 6 mm, SST),
install timing chain slack guide.
JEM125G
4. Install chain tensioner.
a. Push the plunger of the chain tensioner. While holding it with
a push pin, install the chain tensioner.
b. Using a hexagon-head wrench (face to face: 5 mm, SST),
tighten bolts.
c. Pull out the push pin, etc. holding the plunger.
Check again that the alignment marks on the sprockets
and the colored alignment marks on the timing chain are
aligned.
SEM514G
5. Install front chain case.
a. Install tension guide on the back surface of front chain case.
Hold front chain case vertically when installing. Tension guide
may come off if front chain case is tilted.
JEM129G
b. Apply specified liquid gasket (Refer to EM-3, “Liquid Gasket
Application Procedure”.) on both ends of arched area (loca-
tions where rear chain case is adjoined) as shown in the fig-
ure.
c. Install front chain case.
When installing, align dowel pin on oil pump case with the pin
hole.
JEM121G
Install No. 6, 10, and 11 bolts with the rubber washer to the
front chain case.
d. Tighten fixing bolts in the numerical order shown in the figure.
e. After tightening all the bolts, re-tighten in the same order.
GI
MA
LC
EC
FE
CL
MT
AT
AX
SU
BR
ST
RS
BT
HA
SC
EL
IDX
TIMING CHAINYD
Secondary Timing Chain (Cont’d)
EM-23
Page 208 of 3189
6. Hereafter, install in the reverse order of removal.
TIMING CHAINYD
Secondary Timing Chain (Cont’d)
EM-24
Page 209 of 3189
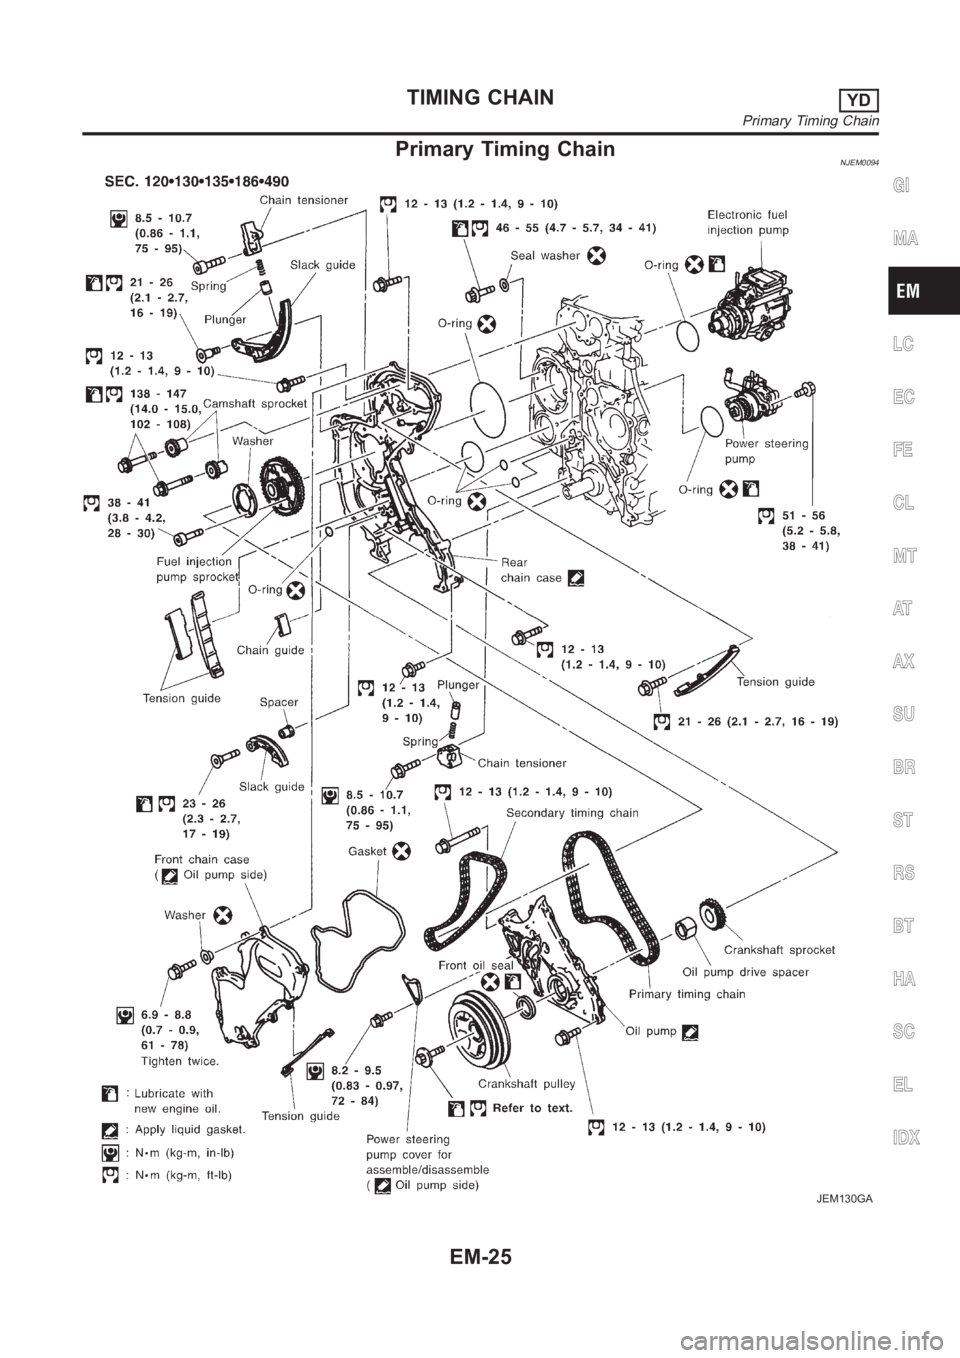
Primary Timing ChainNJEM0094
JEM130GA
GI
MA
LC
EC
FE
CL
MT
AT
AX
SU
BR
ST
RS
BT
HA
SC
EL
IDX
TIMING CHAINYD
Primary Timing Chain
EM-25
Page 210 of 3189
REMOVALNJEM0094S011. Remove engine and transaxle assembly. Refer to EM-63,
“ENGINE ASSEMBLY”.
2. Remove transaxle from engine. Place engine onto engine
stand (SST). Refer to EM-67, “CYLINDER BLOCK”, “Disas-
sembly”.
3. Remove the following parts:
Oil pan (upper and lower)
Refer to EM-15, “OIL PAN”.
Oil filter bracket
Refer to LC-31, “Oil Filter Bracket”.
Injection tube
Refer to EC-21, “Injection Tube and Injection Nozzle”.
4. Remove secondary timing chain and associated parts.
Refer to EM-20, “Secondary Timing Chain”.
5. When removing rear chain case, remove camshaft sprockets.
Refer to EM-46, “CAMSHAFT”.
JEM131G
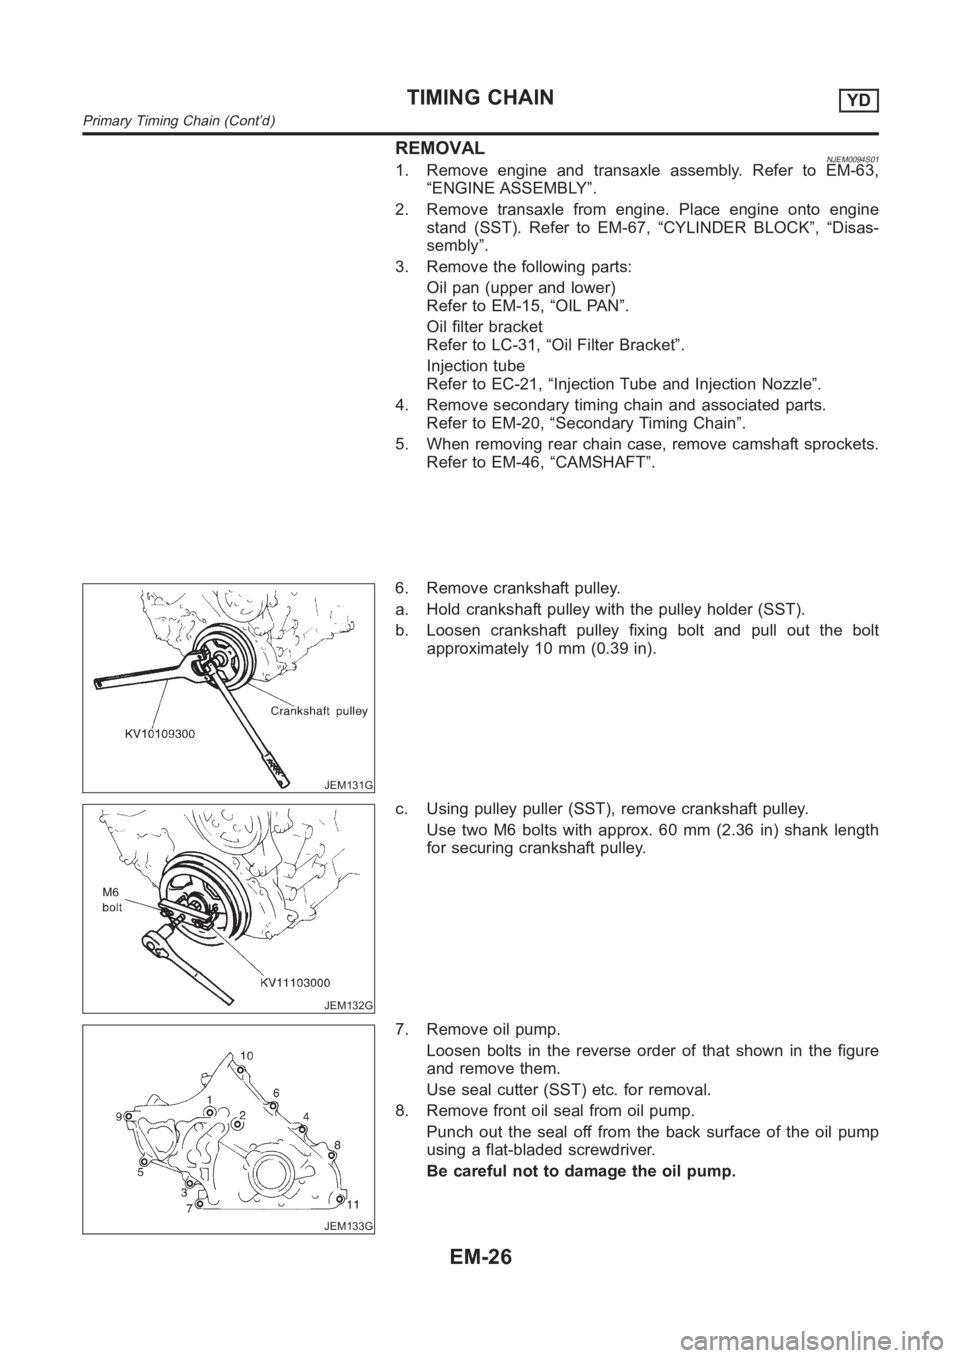
6. Remove crankshaft pulley.
a. Hold crankshaft pulley with the pulley holder (SST).
b. Loosen crankshaft pulley fixing bolt and pull out the bolt
approximately 10 mm (0.39 in).
JEM132G
c. Using pulley puller (SST), remove crankshaft pulley.
Use two M6 bolts with approx. 60 mm (2.36 in) shank length
for securing crankshaft pulley.
JEM133G
7. Remove oil pump.
Loosen bolts in the reverse order of that shown in the figure
and remove them.
Use seal cutter (SST) etc. for removal.
8. Remove front oil seal from oil pump.
Punch out the seal off from the back surface of the oil pump
using a flat-bladed screwdriver.
Be careful not to damage the oil pump.
TIMING CHAINYD
Primary Timing Chain (Cont’d)
EM-26
Page 211 of 3189
JEM134G
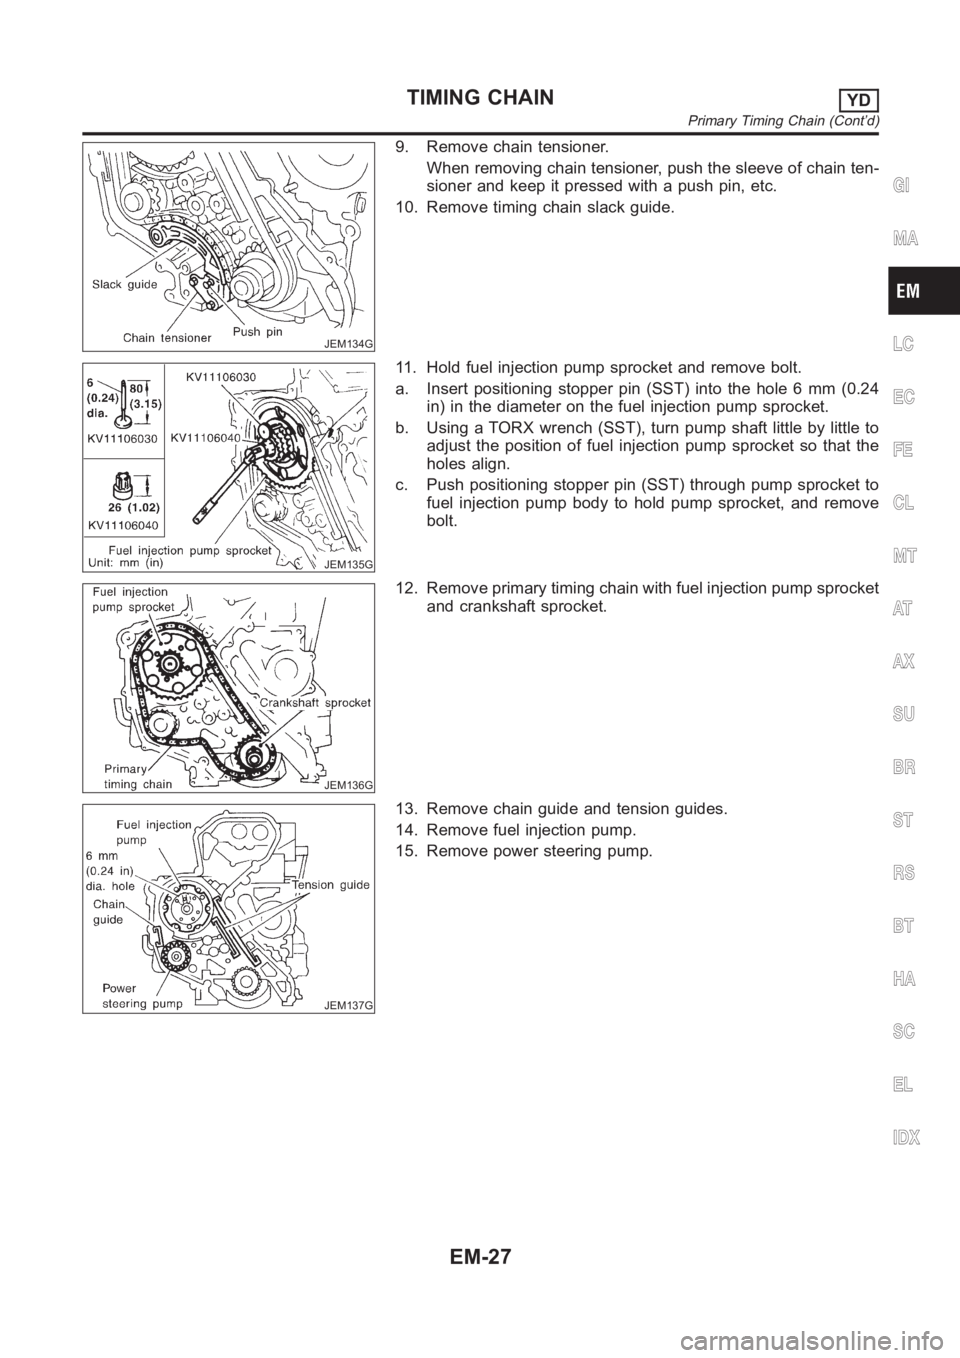
9. Remove chain tensioner.
When removing chain tensioner, push the sleeve of chain ten-
sioner and keep it pressed with a push pin, etc.
10. Remove timing chain slack guide.
JEM135G
11. Hold fuel injection pump sprocket and remove bolt.
a. Insert positioning stopper pin (SST) into the hole 6 mm (0.24
in) in the diameter on the fuel injection pump sprocket.
b. Using a TORX wrench (SST), turn pump shaft little by little to
adjust the position of fuel injection pump sprocket so that the
holes align.
c. Push positioning stopper pin (SST) through pump sprocket to
fuel injection pump body to hold pump sprocket, and remove
bolt.
JEM136G
12. Remove primary timing chain with fuel injection pump sprocket
and crankshaft sprocket.
JEM137G
13. Remove chain guide and tension guides.
14. Remove fuel injection pump.
15. Remove power steering pump.
GI
MA
LC
EC
FE
CL
MT
AT
AX
SU
BR
ST
RS
BT
HA
SC
EL
IDX
TIMING CHAINYD
Primary Timing Chain (Cont’d)
EM-27
Page 212 of 3189
JEM138G
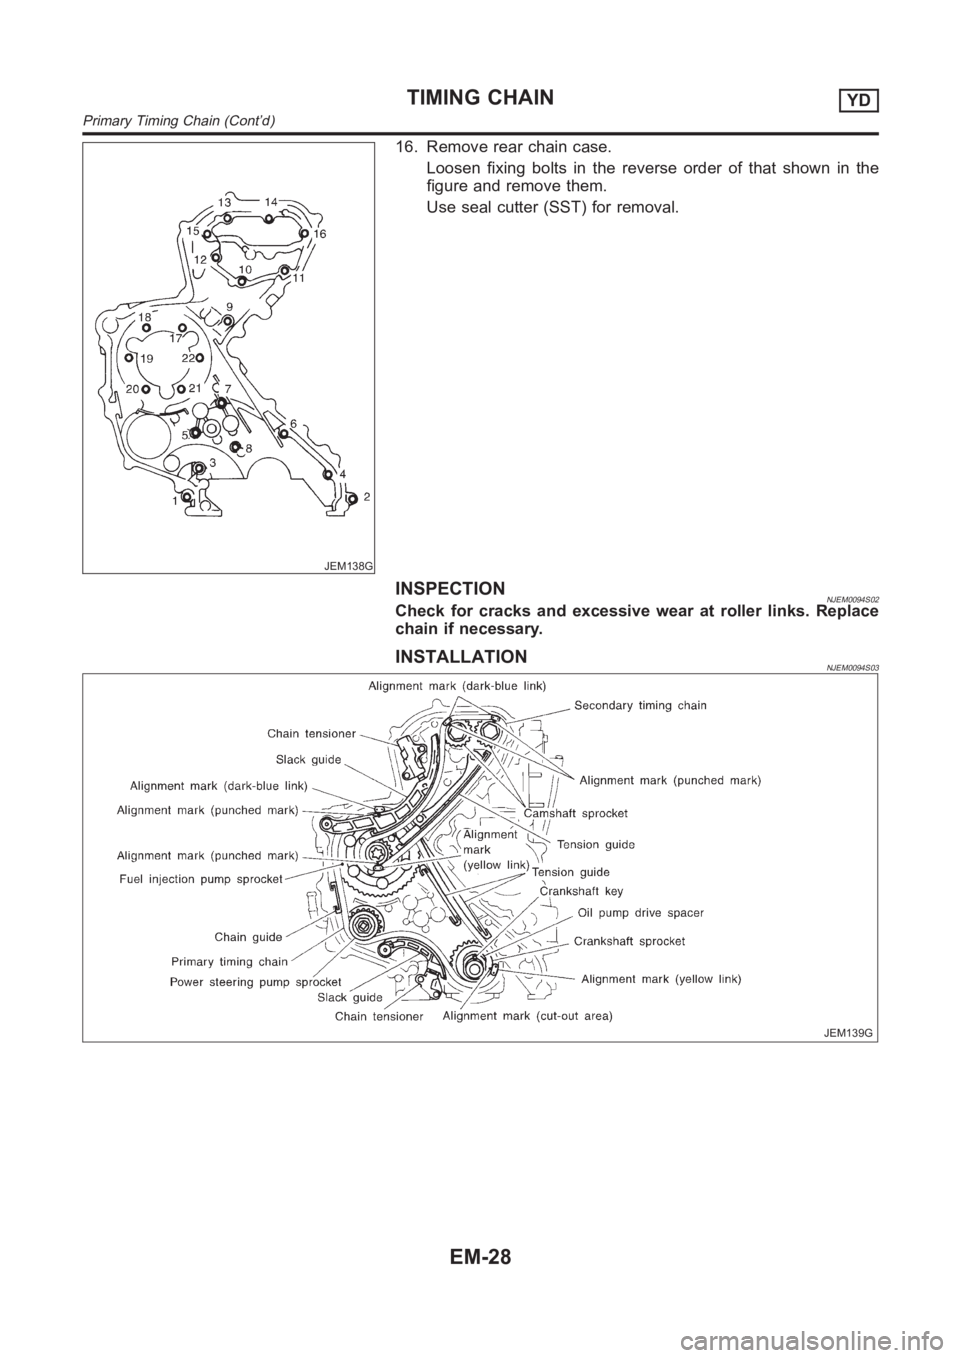
16. Remove rear chain case.
Loosen fixing bolts in the reverse order of that shown in the
figure and remove them.
Use seal cutter (SST) for removal.
INSPECTIONNJEM0094S02Check for cracks and excessive wear at roller links. Replace
chain if necessary.
INSTALLATIONNJEM0094S03
JEM139G
TIMING CHAINYD
Primary Timing Chain (Cont’d)
EM-28
Page 213 of 3189
JEM140G
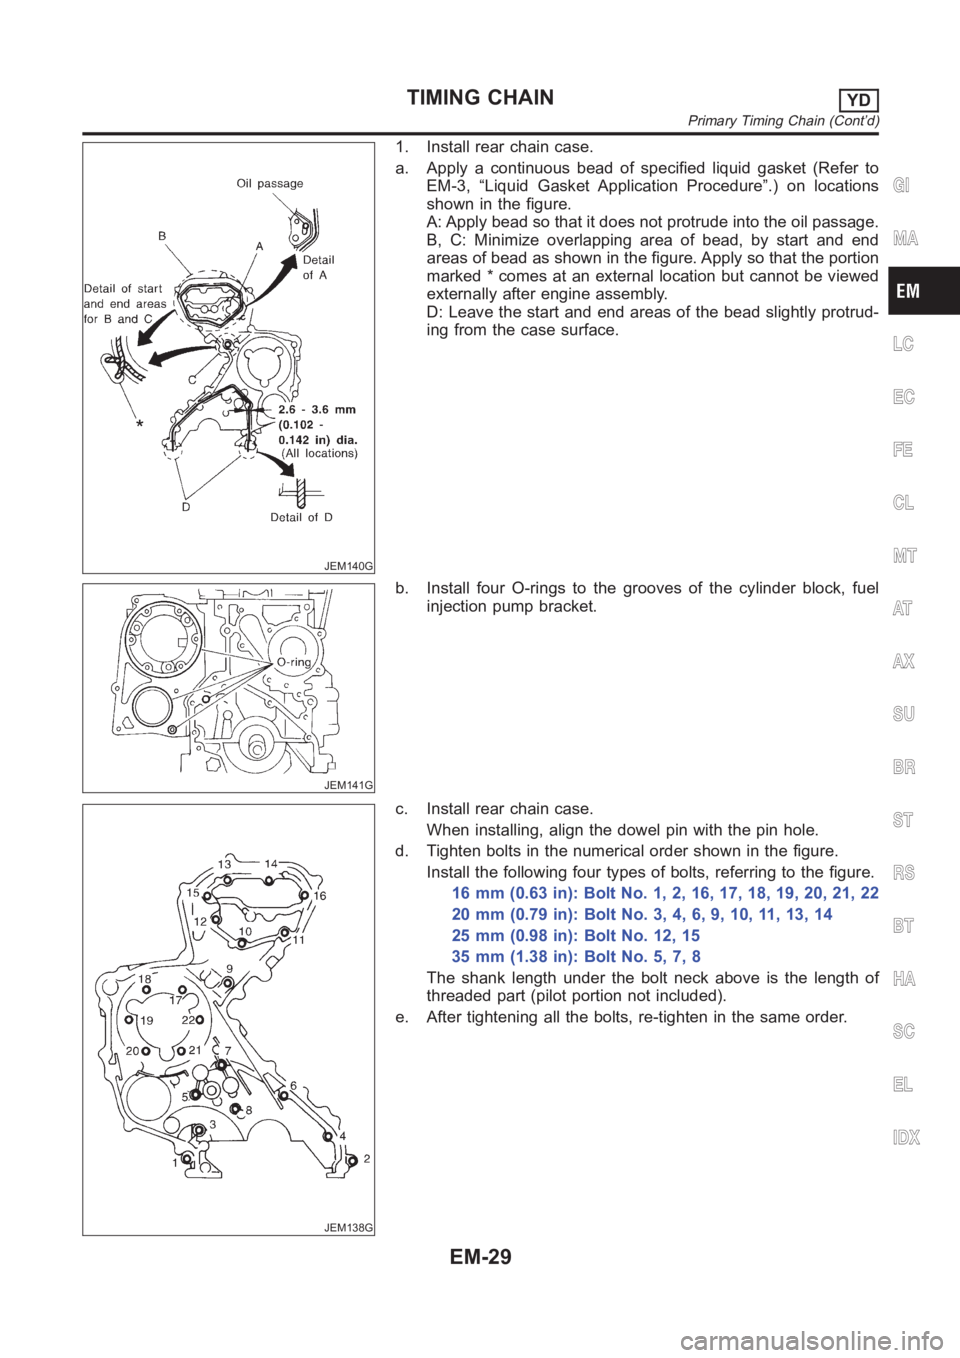
1. Install rear chain case.
a. Apply a continuous bead of specified liquid gasket (Refer to
EM-3, “Liquid Gasket Application Procedure”.) on locations
shown in the figure.
A: Apply bead so that it does not protrude into the oil passage.
B, C: Minimize overlapping area of bead, by start and end
areas of bead as shown in the figure. Apply so that the portion
marked * comes at an external location but cannot be viewed
externally after engine assembly.
D: Leave the start and end areas of the bead slightly protrud-
ing from the case surface.
JEM141G
b. Install four O-rings to the grooves of the cylinder block, fuel
injection pump bracket.
JEM138G
c. Install rear chain case.
When installing, align the dowel pin with the pin hole.
d. Tighten bolts in the numerical order shown in the figure.
Install the following four types of bolts, referring to the figure.
16 mm (0.63 in): Bolt No. 1, 2, 16, 17, 18, 19, 20, 21, 22
20mm(0.79in):BoltNo.3,4,6,9,10,11,13,14
25 mm (0.98 in): Bolt No. 12, 15
35 mm (1.38 in): Bolt No. 5, 7, 8
The shank length under the bolt neck above is the length of
threaded part (pilot portion not included).
e. After tightening all the bolts, re-tighten in the same order.
GI
MA
LC
EC
FE
CL
MT
AT
AX
SU
BR
ST
RS
BT
HA
SC
EL
IDX
TIMING CHAINYD
Primary Timing Chain (Cont’d)
EM-29