radiator cap NISSAN ALMERA TINO 2001 Service User Guide
[x] Cancel search | Manufacturer: NISSAN, Model Year: 2001, Model line: ALMERA TINO, Model: NISSAN ALMERA TINO 2001Pages: 3051, PDF Size: 46.38 MB
Page 1627 of 3051

TERMI-
NAL
NO.WIRE
COLORITEM CONDITION DATA(DC Voltage)
221 LG/B Cooling fan relay (High)[Engine is running]
+Cooling fans are not operating
+Cooling fans are operating at low speedBATTERY VOLTAGE
(11 - 14V)
[Engine is running]
+Cooling fans are operating at high speedApproximately 0.1V
On Board Diagnosis LogicNLEC0663This diagnosis continuously monitors the engine coolant temperature.
If the cooling fan or another component in the cooling system malfunctions, engine coolant temperature will
rise.
When the engine coolant temperature reaches an abnormally high temperature condition, a malfunction is
indicated.
DTC Malfunction is detected when ... Check Items (Possible Cause)
P1217
0208+Cooling fan does not operate properly (Overheat).
+Cooling fan system does not operate properly
(Overheat).
+Engine coolant was not added to the system using
the proper filling method.+Harness or connectors
(The cooling fan circuit is open or shorted.)
+Cooling fan
+Radiator hose
+Radiator
+Radiator cap
+Water pump
+Thermostat
+Engine coolant temperature sensor
For more information, refer to ªMAIN 12 CAUSES OF
OVERHEATINGº, EC-1217.
CAUTION:
When a malfunction is indicated, be sure to replace the coolant following the procedure in the LC-59,
ªChanging Engine Coolantº. Also, replace the engine oil.
1) Fill radiator with coolant up to specified level with a filling speed of 2 liters per minute. Be sure
to use coolant with the proper mixture ratio. Refer to MA-22, ªEngine Coolant Mixture Ratioº.
2) After refilling coolant, run engine to ensure that no water-flow noise is emitted.
DTC P1217 OVER HEATYD22DDTI
ECM Terminals and Reference Value (Cont'd)
EC-1202
Page 1628 of 3051

AEC640
SEF111X
SEC163BA
MEC475B
Overall Function CheckNLEC0664Use this procedure to check the overall function of the cooling fan.
During this check, a DTC might not be confirmed.
WARNING:
Never remove the radiator cap when the engine is hot. Serious
burns could be caused by high pressure fluid escaping from
the radiator.
Wrap a thick cloth around the cap. Carefully remove the cap
by turning it a quarter turn to allow built-up pressure to
escape. Then turn the cap all the way off.
WITH CONSULT-IINLEC0664S011) Check the coolant level in the reservoir tank and radiator.
Allow engine to cool before checking coolant level.
If the coolant level in the reservoir tank and/or radiator is below
the proper range, skip the following steps and go to ªDiagnos-
tic Procedureº, EC-1206.
2) Confirm whether customer filled the coolant or not. If customer
filled the coolant, skip the following steps and go to ªDiagnos-
tic Procedureº, EC-1206.
3) Turn ignition switch ªONº.
4) Perform ªCOOLING FANº in ªACTIVE TESTº mode with CON-
SULT-II and make sure that cooling fans operate when touch-
ing ªHIGHº or ªLOWº.
If NG, go to ªDiagnostic Procedureº, EC-1206.
WITHOUT CONSULT-IINLEC0664S021) Check the coolant level in the reservoir tank and radiator.
Allow engine to cool before checking coolant level.
If the coolant level in the reservoir tank and/or radiator is below
the proper range, skip the following steps and go to ªDiagnos-
tic Procedureº, EC-1206.
2) Confirm whether customer filled the coolant or not. If customer
filled the coolant, skip the following steps and go to ªDiagnos-
tic Procedureº, EC-1206.
3) Start engine.
Be careful not to overheat engine.
4) Set temperature control lever to full cold position.
5) Turn air conditioner switch ªONº.
6) Turn blower fan switch ªONº.
7) Run engine at idle for a few minutes with air conditioner oper-
ating.
Be careful not to overheat engine.
8) Make sure that cooling fans operate at low speed.
9) Turn ignition switch ªOFFº.
10) Turn air conditioner switch and blower fan switch ªOFFº.
11) Disconnect engine coolant temperature sensor harness con-
nector.
12) Connect 150Wresistor to engine coolant temperature sensor
harness connector.
13) Start engine and make sure that cooling fans operate at higher
speed than low speed.
Be careful not to overheat engine.
14) If NG, go to ªDiagnostic Procedureº, EC-1206.
DTC P1217 OVER HEATYD22DDTI
On Board Diagnosis Logic (Cont'd)
EC-1203
Page 1635 of 3051
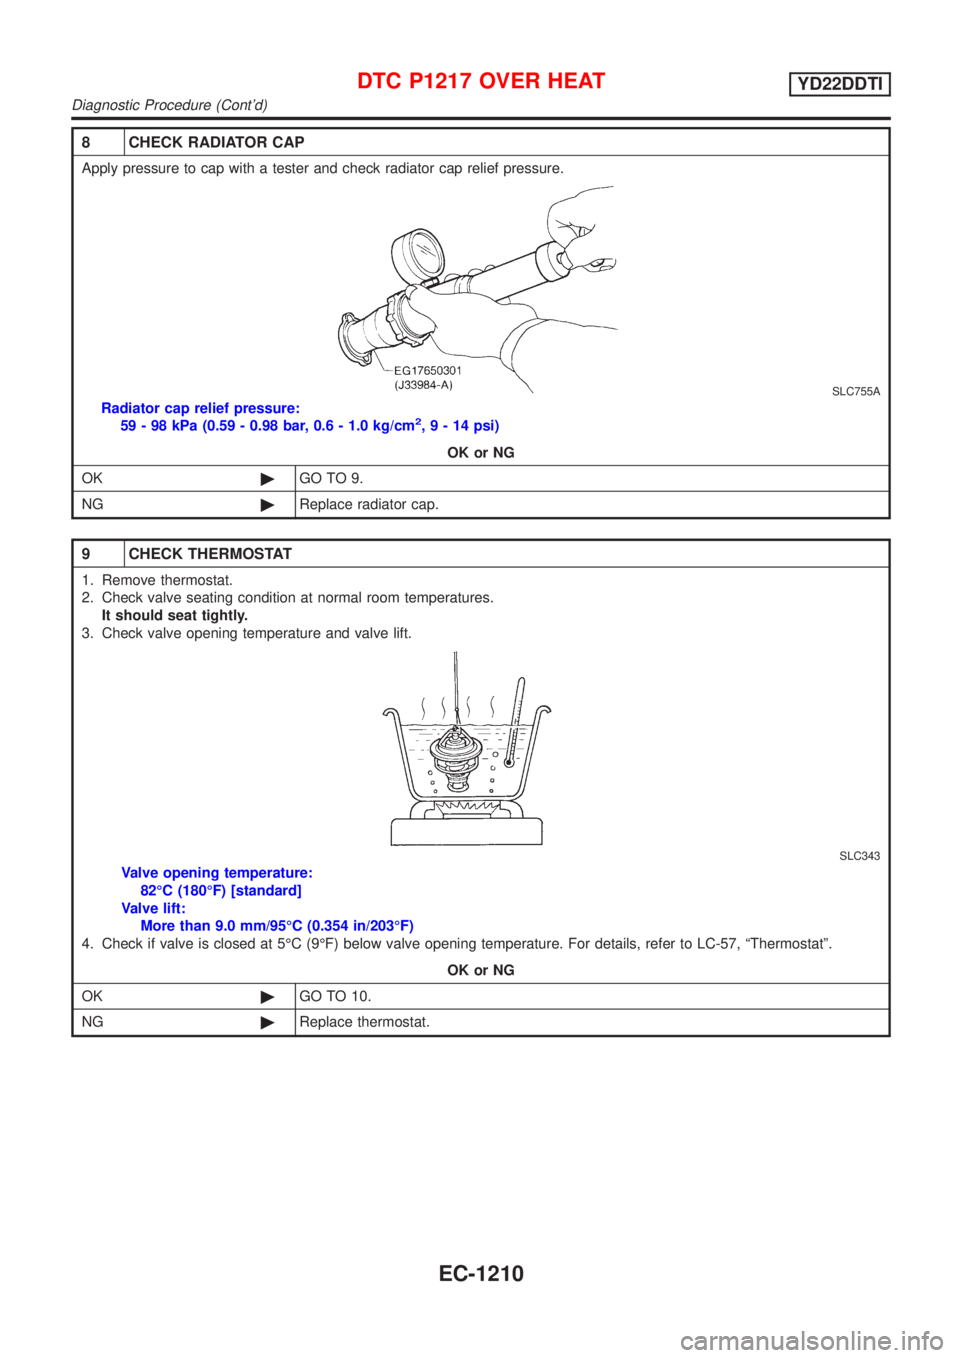
8 CHECK RADIATOR CAP
Apply pressure to cap with a tester and check radiator cap relief pressure.
SLC755A
Radiator cap relief pressure:
59 - 98 kPa (0.59 - 0.98 bar, 0.6 - 1.0 kg/cm2,9-14psi)
OK or NG
OK©GO TO 9.
NG©Replace radiator cap.
9 CHECK THERMOSTAT
1. Remove thermostat.
2. Check valve seating condition at normal room temperatures.
It should seat tightly.
3. Check valve opening temperature and valve lift.
SLC343
Valve opening temperature:
82ÉC (180ÉF) [standard]
Valve lift:
More than 9.0 mm/95ÉC (0.354 in/203ÉF)
4. Check if valve is closed at 5ÉC (9ÉF) below valve opening temperature. For details, refer to LC-57, ªThermostatº.
OK or NG
OK©GO TO 10.
NG©Replace thermostat.
DTC P1217 OVER HEATYD22DDTI
Diagnostic Procedure (Cont'd)
EC-1210
Page 1642 of 3051

9 CHECK INTERMITTENT INCIDENT
1. Perform ªTROUBLE DIAGNOSIS FOR INTERMITTENT INCIDENTº, EC-1135.
©INSPECTION END
Main 12 Causes of OverheatingNLEC0667
Engine Step Inspection item Equipment Condition Reference page
OFF 1+Blocked radiator
+Blocked radiator grille
+Blocked bumper+Visual No blocking Ð
2+Coolant mixture+Coolant tester 30 - 50% coolant mixture See MA-20, ªRECOM-
MENDED FLUIDS AND
LUBRICANTSº.
3+Coolant level+Visual Coolant up to MAX level
in reservoir tank and
radiator filler neckSee LC-19, ªChanging
Engine Coolantº.
4+Radiator cap+Pressure tester 78 - 98 kPa
(0.78 - 0.98 bar, 0.8 - 1.0
kg/cm
2, 11 - 14 psi)See LC-54, ªSystem
Checkº.
ON*
25+Coolant leaks+Visual No leaks See LC-54, ªSystem
Checkº.
ON*
26+Thermostat+Touch the upper and
lower radiator hosesBoth hoses should be
hotSee LC-57, ªThermostatº
and ªRadiatorº.
ON*
17+Cooling fan+CONSULT-II Operating See Trouble Diagnosis
for DTC P1217,
EC-1201.
OFF 8+Combustion gas leak+Color checker chemi-
cal tester 4 Gas ana-
lyzerNegative Ð
ON*
39+Coolant temperature
gauge+Visual Gauge less than 3/4
when drivingÐ
+Coolant overflow to
reservoir tank+Visual No overflow during driv-
ing and idlingSee LC-59, ªChanging
Engine Coolantº.
OFF*
410+Coolant return from
reservoir tank to radia-
tor+Visual Should be initial level in
reservoir tankSee LC-60, ªREFILLING
ENGINE COOLANTº.
OFF 11+Cylinder head+Straight gauge feeler
gauge0.04mm (0.0016 in)
Maximum distortion
(warping)See EM-203, ªInspec-
tionº.
12+Cylinder block and
pistons+Visual No scuffing on cylinder
walls or pistonSee EM-225, ªInspec-
tionº.
*1: Turn the ignition switch ON.
*2: Engine running at 3,000 rpm for 10 minutes.
*3: Drive at 90 km/h (55 MPH) for 30 minutes and then let idle for 10 minutes.
*4: After 60 minutes of cool down time.
For more information, refer to LC-62, ªOVERHEATING CAUSE ANALYSISº.
DTC P1217 OVER HEATYD22DDTI
Diagnostic Procedure (Cont'd)
EC-1217
Page 2544 of 3051
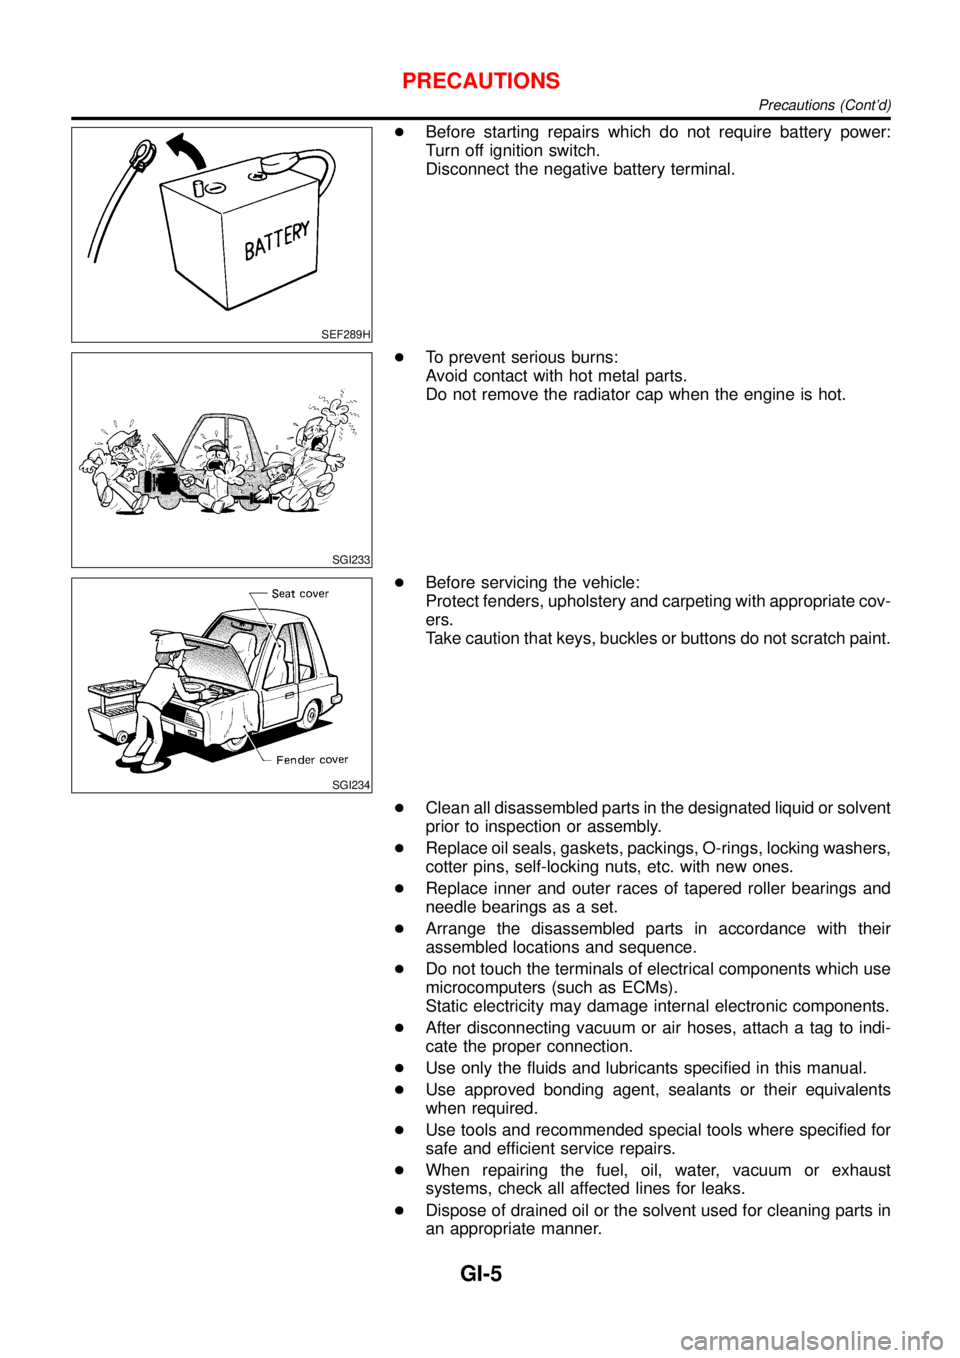
SEF289H
+Before starting repairs which do not require battery power:
Turn off ignition switch.
Disconnect the negative battery terminal.
SGI233
+To prevent serious burns:
Avoid contact with hot metal parts.
Do not remove the radiator cap when the engine is hot.
SGI234
+Before servicing the vehicle:
Protect fenders, upholstery and carpeting with appropriate cov-
ers.
Take caution that keys, buckles or buttons do not scratch paint.
+Clean all disassembled parts in the designated liquid or solvent
prior to inspection or assembly.
+Replace oil seals, gaskets, packings, O-rings, locking washers,
cotter pins, self-locking nuts, etc. with new ones.
+Replace inner and outer races of tapered roller bearings and
needle bearings as a set.
+Arrange the disassembled parts in accordance with their
assembled locations and sequence.
+Do not touch the terminals of electrical components which use
microcomputers (such as ECMs).
Static electricity may damage internal electronic components.
+After disconnecting vacuum or air hoses, attach a tag to indi-
cate the proper connection.
+Use only the fluids and lubricants specified in this manual.
+Use approved bonding agent, sealants or their equivalents
when required.
+Use tools and recommended special tools where specified for
safe and efficient service repairs.
+When repairing the fuel, oil, water, vacuum or exhaust
systems, check all affected lines for leaks.
+Dispose of drained oil or the solvent used for cleaning parts in
an appropriate manner.
PRECAUTIONS
Precautions (Cont’d)
GI-5
Page 2687 of 3051
1. Drain the cooling system. Refer to LC-19 (QG), LC-38 (SR),
LC-59 (YD),“Changing Engine Coolant”.
2. Discharge the A/C system. Refer to HA-85.
3. Disconnect the two heater hoses from inside the engine com-
partment.
4. Remove the blower unit. Refer to HA-97.
5. Remove the steering member assembly. Refer to BT-22,
“Instrument Panel Assembly”.
6. Remove the heater unit.
7. Separate the heater & cooling unit case, and remove the
heater core.
INSTALLATIONNLHA0194Install in the reverse order of removal.
When filling radiator with coolant, refer to LC-20 (QG), LC-38
(SR), LC-60 (YD),“Refilling Engine Coolant”.
Recharge the A/C system. Refer to HA-85.
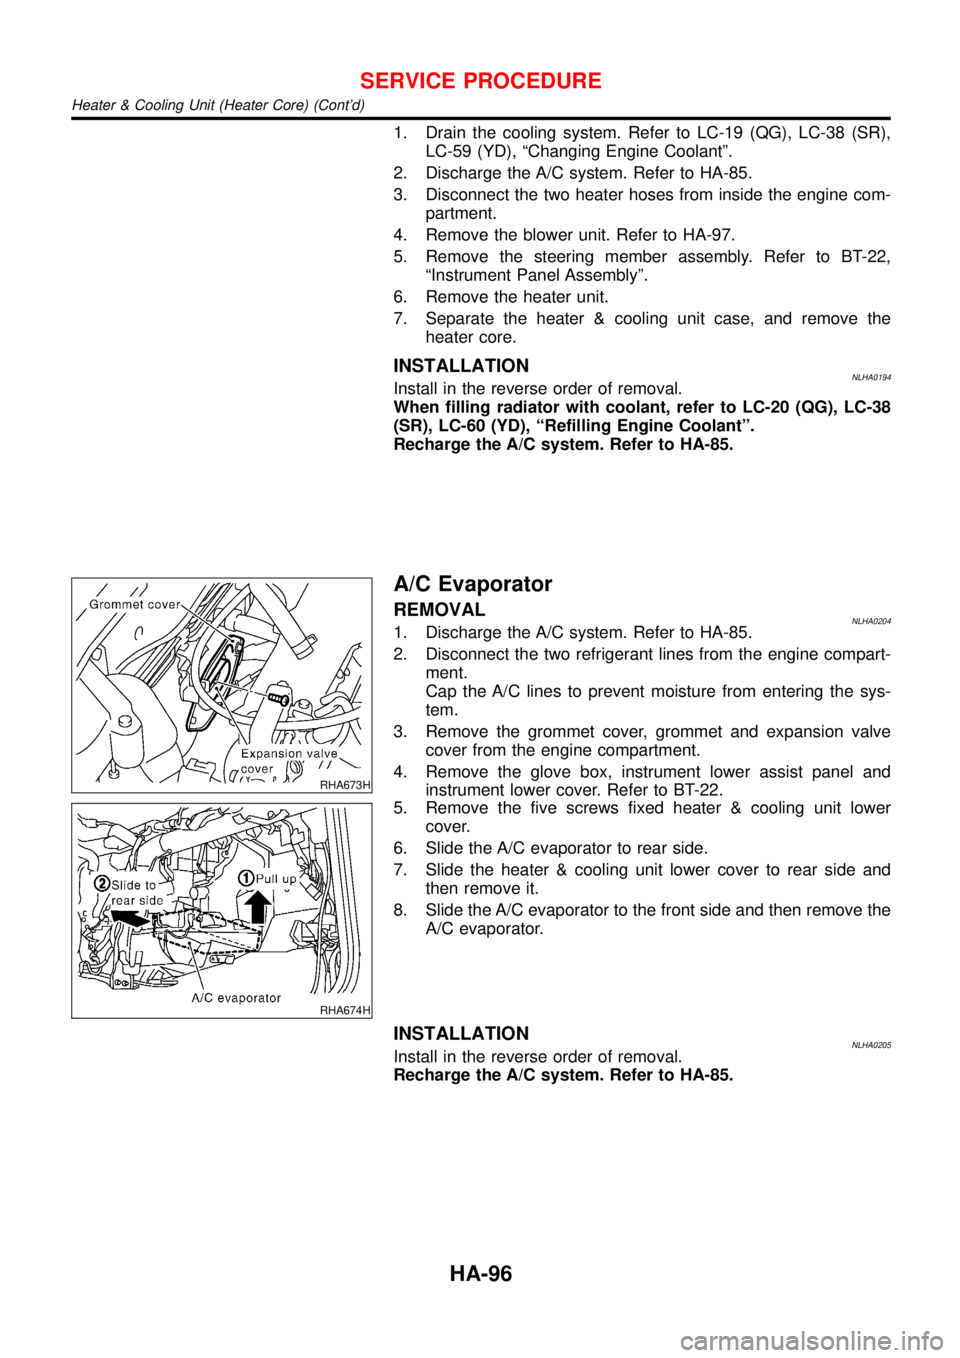
RHA673H
A/C Evaporator
REMOVALNLHA02041. Discharge the A/C system. Refer to HA-85.
2. Disconnect the two refrigerant lines from the engine compart-
ment.
Cap the A/C lines to prevent moisture from entering the sys-
tem.
3. Remove the grommet cover, grommet and expansion valve
cover from the engine compartment.
4. Remove the glove box, instrument lower assist panel and
instrument lower cover. Refer to BT-22.
RHA674H
5. Remove the five screws fixed heater & cooling unit lower
cover.
6. Slide the A/C evaporator to rear side.
7. Slide the heater & cooling unit lower cover to rear side and
then remove it.
8. Slide the A/C evaporator to the front side and then remove the
A/C evaporator.
INSTALLATIONNLHA0205Install in the reverse order of removal.
Recharge the A/C system. Refer to HA-85.
SERVICE PROCEDURE
Heater & Cooling Unit (Heater Core) (Cont’d)
HA-96
Page 2704 of 3051

ENGINE LUBRICATION &
COOLING SYSTEMS
SECTION
LC
CONTENTS
QG
ENGINE LUBRICATION SYSTEM..................................3
Precautions ..................................................................3
LIQUID GASKET APPLICATION PROCEDURE............3
Preparation ..................................................................3
SPECIAL SERVICE TOOLS........................................3
Lubrication Circuit ........................................................4
Oil Pressure Check......................................................5
Oil Pump ......................................................................5
REMOVAL AND INSTALLATION.................................5
DISASSEMBLY AND ASSEMBLY................................6
INSPECTION.............................................................7
REGULATOR VALVE INSPECTION............................7
Changing Engine Oil....................................................8
Changing Oil Filter .......................................................9
Service Data and Specifications (SDS).....................10
OIL PRESSURE CHECK..........................................10
OIL PUMP INSPECTION..........................................10
REGULATOR VALVE INSPECTION..........................10
OIL CAPACITY........................................................10
ENGINE COOLING SYSTEM........................................ 11
Precautions ................................................................ 11
LIQUID GASKET APPLICATION PROCEDURE.......... 11
Preparation ................................................................ 11
SPECIAL SERVICE TOOLS...................................... 11
Cooling Circuit ...........................................................12
System Check............................................................12
CHECKING COOLING SYSTEM HOSES...................12
CHECKING RADIATOR............................................13
CHECKING RADIATOR CAP....................................13
CHECKING COOLING SYSTEM FOR LEAKS............13
Water Pump ...............................................................14
REMOVAL AND INSTALLATION...............................14
INSPECTION...........................................................14
Thermostat .................................................................15
REMOVAL AND INSTALLATION...............................15
INSPECTION...........................................................16
Radiator .....................................................................17
COMPONENTS.......................................................17
Cooling Fan ...............................................................18
COMPONENTS.......................................................18
CONTROL SYSTEM................................................19
Changing Engine Coolant..........................................19
- DRAINING ENGINE COOLANT -............................19
- REFILLING ENGINE COOLANT -...........................20
- FLUSHING COOLING SYSTEM -............................20
Overheating Cause Analysis .....................................21
Service Data and Specifications (SDS).....................22
THERMOSTAT........................................................22
RADIATOR..............................................................22
COOLANT CAPACITY..............................................22
SR
ENGINE LUBRICATION SYSTEM................................23
Precautions ................................................................23
LIQUID GASKET APPLICATION PROCEDURE..........23
Preparation ................................................................23
SPECIAL SERVICE TOOLS......................................23
Lubrication Circuit ......................................................24
Oil Pressure Check....................................................25
Oil Pump ....................................................................25
REMOVAL AND INSTALLATION...............................25
DISASSEMBLY AND ASSEMBLY..............................26
INSPECTION...........................................................26
REGULATOR VALVE INSPECTION..........................27
Changing Engine Oil..................................................28
Changing Engine Oil Filter ........................................28
Oil Filter .....................................................................29
Oil Cooler ...................................................................29
REMOVAL AND INSTALLATION...............................29
INSPECTION...........................................................30
Service Data and Specifications (SDS).....................30
OIL PRESSURE CHECK..........................................30
REGULATOR VALVE INSPECTION..........................30
OIL PUMP INSPECTION..........................................30
OIL CAPACITY........................................................30
ENGINE COOLING SYSTEM........................................31
Precautions ................................................................31
LIQUID GASKET APPLICATION PROCEDURE..........31
Preparation ................................................................31
Page 2705 of 3051

SPECIAL SERVICE TOOL........................................31
Cooling Circuit ...........................................................32
System Check............................................................32
CHECKING COOLING SYSTEM HOSES...................32
CHECKING COOLING SYSTEM FOR LEAKS............32
CHECKING RADIATOR............................................33
CHECKING RADIATOR CAP....................................33
Water Pump ...............................................................33
REMOVAL AND INSTALLATION...............................33
INSPECTION...........................................................34
Thermostat .................................................................35
REMOVAL AND INSTALLATION...............................35
INSPECTION...........................................................36
Water Outlet ...............................................................36
INSPECTION...........................................................36
INSTALLATION........................................................36
Radiator .....................................................................37
COMPONENTS.......................................................37
Cooling Fan Control System .....................................37
Changing Engine Coolant..........................................38
- DRAINING ENGINE COOLANT -............................38
- REFILLING ENGINE COOLANT -...........................38
- FLUSHING COOLING SYSTEM -............................39
Overheating Cause Analysis .....................................40
Service Data and Specifications (SDS).....................41
THERMOSTAT........................................................41
RADIATOR..............................................................41
COOLANT CAPACITY..............................................41
YD
ENGINE LUBRICATION SYSTEM................................42
Precautions ................................................................42
LIQUID GASKET APPLICATION PROCEDURE..........42
Preparation ................................................................42
SPECIAL SERVICE TOOLS......................................42
Lubrication Circuit ......................................................43
Oil Pressure Check....................................................44
Oil Pump ....................................................................44
REMOVAL AND INSTALLATION...............................44
DISASSEMBLY AND ASSEMBLY..............................45
OIL PUMP INSPECTION..........................................45
REGULATOR VALVE INSPECTION..........................46
Changing Engine Oil..................................................47
Oil Filter Bracket ........................................................48
REMOVAL AND INSTALLATION...............................48
Changing Oil Filter .....................................................48
REMOVAL...............................................................49
INSTALLATION........................................................49
Oil Cooler ...................................................................50
REMOVAL AND INSTALLATION...............................50
Service Data and Specifications (SDS).....................51
OIL PRESSURE CHECK..........................................51
REGULATOR VALVE INSPECTION..........................51
OIL PUMP INSPECTION..........................................51
ENGINE OIL CAPACITY...........................................51
ENGINE COOLING SYSTEM........................................52
Precautions ................................................................52
LIQUID GASKET APPLICATION PROCEDURE..........52
Preparation ................................................................52
SPECIAL SERVICE TOOLS......................................52
Cooling Circuit ...........................................................53
System Check............................................................54
CHECKING COOLING SYSTEM HOSES...................54
CHECKING RADIATOR............................................54
CHECKING RADIATOR CAP....................................54
CHECKING COOLING SYSTEM FOR LEAKS............55
Water Pump ...............................................................55
REMOVAL AND INSTALLATION...............................55
REMOVAL...............................................................56
INSPECTION...........................................................56
INSTALLATION........................................................56
Thermostat .................................................................57
REMOVAL AND INSTALLATION...............................57
INSPECTION...........................................................58
Radiator .....................................................................58
COMPONENTS.......................................................58
REMOVAL AND INSTALLATION...............................59
Cooling Fan ...............................................................59
COMPONENTS.......................................................59
CONTROL SYSTEM................................................59
Changing Engine Coolant..........................................59
- DRAINING ENGINE COOLANT -............................59
- REFILLING ENGINE COOLANT -...........................60
- FLUSHING COOLING SYSTEM -............................61
Overheating Cause Analysis .....................................62
Service Data and Specifications (SDS).....................63
THERMOSTAT........................................................63
RADIATOR..............................................................63
ENGINE COOLANT CAPACITY................................63
CONTENTS(Cont'd)
LC-2
Page 2714 of 3051

SEM164F
AEM080
Precautions
LIQUID GASKET APPLICATION PROCEDURENLLC00141. Use a scraper to remove all traces of old liquid gasket from
mating surfaces and grooves. Also, completely clean any oil
from these areas.
2. Apply a continuous bead of liquid gasket to mating surfaces.
(Use Genuine Liquid Gasket or equivalent).
+For oil pan, be sure liquid gasket diameter is 3.5 to 4.5 mm
(0.138 to 0.177 in).
+For areas except oil pan, be sure liquid gasket diameter is 2.0
to 3.0 mm (0.079 to 0.118 in).
3. Apply liquid gasket around the inner side of bolt holes (unless
otherwise specified).
4. Assembly should be done within 5 minutes after coating.
5. Wait at least 30 minutes before refilling engine oil and engine
coolant.
Preparation
SPECIAL SERVICE TOOLSNLLC0015
Tool number
Tool nameDescription
EG17650301
Radiator cap tester
adapter
NT564
Adapting radiator cap tester to radiator filler neck
a: 28 (1.10) dia.
b: 31.4 (1.236) dia.
c: 41.3 (1.626) dia.
Unit: mm (in)
ENGINE COOLING SYSTEMQG
Precautions
LC-11
Page 2715 of 3051

Cooling CircuitNLLC0016
SLC317B
System CheckNLLC0017WARNING:
Never remove the radiator cap when the engine is hot. Serious
burns could occur from high pressure fluid escaping from the
radiator.
Wrap a thick cloth around the cap. Slowly turn it a quarter turn
to allow built-up pressure to escape. Carefully remove the cap
by turning it all the way.
CHECKING COOLING SYSTEM HOSESNLLC0017S01Check hoses for the following:
+Improper attachment
+Leaks
+Cracks
+Damage
+Loose connections
+Chafing
+Deterioration
ENGINE COOLING SYSTEMQG
Cooling Circuit
LC-12