suspension NISSAN ALMERA TINO 2001 Service Service Manual
[x] Cancel search | Manufacturer: NISSAN, Model Year: 2001, Model line: ALMERA TINO, Model: NISSAN ALMERA TINO 2001Pages: 3051, PDF Size: 46.38 MB
Page 3046 of 3051

SRA695A
SSU038
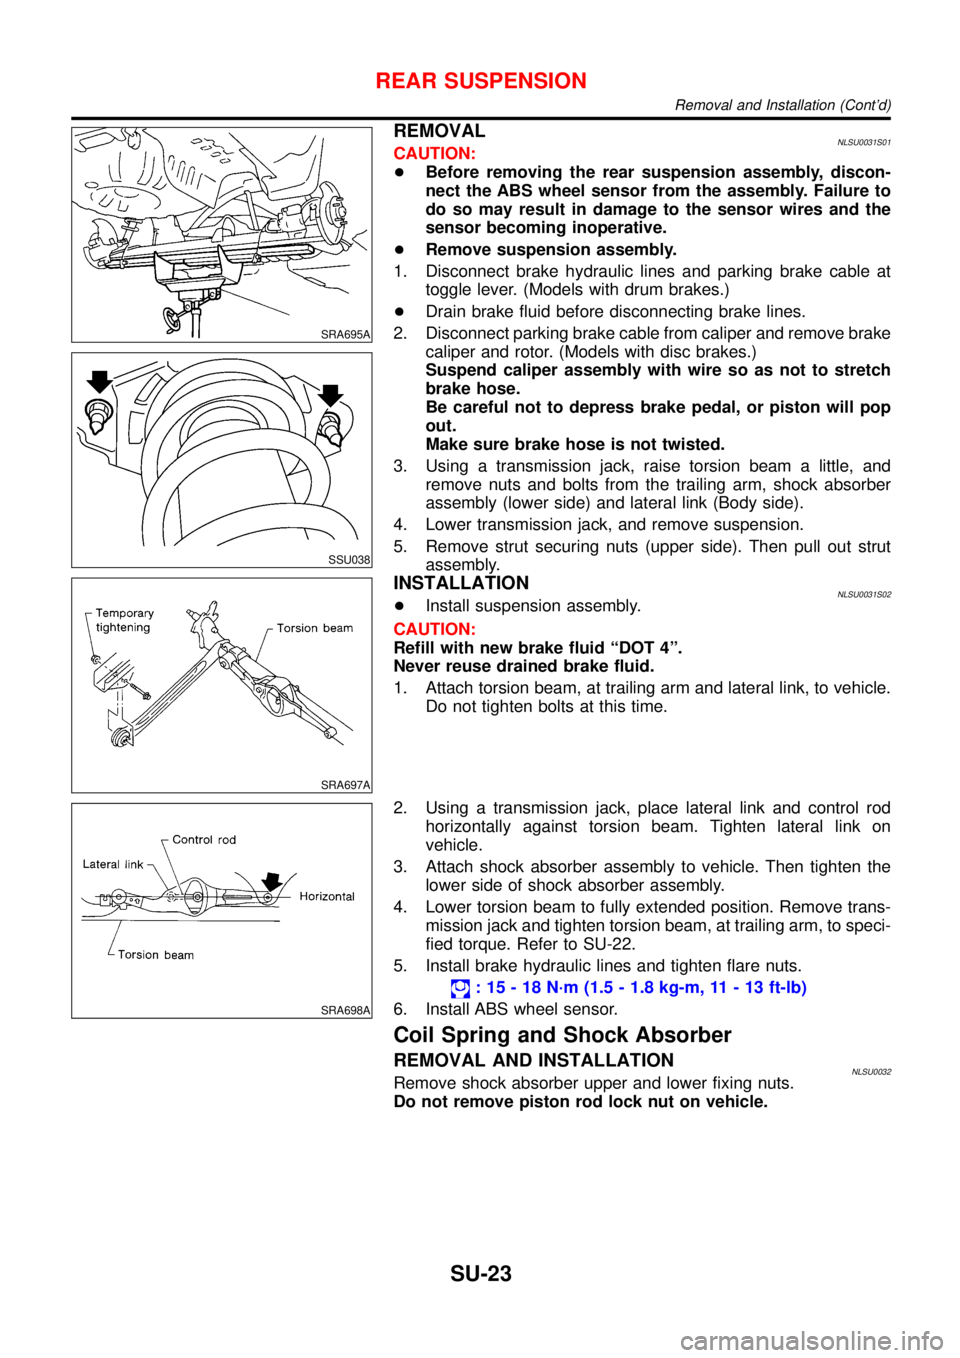
REMOVALNLSU0031S01CAUTION:
+Before removing the rear suspension assembly, discon-
nect the ABS wheel sensor from the assembly. Failure to
do so may result in damage to the sensor wires and the
sensor becoming inoperative.
+Remove suspension assembly.
1. Disconnect brake hydraulic lines and parking brake cable at
toggle lever. (Models with drum brakes.)
+Drain brake fluid before disconnecting brake lines.
2. Disconnect parking brake cable from caliper and remove brake
caliper and rotor. (Models with disc brakes.)
Suspend caliper assembly with wire so as not to stretch
brake hose.
Be careful not to depress brake pedal, or piston will pop
out.
Make sure brake hose is not twisted.
3. Using a transmission jack, raise torsion beam a little, and
remove nuts and bolts from the trailing arm, shock absorber
assembly (lower side) and lateral link (Body side).
4. Lower transmission jack, and remove suspension.
5. Remove strut securing nuts (upper side). Then pull out strut
assembly.
SRA697A
INSTALLATIONNLSU0031S02+Install suspension assembly.
CAUTION:
Refill with new brake fluid“DOT 4”.
Never reuse drained brake fluid.
1. Attach torsion beam, at trailing arm and lateral link, to vehicle.
Do not tighten bolts at this time.
SRA698A
2. Using a transmission jack, place lateral link and control rod
horizontally against torsion beam. Tighten lateral link on
vehicle.
3. Attach shock absorber assembly to vehicle. Then tighten the
lower side of shock absorber assembly.
4. Lower torsion beam to fully extended position. Remove trans-
mission jack and tighten torsion beam, at trailing arm, to speci-
fied torque. Refer to SU-22.
5. Install brake hydraulic lines and tighten flare nuts.
:15-18N·m (1.5 - 1.8 kg-m, 11 - 13 ft-lb)
6. Install ABS wheel sensor.
Coil Spring and Shock Absorber
REMOVAL AND INSTALLATIONNLSU0032Remove shock absorber upper and lower fixing nuts.
Do not remove piston rod lock nut on vehicle.
REAR SUSPENSION
Removal and Installation (Cont’d)
SU-23
Page 3047 of 3051

SRA806A
DISASSEMBLYNLSU00331. Set shock absorber in vise, thenloosenpiston rod lock nut.
Do not remove piston rod lock nut at this time.
2. Compress spring with Tool so that the shock absorber upper
spring seat can be turned by hand.
WARNING:
Make sure that the pawls of the two spring compressors are
firmly hooked on the spring. The spring compressors must be
tightened alternately so as not to tilt the spring.
3. Remove piston rod lock nut.
INSPECTIONNLSU0034Shock Absorber AssemblyNLSU0034S01+Check for smooth operation through a full stroke, both com-
pression and extension.
+Check for oil leakage on welded or gland packing portions.
+Check piston rod for cracks, deformation or other damage.
Replace if necessary.
Upper Rubber Seat and BushingNLSU0034S02Check rubber parts for deterioration or cracks.
Replace if necessary.
Coil SpringNLSU0034S03Check for cracks, deformation or other damage. Replace if
necessary.
NRA029
ASSEMBLYNLSU0035+Locate upper spring seat as shown.
SFA436B
+When installing coil spring, be careful not to reverse top and
bottom direction. (Top end is flat.)
+When installing coil spring on shock absorber, it must be posi-
tioned as shown in figure at left.
CAUTION:
Do not reuse piston rod lock nut.
REAR SUSPENSION
Coil Spring and Shock Absorber (Cont’d)
SU-24
Page 3048 of 3051

Torsion Beam, Lateral Link and Control Rod
DISASSEMBLYNLSU0036+Remove torsion beam assembly. Refer to“Removal and
Installation”,“REAR SUSPENSION”, SU-23.
+Remove lateral link and control rod from torsion beam.
ARA072
INSPECTIONNLSU0037+Check for cracks, distortion or other damage. Replace if nec-
essary.
Standard length:
A 207 - 208 mm (8.15 - 8.19 in)
B 394 - 395 mm (15.51 - 15.55 in)
C 601 - 603 mm (23.66 - 23.74 in)
D 106 - 108 mm (4.17 - 4.25 in)
+Check all rubber parts for wear, cracks or deformation.
Replace if necessary.
SRA793A
ASSEMBLYNLSU00381. Temporarily assemble lateral link and control rod.
+When installing the control rod, connect the bush with the
smaller inner diameter to the lateral link.
SRA701A
2. Temporarily install lateral link and control rod on torsion beam.
+When installing, place lateral link with the arrow topside.
REAR SUSPENSION
Torsion Beam, Lateral Link and Control Rod
SU-25
Page 3049 of 3051

SRA702A
3. Place lateral link and control rod horizontally against torsion
beam, and tighten to the specified torque.
4. Install torsion beam assembly. Refer to“Removal and
Installation”,“REAR SUSPENSION”, SU-23.
REAR SUSPENSION
Torsion Beam, Lateral Link and Control Rod (Cont’d)
SU-26
Page 3050 of 3051

Service Data and Specifications (SDS)
GENERAL SPECIFICATIONS (REAR)=NLSU0039
Suspension type Multi-link beam suspension
Shock absorber type Double-acting hydraulic
REAR WHEEL ALIGNMENT (UNLADEN*)NLSU0040
Body
Camber
Degree minute (Decimal degree)Minimum�1°45′(�1.75°)
Nominal�1°00′(�1.00°)
Maximum�0°15′(�0.25°)
Total toe-in Distance (A�B)
mm (in)Minimum�3(�0.12)
Nominal 1 (0.04)
Maximum 5 (0.20)
Angle (left plus right)
Degree minute (Decimal degree)Minimum�16′(�0.27°)
Nominal 5′30″(0.09°)
Maximum 26′(0.43°)
*: Fuel, radiator coolant and engine oil full. Spare tire, jack, hand tools and mats in designated positions.
REAR SUSPENSION
Service Data and Specifications (SDS)
SU-27
Page 3051 of 3051

REAR SUSPENSION
Service Data and Specifications (SDS) (Cont’d)
SU-28