NISSAN ALTIMA 1997 U13 / 1.G Owners Manual
Manufacturer: NISSAN, Model Year: 1997, Model line: ALTIMA, Model: NISSAN ALTIMA 1997 U13 / 1.GPages: 203, PDF Size: 1.64 MB
Page 131 of 203

7Do-it-yourself operations
Maintenance precautions .......................................7-2
Engine compartment check locations ....................7-3
Engine cooling system ...........................................7-4
Checking engine coolant level ...............................7-4
Changing engine coolant .......................................7-5
Engine oil ...............................................................7-7
Checking engine oil level .......................................7-7
Changing engine oil ...............................................7-8
Changing engine oil filter .......................................7-9
Automatic transmission fluid (ATF) ........................7-9
Temperature conditions for checking ATF ...........7-10
Power steering fluid..............................................7-11
Brake and clutch fluid...........................................7-11
Window washer fluid ............................................7-12
Battery ..................................................................7-13
Jump starting ........................................................7-14
Drive belts ............................................................7-14Spark plug replacement .......................................7-15
Air cleaner housing filter ......................................7-16
Wiper blades ........................................................7-17
Parking brake check.............................................7-18
Brake pedal ..........................................................7-18
Brake booster .......................................................7-19
Clutch pedal .........................................................7-20
Fuses ....................................................................7-20
Fusible links..........................................................7-21
Light bulbs ............................................................7-22
Headlights ............................................................7-22
Headlight aiming adjustment ................................7-23
Adjustment after headlight assembly
replacement ..........................................................7-24
Bulb replacement .................................................7-25
Wheels and tires ..................................................7-29
ZX
Page 132 of 203
When performing any inspection or mainte-
nance work on your vehicle, always take
care to prevent serious accidental injury to
yourself or damage to the vehicle. The
following are general precautions which
should be closely observed.
WARNING
cPark the vehicle on a level surface,
apply the parking brake securely and
block the wheels to prevent the ve-
hicle from moving. For a manual
transmission, move the shift lever to
Neutral. For an automatic transmis-
sion, move the shift lever to P (Park).
cBe sure the ignition key is OFF when
performing any parts replacement or
repairs.
cYour vehicle is equipped with an
automatic engine cooling fan. It may
come on at any time without warn-
ing, even if the ignition key is in the
OFF position and the engine is not
running. To avoid injury, always dis-
connect the negative battery cable
before working near the fan.cIf you must work with the engine
running, keep your hands, clothing,
hair and tools away from moving
fans, belts and any other moving
parts.
cIt is advisable to remove ties and any
jewelry, such as rings, watches, etc.
before working on your vehicle.
cIf you must run the engine in an
enclosed space such as a garage, be
sure there is proper ventilation for
exhaust gases.
cNever get under the vehicle while it
is supported only by a jack. If it is
necessary to work under the vehicle,
support it with safety stands.
cKeep smoking materials, flame and
sparks away from fuel and the
battery.
cOn gasoline engine models with the
Multiport Fuel Injection (MFI) sys-
tem, the fuel filter or fuel lines
should be serviced by a NISSAN
dealer because the fuel lines are
under high pressure even when the
engine is off.
CAUTION
cDo not work under the hood while
the engine is hot. Turn off the engine
and wait until it cools down.
cNever connect or disconnect either
the battery or any transistorized
component connector while the igni-
tion is ON.
cNever leave the engine or the auto-
matic transmission related compo-
nent harness connector discon-
nected while the ignition is on.
c
Avoid contact with used engine oil.
Improperly disposed motor oil and/or
other vehicle fluids can hurt the en-
vironment. Always conform to local
regulations for disposal of vehicle
fluid.
This ``Do-it-yourself operations'' section
gives instructions regarding only those
items which are relatively easy for an owner
to perform.
You should be aware that incomplete or
improper servicing may result in operating
difficulties or excessive emissions, and
could affect your warranty coverage.If in
doubt about any servicing, have it done
by your NISSAN dealer.
MAINTENANCE
PRECAUTIONS
7-2
ZX
Page 133 of 203

ADI0501
ENGINE COMPARTMENT CHECK LOCATIONS
7-3
ZX
Page 134 of 203
The engine cooling system is filled at the
factory with a high-quality, year-round, anti-
freeze coolant solution. The anti-freeze so-
lution contains rust and corrosion inhibitors,
therefore additional cooling system addi-
tives are not necessary.
CAUTION
When adding or replacing coolant, be
sure to use only an ethylene glycol
anti-freeze with the proper mixture ratio
of 50% anti-freeze and 50% distilled
water. The use of other types of coolant
solutions may damage your cooling
system.
Outside temperature
down toAnti-
freezeDistilled
water
ÉC ÉF
þ35 þ30 50% 50%
WARNING
cNever remove the radiator cap when
the engine is hot. Wait until the en-
gine and radiator cool down. Serious
burns could be caused by high pres-
sure fluid escaping from the radia-
tor. See precautions in ``If your ve-
hicle overheats,'' found in the ``In
case of emergency'' section.
cThe radiator is equipped with a pres-
sure cap. Use a genuine NISSAN cap
or its equivalent when replacement
is required.
CHECKING ENGINE COOLANT
LEVEL
With coolant reservoir
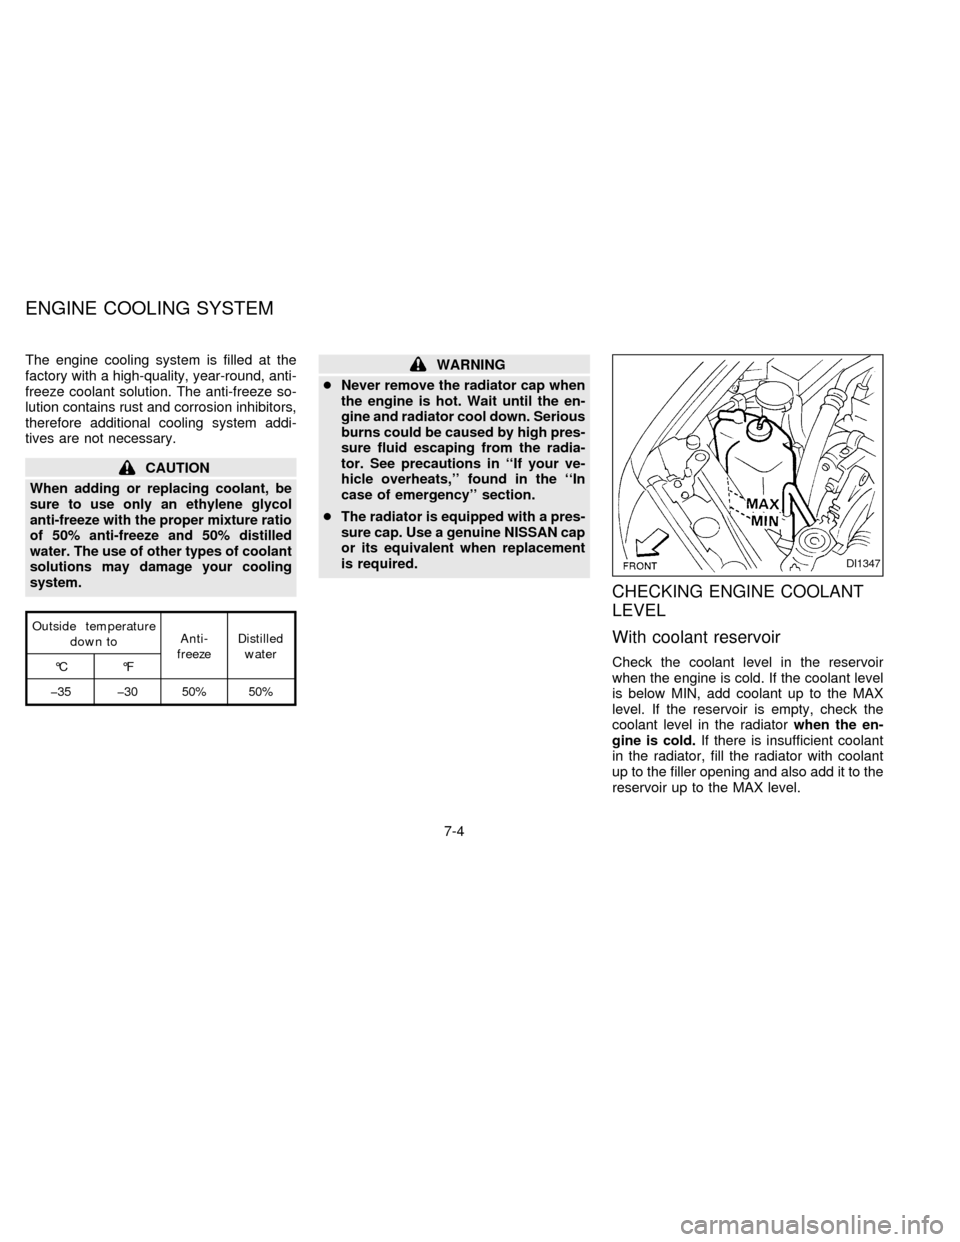
Check the coolant level in the reservoir
when the engine is cold. If the coolant level
is below MIN, add coolant up to the MAX
level. If the reservoir is empty, check the
coolant level in the radiatorwhen the en-
gine is cold.If there is insufficient coolant
in the radiator, fill the radiator with coolant
up to the filler opening and also add it to the
reservoir up to the MAX level.
DI1347
ENGINE COOLING SYSTEM
7-4
ZX
Page 135 of 203
If the cooling system frequently requires
coolant, have it checked by your NISSAN
dealer.
CHANGING ENGINE COOLANT
cMajor cooling system repairs should be
performed by your NISSAN dealer. The
service procedures can be found in the
appropriate NISSAN Service Manual.cImproper servicing can result in reduced
heater performance and engine over-
heating.
WARNING
cTo avoid the danger of being
scalded, never change the coolant
when the engine is hot.
cNever remove the radiator cap when
the engine is hot. Serious burns
could be caused by high pressure
fluid escaping from the radiator.
1. Perform the following procedure to open
the heater water cock:
cAutomatic air conditioner
a. Turn ignition switch from OFF to ON.
b.
Within 5 seconds after ignition switch is
turned ON, press the automatic heater
and air conditioner OFF switch for at least
5 seconds. At this time, AUTO, ECON,
88ÉF and
appear in the display.
c. Press(HOT) switch 3 times.
d. Press
(defrost) switch 2 times.
e. Make sure that the display indicates 43.
DI1349
7-5
ZX
Page 136 of 203

f. Wait 10 seconds before turning ignition
switch OFF.
cManual air conditioning
a. Turn the ignition switch ON and set the
temperature control lever to the maxi-
mum hot position. Wait 10 seconds, then
turn the switch OFF.
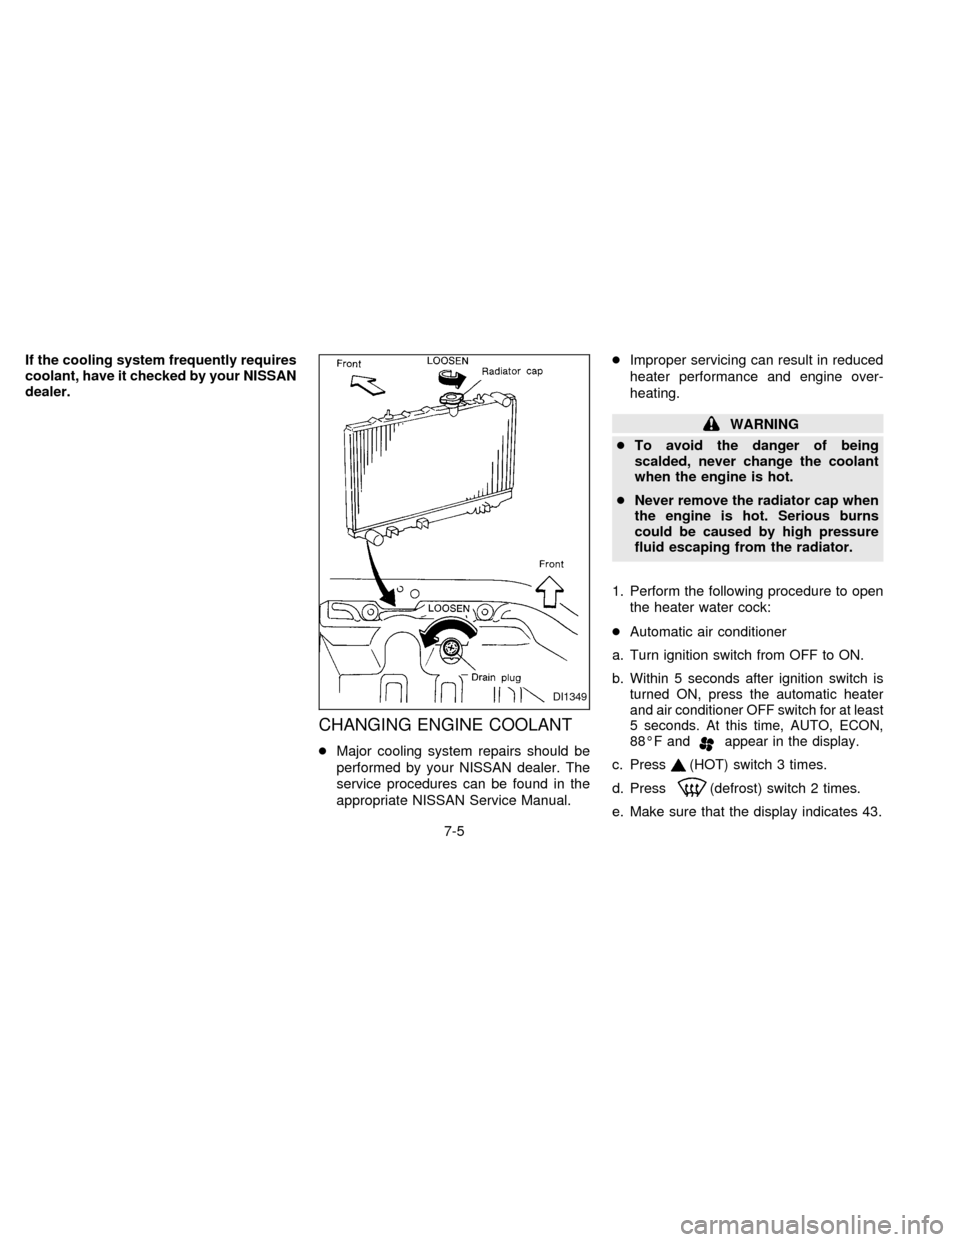
2. Open the radiator drain plug. Open the
drain plug on the engine water pipe.
3. Open the radiator cap to drain the cool-
ant.
4. Flush the cooling system by running
fresh water through the radiator.
5. Close the radiator drain plug and the
drain plug on the engine water pipe se-
curely.
6. See the ``Technical and consumer infor-
mation'' section for cooling system ca-
pacity. Fill the radiator slowly with the
proper mixture of coolant and water. Fill
the reservoir tank up to the MAX level.
7. Open and close the air release plug to
release air. Then fill the radiator again
and install the radiator cap.8. Start the engine and warm it up until it
reaches normal operating temperature.
Then race the engine 2 or 3 times under
no load. Watch the coolant temperature
gauge for signs of overheating.
9. Stop the engine. After it completely cools
down, refill the radiator up to the filler
opening. Fill the reservoir tank up to the
MAX level.
10. Open and close the air release plug to
release air. Then fill the radiator again
and install the radiator cap.11. Check the radiator drain plug and the
drain plug on the engine water pipe for
any sign of leakage, tighten if neces-
sary.
DI1351DI1299
7-6
ZX
Page 137 of 203
CHECKING ENGINE OIL LEVEL
1. Park the vehicle on a level surface and
apply the parking brake.
2. Run the engine until it reaches operating
temperature.
3. Turn off the engine.Wait a few minutes
for the oil to drain back into the oil
pan.
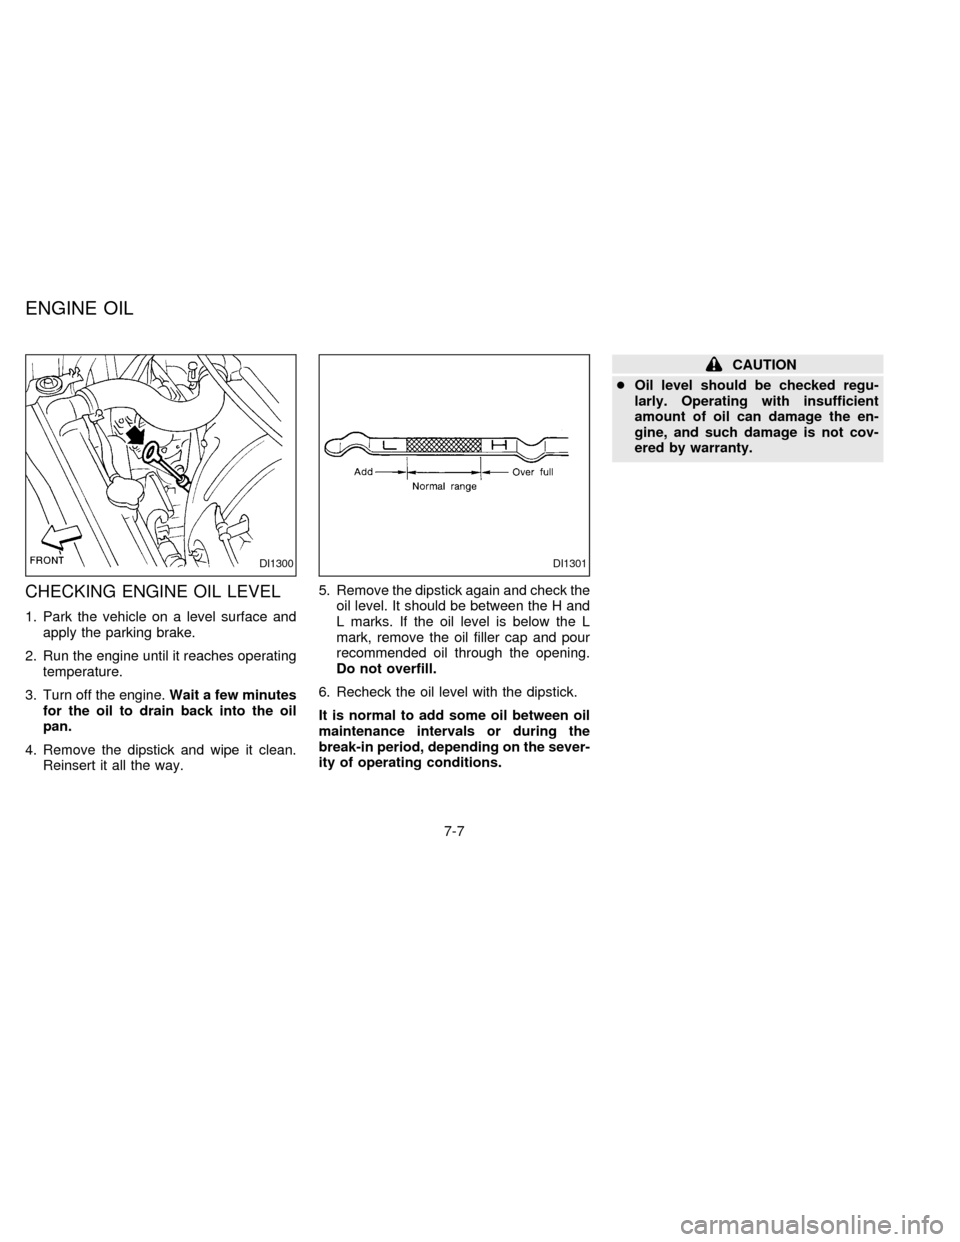
4. Remove the dipstick and wipe it clean.
Reinsert it all the way.5. Remove the dipstick again and check the
oil level. It should be between the H and
L marks. If the oil level is below the L
mark, remove the oil filler cap and pour
recommended oil through the opening.
Do not overfill.
6. Recheck the oil level with the dipstick.
It is normal to add some oil between oil
maintenance intervals or during the
break-in period, depending on the sever-
ity of operating conditions.
CAUTION
cOil level should be checked regu-
larly. Operating with insufficient
amount of oil can damage the en-
gine, and such damage is not cov-
ered by warranty.
DI1300DI1301
ENGINE OIL
7-7
ZX
Page 138 of 203
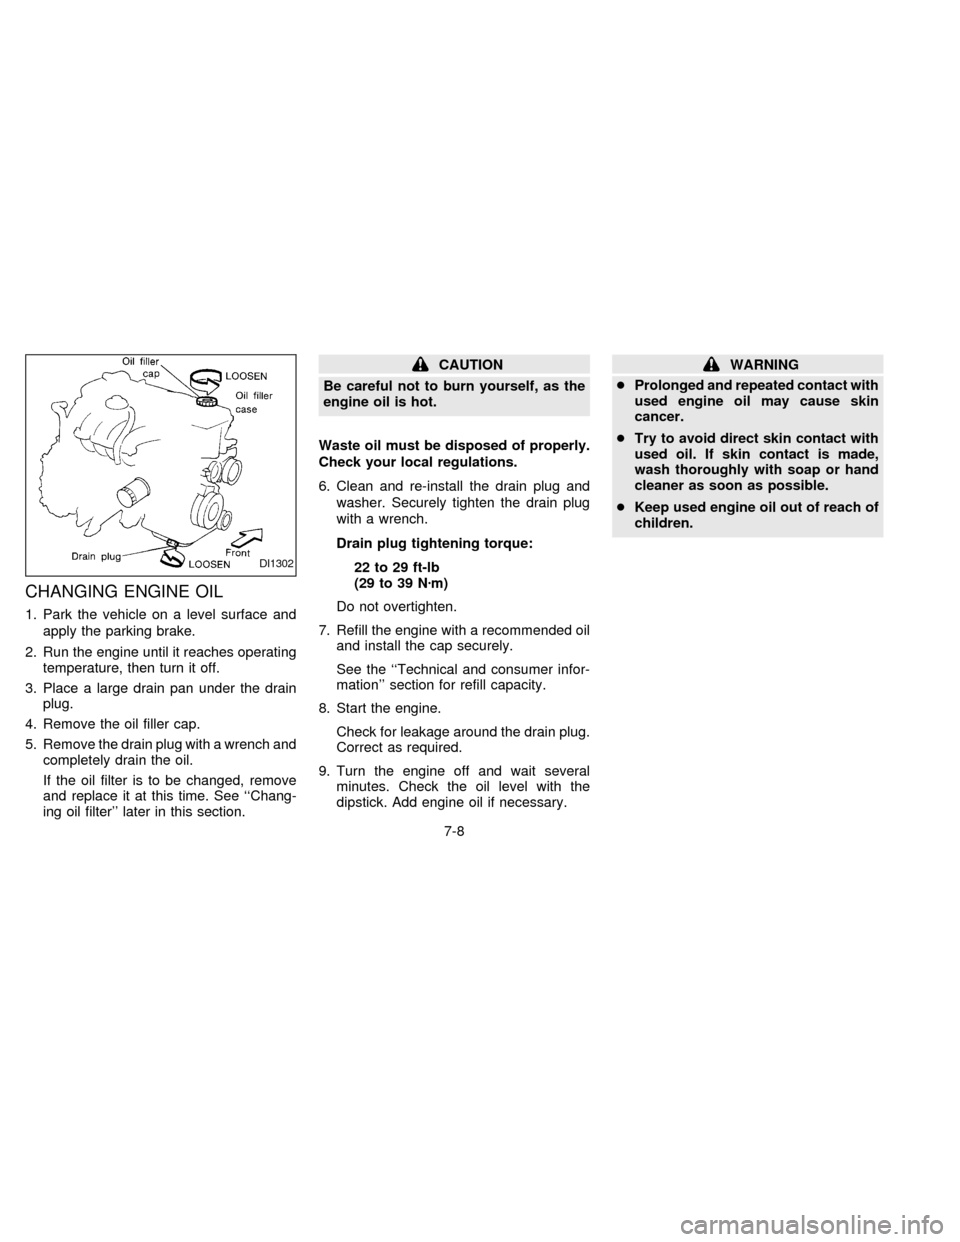
CHANGING ENGINE OIL
1. Park the vehicle on a level surface and
apply the parking brake.
2. Run the engine until it reaches operating
temperature, then turn it off.
3. Place a large drain pan under the drain
plug.
4. Remove the oil filler cap.
5. Remove the drain plug with a wrench and
completely drain the oil.
If the oil filter is to be changed, remove
and replace it at this time. See ``Chang-
ing oil filter'' later in this section.
CAUTION
Be careful not to burn yourself, as the
engine oil is hot.
Waste oil must be disposed of properly.
Check your local regulations.
6. Clean and re-install the drain plug and
washer. Securely tighten the drain plug
with a wrench.
Drain plug tightening torque:
22 to 29 ft-lb
(29 to 39 Nzm)
Do not overtighten.
7. Refill the engine with a recommended oil
and install the cap securely.
See the ``Technical and consumer infor-
mation'' section for refill capacity.
8. Start the engine.
Check for leakage around the drain plug.
Correct as required.
9. Turn the engine off and wait several
minutes. Check the oil level with the
dipstick. Add engine oil if necessary.WARNING
cProlonged and repeated contact with
used engine oil may cause skin
cancer.
cTry to avoid direct skin contact with
used oil. If skin contact is made,
wash thoroughly with soap or hand
cleaner as soon as possible.
cKeep used engine oil out of reach of
children.
DI1302
7-8
ZX
Page 139 of 203
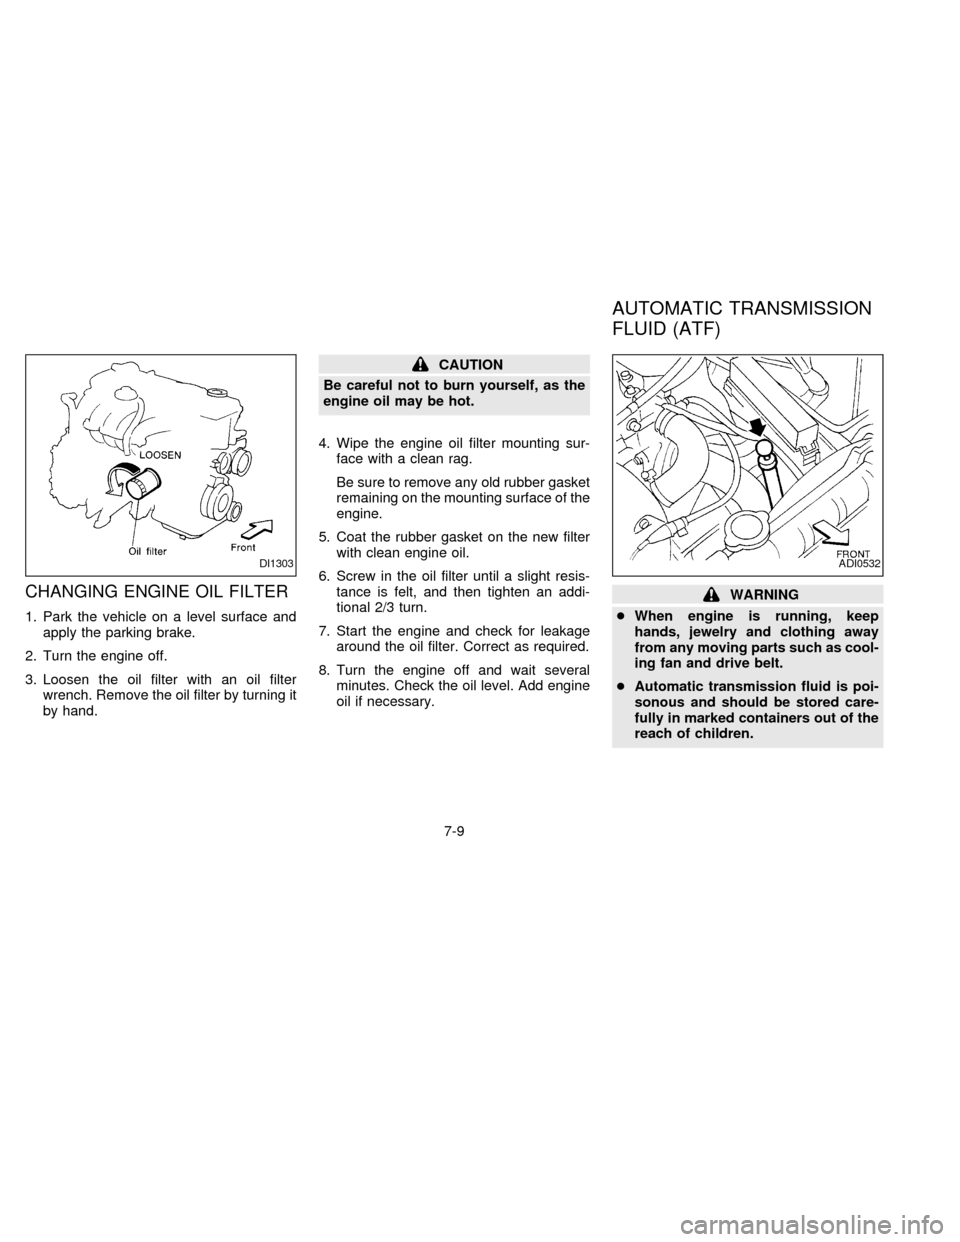
CHANGING ENGINE OIL FILTER
1. Park the vehicle on a level surface and
apply the parking brake.
2. Turn the engine off.
3. Loosen the oil filter with an oil filter
wrench. Remove the oil filter by turning it
by hand.
CAUTION
Be careful not to burn yourself, as the
engine oil may be hot.
4. Wipe the engine oil filter mounting sur-
face with a clean rag.
Be sure to remove any old rubber gasket
remaining on the mounting surface of the
engine.
5. Coat the rubber gasket on the new filter
with clean engine oil.
6. Screw in the oil filter until a slight resis-
tance is felt, and then tighten an addi-
tional 2/3 turn.
7. Start the engine and check for leakage
around the oil filter. Correct as required.
8. Turn the engine off and wait several
minutes. Check the oil level. Add engine
oil if necessary.
WARNING
cWhen engine is running, keep
hands, jewelry and clothing away
from any moving parts such as cool-
ing fan and drive belt.
cAutomatic transmission fluid is poi-
sonous and should be stored care-
fully in marked containers out of the
reach of children.
DI1303ADI0532
AUTOMATIC TRANSMISSION
FLUID (ATF)
7-9
ZX
Page 140 of 203
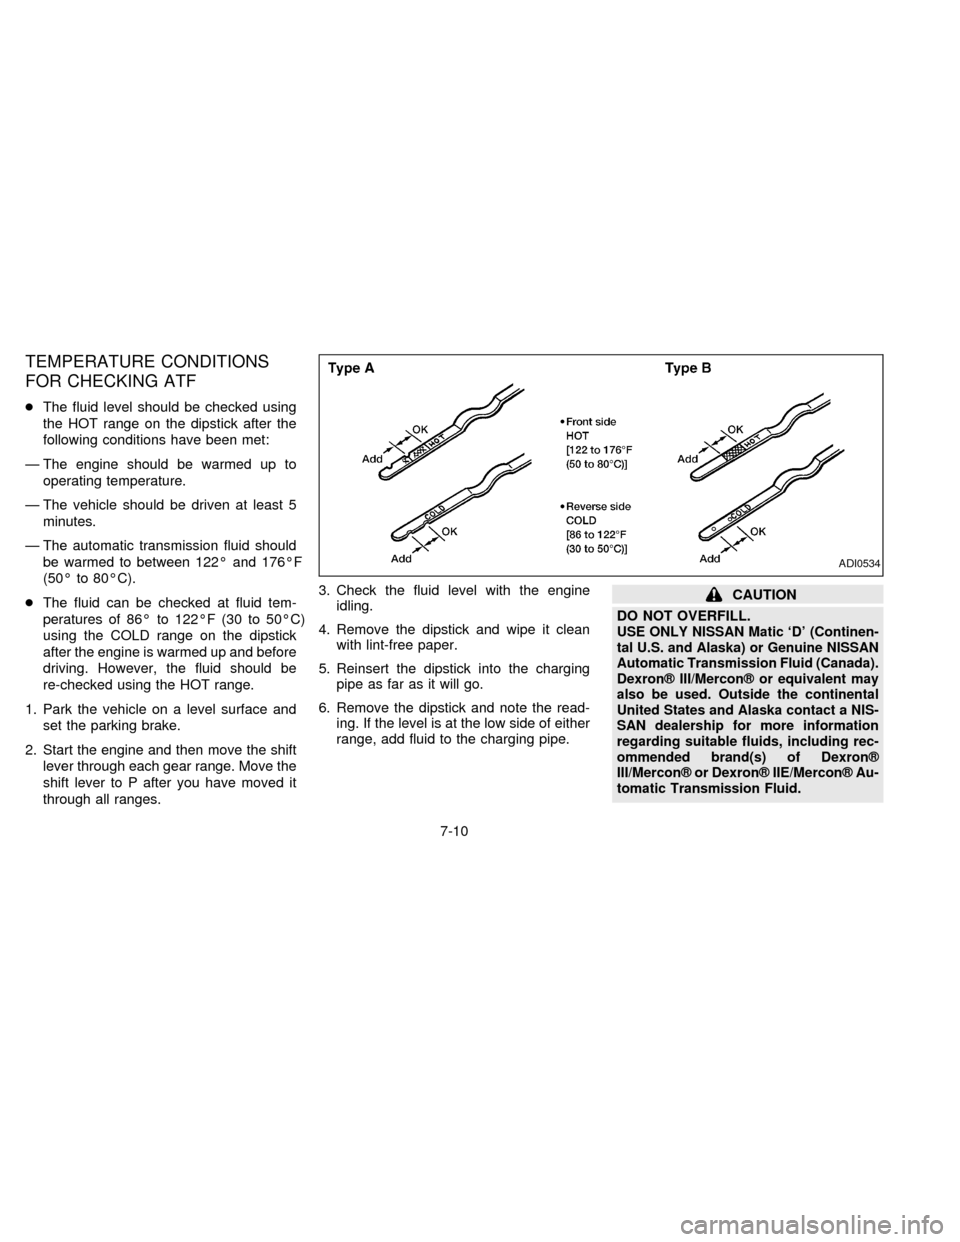
TEMPERATURE CONDITIONS
FOR CHECKING ATF
cThe fluid level should be checked using
the HOT range on the dipstick after the
following conditions have been met:
Ð The engine should be warmed up to
operating temperature.
Ð The vehicle should be driven at least 5
minutes.
Ð The automatic transmission fluid should
be warmed to between 122É and 176ÉF
(50É to 80ÉC).
cThe fluid can be checked at fluid tem-
peratures of 86É to 122ÉF (30 to 50ÉC)
using the COLD range on the dipstick
after the engine is warmed up and before
driving. However, the fluid should be
re-checked using the HOT range.
1. Park the vehicle on a level surface and
set the parking brake.
2. Start the engine and then move the shift
lever through each gear range. Move the
shift lever to P after you have moved it
through all ranges.3. Check the fluid level with the engine
idling.
4. Remove the dipstick and wipe it clean
with lint-free paper.
5. Reinsert the dipstick into the charging
pipe as far as it will go.
6. Remove the dipstick and note the read-
ing. If the level is at the low side of either
range, add fluid to the charging pipe.
CAUTION
DO NOT OVERFILL.
USE ONLY NISSAN Matic `D' (Continen-
tal U.S. and Alaska) or Genuine NISSAN
Automatic Transmission Fluid (Canada).
Dexronž III/Merconž or equivalent may
also be used. Outside the continental
United States and Alaska contact a NIS-
SAN dealership for more information
regarding suitable fluids, including rec-
ommended brand(s) of Dexronž
III/Merconž or Dexronž IIE/Merconž Au-
tomatic Transmission Fluid.
ADI0534
7-10
ZX